1
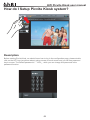
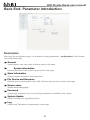
HiTi Picvite Kiosk
user manual
www.hiti.com
HiTi Picvite Kiosk user manual
CONTENTS
PREFACE
How do I Setup Picvite Kiosk System?
Back End: Parameter Introduction
Configuration
General
System Information
Store Information
File Device and Resource
Screen Saver
Password
System Update
Log
Operation
Language
Choose Application
Size
Price and Tax
Application Setting
Output and Printer
Printer
Color Setting
Connect
Frot End: User Operation Flow
Photo
Print All
Index Photo
How do I print photo?
02
03
04
05
07
09
10
11
12
13
14
15
16
17
19
25
26
27
28
29
30
31
HiTi Picvite Kiosk user manual
Declarations
Warranties
Although the best efforts are made to ensure that the information in this manual is complete and
correct, HiTi Digital, Inc. makes no warranty of any kind with regard to this material, including but not
limited to the implied warranties of marketability and fitness for a particular purpose. Information in this
manual is subject to change without notice. No part of this manual may be reproduced or transmitted in
any form or by any means, electronic or mechanical, including photocopying, recording, or information
recording and retrieval systems without the express written permission of HiTi Digital, Inc.
Trademarks
Windows is a registered trademark of Microsoft Corporation.
Frame Maker is a registered trademark of Adobe Corporation.
Printing History
New editions of this manual incorporate new and changed material since the previous edition. Minor
corrections and updates may be incorporated into reprints of the current edition without changing the
publication date or the edition number.
dition
Month
Year
Software
1st
September
2010
1.0
Remarks
Please run the system on the 1024 x 768 resolution or higher.
Please set the parameters ofȶOutput and Printerȷ/ ȶPrinterȷbefore printing (Page 25)
01
HiTi Picvite Kiosk user manual
How do I Setup Picvite Kiosk system?
Description
Before starting Picvite Kiosk, we should know how to log in the configuration page, please double
click on the HITI logo (as picture above) using mouse or touch screen and you will see password
key-in screen. The default password is Ⱥ1234Ȼ, while you can change this password in the
password function.
02
HiTi Picvite Kiosk user manual
Back End: Parameter Introduction
Description
After login into configuration page, it is available to setting parametersɯConfiguration. Every function
can be identified easily.
General
System status, user may check all device status in this page.
System Information
Kernel parameters of the system can be found in this page.
Store Information
All store relative information and parameters.
File Device and Resource
External device including Blue tooth, IrDA, Scanner settings can be found in this page.
Screen saver
Screen saver setting page.
Password
System login password, only one set of login password is available in this version.
System Update
System remaining for upgrading function
Log
System and Transaction log parameters in this page.
03
HiTi Picvite Kiosk user manual
General
Usage
Business Day
Financial accounting day; for both 24 hour operating shop and normal, every transaction can be
categories by setting Business Day. This function will be hiding if End of Business Day disable.
Related Topics: Store Information
Change setting wizard language
Language of configuration page; Picvite Kiosk currently support English, Chinese, Arabic, Spanish,
Portuguese, German, Russian, French, and Portuguese in the version.
Close Front Desk
This function would shut down Picvite Kiosk system, and user is required to restart the system after
changing any setting.
04
HiTi Picvite Kiosk user manual
System Information
Usage
System Name
Application name, this is for creating a sales report title.
Station Code
Identification code, this value is used to identify data transmit flow when linking Minilab system.
Show mouse in the Front-End
Hide/Show mouse cursor in the front of desk.
System Initial Detect
This function will run auto detecting process when application booting, it will show message for user
and warning when error occur.
Login by user: user needs click OK button to cancel detecting dialogue
System Auto Login: system will cancel detecting dialogue automatically after 1 minute
05
HiTi Picvite Kiosk user manual
System Information
Regional
Measurement units of system, i.e. 4 x 6 “inch” or 10 x 15 “mm”.
Date Format
Administrator can use this function to determine which type of date format is printed on the
photo paper.
2010/01/01
Currency
Administrator can use this function to adjust dollar sign position and symbol.
System Volume
System will make beep volume when user clicking touch screen if the function is enable.
Auto Shutdown
System allows user to set auto shutdown timer and it will pop up message in 10 sec remaining,
if user has no further behavior, computer power off.
Local Temporary Disk Space
This function allows Administrator setting the disk space of system for buffer. In case user load
too many big files and exceed computer physical disk space.
For exampleȈ
Computer physical disk = 80GB
User insert 200 GB image into computer(80GB)? Overloading.
06
HiTi Picvite Kiosk user manual
Store Information
Usage
Store Name
Store name, this is for creating a sales report title.
Store Code
Identify code of the computer, this value is used to identify data transmit flow when linking
Minilab system.
End of Business Day
This function allow Administrator enable/disable business day counting, all of transaction records
will be categorized by business day when setting time arrival.
For exampleȈX store opening hour is 10:00 AM ~ 02:00 AM
(ie: 2010/5/21 10:00 AM ~ 2010/5/22 02:00 AM)
If Administrator set business day = disable, the daily sales would be separate to two part in
the system
2010/5/21 and 2010/5/22, <<2010/5/21 10:00AM~11:59PM + 00:00 AM~02:00AM>>
If Administrator setting business day = enable , the daily sales would be remained one in
the system
2010/5/21, <<2010/5/21 working day>>
07
HiTi Picvite Kiosk user manual
Store Information
Store Information
Store information, it would be enabled in next version
Daily Sales
System will show printing amount of all types of paper size by business day or system day
(depend on Business day function enable/disable)
Store Logo
User operation screen parameter, default value is “HiTi” logo
08
HiTi Picvite Kiosk user manual
File Device and Resource
Usage
Enable blue tooth
Bluetooth device on/off
Enable Infrared
Infrared device on/off
Enable Scanner
Infrared device on/off
Device: scanner model type choose
Resolution: scanner input format
09
HiTi Picvite Kiosk user manual
Screen saver
Usage
Enable screen saver, Administrator can set time remainder to lunch screen saver function.
There is Hiti default screen saver in the system orȈ
1. You can import your own screen saver file (*.gif)
2. Creating a new screen saver file by importing several pictures (*.jpeg )
10
HiTi Picvite Kiosk user manual
Password
Usage
Password
System password for four digits
Express version only allow one Administrator account, multiple authorities control function will be
developed in the next version.
11
HiTi Picvite Kiosk user manual
System Update
Usage
Kiosk information
Application version information, other update function will be developed in the next version.
12
HiTi Picvite Kiosk user manual
Log
Usage
System will export transaction records by user define period. Administrator can set the time frequency of
exporting procedure, there are three types of period could be used:
Day:
Week:
Month:
daily exporting
assign day, Monday to Sunday
assign day, 1 ~ 31, system will auto export data at the first day of next month if
Administrator setting “31” but there are only 30 days in this month
Data interval
System will insert the interval symbol into data stream in order to separate data.
Log file keep Period
Transaction Log will be saved in the folder, if files no moving or deleting, system will remove that
on setting time automatically. (Max: 180 days)
Sales Data keep Period
All sales records will be saving by remaining time (Max: 365 days)
Export Data when End of Business Day
If the function enable, exporting procedure will be started when business day change function
in activate.
The function will disable if End of Business Day function closed.
Export Data on Specific Time
If the function enable, exporting procedure will be started on user demand
The function will disable if End of Business Day function in activate.
13
HiTi Picvite Kiosk user manual
Language
Usage
Language setting, Administrator can decide and choose language types in the language pool. It will
change language type on the Front of Desk.
14
HiTi Picvite Kiosk user manual
Choose Application
Usage
This function allows Administrator to adjust function sequence and available.
15
HiTi Picvite Kiosk user manual
Size
Usage
Printing paper size enable/disable in the front of desk, each of application has its own available paper
size setting.
Noticed: Please be sure the consumables in the machine match your setting, otherwise system
will show warning message after initial detection.
16
HiTi Picvite Kiosk user manual
Price and Tax - Price
Usage
Printing price, individual section parameters and Administrator can set three kinds of price level
depending on quantity. The price information of section is the same as user operation screen, tax issue
(including or excluding) could be set in the Price and Tax section
Including Tax (5%):
Administrator setting: 15 dollars / piece
User price on screen: 15 dollars
Transaction Log: 14.28 (sales price) + 0.72 (tax price)
Excluding Tax (5%):
Administrator setting: 15 dollars / piece
User price on screen: 15 dollars + 0.75 dollars (tax)
Transaction Log: 15 (sales price) + 0.75 (tax price)
17
HiTi Picvite Kiosk user manual
Price and Tax - Tax
Usage
Inclusive / Exclusive
Including Tax (5%):
Administrator setting: 15 dollars / piece
User price on screen: 15 dollars
Transaction Log: 14.28 (sales price) + 0.72 (tax price)
Excluding Tax (5%):
Administrator setting: 15 dollars / piece
User price on screen: 15 dollars + 0.75 dollars (tax)
Transaction Log: 15 (sales price) + 0.75 (tax price)
Tax 2
The function allow Administrator to set second tax policy.
Tax/Decimal Point
Rounding
Unconditionally carry
Round off
12.65=12.7
12.61=12.7
12.64=12.6
18
HiTi Picvite Kiosk user manual
Application Setting - Main
Usage
Skip the paper size chosen page when just only paper size
The screen would be skip if the check box = Enable and Administrator only set one type of paper
size in the Size configuration
19
HiTi Picvite Kiosk user manual
Application Setting - Photo
Usage
Administrator can control default value and Enable/Disable functions as below screen.
Shopping Cart Function:
Enable Setting Function:
Enable Photo Edit Function:
20
HiTi Picvite Kiosk user manual
Application Setting - Printer All
Usage
Administrator can control default value and Enable/Disable functions as below screen.
Enable Auto-Color Function in size choose page
The same setting as photo application
Administrator can keep these parameters of ȶPrint Allȷwhich the same as ȶPhotoȷor using
Self define to make new operate flow.
Enable Setting Function
Enable Editing Function
21
HiTi Picvite Kiosk user manual
Application Setting - Index Photo
Usage
Enable Editing Function
Administrator can control default value and Enable/Disable functions as below screen.
Enable Editing Function
22
HiTi Picvite Kiosk user manual
Application Setting - Payment
Usage
Enable Receipt Printer
External thermal device for printing receipt, currently supported models for the
EPSON TM-88 Series.
baud rate : 9600
Enable Remote Control
Administrator can enable this feature to control the printing process; the photo-printing behavior
will start after inserted correct control password.
On-Screen Information
Information for advertisements.
23
HiTi Picvite Kiosk user manual
Application Setting – Shopping Cart
Usage
Enable Add Service application
Administrator can control default value and Enable/Disable functions as below screen.
Always show confirm message when payment function is disable
Double confirm message will be shown before printing if this function is enable and
ȶEnable Remote controlȷis disable.
Reference :ȶOperationȷ/ȶPaymentȷ/ȶEnable Remote controlȷ
24
HiTi Picvite Kiosk user manual
Printer
Usage
Administrator can use this tool for adjust printers and specified consumable format.
Operation:
1. Please select printer from the Printer Pool and press the "Add" button
2. The new printer will appear at the bottom of the Active Printer, it is ready for printing
3. You can press the right of the "Delete" button, then the printer will return to the Printer Pool .
25
HiTi Picvite Kiosk user manual
Color Setting
Usage
Administrator can use this function to adjust printing color parameters.
26
HiTi Picvite Kiosk user manual
Connect
Usage
Printing Direction
There are two operation modes for choosing:
Kiosk Mode:
Printing out photo paper by local printer
Terminal Mode:
Printing out photo paper by Picvite Mini Lab system (Back Office System)
In the beta site version, only Kiosk mode is available for printing photo
27
HiTi Picvite Kiosk user manual
Front End: User Operation Flow
Photo
Description
The function allows user printing their photos before image choosing; photo editing … even
deciding copies quantity by each image.
Support Photo Size (Inch):
4 x 6 Photo
5 x 7 Photo
6 x 8 Photo
6 x 9 Photo
28
HiTi Picvite Kiosk user manual
Print All
Description
The function allows a user to print their photos with few steps few steps; User can click this function for
fast and easy photo printing.
Support Photo Size (Inch):
4 x 6 Photo
5 x 7 Photo
6 x 8 Photo
6 x 9 Photo
29
HiTi Picvite Kiosk user manual
Index Photo
Description
The function allow a user to print their photos as index formats; it means these photos will be
adjusted like a small icon and print in the same photo paper.
Support Photo Size (Inch):
4 x 6 Photo
5 x 7 Photo
6 x 8 Photo
6 x 9 Photo
Support Photo Format (4 x 6 Photo)
Landscape 7 x 4
Landscape 9 x 5
Portrait 4 x 6
Portrait 5 x 8
Support Photo Format (5 x 7 Photo)
Landscape 8 x 5
Landscape 10 x16
Portrait 5 x 8
Portrait 6 x 10
Support Photo Format (6 x 8 Photo)
Landscape 9 x 6
Landscape 11 x 17
Portrait 7 x 9
Portrait 8 x 11
Support Photo Format (6 x 9 Photo)
Landscape 11 x 6
Landscape 13 x 7
Portrait 6 x 10
Portrait 9 x 13
30
HiTi Picvite Kiosk user manual
How do I print photo?
Description
Step 1:
Click ȶPhotoȷbutton
Step 2:
Choose Paper Size which you prefer.
Step 3:
Insert and choose your storage media before click Next button.
31
HiTi Picvite Kiosk user manual
Step 4:
Choose image which you woul.d like to print,
there are two ways to adjust copies number:
1. Click image: One click means one copy for
print, if you want to print more than one,
you can use Copies button to adjust
printing number.
2. Select All : User can use Select All button
and adjust copies number by Copies button.
Step 5:
Switch On/Off function for personal demand
(Photo crop, Date Printing, Border Printing )
Step 6:
Order confirmation page, you can review
order list or using ”Add Service” button to
add another photo printing order, user may
continue to photo editing by pressing the
“Setting and Edit” button.
Step 7:
Printing Status, wait for printing finish.
Step 8:
Printing succeed, and you can enjoy your
colorful memory.
32
HiTi Picvite Kiosk user manual
How do I print All?
Description
Step 1:
Click ȶPrint Allȷbutton.
Step 2:
Choose Paper Size which you prefer.
Step 3:
Insert and choose your storage media before click Next button.
33
HiTi Picvite Kiosk user manual
Step 4:
Switch On/Off function for personal demand
(Photo crop, Date Printing, Border Printing)
Step 5:
Order confirmation page, you can review
order list or using ”Add Service” button to
add another photo printing order, user may
continue to photo editing by pressing the
“Setting and Edit” button.
Step 6:
Printing Status, wait for printing finish.
Step 7:
Printing succeed, and you can enjoy your
colorful memory.
34
HiTi Picvite Kiosk user manual
How do I print photo?
Description
Step 1:
Click ȶIndex Photoȷbutton.
Step 2:
Prefer paper size.
Step 3:
Insert and choose your storage media before click Next button.
35
HiTi Picvite Kiosk user manual
Step 4:
Choose an index photo format.
Step 5:
Choose images which you want to put it in
the index photo.
Step 6:
Preview for printing, you can switch the
arrangement of files by name or snap date
with Order by alphabet and Order by date.
Step 7:
Order confirmation page, you can review
order list or using ”Add Service” button to
add another photo printing order, user may
continue to photo editing by pressing the
“Setting and Edit” button.
Step 8:
Printing Status, wait for printing finish.
Step 9:
Printing succeed, congratulations you can
enjoy your colorful photo index.
36