1
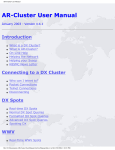
SOVoIP Prototype System
User Manual
Author:
Jin Li
Contact:
[email protected]
User Manual
Table of Contents
1
Introduction .......................................................................................................................................... 3
1.1
1.1.1
Inter-servers Communication.................................................................................................... 4
1.1.2
Client-Server Communication ................................................................................................... 5
1.2
2
Online support and resources....................................................................................................... 8
1.2.1
Original Papers .......................................................................................................................... 8
1.2.2
Hosted Project ........................................................................................................................... 8
1.2.3
SVN ............................................................................................................................................ 8
Deployment Guide (Single machine) .................................................................................................... 9
2.1
Deployment: Preparation.............................................................................................................. 9
2.1.1
Setup database........................................................................................................................ 10
2.1.2
Manipulate war file ................................................................................................................. 11
2.2
Deployment: Distribution............................................................................................................ 12
2.2.1
Deploy in GlassFish.................................................................................................................. 12
2.2.2
Diagnose .................................................................................................................................. 12
2.3
3
System Overview........................................................................................................................... 3
Deployment: Configuration......................................................................................................... 13
2.3.1
Configure The Global Node ..................................................................................................... 13
2.3.2
Configure The Home Node...................................................................................................... 13
Deployment Guide (Multiple machines)............................................................................................. 14
3.1
Deployment: Preparation............................................................................................................ 14
3.1.1
Setup database........................................................................................................................ 15
3.1.2
Manipulate war file ................................................................................................................. 16
3.2
Deployment: Distribution............................................................................................................ 17
3.2.1
Deploy in GlassFish.................................................................................................................. 17
3.2.2
Diagnose .................................................................................................................................. 17
3.3
Deployment: Configuration......................................................................................................... 18
3.3.1
Configure The Global Node ..................................................................................................... 18
3.3.2
Configure The Home Node...................................................................................................... 18
Page 2
User Manual
1 Introduction
The SOVoIP (Service-Oriented Voice over IP) project is the demonstration for the working scheme of
a prototype system designed by Dr. Arif Jubaer, aiming to provide a light weight, robust solution to VoIP.
This project is a part of the Sun Academic Initiative program, sponsored by University of Melbourne and
Sun Microsystem.
To design and implement this P2P-based servers for a service-oriented VoIP software, Java,
MySQL server and Glassfish server are used to realize the features in the original proposal. The
development environment is based on NetBeans IDE.
1.1 System Overview
Deployment diagram, showing all the components in this system
As illustrated in the deployment diagram, the system has two kinds of servers: Global Public Nodes
and normal Public Nodes. Global Public Nodes are referred as Global Nodes in the future. Since the
normal Public Nodes are all used as “Home Node” which maintains information of users assigned to it,
we refer to this kind of servers as Home Node. It is necessary that the nearest nodes in the prototype
are all avatars of home nodes, even if they can be just a “passing-through” server. The deployment are
different for these two kinds of servers, for each of them, a dedicated war file containing an
Page 3
User Manual
administration panel will need to be deployed separately on the machine on which that type of Node is
deployed. We also define the Home Node which is nearest to a client as this client’s Nearest Node.
The behaviors of inter-servers and server-client communication are helpful for understanding the
working scheme of the entire system. For further information, please refer to next section “1.2 Online
support and resources”.
1.1.1 Inter-s ervers Communication
Take two typical workflows in the system as examples.
A. Workflow of Authentication and Registration
Client A
3
2
1
Client A’s NearestNode
Client A’s HomeNode
Client B’s NearestNode
3
Client B’s HomeNode
2
1
Client B
1. ClinetA logs into A’s HomeNode, same to B;
2. A’s HomeNode assign a Node to A as its NearestNode, same to B;
3. Finally, ClientA’s NearestNode takes care of A, same to B.
(NOTE: in this scenario, Home Nodes maintain the registration information of corresponding Clients in
their databases, not the NearestNodes.)
Page 4
User Manual
B.Workflow of UserSearch
1. ClinetA uses “UserSearch()” to ask for ClientB’s IP and port, via ClientA’s NearestNode;
2. ClientA’s NearestNode uses Chord to retrieve ClientB’s HomeNode;
3. Chord returns ClientB’s HomeNode;
4. A’s NearestNode asks B’s NearestNode for B’s info (Web Service to Web Service);
5. B’s NearestNode returns B’s IP and port to A’s NearestNode;
6. A’s NearestNode return B’s IP and port to A
7. A starts to contact B.
1.1.2 Client-Server C ommunication
There are 8 types of interactions between a client and the server side:
Page 5
User Manual
2. The Process of Sign‐In
call:
wsSignin(UserInfo)
return:
String:NearestNode/Resp
Client
HomeNode
if success:
if fail:
success&127.0.0.1:8080
fail&message_for_you_to_print_out
4. The Process of Adding a Friend
call:wsAddFriend
(String: Initiator, String:userID,
[String Relation])
return:
String:Resp
Client
NearestNode
if success:
if fail:
success
fail&message_for_you_to_print_out
Page 6
User Manual
6. The Process of Deleting a Friend
call:wsDelFriend
(String: Initiator, String:userID)
return:
String:Resp
Client
NearestNode
if success:
if fail:
success
fail&message_for_you_to_print_out
Page 7
User Manual
1.2 Online support and resources
There are several ways for obtaining the source codes and detailed documents:
1.2.1 Original Papers
The papers about the SOVoIP can be found at:
http://p2p.cs.mu.oz.au/software/SOVoIP/
1.2.2 Hosted Pr oject
The project is hosted on Sun’s Kenai website:
http://kenai.com/projects/sovoip/
which includes the Issue tracking, wiki and mail list.
1.2.3 SVN
All the source codes and database scripts involved in this manual can be found in the SVN.
Subversion URI is:
https://svn.kenai.com/svn/sovoip~sovoiprototype
Page 8
User Manual
2 Deployment Guide (Single machine)
Deployment diagram, showing all the components in this system
As illustrated in the deployment diagram, the system has two kinds of servers: Global Public Nodes
and normal Public Nodes. Global Public Nodes are referred as Global Nodes in the future. Since the
normal Public Nodes are all used as “Home Node” which maintains information of users assigned to it,
we refer to this kind of servers as Home Node. It is necessary that the nearest nodes in the prototype
are all avatars of home nodes, even if they can be just a “passing-through” server. The deployment are
different for these two kinds of servers, for each of them, a dedicated war file containing an
administration panel will need to be deployed separately on the machine on which that type of Node is
deployed.
The procedure of deploying the system involves preparation, distribution and configuration.
2.1 Deployment: Preparation
Now we have one machine working as both Global Node and Home node, with IP 192.168.1.101 .
The softwares we install on both machines are:
Page 9
User Manual
1.
2.
3.
4.
5.
MySQL Server 5.0 (as DB server);
PHPMyAdmin 2.11.7 (as DB setting tool );
Sun GlassFish Server v2.1 (as application server);
Mozilla Firefox 3.0.14 (as Explorer for running admin panel);
WinRAR (to manip)
2.1.1 Setup databas e
On both machines, in the MySQL console, create a user for the database:
mysql > CREATE USER 'sovoip'@'localhost' IDENTIFIED BY 'biscuit';
mysql > GRANT all privileges ON sovoipdb.* TO 'sovoip'@'localhost'
> IDENTIFIED BY 'biscuit';
In the PHPMyAdmin panel( or you can use MySQL console itself) of both machines, create a
database called “sovoipdb”. Firstly for Global Node functions, run the script
“.db/global_node_structure.sql” under the database “sovoipdb”; secondly, for Home Node functions,
run the script “.db/ public_node_structure.sql” under the database “sovoipdb”. After that, all the table
structures are created.
After creating tables of the first step
Page 10
User Manual
After creating tables of the second step
The last thing to do is to check the port for MySQL server. (By default it is 3306)
2.1.2 Manipul ate war file
If you follow the previous step and the default MySQL port is not changed, the war files provided in
the “deployment” folder do not need to be changed, you can jump over this step to distribution. If not,
you need to modify the properties files in the war file before you head to the next step.
Use WinRAR to open the GlobalNode.war which is under the “deployment” folder. Extract the file
GlobalNode.war\WEB-INF\classes\utility\config.properties and edit it. There some fields you might need
to change:
Fields
Key
username
password
url
INITIAL_PORT
Default Value
sovoip
biscuit
jdbc:mysql://localhost:3306/sovoipdb
9820
Explanations
(Conditions)
If you have another username
If you have another password
if the JDBC URI is changed
if the system can’t use it as chord port
After modification, you can replace the properties file in the war file.
The same to HomeNode.war, which is under the “deployment” folder. Extract the file
HomeNode.war\WEB-INF\classes\utility\config.propertie and edit it. There some fields you might need
to change:
Fields
Key
Default Value
username
sovoip
password
biscuit
url
jdbc:mysql://localhost:3306/sovoipdb
INITIAL_PORT
9900
After modification, you can replace the properties file in the war file.
Page 11
Explanations
(Conditions)
If you have another username
If you have another password
if the JDBC URI is changed
If can’t use it as chord port
User Manual
2.2 Deployment: Distribution
Manually deploying the war files on GlassFish server:
The GlobalNode.war and GlobalNodeAdmin.war ;
The HomeNode.war and HomeNodeAdmin.war ;
2.2.1 Depl oy in GlassFis h
After the deployment of the servers
In GlassFish server’s console (http://localhost:4848/), go to Applications->Web Applications, press
“deploy” button, then choose the war file to deploy.
2.2.2 Diagnose
The server’s console will give helpful information to diagnose the deployment.
After the deployment of the servers
Page 12
User Manual
2.3 Deployment: Configuration
Now the servers are deployed, they need to be configured for initialization and connection. The
outlooks of the admin panels are tatty; you may need to bear with them.
2.3.1 Config ure The Global Node
To configure the Global Node, after
knowing the IP address exposed to the
outside world, in this case it is
192.168.1.101,
go
to
(http://localhost:8080/GlobalNodeAdmin/
index.jsp) GlobalNode Administrator
Panel. Type in 192.168.1.101, then press
OK. Then the Global Node is started. The
port number should be remembered for
the next step.
2.3.2 Config ure The Home Node
On machine #2, after knowing the IP address
exposed to the outside world, in this case it is
192.168.1.101,
go
to
(http://localhost:8080/HomeNodeAdmin/index.j
sp) Home Node Administrator Panel. Type in
192.168.1.101 as Global Node’s IP and 8080 as
Global Node's port for web service, so that this
Home Node knows where to find the Global
Node; then type in 192.168.1.101 as this Home
Node’s IP and 8080 as port, the Global Node
knows where to find this Home Node; The type
in the chord port 9820 for Global Node that we obtained from last step; then press OK. Please note that
you need to consider the IP and port for Web Service in your case, such as city name.
Page 13
User Manual
3 Deployment Guide (Multiple machines)
Deployment diagram, showing all the components in this system
As illustrated in the deployment diagram, the system has two kinds of servers: Global Public Nodes
and normal Public Nodes. Global Public Nodes are referred as Global Nodes in the future. Since the
normal Public Nodes are all used as “Home Node” which maintains information of users assigned to it,
we refer to this kind of servers as Home Node. It is necessary that the nearest nodes in the prototype
are all avatars of home nodes, even if they can be just a “passing-through” server. The deployment are
different for these two kinds of servers, for each of them, a dedicated war file containing an
administration panel will need to be deployed separately on the machine on which that type of Node is
deployed.
The procedure of deploying the system involves preparation, distribution and configuration.
3.1 Deployment: Preparation
Now we have two machines connected in LAN. We will use the machine #1 with IP 192.168.1.101 as
the Global Node, and machine #2, 192.168.1.102, as a Home Node. (Please make sure all the firewalls
are closed)
The softwares we install on both machines are:
Page 14
User Manual
6.
7.
8.
9.
10.
MySQL Server 5.0 (as DB server);
PHPMyAdmin 2.11.7 (as DB setting tool );
Sun GlassFish Server v2.1 (as application server);
Mozilla Firefox 3.0.14 (as Explorer for running admin panel);
WinRAR (to manip)
3.1.1 Setup databas e
On both machines, in the MySQL console, create a user for the database:
mysql > CREATE USER 'sovoip'@'localhost' IDENTIFIED BY 'biscuit';
mysql > GRANT all privileges ON sovoipdb.* TO 'sovoip'@'localhost'
> IDENTIFIED BY 'biscuit';
In the PHPMyAdmin panel( or you can use MySQL console itself) of both machines, create a
database called “sovoipdb”. On machine #1, run the script “.db/global_node_structure.sql” under the
database “sovoipdb”; on machine #2, run the script “.db/ public_node_structure.sql” under the
database “sovoipdb”. After that, all the table structures are created.
After creating tables in machine #1
Page 15
User Manual
After creating tables in machine #2
The last thing to do is to check the port for MySQL server. (By default it is 3306)
3.1.2 Manipul ate war file
If you follow the previous step and the default MySQL port is not changed, the war files provided in
the “deployment” folder do not need to be changed, you can jump over this step to distribution. If not,
you need to modify the properties files in the war file before you head to the next step.
Use WinRAR to open the GlobalNode.war which is under the “deployment” folder. Extract the file
GlobalNode.war\WEB-INF\classes\utility\config.properties and edit it. There some fields you might need
to change:
Fields
Key
username
password
url
INITIAL_PORT
Default Value
sovoip
biscuit
jdbc:mysql://localhost:3306/sovoipdb
9820
Explanations
(Conditions)
If you have another username
If you have another password
if the JDBC URI is changed
if the system can’t use it as chord port
After modification, you can replace the properties file in the war file.
The same to HomeNode.war, which is under the “deployment” folder when you are the
administrator of machine #2. Extract the file HomeNode.war\WEB-INF\classes\utility\config.propertie
and edit it. There some fields you might need to change:
Fields
Key
username
password
url
INITIAL_PORT
Default Value
sovoip
biscuit
jdbc:mysql://localhost:3306/sovoipdb
9900
Explanations
(Conditions)
If you have another username
If you have another password
if the JDBC URI is changed
If can’t use it as chord port
After modification, you can replace the properties file in the war file.
Page 16
User Manual
3.2 Deployment: Distribution
Manually deploying the war files on GlassFish server:
The GlobalNode.war and GlobalNodeAdmin.war should be in machine #1.
The HomeNode.war and HomeNodeAdmin.war should be in machine #2.
3.2.1 Depl oy in GlassFis h
After deployment of the servers
(using one machine, which is not the case of multiple machines).
In GlassFish server’s console (http://localhost:4848/), go to Applications->Web Applications, press
“deploy” button, then choose the war file to deploy.
3.2.2 Diagnose
The server’s console will give helpful information to diagnose the deployment.
After deployment of the servers
(using one machine, which is not the case of multiple machines).
Page 17
User Manual
3.3 Deployment: Configuration
Now the servers are deployed, they need to be configured for initialization and connection. The
outlooks of the admin panels are tatty; you may need to bear with them.
3.3.1 Config ure The Global Node
On machine #1, after knowing the IP
address exposed to the outside world, in
this case it is 192.168.1.101, go to
(http://localhost:8080/GlobalNodeAdmin/
index.jsp) GlobalNode Administrator
Panel. Type in 192.168.1.101, then press
OK. Then the Global Node is started. The
port number should be remembered for
the next step.
3.3.2 Config ure The Home Node
On machine #2, after knowing the IP address
exposed to the outside world, in this case it is
192.168.1.102,
go
to
(http://localhost:8080/HomeNodeAdmin/index.js
p) Home Node Administrator Panel. Type in
192.168.1.101 as Global Node’s IP and 8080 as
Global Node's port for web service, so that this
Home Node knows where to find the Global Node;
then type in 192.168.1.102 as this Home Node’s
IP and 8080 as port, the Global Node knows
where to find this Home Node; The type in the
chord port 9820 for Global Node that we obtained from last step; then press OK. Please note that you
need to consider the IP and port for Web Service in your case, such as city name.
Page 18