1
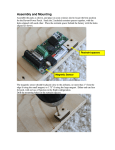
Overview
The RAM3 is the third generation in Soaring Circuits’ line of RAM altimeters. These altimeters
have been developed to allow the R/C pilot to gather and analyze altitude data from model aircraft. The RAM3 is a barometric altimeter, which means it is actually measuring variations in air
pressure as your model changes altitude. These pressure readings are then converted into altitude data using a standard time tested algorithm similar to those used by full scale aircraft.
Your RAM3 package contains the altimeter itself, wrapped in protective pink foam, an upload
cable used to connect your RAM3 to your computer, and a CD-ROM which contains the FlightView software, used to plot, analyze, and save your altitude data.
Make sure that the area of the fuselage that the RAM3 is in is not sealed from the outside air
pressure. This is rarely the case since any small hole will allow the altimeter to function. While
installing the RAM3, the unit should be easily accessible for uploading of the data after flying.
When using the RAM3 with a small dedicated LiPoly battery, you can install them together by
placing one wrap around the altimeter, sandwiching the battery against the bundle, then continuing to wrap around both. The RAM3 may be powered from 3.1 to 15.0 volts, meaning that a
single LiPoly may be used up to a standard 12 volt battery. The battery’s capacity does not need
to be large. For example, a 100mAh pack will power the RAM3 for about 20 hours.
Using the RAM3
Installing the FlightView Software
To install the FlightView software you’ll first want to determine if your computer’s operating system is Windows 7 or an older version such as Windows XP. If you are running Windows XP, you
may have to install Microsoft’s .NET Framework by running the dotnetfx.exe program supplied on
the CD-ROM. You most likely already have the required .NET Framework installed so in most
cases you can skip this step and proceed directly to installing FlightView.
FlightView is installed by running setup.exe on the CD-ROM. Included on the CD-ROM is a sample flight file, so you can try running FlightView, click on “File” then “Open”, browse to your CDROM drive, and select the “Omega.alt” file. You can then play around with the panning and
zooming controls and the different cursors to see how they work. FlightView has a Help menu
which contains more information regarding the various controls and features.
Installing the USB Upload Cable
There are two steps to install the USB upload cable. First, the proper software drivers must be
available so that your computer can recognize and install the cable when it’s plugged in. Second,
you must determine what COM port Windows has assigned to the cable and set FlightView to
match using the Setup menu.
For the computer savvy user, if you’re running Windows 7 and connected to the internet, there’s a
good chance that the cable will install automatically. If it does, open the Windows Device Manager and look for the Ports (COM & LPT) entry. Expand this entry and you should see a USB
Serial Port line followed by the COM port assignment. Make note of this and then run FlightView
and use Setup => Com Port to set the COM port to match. Otherwise, if you need to download
drivers, please see the driver page at www.ftdichip.com. The VCP (Virtual Com Port) drivers are
the ones you want. The drivers and installation instructions are all available for download there.
If you need more help, please go to www.soaringcircuits.com for more information or drop us an
email.
Installing the RAM3 in Your Model
Your RAM3 was sent to you wrapped in a 6" long piece of 1/8" thick pink foam. This foam is
breathable and anti-static, and should be used when installing the RAM3 in your model so that
the unit is protected and will operate properly. You can trim the length of the foam wrap to suit
whatever location you’re putting the unit in, but it is recommended that you use at least one full
wrap. To install the RAM3, find an appropriate spot in the aircraft’s fuselage and adjust the length
of the foam wrap so that the altimeter fits snugly in place. If the area is too large for the supplied
foam wrap, any type of sponge rubber foam may be added to the unit to fill the space. If extra
foam is needed, we recommend applying this over the supplied pink foam wrap.
With the RAM3 installed, when you turn your plane on, the unit will beep out a 3 note chime that
announces that the unit has powered up. From here on out we’ll just refer to this as a chime.
Right after the chime, the unit will beep either 1, 2, 5, or 10 times signifying what the current sampling rate is. One beep signifies that the altimeter is currently set to a 1 sample per second sampling rate, two beeps signifies 2 samples per second, etc. After this set of beeps, there's a 3
second delay (discussed below) where the unit is silent and then another chime. The unit will
then start taking data, and beep every second to let you know that it’s running.
You'll notice that during the first 2 minutes of taking data, the unit will have a double beep. After 2
minutes, the beep will convert to the standard single beep. This is due to the fact that the
RAM3’s pressure sensor must warm up before it’s output settles down and stops drifting as the
sensor reaches thermal equilibrium, and this process takes approximately 2 minutes. The original RAM altimeters had a built-in 2 minute delay where the unit would not take data until the
pressure sensor warmed up. The RAM3, however, starts taking data right away and the user can
decide whether to let the plane sit until the double beeps stop, signifying the end of the warm-up
period, or to fly the plane right away.
For example, if the RAM3 is installed in a hand launch glider, you can start throwing immediately
because you’ll most likely be back on the ground after the 2 minute warm-up period has ended
and therefore be able to use FlightView’s Zero Start function to set your zero altitude reference. If
you’re going to winch launch a thermal duration glider and you won’t be back on the ground for a
half hour or so, it would be best to wait the 2 minutes after turning the RAM3 on until you hear the
single beeps, and then launch. This way, you’re assured the most accurate altitude plot.
So, to summarize, the RAM3 will start taking data as soon as you hear the double beeps. This is
also when the zero altitude reference will be set. During the 2 minute warm-up this zero reference will typicaqlly drift due to the sensor warming up, and depending how long it is until you
launch, you may also get some drift due to the barometric pressure changing at your location.
You can compensate for any drifting by placing your model on the ground for 5-10 seconds right
before you launch and then setting that point on the plot to zero altitude in FlightView.
Between flights, you can either turn the system off and back on again to reset the altimeter, or
you can just leave it on. You can see on the plots when you’re back on the ground. If you turn
the system off and back on again quickly, there will be very little drift due to the sensor warming
up because it never had a chance to cool down. Every time the RAM3 is turned on, it begins a
new “flight”. A “flight” will be viewed as a single continuous plot on the FlightView software, no
matter how many times you take-off and land.
The RAM3 has 4 different sampling rates, 1, 2, 5, and 10 samples per second. The sampling rate
is set by turning the unit off and on a certain way. As mentioned above, after the RAM3 is powered up and it beeps out the current sampling rate, there's a 3 second silent delay. If you turn the
unit off during this 3 second period and turn it back on again, it will come up in the programming
mode. The programming mode is very simple, it simply cycles through 4 tones, for 2 seconds
each. If you turn the unit off during the first (lowest pitch) tone, it will come up in the lowest sampling rate (1 sample per second) the next time you turn it on. If you turn it off during the second
tone it will be set to 2 samples per second, and so forth. Using this method the sampling rate can
be quickly set, even if the altimeter is closed up inside the model.
Soaring Circuits
Uploading the Data
To upload the data to your computer, make sure the RAM3 is OFF. With the USB upload cable
installed as previously described, plug the other end into the RAM3 making sure the connector is
fully seated in the RAM3. Run the FlightView software. Click on “Data” then “Upload”. A little
window will appear, waiting for the altimeter. Power up the RAM3. You will hear the chime, then
the data being transferred, which sounds like a modem.
When the data is done transferring, there will be a 10 second period where the RAM3 will blip
every second. If you turn power off to the RAM3 before this 10 seconds is up, the data will stay in
the RAM3’s memory. If you wait for the 10 seconds to time out, you’ll hear the chime then nothing, which means the RAM3 has erased the data and is now empty.
When uploading data from your RAM3, it is important to make sure that the upload has executed
properly before allowing the RAM3 to erase. As soon as the modem sound stops, you should
see a window pop up that says “Upload complete, xxxx bytes of data received, xx flights decoded.” If you do not see this, quickly remove power from the RAM2L before the 10 second
period is up so that the data is not erased, then try to figure out why the upload is not working.
Temperature Compensation
It was mentioned at the beginning of the manual that the RAM3 measures air pressure and converts this into altitude data using a standard algorithm. This algorithm is derived from a model of
the atmosphere known as the International Standard Atmosphere. In this atmospheric model, the
air temperature at sea level is 59F and drops linearly as altitude increases. This temperature
profile is obviously not the case for all locations at all times, and furthermore, if the temperature at
your location does not match this ideal value, it will affect your altimeter data as follows. If the
temperature is lower than the ideal, the altimeter will read too high, and if the temperature is
higher than the ideal, the altimeter will read too low.
Fortunately, for the typical temperature range that we fly our models at, the effect is not that
great. If, however, you would like your altitude data to be as accurate as possible, temperature
and elevation data may be entered into the FlightView software. For example, say your flying
location is near sea level and the temperature when you were flying was 74F. First, using the
Setup menu, make sure the units for altitude are set to “feet” and the units for temperature are set
to “Farenheit”. Now set the temperature selection box to “74 F” and the elevation selection box to
“sea level”. The altitude plot will be automatically adjusted to compensate for these settings.
Different temperature and elevation values may be entered for each separate flight and these
values will be saved with the altitude data when the plot is saved to a file.
If you don’t know the exact elevation of your flying field or you can’t remember the exact temperature of the day you were flying, just approximate them as closely as possible.
V1.1
Recording Altimeter for Models
User’s Manual
Specs
Size: 3/4” long x 5/8” wide x 3/8” high
Weight: 2-1/4 grams
Resolution: < 1 foot
Sample Rates: 1, 2, 5, and 10 samples/second
Memory: 18 hours at the 1 sample/second rate
Interface: USB, cable included
Power Supply: 3.1 to 15 volts
Current Draw: 5 milliamps
Operating Temperature: 32F -140F (0C to 60C)
Requires: PC running Win XP or Win 7 with USB port
www.soaringcircuits.com