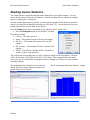
1
User Manual
Version 1.1
HCX User Manual Version 1.1
Limited Warranty and Disclaimer
G-Wiz Partners warrants the G-Wiz HCX flight computers to be free from defects in materials
and workmanship and remain in working order for a period of 180 days. If the unit fails to
operate as specified, the unit will be repaired or replaced at the discretion of G-Wiz Partners,
providing the unit has not been damaged, modified, or serviced by anyone except for the
manufacturer.
G-Wiz HCX flight computers are sold as an experimental accessory only. Due to the nature of
experimental electronic devices, especially when used in experimental carriers such as rockets,
the possibility of failure can never totally be removed. The owners, employees, vendors and
contractors of G-Wiz Partners shall not be liable for any special, incidental, or consequential
damage or expense directly or indirectly arising from the customer or anyone’s use, misuse, or
inability to use this device either separately or in combination with other equipment or for
personal injury or loss or destruction of other property, for experiment failure, or for any other
cause. It is up to the user, the experimenter, to use good judgment and safe design practices and
to properly pre-test the device for its intended performance in the intended vehicle. It is the user
or experimenter’s responsibility to assure the vehicle will perform in a safe manner and that all
reasonable precautions are exercised to prevent injury or damage to anyone or anything.
WARNING: Do not use this device unless you completely understand and agree with all
the above statements and conditions. First time use of the G-Wiz HCX flight computer
signifies the user’s acceptance of these terms and conditions.
How to Contact G-Wiz Partners
Please see our web site at: http://www.gwiz-partners.com. There we have the latest versions of
all our user manuals, device firmware, and FlightView software. We also have several options
for you to contact us, including email and shipping address information.
© 2008 by Marjorie Lynch-Freshner and G-Wiz Partners
Page ii
HCX User Manual Version 1.1
Important Safety Precautions
Use a checklist when you set up your flight computer and when you mount it in your rocket.
Dangers from ejection charges - Make safe the ejection charges, or disconnect the power
whenever you transport the flight-prepped unit.
Electrostatic discharge - Static electricity may damage or destroy components on your flight
computer. Keep it in an antistatic bag when not in use. Ground yourself before handling the
flight computer. Be especially cautious when using it in low humidity environments.
Mount the flight computer in the correct orientation - Otherwise it will not operate properly.
The “nose” end is indicated on the board. To confirm the orientation, make sure the terminal
block is at the aft, or rear, end of the flight computer.
Make sure the flight computer is rigidly installed in the rocket payload bay.
Protect the flight computer from ejection gasses - Ejection gasses are corrosive and will
damage the flight computer. Ejection gas damage will void your warranty.
Use good batteries - If you are using non-rechargeable batteries, we recommend using Duracell
brand. Because many lower-cost batteries have press-fit contacts, vibration and sudden
acceleration might cause them to come loose, resulting in a momentary or permanent break in
your power connection. Losing power will cause a catastrophic flight failure.
Make sure your batteries are properly secured to prevent them from pulling wires out of the
terminal block pins and always use good quality battery connectors.
If you hear the breakwire-launch error code, power the unit off before attaching the break wire.
Recommended Battery Sizes
•
•
Minimum
Optimum
Maximum
CPU
7.5 volt
9 volt
12 volt
Pyro
7.5 volt
9 volt
15 volt
Using too small a battery might cause a low-voltage failure and will reduce your operating
time.
Using too large a battery might damage the MOSFET switches with excessive current
flow.
Page iii
HCX User Manual Version 1.1
Table of Contents
Introduction ...................................................................................................................... 1
Components .................................................................................................................. 2
Product Features ............................................................................................................ 2
Using your Flight Computer................................................................................................ 5
Your Flight Computer and Accessories............................................................................. 6
Setting Up your HCX for Flight....................................................................................... 7
Testing the Setup.......................................................................................................... 15
Mounting the Flight Computer in your Rocket ................................................................ 17
Reading Altitude Data after Recovering your Rocket ....................................................... 18
Using FlightView Software............................................................................................... 20
Changing Your Preferences........................................................................................... 20
Reading your Flight Data with FlightView...................................................................... 22
The Flight Data Window............................................................................................... 24
Saving Flight Data to Your Computer ............................................................................ 27
Connecting your G-Wiz HCX to your Personal Computer ................................................ 28
Configuring your HCX ................................................................................................. 32
Bench Testing.............................................................................................................. 36
Reading Sensor Statistics .............................................................................................. 38
Calibrating .................................................................................................................. 39
Scaling Data from User-Provided Sensors....................................................................... 41
Appendix A..................................................................................................................... 45
Appendix B..................................................................................................................... 46
Appendix C..................................................................................................................... 48
Appendix D..................................................................................................................... 49
Appendix E ..................................................................................................................... 53
Appendix F ..................................................................................................................... 54
Appendix G..................................................................................................................... 55
List of Procedures ............................................................................................................ 57
Page iv
HCX User Manual Version 1.1
Date Printed: 5/30/2008
Introduction
The G-Wiz HCX flight computer is a precision state-of-the-art accelerometer-based datarecording flight computer.
Using its dual sensors, altimeter and accelerometer, this flight computer can:
• Air-start clusters.
• Perform precision staging.
• Deploy a single chute at apogee.
• Deploy a drogue chute at apogee and a main chute at your preset altitude.
The processor at the heart of this third-generation flight computer is an integrated 12-bit A to D
converter with an 8 MIPS CPU core.
The HCX flight computer uses proprietary firmware algorithms. These algorithms take full
advantage of its dual sensor system to determine the key events in a rocket’s flight, including:
• Launch.
• Booster burn-out.
• Sustainer ignition.
• Sustainer burn-out.
• Inertial and barometric apogee events.
• Altitude, both rising and falling.
• Landing.
HCX has four independent high-current output ports. Therefore it can simultaneously control
four separate flight events including:
• Apogee deployment.
• Low altitude deployment.
• Starting of clustered motors.
• Midair ignition of upper stage motors.
• Activation of an event based on data from a user-provided sensor.
The HCX has three models which can measure up to 56, 112, or 224 G of positive/negative
acceleration.
Our unique shunt is designed to prevent the pyro ports from accidentally firing while you are
working on, or transporting, your rocket.
The on-board beeper starts to read out the peak altitude upon landing.
HCX keeps track of multiple flights by recording the accelerometer and barometric sensor data
in a file on a Mini-SD card.
Our FlightView software, which runs on Windows, Mac OS X, and Linux platforms, reads the
files from the Mini-SD card. This program analyzes your flight data, presents it in graphical
format, and allows you to save the data to your personal computer.
Page 1
HCX User Manual Version 1.1
Date Printed: 5/30/2008
Components
Here are the major components of the G-Wiz HCX flight computer. More detailed information
on each of these components can be found in the Using your Flight Computer section.
Product Features
Hardware
•
•
Accurately measures barometric altitude as high as 70,000 feet above mean sea level
(MSL).
The HCX flight computer comes in three models. This chart shows the model numbers
and the maximum acceleration each model can measure.
Model Number
Maximum Acceleration
HCX/50
+/- 56 G
HCX/100
+/- 112 G
HCX/200
+/- 224 G
Firmware
•
•
•
Page 2
Configuration settings are stored on non-volatile EEPROM and stay in the flight computer
until you change them.
The HCX uses the US Standard Atmosphere Model to calculate altitude from the pressure
sensor readings.
The HCX uses filtering to take into account the chamber pressure oscillation inherent in
hybrid motors.
HCX User Manual Version 1.1
Date Printed: 5/30/2008
Data Output
•
•
•
•
The beeper and LED indicate configuration and operational status of the flight computer
before the flight.
The beeper and LED read out peak altitude after landing. You can configure the unit to
also beep out the maximum airspeed.
You can configure the beeper to read out in either Metric or English units.
You can program the fourth output channel to accommodate many different flight plans.
User Controls
•
•
•
•
•
•
•
•
•
You can enable either cluster or stage mode on pyro channel 1.
When you use pyro channel 1 for staging, you can operate a 1st, 2nd, or 3rd stage event.
You can configure pyro channel 2 to fire either at either inertial or barometric apogee.
You can configure pyro channel 3 activate the low-altitude event in 100 foot/meter
increments.
You can configure the low-altitude event in either Metric or English units.
You can configure pyro channel 4 to:
o Activate an event based on data from a 3.3v or 5.0v user-provided sensor.
o Activate an additional event based on data from the barometer or accelerometer.
o Turn off the same or a different event.
You can also delay activating any channel’s event. The delays are set in 0.1 second
increments in a range from 0 to 25 seconds.
You can connect your HCX to a personal computer using the G-Wiz USB or RS232
Interface Cards. The Communication Interface cards attach to the communication
interface socket. This card is the same one used for the LCX and MC2 flight computers.
Once the flight computer is connected, you can upload configurations and firmware
upgrades through your personal computer.
You can set the recording rate between 66.67 samples per second and 500 samples per
second in 6 user selectable settings. Recording bit depth is 12-bits per sample.
Data Storage
•
•
•
•
The firmware is stored in flash memory, and can be conveniently upgraded by the user
when new versions are released by G-Wiz Partners.
The flight computer records flight data on a removable Mini-SD memory card.
The Mini-SD card can record multiple flights between downloads.
The included SD card adapter allows convenient download of flight data to your personal
computer.
FlightView Software
•
•
Available for Windows, Macintosh, and Linux systems.
Use it to:
o Download flight data recorded during the flight from the Mini-SD memory card.
o Analyze and chart the recorded and calculated data from your flight
o Save the flight data to your personal computer.
Page 3
HCX User Manual Version 1.1
Date Printed: 5/30/2008
o Configure your HCX flight computer.
o Bench test your HCX flight computer.
Power
•
•
In low current mode, a single battery powers both the flight computer’s CPU and the pyro
ports.
In high current mode, dual batteries can provide up to 8 amps of current to your pyro
devices.
Safety
•
•
•
•
•
Page 4
The on-board safety shunt is wired in parallel with the terminals of an optional external
shunt. This allows you to place a pyro safety switch wherever you want in your rocket.
High current, open drain, power MOSFET switches initiate the pyrotechnic events.
The reverse-protection diodes protect your flight computer from the damage that could be
caused if you accidentally connect a battery backwards. They also prevent unwanted high
current events from occurring on the pyro ports.
If you have configured your flight computer for breakwire detection, the firmware checks
the port’s continuity at power-on and sounds an alert if the break wire’s circuit is open.
The firmware prevents the stage/cluster port from firing if the rocket has already passed
apogee.
HCX User Manual Version 1.1
Date Printed: 5/30/2008
Using your Flight Computer
•
•
•
•
•
•
•
•
•
CPU – The RISC processor that controls the Flight Computer.
Mini-SD Card Socket – Insert a Mini-SD card to record your flight data.
MOSFET – The MOSFET semiconductor switches are a safety feature which reduces
power consumption and heat generation.
Accelerometer – The inertial acceleration is continually monitored during flight. The
acceleration data is used to calculate the integrated altitude.
Pressure Sensor – The barometric pressure is continually monitored during flight. The
barometric data is used to calculate the pressure altitude of the rocket, based on the US
Standard Atmosphere Model.
JP1 & JP3 Safety Shunt – When the safety shunt plug is inserted into these connectors,
the pyro ports will not fire. The pyro ports will still detect continuity and will report their
status when the flight computer is powered on.
JP2 Pyro Current Jumper –With this jumper OUT, the computer will be in low power
mode, limiting the current at each pyro port to 1 amp. With this jumper IN, you can use
up to 8 amps from your batteries at each pyro port.
JP7 Cluster / Stage Jumper – When this jumper is IN, pyro 1 will fire at the burnout
event you choose. When the jumper is OUT, pyro 1 will fire when launch is detected;
approximately half a second into the flight.
JP6 Communications Interface Socket. – This connector attaches to either the G-Wiz
USB or RS-232 Interface cards.
Page 5
HCX User Manual Version 1.1
•
•
•
•
Date Printed: 5/30/2008
JP5 Breakwire Bypass Jumper – This jumper must be IN when you use a break wire for
launch detection, and OUT when you use the BreakWire/Analog input to record data from
a user-provided sensor.
Terminal Blocks – The pins in the two terminal blocks are used to attach wires to the
Flight Computer. Their functions are shown in this graphic:
o The Pyro Shunt port is a parallel input to the JP1/3 safety shunt. Breaking this
connection arms the pyro ports.
o The BreakWire/Analog port is used in conjunction with the breakwire bypass jumper.
Beeper – Gives an audible status indication.
Status LED – Gives a visual status indication.
Your Flight Computer and Accessories
Your flight computer comes in a
pink antistatic zipper bag and also
has these accessories:
•
•
•
•
•
Safety shunt plug
Mini-SD card and adapter
Two 9v battery adapters
Information sheet
Three small black jumpers
attached to their pins
Retain the antistatic bag to store
your flight computer between uses.
Two nine volt battery adapters are
included for your use. If you
misplace or damage either of the
adapters, please make sure to purchase high quality, well constructed battery adapters. Cheaply
made adapters might lose contact under the stresses of flight computer acceleration, potentially
causing catastrophic failure.
Page 6
HCX User Manual Version 1.1
Date Printed: 5/30/2008
Setting Up your HCX for Flight
While the specific setup of the flight computer will vary depending on your rocket and your
flight plan, the basic procedure remains the same.
•
•
•
•
For more detail on setting up the hardware, see the task specific sections later in this
chapter.
More information on the software is available in the Using FlightView Software section.
Several specific hardware setups are shown in the Cookbook for Launch Setups chapter of
the First Flight tutorial manual.
A quick reference chart is available for download at our web site:
http://www.gwiz-partners.com/Downloads.
Basic Setup Procedure
To Set Up the On-Board Hardware
IN
OUT
1. Install the shunt plug
JP2
High current
Low current mode
2. Insert a FAT formatted Mini-SD card into
mode
the socket on the bottom side of the flight
JP7
Stage mode
Cluster mode
computer.
Breakwire
User analog input
o See Formatting Mini-SD Cards later in JP5
launch
this chapter for more information.
3. Set the jumpers according to your flight plan. Refer to the table for specific jumper data.
o See Setting the Jumpers later in this chapter for more information.
To Attach Devices to the Terminal Blocks
Battery Power
•
•
For more information on battery usage, see The HCX Power System in the next section.
For instructions to wire up your batteries, see Attaching Battery later in this chapter.
External Shunt
•
Depending on your rocket, you may want to use the external shunt instead of the on-board
shunt. See the Using an External Safety Shunt section later in this chapter for more
information.
Pyro Devices
•
•
If you are using motor deployment, skip this section.
If you are using Cluster or Staging, attach its ejection charge to the Pyro 1 terminals (TB1
pins 3/4).
Page 7
HCX User Manual Version 1.1
•
•
Date Printed: 5/30/2008
If you are deploying a chute at apogee, attach its ejection charge wiring to the Pyro 2
terminals (TB1 pins 5/6).
If you are deploying an additional chute, attach its ejection charge wiring to the Pyro 3
terminals (TB1 pins 7/8).
BreakWire/ Analog Port
•
For more information on using this port, see “BreakWire/Analog Terminals” later in this
chapter.
To Test the Setup
1. Install the shunt plug or close the external shunt circuit.
2. Power the unit on.
3. Confirm that the flight computer status is giving the correct status beep code. See
Testing the Setup later in this chapter, or Appendix B, for a complete list of the status
codes.
To Change Configuration Settings
•
The instructions for configuring your flight computer, including descriptions of the
options available, are located in the Configuring your HCX section of the Using
FlightView Software chapter.
The HCX Power System
Depending on your flight plan, you can operate the HCX with either one or two batteries.
•
Nine volt batteries are optimal for all applications on this flight computer.
o Use batteries in the 7.5v to 15v range for the pyro circuit.
o Use batteries in the 7.5v to 12v range for the CPU and the CPU & pyro circuits.
What the Jumper Does
The JP2 jumper sets the current allowed in the system. When JP2 is pulled OUT your HCX is
set to low current mode. When JP2 is put IN, your HCX is set to high current mode.
In low current mode, your pyro port current is limited to 1 amp whether you are using one or two
batteries. In high current mode, you can use up to 8 amps of power at each of your pyro ports.
•
•
If you put the JP2 jumper IN (high current mode) when you have only one battery
attached, the pyro circuit firing may draw too much power away from the CPU, causing it
to reset mid-flight.
If you pull the JP2 jumper OUT (low current mode) when you have two batteries
attached, you will get a maximum of 1 amp at each of your pyro ports no matter what size
battery you use.
When to Use One Battery
When you use a single battery, it is responsible for running the computer and firing any pyro
devices you have hooked up. You should use a single battery only when:
Page 8
HCX User Manual Version 1.1
Date Printed: 5/30/2008
• You do not have any ejection charges.
• You are using a low power ejection charge.
You can test your ejection charges using the Bench Testing feature in FlightView.
When to Use Two Batteries
When you use two batteries, one powers the CPU circuit and the other powers the pyro ports.
This setup eliminates the risk of staging or ejection drawing power away from the CPU.
Pulling the JP2 jumper OUT allows up to 8 amps of power to go to each of your pyro ports. This
is of course limited by the size of the battery you attach to your pyro circuit. At full charge a
Duracell 9V battery will provide approximately 5 amps of power to each pyro port.
Always use two batteries when:
•
•
•
You are using high power ejection charges.
You are igniting cluster or stage motors.
You want to be sure that your pyro ports will not take power away from your CPU.
Other Battery and Power Information
When you use a single battery, it needs to power both the CPU and pyro circuits. You must
attach a jumper wire between the positive CPU and Pyro terminals (TB1 pin1 to TB2 pin6). If
you forget to attach the jumper wire, your HCX will beep out the Low Battery warning.
If you are using two batteries, we recommend that you disconnect the pyro battery whenever you
disconnect the CPU battery. Although the shunt plug will make safe the pyro ports, the pyro
circuit has a noticeable power drain. It will deplete your battery if it is left connected for long
time periods.
Setting up the On-Board Hardware
Using the Safety Shunt
Unless you are using motor
ejection, it is recommended that
you always include a pyro shunt
in your flight computer setup.
The HCX includes a built-in safety
shunt (JP 1/3) and its shunt plug.
Any time the HCX is mounted in
the rocket in a position where you
can insert the shunt plug through a
hole in the airframe, the built-in
shunt is the most practical method to safe your pyro ports.
Page 9
HCX User Manual Version 1.1
Date Printed: 5/30/2008
When the shunt plug is properly installed, connecting JP1 and JP3, it protects the pyro ports from
accidentally firing.
In normal use, insert the shunt before you power the unit on, and remove it, on the pad, only after
all other prep work is completed.
Once you remove the shunt, the flight computer will arm the pyro outputs, enabling them to fire
when they are signaled by the firmware.
This picture shows the safety shunt correctly installed into the JP1/JP3 shunt connectors.
The HCX also has an additional parallel safety shunt input on TB2 pins 1/2. If either circuit is
closed, the pyro ports will not fire. You can use this shunt connection if your application does
not allow you to easily install and remove the plug from the built in shunt. See the Using an
External Safety Shunt section later in this chapter for more information.
Formatting Mini-SD Cards
Put the Mini SD memory card into its adapter and connect it to your personal computer. Your
operating system can format it like any other removable storage device. If your personal
computer gives you a choice of formats, use FAT or FAT32 formatting.
Because the flight computer records at a very high data rate, it pre-allocates a file on the MiniSD card. This file must be continuous on the card; it cannot have any fragments. The flight
computer will sound an error code during the power-on test if it cannot allocate a file of the
correct size. You will have to reformat or replace the Mini-SD card before you can fly.
We recommend that you use a freshly formatted card for each series of flights and do not use
your flight computer’s Mini-SD for any other uses. If you use your flight computer’s Mini-SD
card for other uses, it will quickly become fragmented and unable to allocate the required space
Setting the Jumpers
The hardwired jumpers have the following functions:
Jumper Position Number
With Jumper IN
With Jumper OUT
JP 2 -- Pyro current selection
System allows high current –
you must use two batteries.
System limited to low current –
you can use one battery.
JP 7 -- Cluster or stage
selection
Stage mode enabled.
Cluster mode enabled.
JP 5 -- Breakwire bypass
Breakwire launch detection
enabled.
User analog input (0-5v) enabled.
Using the Pyro Current Jumper
When you use a single battery, it is responsible for running the computer and firing all pyro
ports. Use low current mode by pulling the JP2 Jumper OUT. This will to prevent the pyro ports
from taking too much power from your CPU.
Page 10
HCX User Manual Version 1.1
•
Date Printed: 5/30/2008
When you use two batteries, one powers the CPU circuit and the other powers the pyro
ports. Use high current mode by putting the JP2 Jumper IN. This will allow you to use
higher power ejection charges on the pyro ports.
To Enable the Flight Computer for High Current Use
•
Put jumper JP2 IN.
o Attach two batteries to your terminal blocks.
To Enable the Flight Computer for Low Current Use
•
Pull jumper JP2 OUT.
o Attach one battery to your terminal blocks.
Using the Cluster/Stage Jumper
In the cluster mode, the flight computer fires the clustered motors as soon as it detects and
confirms launch. This occurs approximately 0.5 seconds after the first movement of the rocket.
There is also a delay factor from the time the igniter fires until the time the motor (or motors)
actually ignite. See your motor manufacturer for more information on this delay.
In the stage mode, the unit fires the sustainer after your preprogrammed count of burnout events.
You can also program in a delay before the upper stage ignition. See Configuring your HCX in
the Using FlightView Software chapter for more details.
To Enable the Flight Computer for Cluster Ignition
•
Pull jumper JP7 OUT.
o Attach your pyro device wires to the Cluster/Stage terminals (TB1 pins 3/4) and
configure the flight computer in FlightView to ignite the clustered motors.
To Enable the Flight Computer for Staged Ignition
•
Put jumper JP7 IN.
o Attach your pyro device wires to the Cluster/Stage terminals (TB1 pins 3/4) and
configure the flight computer in FlightView to identify which stage is ignited and if
any delays are used.
Using the Breakwire Bypass Jumper
The primary purpose of the breakwire bypass jumper JP5 is to be a mechanical sensor for launch
detection. See the Launch Detection section for more information on when to use this feature.
In order for the breakwire bypass system to work, you must:
• Put the breakwire bypass jumper JP5 IN.
• Attach a wire between the two BreakWire/Analog terminals (TB2 pins 3/4).
• Configure the flight computer in FlightView.
The secondary function of JP5 uses pins 3 and 4 of terminal block 2 as a data input port. If you
remove the JP5 jumper, you can attach an analog sensor to TB2 pins 3/4. See Scaling Data from
User-Provided Sensors in the Using FlightView Software chapter for more information on
applications.
Page 11
HCX User Manual Version 1.1
Date Printed: 5/30/2008
Problems that will occur if you do not make the required changes all three places:
•
•
•
If you configure the break wire in FlightView and correctly install the break wire, but pull
the jumper OUT: you do not get a warning if the break wire comes loose before launch.
If the flight computer does not detect the launch, it will not record any flight data.
If you attach the wires to the terminal block and configure it for analog input in
FlightView, but put the jumper IN: your data is not recorded
If you configure for breakwire detection in FlightView and put the jumper JP5 IN, but do
not attach the break wire: you get a breakwire error warning and cannot fly until you
correct the problem.
To Enable the Flight Computer for a Breakwire Launch
•
Put the jumper JP 5 IN.
o Make sure you configure the breakwire launch in FlightView and have your break
wire attached to the terminal block pins.
To Enable the Flight Computer to Accept Analog Input
•
Pull the jumper JP5 OUT.
o Make sure you attach the sensor wires correctly and the select the Analog Input
option in FlightView’s configuration dialog box.
Attaching Devices to the Terminal Blocks
To attach your wiring to the flight computer, install each wire into the terminal blocks according
to this schematic.
Loosen the screw at the top of the terminal and insert your wire into the opening as shown in this
picture. Tighten the screw to make good contact between your wiring and the pin inside the
terminal
•
•
•
Make sure you insert the wires completely into the openings in the terminal blocks.
Use a screwdriver to tighten down the pins and prevent wires from coming loose in flight.
Make sure you attach the positive and negative wires correctly.
Page 12
HCX User Manual Version 1.1
Date Printed: 5/30/2008
Attaching Battery Connectors
When you power the G-Wiz flight computer on, you will hear a series of beeps. This status
readout will continue and audibly indicate any change, until 1) you power it off, 2) you link to
the FlightView software, or 3) the flight computer detects launch.
To Attach Power Wires If You are Using a Single Battery
1. Attach the positive wire to the CBatt+ terminal (TB2 pin6).
2. Attach the negative wire to the CBatt– terminal (TB2 pin5).
3. Attach a jumper wire from the PBatt+ terminal (TB1 pin1) to the CBatt+ terminal (TB2
pin6).
o Make sure you pull the JP2 jumper OUT.
Caution: If you forget to attach the jumper wire in step 4 of this procedure, your HCX will beep
out the Low Battery warning.
Tip: You can attach power wires for one battery to the PBatt terminals if your application
makes using the CBatt terminals difficult. Make sure you attach the jumper wire between the
positive PBatt terminal and the positive CBatt terminal or your flight computer will not
function.
To Attach Power Wires If You are Using Two Batteries
1. Attach the wires for your pyro ports to the PBatt+ (TB1 pin1) and the PBatt- (TB1 pin2)
terminals.
2. Attach another pair of battery wires to the CBatt+ (TB2 pin6) and CBatt- (TB2 pin5)
terminals.
o Make sure that the polarity is correct to each battery.
o Make sure you put the JP2 jumper IN.
Caution: With this setup you do not use a jumper wire.
Tip: You can see pictures of both these setups in the Cookbook for Launch Setups chapter of
the First Flight manual.
Page 13
HCX User Manual Version 1.1
Date Printed: 5/30/2008
Using an External Safety Shunt
If you cannot use the on-board safety shunt, this terminal pair (TB2 pins1/2) is wired in parallel
to the on-board shunt. It allows you to place a safety shunt switch anyplace on your rocket so
you can conveniently open the circuit when the flight computer is on the pad and ready for flight.
To Set Up the External Safety Shunt
1.
2.
3.
4.
Attach a switched wire to the two Pyro Shunt terminals (TB2 pins 1/2).
Close the switch to safe your pyro ports.
Finish your flight computer setup per your flight plan.
When you have finished preparing the rocket on the launch pad, open the switch to arm
the pyro ports.
Once you open the switch on the shunt, the flight computer will arm the pyro outputs, enabling
them to fire when they are signaled by the flight computer.
Attaching Pyro Devices
The G-Wiz HCX has four pyro ports. Three are dedicated ports:
• Cluster/Staging on TB1 pins 3/4
• Apogee Deployment on TB1 pins 5/6
• Low Altitude Deployment on TB1 pins 7/8
The fourth port, called the FlexPort (TB1 pins 9/10) is user programmable in FlightView. It has
many uses including:
• Backing up the primary ejection system.
• Flying a rocket with more than two stages.
• Using cluster launch and multiple-stage ignition during the same flight.
• Turning a camera on and/or off.
• Activating an event based on data from a user-provided sensor.
If you have set up your HCX flight computer to use one battery, you should test your electric
matches before flying. Many brands of electric matches will not ignite at the power levels
provided by one battery. You can test igniters and other devices for your flight computer using
the Bench Test feature of FlightView. Detailed information on using Bench Test is available
in the Using FlightView Software chapter.
BreakWire/Analog Terminals
Caution: If you are using these terminals, make sure you set the JP5 jumper correctly.
To Set Up for a Breakwire Launch
•
Attach a wire between the two BreakWire/Analog inputs. It must be long enough that you
can place it in a location where it will break during launch.
o Make sure you configure the breakwire launch in FlightView.
o Make sure you put the JP5 jumper IN.
Page 14
HCX User Manual Version 1.1
Date Printed: 5/30/2008
To Attach a User-Provided Sensor on the BreakWire/Analog Inputs
1. Attach the positive wire of the sensor to pin 3 of terminal block 2.
2. Attach the negative wire of the sensor to pin 4 of terminal block 2.
o Make sure you configure the sensor in FlightView.
o Make sure you pull the JP5 jumper OUT.
Testing the Setup
Every time you power on the flight computer, it runs a diagnostic and beeps out its status. The
HCX has three types of status codes:
• Normal
• Non-fatal errors
• Fatal errors
If you want to hear samples of the status codes, we have recordings on our website at
http://www.gwiz-partners.com/html/hcx_beeps.html.
Normal Status Code
1.
2.
3.
4.
5.
The LED turns on then off.
The LED turns on and the beeper gives one (JP7 OUT) or two (JP7 IN) low pitch beeps.
LED turns off.
The sequence pauses for a half second.
Starting with Pyro Port 1, each pyro port reports status, with a single quick “beep” for good
continuity or a double “beep” for incomplete continuity.
6. The sequence repeats from step 2 after a one second pause.
Non-Fatal Error Status Codes
The Non-Fatal error codes are variations of the Normal Status code. The specific parts defining
the error are printed in boldface. While the noted problem will not prevent a launch, you must
correct it before the flight if you want full functionality in your flight computer.
Low Battery
1. The LED turns on then off.
2. The LED turns on and the beeper gives one (JP7 OUT) or two (JP7 IN) low pitch beeps.
After a half second pause, the beeper gives a short warble.
3. LED turns off.
4. The sequence pauses for a half second.
5. Starting with Pyro Port 1, each pyro port reports status, with a single quick “beep” for good
continuity or a double “beep” for incomplete continuity.
6. The sequence repeats from step 2 after a one second pause.
If you hear this sequence, you have less than sixty minutes before your batteries die. If possible,
change your batteries to avoid the risk of losing power during your flight. If this is not possible;
because your rocket is already assembled and on the pad, for example, then ask the LCO to
expedite your launch.
Un-Plugged Mini-SD Card
1. The LED turns on then off.
Page 15
HCX User Manual Version 1.1
Date Printed: 5/30/2008
The beeper gives a long, high pitch beep, then a long, low pitch beep.
2. After a 3/4 second delay, the normal status code continues.
If the Mini-SD card is missing or not installed correctly, the flight computer will fire all the
events, but will not be able to record data.
Fatal Error Status Codes
The Fatal Error codes are not built on a Normal Status code. You cannot fly your flight
computer until the problem is fixed. Most of the Power-On Self-Test failures are caused by
problems with the Mini-SD card. These you can correct by reformatting or replacing the MiniSD card.
Break Wire Error
The unit is configured for a breakwire launch but the break wire is not correctly attached.
1. The beeper gives a short warble.
2. The sequence repeats after a one second pause.
Warning: If you hear this sequence, you will not be able fly your rocket until the error is
corrected. Follow these instructions to correct the problem.
To Correct the Setup, If You Want a Breakwire Flight
1. Power your unit off.
2. Attach your break wire.
3. Power on to continue.
To Correct the Setup, If the Breakwire Mode was Configured by Mistake
1.
2.
3.
4.
5.
Power your unit off.
Attach a wire between the BreakWire terminals (TB2 pins 3/4).
Connect your flight computer to FlightView.
Go into the Configuration screen.
Click the Analog Input option button.
Power-on Self-Test Failure (POST Failure)
1. The beeper gives a long warble.
2. After a half second delay, the beeper gives up to 7 beeps identifying the type of failure.
3. If you hear 5 or more beeps, there will be another half second delay, and you will hear another
series of low pitch beeps giving a secondary code.
4. The sequence repeats after a 1 second pause.
Warning: If you hear this sequence – Do not fly your computer! Record the number of beeps,
and refer to the POST Failure Code Lookup Charts in Appendix B. Unless you can correct the
failure by changing SD cards, contact G-Wiz support, ([email protected] ) before
flying your unit.
Page 16
HCX User Manual Version 1.1
Date Printed: 5/30/2008
Mounting the Flight Computer in your Rocket
Some considerations you should keep in mind when you build your rocket’s payload bay.
•
•
•
•
•
•
•
Make sure the flight computer is secured in the payload bay. Not only could a loose unit
cause itself damage, but its motion will make your flight data inconsistent.
Make sure your batteries are secured as well. During a fifty g launch, a one ounce battery
weighs nearly four pounds.
Note the proper orientation of the flight computer. The nose end of the flight computer is
indicated by the word “Nose” and an arrow printed on the front of the board between the
Cluster/Stage Jumper and the Communications Interface Socket (JP6).
If you are using pyrotechnic events, make sure you either have access to your safety shunt
or else design your payload bay to include a switched wire you can attach to the pyro
shunt terminals (TB2 pins 1/2).
The flight computer’s barometer needs a ventilation hole into the payload bay of the
rocket. For rockets measuring up to two inches in diameter, a single hole of 1/8 inch
diameter, at least six inches below the nosecone transition is sufficient. For this size
rocket, the shunt plug access hole provides sufficient ventilation.
Design your wiring to allow easy access to power switches. You do not want to have to
completely disassemble your rocket because the LCO has put a hold on launches until the
wind dies down.
Make sure all your connections and switches can withstand the G forces applied during
the flight. Phone jack switches and twisting wires to close connections have been found
to be extremely susceptible to acceleration and shock, causing catastrophic failures.
Page 17
HCX User Manual Version 1.1
Date Printed: 5/30/2008
Reading Altitude Data after Recovering your Rocket
After landing, the HCX computer will begin the readout phase. The numbers are beeped out in
quick sequences with very brief pauses between each number sequence.
• Zero is represented as a long beep.
• One is a single quick beep.
• Two is a pair of quick beeps.
• …
• Nine is 9 quick beeps.
After the number sequence is read out, the unit will pause for ONE FULL SECOND and then
repeat the number sequences until you power off the unit.
This chart shows some examples.
Altitude (feet)
Beep Code
5,081
Beep, beep, beep, beep, beep (5) – long beep (0) – beep, beep, beep, beep, beep,
beep, beep, beep (8) – beep (1)
12,112
Beep (1) – beep, beep (2) – beep (1) – beep (1) – beep, beep (1)
9,817
Beep, beep, beep, beep, beep, beep, beep, beep, beep (9) – beep, beep, beep, beep,
beep, beep, beep, beep (8) – beep (1) – beep, beep, beep, beep, beep, beep, beep (7)
By default the system beeps out the measurements in feet. If you want to configure the unit so
that the beeper reads out in meters, see Configuring your HCX in the Using FlightView
Software chapter.
The flight computer must be turned off and then on before you can launch it again. Your data
will be safely stored on the SD card. Each flight is saved under a sequential file number.
In the Configuration dialog box in FlightView, you can configure the HCX to read out both the
maximum speed and the maximum altitude. If you select this option, the altitude and speed
readouts will alternate. The status LED will light during the speed readout, and be off during the
altitude readout.
Launch Detection
The G-Wiz HCX flight computer uses firmware algorithms to prevent the unit from starting
prematurely. This is important, because you do not want the flight computer to assume launch
has occurred if you jostle or drop the unit. The two extreme parameters the flight computer use
to detect launch are:
•
An acceleration of at least 2.2G for a minimum of 6/10 second. This will detect launch in
most rocket motors.
• An acceleration of at least 40 G for a minimum of 2/10 second. This is often required to
detect launch in high-thrust motors.
If you are not certain your rocket will trigger launch within the range of these parameters, use the
breakwire port. See Using the Breakwire Bypass Jumper for instructions on using a break wire.
Page 18
HCX User Manual Version 1.1
Date Printed: 5/30/2008
Flying with Hybrid Motors
Hybrid motors cause problems with some flight computers because of the chamber-pressure
oscillation inherent in the hybrid design. The HCX uses DSP filtering to smooth out the thrust
oscillations, allowing it to more accurately sense launch detection and to compute the inertial
data.
We have successfully tested the HCX with the Rattworks hybrid motors under varying
conditions.
Flying with High Thrust Motors
High thrust, short burn-time motors often have too short a burn time to be detected by launch
algorithms.
HCX has been tested with Aerotech WARP9 propellant. In tests, we were able to detect launch
in rockets with a recommend a minimum thrust-to-weight ratio of 10:1.
If you are unsure your anticipated boost time will trigger the launch detect algorithm, then use
the break wire to ensure launch detection.
Page 19
HCX User Manual Version 1.1
Date Printed: 5/30/2008
Using FlightView Software
FlightView is the G-Wiz
proprietary program which
interfaces with the G-Wiz
flight computers. Starting
with version 2.8,
FlightView includes
configuration and data
viewing support for the
HCX flight computer. If
you are upgrading from
another G-Wiz flight
computer, make sure you
have the latest copy of
FlightView. You only need
the one program to interface with both flight computers.
To install FlightView, go to http://www.gwiz-partners.com/Downloads/install/install.html and
click on the correct installer for your operating system. Follow the instructions on the page to
install your software.
When you open the FlightView program you will see the main window. It has a standard menu
bar and toolbar buttons. This screenshot shows the buttons marked with their functions.
Changing Your Preferences
To Set the FlightView Program Preferences
1. Start FlightView.
2. From the main window, select Edit > Preferences or click the Set Preferences button
on the menu bar.
3. In the Preferences dialog box, select the changes you want. The options are discussed
in detail in this section.
4. Select OK, to close the Preferences dialog box and accept your changes.
Options in the Preferences Dialog Box
In the Preferences dialog box, you control how information displays in FlightView.
The Preferences dialog box has three types of options:
•
•
•
How the data is displayed.
Default data options
Links to advanced features and DCS extensions.
Page 20
HCX User Manual Version 1.1
Date Printed: 5/30/2008
Data Display Options
Most of the options in the Preferences dialog box allow you to change how your flight data is
displayed.
The Units Group
In the top left corner of the Preferences dialog
box is a group marked Units. Here you can
choose which of the four measurement systems
you want to use to display your data. Your
choices are:
•
•
•
•
English – Data is displayed in feet.
Big English – Data is displayed in miles.
Metric – Data is displayed in meters.
Big Metric – Data is displayed in kilometers.
The Overlay Graph Group
In the top right corner are the options for your Overlay Graph. Use the checkboxes to choose
which graphs to show together. If you do not choose any of the graphs, the overlay graph tab will
be empty.
The Graph Color Group
The group of colored boxes in the bottom left allows you to choose the colors for your graphs.
Because the same colors are used on your overlay graph, we recommend that you should use a
different color for each of your graphs.
Other Ungrouped Options
Show data points in graphs - You can choose if you want to see the data points on your graphs.
Even if checked, this option only takes effect when you are zooming in on a small enough graph
area that the data points do not obscure the graph.
Crop integrated data at apogee - Because the accelerometer data taken after apogee is usually
not very informative, you have the option to crop the accelerometer data displays at apogee.
Selecting this option will give you a smaller, cleaner graph.
Smooth barometric data - If you record at a low sampling rate, you may see noise in the
barometer-based graphs. Select this smoothing filter to clean up the display.
Default Data Options
Some of the other options set default data which you include when you first open a GWZ data set
file.
Use today’s date by default in flight data - This is a means of date stamping your files when
you open a GWZ file
Default Launch Site - If you usually fly at the same site, you can type it in here. The site name
will appear in the Flight Information tab when you open a GWZ file.
Default ID Pattern - Here you can choose a default pattern for flight ID names. These ID
names are not the same as the filename prefix you set in the Configuration dialog box. These
Page 21
HCX User Manual Version 1.1
Date Printed: 5/30/2008
names are used to identify the GWZ files. Every time you open a GWZ data set, from any flight
computer or storage device, in your copy of FlightView, it is named sequentially using this
pattern. This ID stays with the flight information even when you change file names. You can see
this ID name on the Flight Information tab of your flight data window.
Extensions
The Extensions button connects to options, such as telemetry links, which are used exclusively
in more advanced flight computer models including the G-Wiz DCS.
Advanced Features
We are constantly adding new abilities to FlightView. The Advanced Features button links to
an additional dialog box with experimental features such as database searching. As we release
new versions of FlightView, we will provide information about the new features on our web site
at http://www.gwiz-partners.com/html/tech.html.
The Help Menu
On the Help menu you can access FlightView’s
help system.
• The Help Contents item opens our help
system.
• Select About for more information
about FlightView, including your
software revision level.
The File Menu
On the File menu you can open, save, and print your data.
•
•
•
The Open command opens both memory image
files from you Mini-SD card (GWZ) and saved flight
files from your personal computer (gwiz). All of
your flight data is accessible here. You do not need
to connect your HCX to your personal computer to
view and save your data.
The Save and Save as commands will save your
data to your personal computer.
The Print command will print your flight data.
Reading your Flight Data with FlightView
A major feature of the HCX flight computer is its removable Mini-SD memory card. This card
allows you to download your flight files without connecting the HCX to your computer.
Page 22
HCX User Manual Version 1.1
•
Date Printed: 5/30/2008
FlightView can read two data formats:
o The GWZ extension files are data set files created by the flight computer.
o The gwiz extension files are data files saved by FlightView.
To Read Your Flight Data from the Mini-SD Card
1. Power the flight computer off.
2. Remove the Mini-SD card from your flight computer and insert it into its adapter.
o The Mini-SD card now fits into any of the standard SD drives available for personal
computers.
3. Plug your SD card into your personal computer.
4. Start FlightView and select File > Open from the main menu to access the Open dialog
box.
5. In the Open dialog box, navigate to the directory of your Mini-SD card.
6. Select the file name of your flight.
o By default, the firmware names the data set files sequentially, in the form FLT###.GWZ. If you want to change the flight ID naming convention, you can change it
in the Configuration window when your flight computer is attached.
o You may have one more file on your Mini-SD card than you had flights. This is
because every time you power the flight computer on, the firmware creates a “header”
file in anticipation of a flight. If you have a header file it will be the highest numbered
file.
7. Press the Open button to open the file in the Flight Data Window.
o If you see this message when opening a GWZ file from HCX, it is usually a “header”
file and you can delete it after you open your flight data files.
To Read a Previously Saved Flight Data File
1. Start FlightView.
2. Select File > Open from the main menu.
3. In the Open dialog box, navigate to the directory where you have saved your data file.
4. Select your flight file.
5. Press the Open button to open the file in the Flight Data Window.
Tip: In Windows, you can open either type of file without starting FlightView. Navigate to the
file’s directory and double-click on the flight file name.
Page 23
HCX User Manual Version 1.1
Date Printed: 5/30/2008
The Flight Data
Window
The flight data window opens up at the
Flight Information tab.
In the top left corner is the Flight ID
number. FlightView creates a
sequential ID every time a new GWZ
data set is read into FlightView, either
from a flight computer’s memory read
or a saved file from a memory card.
These IDs are not the same as the file
names because they will stay with the
data even if you save it to a new
filename. You can change the ID
pattern in the Preferences dialog box.
On the Flight Information tab you can
fill in the fields with other information
about your flight including:
• Date.
• Location.
• Rocket used.
• Motor types used.
You have ample room for additional
notes about the flight.
The Flight Summary tab gives you a
snapshot look at your flight.
The other tabs contain graphs showing:
• Airspeed during the flight.
• Acceleration during the flight.
• Altitude based on data reading from the barometer.
• Integrated altitude based on data from the accelerometer.
• An overlay graph which combines several of the graphs plotted on the same time axis.
You can choose which graphs to show in the overlay tab by making selections in the
Preferences dialog box. See Changing Your Preferences for more information.
Page 24
HCX User Manual Version 1.1
Date Printed: 5/30/2008
Other Data Windows in FlightView
Acceleration Graph
Integrated Altitude Graph
Integrated Airspeed Graph
Overlay Graph
You can zoom in on the graphs by dragging your mouse over the time range you want to
examine. Click the magnifying glass icon in the lower left corner to return the window to the
original time range.
At the bottom of the graph, is a legend of the symbols that mark the events in your flight. The
symbols point at the graph and are oriented so they interfere as little as possible with the graph.
You can modify the display’s colors in the Preferences dialog box.
Page 25
HCX User Manual Version 1.1
Date Printed: 5/30/2008
Printing your Flight Data
When you click the Print menu item or the Print button on the toolbar, all the tabs of your active
data file will print. You can also use the Copy command to copy the graphs into another
program and print them at different sizes and in multiple colors.
The Edit Menu
On the Edit menu, you can manipulate your data.
•
•
•
The Copy command lets you copy and
paste your flight data graphs to other
programs.
The Clip to Selection allows you to
remove unneeded data from your flight
file.
You will also find the Preferences
command here.
The G-Wiz Menu
On the G-Wiz menu you have
specialized features relating to your
flight computer.
• The Connect menu item.
• The Set Port menu item
gives you a submenu of the
active COM ports on your
personal computer.
• The Read Memory item is
unavailable because you read
flight data directly from the
Mini-SD card rather than through your HCX.
• The User Data Scaling item will become available when you open a file containing data
from a user-provided sensor.
• After you connect your HCX to FlightView, you see have additional items
Caution: The Connect via Telemetry and Set Telemetry Port menu items are only used for
the DCS flight computer. They will not connect to your HCX to FlightView.
Note: If you are using FlightView 2.9 or earlier, you will find the connection port list in the
Preferences Dialog Box
Page 26
HCX User Manual Version 1.1
Date Printed: 5/30/2008
Saving Flight Data to Your Computer
To archive your flight data, save it to the hard drive of your personal computer.
FlightView can save in the following formats:
•
•
•
•
gwiz
txt
csv
xml
The gwiz files are formatted to display in FlightView.
The txt and csv files are text formatted flight data. These formats allow your flight data to be
used in spreadsheets and other analysis programs.
The xml is used for a more advanced data format which allows users to share the structured data
on different computer systems.
When you close your memory set file, FlightView will ask if you want to save. Click Yes to
open the Save As dialog box.
To Save your Data Files
• Select File > Save as to:
o Give a new name to the file.
o Save the file to a new location.
o Save the data as a new file type.
♦ If you select the Save option on a GWZ file, FlightView will open the Save as
dialog box.
♦ If you select the Save option on a gwiz file, FlightView will overwrite any
information in the Flight Information tab. However, no flight data will be lost.
Warning: Make sure you place your save files in the correct directory on your personal
computer and do not re-save them back on the Mini-SD memory card.
After all your flight data is saved on your laptop computer, format the Mini-SD card to free up
continuous memory for additional flights. See Formatting Mini-SD Cards for an explanation of
why this is important.
Page 27
HCX User Manual Version 1.1
Date Printed: 5/30/2008
Connecting your G-Wiz HCX to your Personal
Computer
You still need to occasionally attach the G-Wiz HCX flight computer directly to your personal
computer in order to:
• Configure your HCX to your flight plan.
• Calibrate your HCX.
• Bench test your HCX.
• Get statistical data on the sensors.
• Update the HCX firmware.
Note: You must have power on the flight
computer in order to connect it. Wire up your
flight computer in single battery mode before you attach it to your personal computer. This is a
picture of the flight computer in simple single battery mode. While you do not need to attach the
jumper wire between the CPU and the pyro circuit, we recommended you do so because
otherwise you will get a (very annoying) low battery warning.
Installing the Communication Interface Drivers
To connect your unit to a personal computer, you need either a G-Wiz USB interface card or a
G-Wiz RS-232 serial interface
card along with the appropriate
cable. These are the same
interface cards used to connect
the LCX and MC2 flight
computers to FlightView.
Because the G-Wiz flight
computer is a serial device, its
USB connection works through
the serial ports of your personal
computer. Select the COM port
where your flight computer
connects to your personal
computer in the G-Wiz menu.
•
•
If you use a USB interface card, the COM port is defined when you install the USB
drivers.
If you use a serial interface card, see you personal computer documentation to identify the
correct COM port.
To Install the G-Wiz USB Interface Drivers
Note: you may need administrator access to install the drivers.
1. Start FlightView.
2. Select G-Wiz > COM Port and note the COM ports already assigned.
Page 28
HCX User Manual Version 1.1
Date Printed: 5/30/2008
3. Attach the interface card to your personal computer using the supplied cable.
4. Your computer will start to install the USB drivers.
o In Windows 95 - 2000, a dialog box will appear asking where to find the drivers. If
you installed at the default location, this will be: C:\Program
Files\GWizViewer\usbDrivers. (If C is your root directory)
o If you are connecting to an OS X 10.3 or earlier Macintosh computer and have any
problems, follow the procedure in described in Appendix E.
o If you are connecting to a computer running Windows XP, follow the procedure
described in Appendix F.
o The procedure for Windows Vista is similar to Windows XP. The major difference is
that the computer tries to look on-line for the driver before asking if you have the
driver available. Follow the procedure described in Appendix G.
5. After your computer confirms driver installation, look at the available COM ports.
6. Select the most recently installed COM port.
Note: If you are using FlightView 2.9 or earlier, you will find the COM port dropdown in the
Preferences dialog box.
Connecting Your Flight Computer
To Connect with the G-Wiz USB Interface Card after Your Drivers have been Installed
1. Attach the interface card to your personal computer using the supplied USB cable.
2. Start FlightView.
o The box in the bottom left of the window will say: Not connected to anything yet.
3. On the G-Wiz menu, select the COM port you noted during the driver installation.
4. Attach the interface card to the flight computer by inserting the 8 pin connector into the
matching socket (JP6) on the HCX.
o See the photo at the beginning of this section.
5. Power the HCX unit on.
o It will start beeping its status.
6. In FlightView, select G-Wiz > Connect from the main menu.
o The box in the bottom left of the window will say: Connected to: G-Wiz HCX when
the connection is made.
o If the box says Connection Closed or your flight computer continues to beep, check
to see if your COM port setting is correct and if your flight computer is attached
correctly.
o If you do not know the correct port, select the highest number port on the G-Wiz
menu first. If this port does not connect, then check the lower numbered ports.
To Connect with the G-Wiz RS-232 Serial Interface Card
Note: You do not need to install any drivers for the G-Wiz RS-232 Serial Interface.
1. Attach the interface card to your computer using a straight-through serial cable.
Page 29
HCX User Manual Version 1.1
Date Printed: 5/30/2008
o Refer to your computer documentation to identify the COM port where you are
attaching your serial cable.
2. Start FlightView.
3. On the G-Wiz menu, select the COM port where you attached your serial cable and
interface.
4. Attach the interface card to the flight computer by inserting the 8 pin connector into the
matching socket (JP6) on the HCX.
o See the photo at the beginning of this section.
5. Power the HCX unit on.
o It will start beeping its status.
6. In FlightView, select G-Wiz > Connect from the main menu.
o The box in the bottom left of the window will say: Connected to: G-Wiz HCX.
o If the box says Connection Closed, or your flight computer continues to beep, check
to see if your COM port setting is correct and if your flight computer is attached
correctly.
Tip: After your first connection, FlightView will save the port preference in memory. Unless
you are connecting several different G-Wiz flight computer models, you should be able to skip
step 3 for later connections.
Page 30
HCX User Manual Version 1.1
Date Printed: 5/30/2008
More G-Wiz Menu Items
When the HCX unit is connected, the G-Wiz
menu will show several additional items.
• Disconnect
• Configure
• Bench Test
• Sensor Statistics
• Calibrate Accelerometer
• Update HCX Firmware
These menu items, are described in more
detail in the next few sections
Disconnecting
To Disconnect your HCX Flight Computer
1. Select G-Wiz > Disconnect from the menu or click the Connect/Disconnect button on
the menu bar.
o The box in the bottom left of the window will say: Connection Closed and your
flight computer will start beeping.
2. Power off your flight computer.
3. Detach the flight computer from the interface card.
4. Remove the interface card and cable from your computer and store them in a safe place.
Page 31
HCX User Manual Version 1.1
Date Printed: 5/30/2008
Configuring your HCX
The HCX stores its configuration settings in nonvolatile EEPROM memory. The factory default
configuration settings for the G-Wiz HCX flight computer are the same as those used for the
earlier G-Wiz flight computer products:
• Staging is for first stage.
• Apogee deployment occurs at inertial apogee.
• Low altitude deployment is set for 800 feet.
• English units are used.
• No delays are put into any of the events.
Your configuration settings are stored on the flight computer in EEPROM and will not change
until you change them.
Caution: If you change your configuration for a special flight plan, be sure to change it back
before your next flight.
To Configure the Flight Computer
1. Connect your flight computer to your personal computer.
o When you are connected, the box in the bottom left of the window will say:
Connected to: G-Wiz HCX.
2. Select G-Wiz > Configure from the menu.
o The Configuration dialog box will appear.
3. Change the configuration on both the Main and Outputs tabs to match your flight plan.
o The options in each tab page are described in the rest of this section.
4. Press Upload & Exit when you are done.
o The Configuration dialog box will disappear when the process is complete.
5. Select G-Wiz > Disconnect from the menu.
6. Power your flight computer off. The new configuration will be ready when the flight
computer is powered on again.
The Configuration Dialog Box
When you open the Configuration dialog box, FlightView
reads the configuration memory of the HCX unit and
displays the configuration data in the two tabs of the dialog
box:
The Main Tab
The Main tab of the Configuration dialog box contains
input options. Its functions are divided into 3 groups:
•
•
•
Breakwire/Analog Input
Data File
Miscellaneous
Page 32
HCX User Manual Version 1.1
Date Printed: 5/30/2008
BreakWire/Analog Input
The BreakWire/Analog Input group tells the flight computer how to use data from the
BreakWire/Analog terminals (TB2 pins 3/4).
Its primary function is to be a mechanical detection for launch when your rocket/motor
combination may be too fast or too slow for the acceleration sensors to confirm launch.
Important: If you are using a break wire to detect the launch, make sure to configure it on
this menu as well as enabling it by putting IN the JP5 jumper.
Alternately, you can use the BreakWire/Analog terminals to record data from a user-provided
3.3v or 5.0v sensor. You can use the data recorded through this port to trigger events. See
Scaling Data from User-Provided Sensors for more information on applications.
Tip: If you are not attaching any wires to the BreakWire/Analog terminal, then it does not
matter which option you check in this group.
Data File
In the Data File group you:
•
•
•
Set the date to be logged when
flight computer saves each
flight file to the Mini-SD card.
Define the maximum size file
to use on the Mini-SD card.
Identify the prefix for your file
names to use on the Mini-SD
card.
File Timestamp
To avoid weight/size penalties, the HCX does not have a real-time clock. If you want to log the
flight date on your flight file, set it here.
File Size
Because the HCX pre-allocates the file before each flight, you must define a maximum file size.
You can set the file size either in bytes or by the number of seconds of data to record. Because
the file will crop to the size at landing you can use the maximum file size without worrying about
running out of space on your Mini-SD card.
While the FlightView program has a limitation on the size of file it can read, the 4 megabyte file
size is still generous. Even at 500 samples per second, FlightView can read a flight lasting at
least twenty minutes. But if you need to record a flight significantly larger than 4 megabyte, you
can still save it in a txt format.
Filename Prefix
When your HCX writes the flight data onto the Mini-SD card it gives it a sequential file name
such as Flt-0001.GWZ. You can change the first four characters of the filename here.
Page 33
HCX User Manual Version 1.1
Date Printed: 5/30/2008
Miscellaneous
The Miscellaneous group is used to:
• Select the sample rate to use during your
flight. You have a choice of six settings:
o 66.67 samples per second.
o 100 samples per second.
o 200 samples per second.
o 250 samples per second.
o 333 samples per second.
o 500 samples per second.
• Choose the measurement system (English or
SI) for the readout at landing.
• Define if you want the maximum speed, in
addition to the maximum altitude, read out
after landing.
The Outputs Tab
The Outputs tab in the Configuration
dialog box allows you to determine
when each output should fire. Because
each port has a specific function, the
window is organized into a separate
group for each port.
•
•
•
•
Pyro 1 is for cluster or upper
stage ignition.
Pyro 2 is for apogee
deployment.
Pyro 3 is for low altitude deployment.
Pyro 4 has multiple uses and is designed for you to configure according to your flight
plan.
Pyro 1 – Cluster/Stage
Pyro Port 1 ignites additional motors. You attach the cluster or staging igniter’s wires to pins 3
and 4 of terminal block 1.
•
•
•
You can ignite a cluster at liftoff (if JP7 is OUT) or stage an additional motor (if JP7 is
IN).
You can add a delay of 0 to 25.0 seconds before triggering the event.
When JP7 is IN, you can also choose which stage (1st, 2nd, or 3rd) you want to fire. The
flight computer identifies how many burnouts have occurred before it fires the stage
event.
Pyro 2 - Apogee
Pyro Port 2 deploys apogee devices. You attach your apogee (either drogue or main chute)
igniter’s wires to pins 5 and 6 of terminal block 1.
Page 34
HCX User Manual Version 1.1
Date Printed: 5/30/2008
• You can specify a delay, just as you can with the pyro 1 port.
• You can configure the flight computer to use either inertial apogee or barometric apogee.
In most situations, inertial apogee is more accurate. However, barometric apogee is useful when
flying strap-on boosters and in other situations where tumbling may occur because tumbling
confuses the inertial apogee algorithm.
If your rocket exceeds the rated acceleration of your flight computer, the HCX will wait until
barometric apogee to activate Pyro Port 2.
If you are using barometric apogee and you expect your rocket to approach or exceed Mach 1,
check the Lockout when airspeed near mach box to prevent the shockwave at mach from
causing deployment while the rocket is still accelerating.
Pyro 3 – Low Altitude
Pyro Port 3 deploys low altitude devices. You attach your low altitude (not always your main
chute) igniter’s wires to pins 7 and 8 of terminal block 1.
•
•
You can deploy your chute when the rocket drops below a preset altitude. You can set the
altitude, in increments of 100, anywhere from 100 to 25,500, feet or meters,
You can deploy your chute at a given time after inertial apogee. This is a special feature
included for the ARLISS flights, but may also be useful to provide two stage deployment
in conditions where the computer cannot be exposed to atmospheric pressure.
Pyro 4 - FlexPort
Pyro Port 4 is user definable. You attach your output wiring to pins 9 and 10 of terminal block 1.
See the Attaching Pyro Devices section of the Basic Setup Procedure for uses of this port.
You can select an event to cause this port to turn on. You can choose the same or a different
event to turn the port off. Delays are possible for both on and off events. Some events may
require additional information, which can also be
supplied. Available events are:
•
•
•
•
•
•
•
•
•
Launch Confirmed
Burnout N (Nth Burnout)
Stage N (Nth acceleration)
Inertial Apogee
Barometric Apogee
Ascending above <Altitude>
Descending below <Altitude>
Landed
Data from a sensor attached to the analog
input
After you upload the new configuration, power
the flight computer off. When you power it back on, you can start using the new configuration.
Page 35
HCX User Manual Version 1.1
Date Printed: 5/30/2008
Bench Testing
The Bench Test menu item will
scan the sensors and ports of your
HCX and then display this dialog
box.
Here you can see the status of the
sensors and the batteries. You can
also see the continuity state of all
the input and output ports. Each
item has a value and a quick
reference indicator light.
• Green is good.
• Red is bad.
• Yellow is questionable.
Continuity on the pyro outputs
reads as Good if the igniter resistance is between 0 and 30 ohms.
Use this program to test electric matches or other output devices. The program allows you to
selectively arm and fire the pyro ports if you want to test battery power or igniters.
If you want to fly a rocket with an external sensor attached to the BreakWire/Analog terminals
(TB2 pins 3/4) you can test it here. You can also get actual readings by running the Test Flight
program described in the next section.
Sensor Self-test Data
Sensor
Nominal Value
Tolerance
Barometer
100 kPa1
kilopascals
+/- 20 kPa
Accelerometer
-1g, 0g, or +1 g
Accelerometer Self Test
HCX/50 HCX/100
HCX/200
12 g
30 g
+/- 2 g
+/- 6 g
Press the Update button to re-read all of the values.
Test Flight
In the upper right corner of the Bench Test dialog box is a button marked Test Flight. The Test
Flight program initiates a simple 2 stage test flight and then follows its progress. This program
will test all the inertial related systems in the computer, except the accelerometer itself, by
feeding simulated acceleration values to the flight computer.
The program behaves as if the data are real. You can attach electric matches or lights to the pyro
ports and watch them activate.
1
The actual value is dependent on weather conditions and the altitude where the test occurs.
Page 36
HCX User Manual Version 1.1
Date Printed: 5/30/2008
To Use the Test Flight Feature
1. From the Bench Test dialog box press the Test Flight button.
2. In the Test Flight dialog box, press the Start button.
3.
4.
5.
6.
7.
o The flight computer will start beeping, as if it were on the pad. It will stop when it
detects launch.
As each portion of the simulated flight completes, its LED will “light” and its name in the
Flight Sequence box will change from shaded to black type.
When the flight sequence is complete, the flight computer’s LED and beeper will read
out the simulated altitude.
Press the Done button to close the Test Flight dialog box.
Disconnect the flight computer from the FlightView program.
Power the flight computer off.
Page 37
HCX User Manual Version 1.1
Date Printed: 5/30/2008
Reading Sensor Statistics
The Sensor Statistics application displays data readings from your flight computer. You can
choose the barometer, accelerometer, batteries, or the analog input and see continuous readings
either as a line graph or a histogram.
Its most valuable application is its ability to create real-time graphs of data from user-provided
sensors you install on the BreakWire/Analog port (TB2 pins 3/4). You can use this to test your
analog sensors before you fly them in your rocket.
Press the Graph button to get a line graph of your chosen sensor’s output value.
• Press the Histogram button to see the data’s variation.
Data shown includes:
•
•
•
Current – The value just read.
Mean – That statistical mean of the last 100 samples.
Std. Dev. – The Standard Deviation of the last 100
samples.
• Std. Variance – The Standard Variance of the last 100
samples.
• ENOB – The Effective Number of Bits. Essentially, a
measure of how clean the data is.
The vertical axis of the graph is the raw ADC (analog to digital conversion) number. The data
will be in the range of 0 to 4095 where 4095 is full voltage. This is proportional to the actual
values you can see in the Bench Test program so these readings are useful to see noise and timedependent changes.
This graph shows the voltage level of a nine volt
battery while the voltage dropped steadily over a
period of nearly four minutes.
Page 38
This is a histogram of the same battery’s voltage.
HCX User Manual Version 1.1
Date Printed: 5/30/2008
Calibrating
Your HCX flight computer is factory calibrated at a
temperature of approximately 20°C (68°F). Unless you
expect to fly at a location where the temperature is radically
different, you do not need to recalibrate your flight
computer.
If you do want to calibrate your flight computer, for
example if you are flying at the Black Rock Desert in July,
connect your flight computer to your personal computer and
select G-Wiz > Calibrate Accelerometer from the main
menu.
•
•
The Calibrate Accelerometer dialog box will appear.
Follow the instructions in the dialog box.
Updating your Firmware
From time to time, we want to add features to our flight computers. Or we may discover a bug in
the HCX firmware. Therefore we designed the HCX flight computer firmware to be customer
upgradeable.
When we have an upgrade, we will make a free download available on our Web site at
http://www.gwiz-partners.com.
To Update your Firmware
1.
2.
3.
4.
5.
6.
7.
8.
Download the ZIP file and un-archive it on to your personal computer.
If necessary, change firmware’s filename extension to .update.
Attach the flight computer to your personal computer and start FlightView.
Select G-Wiz > Connect on the main menu.
Select Update HCX Firmware to display the Open dialog box.
Navigate to and select the .update file
Press Open to start the update process.
Make sure that nothing disturbs either computer during the update process.
o The box in the lower left corner of the main FlightView window will show the
progress of your firmware upload.
o When the upload is complete, you will
see the Upload Successful dialog box:
9. Click OK.
o The flight computer will start beeping and
you will see the progress indicator for the
programming process. When it is
complete you will see the Programming
dialog box.
Page 39
HCX User Manual Version 1.1
Date Printed: 5/30/2008
10. Power cycle the flight computer.
11. Click OK.
12. Detach the flight computer from the interface card.
o Your update is now complete
If for any reason, the update fails, power cycle the HCX, and install the firmware again. In some
cases, when the update is interrupted, the firmware will completely uninstall and the flight
computer will return to the factory state. It will still connect to FlightView, but the only option
you will see on the G-Wiz menu will be to install the firmware.
Caution: If multiple failures occur, report the problem to: [email protected].
Page 40
HCX User Manual Version 1.1
Date Printed: 5/30/2008
Scaling Data from User-Provided Sensors
As mentioned in the Using your Flight Computer chapter, the BreakWire/Analog port has an
alternate function. You can use it to plug in a user-provided sensor.
This feature is designed for advanced users only. Because rocketeers can use so many different
instruments on this input port, this manual does explain how to use the sensors themselves.
These instructions are only intended to explain how the interface works.
Your sensor, which plugs into pins 3 and 4 of terminal block 2, must output in the 0.0 to 5.0 volt
range to be recorded into the flight computer’s memory.
Some examples of auxiliary instruments are:
•
•
•
•
•
Pitot probes.
Temperature sensors.
An additional pressure sensor.
An additional acceleration sensor.
A scientific instrument hitching a ride on the rocket.
Overall Procedure
1. Configure the Breakwire/Analog input port in FlightView.
2. If you will use data from your sensor to generate an event, also configure the FlexPort in
FlightView.
3. Pull the Breakwire Bypass Jumper OUT.
4. Attach your sensor when you set up the flight computer, negative lead to pin 3 and
positive lead to pin 4.
5. Fly and recover your rocket.
6. Download your flight data file from the Mini-SD Card.
7. Scale your flight data.
8. Save your data.
Configuring the HCX to Accept User Data
Note: Connect your flight computer to FlightView to change its configuration.
To Configure the Breakwire/Analog Port in FlightView
1. On the G-Wiz menu, click Configure.
2. On the Main tab of the Configure dialog box, click Analog Input.
3. Select the Record User Input check box.
4. Click the Upload and Exit button.
5. On the menu bar select G-Wiz > Disconnect or click the Connect/Disconnect button.
6. Power off the flight computer and detach it from the interface card.
Page 41
HCX User Manual Version 1.1
Date Printed: 5/30/2008
To Configure the Breakwire/Analog Port and the FlexPort in FlightView
1. On the G-Wiz menu, click,
Configure.
2. In the Configure dialog box, click
on the Main tab.
3. Click Analog Input.
4. Select the Record User Input
checkbox.
5. Select the Generate an Event when
value checkbox.
6. Select the appropriate symbol in the
drop down list to define if you want
the event to trigger when the data:
o Is exactly at the value selected.
o Drops to or below the value
selected.
o Rises above the value selected.
o Is no longer at the value selected
.
7. Type the value at which you want
the event triggered.
o See your sensor’s technical data
for specifications.
8. Click on the Outputs tab.
9. In the Pyro 4 data box, select analog
input in the appropriate On Event
and Off Event lists, to match your
flight plan.
10. Type in any delays or counts as needed.
11. Click Upload and Exit.
12. Disconnect your flight computer from FlightView and power cycle the unit.
To Set Up the Flight Computer for User Data Input
1. Pull the breakwire jumper JP5 OUT.
2. Attach the positive sensor output wire to the positive BreakWire/Analog terminal (TB2
pin 4).
3. Attach the negative sensor output wire to the negative BreakWire/Analog terminal (TB2
pin 3).
4. Install everything else per your flight plan.
To Test your Sensor
If you want to do a test run of the sensor, set up the flight computer and connect it to your
personal computer.
•
The Bench Test application shows continuity and voltage status for your installed sensor.
Page 42
HCX User Manual Version 1.1
Date Printed: 5/30/2008
•
The Test Flight application runs a simulated flight where it records the data produced by
your sensor and fires any events generated by your sensor.
• The Sensor Statistics application shows a live data feed from your sensor.
For more information, see the Reading Sensor Statistics and Bench Testing sections in this
manual.
Retrieving and Scaling your Sensor Data
Note: The examples shown here were created with a variable resistor on the input port.
To Download and Scale your Flight Data
1. Put the Mini-SD memory card into your personal computer.
2. Start FlightView.
3. Open your flight file. There is a new tab on the window: Unknown (Chan2).
4. Click on the tab. You see no (or worse erroneous) scale or units for the data.
5. Click G-Wiz > User Data Scaling.
o The Edit Sensor Data dialog box appears.
6. Select a name for your data.
7. Fill in the specifications on your sensor from its manufacturer spec sheets.
o For example, the sensitivity of my variable resistor is 1000mV/unit (Volt).
Page 43
HCX User Manual Version 1.1
Date Printed: 5/30/2008
8. Click OK to close the dialog box and save your changes.
9. In the flight data window, note that the tab now has the name you gave it in the Edit
Sensor Data dialog box.
10. Click on the tab to see a graph of your data.
11. Save the data onto your personal computer by clicking on File > Save As.
12. You can also save your flight data in txt, csv, or xml formats for additional analysis.
Page 44
HCX User Manual Version 1.1
Date Printed: 5/30/2008
Appendix A
Product Specifications
Parameter
Maximum acceleration
Maximum inertial altitude (32-bit math)
Maximum barometric altitude
HCX-50G
HCX-100G
HCX-200G
+/- 56 G
+/- 112 G
100K+ feet MSL2
70K feet MSL
+/- 225 G
(Limited by sensor linearity)
Number of pyro channels
Maximum continuous current
Four
8 Amps
(Per pyro channel)
Number of batteries required
Recommended computer battery
Maximum voltage applied to computer
battery input terminals (TB 2 pins 5/6)
Computer current consumption
Maximum voltage applied to pyro
battery input terminals (TB 1 pins 1/2)
Pyro channel test current (9VDC battery)
Pyro channel firing time
Pyro channel functions
One or Two (We strongly recommend using 2 batteries)
9 VDC transistor battery (Duracell MN1604)
12 VDC
Low altitude pyro channel activation
ADC resolution
Analog input channel:
range / resolution
Breakwire input switch requirements
Sensor sample rate
Altitude readout
Programmable (Default is 800 feet)
12-bits or 1.22 mV/bit
Input range = 0 to 5.0 VDC
Resolution = 12-bits or 1.22 mV/bit
Closed – to – open signals launch
Selectable – 66.67 to 500 samples per second
Status LED and acoustic beeper
User field interface
1 status LED
1 beeper
Limited only by the size, in MB or GB, of the MiniSD card used (2Gigabyte Maximum card size)
TTL/CMOS serial
65mA typical at idle
15 VDC
3.5mA
Programmable
1: Stage/cluster
2: Apogee parachute deployment (typical)
3: Low altitude parachute deployment (typical)
4: User selectable/programmable (FlexPort)
(Reads out barometric altitude)
Data recording depth
Host computer interface
(Use the G-Wiz USB or RS 232 adapter to interface to a host
computer)
Main battery life
6 hours (typical)
(With separate pyro battery)
Weight (typical)
Operating temperature range
45 g
51 g
51 g
0-85°C
2
Flights over 25,000 feet MSL require HCX to be coated with a special epoxy layer. The coating protects the circuit board and
components from condensation moisture damage. This also insures proper electrical operation of HCX. Please contact G-Wiz
Partners for special order options.
Page 45
HCX User Manual Version 1.1
Date Printed: 5/30/2008
Appendix B
Flight Computer Status Codes
Normal Status Code
1.
2.
3.
4.
The LED turns on then off.
The LED turns on and the beeper gives one (JP7 OUT) or two (JP7 IN) low pitch beeps.
LED turns off and the sequence pauses for a half second.
Starting with Pyro Port 1, each pyro port reports status, with a single quick “beep” for good
continuity or a double “beep” for incomplete continuity.
5. The sequence repeats from step 2 after a one second pause.
Non-Fatal Error Status Codes
Low Battery
1.
2.
3.
4.
5.
The LED turns on then off.
The LED turns on and the beeper gives one (JP7 OUT) or two (JP7 IN) low pitch beeps.
After a half second pause, the beeper gives a short warble.
LED turns off and the sequence pauses for a half second
Starting with Pyro Port 1, each pyro port reports status, with a single quick “beep” for good
continuity or a double “beep” for incomplete continuity.
6. The sequence repeats from step 2 after a one second pause.
SD Card is Unplugged
1. The LED turns on then off.
2. The beeper gives a long, high pitch beep, then a long, low pitch beep.
3. After a 3/4 second delay, the normal status code starts.
Fatal Error Status Codes
Break Wire Error
The unit is configured for a breakwire launch but the break wire is not attached.
1. Short warble.
2. The sequence repeats after a 1 second pause.
Caution: If you hear this sequence, you will not be able fly your rocket until the error is
corrected. Power the unit off before correcting. See the Testing the Setup section of the Using
your Flight Computer chapter for correction instructions.
Power-On Self-Test Failure (POST Failure)
1. The beeper gives a long warble.
2. After 1/2 second delay, the beeper gives a series of beeps (up to 7 beeps) identifying the failure.
o For 1 to 4 beeps see the Hardware Error chart.
o For 5 beeps, there will be an additional set of low pitch beeps. See the Initialization
Error chart.
o For 6 beeps, there will be an additional set of low pitch beeps. See the File Creation
Error chart.
Page 46
HCX User Manual Version 1.1
Date Printed: 5/30/2008
o For 7 beeps, the Mini-SD card is full.
3. The sequence repeats after a 1 second pause.
POST Failure Code Lookup Charts
Hardware Error Chart - First Set of Beeps (High Pitch)
Beep Code
Problem
Solution
1 beep
Failure reading configuration from
EEPROM
Do not fly – Contact G-Wiz
2 beeps
Sensors reading out of range
Do not fly – Contact G-Wiz
3 beeps
Accelerometer self-test failure
Do not fly – Contact G-Wiz
4 beeps
Accelerometer status failure
Do not fly – Contact G-Wiz
5 beeps
SD Card initialization error – Secondary
code will beep.
Count the low pitched beeps and refer to the
Initialization Error chart.
6 beeps
SD file-creation error – Secondary code
will beep.
Count the low pitched beeps and refer to the
File Creation Error chart.
7 beeps
SD file-creation error
Not enough space. Reformat/replace card.
Card Initialization Error Chart – Second Set- Block 1 (Low Pitch)
Beep Code
Problem
Solution
1 beep
Failure to reset card.
Reformat or replace card.
2 beeps
Failure to initialize card.
Reformat or replace card.
3 beeps
Wrong file system on card.
Reformat card as FAT or FAT32.
4 beeps
SD card read error.
Replace card.
5 beeps
SD card not FAT formatted.
Reformat card as FAT or FAT32.
6 beeps
SD card partition table bad.
Reformat card as FAT or FAT32.
7 beeps
SD card partition not right type.
Reformat card as FAT or FAT32.
8 beeps
SD card read error.
Replace card.
9 beeps
SD card not properly formatted.
Reformat card as FAT or FAT32.
10 beeps
SD card, bad sector size.
Reformat card with 512 byte sectors.
11 beeps
SD card formatted as FAT12.
Unsupported format – Reformat as FAT or
FAT32.
Card File Creation Error Chart – Second Set-Block 2 (Low pitch)
Beep Code
Problem
Solution
1 beep
File creation error 1.
Do not fly – Contact G-Wiz.
2 beeps
SD card full.
Reformat or replace card.
3 beeps
SD card write error.
Replace card.
4 beeps
SD card directory error.
Replace card.
Unless the failure is due to a SD card problem that can be remedied by changing cards, POST
failures should be reported to G-Wiz Support ([email protected]). Do not fly the unit
until the failure is repaired.
Page 47
HCX User Manual Version 1.1
Appendix C
Mechanical Drawing
Page 48
Date Printed: 5/30/2008
HCX User Manual Version 1.1
Date Printed: 5/30/2008
Appendix D
Technical Data
Analyzing Raw Data from the Flight Computer
2048,3234,0
2048,3233,0
2048,3232,0
2048,3233,0
2048,3233,0
2048,3234,0
2048,3234,0
2048,3234,0
2048,3234,0
2048,3233,0
2048,3232,0
2305,3233,0, Movement(1)
2305,3233,0
2305,3233,0
2305,3234,0
2305,3234,0
2305,3233,0
In addition to graphing your flight data in FlightView,
you can save it in txt, csv, or xml formats for
analysis with other programs.
For a discussion on how this data is used, see the article
How Flight Computers Work on our website at:
http://www.gwiz-partners.com/Flight_Computers.pdf.
A snippet of a flight data file in csv (comma separated
value) format is shown in the box. The first number is the
accelerometer reading and the second is the barometer
reading. If you have installed a user-provided sensor, its
data will be the third number. The final item will show if
a status change such as launch detection or a pyro port
action occurs during the measurement interval.
Each row of data is a single sample in chronological
order based on the sample rate you configured before the
flight.
For Example: At a sample rate of 500 samples per
second, this data shows movement 0.024 seconds
(12/500) after the flight computer started recording.
Reading the Accelerometer Data
These are the raw decimal sensor readings and need to be converted back into the appropriate
numerical values using the specifications of the sensors in your HCX model.
The acceleration data in column 1 is output in the range of 0 to 4095 based on a twelve-bit
analog to digital converter (ADC). 0 is your maximum negative acceleration, 4095 is your
maximum positive acceleration, and 1G (absolute) is approximately 2048.
The core information for converting the readings is listed in the table below.
Accelerometer Specifications
Processor
Full Scale Range
Full Scale Span
Sensitivity
Offset (0G)
HCX 50
HCX 100
HCX 200
MMA 2202
+/-56G
4.48v
40mV/G
2.5v Nominal (2.35v2.65v)
MMA2204
+/-112G
4.48v
20mV/G
2.5v Nominal (2.35v2.65v)
MMA2301
+/-225G
4.50v
10mV/G
2.5v Nominal (2.40v2.60v)
For more information on the accelerometers, see the manufacturer’s web site at
www.freescale.com.
Page 49
HCX User Manual Version 1.1
Date Printed: 5/30/2008
To get G values, you need to reverse the process. First, take the digital number and convert it
back to the voltage as output by the accelerometer.
number − stationarynumber
* 4.48 = voltage
4096
Then divide the voltage by the sensitivity:
(voltage) / .04 v − = acceleration
G
Reading the Barometer Data
The barometric pressure data in column 2 is also in the range 0 to 4095 (12 bits). This represents
pressure data from 0 to 100 kPa (approximately 0 to14 psi). The sensor used here is the
MPX2102A by Motorola, connected to a low-noise op-amp.
Pressure readings start high, and decrease as your altitude increases.
Because this is a millivolt output sensor, the data is amplified by 201 times before being sent to
the ADC.
Barometer Specifications MPX2102A
Specification
Before Amplification
After Amplification
Full scale range
Full scale span
Offset
Sensitivity (sensor)
0kPa – 100kPa
20mV
0
.2 mV/kPa
0kPa – 100kPa
4.03V
1.0 mV
40.28 mV/kPa
Voltage before amplification:
number − stationarynumber
* 20mV = voltage
4096
Voltage after amplification:
number − stationarynumber
* 4.03V = ampVoltage
4096
Divide the voltage by the sensitivity.
(ampvoltage) / 40.28 mV
kPA
− = pressureDifference
The Events
As events occur, they are listed in Column 3. If an event happened in a measurement interval,
this column will show the appropriate keyword. Most of the events are self-describing and are
listed in the xml file below.
Page 50
HCX User Manual Version 1.1
Date Printed: 5/30/2008
Exported Data in XML Format
The xml data file has two main differences from the txt file. First, all of the specific sensor
data is included in the file. The other difference is the A to D conversion reads out in
hexadecimal. This is a section of the same flight as the data above.
<?xml version="1.0" encoding="UTF-8" standalone="no"?>
<flight>
<computer>
<manufacturer url="http://www.gwiz-partners.com">G-Wiz
Partners</manufacturer>
<model>hcx/50</model>
<version>1.13</version>
<sensors accel-index="0" baro-index="1">
<sensor index="0" name="Unknown">
<type>accel</type>
<units>Gs</units>
<min>-56.0</min>
<max>56.0</max>
<offset>2.5</offset>
<sensitivity>0.04</sensitivity>
<sample-size>12</sample-size>
</sensor>
<raw-data index="0" radix="16" sample-rate=”500”>
817,818,819,818,817,817,816,817,818,816,816,816,816,813,82e,914,8
41,867,865,85b,85e,864,862,... 7f9,7f9,7fa,7f9,7f9,0,0</raw-data>
<sensor index="1" name="Unknown">
<type>static</type>
<units>kPa</units>
<min>0.0</min>
<max>100.0</max>
<offset>0.025</offset>
<sensitivity>0.04028</sensitivity>
<sample-size>12</sample-size>
</sensor>
<raw-data index="1" radix="16" sample-rate="500">d47,d47,
d47,d47,d47,d47,d47,d47,d47,…,d47,d4,d48,d48,d48,d48,0</raw-data>
<events>
<event data="0" index="17" name="Movement"/>
<event data="0" index="117" name="Launch"/>
<event data="1" index="1504" name="Burnout"/>
<event data="0" index="1504" name="PyroOn"/>
<event data="0" index="2039" name="PyroOff"/>
<event data="0" index="7269" name="Apogee"/>
<event data="1" index="7269" name="PyroOn"/>
<event data="1" index="7796" name="PyroOff"/>
<event data="0" index="22484" name="AltDn"/>
<event data="2" index="22484" name="PyroOn"/>
<event data="2" index="22997" name="PyroOff"/>
<event data="1" index="56082" name="AltDn"/>
<event data="3" index="56082" name="PyroOn"/>
</events>
Page 51
HCX User Manual Version 1.1
Date Printed: 5/30/2008
</sensors>
</computer>
<notes date="Jan 21, 2008" id="FLT:4">
<location>TCC</location>
<rocket diameter="4" length="96" name="Insanity" weight="16.2">
<motors>J415</motors>
</rocket>
<note>HCx electronics flown as primary on this flight. MC as
backup and an LCx just along for a ride.</note>
</notes>
<calibration>
<accel accel-mult="1" minus-g="33.05859375" offset="65425"
one-g="34.796875" zero-g="7.953125"/>
</calibration>
<config>
<flags/>
<actions>
<pyro-port index="1">
<continuity value="bad"/>
<event name="burnout" on="100.0" value="1"/>
</pyro-port>
<pyro-port index="2">
<continuity value="good"/>
<event name="intertial-apogee" on="100.0"/>
</pyro-port>
<pyro-port index="3">
<continuity value="bad"/>
<event name="altitude-descending" on="100.0" value="1200"/>
</pyro-port>
<pyro-port index="4" value="on">
<continuity value="bad"/>
<event name="altitude-descending" value="100"/>
</pyro-port>
<pyro-port index="4" value="off">
<event delay="100.0" name="landing" value="0"/>
</pyro-port>
</actions>
<battery name="cpu" value="8.38157958984375"/>
<battery name="pyro" value="5.3839599609375"/>
</config>
<summary max-accel="216" max-altitude="3030" max-speed="439"/>
<preflight>
<base-accel value="2072"/>
<base-accel value="3399"/>
</preflight>
</flight>
Page 52
HCX User Manual Version 1.1
Date Printed: 5/30/2008
Appendix E
Installing USB Drivers on Macintosh
Installing the USB drivers on older Macintosh operating systems is more complex than the
simple plug-and-play you get with operating systems of 10.3 and later.
To Install the USB Drivers on a Macintosh 10.2 and Earlier
1. Log onto your computer as an administrator.
2. Unless you have FlightView 2.8 or later, remove all older copies and install the latest
version from our web-site at www.gwiz-partners.com.
3. Open the folder where FlightView was installed.
o This is usually Applications/GwizViewer.
4. Double-click the package icon named FTDIUSBSerialDriver.
5. In your Utilities folder, open the Terminal program.
6. At the prompt, type: cd /Library/StartupItems/FTDIReEnumerate and press
RETURN.
7. Type sudo pico FTDIReEnumerate and press RETURN.
8. Type in your administrator password when requested by the system.
9. Find this line in the terminal editor window:
/Library/StartupItems/FTDIReEnumerate/ReEnumerate –v0403 –p6001
10. Replace it with these two lines:
/Library/StartupItems/FTDIReEnumerate/ReEnumerate –v0403 –pEE18
/Library/StartupItems/FTDIReEnumerate/ReEnumerate –v0403 –pDA38
11. Save the file.
12. Exit the editor.
13. Exit Terminal.
14. Restart the Macintosh.
o When you open FlightView you will see the available serial port installed by the USB
driver.
Your computer is now ready to connect to your G-Wiz HCX flight computer through the G-Wiz
USB Interface Card
Page 53
HCX User Manual Version 1.1
Date Printed: 5/30/2008
Appendix F
Installing USB Drivers on XP
Because installing our drivers on Windows XP is more
complex than on the older Windows operating systems,
here is a guided tour.
1. Log into your PC as an administrator before
attaching the interface card to your PC for the
first time.
2. Install FlightView.
3. Attach the USB interface card to your PC.
o Windows XP will display the Found New
Hardware dialog box.
4. Select No, not this time, and click Next.
o Windows XP will now ask where to find
drivers.
5. Select Install from a list or specific location
(Advanced), and click Next.
o Windows will now display the Please
choose your search and installation
options dialog box.
6. Select the Search for the best driver in these
locations option.
7. De-select the Search removable media
checkbox.
8. Click the Include this location in the search
checkbox.
9. In the edit field, navigate to the directory where
you installed FlightView, and then to the
usbDrivers directory under it.
o The location shown here is the default
installation directory, if you installed
FlightView at C:\Program Files.
10. Click Next.
o Windows XP will display the Hardware Installation
dialog box
11. Press the Continue Anyway button.
12. Repeat steps 3 through 11 for the second driver.
13. Start FlightView and look for the most recently installed
COM port.
14. Select it.
Your computer is now ready to connect to your G-Wiz HCX flight computer through the G-Wiz
USB Interface Card.
Page 54
HCX User Manual Version 1.1
Date Printed: 5/30/2008
Appendix G
Installing USB Drivers on Vista
When you install our drivers, Windows Vista has an even more complex process than XP.
Mainly this is because Microsoft is trying to make the process totally invisible to the user.
Therefore, if you have anything unusual about an
installation, Windows gets confused. This is a step by step
tour of the process.
1. Log into your PC as an Administrator before
attaching the interface card for the first time.
2. Attach your USB interface card and cable to your
PC.
o Windows Vista will display the Found New
Hardware dialog box.
3. Select Locate and install driver software.
o If you select Ask me again later, the installation will stop. To restart the installation
process, unplug the USB card and
then plug it back in.
o Windows will start by looking for
drivers in Windows Update.
There is no way to tell Windows
not to do so. If you click on the
Device Installation icon in the
notification area of the taskbar you will
see the progress dialog box.
4. Do not close the Progress dialog box!
o After searching for a few minutes,
Windows will ask you for a CD
containing the drivers.
5. Click I don’t have the disc. Show me
other options.
o Windows will ask where to look
for the drivers
Page 55
HCX User Manual Version 1.1
Date Printed: 5/30/2008
6. Click Browse my computer for driver
software (advanced).
o Windows opens a Browse for dialog
box.
7. Navigate to the directory where you
installed FlightView.
8. Select the usbDrivers directory.
9. Click Next.
o Windows Vista will start to install the
drivers.
o Windows will display a Windows
Security dialog box.
10. Click Install this driver software
anyway.
o When Windows tells you it has
finished installing the drivers for the
G-Wiz USB Interface Card, it will
tell you it has found a second device
that needs a driver.
11. Repeat steps 3 to 10 for the second
driver.
12. Start FlightView and look for the most
recently installed COM port.
13. Select it.
Your computer is now ready to connect to your G-Wiz HCX flight computer through the G-Wiz
USB Interface Card
Page 56
HCX User Manual Version 1.1
Date Printed: 5/30/2008
List of Procedures
To Set Up the On-Board Hardware............................................................................................................... 7
To Attach Devices to the Terminal Blocks................................................................................................... 7
To Test the Setup .......................................................................................................................................... 8
To Change Configuration Settings................................................................................................................ 8
To Enable the Flight Computer for High Current Use................................................................................ 11
To Enable the Flight Computer for Low Current Use ................................................................................ 11
To Enable the Flight Computer for Cluster Ignition................................................................................... 11
To Enable the Flight Computer for Staged Ignition.................................................................................... 11
To Enable the Flight Computer for a Breakwire Launch............................................................................ 12
To Enable the Flight Computer to Accept Analog Input ............................................................................ 12
To Attach Power Wires If You are Using a Single Battery ........................................................................ 13
To Attach Power Wires If You are Using Two Batteries ........................................................................... 13
To Set Up the External Safety Shunt .......................................................................................................... 14
To Set Up for a Breakwire Launch ............................................................................................................. 14
To Attach a User-Provided Sensor on the BreakWire/Analog Inputs ........................................................ 15
To Correct the Setup, If You Want a Breakwire Flight .............................................................................. 16
To Correct the Setup, If the Breakwire Mode was Configured by Mistake................................................ 16
To Set the FlightView Program Preferences............................................................................................... 20
To Read Your Flight Data from the Mini-SD Card .................................................................................... 23
To Read a Previously Saved Flight Data File ............................................................................................. 23
To Save your Data Files.............................................................................................................................. 27
To Install the G-Wiz USB Interface Drivers .............................................................................................. 28
To Connect with the G-Wiz USB Interface Card after Your Drivers have been Installed ......................... 29
To Connect with the G-Wiz RS-232 Serial Interface Card......................................................................... 29
To Disconnect your HCX Flight Computer ................................................................................................ 31
To Configure the Flight Computer.............................................................................................................. 32
To Use the Test Flight Feature.................................................................................................................... 37
To Update your Firmware........................................................................................................................... 39
To Configure the Breakwire/Analog Port in FlightView............................................................................ 41
To Configure the Breakwire/Analog Port and the FlexPort in FlightView ................................................ 42
To Set Up the Flight Computer for User Data Input................................................................................... 42
To Test your Sensor .................................................................................................................................... 42
To Download and Scale your Flight Data................................................................................................... 43
To Install the USB Drivers on a Macintosh 10.2 and Earlier ..................................................................... 53
If, after reading this manual, you have any questions or problems with either your flight
computer or the FlightView software, please visit us on the web at: http://www.gwizpartners.com. We maintain an FAQ on our web site. In addition, the latest versions of both
FlightView and the HCX Firmware are posted there for download.
You can email us at:
G-Wiz Partners
PO Box 320103
[email protected]
Los Gatos, CA 95032-0101.
Or write us at:
Page 57