1
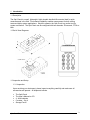
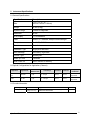
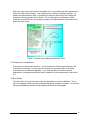
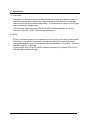
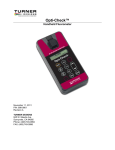
Opti-Check™
Handheld Fluorometer
November 11, 2011
P/N: 998-0861
Revision A
TURNER DESIGNS
845 W. Maude Ave.
Sunnyvale, CA 94085
Phone: (408) 749-0994
FAX: (408) 749-0998
Distributed by;
Advantage Controls (Europe) Ltd
Unit 4 Ground Floor Offices
The Towers, Foley Business Park
Foley Avenue, Kidderminster
Worcestershire, DY11 7PG
United Kingdom
Phone: 01562 743656
Web: www.advantagecontrols.co.uk
Email: [email protected]
Table of Contents
1.
2.
3.
4
5
6
7.
Introduction
1.1
Description
1.2
Quick View Diagram
1.3
Inspection and Setup
1.4
General Information, Precautions & Cleaning
3
3
3
4
Instrument Specifications
2.1
General Specifications
2.2
Optical Configurations for Applications
2.3
Cuvette Information
5
5
5
Instrument Operation and Calibration
3.1
Instrument Power Up
3.2
Detection Channel Configuration
3.3
Calibration Overview
3.4
Calibration Procedure
3.5
Sample Analysis
3.6
Diagnostic Information
6
6
6
7
8
8
Sample Analysis Guidelines
4.1
Handling Samples
4.2
Positioning Samples
4.3
Linear Range and Quenching
4.4
Temperature Considerations
4.5
Data Quality
9
9
9
10
10
Applications
5.1
Fluorescein
5.2
PTSA
11
11
Quick Diagnosis Guides
6.1
Power / Battery / Screen Issues
6.2
Reading and Calibration Issues
12
13
Warranty
7.1
Terms
7.2
Warranty Service
7.3
Out of Warranty Service
14
14
15
Opti-Check™ User’s Manual
2
1
Introduction
1.1 Description
The Opti-Check is a small, lightweight, highly durable handheld fluorometer ideal for quick
measurements in the field. Dual-channel capability enables measurement for both cooling
tower and boiler system applications. Simple to operate, the Opti-Check is a perfect tool for
system verification. The Opti-Check can be configured with two channels: Fluorescein, PTSA or
both.
1.2 Quick View Diagrams
1.3 Inspection and Setup
1.3.1 Inspection
Upon receiving your instrument, please inspect everything carefully and make sure all
accessories are present. All shipments include:
•
•
•
•
•
The Opti-Check
The User’s Manual on CD
4 - AAA batteries
Cuvettes – Qty 4
Storage Pouch
Opti-Check™ User’s Manual
3
1.3.2 Setup
Before the Opti-Check can be used, the supplied batteries must be installed.
1. On the back side of the instrument, remove the battery panel by loosening the center
screw and then gently pulling on the screw. There is some resistance due to the o-ring
which is used for watertight sealing (see Section 1.2 for diagram).
2. Install the 4 - AAA batteries and verify the batteries are positioned correctly.
3. Replace the battery panel and press it down into position.
4. Hold the battery panel down in place and gently tighten the screw until it is snug.
Do not over tighten the screw.
Note: If the battery panel is very difficult to press down or remove, you can apply a small
amount of silicon-based grease to lubricate the o-ring as needed.
1.4 General Information, Precautions and Cleaning
•
•
•
•
•
•
•
The sample compartment cannot accept 10 mm square cuvettes because the cuvette
wall thickness exceeds the 12 mm maximum outer dimension that the Opti-Check can
accept. The 10 mm size is the internal dimension of the cuvette and some plastic
cuvettes may be too large.
Do not force oversized cuvettes into the sample compartment. This can damage the
sample compartment. If the cuvette does not easily fit down inside the Opti-Check you
will need to purchase different cuvettes.
Use caution around solvents because they may attack the plastic case of the OptiCheck.
If a sample is accidentally spilled inside the Sample Compartment, invert the Opti-Check
to drain out the excess liquid. Then wipe the inside area dry with a clean soft towel or
tissue.
If extra cleaning is needed, use a mild detergent to dampen the towel for cleaning.
Do not submerge the Opti-Check in water.
Do not expose the Opti-Check to temperatures outside the specified range of
5 to 40 °C or damage may occur to the unit that will not be covered under warranty.
Opti-Check™ User’s Manual
4
2
Instrument Specifications
2.1 General Specifications
Specification
Description
Size
1.75” x 3.5” x 7.25”
(4.45cm x 8.9cm x 18.4cm)
Weight
13.9oz (0.4kg)
Dynamic range
3 orders of magnitude
Resolution
12 bits
LCD Display
2 x 16 characters
Case
Meets IP 67 Standard; dustproof and watertight
Temperature
41-104 °F; 5-40 °C
Detector
Photodiode
Calibration Type
Single-point and blank
Error message
Low battery, High blank
Cuvette Type
Methacrylate
Warm Up Time
5 seconds
Auto Power Off
After 3 minutes of inactivity
2.2 Optical Configurations for Application (Channel)
Application
Light Source
Minimum
Detection Limit
Linear Range
Excitation
Emission
Temperature
Coefficients
Fluorescein
Dye
Blue LED
< 1 ppb
0 - 400 ppb
485 nm
540 nm
0.0036/°C
Exponential
PTSA
UV LED
< 1 ppb
0 – 1000 ppb
365 nm
400 nm
-0.00126/°C
Exponential
2.3 Cuvette information
Cuvette type
Size
Usage
Part No.
Methacrylate plastic
10 mm Square
(height 44.5 mm)
Required for UV (< 400 nm), works for all applications.
Do NOT use with solvents
7000-959
Opti-Check™ User’s Manual
5
3
Instrument Operation and Calibration
3.1 Instrument Power Up
To turn on the Opti-Check, press the <ON/OFF> button. After a 5 second warm up, the
Opti-Check is ready for operation.
Pressing the <ON/OFF> button again will turn the unit off or if left idle for 3 minutes the unit
will turn itself off to save battery power.
A set of new batteries will last for over 1,000 sample readings. If the batteries have low
power or are not positioned properly, the following warning message will be displayed –
“Batt Level < 20% !! Caution !!”.
The contrast of the display can change with temperature and will get lighter as the unit gets
colder. The contrast can be easily adjusted. Press the ↑ arrow button to darken the
contrast and press the ↓ arrow to lighten the display contrast.
3.2 Detection Channel Configuration
The Opti-Check can be configured with one or two optical channels. To identify the
configuration look at the label on the back side of the Opti-Check.
The <A/B> button allows the user to toggle between the 2 channels. The display will show a
label in the lower left corner of the Home screen to identify which channel is activated.
3.3 Calibration Overview
The Opti-Check can be calibrated using a Primary standard. A Primary Standard is one that
contains the same fluorescent material that you are measuring in your unknown samples.
The Opti-Check will give an actual quantitative concentration reading when a primary
standard of known concentration is used for calibration.
The standard and samples must be in the linear detection range to get accurate quantitative
results. Refer to Section 5.3 for more details about the linear range and quenching of the
samples.
For Dye tracing applications the calibration is normally performed with a primary standard
made from the same dye that is being used for the testing. The primary standard will either
be made to a known concentration, typically in ppb or µg/L units, or to a known dilution
factor. Ideally the Primary Standard and Blank samples used for calibrating will be made
with the same water the tests are being performed in.
Opti-Check™ User’s Manual
6
3.4 Calibration Procedure
It is recommended for best accuracy, that you always calibrate before performing your
sample analysis. The Opti-Check will save the calibration settings for each channel until a
new calibration is performed.
If the temperature of your samples or the Opti-Check changes significantly, the readings
may show a small shift and in this case, you should consider recalibrating.
The Opti-Check is designed with “ambient light rejection”. The black sample compartment
cover does NOT need to be closed when calibrating or reading samples.
The orientation and cleanliness of the cuvettes can have an impact on the accuracy of your
results. Refer to Section 4, Sample Analysis Guidelines for information to help ensure the
best results for your analysis.
3.4.1 Assign a Calibration Standard Value.
This defines the numeric value that you want the standard to read. For example, if you
calibrate with a primary standard that has a concentration of 100ppb, then you will set
the value to 100 and the implied unit of measure will be in ppb.
3.4.1.1 Press the <STD VAL> button.
3.4.1.2 Use the ↑ and ↓ arrow buttons to set the standard value. Pressing the arrow
button once quickly will make a small incremental change to the value. Holding
either arrow button will allow you to change the value using fast scrolling.
3.4.1.3 When finished, Press the <ENT> or <ESC> button to accept the value and to
return to the Home screen.
3.4.2 Perform the Calibration.
3.4.2.1 Press the <CAL> button.
3.4.2.1 Press <ENT> to start the calibration.
3.4.2.3 Insert your blank sample and press <ENT>. The Opti-Check will average the
reading for 10 seconds and set the blanking zero point.
3.4.2.4 Insert the standard sample and press <ENT>. The reading is averaged for 10
seconds and the Standard Calibration value is set.
3.4.2.5 Press <ENT> when the calibration is complete to accept the calibration. If
<ENT> is not pressed within 10 seconds, you will be asked if you want to abort
the calibration. Press the ↑ or ↓ arrow button to abort or accept the calibration
respectively.
If at anytime during steps 1-4 you want to stop the calibration, press <ESC>.
This will return you to the Home screen and will default the instrument to the
previous calibration.
Opti-Check™ User’s Manual
7
3.4.3 Calibration Check
Once the Opti-Check calibration is accepted, press the <DIAG> button to see what
your standard to blank ratio is. The standard to blank ratio is defined as the %FS
blank as compared to the %FS standard. The %FS signal should be at least 5 times
larger than the %FS Blank. It should be between 5 and 30.
• If your %FS std:%FS blk ratio is greater than 30, dilute your Calibration
Standard accordingly and recalibrate. Check the ratio again.
• If your ratio is less than 5 you'll have to find a different standard for calibration.
• If your ratio falls between 5 and 30 after the initial calibration then you can start
measuring samples.
3.5
Sample Analysis
1. Insert your sample. The Opti-Check is designed with “ambient light rejection”. The
black sample compartment cover does NOT need to be closed when reading samples.
The orientation and cleanliness of the cuvettes can have an impact on the accuracy of
your results. Refer to Section 5 for more details.
2. Press the <READ> button. The instrument will measure and average the fluorescence
signal for 5 seconds.
3. The reading result will be displayed on the top line of the Home screen.
4. The top left corner will then display “WAIT” for 5 seconds. Once “WAIT” disappears,
another sample reading can be performed.
3.6
Diagnostic Information
1. Press <DIAG> to access the diagnostic screens.
2. Press <ENT> to toggle to the %FS (Full Scale) values for the blank (Blk) and standard
(STD) calibration points. The STD value should be at least 5 times larger than the Blk
value to ensure consistent results. This is often referred to as the Standard to Blank
Ratio.
3. Press <ESC> when finished to return to the Home screen.
Opti-Check™ User’s Manual
8
4
Sample Analysis Guidelines
4.1 Handling Samples
4.1.1
Take care not to spill samples into the sample chamber. Wipe up any spills
promptly.
4.1.2
The cuvette MUST BE DRY on the outside when taking readings. Any moisture or
condensation on the outside of the cuvette can affect the reading.
4.1.3
Fill the cuvette with at least 2mL solution volume or at least 2/3 full. Significant error
in the readings can result if the cuvette contains less than this minimum volume.
4.1.4
The Opti-Check is very sensitive and even small amounts of material from a previous
sample may contaminate the sample and result in errors. Use a clean cuvette for all
readings. If you are using the same cuvette for your samples it is very important that
you thoroughly clean the cuvette between samples. A good way to confirm the
cuvette cleanliness is to read a blank solution. If the reading is higher than the
normal blank reading, the cuvette is not clean.
4.1.5
Any bubbles in the sample will affect the readings. Take care not to introduce
bubbles into samples. Remove any bubbles by lightly tapping with your finger on the
outside cuvette wall or cover the top of the cuvette and tilt the sample to help
dissipate bubbles.
4.2 Positioning Samples
The orientation of the cuvette in the sample compartment can give slightly different readings
especially for low concentration samples. This is due to variations in the walls of the cuvette
that are not readily visible to the eye. We recommend that the cuvette be marked at the top
on one side and positioned in the sample compartment the same way each time for best
results.
4.3 Linear Range and Quenching
The linear range is the concentration range in which the readout of the Opti-Check is directly
proportional to the concentration of the fluorophore in the sample. The linear range begins
with the lowest detectable concentration and spans to an upper limit concentration that is
dependent on the properties of the fluorescent material and the cuvette optical path length.
For Fluorescein dye in the 10 mm square cuvette, the upper limit of linearity is approximately
400 ppb.
At concentrations above this upper limit, the fluorescence reading will not increase at a
linear rate in comparison to the change in concentration. At concentrations 10 times higher
than the upper limit, the readings will start to decrease even though the sample
concentration is increasing.
This effect is known as "sample quenching" and is due to light absorption losses in the
sample. See the Figure 1 graph below.
Opti-Check™ User’s Manual
9
When you start to see visual color in the sample, this is an indicator that the sample may be
above the upper limit of linearity. The linearity can be verified by diluting a sample 1:1 or
another convenient dilution ratio. If the sample is within the linear range, the reading will
decrease in direct proportion to the dilution. If the reading does not decrease in direct
proportion to the dilution or if the reading increases, the original sample concentration was
above the linear range.
Figure 1. Linearity and Calibration Response Curve
4.4 Temperature Considerations
Fluorescence is temperature sensitive. As the temperature of the sample increases, the
fluorescence decreases. For best accuracy make sure your samples are at the same
temperature as the calibration standard. If you have the ability to measure sample
temperature, a temperature coefficient may be applied to your measurements, see section
2.2.
4.5 Data Quality
The Opti-Check is only as accurate as the standards that are used to calibrate it. This is
why it is important to take care when preparing standards, samples, and blank. One should
follow good laboratory practices when preparing all solutions and samples.
Opti-Check™ User’s Manual
10
5
Applications
5.1 Fluorescein
Fluorescein is a fluorescent tracer dye that provides an accurate, cost effective method for
monitoring industrial boiler applications. Fluorescein dye can be detected using the Blue
channel on the Opti-Check between 485-540nm. The linear detection range is 0 to 400 ppb
(active ingredient) in potable water.
Turner Designs offers Fluorescein Dye (PN 10-508) Calibration standard 10 ppb and
Fluorescein Dye (PN 10-509) Calibration standard 400 ppb.
5.2 PTSA
PTSA is a fluorescent tracer dye that measures in the UV range on the Opti-Check between
365-400nm. It can provide an accurate, cost effective method for monitoring industrial
cooling tower applications and it can also be used as a standard for UV sensors. The linear
detection range is 0 to 1000 ppb.
Turner Designs offers PTSA (PN 10-608) Calibration standard 100 ppb and PTSA (PN 10609) Calibration standard 400 ppb.
Opti-Check™ User’s Manual
11
6
Quick Diagnosis Guide
6.1 Power / Battery / Screen Issues
The Opti-Check is, generally, a trouble-free solid-state instrument. However, there have
been a few issues reported that can easily be diagnosed and/or resolved in the field. Please
use this guide to address some common Power / Battery / Screen Issues:
If you are
experiencing
any of the
issues on
the left.
Opti-Check does not
appear to turn on.
Opti-Check screen is
not illuminated.
Replace batteries
with new batteries.
There does not appear
to be light visible inside
the sample
compartment when the
"READ" button is
pressed.
No
The following message
displays: “Batt Level
<20% !! Caution !!”
The unit is on and
when "READ" button is
pressed the instrument
powers off.
Yes
Is the
issue
resolved?
No
After replacing the
batteries the screen
is not illuminated.
After replacing the
batteries the screen
is full of black boxes.
Press and hold the
↑ button to darken
the display contrast.
Press and hold the
↓ button to lighten
the display contrast.
Does this
correct
the issue?
Opti-Check screen
displays unusual
characters.
You may use your
Opti-Check and
proceed with calibration
/ sampling.
Yes
No
Contact Customer Support
[email protected]
to receive a RMA# for service.
Opti-Check™ User’s Manual
12
6.2 Reading and Calibration Issues
Please use this guide to address some common Reading / Calibration Issues.
When reading the
blank, there is negative
result <-2 or positive
result >2, and never 0.
Readings for the
sample and or blank
are highly variable.
Readings for the
sample are 0.
If you are experiencing any of the issues above, try the following:
• Check the sample well and make sure that it is dry. Dry sample
well if necessary using a non-abrasive wipe or lint-free cloth.
• Wipe down the cuvettes with a lint-free cloth and make sure they
do not have moisture on the outside.
• Check the cuvettes for scratches. Replace cuvette if scratched.
• Make sure that your cuvette is at least 2/3 full with solution.
• Tap the bottom of the cuvette to purge any air bubbles from
solution that may cause interference.
• Mark the cuvette near the top to make sure cuvette position
doesn’t change.
Was the
issue
resolved?
Yes
No
Check your %FS std:%FS blk ratio
by pressing the <DIAG> button.
You may use your
Opti-Check and proceed
with calibration / sampling.
Your %FS std:%FS blk
ratio is greater than 30.
Your %FS std:%FS blk
ratio is less than 5.
Dilute your calibration
standard by 2x and
recalibrate. Check the
ratio again.
Use a higher standard
concentration and
recalibrate. Check the
ratio again.
No
Yes
Is your
%FSstd:%FSblk
ratio now
between 5-30?
I’ve tried multiple
times and I can’t
make it work.
Contact Customer Support
[email protected]
to receive a RMA# for service.
Opti-Check™ User’s Manual
13
7
Warranty
7.1 Terms
Turner Designs warrants the Opti-Check Fluorometer and accessories to be free from
defects in materials and workmanship under normal use and service for a period of 12
months from the data of shipment from Turner Designs, with the following restrictions:
• Turner Designs is not responsible for replacing parts damaged by accident or neglect.
Your instrument must be installed according to instructions in the User’s Manual.
Damage from corrosion is not covered. Damage caused by customer modification of the
instrument is not covered.
• This warranty covers only Turner Designs products and is not extended to equipment
used with our products. We are not responsible for accidental or consequential
damages, except in those states where this limitation is not allowed. This warranty gives
you specific legal rights and you may have other rights which vary from state to state.
• Damage incurred in shipping is not covered.
7.2 Warranty Service
If you purchased your Opti-Check Fluorometer from one of our partners you need to contact
them for service.
If you purchased your instrument directly from Turner Designs and need to obtain service
during the warranty period, please take the following steps:
7.2.1
Write, email, or call the Turner Designs Technical Support department and describe
as precisely as possible the nature of the problem.
Phone: 1 (877) 316-8049
Email: [email protected]
7.2.2
Carry out any adjustments or tests as suggested by the Technical Support
Department.
7.2.3
If proper performance is not obtained you will be issued a Return Authorization
number (RMA). Package the unit, write the RMA number on the outside of the
shipping carton, and ship the instrument, prepaid, to Turner Designs. If the failure is
covered under the warranty terms, the instrument will be repaired and returned free
of charge, for all customers in the contiguous continental United States.
Opti-Check™ User’s Manual
14
7.3 Out-of-Warranty Service
Follow steps for Warranty Service as listed above. If our Technical Support department can
assist you by phone or correspondence, we will be glad to, at no charge. Repair service will
be billed on a fixed price basis, plus any applicable duties and/or taxes. Shipment to Turner
Designs should be prepaid. Your bill will include return shipment freight charges.
Address for Shipment:
Turner Designs
845 W. Maude Avenue
Sunnyvale, CA 94085
Opti-Check™ User’s Manual
15