1
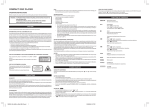
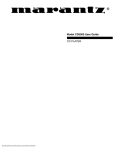
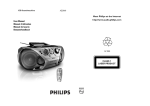
Portable Radio/CD Player Operating Instruction Before operating the unit, please read this manual thoroughly and retain it for future reference. WARNING: To prevent fire or shock hazard, do not expose the unit to rain or moisture. To avoid electrical shock, do not open the cabinet. Refer servicing to qualified personnel only. The use of optical instruments with this product will increase eye hazard. INFORMATION (For the Customers in U.S.A) This equipment has been tested and found to comply with the limits for a Class B digital device, pursuant to Part 15 of the FCC Rules. These limits are designed to provide reasonable protection against harmful interference in a residential installation. This equipment generates, uses, and can radiate radio frequency energy and, if not installed and used in accordance with the instructions, may cause harmful interference to radio communications. However, there is no guarantee that interference will not occur in a particular installation. If this equipment does cause harmful interference to radio or television reception, which can be determined by turning the equipment off and on, the user is encouraged to try to correct the interference by one or more of the following measures: - Reorient or relocate the receiving antenna. - Increase the separation between the equipment and receiver. - Connect the equipment into an outlet that is on a circuit different from the one the receiver is connected. - Consult the dealer or an experienced radio/TV technician for help. You are cautioned that any changes or modifications not expressly approved in this manual could void your authority to operate this equipment. For the Customers in the United Kingdom/ European Countries CLASS 1 LASER PRODUCT APPAREIL À LASER DE CLASSE 1 PRODUCTO LASER DE CLASE 1 PRODUTO LASER CLASSE 1 This apparatus complies with the Class B limits for radio noise emissions set out in radio interference regulations. CAUTION If the unit is brought directly from a cold to a warm location,or is placed in a very damp room, moisture may condense on the lens inside the unit. Should this occur, the unit will not operate. In this case, remove the disc and leave the unit in a warm place for several hours until the moisture evaporates. For the unit to operate at its best, it should not be subject to temperatures below 5oC (41oF) or above 35oC (95oF). Do not use headphones / earphones while driving, cycling, or operating any motorized vehicle, it may create a traffic hazard and is illegal in some areas. It can also be potentially dangerous to play your headsets at high volume while walking, especially at pedestrian crossings. You should exercise extreme caution or discontinue use in potentially hazardous situations. Avoid using headphones/earphones at high volume. Hearing experts advise against continuous, loud and extended play. If you experience a ringing in your ears, reduce volume or discontinue use. Keep the volume at a moderate level. This will allow you to hear outside sounds and to be considerate to the people around you. If you have any questions or problems concerning your unit, please consult your nearest dealer. NOTES: This unit can play Audio Discs including CD-Recordables and CD-Rewriteables. Do not try to play CD-ROMs, CD-ls, CDVs, or computer CDs. The unit may not play a CD-R/RW disc that is recorded on personal computers or some kinds of CD-R/RW recorders because of differences in recording platforms. Do not attach any seal or label to either side(the recordable side or the labled side) of a CD-R/RW disc. It may cause malfunction. Do not use irregular shape CDs(example: heart-shaped, octagonal ones). It may result in malfunction. When a CD-RW is loaded, it takes about 15 seconds before it can be play-back. IMPORTANT SAFETY INSTRUCTIONS POWER SOURCES Using with Batteries Insert two "AA" size batteries (LR6 or UM-3 alkaline) according to the " " and " " indications in the battery compartment. Inserting batteries Open the CD door by pushing the clasp. Detach the battery cover on the middle cabinet and insert two "AA" size batteries (LR6 or UM-3 alkaline). Notes on batteries Insert batteries with correct polarity. Do not use old batteries together with new ones or different types of batteries together. If the electrolyte inside the battery should leak, wipe the contaminated parts in the battery compartment with a cloth and replace the old batteries with new ones. When the unit is not to be used for a long period of time, remove the batteries. Do not mix ALKALINE, standard (CARBON-ZINC) or rechargeable (NICKEL-CADMIUM) batteries. " Notes on " When the battery voltage level is low, " " will flash 10 ~15 minutes, playback still continues in this period. Playback will automatically come to a stop when the batteries " as the unit have no more power. Do not repeat pressing " may operate incorrectly. Replace all the batteries with new ones. " " will not be on if an AC adaptor is used. Using on house current If the unit you purchased does not include an AC power adaptor, please use a 6V 350mA AC power adaptor. Plus pole " " to the centre pin of the 3.5 mm socket.Otherwise use only the supplied AC power adaptor. Be sure to disconnect the AC power adaptor when the unit is not in use. FUNCTION OF CONTROLS OPEN 1. Read Instructions - All the safety and operating instructions should be read before the appliance is operated. This product contains a low power laser device. STOP Button " PRECAUTIONS On Safety As the laser beam used in this compact disc player may be harmful to the eyes, do not attempt to disassemble the casing. Refer servicing to qualified personnel only. Do not put any foreign objects in the safety slot inside the disc compartment. If you do so, the laser beam may come out when the lid is opened. Do not put any foreign objects in the DC IN 6V (external power input) jack. Should any solid objects or liquid fall into the unit, disconnect the power supply and have the unit checked by qualified personnel before operating it any further. On Operation Since the CD system offers a wide dynamic range, the peaks of the high level inputs are recorded with high fidelity, and the noise level is very low. Do not turn up the volume while listening to a part of the disc with no audio signals or very low level inputs. If you do, the speakers may be damaged when the peak level of the sound is played. The lens on the disc table should be kept clean. Do not touch the lens or poke at it. If you do, the lens may be damaged and the unit will not operate properly. Notes: One alternative method to resolve the failure is to add the following instruction to the user manual. The normal function of the product may be disturbed by interference and shows error message, just re-connect the power source for resume normal operation. On Installation Never install the unit where it would be subject to: - heat sources such as radiators or airducts - direct sunlight - excessive dust - moisture or rain - mechanical vibration or shock - unleveled surface 9. Grounding or Polarization - Precautions should be taken so that the grounding or polarization means of an appliance are not defeated. 10.Power-Cord Protection - Power-supply cords should be routed so that they are not likely to be walked on or pinched by items placed upon or against them, paying particular attention to cords at plugs, convenience receptacles, and the point where they exit from the appliance. SKIP-/TUNING Button SKIP + TUNING SKIP+/TUNING Button Press " SKIP+/TUNING " lightly/repeatedly: To locate the beginning of next selections, or tune into a station in Radio status. Keep " SKIP+/TUNING " depressed: To go ahead at high speed, or auto search a station in Radio status. PLAY MODE/STEREO Button PROGRAM / MEMORY PROGRAM/MEMORY Button BAND / TUNER ON BAND/TUNER ON Button Press BAND/TUNER ON button to select the AM or FM band and listen to the radio. Press PLAY MODE/STEREO button to select the various playing modes during CD playback. Press PLAY MODE/STEREO button to select the stereo function during listen to the radio. Press PROGRAM/MEMORY button to reserve songs while playing a CD, or store stations in radio mode. PHONES Jack For connecting the headphones/earphones. 12.Nonuse Periods - The power cord of the appliance should be unplugged from the outlet when left unused for a long period of time. Mains Socket (DC in 6V) 13.Object and Liquid Entry - Care should be taken so that objects do not fall, and liquids are not spilled into the enclosure through openings. 15.Servicing - The user should not attempt to service the appliance beyond that described in the operating instructions. All other servicing should be referred to qualified service personnel. Press " SKIP-/TUNING " lightly/repeatedly: To locate the beginning of the current selection or previous selections, or tune into a station in Radio status. Keep " SKIP-/TUNING " depressed: To go back at high speed, or auto search a station in Radio status. PLAY MODE / STEREO 11.Cleaning -The appliance should be cleaned only as recommended by the manufacturer. 14.Damage Requiring Service - The appliance should be serviced by qualified service personnel when: A. The power-supply cord or the plug has been damaged; or B. Objects have fallen, or liquid has been spilled into the appliance;or C. The appliance has been exposed to rain; or D. The appliance does not appear to operate normally or exhibits a marked change in performance; or E. The appliance has been dropped, or the enclosure damaged. " SKIP TUNING 7. Heat - The appliance should be situated away from heat sources such as radiators, heat registers, stoves, or other appliances (including amplifiers) that produce heat. 8. Power Sources - The appliance should be connected to a power supply only of the type described in the operating instructions or as marked on the appliance. " To activate stop mode/standby mode from playing mode. In standby mode, press " " button again the unit will be off. 4. Follow Instructions - All operating and use instructions should be followed. 6. Ventilation - The appliance should be situated so that its location or position does not interfere with its proper ventilation. For example, the appliance should not be situated on a bed, sofa, rug, or similar surface that may block the ventilation openings; or, placed in a built-in installation, such as a book case or cabinet, that may impede the flow of air through the ventilation openings. For opening the CD tray to insert or remove a CD. Press " " button to begin playing. Press " " button to pause during play. To release pause, press " " button again. 2. Retain Instructions - The safety and operating instructions should be retained for future reference. 5. Water and Moisture - The appliance should not be used near water - for example, near a bathtub, washbowl, kitchen sink, laundry tub, in a wet basement, or near a swimming pool, and the like. OPEN Button PLAY / PAUSE Button " 3. Heed Warnings - All warnings on the appliance and in the operating instructions should be adhered to. For the Customers in Canada INVISIBLE LASER RADIATION WHEN OPEN AND INTERLOCKS DEFEATED. AVOID EXPOSURE TO BEAM When the unit is used with an AC power adaptor, do not wrap the unit in a cloth, blanket, etc. If you do, the temperature inside and outside the unit may rise considerably, resulting in malfunctioning of the unit or serious accidents. Notes on headphones / earphones CAUTION This Compact Disc player is classified as a CLASS 1 LASER product. The CLASS LASER PRODUCT label is located on the bottom exterior. Do not place any heavy object on the top of the unit. Volume Control To adjust the volume. PRESET UP PRESET DOWN PRESET UP/DOWN Buttons Select presetted stations. Only available in radio mode. LISTENING TO THE RADIO 1. Press " BAND / TUNER ON " button to turn on the Radio. 2. Press " SKIP- / TUNING " or " SKIP+ / TUNING " button to tune into a station. To Tune Faster VARIOUS PLAYING MODES DIGITAL ANTI-SHOCK SYSTEM During playback, every time the " PLAY MODE/STEREO " button is pressed, the mode will change to the next one as follows: NORMAL play -> ( ) Repeat One -> ( ALL -> INTRO -> SHUFF ) Repeat Hold down the " SKIP- / TUNING " or " SKIP+/ TUNING " button. While the button is being held, the frequency will change faster. Normal Play - Playing the Whole Disc To Search for a Station Quickly (AUTO Search) Repeat Playback (Repeat One and Repeat All) Keep the " SKIP - / TUNING " or " SKIP + / TUNING " button pressed until the tuner starts searching for a station. After tuning into a station, the search stops. To stop the Auto Search manually, press the " SKIP - / TUNING " or " SKIP + / TUNING " button. The Auto Search may not stop at stations with very weak signals. To repeat the same track, press " PLAY MODE/STEREO " button during play until " " appears in the display window. Select desired track to be played repeatedly by pressing " SKIP - / TUNING " or " SKIP + / TUNING ". To repeat the whole disc Press " PLAY MODE/STEREO " button " appears during play until " in the display window. To Turn Off the RADIO Press " " button to turn off the Radio. Presetting RADIO Station You can tune into a stored station directly by entering the preset number. 10 stations on AM band can be presetted. 20 stations on FM band can be presetted. 1. Press " BAND/TUNER ON " button to select AM or FM band to listen to the Radio. 2. Press " SKIP - / TUNING " or " SKIP + / TUNING " button to tune your desired station. 3. Press " PROGRAM/MEMORY " button till " PGM " flashes in the display window. 4. Press " PRESET UP " or " PRESET DOWN " button to select the desired number. 5. Press " PROGRAM/MEMORY " button to store the station. 6. Repeat steps 2 to 5 to preset other stations. Tuning Into a Preset Station The CD is played once from beginning to end. Intro Play - Playing the First Ten Seconds of All the Selections 1. Press " PLAY MODE/STEREO " button during play until " INTRO " flashes in the display window. 2. Press " play. " to begin the " INTRO " 3. Press " PLAY MODE/STEREO " button to cease the INTRO play and continue playback in the NORMAL play mode. INTRO play always starts from the first track. The Digital Anti-Shock System incorporates a special electronic circuit that prevents sound from skipping when the unit is subject to shocks and vibration during play. When the unit receives a physical shock which prevents the laser pick-up from " reading " the CD, this system immediately starts playing the sound stored in its memory and continues until the laser pick-up recovers. If the unit is subject to continuous shocks and all the data stored in memory is used up the sound will skip. If the vibration stops then the data memory will be restored. To reset the CD player, press " " once. Note: Under some conditions, noise may be heard or sound skipping may occur. -when the disc is dirty or scratched. -when the disc contains certain signals. TROUBLESHOOTING GUIDE Should any problem persist after you have made the following checks, consult your nearest service facility. Disc play does not start: The disc is inserted upside down or incorrectly. Insert the disc correctly with the label surface up Dusty or defective disc Dirty or dusty lens The disc compartment lid is not closed Moisture condensation -> Leave the unit in a warm place until the moisture evaporates The AC power adaptor is not plugged into the wall outlet The unit is not placed on a level surface Weak batteries No sound from the headsets: The headphones/earphones plug is not firmly connected to the PHONES jack Adjust the VOL control Dirty plug Skipping of sound: Press the " PRESET UP " or " PRESET DOWN " button repeatedly to select the desired preset station. SHUFF (Shuffle) Play - Playing the Selections in Random Order Dirty or defective disc Dirty lens Strong vibration For Better Reception 1. Press " PLAY MODE/STEREO " button during play until " SHUFF " flashes in the display window. Use alkaline batteries and not manganese batteries. 2. Press " " to begin the SHUFF play. To locate the beginning of the track being played: press "SKIP-/ TUNING " . To locate the next track: press " SKIP+ / TUNING " ". However, you cannot locate a previous track even if you press "SKIP - / TUNING". No disc , dirty disc or scratched disc. The unit will return to full stop mode after approx.30 seconds, or reset the player by pressing " " once and then insert a disc to start playing. FM: To improve FM reception, extend the earphone cord. AM: To improve AM reception, rotate the unit. Note: During listen to the radio, you can press " PLAY MODE/STEREO " button to select stereo broadcast. While the reception is good, the " " icon will appear in the display window. PGM (Program) Play - Playing the Selections in the Desired Order DISC PLAYING 1. Open the CD door by sliding the " OPEN " button. 2. Insert the CD with the printed side facing upwards and push the disc gently until it clicks so that the disc fits into the pivot. 3. Press the CD door to close. 4. Press the " " button to play " CD ". Note: To play an 8 cm (3-inch) disc, you can play it without an adaptor. On Display Window When you press " ", the display window shows: 1. Press " PROGRAM/MEMORY " button until " PGM " flashes and " " appears in the display window. 2. Press " SKIP- / TUNING " or " SKIP + / TUNING " button to select the desired selection. 3. Press " PROGRAM/MEMORY " button to store this track in memory. 4. To add additional track(s), repeat steps 2 and 3. When using with batteries the battery life is short: The unit can not be operated: MAINTENANCE Cleaning the unit Do not use volatile chemicals on this unit. Clean by lightly wiping with a soft cloth. Cleaning CD If the CD skips or will not play, the disc may need to be cleaned. Before playing, wipe the disc in a circular motion from the centre out with a cleaning cloth. After playing, store the disc in its case. Handling the disc Only touch the CD on the edge to avoid finger prints on its surface. Do not stick paper or tape, or write anything on the surface. SPECIFICATIONS Power requirements 2 "AA" size (LR6 or UM-3) alkaline batteries, or DC IN 6V, 350mA power adaptor Polarity of plug Operating voltage: U.S.A., Canada: 120V AC ± 5% (AC adaptor) 60 Hz Middle East and Australia: 240V AC ± 5% 50 Hz UK and Germany: 230V AC ± 5% 50 Hz Chile: 230V AC ± 5% 50 Hz Singapore,Malaysia & Thailand: 200-240V AC ± 5% 50 Hz Japan: 100V AC ± 5% 50/60Hz 5. Press " ", " PGM " stops flashing and play starts. During Playback The track number of the current selection appears. When " " is pressed during playback, total number of tracks on the disc will be displayed and the unit is in standby mode. If " " is " is pressed again the unit will return to full stop mode. If " pressed the unit returns to play mode. The unit will return to full stop mode automatically after approximately 30 seconds if no button is pressed. During Pause The current track time flashes. Pause mode of the first track When no disc is inserted into the player and when " " is pressed, the display window shows " " and " ". The unit cannot be operated when " no disc " message is displayed. After approx.30 seconds the unit will return to full stop mode, or reset the player by pressing " " once and then insert a disc to start playing. To Edit Program Play: To check: Press " PROGRAM / MEMORY " button lightly during programming before you press " ". Each time "PROGRAM / MEMORY" button is pressed, the track number appears in the display window. To change: When checking, press either " SKIP - / TUNING " or " SKIP + / TUNING " button to alter the track number for the program currently displayed. Press "PROGRAM / MEMORY " button to register the newly selected track into memory. To delete: When open the CD door including that program will be cancelled. Notes: Design and specifications are subject to change without notice. Repeat play, intro play can be performed during program. PGM play cannot be set in SHUFF play mode. The program is also erased when the disc compartment is opened or the auto power off function turns the power off. If the program mode is exited by means of the " " button, all the programs would still remain in memory. During the program play, the AMS operates in the programed order. (AMS-auto music sensor). Printed in CHINA 811-821691-040