1
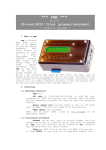
hwlcd-mini
LCD panel for Hauptwerk virtual organ
* user’s guide *
1. Introduction
The hwlcd-mini is compact display module, designed for use with Hauptwerk VPO
as well as with any other application that support Hauptwerk’s original System Exclusive
messages format. It is supposed to play the role of intelligent label for stops and other
console controls so that their functionality could be easily assigned/changed from within
Hauptwerk. The module has standard opto-insulated MIDI input and repeating MIDI output
that allows easy inserting this module in existing MIDI consoles even chaining up to 128
hwlcd-mini units in a system.
The standard display is 2x16 characters on blue background (can be black on green
as well on request). An optional RGB LED (CC) can be controlled, allowing up to 8
different colors or color combinations based on RGB scheme, which may be used for
indicating modes, groups etc. The text on display as well as the LED color are controlled by
means of System Exclusive message defined in Hauptwerk online documentation:
http://www.hauptwerk.com/clientuploads/documentation/CurrentUserGuide/HauptwerkInstal
lationAndUserGuide.pdf
2. Settings
For using multiple LCD
character
displays,
Hauptwerk
supports 16-bit address space
allowing addressing virtually up to
65536 display units. hwlcd-mini
itself has 8 jumpers on its back
side (Fig. 1). The jumpers
numbered 1 to 7 (black jumpers)
are used for setting unit’s ID in
range (0-127) according Table 1.
The address space 0-127 would
allow up to 128 hwlcd-mini unit
to be chained together in single
system.
The 8-ht jumper (shown in
Fig. 1 hwlcd-mini bottom view
red color) controls the LCD
backlight. For standard white-onblue LCDs the backlight must be on all the time, otherwise characters become hard-to
see. For black-on-green LCDs the backlight can be used per user choice. The jumper can
be replaced for external switch when/if necessary.
Please note that the black jumpers (i.e. unit's ID) are read once upon unit reset
and any change would take place after power cycle. The unit's ID is displayed briefly upon
each power-up/reset for user convenience.
[email protected]
www.midiboutique.com
Table 1. Setting unit ID (Address) on Jumpers 1 - 7
Unit ID
Jumper 7
Jumper 6
Jumper 5
Jumper 4
Jumper 3
Jumper 2
Jumper 1
000
001
002
003
004
005
006
007
008
009
010
011
012
013
014
015
016
017
018
019
020
021
022
023
024
025
026
027
028
029
030
031
032
033
034
035
036
037
038
039
040
041
042
043
044
045
046
047
048
049
050
051
052
053
054
055
056
057
058
059
060
061
062
063
064
065
066
On
On
On
On
On
On
On
On
On
On
On
On
On
On
On
On
On
On
On
On
On
On
On
On
On
On
On
On
On
On
On
On
On
On
On
On
On
On
On
On
On
On
On
On
On
On
On
On
On
On
On
On
On
On
On
On
On
On
On
On
On
On
On
On
Off
Off
Off
On
On
On
On
On
On
On
On
On
On
On
On
On
On
On
On
On
On
On
On
On
On
On
On
On
On
On
On
On
On
On
On
Off
Off
Off
Off
Off
Off
Off
Off
Off
Off
Off
Off
Off
Off
Off
Off
Off
Off
Off
Off
Off
Off
Off
Off
Off
Off
Off
Off
Off
Off
Off
Off
On
On
On
On
On
On
On
On
On
On
On
On
On
On
On
On
On
On
On
Off
Off
Off
Off
Off
Off
Off
Off
Off
Off
Off
Off
Off
Off
Off
Off
On
On
On
On
On
On
On
On
On
On
On
On
On
On
On
On
Off
Off
Off
Off
Off
Off
Off
Off
Off
Off
Off
Off
Off
Off
Off
Off
On
On
On
On
On
On
On
On
On
On
On
Off
Off
Off
Off
Off
Off
Off
Off
On
On
On
On
On
On
On
On
Off
Off
Off
Off
Off
Off
Off
Off
On
On
On
On
On
On
On
On
Off
Off
Off
Off
Off
Off
Off
Off
On
On
On
On
On
On
On
On
Off
Off
Off
Off
Off
Off
Off
Off
On
On
On
On
On
On
On
Off
Off
Off
Off
On
On
On
On
Off
Off
Off
Off
On
On
On
On
Off
Off
Off
Off
On
On
On
On
Off
Off
Off
Off
On
On
On
On
Off
Off
Off
Off
On
On
On
On
Off
Off
Off
Off
On
On
On
On
Off
Off
Off
Off
On
On
On
On
Off
Off
Off
Off
On
On
On
On
On
Off
Off
On
On
Off
Off
On
On
Off
Off
On
On
Off
Off
On
On
Off
Off
On
On
Off
Off
On
On
Off
Off
On
On
Off
Off
On
On
Off
Off
On
On
Off
Off
On
On
Off
Off
On
On
Off
Off
On
On
Off
Off
On
On
Off
Off
On
On
Off
Off
On
On
Off
Off
On
On
Off
On
Off
On
Off
On
Off
On
Off
On
Off
On
Off
On
Off
On
Off
On
Off
On
Off
On
Off
On
Off
On
Off
On
Off
On
Off
On
Off
On
Off
On
Off
On
Off
On
Off
On
Off
On
Off
On
Off
On
Off
On
Off
On
Off
On
Off
On
Off
On
Off
On
Off
On
Off
On
Off
On
Off
On
[email protected]
www.midiboutique.com
067
068
069
070
071
072
073
074
075
076
077
078
079
080
081
082
083
084
085
086
087
088
089
090
091
092
093
094
095
096
097
098
099
100
101
102
103
104
105
106
107
108
109
110
111
112
113
114
115
116
117
118
119
120
121
122
123
124
125
126
127
Off
Off
Off
Off
Off
Off
Off
Off
Off
Off
Off
Off
Off
Off
Off
Off
Off
Off
Off
Off
Off
Off
Off
Off
Off
Off
Off
Off
Off
Off
Off
Off
Off
Off
Off
Off
Off
Off
Off
Off
Off
Off
Off
Off
Off
Off
Off
Off
Off
Off
Off
Off
Off
Off
Off
Off
Off
Off
Off
Off
Off
On
On
On
On
On
On
On
On
On
On
On
On
On
On
On
On
On
On
On
On
On
On
On
On
On
On
On
On
On
Off
Off
Off
Off
Off
Off
Off
Off
Off
Off
Off
Off
Off
Off
Off
Off
Off
Off
Off
Off
Off
Off
Off
Off
Off
Off
Off
Off
Off
Off
Off
Off
[email protected]
www.midiboutique.com
On
On
On
On
On
On
On
On
On
On
On
On
On
Off
Off
Off
Off
Off
Off
Off
Off
Off
Off
Off
Off
Off
Off
Off
Off
On
On
On
On
On
On
On
On
On
On
On
On
On
On
On
On
Off
Off
Off
Off
Off
Off
Off
Off
Off
Off
Off
Off
Off
Off
Off
Off
On
On
On
On
On
Off
Off
Off
Off
Off
Off
Off
Off
On
On
On
On
On
On
On
On
Off
Off
Off
Off
Off
Off
Off
Off
On
On
On
On
On
On
On
On
Off
Off
Off
Off
Off
Off
Off
Off
On
On
On
On
On
On
On
On
Off
Off
Off
Off
Off
Off
Off
Off
On
Off
Off
Off
Off
On
On
On
On
Off
Off
Off
Off
On
On
On
On
Off
Off
Off
Off
On
On
On
On
Off
Off
Off
Off
On
On
On
On
Off
Off
Off
Off
On
On
On
On
Off
Off
Off
Off
On
On
On
On
Off
Off
Off
Off
On
On
On
On
Off
Off
Off
Off
Off
On
On
Off
Off
On
On
Off
Off
On
On
Off
Off
On
On
Off
Off
On
On
Off
Off
On
On
Off
Off
On
On
Off
Off
On
On
Off
Off
On
On
Off
Off
On
On
Off
Off
On
On
Off
Off
On
On
Off
Off
On
On
Off
Off
On
On
Off
Off
On
On
Off
Off
Off
On
Off
On
Off
On
Off
On
Off
On
Off
On
Off
On
Off
On
Off
On
Off
On
Off
On
Off
On
Off
On
Off
On
Off
On
Off
On
Off
On
Off
On
Off
On
Off
On
Off
On
Off
On
Off
On
Off
On
Off
On
Off
On
Off
On
Off
On
Off
On
Off
On
Off
3. Wiring
Appendix.A shows the wiring diagram for single hwlcd-mini using locally
obtained wiring/connecting materials. Alternatively the unit is available in a form of
bundles,
including all necessary wires and connectors plus RGB LED per display.
Appendices B,C,D show the wiring diagrams for bundle#1, #2 and #3 accordingly.
Bigger number of chained units is also possible, following same logic.
4. MIDI Implementation
The hwlcd-mini standard firmware would only ‘understand’ System Exclusive
messages as defined in Hauptwerk specification. Each MIDI byte received on MIDI input
will be immediately retransmitted on MIDI output with no processing and/or delay. Any
MIDI message that is different than Hauptwerk’s System Exclusive will be simply ignored
and won’t affect the status of display/LEDs. The unit won’t alter the MIDI messages
passing thru so that they can be used by another units cascaded down the same MIDI line.
Following is the description of how hwlcd-mini would interpret Hauptwerk System
Exclusive message format (all bytes shown in hexadecimal format). Note that the format is
compatible to Hauptwerk’s original SysEx format, but has extended color set so that any
combination of the three basic LED colors (Red, Green, Blue) can be used.
The
System
Byte 1:
Byte 2:
Byte 3:
Byte 4:
Byte 5:
Byte 6:
Bytes 7-38:
Byte 39:
Exclusive
message
is
exactly
39
bytes
in
length:
System Exclusive start, always 0xf0
Fixed manufacturer ID, always 0x7d
Message type code for Hauptwerk LCD output message, always 0x01
LCD panel ID most significant byte, ignored by hwlcd-mini, can be 0x00-0x7f
LCD panel ID least significant byte, interpreted by hwlcd-mini as unique ID, can be 0x00-0x7f
Color code for controlling LEDs, can be 0x00-0x7f:
0x00 =
none (LED off)
0x01 =
white (R+G+B)
0x02 =
red (R)
0x03 =
green (G)
0x04 =
yellow (R+G)
0x05 =
blue (B)
0x06 =
magenta (R+B)
0x07 =
cyan (G+B)
0x08-0x7f=
none (LED off)
The 32 ASCII (7-bit) bytes for the text to display, each byte can be 0x00-0x7f
EOX/End of System Exclusive, always 0xf7.
5. Technical parameters
Table 2. hwlcd-mini technical parameters
Parameter
Power supply voltage
Power supply current
Recognized MIDI
messages
Retransmitted MIDI
messages
Unit ID
Backlight
Value
Unit
9-12 AC/DC
White-on-blue with backlight: 30
Black-on-green with backlight: 160
Hauptwerk specific System Exclusive
message for controlling Displays
mA
-
Any received
-
0..127
Yes
-
Size
8.0x3.5x2.7
cm
Weight
57
g
[email protected]
www.midiboutique.com
Comment
V
Adapter or transformer
May be other on request
The unit is actually transparent for
all MIDI messages.
User-selectable
User-selectable
3.1”x1.4”x1.1” approx.
(with no cables attached)
2.0 oz (with no cables attached)
Appendix A. hwlcd-mini wiring diagram
[email protected]
www.midiboutique.com
Appendix B. hwlcd-mini-bundle#1 wiring diagram
[email protected]
www.midiboutique.com
Appendix C. hwlcd-mini-bundle#2 wiring diagram
[email protected]
www.midiboutique.com
Appendix D. hwlcd-mini-bundle#3 wiring diagram
[email protected]
www.midiboutique.com