1
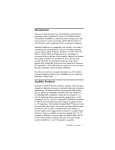
GRACE ONE Manual Stand 04/2013 GRACE ONE 2013 This user manual is valid for the GRACE ONE with the City and Universal frame variations (type number WGRACEUXDB) delivered in the 2013 model year. Explanation of the safety instructions and symbols: To begin with, we would like to familiarize you with the meaning of the attention signs and hazard symbols that you will find in this user manual. Please pay attention to the instructions displayed next to the symbols and follow them without fail. Caution! This attention sign alerts you to a potentially dangerous situation, which could result in injury to people in the vicinity and damage to the product or objects, if you fail to take the required action. Danger! This symbol indicates an imminent threat of explosion due to improper handling of the battery and the charger for example. Warning! A warning about hot surfaces, for example brake disks and brake callipers that become very hot due to the brakes and can cause burns if touched! Information! This sign shows you useful information on how to handle your product. Please note! This symbol indicates that your vehicle could suffer damage. 44 GRACE ONE 2013 Manual Table of contents Your GRACE ONE E-Motorbike About this user manual........................................................................................................................... 47 Before the first use ................................................................................................................................. 48 Description of the devices ...................................................................................................................... 49 Scope of delivery..................................................................................................................................... 50 Accessories/options ................................................................................................................................ 50 Safety instructions and tips..................................................................................................................... 51 Initial operation Charging the battery packs ..................................................................................................................... 53 Switching the bike on and off ................................................................................................................. 54 Checking the tyre pressure ..................................................................................................................... 55 Setting the seat height ............................................................................................................................ 56 Setting the seat angle ............................................................................................................................. 57 Functional description The handlebars ....................................................................................................................................... 58 The motor ............................................................................................................................................... 59 The cockpit .............................................................................................................................................. 60 The derailleur system .............................................................................................................................. 61 The throttle system ................................................................................................................................ 61 The brakes ............................................................................................................................................... 62 The display ........................................................................................................................................ 63-64 Maintenance and repair Prior to any maintenance work............................................................................................................... 65 Disassembling the front wheel ............................................................................................................... 66 Disassembling the rear wheel ................................................................................................................. 67 The drive chain........................................................................................................................................ 67 Changing the tyres ............................................................................................................................ 68-69 Switching gears ....................................................................................................................................... 70 The suspension fork ................................................................................................................................ 70 Checking the brake pads ......................................................................................................................... 70 Changing the lights ................................................................................................................................. 71 Adjusting the lighting .............................................................................................................................. 72 Wearing parts, maintenance, bike inspection after a fall ................................................................. 73-74 GRACE ONE 2013 Manual 45 Replacing parts ........................................................................................................................................ 75 Technical data ......................................................................................................................................... 76 Frame sizes.............................................................................................................................................. 77 Torques ................................................................................................................................................... 78 Rear-view mirror installation guide ........................................................................................................ 79 Side reflector installation guide .............................................................................................................. 80 Use in compliance with the regulations ................................................................................................. 81 Warranty conditions ............................................................................................................................... 82 Attachment A: Delivery checklist Attachment B: GRACE Service booklet 46 GRACE ONE 2013 Manual Your GRACE ONE E-Motorbike The GRACE ONE is the first E-Motorbike that has been authorized for road use worldwide. It is equipped with a 1.3 kW motor with a speed of up to 45 km/h and has a range* of up to 60 km. In that way, the low weight and modern, high-performance lithium ion batteries make the GRACE ONE E-Motorbike into an ecologically groundbreaking and efficient means of transportation. You can operate your GRACE ONE E-Motorbike independently with a motor drive or by pedalling or you can choose to use a combination of the two drives. The battery packs, which were developed exclusively for GRACE, are optimally suited to the frame and provide the highest energy density with the least use of space. The GRACE ONE E-Motorbike can be connected at any time to the automatic chargers completely independently of the state of charge of the batteries. About this user manual The content of this user manual refers exclusively to the GRACE ONE City und GRACE ONE Universal range of models (type number WGRACEUXDB) delivered in the 2013 model year. Please take the time to read through the following pages of this manual thoroughly and attentively in order to familiarize yourself with the GRACE ONE E-Motorbike. For maintenance and repair work, do not hesitate to consult your specialist retailer, whose contact data you will find in the delivery checklist (Attachment A). For care and maintenance of the components, please consult the instructions in the component manufacturers’ manuals. ______________________ *Depending on the riding style, territory, weather and the use of a range extender GRACE ONE 2013 Manual 47 Before the first use As a moped, your GRACE ONE E-Motorbike is subject to the country-specific traffic regulations. Please inform yourself about the guidelines that govern the equipment of mopeds for use on the roads. Helmets are required for riders of mopeds. Apart from the requirement of wearing a safety helmet, it is also necessary to have an insurance sticker on the GRACE ONE EMotorbike and to be the holder of a class M driver’s licence. We recommend that you try out your GRACE ONE in a suitable low-traffic location before you venture into road traffic with it. Please note that when you are operating the bike with the motor drive exclusively or if you are using the motor and the pedals, the highest prescribed speed for mopeds, which is 45 km/h, must not be exceeded. Your GRACE ONE E-Motorbike will be delivered without installation of the rear-view mirror or reflectors. In order to go out in road traffic, the rear-view mirror and the side reflectors must be installed. For this, please follow the assembly instructions on pages 7980 in this manual. In order to go out in road traffic, the rear-view mirror and the side reflectors must be installed. Modifications of your GRACE ONE E-Motorbike, which result in an increase in motor power and speed, compromise your driving safety and can lead to the loss of your driver’s licence and insurance coverage. Please lift your GRACE ONE slightly, when you set it on the double kickstand. To do this, grip the bike with one hand in the middle of the handlebar and place the other hand under the seat. In this way, you will avoid damage to the stand. Description of the bike 48 GRACE ONE 2013 Manual 23 24 22 1. Seat 2. Brake light, rear light 3. Seat post with range extender 4. Seat post clamp 5. Luggage rack* 6. Rear mudguard* 7. Hub motor 8. Rear wheel 9. Chain 10. Double kickstand 11. Top tube with integrated battery packs 12. Stem 13. Rear-view mirror 14. Halogen headlamp 15. Front mudguard* 16. Fork 17. Control unit 18. Front wheel 19. Hydraulic disk brake 20. Crank and pedal 21. Down tube with integrated battery packs 22. Motor Plug-Connector 23. USB-Port (only for the service) 24. Charging-Port *Luggage racks and mudguards are available as optional features. Scope of delivery GRACE ONE 2013 Manual 49 22 1 standard charger (weight: 850 g, dimensions: 155 x 85 x 45 mm) 2 key cards (ISO card: 85.6 x 54 x 0.85 mm) 2 transport locks for the brake system 1 user manual 2 reflectors 1 rear-view mirror Keep the yellow transport locks for the brake system. They will be needed, when wear to the brakes is being examined and serve as a helpful tool for repairs. Please consult the completed transfer protocol, which has been prepared for you by your dealer, to find out about the individual equipment of your GRACE E-Motorbike. (Attachment A) Accessories/options Curana C-Lite mudguards (26'' x 60mm) and Tubus Vega luggage rack in a typical minimalistic design for trips under any weather conditions and the comfortable transport of your luggage. The Domain RC suspension fork ensures that there is even more ground clearance and comfort. This suspension fork from the renowned manufacturer Rock Shox is outstanding in its functionality and is virtually maintenance-free. Safety information 50 GRACE ONE 2013 Manual Always check that the lights and the horn are working before using your bike. Wear safety helmet when you ride the GRACE ONE E-Motorbike. We also recommend that you wear safety goggles. Make sure that you avoid the use of loose leg wear. In that way, you can prevent clothing from being caught in the chain or between the spokes. Check all wearing parts regularly. These include, but are not limited to the drive chain, lights, brake pads, brake disks, seals, the cartridge and tyres. Check your GRACE ONE regularly for loose spokes as they can lead to instability at high speeds. Modifications of your GRACE ONE E-Motorbike, which result in an increase in motor power and speed, compromise your driving safety and can lead to the loss of your driver’s licence and insurance coverage. Please note that the E-Bike for safety reasons only responds to the throttle operation when the rear wheel will be moved contemporaneously. To save energy the GRACE ONE turns off automatically when not in use after 10 minutes. Even when switched off electrical currents can still be in the system. If you need to separate electrical connections please make always sure to disconnect and to connect the contacts cleanly. To avoid short circuits in the system please to not touch the frame or not foreseen contacts. GRACE ONE 2013 Manual 51 Important tips and instructions for handling lithium ion batteries If you don’t wish to use your GRACE ONE for an extended period of time (> 1 month), make sure that the battery voltage is not below 44 volts. In this way, you can extend the length of the life span of your battery pack. You can read the battery voltage off the display (page 63). Lithium ion batteries have no memory effect, therefore you can charge your GRACE ONE at any time irrespective of the state of charge of the batteries. However, we recommend that you use up the battery capacity fully at regular intervals to achieve the best possible life span. If your GRACE ONE cannot be switched off as usual, there could be a defect in the controls. In this event, contact your GRACE dealer immediately in order to avoid long-term damage to the batteries. 52 GRACE ONE 2013 Manual Initial operation Charging the battery pack The battery packs of your GRACE ONE E-Motorbike are integrated securely inside the frame. In the top tube there is a large lithium ion cell battery installed and two small batteries are housed in the down tube. All of the batteries are connected in parallel. Lithium ion batteries are not subject to any memory effect. You can re-charge them at any time, even after short rides. Proceed as follows in order to charge the batteries: 1. Insert the main plug of the original charger provided. (220 V - 240 V 50 Hz) Open the dust cap and connect the plug of the charger with the charging port. To charge the batteries, use the standard charger exclusively. Otherwise there is a risk of explosion. 2. The charging automatically. process will start 3. When the LED of the charger is lit up in green, the batteries are fully charged. The indicator on the display will show a slight metrological deviation. 4. Disconnect the plug connector and pull the plug out of the receptacle. GRACE ONE 2013 Manual 53 Switching the bike on and off 1. Press the green ON button and hold the key card above the stem while you are doing so. 2. You can also place the key card on the stem and then press the green ON button. The on-board computer display will light up and the GRACE ONE E-Motorbike will be ready to operate. 3. To switch the bike off, keep pressing the red OFF button. 4. The Grace One E-Motorbike is switched off if the display light has gone out. Your GRACE ONE E-Motorbike will turn itself off automatically, if the battery voltage falls below 32 volts! This safety shutdown mechanism prevents damage to the batteries due to deep discharge. 54 GRACE ONE 2013 Manual Checking the tyre pressure Tyres make contact between the wheels and the road. They ensure that the wheels grip the road and that there is traction and absorb small shocks depending on the tyre pressure. Please note the manufacturer’s information on air pressure printed on the side of the tyre. Exceeding the maximum permissible air pressure when you pump your tyres can lead to their bursting. The GRACE ONE E-Motorbike is equipped with the following standard tyres: SCHWALBE Crazy Bob special street legal edition (26 x 2.35) The manufacturer recommends the following readings for operating pressure for the tyres used: 2.0 – 2.5 bar (30 – 35 psi) for the front wheel tyres 2.0 – 2.5 bar (30 – 35 psi) for the rear wheel tyres Please note when you are replacing tyres that you must use tyres of the same type, dimensions and tread exclusively. The ECE mark must be printed on the tyres! The tyres are filled with air and the air pressure is regulated by means of Schrader valves. This can be done with track pumps or with the compressed air dispenser at the petrol station. GRACE ONE 2013 Manual 55 Setting the seat height 1. To set the seat height, loosen the two Allen screws of the seat post clamp. 2. Adjust the seat height so that the upper edge of the seat is approximately at the level of your hip bone, when you are standing next to your GRACE ONE. Within the adjustment range of the seat post, there are technical components such as cables and batteries. Therefore, proceed cautiously when you are pushing in and pulling out the seat post! Pull the seat post no further than 30 cm out of the seat tube at the most. 3. Make sure that the seat is aligned parallel to the top tube of your GRACE ONE. 4. Tighten the screws of the seat post clamp evenly in turn several times in sequence until both screws are equally tight. As you are doing so, check that the clamp is in its proper position. 56 GRACE ONE 2013 Manual max. 30 cm Setting the seat angle 1. In order to change the angle or the horizontal position of the seat, loosen the two Allen screws of the seat clamp, which are located directly below behind the seat. 2. Loosen the two Allen screws of the seat clamp, which are located directly below in front of the seat as well. 3. Now you can slide the seat back and forth in the clamp guide… 4. ... and adjust the angle. 5. Finally, tighten all four screws equally. GRACE ONE 2013 Manual 57 Functional Description The handlebars The right side of the handlebars: The throttle grip the horn High beam changeover switch Brake lever for the rear wheel brake The left side of the handlebars: Left handlebar grip Gear twist grip Brake lever for the front wheel brake 58 GRACE ONE 2013 Manual The motor Your GRACE ONE E-Motorbike is equipped with a 1.3-kilowatt electric motor, which also forms the hub of the rear wheel. This type of motor is also called a hub motor for that reason. You can request power from the motor by means of a throttle handle. A regulator that is located in the control unit of your GRACE ONE under the top tube regulates the power output of the motor and limits the latter when the maximum permissible speed for this class of bicycle, which is 45 km/h, is reached. However, you can also reach higher speeds with your GRACE ONE E-Motorbike, for example on an incline or when you have a tailwind. Then you are depending on the conventional chain drive alone and have no more assistance from the motor. If your speed falls below 45 km/h, then the motor power is available to you again. GRACE ONE 2013 Manual 59 The cockpit The stem of your GRACE ONE E-Motorbike forms the connection between the handlebars and the steerer tube. The cockpit, the front lights and the on-board computer are all integrated into the stem. The operating elements for the on-board computer are located on the left hand side at the stem. The headlamp on the top is the low beam light and the lower headlamp is the high beam. Low beam light High beam light Activate the button with the light symbol on the right side of the stem. The low beam and the rear light will come on. In order for the low beam light to come on, the low beam must be switched off. Activate the high beam switch on the right side of the handlebars. If the high beam is turned on, the high beam switch will be lit up in blue for checking purposes. The low beam will then be switched off. Pressing on the high beam switch again will turn the low beam on once more and turn the high beam off. If you use the high beam as a flasher, the low beam must not be switched on. 60 GRACE ONE 2013 Manual The derailleur system Activate the derailleur by means of the grip shift on the left handlebar grip. Do not activate the derailleur system, when the bike is at a standstill, but rather only during a ride when the crank is turning at the same time. There are nine different gear ratios available. The throttle handle You can start your motor drive on the back wheel of your GRACE ONE E-Motorbike with a rotary motion of the throttle handle. The further the throttle handle is rotated, the more energy gets directed to the motor and the greater the acceleration or the speed is. The brakes GRACE ONE 2013 Manual 61 The brakes are operated by means of the brake lever on the handlebar, whereby the left brake lever slows down the front wheel… … and the right brake lever slows the rear wheel down. Do not fail to carry out some braking tests to familiarize yourself with the hydraulic brake system, before you venture into road traffic with your GRACE ONE E-Motorbike. If you squeeze the front wheel brake too hard, this can lead to a rollover or fall due to the front wheel breaking loose! The brake disks and the brake callipers of your GRACE ONE E-Motorbike can become very hot when you are braking and can cause burns if they are touched. 62 GRACE ONE 2013 Manual The display The GRACE ONE display informs you about the speed, the route covered, energy consumption and the state of charge of the batteries. All of the information will be displayed on a panel with background lighting. 1 2 4 3 1 Riding mode [Sport (SRT), City (CTY), Economic (ECO)] 2 Current power in watts (W) 3 Speed [km/h] 4 Present current value (A) 5 The state of charge as a percentage (volts) 5 Menu navigation Using the ENTER button, you move through the menu. With the UP/Down buttons you can choose directly the different riding modes (SRT, CTY, ECO). GRACE ONE 2013 Manual 63 Change Mode SRT [sport] maximum acceleration, maximum top speed, and a lower range CTY [city] good acceleration, good top speed and a medium range ECO [economic] reduced acceleration, reduced top speed, and the greatest range Trip Under the menu heading Trip, all of the data concerning your most recent ride is listed. km Kilometres travelled Km/h: The greatest speed travelled Wh: Use of watt hours per trip Wh/km: Use of watt hours per km Trip Reset Keep the enter key pressed down for approx. 3 - 4 seconds and the display of the last trip will be set to zero. History Under the menu heading History the information about the bike’s history is listed. Total km: Total kilometres travelled Total Wh: Total watt hours consumed 64 GRACE ONE 2013 Manual Maintenance Prior to any maintenance work Prior to any maintenance work make sure that the GRACE ONE E-Motorbike is disconnected from any power supply. To do this, press the red OFF button on the right hand side of the stem. When the front and rear wheels have been disassembled, insert the brake pad retainer provided between the brake pads in order to avoid unintentionally adjusting the distance between them. Brake pad retainer Brake calliper GRACE ONE 2013 Manual 65 Disassembling the front wheel 1. Loosen the axle of the front wheel with the 14 mm Allen key in an anti-clockwise direction 2. Pull the axle to the right and remove it from the fork. 3. Loosen the front wheel and remove it from the fork against the rotational direction. When the front wheel has been disassembled, insert the brake pad retainer between the brake pads in order to avoid unintentionally adjusting the distance between them. 66 GRACE ONE 2013 Manual Disassembling the rear wheel 1. Remove the both central M4 x25 Allen screws on the motor plug. 2. Remove the plug from the motor controller and open the cable straps from left chain stay. 3. Loose both wheel nuts with 19mm box wrench. 4. Remove the locking ring placed below the wheel nuts. 5. Pull out the rear wheel downwards. Switch the chain onto the smallest sprocket of the sprocket set and note how the chain runs the rear wheel. When the wheel has been disassembled, insert the brake pad retainer between the brake pads in order to avoid unintentionally adjusting the distance between them. 6. For reassembly, follow the steps for disassembly of the rear wheel in reverse order and make sure that the chain is in the same position on the cartridge as was the case before the wheel was disassembled. Also take care for the proper fixing of the motor cable. The drive chain: The chain should always be metallically clean and have a sufficient coating of lubricant. If the chain is dry (without lubrication) or dirty, clean it with a clean or slightly oily cloth and then coat it with a bicycle chain oil that is commercially available and leave it overnight. Remove any excess oil the following day with a cloth. GRACE ONE 2013 Manual 67 Changing the tyres 1. Remove the valve cap of the tube and the knurled nut of the valve nozzle. Bleed the tube with at the valve pin using a pointed instrument such as a ballpoint pen refill. 2. Use a tyre iron to loosen the casing from the rim. 3. Replace the tyre or the defective tube. If you are putting on a new tyre, change the tube as well! 4. Pull one side of the tyre onto the rim. In the process, please pay attention to the running direction of the tyre that was printed by the manufacturer. Some makes of tyres don’t have any rotational direction printed on them. 5. Place the new tube into the rim well and insert the valve through the valve opening. 6. Pump the tube slightly. 68 GRACE ONE 2013 Manual 7. Lever the tyre bead over the rim flange with the installation tools. 8. Pump the tube until the tyre assumes its shape and check to see if it is sitting correctly on the rim. 9. Pump the tyre in accordance with the manufacturer’s information and check again that the tyre is sitting correctly in the rim. 10. Tighten the knurled nut and screw the valve cap onto the valve. GRACE ONE 2013 Manual 69 Switching gears Please consult the attached manual from the manufacturer, SRAM for information on the gearshift adjustment. The suspension fork If you ride a GRACE ONE E-Motorbike with a suspension frame, it is advisable to adjust it to suit your weight and your personal needs. For more specific information about this, please consult the particular suspension fork manufacturer’s user manual. Checking the brake pads Check the strength of the brake pads regularly. The brake pads must be replaced as soon as their wear limit is reached. Information on the wear limit, adjusting the brakes, maintenance and changing the brake pads can be found in the user manual of the manufacturer, Magura, which is enclosed with your GRACE service documentation. In cases of doubt, please consult your GRACE dealer. 70 GRACE ONE 2013 Manual Changing the lights 1. Loosen the four screws on the two internal sides of the housing with a 3 mm Allen key. 2. Remove the two plug contacts on the back of the lamp housing and remove the neoprene cover. 3. Unlock the metal springs in order to be able to remove the light source. 4. To do that, pull the light source backwards out of the housing. GRACE ONE 2013 Manual 71 5. Insert a new light source. To reassemble the light fixture, follow the preceding steps for disassembly in reverse order. Adjusting the lighting Adjust low beam and high beam lamps so that the cones of light hit a wall at a distance of 5 m at the specified height. Lowbeam Highbeam 72 GRACE ONE 2013 Manual Wearing parts, maintenance and vehicle inspection after a fall Some parts and components on your GRACE ONE E-Motorbike are susceptible to wear due to their function and must be monitored with particular care for that reason and regularly maintained or replaced, where applicable. Wearing parts include the following: Tyres Wear to the tyres depends on how the GRACE ONE E-Motorbike is used and can be very strongly influenced by the rider. The lifespan of a tyre is considerably shortened by sharp braking which leads to the blocking of a tyre and reduces its life span considerably. In addition, tyre pressure should be checked regularly and tyres should be pumped to the level specified by the tyre manufacturer, where applicable. Handles Handlebars and grip coverings are susceptible to wear due to their function and must be replaced regularly where applicable. Handles must always be firmly connected to the handlebars. Brake pads Due to their function, brake pads are susceptible to wear, which is very dependent on how the GRACE ONE E-Motorbike is used. If the GRACE ONE E-Motorbike is used for sports or for trips on routes with steep inclines, it may be necessary to change the brake pads at frequent intervals. Therefore, it is absolutely essential to check the state of wear of the brake pads regularly. Have them replaced by a dealer, if necessary. The chain Due to its function, the chain is susceptible to wear, which is very dependent on care and maintenance and on how the GRACE ONE E-Motorbike is used (mileage, dirt, salt and riding in the rain, etc.). The life span of the chain can be prolonged by regular cleaning and lubrication although it is necessary to replace it when the limit is reached. Chain wheels, the cartridge, rear derailleur rollers and the bottom bracket All sprockets, chain wheels and the bottom bracket are susceptible to wear due to their function. Wear and tear on these components depends on care and maintenance and the use of your GRACE ONE E-Motorbike (mileage, dirt, salt, trips in the rain, etc.). GRACE ONE 2013 Manual 73 Gear switching cables The Bowden cables of the gears must be regularly maintained and replaced, if applicable. This can be the case, especially if the GRACE ONE E-Motorbike is often stored outdoors and exposed to the elements. Lights Flawless functioning of the lighting systems is very important for traffic safety. As lights are susceptible to wear due to their function, they should be checked before every trip to see how they are functioning. You should always have spare lights with you in order to be able to replace them, if necessary. Hydraulic oils and lubricants Hydraulic oils and lubricants lose their effectiveness over time. Therefore, all areas to which lubricants are applied must be cleaned regularly and re-lubricated in order to avoid increased wear to the parts and the bearings involved. Handlebars and seat posts Both the handlebars and the seat post are subject to severe dynamic stresses, when the bike is being ridden. Therefore, check them regularly for visible external damage and replace them, where applicable. Furthermore, we recommend that these parts be replaced every two years, if your GRACE ONE E-Motorbike is subject to heavy use. Frame paintwork and coating The coating on the structural elements of your GRACE ONE E-Motorbike protects them against corrosion. Check all painted areas regularly for damage and touch them up immediately. This also maintains the appearance of your GRACE E-Motorbike. When you purchased your GRACE ONE E-Motorbike, you received a service booklet from your dealer. Please adhere without fail to the inspection intervals entered for your safety and your enjoyment of your bike. 74 GRACE ONE 2013 Manual Maintenance We recommend that your dealer inspects your bike for the first time after you have ridden 100 kilometres. Spokes, brakes, gears and bearings can shift due to settling processes during this running-in phase. Your GRACE dealer is the one, who is most familiar with your bike and has the appropriate tools for the maintenance of your GRACE vehicle. Inspection of your bike after an accident or fall After a fall or an accident on your GRACE ONE E-Motorbike, you should bring your bike to your authorized dealer for close examination in any event. Damage that was caused by falls or improper handling can only be repaired by your GRACE dealer. Changing parts Your GRACE ONE E-Motorbike is a moped and it is therefore necessary to obtain a permit from the German Federal Bureau of Motor Vehicles and Drivers and the Vehicle Registration Office. There is a type approval available for the GRACE ONE. During the approval process, certain parts were specified, whose use is approved for this vehicle. This means that the approval only remains valid, if these precise parts of the type approved are being used. [Repetition] [Incomplete] If parts are subsequently changed or replaced, the same provisions that have effect for other vehicles are also valid here. You may only use replacement parts, for which there is a certificate of release for your GRACE ONE E-Motorbike. [Repetition] Defective parts, particularly forks, handlebars, frames, handlebar stems, seat posts, pedals or crank arms must be replaced immediately due to the danger of breakage. GRACE ONE 2013 Manual 75 Technical data Frame GRACE aluminium frame Fork GRACE rigid aluminium fork Battery GRACE lithium ion battery pack 18650 Seat post GRACE aluminium seat post Handlebars GRACE aluminium handlebars Handles (Bar ends) Velo lock On Grip Stem GRACE Custom made aluminium, integrated lighting system Headset Cane Creek 40 series Saddle Velo Bottom bracket Truvativ GXP Wheel rims Rigida Andra 40 Front wheel hub KT Industries Tyres Schwalbe Crazy Bob Pedals Wellgo B087 Battery charger GRACE Charger 250 x 140 x 90 mm, 2140 g Computer GRACE computer with a display of the power, speed, kilometres for the day, state of charge, charging cycles and statistics Crank Truvativ Firex Single 48 with chain guard ring Chain SRAM PC 971 Cartridge Sunrace 9-speed Rear derailleur SRAM X-7, 9 gears Shift lever SRAM X-7, rotary handle Brakes Magura MT 4 hydraulic disc brake Weight 33 kg, incl. batteries Type of motor Brushless rear wheel, hub motor max. Assistance power: 1,300 watts Battery power 518 Wh/12.0 Ah (713 Wh/16.5Ah with range extender) Admissible total weight 150 kg Frame geometry Universal or City Charging time 4.5-6 hours Headlamp GRACE Custom-made 76 GRACE ONE 2013 Manual Frame sizes GRACE ONE City GRACE ONE Universal A Top tube B Standover height C Inside leg measurement E D Seat tube height 640 mm 885 mm 885 mm 548 mm A Top tube B Standover height C Inside leg measurement D Seat tube height 630 mm 830 mm 800 mm 427 mm GRACE ONE 2013 Manual 77 Torques Torques for binding elements on the main frame M5x12 swing arm screw 10 – 12 Nm M12x30 strut mounting screw 25 – 30 Nm M8x40 Dropout strut mounting screw 20 – 25 Nm M8x16 Dropout fastening screw 20 – 25 Nm Seat clamp 8 Nm Torques of binding elements on the wheels 20 mm thru axle 30 – 35 Nm M14 axle nut (rear) 50 – 55 Nm Brake disks (manufacturer’s specifications from Magura) 4 Nm Torques for handlebar and stem Stem clamp (M8x25) 8 Nm Handlebar clamp 6 Nm Grip shift(manufacturer’s specifications from SRAM) 1,9 Nm Throttle grip 1,9 Nm Brake lever (manufacturer’s specifications from Magura) 4 Nm Torques for add-on parts Brake callipers (manufacturer’s specifications from Magura) 6 Nm Post mount adapter 6 Nm Rear derailleur fastening (manufacturer’s specifications from) 8 – 10 Nm Gear cable fastener (manufacturer’s specifications from SRAM) 4 – 5 Nm Bottom bracket (manufacturer’s specifications from SRAM) 78 GRACE ONE 2013 Manual 48 – 54 Nm Rear-view mirror installation guide The mirror is attached to the left side of the handlebars with a 4 mm Allen key between the front brake and the stem unit. The drawing shows how to mount the mirror for riding on the right side of the road The mirror must be mounted symmetrically on the right hand side for left hand traffic. GRACE ONE 2013 Manual 79 Side reflector installation guide Mount the reflectors supplied on the position shown in the drawing. 80 GRACE ONE 2013 Manual Use in compliance with the regulations Due to its design and its equipment, your GRACE ONE E-Motorbike is designated for use on public roads and on paved paths. The required safety-related active and passive lighting systems are installed in accordance with the German Regulations Authorising the Use of Vehicles for Road Traffic (StVZO). This safety-related equipment must be checked regularly and repaired, if necessary, by a skilled technician. Neither the manufacturer nor the dealer shall be liable for any other use or for failure to comply with the safety-related instructions in this user manual and any resulting damage. Mastering your GRACE ONE E-Motorbike is a challenge that you should not underestimate. Please be aware always that other road users will not be expecting your high speed. Practise the handling of your new GRACE ONE E-Motorbike first in a quiet traffic-free area before venturing into road traffic. You must comply with the safety helmet provision while you are doing that. Please note that you may not ride your GRACE ONE E-Motorbike on public bike paths, even if they are not identified with the additional ”moped-free” sign. Operation of your GRACE ONE E-Motorbike with a trailer is not permitted within the EU. GRACE ONE 2013 Manual 81 Warranty conditions Since 01/01/2012 you have been entitle to a warranty period of two years. The 24 month warranty period for batteries is limited to 500 charging cycles and ensures a residual capacity of at least 80% of the rated capacity within the warranty period. This period begins when the GRACE ONE is handed over by your dealer, who is also the person to contact in case of a warranty claim. Please store the transfer protocol and the invoice or proof of purchase respectively in a safe place even after expiry of the warranty period. You are entitled to make a warranty claim under the following conditions: - if there is a manufacturing, material or information error, If the claimed damage already existed at the time of delivery, if the alteration of the product was not caused by wear due to its function or ageing if the damage was not caused by violation of the intended use (use in compliance with the regulations, page 81.) The following items are excluded from the warranty. - All wearing parts in accordance with the itemized list of wearing parts on pages 73-74, unless there is a manufacturing or material error, damage that came about due to failure to use the bike in compliance with the regulations or force majeure, damage that came about due to competitive use, damage that came about due to improper repair tools and insufficient care, repairs that were made with by means of used parts and damage that originated from the subsequent addition of non-standard equipment and technical modifications When you purchased your GRACE ONE E-Motorbike, along with this user manual, you also received the user manuals, the warranty and the warranty conditions from the manufacturers of the supplementary components. Please read through those documents attentively as well! 82 GRACE ONE 2013 Manual Notices GRACE ONE 2013 Manual 83 84 GRACE ONE 2013 Manual