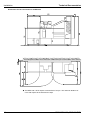
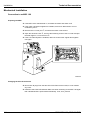
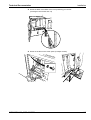
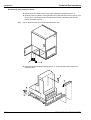
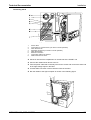
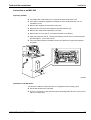
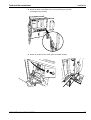
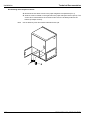
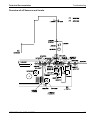
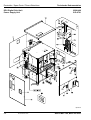
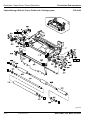
1
TECHNICAL DOCUMENTATION DD+8508400H010E 00000 AGFA DPU Digital Print Unit Edition 02.11.98 /PN 8103 BUSINESS SYSTEM Type 8508/400 List of registers Edition Register Installation........................................................................... 03.06.98................... 1 Operation ............................................................................ 03.06.98................... 2 Maintenance ....................................................................... 03.06.98................... 3 Troubleshooting .................................................................. 02.11.98................... 4 Spare Parts ......................................................................... 03.06.98................... 5 Image Processor ................................................................. 03.06.98................... 6 Transfer Software ............................................................... 03.06.98................... 7 All rights of design modifications and alterations of designations or indications of the scope of delivery reserved. Printed in Germany on paper made without chlorine. Technical Documentation Contents Contents Page Preinstallation ...............................................................................................................1.3 General ...................................................................................................................1.3 Basic Structure .................................................................................................1.3 Requirement of the workstation........................................................................1.3 Tasks of the AGFA Service technician .............................................................1.4 Floor Space Requirements .....................................................................................1.4 Dimensions for the connection to an MSC 100 ................................................1.5 Dimensions for the connection to an MSC 200 ................................................1.6 Room lighting....................................................................................................1.7 Operating conditions.........................................................................................1.7 Overview.................................................................................................................1.7 Current consumption ........................................................................................1.7 Electrical fusing.................................................................................................1.7 Weight ..............................................................................................................1.7 Storage and transport.......................................................................................1.7 Prerequisites for the connection of the DPU.....................................................1.8 Densitometer of the MSC .................................................................................1.8 Scope of delivery ............................................................................................1.11 Required tools ................................................................................................1.11 Software......................................................................................................................1.12 Loading the Software V2.61 (or higher)..........................................................1.12 Changing the parameter IDENT in PA_MC.DAT............................................1.13 Entering the parameters of the DPU in PA_MC.DAT.....................................1.13 Mechanical Installation................................................................................................1.14 Connection to an MSC 100...................................................................................1.14 Preparing the MSC .........................................................................................1.14 Changing the CPU of the Printer ....................................................................1.14 Installation of the 51D-EXI board in the MSC 100..........................................1.15 Installing the cable set for MSC 100...............................................................1.16 Changing the control cable of the FOCRT unit...............................................1.17 Changing the paper transport control cable ...................................................1.17 Attaching the DPU ..........................................................................................1.18 Dismounting the transport securities ..............................................................1.20 Connection to the MSC 100 ...........................................................................1.21 Hiding the cables for MSC 200.......................................................................1.22 Connecting the IP ...........................................................................................1.23 Final work .......................................................................................................1.24 Connection to an MSC 200...................................................................................1.25 Preparing the MSC .........................................................................................1.25 Installation of the EXI board............................................................................1.25 Attaching the DPU ..........................................................................................1.26 Dismounting the transport securities ..............................................................1.28 Connection to the MSC 200 ...........................................................................1.29 Connecting the IP ...........................................................................................1.30 Final work .......................................................................................................1.31 After first Switch-on...............................................................................................1.32 Operation of the DPU without Index camera..................................................1.32 Test print for the FRED calibration .................................................................1.32 Loading the correction file into the DPU.........................................................1.35 AGFA MSC 100, MSC 200 DPU 03.06.98 /PN 7020 1.1 Contents Technical Documentation Technical Data ........................................................................................................... 1.36 Exposure unit (FOCRT) ................................................................................. 1.36 Print capacity ................................................................................................. 1.36 Available paper widths and lengths ............................................................... 1.36 Operating conditions...................................................................................... 1.36 Current consumption...................................................................................... 1.37 Electrical fusing.............................................................................................. 1.37 Weight............................................................................................................ 1.37 Dimensions .................................................................................................... 1.37 Storage and transport .................................................................................... 1.37 Prerequisites for the connection of the DPU.................................................. 1.37 1.2 03.06.98 /PN 7020 AGFA MSC 100, MSC 200 DPU Technical Documentation Installation Preinstallation General Basic Structure The DPU (Digital Print Unit) is used to produce digital prints. It is attached to the left side of the MSC 100 or MSC 200. An IP (Image Processor) serves as interface between the workstation and the DPU. The IP is connected to the workstation via Ethernet. An image sent to the IP is printed by the DPU. The DPU Handshake program is used for a better adjustment of the digital images to the paper in use. It is also supplied by Agfa and is installed on the workstation. The DPU is fitted with a magazine holder. All digital images as well as the Indexprints can only be exposed from this side. Printing frames is possible as well. Requirement of the workstation DPU users who do not want to use PIXTASY need an external image processing workstation. Detailed information is given in the brochure of the local Agfa subsidiaries. Only those components needed for the network connection to the IP are described in the following: Network board Ethernet 10 Base-T or 100 Base T with Twisted Pair connection (no coax!) NetBEUI protocol installed For a direct connection of a workstation to the IP For a network of several workstations to IP TCP/IP and/or NetBEUI protocol installed Sweep (distributor function) Twisted Pair cable for every workstation For a remote workstation or a sweep -- IP Twisted Pair cable (> 5m) AGFA MSC 100, MSC 200 DPU 03.06.98 /PN 7020 1.3 Installation Technical Documentation Tasks of the AGFA Service technician − Attachment of the DPU to the existing MSC 100 or MSC 200 − Connection of the IP − Creation and calibration of digital channels and Index configurations (together with the operator/customer) − Instruction of the operator/customer how to operate the DPU − Loading the Agfa DPU Handshake Software − Entry of the user, computer and group names predefined for the IP − Creation of the network path to the transfer directory of the IP − Instruction of the operation how to use the AGFA Handshake Software Note The external workstation cannot be serviced by the AGFA service technician. The installation of the network components as well as of additional peripheral units has to be ensured by the customer. Floor Space Requirements No special requirements are needed to operate the DPU. Only an additional surface of about 1 sq.m next to the MSC is required. The exact dimensions are given in the following chapters. 1.4 03.06.98 /PN 7020 AGFA MSC 100, MSC 200 DPU Technical Documentation Installation Dimensions for the connection to an MSC 100 t The MSC 100 + DPU require a total surface of 3,5 sq.m. If the MSC 100 is installed very close to the wall, it has to be moved away from the wall. t To obtain a minimum distance of 5 cm between the DPU and the wall, the MSC 100 has to be at least 13 cm away from the wall. AGFA MSC 100, MSC 200 DPU 03.06.98 /PN 7020 1.5 Installation Technical Documentation Dimensions for the connection to an MSC 200 t The MSC 200 + DPU require a total surface of 5 sq.m. The minimum distance of 5 cm with respect to the wall must be kept. 1.6 03.06.98 /PN 7020 AGFA MSC 100, MSC 200 DPU Technical Documentation Installation Room lighting The room lighting must be sufficiently bright so that the colour hues on the prints can be recognised. The use of daylight fluorescent tubes is recommended (400 - 1000 Lux). Note Avoid the impact of direct sunlight. The maximum illumination should not exceed 10000 Lux. Operating conditions Room temperature: Relative humidity: Noise level: EMV: +15°C ..+30°C 15% - 75% < 70 dB(A) Class B Overview Current consumption The DPU needs 750 W in operation. The power supply unit adjusts itself automatically to the existing voltage within a range of 100 V to 240 V. The connection is single-phase to a normal socket outlet. Mains voltage Current Note 100 V 115 V 7,5 A 6,5 A 120 V 6,25 A 127 V 5,9 A 200 V 3,8 A 220 V 3,4 A 230 V 3,3 A 240 V 3,2 A The Image Processor is not included. The values are as follows: 90 - 140 V max 2A 190 - 264 V max 1 A Electrical fusing No special fusing is required for the operation of the DPU. Weight DPU DPU + MSC 100 DPU + MSC 200 180 Kg 700 Kg 1040 Kg Storage and transport Temperature range: Relative humidity: AGFA MSC 100, MSC 200 DPU -50°C ..+60°C up to 95% 03.06.98 /PN 7020 1.7 Installation Technical Documentation Prerequisites for the connection of the DPU t The following prerequisites have to be met so that the DPU can be operated together with the MSC: − IP (Image Processor) type 8508/410 available − Camera Kit type 8506/313 installed in the MSC (only if Indexprints are made) − Software V 2.61 or higher installed in the MSC − 53A-CPU board type 8506/351 (only for MSC 100) Note The DPU cannot be connected to an MSC 101! An LCD system that may be installed has to be removed completely. The original test negative unit is needed again. Densitometer of the MSC The densitometer has to be of the right technical level so that the test prints of the DPU can be measured correctly. The following items have to be observed and checked: − Densitometers carrying an SN < 5000 have to be replaced in general (type 8506/921) − In densitometers carrying SN between 5000 and 7000, the Eprom has to be changed. The Eprom of SW V 5.7 has to be mounted. In addition, these densitometers not marked by a red dot have to be calibrated. In this case, it is recommended to order the conversion kit for the control strip handling (CM+9.8506.9740.0). All required parts needed for the calibration are contained in this kit. − In densitometers carrying SN from 7000, only the Eprom with SW V 5.7 has to be mounted. Part number for the densitometer Eprom SW V 5.7: CM+9.8506.9750.0 Basically, all MSC 100 and MSC 200 are equipped already with the densitometers SN < 7000 when they are delivered. Unfortunately there are a few exceptions. The serial numbers of the MSC that have an older densitometer or a densitometer of an unknown level are given in the following table. 1.8 03.06.98 /PN 7020 AGFA MSC 100, MSC 200 DPU Technical Documentation Installation MSC 100 Machine Machine Machine Densito SN TÜV SN UL SN ACC meter SN 111-120 125-127 131 -139 111 121 122 123 124 19941999 20012015 20012052 Dens SN <5000 = change ä ä ä ä 20162055 ä 20012010 20212025 2089 2036 2129 21362138 21512157 5034 AGFA MSC 100, MSC 200 DPU Dens SN unknown = check ä ä ä ä ä ä ä ä ä ä 3021 4396 4501 ä ä ä ä ä ä 03.06.98 /PN 7020 1.9 Installation Technical Documentation MSC 200 Machine Machin Machine SN TÜV e SN SN ACC UL Densitom eter SN Dens SN <5000 = change 112 113 115 116 121 119 117 118 132 132 125 -131 133 136 140 141 146 149 150 151 152 153 154 155 156 161 164 165 167 168 4954 4843 4489 4875 4879 4841 3294 4882 4956 4194 4887 4898 4894 4930 ä ä ä ä ä ä ä ä ä ä ä ä ä ä 143 164 2017 2021 2260 1.10 03.06.98 /PN 7020 4944 ä Dens SN unknown = check ä ä ä ä ä ä ä ä ä ä ä ä ä ä ä ä ä ä ä AGFA MSC 100, MSC 200 DPU Technical Documentation Installation Scope of delivery TI10 1 2 3 4 5 6 Cable passage (only for MSC 100) Front door Positioning pins Coupling for drive gear of the LH cutter Connector Door of the scrap box − DPU exposure unit − 51D-EXI board − Spacers for 51D-EXI board − Fastening screws − Documentation − Cable set for the connection to the MSC 100 Required tools − Open-end spanner size 13 − Open-end spanner size 17 − Open-end spanner size 24 − Cross tip screwdriver − Allen key 2,5 mm − Allen key 3,0 mm with ball head AGFA MSC 100, MSC 200 DPU 03.06.98 /PN 7020 1.11 Installation Technical Documentation Software t If the Software V2.61 has not yet been installed, it should be loaded: Loading the Software V2.61 (or higher) Note The loading of the new Software takes about 40 minutes. While the Updating is running, other jobs can be performed, i.e. removing panels. q Take the first diskette of the MSC Software and put it in the disk drive of the MSC. q Select the corresponding menu on the MSC: q Select UPDATE. The machine begins the Update of the Software. After a certain time (up to 30 minutes) you are asked to insert the second diskette and then the third one. At the end of the updating, the machine switches off and back on automatically. Please also read the documentation attached to the Software. q Select INFO/SOFTWARE VERSION and check whether the updating has been successful: MAIN FD PA PP SCPU MSC 100 2.61 3.17 2.53 1.50 --- MSC 200 2.61 3.17 3.38 3.23 3.33 q There are a few other parameters left that have to be entered in the file PA_MC.DAT. 1.12 03.06.98 /PN 7020 AGFA MSC 100, MSC 200 DPU Technical Documentation Installation Changing the parameter IDENT in PA_MC.DAT q Return to the Root menu. Connect an external keyboard and enter <Q>. The MSC terminates the program and goes to the DOS level. Display: C:\MSC1 q Open the file PA_MC.DAT with the MS DOS Editor. q Search the parameter IDENT. Change this value acc. to the machine: 30 for MSC 100 40 for MSC 200 This is to inform the Software, that the DPU has been installed. q Do not save the file yet, but go to the next chapter. There are other parameters to enter. Entering the parameters of the DPU in PA_MC.DAT To ensure a correct paper transport in the DPU, some additional parameters have to be entered. There is a sheet of paper on the inside of the large door of the DPU on which all parameters and the corresponding values are indicated. They have to be entered exactly as indicated on the paper (see example). DCUTX+00 DCUTZ4992 DEXPP4976 PWGHP+00 SCUTZ+01 q Save the file and close it. q Switch off the machine by the main switch. AGFA MSC 100, MSC 200 DPU 03.06.98 /PN 7020 1.13 Installation Technical Documentation Mechanical Installation Connection to an MSC 100 Preparing the MSC q If the MSC 100 is still switched on, terminate all orders and switch it off. q If the option Left paper magazine is installed, it has to be dismounted. It is not needed any more. q Remove the LH cover part , as well as the black cover behind. q Open the electronic rack ô, unscrew the fastening screw of the LH cutter and pull the latter approx. 3 cm to the front í. q If the LCD Index System is installed, dismount it. Mount the original test negative unit again. 200PK01 Changing the CPU of the Printer q Disconnect all plugs from the 50A-CPU PCB. Remove the board, it is not needed any more. q Install the 53A-CPU PCB instead. Make sure when switching on the MSC 100 again that a Download PA is performed automatically. If not, do it yourself. 1.14 03.06.98 /PN 7020 AGFA MSC 100, MSC 200 DPU Technical Documentation Installation Installation of the 51D-EXI board in the MSC 100 This board is needed to control the DPU. It is supplied in the additional pack. q Put the 51D-EXI board on the 53A-CPU. q Take the connector with the designation EXI CN1 from the cable set for the MSC 100. q Connect it to CN1 on the EXI board. q Remove the covers from the two cable ducts (Pos 1 and 2). q Look for the red and the black cable in the cable duct (Pos 2) that run to the 53AMD1 board. q Crimp the two cables of the connector EXI CN1. Always link cables of the same colour. q Run the cables as shown in the above figure and put the covers back on the cable ducts. Note If the DPU does not start when the MSC is switched on, check the two crimp connections. Squeeze them again with a pair of pliers. AGFA MSC 100, MSC 200 DPU 03.06.98 /PN 7020 1.15 Installation Technical Documentation Installing the cable set for MSC 100 q Unscrew the covers at the back and the front of the DPU. q Dismount the connector shown in the figure. Disconnect all cables with plugs from the connector: − MAD CN 1 − MAD CN 2 − LSGAMD CN (detection of the paper magazine) − PRD CN 7 1 Dismount this connector q Mount the delivered cable set. All connectors mentioned above have to be reconnected. 1.16 03.06.98 /PN 7020 AGFA MSC 100, MSC 200 DPU Technical Documentation Installation Changing the control cable of the FOCRT unit q Remove the large black cover at the back of the DPU. The FOCRT unit is then accessible. q Remove the connector marked MSC 200 and replace it by the one marked MSC 100 (see figure below). Changing the paper transport control cable q On the board 51A-PRD, replace the connector CN2 by the one marked MSC 100. The cable is mounted already in the DPU. AGFA MSC 100, MSC 200 DPU 03.06.98 /PN 7020 1.17 Installation Technical Documentation Attaching the DPU Note If the DPU and the MSC 100 are operated close to a wall, the cables of the Index Printer Scan and the Index Printer Data have to be installed in the DPU first before the latter is attached. See chapter Connecting the IP. q Push the DPU against the machine, making sure that the positioning pins fit into the holes on the machine. Level any difference in height that may exist by unscrewing the front rollers. At the back, the DPU is adjusted to the right level by means of the adjusting feet. 1.18 03.06.98 /PN 7020 AGFA MSC 100, MSC 200 DPU Technical Documentation Installation q Screw the DPU to the MSC at the front positioning pin rail first. (3 hexagon head screws size 13) q Screw on the DPU in the other spots (4 Phillips screws). AGFA MSC 100, MSC 200 DPU 03.06.98 /PN 7020 1.19 Installation Technical Documentation Dismounting the transport securities q Dismount the two Allen screws in the paper magazine compartment (Pos 1) q Another screw is located on the right side in the paper transport section (Pos 2). The screws to be unscrewed for the removal of this cover are located just above the bottom (2 Phillips screws). Note Use an Allen key size 3mm with a ball head for this job. q Dismount all three holding brackets (Pos 2, 3, 4) used to fasten the FOCRT unit inside the DPU. 1.20 03.06.98 /PN 7020 AGFA MSC 100, MSC 200 DPU Technical Documentation Installation Connection to the MSC 100 q Dismount the cover at the bottom right (with the scrap box) and pull out the two cables (Pos 1). q Run the two cables of the DPU through the opening (see figure below) up to the board 51D-EXI of the MSC. q Connect the two connectors to the EXI board (CN 7 and CN 8). The other slots remain vacant. AGFA MSC 100, MSC 200 DPU 03.06.98 /PN 7020 1.21 Installation Technical Documentation Hiding the cables for MSC 200 q The two cables carrying the same designation that come out from under the top cover (Pos 2) are not needed (only for MSC 200). They can be hidden under this cover. For this, unscrews the screws marked by the arrows, pull the cover towards you and lift it off. 1.22 03.06.98 /PN 7020 AGFA MSC 100, MSC 200 DPU Technical Documentation Installation Connecting the IP 1 2 3 4 5 6 7 8 Power cable Connection for a serial mouse (not used in normal operation) Index Printer Scan Keyboard connection (not used in normal operation) Index Printer Data Ethernet connection Connecting cable to the FOCRT GND connection for the IP q Put the IP into the free compartment on the left side of the FOCRT unit q Connect the cables shown above to the IP. q Take the power cable that is normally used for the screen and connect the other end to the high-voltage output in the DPU. q Link the GND connection of the IP with the frame of the DPU. q Run the cables to the Agfa computer as shown in the following figure. AGFA MSC 100, MSC 200 DPU 03.06.98 /PN 7020 1.23 Installation Technical Documentation Final work q Put back all covers of the DPU q Mount the scrap box to the DPU at the bottom right. q Install the cutter again in the MSC and close the electronic cover. q Use the power cable in the IP accessory pack to connect the DPU to the mains socket outlet. q Now go to the chapter After the first switch-on 1.24 03.06.98 /PN 7020 AGFA MSC 100, MSC 200 DPU Technical Documentation Installation Connection to an MSC 200 Preparing the MSC q If the MSC 200 is still switched on, terminate all orders and switch it off. q If the option Left paper magazine is installed, it has to be dismounted. It is not needed any more. q Remove the negative carrier and the mirror box q Dismount the cover from the lamphouse and the Scanner tray. q Remove the metal plate underneath (2 screws) q Remove the LH cover part , as well as the black cover behind. q Open the electronic rack ô, unscrew the fastening screw of the LH cutter and pull the latter approx. 3 cm to the front í. q If the LCD Index System is installed, dismount it. Mount the original test negative unit again. 200PK01 Installation of the EXI board This board is needed to control the DPU. It is supplied in the accessory pack. q Put the EXI board on the 53A-CPU. q There is a connector in this area that carries the designation IXP CN1. Connect it to CN1 on the EXI board. AGFA MSC 100, MSC 200 DPU 03.06.98 /PN 7020 1.25 Installation Technical Documentation Attaching the DPU Note If the DPU and the MSC 200 are operated close to a wall, the cables of the Index Printer Scan and the Index Printer Data have to be installed in the DPU first before the latter is attached. See chapter Connecting the IP. q Push the DPU against the machine, making sure that the positioning pins fit into the holes on the machine. Level any difference in height that may exist by unscrewing the front rollers. At the back, the DPU is adjusted to the right level by means of the adjusting feet. 1.26 03.06.98 /PN 7020 AGFA MSC 100, MSC 200 DPU Technical Documentation Installation q Screw the DPU to the MSC at the front positioning pin rail first. (3 hexagon head screws) q Screw on the DPU in the other spots (4 Phillips screws). AGFA MSC 100, MSC 200 DPU 03.06.98 /PN 7020 1.27 Installation Technical Documentation Dismounting the transport securities q Dismount the two Allen screws in the paper magazine compartment (Pos 1) q Another screw is located on the right side in the paper transport section (Pos 2). The screws to be unscrewed for the removal of this cover are located just above the bottom (2 Phillips screws). Note 1.28 Use an Allen key size 3mm with a ball head for this job. 03.06.98 /PN 7020 AGFA MSC 100, MSC 200 DPU Technical Documentation Installation q Dismount all three holding brackets (Pos 2, 3, 4) used to fasten the FOCRT unit inside the DPU. Connection to the MSC 200 q Run the two cables of the DPU through the opening (Pos 1) around the rack up to the EXI board. q Connect the two connectors to the EXI board (CN 7 and CN 8). The other slots remain vacant. q Make sure that no cables are squeezed when the rack is pushed back in. AGFA MSC 100, MSC 200 DPU 03.06.98 /PN 7020 1.29 Installation Technical Documentation Connecting the IP 1 2 3 4 5 6 7 8 Power cable Connection for a serial mouse (not used in normal operation) Index Printer Scan Keyboard connection (not used in normal operation) Index Printer Data Ethernet connection Connecting cable to the FOCRT GND connection for the IP q Put the IP into the free compartment on the left side of the FOCRT unit q Connect the cables shown above to the IP. q Take the power cable that is normally used for the screen and connect the other end to the high-voltage output in the DPU. q Link the GND connection of the IP with the frame of the DPU. q Run the cables to the Agfa computer as shown in the following figure. 1.30 03.06.98 /PN 7020 AGFA MSC 100, MSC 200 DPU Technical Documentation Installation Final work q Put back all covers of the DPU q Mount the scrap box to the DPU at the bottom right. q Install the cutter again in the MSC and close the electronic cover. q Use the power cable in the IP accessory pack to connect the DPU to the mains socket outlet. q Now go to the chapter After the first switch-on AGFA MSC 100, MSC 200 DPU 03.06.98 /PN 7020 1.31 Installation Technical Documentation After first Switch-on Operation of the DPU without Index camera If no Indexprints are to be produced, the camera need not be used. To suppress error messages on the MSC, the missing camera has to be entered in the file IP_MC.DAT. q On the MSC, enter in the menu EDIT/PRINTER/DEFAULT SETTINGS/ ADJUSTMENTS/EDITING IP_MC q Search the parameter INDEX and change the appropriate value from 1 to 0. It is then possible to work without the camera. Test print for the FRED calibration FRED means Fiber Optic Registration and Equalisation Device. This calibration has to be performed to make sure that large surfaces are represented uniformly. The test print is scanned and assessed by a high-speed Scanner in your Service Centrale. The resulting data is used to create a correction file which has to be loaded into the FOCRT. The calibration has to be performed once upon a new installation. A second calibration may be necessary under the following conditions: − Change of the paper brand. − Change of the location of the DPU. − Printing always the same subject (burning effect). In this case, a calibration is recommended every 12 to 18 months. − Use of a new wider paper after only narrow paper widths have been used. t For this, a VGA monitor and a mouse are required that both have to be connected to the IP. Important 1.32 Clean the exposure array before starting (See the chapter Maintenance) 03.06.98 /PN 7020 AGFA MSC 100, MSC 200 DPU Technical Documentation Installation q Put on a magazine with 203 or 210 mm wide paper on the left side (DPU). Use at least paper of the largest width. q Create a digital channel for this paper and calibrate it (both operations are described in the chapter Operation). q Leave the MSC in the digital print mode after the calibration. q Go to the screen of the IP. q The menu bar is at the top right where you can see among others For Experts Only. Click this point. q Three more lines appear. Click on Activate AG850 functions. q Now click Action q Search FRED Testpattern and click on it. AGFA MSC 100, MSC 200 DPU 03.06.98 /PN 7020 1.33 Installation Technical Documentation A test print is exposed and processed. Have a critical eye on the test print. If there are fluctuations on the grey field crosswise to the direction of transport, proceed as follows: q Expose another test print q Put both prints in a stable envelope and send the latter to the address given below, stating the location of the DPU: Agfa Gevaert AG LG-SAT3/ML Attn. Wolfgang Renner Tegernseer Landstraße 161 D-81539 München Note The two test prints must not show finger marks or kinks, otherwise they cannot be assessed. If desired, the correction file may also be sent via E-Mail. 1.34 03.06.98 /PN 7020 AGFA MSC 100, MSC 200 DPU Technical Documentation Installation Loading the correction file into the DPU After a few days, you will get a diskette with the correction file which has to be loaded into the DPU. For this operation, a keyboard and a monitor are required that are to be connected to the IP. q Switch off the IP q Put the received diskette in the disk drive of the IP q Switch the IP back on. It boots to MS-DOS. If this is not the case, change the boot sequence from C,A to A,C in the BIOS. q Then make the entries described in the table below: The appropriate messages that appear after each sending of a command are given under Display DPU and screen IP. Entry bootjump fm -edbv bXXXXXXy.dlu Display DPU Boot Rom Test Executive Waiting Test Boot Rom Test Executive flash erase in progress (bXXXXXXy.dlu is the file that has to be downloaded. XXXXXX is the 6-digit serial number of the FOCRT that should agree with the sticker on the unit) (The entries can be continued as soon as the current drive of the IP appears again) AG850 Warm up Please wait test999 Screen IP fast8 -c bt_jump.cmd Got NOT_BUSY (LPT1 at 0x378 Erase of uniformity flash 000... Download... Burning flashes... Verifying... fast8 -c test999.cmd Got NOT_BUSY (LPT1 t 0x378) A:dsc2pc8 TE: [32mOK -- Flash EEPROMS are programmed. [0m The DPU is ready to operate again. AGFA MSC 100, MSC 200 DPU 03.06.98 /PN 7020 1.35 Installation Technical Documentation Technical Data Exposure unit (FOCRT) Pixel resolution Maximum image resolution Colour depth Maximum paper width Sweep time (1 line, 1 colour) Host Interface Centronics Paper transport during the exposure Video tape width Internal data processing Max. density fluctuation on a print Max. density fluctuation from print to print 500 dpi 360 dpi 3x8 bit (RGB) 220 cm or 8,5“ 0,35 ms 0,8 - 1,0 MB/s 10 - 12 mm/s 10 MHz 12 bits/colour +/- 0,03 D +/- 0,05 D Print capacity 160 Prints/h 70 Prints/h 10 X 15 cm or 6“ X 4“ 20 X 30 cm or 8“ X 12“ Available paper widths and lengths Paper width mm Inch 82 3¼ 89 3½ 95 3¾ 102 4 120 4¾ 127 5 152 6 165 6½ 178 7 203 8 210 8¼ Available length mm Inch 120 - 305 4 ¾ - 12 120 - 305 4 ¾ - 12 120 - 305 4 ¾ - 12 120 - 305 4 ¾ - 12 89 - 305 3 ½ - 12 89 - 305 3 ½ - 12 89 - 305 3 ½ - 12 89 - 305 3 ½ - 12 89 - 305 3 ½ - 12 89 - 305 3 ½ - 12 89 - 305 3 ½ - 12 Operating conditions Room temperature: Relative humidity: Noise level: EMV: 1.36 03.06.98 /PN 7020 +15°C ..+30°C 15% - 75% < 70 dB(A) Class B AGFA MSC 100, MSC 200 DPU Technical Documentation Installation Current consumption The DPU needs 750 W in operation. The power supply unit adjusts itself automatically to the existing voltage within a range of 100 V to 240 V. The connection is single-phase to a normal socket outlet. Mains voltage Current Note 100 V 115 V 7,5 A 6,5 A 120 V 6,25 A 127 V 5,9 A 200 V 3,8 A 220 V 3,4 A 230 V 3,3 A 240 V 3,2 A The Image Processor is not included. The values are as follows: 90 - 140 V max 2A 190 - 264 V max 1 A Electrical fusing No special fusing is required for the operation of the DPU. Weight DPU DPU + MSC 100 DPU + MSC 200 180 Kg 700 Kg 1040 Kg Dimensions Length: Width: Height: 75 cm 67 cm 110 cm Storage and transport Temperature range: Relative humidity: -30°C ..+60°C up to 95% Prerequisites for the connection of the DPU The following prerequisites have to be met so that the DPU can be operated together with the MSC: − IP (Image Processor) type 8508/410 available − Camera Kit type 8506/313 installed in the MSC − Software Main V 2.61 or higher installed in the MSC − 53A-CPU board type 8506/351 (only for MSC 100) − Densitometer of the MSC: Modify or replace, see the chapter Installation Note The DPU cannot be connected to an MSC 101! An LCD system that may be installed has to be removed completely. The original test negative unit is needed again. ■ AGFA MSC 100, MSC 200 DPU 03.06.98 /PN 7020 1.37 Technical Documentaion Contents Contents Page Operation ......................................................................................................................2.3 Creating a digital Print Channel ..............................................................................2.3 Defining the name of the cannel.......................................................................2.4 Back printer ......................................................................................................2.4 Selection of the calibration method...................................................................2.5 Sub-method ......................................................................................................2.5 Emulsion...........................................................................................................2.5 Calibrating a digital Print Channel...........................................................................2.6 Automatic calibration ........................................................................................2.6 Selection of a digital Print Channel.........................................................................2.8 Creating Index Channels ........................................................................................2.9 Connection to the Image Processor .................................................................2.9 Creating Indexprint sizes ................................................................................2.10 Selecting the Layout .......................................................................................2.11 Print length .....................................................................................................2.12 Linking Index channels with the optical print channel.....................................2.13 Selection of the DPU as Indexprint printer......................................................2.14 Setting and Configuration of the Indexprint Production ........................................2.16 Adjustment of the IP Logic / camera optimisation...........................................2.16 Setting the general trend ................................................................................2.17 Colour and density corrections .......................................................................2.17 Optimisation of single film types .....................................................................2.18 Printing selected frames .................................................................................2.21 Texts for selected frames ...............................................................................2.22 Indexprints with frames...................................................................................2.22 Output of the DX code on the Indexprint ........................................................2.23 Change of the date format for 135..................................................................2.23 Selftest IIP ......................................................................................................2.24 Modifying Logos....................................................................................................2.25 Overview.........................................................................................................2.25 Procedure .......................................................................................................2.26 Working with the DPU...........................................................................................2.27 Printing in the digital mode .............................................................................2.27 Switching on the Index Print function on the user level..................................2.27 Producing Indexprints.....................................................................................2.28 Several Indexprints per order .........................................................................2.28 Indexprints from film strips..............................................................................2.29 DX Table...............................................................................................................2.30 Size 135..........................................................................................................2.30 Size APS.........................................................................................................2.33 AGFA MSC 100, MSC 200 DPU 03.06.98/ PN 7020 2.1 Contents 2.2 Technical Documentation 03.06.98/ PN 7020 AGFA MSC 100, MSC 200 DPU Technical Documentaion Operation Operation Creating a digital Print Channel The digital print mode can be reached from the Root menu. Prerequisite is that the DPU has been recognised by the MSC. q Select the key Digital Print Mode q Press Edit to create a digital channel AGFA MSC 100, MSC 200 DPU 03.06.98/ PN 7020 2.3 Operation Technical Documentation Defining the name of the cannel q Press <New>. A menu is displayed that asks for the entry of the name. q Confirm the entry by pressing <BACK.> The following menu is displayed: Back printer The characters entered here are only printed when a transfer program (Workstation -IP) is used and no data is indicated for the back print in the associated ICF file. If only a graphic file is copied to the directory DPU of the IP, the back print shows the file name and the current date. No other data can be printed. q Press <Back print> Up to 40 characters can be printed. The same features can be selected as for the optical channels. Pressing <Back> will validate the entries. The MSC returns to the previous menu. 2.4 03.06.98/ PN 7020 AGFA MSC 100, MSC 200 DPU Technical Documentaion Operation Selection of the calibration method After pressing <Calibration method>, a selection between the internal and the external mode is possible. We recommend to use the internal method in which the test print is measured automatically by the internal densitometer. Note For the external method, a special external densitometer is required, i.e. the model X-Rite810. This calibration procedure is very complicated and time-consuming. Note The key <Sub-method> has no function yet and is reserved for later applications. Sub-method Emulsion After pressing this key, the emulsion number of the paper in use can be entered. It is output for information when test prints are made. AGFA MSC 100, MSC 200 DPU 03.06.98/ PN 7020 2.5 Operation Technical Documentation Calibrating a digital Print Channel q Press Test Automatic calibration After pressing the appropriate key, the menu below is displayed. We recommend to use only this calibration method. q Select the correct paper width and paper surface. q The digital channels created for this configuration are shown below. Select the channel to be calibrated. q Press Testprint. A test print is exposed and processed. Then it is measured by the integrated densitometer. The calculation of the correction values is automatic. 2.6 03.06.98/ PN 7020 AGFA MSC 100, MSC 200 DPU Technical Documentaion Operation Meaning of the TP Flags: R Autocalibration running, test print not yet in tolerance. A Autocalibration finished, test print in tolerance S Calibration stopped AGFA MSC 100, MSC 200 DPU 03.06.98/ PN 7020 2.7 Operation Technical Documentation Selection of a digital Print Channel q Press <Select> q Select the correct paper width and paper surface. q The digital channels created for this configuration are shown below. Select the desired channel. Note 2.8 The sub-menus of <Parameter> have no function yet. They are reserved for later applications. 03.06.98/ PN 7020 AGFA MSC 100, MSC 200 DPU Technical Documentaion Operation Creating Index Channels Connection to the Image Processor To find the <Index> function key described in the following chapters, the communication with the IP has to be switched on first. q Press <Back> to go to the Root menu and then press <ON / OFF>. q Press <IIP ON> Pressing <BACK> will initiate the Index camera calibration. AGFA MSC 100, MSC 200 DPU 03.06.98/ PN 7020 2.9 Operation Technical Documentation Creating Indexprint sizes First of all, 2 Indexprint channels have to be created for each configuration that have the size of the Indexprints, and other settings have to be specified. Indexprint size 1 This size is intended for Indexprints from films that meet the following requirements: − A film of size 135 with less than 28 or 30 frames (depending on the Indexprint size). − An APS film with less than 25 frames. Indexprint size 2 This size is intended for Indexprints from films with more frames than mentioned before. This size requires a separate channel because this Indexprint will get larger. q Go to EDIT/PRINTER/CONFIGURATION q Select the paper width to be used for the Indexprints. q Select NEW. The request comes up to enter a name for the new channel. Example: index1 q Press <BACK> q Select INDEX q First, activate the Index function with the key <Index enabled> and declare this channel to be an Indexprint channel (INDEXFORMAT ON) 2.10 03.06.98/ PN 7020 AGFA MSC 100, MSC 200 DPU Technical Documentaion Operation Then specify the Layout (size) of the Indexprint. Selecting the Layout The Layout is responsible for the size of the Indexprint. For APS films, only the small size is possible at present. For film size 135, either a large or a small size can be selected. The large size can only be used with paper widths from 127 mm. q After the newly created channel has been declared to be an Index size, the following menu is displayed: q Enter the Layout number acc. to the table on the next page. AGFA MSC 100, MSC 200 DPU 03.06.98/ PN 7020 2.11 Operation Technical Documentation Layout table: Film size 135 135 Layout small large APS standard Index format 1 1 3 5 Index format 2 Remark 0 Only possible from paper 2 width 127 mm 4 The numbers to be entered are given under Index format 1 and Index format 2. Upon this, the print length has to be specified: Print length Pressing the <BACK> key twice will bring up the following menu: q Select <Print length> q Enter the print length for this channel acc. to the following table. − APS size Paper width Note 2.12 ≥ 120 mm 89, 102 mm No. of prints up to 25 26 - 40 up to 25 26 - 40 Index size 1 1 Cut length 127 mm 182 mm 127 mm 182 mm 2 2 Only small Indexprints can be produced from APS films. 03.06.98/ PN 7020 AGFA MSC 100, MSC 200 DPU Technical Documentaion Operation − Size 135 Here, either the small or the large Indexprint size can be selected. The Layout parameter is used to specify from which paper width the large size is to be used. However, it is not possible to choose paper widths smaller than 127 mm for the large size. Small size: ≥ 127 mm Paper width 89 mm 102, 120 mm No. of prints up to 28 29 to 40 up to 28 29 to 40 up to 28 29 - 40 Index size 1 Cut length 127 mm 170 mm 140 mm 184 mm 102 mm 178 mm 2 1 2 1 2 Large size: Paper width Note 127 - 210 mm No. of prints up to 30 31 - 40 Index size 1 Cut length 178 mm 200 mm 2 The cut lengths indicated here are only reference values! The creation of Indexprint channel 1 is thus terminated. Indexprint channel 2 is created in the same way. Linking Index channels with the optical print channel q Select on the MSC the channel with the configuration that should be used to produce the DPU Indexprints. For film size APS, the Index channels are assigned to the Simple H channel. For this, the connection to the Auto channel has to be interrupted and reconnected after the allocation. q Call up the menu EDIT/PRINTER/CONFIGURATION/MODIFY q Select INDEX q If Index disabled appears, press Index active. Display: q Select Assign format AGFA MSC 100, MSC 200 DPU 03.06.98/ PN 7020 2.13 Operation Technical Documentation The Index channels just created are offered for selection when the paper width of the optical channel is the same as the one of the Indexprints. Otherwise the paper width has to be selected first for which the Index channels were created. q Call Indexprint channel 1 1st Index format and Indexprint channel 2 2nd Index format q Press <BACK> to return to the Root menu. When an optical channel with a DPU Indexprint function is selected, the following screen should appear. If not, proceed to the next chapter. Note 2.14 The correct selection of the two Indexprint channels is performed automatically by the MSC. 03.06.98/ PN 7020 AGFA MSC 100, MSC 200 DPU Technical Documentaion Operation Selection of the DPU as Indexprint printer If the middle field in the last line does not read DPU Indexprint, the correct Indexprint printer has probably not been selected yet. Note If the MSC is started without DPU by mistake (e.g. main switch of the DPU OFF), the Mitsubishi CP700DE is set again automatically. q Return to the Root menu q Press EDIT/Index Image Processor/Printer type Select DPU as printer type. Upon this, the program asks whether the printer should be changed. Press <Yes>. If the DPU does not appear, then this may be due to the following reasons: − DPU not connected − DPU not switched on − DPU not recognised by the MSC (one or several plugs not plugged in) q The MSC returns to the menu EDIT/Index Image Processor. The change is validated. AGFA MSC 100, MSC 200 DPU 03.06.98/ PN 7020 2.15 Operation Technical Documentation Setting and Configuration of the Indexprint Production Adjustment of the IP Logic / camera optimisation Note It is very important to adjust the IP logic upon a new installation of the IP Software. If this is not done, colour deviations may occur among the different films. The IP logic need not be adjusted when the Software is updated because existing data records are used. Five to ten films of different makes are required for the adjustment. Please observe the following when selecting the films: − The films should include a minimum of problem subjects (no dominants, flash shots, etc..). − None of the films should consist of mainly overexposed or underexposed frames. − The films should not be shorter than 40 cm. q On the MSC, call up the menu EDIT/PRINTER/DEFAULT SETTING/ ADJUSTMENT/EDIT IP_MC q Set the parameter AUTOC to the negative number of films that are available. For example, if you have 10 films, enter <-10>. q Select an Indexprint channel on the MSC and activate INDEXPRINT ONLY ON. q Print all films one after the other. As long as the optimisation is not finished, the message IIP: Calibration not terminated comes up for information. It disappears again when the next film is inserted. q Then set the parameter AUTOC back to <1>. The adjustment is thus terminated and need not be repeated any more. 2.16 03.06.98/ PN 7020 AGFA MSC 100, MSC 200 DPU Technical Documentaion Operation Setting the general trend Note Before starting the setting, calibrate the paper that is used for the Indexprints. This is done by creating a digital channel for this paper and starting the calibration procedure (see the chapters Creating a digital print channel and Calibrating a digital print channel). Produce Indexprints from films of different make. The Indexprints should all show the same trend. If there are deviations with certain film types, go to the chapter Optimisation of single film types. Colour and density corrections Enter the correction values for colour and density as follows: q Select EDIT/INDEX IMAGE PROCESSOR q Press IIP Balance AGFA MSC 100, MSC 200 DPU 03.06.98/ PN 7020 2.17 Operation Technical Documentation q For films 135, select Format correction 135, For films APS, select Format correction APS. q Make a selection as to whether the corrections should be used for normally exposed frames, or for overexposures or underexposures. Optimisation of single film types Should deviations occur with isolated film types, special corrections may be performed. By reducing the cycle counter by 1, for example, a certain film type can be learned again selectively. This procedure should be given preference over the modification of the parameter AUTOC in the IP_MC.DAT file. The special corrections for film size 135 are stored in the file C_DATA.135 and those for APS films, in the file C_DATA.APS on the hard disk of the IP. These values may be modified on the MSC. Always one film type can be corrected. The DX code of the film has to be available as numeric value. The code can be found in the table at the end of the documentation. If it is not possible to identify the DX code clearly, set parameter DXOUT to <1>. The code then appears on the Indexprint. 2.18 03.06.98/ PN 7020 AGFA MSC 100, MSC 200 DPU Technical Documentaion Operation q Select on the MSC EDIT/INDEX IMAGE PROCESSOR q Press IIP Balance q For films 135, select Film correction 135, For APS films, select Film correction APS. The DX code of a film is always shown in the format 000-00. The first three digit numbers identify the manufacturer, the last two, the film type. AGFA MSC 100, MSC 200 DPU 03.06.98/ PN 7020 2.19 Operation Technical Documentation q First select the next Product class and enter the number of the manufacturer. A zero at the beginning is omitted. q Then select Film specifier and enter the last two digit numbers of the DX code. A zero in the tens can be omitted. 2.20 03.06.98/ PN 7020 AGFA MSC 100, MSC 200 DPU Technical Documentaion Operation The DX code of the film is displayed and the corrections can be entered. q Select the area (normally exposed frames = Modify DX Balance, Modify Slope or Cycles) Printing selected frames It is possible to decide separately for each selection criterion whether the frame should be shown on the Indexprint, or whether a corresponding text should appear instead. q Select EDIT/INDEX IMAGE PROCESSOR AGFA MSC 100, MSC 200 DPU 03.06.98/ PN 7020 2.21 Operation Technical Documentation q Press Status Indexscan If the frame should be shown, select <IMAGE>. If a frame with a corresponding text should appear, <FRAME> has to be set. Texts for selected frames The negative numbers of selected frames appear in red. If <FRAME> was selected for a selection criterion, as described in the previous chapter, a brief explanation of the reason why the selector was activated appears in the frame. This text is in English when the machine is delivered. But if desired, another language can be selected. For this, the file INDEX.INI has to be copied to a diskette and edited. The text can be found under Selection: This file (along with some others) is saved on a diskette when a MS-DOS (at least of version 5.0) formatted diskette is put in the disk drive of the IP and then the SELFTEST IIP is triggered on the MSC. <TEST> <SELFTEST IIP>. Note Make absolutely sure that none of these files is on the diskette already. If one or several files of the IP are on the diskette already, they are copied to the hard disk and not vice versa. [Selection] Selection1 = Selection2 = Selection3 = Selection4 = Note hole/label under exposed over exposed fogged To be able to reproduce language-specific characters correctly, e.g. umlauts, the text should be changed with the country-specific Windows Editor. Indexprints with frames If desired, every exposed frame on an Indexprints can be framed. For this, the new parameter BORDER in the file IP_MC.DAT has to be set to 1. 2.22 03.06.98/ PN 7020 AGFA MSC 100, MSC 200 DPU Technical Documentaion Operation Output of the DX code on the Indexprint The responsible parameter in the file IP_MC.DAT carries the designation DXOUT. After the change to 1, the DX code appears behind the date. The DX code also appears behind the date for a film type whose learning phase is not finished yet. The learning phase is terminated as soon as the number of Cycles corresponds to the number under AUTOCAL. Change of the date format for 135 On Indexprints for films 135, the date of creation in the photolab appears which the IIP receives from the MSC. The date format should therefore be set on the Minilab. Go through the following menus one by one: − EDIT − PRINTER − DEFAULT SETTING − SWITCHES − NATIONAL SETTINGS − DATE FORMAT Select the desired format here. AGFA MSC 100, MSC 200 DPU 03.06.98/ PN 7020 2.23 Operation Technical Documentation Selftest IIP The following overview shows what happens under which conditions when the function is activated: Before activating a function, a diskette has to be put in the IIP. The function that is activated depends on the contents of the diskette. Contents of the diskette empty (MS-DOS formatted) Files INDEX.INI, C_DATA.135 and C_DATA.APS BMP or JPG file 2.24 03.06.98/ PN 7020 Function The files INDEX.INI, C_DATA.135 and C_DATA.APS are copied to the diskette The files are copied to the hard disk of the IIP and are then active. The old files (active before in the IIP) are saved on the diskette as Backup file. There is no transfer of the files INDEX.INI, C_DATA.135 and C_DATA.APS. The BMP or JPG file is saved in the directory for Logos. Prerequisite: The file carries the correct name! AGFA MSC 100, MSC 200 DPU Technical Documentaion Operation Modifying Logos After the production has been set, the Image Processor supplies saleable Indexprints. If desired, the Logos can be modified. In this case, the files involved have to be replaced as appropriate. They are stored on the hard disk of the Image Processor C:\MSC_IP\DATA\BMPS. Required properties of the graphic files: − Windows BMP − 24 Bit colour depth (True Color) − Size see overview tables Note Good knowledge of a graphic program is required to do this modification successfully. Overview The following overview informs about the Indexprint sizes and the pertaining Logos that are used. − Format APS Different graphics are used, depending on the number of frames. No. of frames Logo up to 25 File name apsc25i.bmp Size 520 X 64 from 26 to 40 File name apsc40i.bmp Size 744 X 85 apsc25r.bmp 512 X 162 apsc40r.bmp 968 X 218 − Format 135 Here, an additional distinction is made between a small and a large Indexprint size. The large size is selected by means of the Layout number that is specified upon the creation of the auxiliary channels. The smallest paper width for the large size is 127 mm. Small Indexprint size: No. of frames Paper width Logo AGFA MSC 100, MSC 200 DPU up to 28 all * File name 135c28i.bmp 135c28r.bmp Size 600 X 140 from 29 to 40 all * File name 135c40i.bmp Size 608 X 128 320 X 234 135c40r.bmp 320 X 231 03.06.98/ PN 7020 2.25 Operation Technical Documentation Large Indexprint size: No. of frames Paper width Logo up to 30 127 - 210 mm File name Size 135c28bi.bmp 864 X 151 31 - 40 127 - 210 mm File name 135c40bi.bmp Size 1024 X 144 135c28br.bmp 304 X 108 135c40br.bmp 456 X 108 Procedure q Create the graphic file with the desired Logo. q Save the file on an empty diskette. The name and the size of the file should correspond to the data of the tables in the previous chapters. q Put the diskette in the disk drive of the Image Processor. q Copy the file in the directory C:\MSC_IP\DATA\BMPS. The original file can be renamed before so that it is not overwritten. 2.26 03.06.98/ PN 7020 AGFA MSC 100, MSC 200 DPU Technical Documentaion Operation Working with the DPU Printing in the digital mode If there is a file to print in the directory MSC_IP\DPU, the display of the MSC shows the message Digital mode required. q Keep the Back key depressed until the Root menu is reached. q Select the digital mode. The MSC immediately begins the exposure. The selection of the digital channel is performed automatically when a paper magazine is inserted on the left side. Switching on the Index Print function on the user level q Press <Indexprint> Note: If <Indexprint> does not appear, the Indexprint function has to be activated for this configuration. For this, go to the chapter Creating Index channels. Pressing <Index ON> will activate the function. AGFA MSC 100, MSC 200 DPU 03.06.98/ PN 7020 2.27 Operation Technical Documentation If the following display appears, The communication MSC - IP has to be switched on first. Go to the chapter Connection to the Image Processor. Producing Indexprints ▼ Before the film is inserted, the following points have to be checked: 1. Is the Image Processor correctly connected to the MSC (see Installation)? 2. Is the Image Processor ON? 3. Is the communication between the MSC and the IP ON? (Menu ON / OFF) 4. The Indexprint function has to be authorised for the desired configuration channel and should have been activated (see Presettings). 5. Indexprints can only be produced in the Autoprint mode. The Reprint mode is not selectable as long as the Indexprint function is active. Note: The last line of the screen should read: DPU Indexprint ON q Put the film in the negative carrier. The film is scanned and the Index camera takes a picture of every printable frame. The Indexprint is produced as soon as the film has left the negative carrier. Several Indexprints per order The number of Indexprints to be produced per order can be selected as follows: q Press <Indexprint> 2.28 03.06.98/ PN 7020 AGFA MSC 100, MSC 200 DPU Technical Documentaion Operation q Press Number of Indexprints. Select the desired quantity and confirm the entry by pressing <BACK>. Indexprints from film strips In the Autoprint mode, an Indexprint can be produced from several film strips. The parameter STRIP in the file IP_MC.DAT specifies how many frames are shown at max. on the Indexprint. The maximum value is <40>. q Select the Autoprint mode on the MSC q Activate the function INDEX or INDEX ONLY. q Handle the strips one after the other. It is advisable to insert the strip always in the same direction, e.g. always with the smallest frame number first, otherwise some strips are shown up side down. The Indexprint of the taken strips is created under the following conditions: − End of order triggered − Number of frames reached that are set with parameter STRIP. Example (Parameter STRIP set to 40): 38 frames have been taken already for an Indexprint. If a strip of 4 frames is inserted, it is scanned and buffered on the right side. The Indexprint is created. The frames of the strip inserted last appear on the next Indexprint. − Film inserted after the strips. (The film still belongs to the same order). AGFA MSC 100, MSC 200 DPU 03.06.98/ PN 7020 2.29 Operation Technical Documentation DX Table Size 135 2.30 DX-CODE [002-00] [002-01] [002-02] [002-03] [002-04] [002-05] [002-06] [002-07] [002-08] [002-09] [002-10] [002-11] [002-12] [002-13] [002-14] [002-15] [008-00] [008-02] [008-03] [008-04] [008-05] [008-06] [008-08] [008-10] [008-11] [008-12] [008-13] [009-01] [010-02] [010-03] [010-04] [010-08] [010-09] [010-10] [010-11] [010-13] [010-14] [010-15] [012-02] [012-03] [012-04] [012-06] [012-09] [012-10] [012-12] [017-00] [017-01] [017-02] Manufacturer KONICA KONICA KONICA KONICA KONICA KONICA KONICA KONICA KONICA KONICA KONICA KONICA KONICA KONICA KONICA KONICA FUJI FUJI FUJI FUJI FUJI FUJI FUJI FUJI FUJI FUJI FUJI INFACOLOR FUJI FUJI FUJI FUJI FUJI FUJI FUJI FUJI FUJI FUJI FUJI FUJI FUJI FUJI FUJI FUJI FUJI AGFA AGFA AGFA [017-03] [017-04] [017-05] AGFA AGFA AGFA 03.06.98/ PN 7020 Type 100 SR100 SR-V100 SR-V100 / D200 200 SR200 SRV200 GX100 SR400 SRV400 SR1600 SR-V3200 GX100 SRG100 GX-M100 GX400 SHR1600 SHR400 SHR200 SHR100 Superia 100+D62 / SHR100 NSP160 HR1600 HR400 HR200 HR100 Superia S200 SR SHG-400 II SHG-200 II SHR-100 II HG1600 NHG 400 HG400 HG200 HG100 REALA 100 G-400 G-200 G-100 (CN4) NPS 160 G-800 G-400 G-100 XR 100-i XRG 100 XRG 100 /Optima 125 Prof / Portrait 160 Prof ULTRA 50 / XRG 200 OPTIMA 200 / XRG 200 OPTIMA 200 / XRG 200 AGFA MSC 100, MSC 200 DPU Technical Documentaion Operation [017-06] [017-07] [017-08] [017-10] [017-11] [017-12] [017-13] [018-01] [018-07] [018-09] [036-02] [036-03] [036-04] [036-05] [036-07] [036-09] [036-10] [036-14] [036-15] [040-00] AGFA AGFA AGFA AGFA AGFA AGFA AGFA SCOTCH SCOTCH SCOTCH FUJI FUJI FUJI FUJI FUJI FUJI FUJI FUJI FUJI KONICA [040-01] [040-02] [040-03] [040-04] [040-07] [040-09] [040-10] [040-11] [040-12] [040-13] [049-00] [049-02] [049-05] [049-07] [049-08] [049-09] [049-11] [049-12] [050-02] [050-03] [050-04] [050-06] [050-07] [050-08] [066-06] [066-10] [066-11] [078-01] [078-02] [078-03] [078-04] [078-05] [078-06] [078-07] [078-08] [079-01] [079-02] KONICA KONICA KONICA KONICA POLAROID POLAROID KONICA POLAROID KONICA KONICA AGFA AGFA AGFA AGFA AGFA AGFA AGFA AGFA KONICA KONICA KONICA KONICA KONICA KONICA SCOTCH/3M SCOTCH/3M SCOTCH/3M KODAK KODAK KODAK KODAK KODAK KODAK KODAK KODAK KODAK KODAK AGFA MSC 100, MSC 200 DPU HDC 200 XRG 400 HDC 400 XRS 1000 HDC 200 HDC 100 XRG 200 CP 100 CP 200 CP 200 G - 400 / Superia 400 G - 200 G - 100 Superia 800 Reala 100 G 400 CH-4 V86 V100 (CN-8) D100 / HD2-100 / Super-SR100 SUPER-XG100 / Porst SUPER-XG100 IMPRESA-50 / Super SR 100 SR-G160 HDR-400 HDR-200 SR-G200 HD2-200 GX 100M SUPER-SR200P / D200 XR 200 PORTAIT XPS 160 OPTIMA 200 Prof OPTIMA 400 Prof OPTIMA 400 Prof OPTIMA 400-2 OPTIMA 200 Prof OPTIMA 100 Prof VX400 VX100 VX200 JX100 JX400+C101 / Sepia 400 (J) VX-PAN 400 EXL 100 400 200 C GOLD 100-6 GOLD 200-6 GOLD 400-6 RA 100-2 RB 200-6 400-2 RC GOLD 800-2 PJM2 VR100+ / DA-5 Color 200 03.06.98/ PN 7020 2.31 Operation Technical Documentation [081-01] [081-02] [081-03] [081-06] [081-07] [081-08] [081-09] [081-10] [081-11] [081-13] [082-01] [082-02] [082-03] [082-04] [082-05] [082-06] [082-07] [082-08] [082-09] [082-10] [082-11] [082-13] [082-14] [083-02] [083-04] [083-05] [083-06] [083-08] [083-09] [083-10] [083-11] [083-12] [083-13] [112-01] [112-04] [112-06] [112-07] [112-12] [113-00] [113-09] [115-00] [115-06] [115-08] [115-12] [121-00] [121-05] [122-00] [127-15] 2.32 03.06.98/ PN 7020 KODAK KODAK KODAK KODAK KODAK KODAK KODAK KODAK KODAK KODAK KODAK KODAK KODAK KODAK KODAK KODAK KODAK KODAK KODAK KODAK KODAK KODAK KODAK KODAK KODAK KODAK KODAK KODAK KODAK KODAK KODAK KODAK KODAK KODAK KODAK KODAK KODAK KODAK AGFA AGFA AGFA PERUTZ PERUTZ PERUTZ ORWO ORWO ORWO KODAK EXTAR 25-1 EXTAR 125-1 EXTAR 1000-1 5327-PHR GOLD 400-2 GOLD 200 GOLD 1600 GOLD 100 EXTAR 100-2 EKTAPRESS 400 VR200 VR100-2 GOLD 400-3 VR100/3 VR200/3 GOLD 100-3 GOLD 200-3 Outdoor 100 EktocolorBP 160 GOLD 400-4 AC100-3 VR200-4 VR 100-4 EXTAR 1000-2 (RF 1000) GOLD 100-4 GOLD 200-4 GOLD 400-5 EXTAR 100-3 Funtime 100 EXTAR 400 EXTAR 200 GOLD 100-5 GOLD 200-5 5026-VPS Ektacolor G 160 Ektacolor G 400 Gold 160 Pro Gold 160 XRS 400 HDC 400-2 / HDC 200-2 XRS 1000 SC 200 Color SC 400 Color SC 200 Color CNG 200 CNG 400 QRS 100 VR100-4 AGFA MSC 100, MSC 200 DPU Technical Documentaion Operation Size APS DX-CODE [033-02] [033-03] [033-04] [033-07] [033-10] [033-11] [042-01] [042-01] [044-01] [044-02] [044-04] [044-09] [072-00] [072-01] [091-01] [091-02] [091-03] [091-09] Manufacturer FUJI FUJI FUJI FUJI FUJI FUJI FUJI FUJI AGFA AGFA AGFA AGFA KONICA KONICA KODAK KODAK KODAK KODAK Type NEXIA 400 Hi-speed NEXIA 200 / 100 200 / 100F /DS-2 NEXIA 100 Daylight 400 NEXIA A 200 NEXIA DA 200 200 DA-2 FUTURA 100 FUTURA 200 FUTURA 200 FUTURA 400 JX 400 JX 200 ADVANTiX 100 ADVANTiX 200 ADVANTiX 400 ADVANTiX 400 n AGFA MSC 100, MSC 200 DPU 03.06.98/ PN 7020 2.33 Technical Documentation Contents Contents Page Contents...........................................................................................................................1 Maintenance ....................................................................................................................2 Maintenance Schedule ..............................................................................................2 Emptying the paper scrap box.............................................................................2 Cleaning the faceplate (exposure array) and FOCRT unit drive rollers...............3 Cleaning the air filter............................................................................................4 Changing the tape spacer ...................................................................................4 Cleaning the paper transport rollers ....................................................................7 AGFA MSC 100, MSC 200 DPU 03.06.98 /PN 7020 3.1 Technical Documentation AGFA MSC 100, MSC 200 DPU Contents 03.06.98 /PN 7020 3.1 Maintenance Technical Documentation Maintenance Maintenance Schedule daily weekly Technician’s monthly service call required X X X X X X X Jobs to be performed Clean faceplate (exposure array); several times if required! Clean FOCRT unit drive rollers Empty paper scrap box Clean air filter Change tape spacer (every 250000 Prints) Clean paper transport rollers Clean light sensors Emptying the paper scrap box The scrap box has to be emptied every day or when the error message DPU Scrap box full appears. Open the door at the bottom right to get access to the box. It can then be pulled out easily. 3.2 03.06.98 /PN 7020 AGFA MSC 100, MSC 200 DPU Technical Documentation Maintenance Cleaning the faceplate (exposure array) and FOCRT unit drive rollers Clean the faceplate at least once a day. If the machine is used very much, it is recommended to clean it every 300 prints. It should be cleaned in addition when the paper width is changed. Please use only lens cleaning cloths. They are included in the IP accessory pack. Cleaning cloths can be reordered under the P/N CM+ 7.0362.6058.0 Fault: When the faceplate is dirty, the prints show light stripes in the direction of paper transport that may even be scorched. 1 2 3 4 5 Knurled screws Paper pressure unit Faceplate Transport rollers (the magnification shows a bottom view) FOCRT unit q Open the knurled screws shown in figure 1 and unscrew them completely. q Pull out the FOCRT unit up to the stop (Pos 5), holding it by the handle. The power supply of the DPU must be switched off. The MSC shows the message: DPU powerless q Clean the faceplate (Pos 3) with optical cleaning cloths. To have better access to the faceplate, push up the paper pressure unit (Pos 2) against the spring force. q The same cloth may be used to clean the transport rollers (Pos 4). q Push the FOCRT unit back into the DPU. Press <CLEAR> on the display of the MSC. Then the DPU switches on again. Note Do not use dusters! AGFA MSC 100, MSC 200 DPU 03.06.98 /PN 7020 3.3 Maintenance Technical Documentation Cleaning the air filter Clean the air filter in warm water and dry it (not in direct sunlight) before putting it back. Changing the tape spacer Note The tape spacer should only be changed by a trained technician. The paper should not touch the faceplate during the exposure. In order to ensure a defined distance, a so-called tape spacer should be put on the faceplate. It resembles very much an adhesive tape. The tape spacer should be changed every 250,000 prints. The display of the DPU shows a message when to change the tape spacer. The message may be skipped by pressing the key <4>. The tape spacer can be ordered under P/N CM+9.999.1081.0 3.4 03.06.98 /PN 7020 AGFA MSC 100, MSC 200 DPU Technical Documentation Maintenance q Open the knurled screws shown in figure 1 and unscrew them completely. q Pull out the FOCRT unit up to the stop, holding it by the handle. q Dismount the guide plates in front of the faceplate shown in the figure below (Pos 1) AGFA MSC 100, MSC 200 DPU 03.06.98 /PN 7020 3.5 Maintenance Technical Documentation q Strip off the two tape spacers (Pos 4). 1 2 3 4 Cyan array Magenta array Yellow array Tape spacer q Clean the faceplate (remove residues if any) q Pull an approx. 230 mm long piece off the roll, making sure that the tape does not get into contact with dirt. q Starting on one side, stick on the tape uniformly and straight, directly above the cyan array (Pos 1). Use the cyan array as reference. Press on the tape with your finger to prevent air inclusions. q Put excessive tape around the edge of the faceplate towards the back, avoiding creases as far as possible. q If creases or blisters cannot be removed, remove the tape and try again! q Do the same thing with the bottom tape. 3.6 03.06.98 /PN 7020 AGFA MSC 100, MSC 200 DPU Technical Documentation Maintenance Cleaning the paper transport rollers The arrows point to the screws fastening the three transport modules. Caution Dismount the LH unit with care. The guides are less than one centimetre long. For this reason, support the unit from below when dismounting it. n AGFA MSC 100, MSC 200 DPU 03.06.98 /PN 7020 3.7 Technical Documentation Contents Contents Page Error Messages on the MSC Display............................................................................4.3 Error Messages on the Display of the DPU ................................................................4.11 Messages without Error Code ..............................................................................4.11 Messages with Error Code (Software)..................................................................4.12 Messages with Error Code (Hardware) ................................................................4.12 Possible Errors and their Remedy ........................................................................4.13 Additional Parameters in the file PA_MC.DAT............................................................4.17 Adjustment of the Parameters ....................................................................................4.19 General .................................................................................................................4.19 Paper ..............................................................................................................4.19 Order ..............................................................................................................4.19 DCUTX .................................................................................................................4.19 Example..........................................................................................................4.19 DCUTZ..................................................................................................................4.20 Example..........................................................................................................4.21 DEXPP..................................................................................................................4.22 Multiprint without DPU Transfer Program.............................................................4.24 Tables ...................................................................................................................4.25 Image Centering ...................................................................................................4.26 Determination of Image Size Trim ..................................................................4.26 Determination of Top Margin Trim..................................................................4.27 Determination of Left Margin Trim ..................................................................4.28 Test Prints to check the Print Quality..........................................................................4.31 FRED and System Info .........................................................................................4.31 Registration Grid...................................................................................................4.32 Explanation.....................................................................................................4.32 Analysis ..........................................................................................................4.32 Motor Test, Gray Wash, Magenta Wash ..............................................................4.32 Explanation.....................................................................................................4.32 Analysis ..........................................................................................................4.32 DPU Test 0, DPU Test 1.......................................................................................4.32 DPU Test 2 ...........................................................................................................4.33 Explanation.....................................................................................................4.33 Analysis ..........................................................................................................4.33 DPU Test 3 to check Skew and Tracking .............................................................4.34 Explanation.....................................................................................................4.34 Analysis ..........................................................................................................4.34 Detailed Description of the Parameters of the File IP_MC.DAT .................................4.35 Paper Transport ..........................................................................................................4.37 Removal of the Paper Transport Module..............................................................4.37 Paper Guide..........................................................................................................4.38 Turn Roller Unit.....................................................................................................4.38 Cutter Unit.............................................................................................................4.38 Paper Transport Tolerances .................................................................................4.39 Skew...............................................................................................................4.39 AGFA MSC 100, MSC 200 DPU 02.11.98 /PN 8102 4.1 Contents Technical Documentation Tracking ......................................................................................................... 4.39 Cut ................................................................................................................. 4.39 Transport........................................................................................................ 4.40 Paper Control Sequence...................................................................................... 4.41 Software of the FOCRT (Exposure Unit).................................................................... 4.43 Loading new Software.......................................................................................... 4.43 Menu Overview .................................................................................................... 4.43 Circuit Diagram of the Power Supply Unit.................................................................. 4.45 Switch-on Control of the DPU .............................................................................. 4.47 Overview of all Sensors and Loads............................................................................ 4.49 Explanation of Functions...................................................................................... 4.50 Paper Magazine Drive.......................................................................................... 4.51 Activation of the Sensors and Loads in the Service Menu................................... 4.51 Block Circuit Diagram of the DPU........................................................................ 4.52 4.2 02.11.98 /PN 8102 AGFA MSC 100, MSC 200 DPU Technical Documentation Troubleshooting Error Messages on the MSC Display Message DPU paper jam in engine Shortcut TRAN 01 TRAN 04 DPU paper jam in buffer TRAN 02 TRAN 05 DPU paper jam in feed TRAN 03 section TRAN 06 DPU turn roller malfunction TURN 01 TURN 03 DPU turn roller nip malfunction TURN 02 TURN 04 DPU turn guide malfunction TGAD 01 Cause 4 seconds after the start of the motors MO1DPD and MO3AMD, the paper has not yet been seen by LS1DEN (transport out of the magazine) or LS1DTR (transport into the magazine) Paper jam LS1DTR/LS1DEN defective MO1DPD/MO3AMD defective 4 seconds after the start of the motors MO1DPD and MO3AMD the paper has not yet been seen by LS1DTR. The transport tries to rewind the paper into the magazine Paper jam in the magazine LS1DTR defective MO1DPD/MO3AMD defective 4 seconds after the start of the motors MO1DPD and MO3AMD the paper has not yet been seen by LS1DCT, LS3APC and LS5AVC. When the paper is rewound, it has not left the sensor LS1DTR in time Paper jam LS1DCT, LS3APC, LS5AVC or LS1DTR defective MO1DPD/MO3AMD defective 2,5 seconds after the start of the motor MO1DTR the sensors LS3DTR and LS4DTR have not seen any change of position of the turn roller unit. LS3DTR/LS4DTR defective MO1DTR defective 2 seconds after the start of the motor MO2DTR the sensor LS5DTR has not been triggered LS5DTR defective MO2DTR defective 2,5 seconds after the start of the motor MO1DTG the sensor LS1DPG has not seen any change of position of the turn roller unit. LS1DPG defective MO1DPG defective AGFA MSC 100, MSC 200 DPU Remedy Check the paper magazine Check/replace LS1DTR/LS1DEN Check/replace MO1DPD/MO3AMD Check the paper magazine Check/replace LS1DTR Check/replace MO1DPD/MO3AMD Remove the paper jam Check/replace LS1DCT, LS3APC, LS5AVC in case of a faulty transport out of the magazine Check/replace LS1DTR if faults occur upon rewinding Check/replace MO1DPD/MO3AMD Check/replace LS3DTR/LS4DTR Check/replace MO1DTR Check/replace LS5DTR Check/replace MO2DTR Check/replace LS1DPG Check/replace MO1DPG 02.11.98 /PN 8102 4.3 Troubleshooting Technical Documentation DPU paper width guide ATWG 01 6 seconds after the start of the motor malfunction MO1DPG the sensor LS2DPG has not been triggered. The paper guide has not reached the required width. LS2DPG defective MO1DPG defective The slide bearings are jammed on the shafts DPU slug cutter DCUT 01 2 seconds after the start of the motor malfunction DCUT 02 MO1DCT the initial position of the cutter has not been seen by LS2DCT LS2DCT defective MO1DPG defective DPU engine nip ENIP 01 2 seconds after the start of the malfunction pressure motor MO1DEN the ENIP 02 sensors LS2DEN and LS3DEN have not been triggered LS2DEN/LS3DEN defective MO1DEN defective DPU slug box not set SBOX 01 The slug box is not seen by the sensor LS1DPD. - Not mounted LS1DPD defective DPU slug box full SBOX 02 This error message does not exist any more from the official Software version 2.64 (MSC). DPU Check Slug Box DPU power off 4.4 Check/replace LS2DPG Check/replace MO1DPG Make the slide bearings smooth Check/replace LS2DPG Check/replace MO1DPG Check/replace LS2DCT Check/replace MO1DPG Box in place (locked in properly?) Check/replace LS1DPD Normal Updating is not possible. Either return to the last official version with Reset Update (do not forget the Download of the single processors!), or ask LG-SAT/ML for a Patch Update Software (should be performed by a technician). Important: Prior to the Update, it must be checked whether the DPU is of the current version (top sensor in FOCRT unit). SBOX 03 This message appears after every Pull out the slug box and put it in start of the MSC (only when the DPU again --> The message disappears is recognised) or when the DPU is switched back on, e.g. after cleaning the face plate. CRPW 01 Upon start-up, the MSC recognises Switch on the main switch the DPU, but it is not energised. Check the mains voltage Power supply of the DPU interrupted Operate CP1 during operation. Move the FOCRT in the right position MS1DMB operated --> FOCRT not in and screw it on the right position. Check/replace MS1DMB Main switch of the DPU OFF Check/replace the power supply unit Fuse CP1 of the DPU blown After removing the cause, press Power supply unit of the DPU CLEAR on the MSC --> The DPU defective starts again. Then the error message „DPU check slug box“ appears. 02.11.98 /PN 8102 AGFA MSC 100, MSC 200 DPU Technical Documentation DPU power off - paper supplied! CRPW 02 After the paper has left the LH magazine, the power supply of the DPU is interrupted Main switch of the DPU switched off Fuse of the CP1 DPU blown Power supply unit of the DPU defective MS1DMB triggered DPU engine error see ENGN 01 DPU display DPU door open ECOP 01 DPU Line Printer Port 1 missing LPTA 06 DPU Line Printer Port 2 missing LPTB 06 DPU paper does not fit PCCR 01 DPU wrong calibration pattern PCCR 02 DPU calibration pattern PCCR 03 missing DPU digital image not found Troubleshooting PCCR 04 Switch on the main switch Check the mains voltage Operate CP1 Check/replace the power supply unit Check the right position of the FOCRT Check/replace MS1DMB After removing the cause, press CLEAR on the MSC --> The DPU starts again. Defective FOCRT exposure unit Press the key 4 on the display (Sienna). See the chapter Error messages on Check the display of the DPU the display of the DPU Sensor MS3DMB sees that the door Close the door of the DPU is open Adjust MS3DMB MS3DMB maladjusted Check/replace MS3DMB MS3DMB defective Set the parameter DPDOR to 0 --> Parameter DPDOR of file The error message does not appear PA_MC.DAT not on 0. any more. Note: If the value of DPDOR is altered while the error message is displayed, the message does not disappear! The cause for the error message must be removed first. The printer port selected in the INI Install the parallel port 1 and/or enable file does not exist (e.g. parallel port = it in the CMOS 1, corresponds to the port address 0x378, but no printer port is installed for this, or has been deactivated in the CMOS) The printer port selected in the INI Install the parallel port 2 and/or enable file does not exist (e.g. parallel port = it in the CMOS 2, corresponds to the port address 0x278, but no printer port is installed for this, or has been deactivated in the CMOS) Paper of the wrong width inserted on Do not change the paper any more! the left side. Otherwise there are colour drifts. Select either „Reject print“ or continue printing with the inserted paper. Calibration pattern useless (usually Check the calibration pattern, too small to insert the additional data Use the original pattern as a text) Calibration pattern cannot be found Check the hard disk, on the hard disk in the specified Copy the calibration pattern to the directory hard disk Digital image found on the hard disk, Send the image again but deleted again so that the image Check the hard disk, e.g. with cannot be printed Scandisk Hard disk of IP damaged AGFA MSC 100, MSC 200 DPU 02.11.98 /PN 8102 4.5 Troubleshooting Technical Documentation DPU digital image corrupted PCCR 05 DPU default GLT file missing DPU channel GLT disappeared PCCR 06 DPU wrong GLT file PCCR 08 DPU syntax error in ICF file PCCR 11 DPU syntax error in BCF file PCCR 12 DPU digital image too large PCCR 14 DPU digital image too long PCCR 15 DPU wrong Indexprinter PCCR 16 DPU channel not calibrated DPU F/Port initialisation failed PCCR 17 DPU no F/Port found PCCR 19 4.6 PCCR 07 PCCR 18 02.11.98 /PN 8102 Digital image found on the hard disk, Use only undamaged BMP and JPG but cannot be printed because of an files as digital images, the image may erroneous file contents also have been damaged by network transmission errors The Default GLT file required for the Copy the file from the installation CD calibration cannot be found to the hard disk The GLT file belonging to the Repeat the calibration of the digital selected digital channel and required channel for the calibration cannot be found although the digital channel has been calibrated already The GLT file for the calibration is Press Reset + Print and start the defective and/or does not contain all autocalibration again required entries The ICF file is faulty and cannot be Transfer fault (repeat the transfer) or processed correctly check the program generating the ICF file, update if necessary The BCF file is faulty and cannot be Transfer fault (repeat the transfer) or processed correctly check the program generating the BCF file, update if necessary The size of the digital image is larger Reduce the image and print it again than the maximum admissible image file size of 40Mbyte and is therefore cut The image is longer than the Shorten the image and print it again maximum admissible length of 305mm and is therefore cut The selected printer type (LCD, Select the printer type DPU in the Mitsubishi) is not authorised menu The MSC starts without the DPU --> The Mitsubishi printer is switched on automatically The selected digital channel has not Perform the calibration for this digital (yet) been calibrated channel The file for the initialisation of the Check the INI file indication, check the FPort board cannot be found and/or file, start the IP again the Download cannot be performed correctly The following Jumpering must be set: Wrong Jumpering of the F/Ports IRQ 5 IO address 278 Install the FPort board and/or check No FPort can be found on the indicated printer port, switch-over to the existing board. If no board is mounted, set the INI entry the standard parallel port CRTUseFPort to 0 AGFA MSC 100, MSC 200 DPU Technical Documentation DPU TMF file missing PCCR 20 The TMF file for the external calibration belonging to the selected paper width cannot be found DPU JPEG file is not PCSW 38 The JPEG file is no RGB type. It RGB type cannot be printed Index Cal. SyncError FDIP 01 Sync errors during the Index camera FD! calibration Index Frame SyncError FDIP 02 Camera sync errors during the FD! exposure for the Indexprint Index Filter Error FD! FILT 01 Cut Off filters in the lamphouse not set correctly during camera calibration or exposure. IIP: Calibration not PCAC 01 This is only an information telling that completed! the calibration of the IIP logic has not been terminated. See also the chapter Operation IIP: Frame grabber init. PCHW 01 Frame grabber defective not possible! IIP: Frame grabber PCHW 02 Frame grabber missing missing! Frame grabber not mounted correctly Frame grabber defective IIP: Camera not PCHW 03 Camera not connected connected! Plug not plugged in correctly Parameter INDEX of file IP_MC.DAT on 1 IIP: Camera calibration PCHW 14 IIP switched on while a film is in the not performed! Feeder. The camera calibration can therefore not be performed. The IIP is switched off again. IIP: Hilpert-path-file PCSW 09 The indicated directory cannot be missing! found IIP: Separation table PCSW 10 Configuration files missing missing! IIP: Look-up table PCSW 11 Configuration files missing missing! IIP: Layout file missing! PCSW 12 Configuration files missing AGFA MSC 100, MSC 200 DPU Troubleshooting Check the entries in the TMF.INI file, if necessary create the TMF file Change the file to a RGB type Check the camera cable and plug Replace the camera Check the camera cable and plug Replace the camera Check the Cut Off filter unit Insert the next film If no calibration is desired, the parameter AUTOC must be set to a value ≥ 0 Replace Mount Check Replace Connect the camera Check the plug If no Indexprints are to be produced, INDEX must be set to 0 Move out the film Switch the IIP back on in the menu ON/OFF. Reinsert the film Reinstall the Software Reinstall the Software Reinstall the Software Reinstall the Software 02.11.98 /PN 8102 4.7 Troubleshooting IIP: Frame grabber driver incomplete! IIP: Camera calibration TIMEOUT! IIP: Frame cycle TIMEOUT! IIP: Film cycle TIMEOUT! IIP: Negative missing! IIP: Bitmap for logos missing! IIP: Font-files missing! IIP: No entry in CDATA file! Technical Documentation PCSW 13 Configuration files missing Reinstall the Software PCSW 14 Cable or plug of the interface defective PCSW 15 Cable or plug of the interface defective PCSW 16 Cable or plug of the interface defective PCSW 21 The number of reported frames differs from the number of the frames actually sent to the Index Image Processor Film removed from the Scanner? Communication error PCSW 23 Logo files cannot be found Check/replace PCSW 24 PCSW 26 IIP: IP_MC.DAT not active! PCSW 27 IIP (Logo)Bitmap wrong resolut./compress. PCSW 31 IIP (Logo-)Bitmap type wrong/Read error PCSW 32 IIP Harddisk is (almost) PCSW 33 full 4.8 02.11.98 /PN 8102 Check/replace Check/replace Check whether the data cable is ok Reinsert the film and activate the Indexprint only function Reinstall the Software Reinstall the Software Check/replace the Bitmap files Indicated files cannot be found Reinstall the Software The message appears when no data Press <CLEAR>. A data block is created for this film if the parameter block of the current film has been AUTOC is set to a value > 0. created in the file C_DATA.*. This is only for information. Press <CLEAR> The message appears when Set parameter SERVI to 0. parameter SERVI in the file IP_MC.DAT is on 1. The data entered in this file is not taken over by the IIP. This message is only for information. Bitmap has a wrong resolution or is Set the correct resolution (see also compressed. the supplement at the end of the documentation) Decompress the Bitmap Only JPG and BMP files can be used Bitmap cannot be used: Use another file - Wrong type - Cannot be read because the file is damaged. Hard disk of IIP almost full - this may Delete unnecessary directories cause lock-ups. e.g. backup directories of old Software versions. AGFA MSC 100, MSC 200 DPU Technical Documentation IIP Printer Type is PCSW 34 Wrong ink jet printer still selected on not/no more supported the MSC --> Wrong SW version on MSC! Cannot be used any more Wrong entry in file CONFIG.INI IIP Film without PCSW 35 Film has no printable frames and negatives only one selection criterion is used. No picture should appear on the Indexprint for this selection criterion (frame selected) ==> The film is immediately ejected by the Printer, no Indexprint is produced. IIP too much negatives PCSW 36 Software bug: The number of frames reported by the Agfa processor as not having been selected does not agree with the number on the Indexprint. The customer succeeded in taking more than 40 printable frames on the film --> Not all frames can be shown on the Indexprint AGFA MSC 100, MSC 200 DPU Troubleshooting Install Main SW 2.61 on the MSC Alter the entries in the file CONFIG.INI: 3 Mitsubishi printer 5 DPU If an Indexprint should be produced all the same, „PRINT“ must be selected for this selection criterion. In most cases, the criterion „Underexposed“ is concerned. Press <CLEAR> Explain to the customer that he should not put the film in the camera under a cover! 02.11.98 /PN 8102 4.9 Troubleshooting 4.10 02.11.98 /PN 8102 Technical Documentation AGFA MSC 100, MSC 200 DPU Technical Documentation Troubleshooting Error Messages on the Display of the DPU If the MSC shows the message: y(49IVVSVWII(49(MWTPE]l, exact information about the error can be found there. It is located under the small lid at the top of the DPU. These messages can only be displayed in English. Switch-over is only provided for Japanese (Katakana). Messages without Error Code Message NOVRAM FAULT Setups are lost. Restoring factory defaults. Cause Software bug. New Novram. Setups are lost. Restoring factory defaults ERROR - Bad MPCL Command Received. This message appears after a new Software has been loaded. ERROR - MPCL Command Failed Press 4 GO_ON. Work can be continued. If the error occurs frequently, the IIP Software has to be reloaded. Sensor MS4DMB sees the door of the Close the door DPU open Adjust MS4DMB MS4DMB maladjusted Check/replace MS4DMB MS4DMB defective ERROR! Paper access door is open Invalid command sent to the FOCRT unit This message appears for example when a digital image or an Indexprint is interrupted during the exposure. The data still in the memory of the FOCRT unit are then interpreted as a command by mistake. A command sent to the FOCRT unit cannot be performed. AGFA MSC 100, MSC 200 DPU Remedy Press 4 CONTINUE The machine-specific data is deleted. See the chapter Image centering. The values must be reentered. If the error occurs frequently, the Software has to be reloaded Press 4 CONTINUE The machine-specific data is deleted. See the chapter Image centering. The values must be reentered. Press 4 GO_ON. Work can be continued. 02.11.98 /PN 8102 4.11 Troubleshooting Technical Documentation Messages with Error Code (Software) Error messages with an error code mainly concern the Software of the FOCRT unit. They are not listed in detail in the following because the same remedy holds for all of them: − Reset the FOCRT. The switch can be operated with a thin pencil (see figure) − If the error occurs frequently, the Software of the FOCRT unit has to be reloaded Messages with Error Code (Hardware) Error Code 16, 17, 18 Cause Cathode cannot be calibrated. 34 61, 62 Line broken in the vertical deflection unit Electrostatic charge because of insufficient grounding of the FOCRT unit Electrostatic charge because of insufficient grounding of the FOCRT unit The acceleration voltage of the tube is deviated 94 4.12 02.11.98 /PN 8102 Remedy Check the connector of the grid voltage for correct seating Check the fuses Check all connectors Check all screws for tight seating (including the tube) Check all screws for tight seating (including the tube) The pressure unit touches the face plate and deviates the voltage --> Switch off the DPU and push the pressure unit away from the face plate AGFA MSC 100, MSC 200 DPU Technical Documentation Troubleshooting Possible Errors and their Remedy Error The tolerance values are not reached after a stop and a restart of the test print cycle It takes very long until the aim values are reached upon calibration The MSC asks for the wrong paper width The MSC asks for a paper width that is not authorised. Cause New start before the test print of the interrupted cycle is on the Scanner --> Print measured and correction values used for the new cycle. For this reason, the tolerance values will never be reached! Paper inserted incorrectly upon the start of the cycle. Display of a corresponding error message. Then paper inserted correctly. The test print is no longer exposed as a test print, but as a digital image (somewhat lighter). Calibration cycle 2-3 times longer Remedy Before starting again, wait until the test print of the interrupted cycle is at the Sorter Calibration plate of densitometer dirty MSC in optical mode, paper width Y mm inserted, Image X x Y send with Autoturn on, magazine with width Y removed and digital mode selected --> MSC asks for width Y, but should be X Stop required when Y is inserted This only happens when width Y is removed and the digital mode is selected afterwards! Autoturn function active although the print length does not correspond to a paper width Clean The black letters and the Logos Digital channel of the paper in use of the Indexprints are glared not calibrated Wrong paper inserted and MSC display showing a corresponding error message. Magazine removed and „correct“ paper inserted. ⇒ Indexprint then exposed with the correction data of the paper inserted before Lock-up of the IP after the Index configuration of the MSC still installation of the DPU set for an LCD unit AGFA MSC 100, MSC 200 DPU If the message "Wrong paper for test print" is displayed, stop the test print, put in the right paper and start again Insert paper width X and select Handle order later --> The order is performed correctly Stop the order Deactivate Autoturn Make sure that the right paper width is inserted before sending the digital print. Calibration If the Indexprint is to be produced, do not change the magazine any more when an error message has been displayed already on the MSC! Otherwise stop the Indexprints Modify the Index channels for DPU Indexprints 02.11.98 /PN 8102 4.13 Troubleshooting Lock-up of the IP processor after a digital image has been sent to the DPU - the MSC shows the message IIP Time Out After startup of the MSC IIP: wrong Indexprinter type" and IIP: Font files missing" is displayed DPU does not switch on when the MSC is started up Technical Documentation Mitsubishi printer set on the MSC as Indexprinter - therefore no storage location for digital images reserved. Set the DPU as Indexprinter. Check the setting in the file CONFIG.INI of the IP: The line „Last Used Printer“ must show 5. Provide the CONFIG.INI file with a write protect MSC started without the DPU. Then In the menu EDIT/INDEX IMAGE the Mitsubishi is set as Indexprinter PROCESSOR/PRINTER TYPE select the DPU as Indexprinter. The DPU must be ON so that it can be selected. Wrong PA Software loaded Load the right Software with Download PA IDENT on 10 (only on MSC 100) On the MSC 100, set IDENT to 30 51D-EXI board not supplied with +5 Check the crimp connections V, crimp connections (only on MSC 100) not correct +5 V supply too low The 51D-EXI board must be supplied by 4,9 to 5,0 V Relay in main power supply unit of Check/replace the relay the DPU not switching --> defective After a digital print has been After the interruption of a digital After pressing 4 GO ON, the error interrupted, the MSC shows the print, the FOCRT is reinitialised, message disappears - work can be error message "Error - see image data still in the memory is continued. DPU display". The DPU display interpreted as command. shows "Bad MPCL Command..................4 GO ON“ The transfer program cannot Network connection interrupted Check the connector send an image to the DPU any Transfer program started before the Set the network directory of the more full initialisation of the network transfer program again The version number of the IP is shown under INFO/SOFTWARE The transfer program cannot IP switched off due to an error (e.g. Switch on the IP again in the menu send an image to the DPU any by the Index camera) ON/OFF IP more If the IP is on, switch it off in the The version number of the IP is menu, push the Reset button of not shown under the IP, after 5 minutes, switch the INFO/SOFTWARE IP on again in the menu ON/OFF No image can be sent to the Workstation started before the IP. Implement the network connection DPU any more after the MSC, Impossible to initialise the network again in the Windows Explorer, or the DPU and the Workstation connection. close the Workstation and start it have been switched on (mainly again (IP must be operative) at production start) In future, start the Workstation only when the version number of the IP is shown on the MSC under INFO Software 4.14 02.11.98 /PN 8102 AGFA MSC 100, MSC 200 DPU Technical Documentation Several digital images were sent to the DPU. The message "Digital print mode required" does not appear. Troubleshooting The data transfer for large images takes somewhat longer. Error messages on the display of the MSC concerning the DPU Communication between IP and FOCRT disabled Check the DPU directory with Windows NT Explorer of the IP. No .abt or .pri files should exist without pertaining .icf and .b01 / j01 files, i.e. a .icf without a .b01 / j01 file. No calibration of the Index camera because IP switched off upon the start of the MSC Have a little patience and wait Remove the cause for the error Briefly open the DPU door - the FOCRT is reinitialised If there are, delete them On an optical print channel, switch on the Index function - the calibration is performed. Then go into the digital print mode. Briefly open the door of the exposure table --> The paper is returned, briefly open the DPU door and send the order again Check/replace LS1DEN The function "Handle order later" does not work in the Main SW V 2.64! Either insert the right paper or delete the order. A digital paper was sent. A paper transport was performed, since then nothing happens. The display of the DPU shows "MOVING" Lock-up of the IP after pressing "Handle order later" Paper moved to the FOCRT unit by the paper transport, but not recognised The new modified Logos cannot be copied to the IP processor with IIP selftest. Modifications of the file IP_MC.DAT are not taken over by the IP Learning new films for the Index does not function Close the DPU door For the exact procedure see the DPU operation manual Remove the write protect for these files in the Windows Explorer of the IP. Copy the file REINST.BAT (obtainable via Lab Tech Notes) to the hard disk (Root) of the IP and start. The write protect of the files concerned is removed. This is the message telling that no Copy the files KBFIX.BAT and keyboard is connected. This has no KBFIX.REG to the hard disk (Root) effect on the function of the IP. of the IP (obtainable via Lab Tech Notes) Start KBFIX.BAT --> The setting of Windows NT is altered so that the error message does not appear any more If only one screen is connected to the IP, a window appears showing a Windows NT error message AGFA MSC 100, MSC 200 DPU LS1DEN defective When a digital image is to be printed that requires a paper width other than the one inserted, the message appears telling that the wrong paper is inserted. Total lockup of the IP if „Handle order later“ is pressed and the file has been deleted by the transfer program or by Pixtasy DPU not closed after insertion of the diskette - an error message in the IP prevents printing All files in the directory MSC_IP are write protected when the Update CD is burnt --> The INI files as well as the C_DATA files cannot be altered. 02.11.98 /PN 8102 4.15 Troubleshooting Technical Documentation Lock-up of the MSC at the end This happens if not only the of paper while a digital image is message about the missing paper, being exposed but also another error message appears before new paper is inserted. Lock-up of the MSC if Continue order is pressed. Unsharp areas in the image (of Insufficient pressure during only one colour, e.g. yellow) exposure Tape spacer consumed Message from Pixtasy: "DPU No network connection to IP control file cannot be opened" File STATUS.MSC in IP damaged Only a certain paper width cannot be calibrated - no corrections are performed. 4.16 02.11.98 /PN 8102 Check the name of the associated digital channel - no control characters, e.g. ", (, %, $ etc.) or spaces should be inserted. In this case, only MSC OFF/ON helps. This can be prevented by interrupting the order before inserting the new paper. Check the pressure part mechanism Change the tape spacer (see maintenance instructions) Check the network connection Reenter the path on the Pixtasy computer Delete the file STATUS.MSC as well as all other files in the DPU directory of the IP and start the IP again Delete the channel and reenter it (use normal characters). AGFA MSC 100, MSC 200 DPU Technical Documentation Troubleshooting Additional Parameters in the file PA_MC.DAT Code DEXPP DCUTZ DCUTX SCUTX PWGHP RWDMD DPDOR Description Constant for the transport length of the paper up to the FOCRT unit for MO1DPD Cut length constant of the paper Cut length correction of the paper Admissible range -10 to +10 Modification of the width of the cut-out strip, Admissible range -3 to +3 Correction of the automatic paper guide Admissible range -20 to +20 0 When changing between the left and the right paper magazine, the paper of the magazine used last is not moved out again, but remains in waiting position. 1 When changing, the paper is returned into the magazine 1 When the DPU door opens, the PA sends the error message „DPU door open“. As the same error message is sent by the FOCRT unit, the text appears twice on the MSC display 0 The error message is suppressed by PA. AGFA MSC 100, MSC 200 DPU Unit/Step 0,001 mm Default value 5000 0,001 mm 0,5 mm 5000 0 0,5 mm 0 0,07 mm 0 - 0 - 0 02.11.98 /PN 8102 4.17 Troubleshooting 4.18 02.11.98 /PN 8102 Technical Documentation AGFA MSC 100, MSC 200 DPU Technical Documentation Troubleshooting Adjustment of the Parameters General Paper − Use the paper that is used for the DPU. If papers of different thickness are used, this may cause slight differences in the paper transport and by this of the print length. (To prevent misunderstandings: If there is a difference in length, then this appears between two paper types. The length is constant within one paper type.) − Use of 152 mm paper Smaller paper widths are possible, but 152 mm paper should always be used. Order DCUTX → DCUTZ → DEXPP → Top Margin The Top Margin is corrected on the DPU panel, all other parameters are corrected in the PA_MC.DAT. DCUTX This parameter adjusts the length of the single sheet Multiprint (n prints on one sheet). The length of the first print is adjusted to the length of the second print. q Use the DPU transfer program to print a print (at will) with the Number 3, the Length 100 mm and the Resolution 294 dpi (Only the three parameters have to be entered. All other parameters are of no importance.) In the chapter DPU without a transfer program, a procedure is described how to work without the DPU transfer program. q Define the length difference ∆L between the mean length of the prints two and three and the first print. ∆L = L̄23 - L1 (The absolute length of the prints is of no importance, only the difference is important.) q ∆L ≤ ±0.5 mm: ⇒ no correction required q ∆L > ±0.5 mm: Calculate the number of correction pulses, i.e. 1 pulse = 0.5 mm (Formulae: Correction pulse = integral(∆L / 0.5 mm) ) q DCUTXnew = DCUTXold + correction value q Print three test prints (see above) and check ∆L. If necessary, repeat the procedure Example Measure the three prints. Important: The first print is the one that is at the bottom in the Sorter. 1st print: 2nd print: 3rd print: AGFA MSC 100, MSC 200 DPU 99,9 mm 99,3 mm 99,2 mm 02.11.98 /PN 8102 4.19 Troubleshooting Technical Documentation Find the mean value of the 2nd and the 3rd print: (99,3 mm + 99,2 mm) / 2 = 99,25 mm Calculate the length difference between the 1st print and the mean value: 99,9 mm - 99,25 mm = 0,65 mm ⇒ The difference is greater than 0,5 mm, for this reason, a correction is required. Calculate the correction value: 0,65 mm / 0,5 mm = 1,3 ⇒ The correction value is 1 The value of DCUTX must be increased by 1. Note Negative values result if the mean value of the 2nd and the 3rd print is greater than the value of the 1st print. This means that the value of DCUTX must be reduced in proportion. DCUTZ Note This parameter adjusts the cut length It must be decided on the premises whether or not the following operation has to be performed. If the actual cut lengths do not differ too much from the entered lengths, i.e. < 0,8 mm, the value of DCUTZ should be kept. The work input would then be higher than the benefit. q Set the value DCUTZ to 5000. The following steps refer to the program MSC - IIP \ FOCRT q Click on For Experts Only \ Activate AG850 Functions Click on Setup \ Open Setup-Dialogbox q Length: 300 Mode: Manual (All other parameters are of no importance.) Click OK q Click on File \ Print Image (BMP) q Select the file START50.BMP and open it (The file is in the directory: Agfa_DPU \ MSC_IP \ Data \ TestPrint) If the file does not exist, get it from LG-SAT\ML. Do not use the old file START.BMP! q Repeat the last step five times. (Five prints are required.) q Under Setup set the Length to 200 and print START50.BMP again five times q Under Setup set the Length to 100 and print START50.BMP again five times q Always find the average length of the prints 300, 200 and 100 None of the mean values differs by more than ±0.8 mm from its reference value: ⇒ No correction required 4.20 02.11.98 /PN 8102 AGFA MSC 100, MSC 200 DPU Technical Documentation Note: Troubleshooting Owing to the signal travel time from the sensor to the motor control, the tolerance is not the motor step width here (0.5 mm), but 0.8 mm The mean value differs by more than ±0.8 mm: q Calculate the number of correction pulses, i.e. 1 pulse = 0.5 mm (Formulae: Correction pulses = integral ( (L – L̄ ) ÷ 0.5 mm/pulse ) ) ) q Look up the current DCUTZ value in the table DCUTZ in the appendix and read the three associated correction pulse values q Add the correction pulses calculated above to the correction pulses read The result are the new correction pulse values q Look up the new correction pulse values in the table and read the corresponding DCUTZ value (It may be that the new values do not figure in the table. In this case, it is sufficient to find similar values. The pulse number may serve as reference.) q Enter the new DCUTZ value in the PA_MC.DAT q Print five test prints each If necessary, repeat the procedure Example Measure the lengths of the individual prints: 100 mm 200 mm Measured values (all in mm) 99,25 199,85 100,80 199,40 99,80 199,55 99,50 199,55 100,25 200,50 300 mm 299,20 299,05 299,10 299,40 299,05 Calculate the average of the 100 mm prints: 99,25 mm + 100,80 mm + 99,80 mm + 99,50 mm + 100,25 mm = 499,60 mm 499,60 / 5 = 99,92 mm 100 mm - 99,92 mm = 0,08 mm ⇒ No correction is required for step lengths 100 mm. Calculate the average of the 200 mm prints: 199,85 mm + 199,40 mm + 199,55 mm + 199,55 mm + 200,50 mm = 998,85 mm 998,85 / 5 = 199,77 mm 200 mm - 199,77 mm = 0,23 mm ⇒ No correction is required for step lengths 200 mm. Calculate the average of the 300 mm prints: 299,20 mm + 299,05 mm + 299,1 mm + 299,4 mm + 299,05 mm = 1495,8 mm 1495,8 mm / 5 = 299,16 mm AGFA MSC 100, MSC 200 DPU 02.11.98 /PN 8102 4.21 Troubleshooting Technical Documentation 300 mm - 299,16 mm = 0,84 mm ⇒ A correction is required for step lengths 300 mm. Calculate the correction value or pulse correction: 0,84 mm / 0,5 mm/pulse = 1,68 ⇒ The correction pulse for 300 mm is 1 or 2. Take the corresponding combination from the table. As no corrections are required for 100 mm and 200 mm, the correction pulses are 0 here. The combination 0-0-1 might be used as 0-0-2 does not exist. With 0-0-1, the length 300 mm is extended on the average by 0,5 mm, the tolerance range being reached. ⇒ The new value of DCUTZ is 4995 or 4994. DEXPP This parameter adjusts together with TOP margin the length of the exposed area. q Set DEXPP to the start value 5000 q Measure the length L of each one of the fifteen prints printed under DCUTZ (= length of the white area) 1 2 Strip pattern, blue Red line q Calculate the mean value L̄ for each length q Calculate the differences: ∆L312 = L̄300 – L̄100 – 200 mm ; ∆L321 = L̄300 – L̄200 – 100 mm If both differences do not exceed 0.25 mm ⇒ No correction required Difference greater than 0.25 mm: q Calculate the number of correction pulses i.e. 1 pulse = 0.25 mm (Formula: Correction pulses = Integral(∆L ÷ 0.25 mm/pulse) ) q Look up the current DEXPP value in the table DEXPP in the appendix and read the three associated correction pulse values (for start value 5000: 0 0 0) q Add the correction pulses calculated above to the correction pulses read The result are the new correction pulse values q Look up the new correction pulse values in the table and read the corresponding DEXPP value 4.22 02.11.98 /PN 8102 AGFA MSC 100, MSC 200 DPU Technical Documentation Troubleshooting (It may be that the new values do not figure in the table. In this case, it is sufficient to find similar values. The pulse number may serve as reference.) q Enter the new DEXPP value in the PA_MC.DAT q Print five test prints each If necessary, repeat the procedure Example: Given: Lengths L (white area) in mm: 300 mm prints: L1=297,0 ; L2=297,3 ; L3=297,1 ; L4=297,5 ; L5=297,3 200 mm prints: L1=197.7 ; L2=197,8 ; L3=197,9 ; L4=197,7 ; L5=197,8 100 mm prints: L1= 98,4 ; L2= 98,2 ; L3= 98,2 ; L4= 98,0 ; L5= 98,2 Calculation: Mean values L̄ of the lengths L L̄300 = (297,0 mm + 297,3 mm + 297,1 mm + 297,5 mm + 297,3 mm) ÷ 5 = 297,24 mm L̄200 = (197,7 mm + 197,8 mm + 197,9 mm + 197,7 mm + 197,8 mm) ÷ 5 = 197,78 mm L̄100 = ( 98,4 mm + 98,2 mm + 98,2 mm + 98,0 mm + 98,2 mm) ÷ 5 = 98,20 mm Calculation: Differences ∆L312 = 297,24 mm – 98,20 mm – 200 mm = -0,96 mm ∆L321 = 297,24 mm – 197,78 mm – 100 mm = -0,54 mm Calculation: Correction pulses K312 = integral(-0,96 mm ÷ 0,25 mm/pulse) = integral(-3,84 pulses) = -3 pulses K321 = integral(-0,54 mm ÷ 0,25 mm/pulse) = integral(-2,16 pulses) = -2 pulses Determination: New correction pulses From the table: For DEXPP = 5000 ⇒ K312 = 0 ; K321 = 0 ; K300 = 0 K312, new = 0 + (-3) = -3 ; K321 = 0 + (-2) = -2 Determination: New DEXPP value From the table: For K312 = -3 ; K321 = -2 ; K300 = 0 ⇒ 4981 ≤ DEXPP ≤ 4984 (All values in this area trigger the same modification) AGFA MSC 100, MSC 200 DPU 02.11.98 /PN 8102 4.23 Troubleshooting Technical Documentation Multiprint without DPU Transfer Program If no transfer program is available, a corresponding command for the print length and the quantity can be entered via the MSC: q Connect the keyboard to the MSC q Press ALT F1 The MSC screen shows the window Command centrale q Set the parameters Port: 3 Command: LP (LoadPaper) Data: D310NN3 (General: DXXXNNY; D = Digital) XXX = Paper length = Print length *Y+(Y-1)*5 mm ; (5 mm = Slug width) NN = No Rotation NoGreeting; Y= Number of prints Note: Paper lengths shorter than 300 mm ) q Connect the keyboard to the IP q Perform the following settings in the MSC - IIP \ FOCRT program Click on For Experts Only \ Activate AG850 Functions Click on Action \ COM: Disconnect Click on Action \ Print Grid Pattern (another print could also be used, but Grid Pattern has the advantage of a short exposure time) Note: Holds for all tests: Print only the 305 mm long GRID Pattern. Shorter transport lengths bring up a paper jam message because the paper is not caught by the turn guide unit and drops into the Stocker. As the IP is cut from the MSC with COM: Disconect, the program MSC IIP \ FOCRT must be restarted: q Close the MSC - IIP \ FOCRT program q Call up the MSC - IIP \ FOCRT program: Desktop Icon RUN DPU PROGRAM or C:\MSC_IP\DPU_IP.EXE in the Explorer 4.24 02.11.98 /PN 8102 AGFA MSC 100, MSC 200 DPU Technical Documentation Troubleshooting Tables DCUTZ 4970 4971 4972 4973 4974 4975 4976 4977 4978 4979 4980 4981 4982 4983 4984 4985 4986 4987 4988 4989 4990 4991 4992 4993 4994 4995 4996 4997 4998 4999 5000 5001 5002 5003 5004 5005 5006 5007 5008 5009 5010 5011 5012 5013 5014 5015 5016 5017 5018 5019 5020 5021 5022 5023 5024 5025 5026 5027 5028 5029 5030 Pulse number L100 L200 L300 201 402 604 201 402 604 201 402 603 201 402 603 201 402 603 201 402 603 201 402 603 201 402 603 201 402 603 201 402 603 201 402 602 201 402 602 201 401 602 201 401 602 201 401 602 201 401 602 201 401 602 201 401 602 200 401 601 200 401 601 200 401 601 200 401 601 200 401 601 200 401 601 200 400 601 200 400 601 200 400 600 200 400 600 200 400 600 200 400 600 200 400 600 200 400 600 200 400 600 200 400 600 200 400 600 200 400 599 200 400 599 200 399 599 200 399 599 200 399 599 200 399 599 200 399 599 200 399 599 199 399 598 199 399 598 199 399 598 199 399 598 199 399 598 199 399 598 199 398 598 199 398 598 199 398 597 199 398 597 199 398 597 199 398 597 199 398 597 199 398 597 199 398 597 199 398 597 199 398 597 199 398 596 Correction pulses K100 K200 K300 1 2 4 1 2 4 1 2 3 1 2 3 1 2 3 1 2 3 1 2 3 1 2 3 1 2 3 1 2 3 1 2 2 1 2 2 1 1 2 1 1 2 1 1 2 1 1 2 1 1 2 1 1 2 0 1 1 0 1 1 0 1 1 0 1 1 0 1 1 0 1 1 0 0 1 0 0 1 0 0 0 0 0 0 0 0 0 0 0 0 0 0 0 0 0 0 0 0 0 0 0 0 0 0 0 0 0 -1 0 0 -1 0 -1 -1 0 -1 -1 0 -1 -1 0 -1 -1 0 -1 -1 0 -1 -1 -1 -1 -2 -1 -1 -2 -1 -1 -2 -1 -1 -2 -1 -1 -2 -1 -1 -2 -1 -2 -2 -1 -2 -2 -1 -2 -3 -1 -2 -3 -1 -2 -3 -1 -2 -3 -1 -2 -3 -1 -2 -3 -1 -2 -3 -1 -2 -3 -1 -2 -3 -1 -2 -4 AGFA MSC 100, MSC 200 DPU DEXPP 4970 4971 4972 4973 4974 4975 4976 4977 4978 4979 4980 4981 4982 4983 4984 4985 4986 4987 4988 4989 4990 4991 4992 4993 4994 4995 4996 4997 4998 4999 5000 5001 5002 5003 5004 5005 5006 5007 5008 5009 5010 5011 5012 5013 5014 5015 5016 5017 5018 5019 5020 5021 5022 5023 5024 5025 5026 5027 5028 5029 5030 Pulse number L100 L200 L300 864 462 59 864 462 59 864 462 59 864 462 59 864 462 59 863 461 59 863 461 59 863 461 59 863 461 59 863 461 59 863 461 59 862 461 59 862 461 59 862 461 59 862 461 59 862 460 59 861 460 59 861 460 59 861 460 59 861 460 59 861 460 59 861 460 59 860 460 59 860 460 59 860 460 59 860 459 59 860 459 59 860 459 59 859 459 59 859 459 59 859 459 59 859 459 59 859 459 59 858 459 59 858 459 59 858 459 59 858 458 59 858 458 59 858 458 59 857 458 59 857 458 59 857 458 59 857 458 59 857 458 59 857 458 59 856 458 59 856 457 59 856 457 59 856 457 59 856 457 59 855 457 59 855 457 59 855 457 59 855 457 59 855 457 59 855 457 59 854 457 59 854 456 59 854 456 59 854 456 59 854 456 59 Correction pulses K312 K321 K300 -5 -3 0 -5 -3 0 -5 -3 0 -5 -3 0 -5 -3 0 -4 -2 0 -4 -2 0 -4 -2 0 -4 -2 0 -4 -2 0 -4 -2 0 -3 -2 0 -3 -2 0 -3 -2 0 -3 -2 0 -3 -1 0 -2 -1 0 -2 -1 0 -2 -1 0 -2 -1 0 -2 -1 0 -2 -1 0 -1 -1 0 -1 -1 0 -1 -1 0 -1 0 0 -1 0 0 -1 0 0 0 0 0 0 0 0 0 0 0 0 0 0 0 0 0 1 0 0 1 0 0 1 0 0 1 1 0 1 1 0 1 1 0 2 1 0 2 1 0 2 1 0 2 1 0 2 1 0 2 1 0 3 1 0 3 2 0 3 2 0 3 2 0 3 2 0 4 2 0 4 2 0 4 2 0 4 2 0 4 2 0 4 2 0 5 2 0 5 3 0 5 3 0 5 3 0 5 3 0 02.11.98 /PN 8102 4.25 Troubleshooting Technical Documentation Image Centering To position the image correctly on the paper, there are a few parameters that can be modified in the display of the FOCRT unit. They have to be reentered upon a Download of the Software. Parameter Image size trim Top margin trim Left margin trim Description Length correction of the print Position correction of the print tip Position correction of the print crosswise to the paper transport direction Default value 1000 / 1000 0 0 The following order should be kept for the adjustment: 1. Image size trim 2. Top margin trim 3. Left margin trim Determination of Image Size Trim q Enter the default value 1000 for CO Image Size Trim via the display of the FOCRT unit: 4 MENUS 3 SYSTEM MENUS 1 SYSTEM SETUP 3 SYSTEM TRIMS Enter the value with the keys 1 LESS or 2 MORE. Press 4 RETURN to get back. q Click „Activate AG850 Functions“ in the IP program q Print the grid pattern q Measure the length L of 40 boxes (see figure) q CO Image Size Trim = (254 mm / L) X 1000 q Enter CO Image Size Trim (as above) q Print the grid pattern 5 times q Measure the length of 40 boxes on each print. All measured values should range 254 +/- 0,6 mm. If not, start from the beginning. 4.26 02.11.98 /PN 8102 AGFA MSC 100, MSC 200 DPU Technical Documentation Troubleshooting Example: Measured length of 40 boxes : 256,5 mm Image Size Trim = (254 mm / 256,5 mm) X 1000 = 990,253411306 ⇒ The new value of Image Size Trim is 990 Determination of Top Margin Trim q Enter the Default value 0 for CO Top Margin Trim 4 MENUS 3 SYSTEM MENUS 1 SYSTEM SETUP 3 SYSTEM TRIMS 3 NEXT 3 NEXT Enter the value with the keys 1 LESS or 2 MORE. Press 4 RETURN to get back. q Measure the distance L of the last fifteen DEXPP test prints (whole coloured area including the red line). 1 2 Strip pattern, blue Red line q Use all fifteen prints to find the minimum and the maximum Lmin ≥ 1,9 mm AND Lmax ≤ 3,5 mm ⇒ No correction required (Lref. = 2,7 mm±0,8 mm) Lmin < 1,9 mm OR Lmax > 3,5 mm: q L̄ = ½(Lmin + Lmax) q TOP Margin = TOP Margin + 10 * ((2,7 mm – L̄ ) ÷ 0,25 mm/pulse) q Press the following keys on the DPU control panel: <4> MENU → <3> SYSTEM → <1> SETUP → <3> TRIMS → <3> NEXT → <3> NEXT The first line of the display shows the current TOP margin value in mils: CO Top Margin Trim: XXmils ( XX) (The value in brackets is the currently valid value. It is updated when the menu is exited.) q Use the keys 1 LESS or 2 MORE to modify the TOP Margin value (steps of 10). q Press key <4> RETURN until Return is replaced by Menu. q Print five test prints per length If necessary, repeat the procedure AGFA MSC 100, MSC 200 DPU 02.11.98 /PN 8102 4.27 Troubleshooting Technical Documentation Example: Smallest measured length: 1,7 mm; largest measured length: 3,8 mm Calculate the average: (1,7 mm + 3,8 mm) / 2 = 2,25 mm TOP Margin = 0 + 10 X (2,7 mm - 2,25 mm) / 0,25 = 18 ⇒ The new value of TOP Margin Trim is 20 because only steps of 10 can be set. Determination of Left Margin Trim q Enter the Default value 0 for CO Left Margin. 4 MENUS 3 SYSTEM MENUS 1 SYSTEM SETUP 3 SYSTEM TRIMS 3 NEXT 3 NEXT 3 NEXT Enter the value with the keys 1 LESS or 2 MORE. Press 4 RETURN to get back. The following steps refer to the program MSC - IIP \ FOCRT q Click on For Experts Only \ Activate AG850 Functions Click on Setup \ Open Setup-Dialogbox q Length: 300 Mode: Manual (All other parameters are of no importance.) Click OK q Click on File \ Print Image (BMP) q Select the file START50.BMP and open it (The file is in the directory: Agfa_DPU \ MSC_IP \ Data \ TestPrint) If the file does not exist, get it from LG-SAT\ML. Do not use the old file START.BMP! q Measure the lengths L and R as shown in the figure q CO Left Margin Trim = (L - R) / 2 / 25,4 X 1000 q Print START50.BMP 3 times with a cut length of 203 mm q Measure the lengths L and R of all prints as shown in the figure. 4.28 02.11.98 /PN 8102 AGFA MSC 100, MSC 200 DPU Technical Documentation Troubleshooting q B = (L - R) / 2 The sum of value B must not exceed 0,7 mm on any print. If it does, start from the beginning. Example: L = 76,5 mm; R = 75,0 mm Left Margin Trim = (76,5 mm - 75,0 mm) / 2 /25,4 X 1000 = 29,52755905512 ⇒ The new value of Left Margin Trim is 30. (Settable in steps of 10) AGFA MSC 100, MSC 200 DPU 02.11.98 /PN 8102 4.29 Troubleshooting 4.30 02.11.98 /PN 8102 Technical Documentation AGFA MSC 100, MSC 200 DPU Technical Documentation Troubleshooting Test Prints to check the Print Quality A monitor, a mouse and a keyboard have to be connected to the IP to trigger these test prints. Some test prints are only needed for the calibration in the factory and are therefore not described here (DPU Test 4 and 5). FRED and System Info FRED means Fiber Optic Registration and Equalization Device. This calibration is performed to make sure that large areas are displayed uniformly. The test print is scanned with a high-resolution Scanner and analysed by your Service Centre. The result is used to create a correction file which has to be loaded into the FOCRT. The calibration must be performed once upon a new installation, but may also be necessary at any other time under the following circumstances: − When the paper manufacturer is changed. − When the DPU is moved to another location. − When always the same subject is printed (burn-in effect). In this case, a calibration is recommended every 12 to 18 months. − When only small paper widths are used and should be changed to larger paper. Note Before a test print is triggered, the face plate as well as the transport rollers of the FOCRT have to be cleaned. Please trigger not only the FRED test print, but also the „System Info“ print. AGFA MSC 100, MSC 200 DPU 02.11.98 /PN 8102 4.31 Troubleshooting Technical Documentation Registration Grid Explanation A black line is exposed with the colours blue, green and red. To ensure a proper reproduction of this line, the red, green and blue electron beams just be exactly superimposed, this is called registration. The TV technician calls this behaviour convergence. The test is automatically exposed with 200 DPI. Every horizontal and vertical line on this test is exactly 1 pixel wide. Analysis Inspect the horizontal and vertical lines. They must appear black and must be evenly thick. The position of the beam of one colour should not differ by more than half a pixel from the beam of another colour. If the deviation is greater, the lines show coloured fringes. If the quality is not satisfactory, the FOCRT unit has to be replaced. Motor Test, Gray Wash, Magenta Wash Explanation These test prints represent homogeneous areas of magenta and grey. Here, malfunctions of the transport motor can be made visible. Analysis If faults are visible on the test print at a regular distance of 1 inch in horizontal direction, check the transport roller of the FOCRT unit. In case of smaller regular faults in horizontal direction, the transport motor of the FOCRT unit has to be checked. Does the motor turns easily and smoothly in switchedoff condition? In case of irregular faults in horizontal direction, check the complete paper transport. If no faults are found, the unit must be replaced (after consultation with Munich LG SAT). DPU Test 0, DPU Test 1 These two test prints are used to check the image sharpness. If the sharpness of a DPU is not satisfactory, send both test prints to LG-SAT/ML, stating the DPU SN and the FOCRT serial number. Note 4.32 Send in test prints only after having ascertained that the paper was pressed on correctly during the exposure and that the tape spacer is not consumed. 02.11.98 /PN 8102 AGFA MSC 100, MSC 200 DPU Technical Documentation Troubleshooting DPU Test 2 Explanation This test print is split up into different areas. − Grey field with girl on the beach. To check the skin hues and see whether homogeneous areas can be reproduced without faults. − Vertical and horizontal colour ranges to judge the colour management. − Grey, yellow, magenta and cyan colour stripes to judge the sharpness. These colour stripes are created with an average colour density and by vertical lines, each one 1 pixel wide. − Measuring field for the maximum density Analysis Sharpness: Inspect the grey, yellow, magenta and cyan colour stripes with a magnifying glass. A coloured and a white vertical line must be visible at turns over the whole width of the paper. If the different lines are not visible, send this test print together with DPU Test 0 and DPU Test 1 to Munich to LG-SAT/ML (indicating the DPU FN and FOCRT serial number). Colour management: Inspect the vertical and horizontal colour ranges. If there is no smooth transition in the middle of each colour, the loaded “Look Up Tables” (LUTs) are not correct. At this point, there should be a smooth transition of the colour range. No disturbing dark areas should occur here. Check the LUTs in the directory \Luts Install new LUTs Maximum density: Measure the fields of the maximum densities. Limit values: Y=2,1 M=2,05 C=2,00 If the yellow or the magenta density is too low, check the paper chemistry AGFA MSC 100, MSC 200 DPU 02.11.98 /PN 8102 4.33 Troubleshooting Technical Documentation DPU Test 3 to check Skew and Tracking Explanation The parallel shift of the image on the paper is called „Tracking“. This means that the image is not centred on the paper. This may be due to wrong triggering of the electron beam or to a faulty paper transport. Skewing is the word that is used to designate a slanting paper transport. This means that the image is not reproduced on paper at a right angle which may be caused by a tilted paper transport with respect to the FOCRT unit. The transport speed of the paper must match exactly the exposure speed of the electron beam. This can be checked by measurement. The image centering as well as the horizontal position of the electron beam is also checked on this print. For this purpose, there are scales on the left and right side at the top and the bottom border. This test print only serves to check. These settings can be corrected if necessary by means of the adjustment instructions for the IMAGE TRIM and the LEFT and RIGHT MARGIN TRIM in the Troubleshooting manual. The green vertical lines represent the limiting lines for smaller paper widths. Analysis Measure the length of the blue vertical line between the red limiting lines. The length should be exactly 280 mm. If this is not the case, the paper transport may be dirty or may slip. Clean the transport rollers and check the paper advance. Then repeat the test. Inspect the red horizontal limiting lines to check whether the paper transport is parallel to the exposure unit. The red vertical reference line must be exactly in the middle. The adjustment of the centre position and the parallelism is explained in the Troubleshooting manual. 4.34 02.11.98 /PN 8102 AGFA MSC 100, MSC 200 DPU Technical Documentation Troubleshooting Detailed Description of the Parameters of the File IP_MC.DAT The MSC sends this file to the IP after every modification and after every start of the IIP. The file is listed in the following: Parameter name Default value Minimal value Maximal value Function of the parameters SERVI 0 0 1 0 The parameters of the file IP_MC.DAT are copied to the corresponding INI files of the IIP. 1 The file IP_MC.DAT has no effect. The screen of the MSC shows a note in the error message window. BORDR 1 0 1 1 Pictures on the Indexprint with border 0 Pictures on the Indexprint without border STRIP 40 10 40 From which frame should an Index be made (only in the strip mode) P_CUT 5 -9 +9 Length of the cut strip in mm after the exposure IP135 No function yet IPAPS No function yet AUTOC 1 -99 99 AutoCal DXOUT 0 0 1 Output of the DX code C_LOG 0 0 1 Activation of the LOG file DEBUG 0 0 1 Diagnosis output on the VGA monitor SINFO 0 0 1 Output of DX numbers and film codes via serial interface INDEX 1 0 1 0 No Index camera connected - no calibration 1 Index camera connected - calibration performed Note DPU_Y +00 -15 +15 Yellow colour correction for digital images of a Workstation (not Pixtasy) 1 ≡ 1 manual correction MSC DPU_M +00 -15 +15 Magenta colour correction for digital images of a Workstation (not Pixtasy) 1 ≡ 1 manual correction MSC DPU_C +00 -15 +15 Cyan colour correction for digital images of a Workstation (not Pixtasy) 1 ≡ 1 manual correction MSC DPU_D +00 -15 +15 Density correction for digital images of a Workstation (not Pixtasy) 1 ≡ 1 manual correction MSC SW_01 0 -9 9 reserved for later applications SW_02 0 -9 9 reserved for later applications SW_03 0 -9 9 reserved for later applications SW_04 0 -9 9 reserved for later applications SW_05 0 -9 9 reserved for later applications SW_06 0 -9 9 reserved for later applications OPT_1 0 -9999 9999 reserved for later applications OPT_2 0 -9999 9999 reserved for later applications OPT_3 0 -9999 9999 reserved for later applications OPT_4 0 -9999 9999 reserved for later applications OPT_5 0 -9999 9999 reserved for later applications OPT_6 0 -9999 9999 reserved for later applications The parameters DPU_Y, DPU_M, DPU_C, DPU_D are not entered automatically into the file upon the Update to 2.64 MSC. AGFA MSC 100, MSC 200 DPU 02.11.98 /PN 8102 4.35 Troubleshooting 4.36 02.11.98 /PN 8102 Technical Documentation AGFA MSC 100, MSC 200 DPU Technical Documentation Troubleshooting Paper Transport Removal of the Paper Transport Module 1 2 3 Paper guide Turn roller unit Cutter unit Proceed as follows to remove the unit: q Remove the carrier from the paper guide (not illustrated). The top screws are in the area of the FOCRT. q Unscrew the screws marked by arrows. The paper guide is fastened by one nut. q Disconnect the connectors (bottom left) of the associated components. q Pull out the turn roller unit and the cutter. Caution Take out the paper guide with care. The holding rails are less than one cm long. Support the unit from below when removing it. AGFA MSC 100, MSC 200 DPU 02.11.98 /PN 8102 4.37 Troubleshooting Technical Documentation Paper Guide Only very few parts of this module are allowed to be replaced. All screws that must never be slackened are marked by arrows. In case of a fault, the complete unit must be replaced. The light sensor LS2DPG (position monitoring of the paper guide) must not be replaced either. Turn Roller Unit All screws marked by an arrow must not be slackened! Cutter Unit This unit is no problem. All parts can be replaced in case of need. When the complete unit is replaced, the parameters DCUTZ and DCUTX must be redefined. 4.38 02.11.98 /PN 8102 AGFA MSC 100, MSC 200 DPU Technical Documentation Troubleshooting Paper Transport Tolerances The following figure shows the admissible deviations of the paper transport. Skew Tracking Cut AGFA MSC 100, MSC 200 DPU 02.11.98 /PN 8102 4.39 Troubleshooting Technical Documentation Transport 4.40 02.11.98 /PN 8102 AGFA MSC 100, MSC 200 DPU Technical Documentation Troubelshooting Paper Control Sequence Paper Magazine 1 2 3 4 5 6 7 8 9 10 11 12 13 14 15 16 17 18 19 20 21 22 23 Action Exposure command from Main Paper in Turn Roller Unit Paper loop in Buffer Turn Roller in Pos. vertical Paper up to Top Sensor (LS4DEN) FOCRT Paper in Pos exposure Roller pressure in FOCRT Release roller pressure in Turn roller Pressure on face plate Release pressure on face plate Roller pressure in Turn Roller Release roller pressure in FOCRT Paper returned into Turn Roller Unit Turn Roller in Pos. horizontal Paper in Cutter Cut paper length Print to Exposure Table Cut 5 mm strip Paper returned to Turn Roller unit Turn Roller in Pos vertical Paper in waiting position to FOCRT Waiting position After 30 sec paper returned Paper Transport Turn Roller unit Cutter MO3AMD OFF MC2AMD OFF MC4AMD OFF MO1DPD OFF MC1DPD OFF MC2DPD OFF MC3DPD OFF MC4DPD OFF MO1DTR OFF MO2DTR OFF LS1DTR OFF LS3DTR OFF LS4DTR ON MO1DCT OFF LS1DCT OFF ON ON ON ON ON ON ON OFF OFF OFF ON OFF ON OFF OFF ON OFF ON OFF ON OFF OFF OFF ON ON OFF OFF OFF OFF OFF OFF OFF ON OFF OFF ON ON OFF ON ON OFF OFF OFF OFF OFF ON ON ON ON ON ON ON ON OFF OFF ON ON OFF OFF OFF OFF OFF OFF OFF ON MO1DEN in FOCRT: ON; LS2DEN: ON (Position closed); OFF OFF OFF OFF OFF ON ON OFF OFF OFF OFF OFF OFF OFF ON OFF OFF OFF OFF ON ON ON OFF OFF OFF OFF OFF OFF OFF OFF OFF OFF OFF ON ON OFF OFF OFF OFF OFF OFF OFF OFF OFF OFF ON ON ON ON OFF OFF OFF OFF OFF OFF OFF OFF OFF OFF ON OFF OFF OFF OFF ON ON ON OFF OFF OFF MO1DEN in FOCRT: ON; LS3DEN: ON (Position open) OFF OFF OFF ON ON OFF OFF OFF OFF OFF OFF ON OFF OFF OFF OFF OFF OFF OFF ON OFF OFF OFF ON OFF ON OFF ON OFF OFF OFF OFF OFF OFF OFF OFF OFF OFF OFF ON ON ON ON ON OFF OFF ON OFF OFF ON ON OFF ON ON OFF OFF OFF OFF OFF OFF ON ON ON OFF OFF OFF ON ON ON OFF ON OFF ON ON OFF OFF OFF OFF OFF OFF OFF ON ON ON ON ON OFF ON OFF OFF OFF OFF OFF OFF OFF ON OFF OFF OFF ON ON ON OFF OFF OFF OFF OFF OFF OFF ON OFF OFF OFF ON OFF ON OFF ON OFF OFF OFF OFF OFF ON ON OFF OFF OFF OFF OFF ON OFF ON OFF OFF OFF OFF OFF OFF OFF OFF OFF OFF ON OFF OFF OFF OFF OFF OFF OFF OFF OFF OFF OFF ON OFF OFF OFF ON ON OFF OFF OFF OFF AGFA MSC 100, MSC 200 DPU 02.11.98 /PN 8102 4.41 Troubleshooting 4.42 02.11.98 /PN 8102 Technical Documentation AGFA MSC 100, MSC 200 DPU Technical Documentation Troubleshooting Software of the FOCRT (Exposure Unit) Loading new Software In certain cases, i.e. frequent appearance of error messages with error code on the display of the DPU or in case of modifications, a new Software version has to be loaded into the FOCRT unit. For this, the diskette to trigger the FRED test print is required which is included in the accessory pack of the IP. At first, the diskette has to be slightly modified: q Put the diskette in a Laptop or a computer. q Open the File Manager or the Explorer and inspect the contents of the diskette. q Change the name of the file AUTOEXEC.BAT to e.g. AUTOEXEC.FRE q Change the name of the file AUTOEXEC.SWD to AUTOEXEC.BAT q Note down the following parameter values in the DPU menu: - CO Image Size Trim - CO Page Size Trim - CO Top Margin Trim - CO Stepper Motor Table The next page shows how these parameters are calculated. q Perform a Shutdown on the MSC q Push the diskette in the disk drive of the IP q Switch the MSC back on by the „ON“ key The IP is booted from A: and begins the Software Download immediately after startup. This operation takes a few minutes. q Wait until the DPU display shows „AG850“ q Remove the diskette q Press the Reset key of the IP The IP starts the normal program and the work can be continued as usual. Menu Overview The menu of the FOCRT unit can be opened on the DPU display by means of the 4 keys. The next page shows an overview. Most of the items have no function because the exposure control is ensured by the IP. They are used in Sienna machines. Only the lines in bold face are important. Note Please do not alter the presettings! Only the parameters described in the chapter Image centering can be varied. AGFA MSC 100, MSC 200 DPU 02.11.98 /PN 8102 4.43 Troubleshooting 4.44 02.11.98 /PN 8102 Technical Documentation AGFA MSC 100, MSC 200 DPU Technical Documentation Troubleshooting Circuit Diagram of the Power Supply Unit AGFA MSC 100, MSC 200 DPU 02.11.98 /PN 8102 4.45 Troubleshooting 4.46 02.11.98 /PN 8102 Technical Documentation AGFA MSC 100, MSC 200 DPU Technical Documentation Troubleshooting Switch-on Control of the DPU Switch-on sequence: When the 5V supply of the MSC is started, the 51D-PRD board is supplied with the signal PWCONT and +5V. When the switch MS1DMB is closed (FOCRT locked), the relay (RL) of the power supply unit of the DPU is triggered. The 51D-PRD board is energised by +5V from the power supply unit of the DPU. The monitoring C switches the Low active signal of the 52A-MAD board through to the MSC. If this is not the case, the signal PWCONT is reset and the DPU does not switch on. Possible causes if the DPU is not switched on together with the MSC: − Wrong Software of the 53A-CPU board of the MSC loaded − +5V power supply PRD CN 6 insufficient. − Connector PRD CN 2 not connected correctly. There is a separate connector for MSC 100 and MSC 200 (see chapter Installation) − MS1DMB not closed, FOCRT not correctly pushed in − Connector PRD CN4 not connected correctly − Connector PRD CN7 not connected correctly The supply voltages of the DPU power supply unit should be within the following range: Rated voltage +5 V -15 V +15 V +24 V +36 V AGFA MSC 100, MSC 200 DPU Admissible range 4,97 - 5,1 V -15,08 - -14,92 V 14,92 - 15,08 V 23,85 - 24,15 V 35,85 - 36,15 V 02.11.98 /PN 8102 4.47 Troubleshooting 4.48 02.11.98 /PN 8102 Technical Documentation AGFA MSC 100, MSC 200 DPU Technical Documentation Troubleshooting Overview of all Sensors and Loads AGFA MSC 100, MSC 200 DPU 02.11.98 /PN 8102 4.49 Troubleshooting Technical Documentation Explanation of Functions Designation LA1DEN LA2DEN LA1DMB LA2DMB LS2AMF LS1DCT LS2DCT LS1DEN LS2DEN LS3DEN LS4DEN LS1DPD LS3DPD LS1DPG LS2DPG LS3DPG LS1DTR LS2DTR LS3DTR LS4DTR LS5DTR MC1DPD MC2DPD MC3DPD MC4DPD MO1DCT MO1DEN MO1DPD MO1DPG MO2DPG MO1DTR MO2DTR MS1DMB MS2DMB MS3DMB MS4DMB MS5MDB 4.50 02.11.98 /PN 8102 Function LED for LS1DEN LED for LS4DEN DPU on LED LED for LS3DPD Paper detection on magazine Paper in Cutter detection Cutter in home position Paper detection in the FOCRT unit Detection pressure roller closed Detection pressure roller open Detection paper in Top Position Detection slug box mounted Loop detection Detection flap down Paper guide in home position Detection flap up Paper detection Turn Roller Splice detection in Turn Roller unit Detection Turn Roller in vertical position Detection Turn Roller in horizontal position Roller pressure detection Magnetic clutch Turn Roller Magnetic clutch for roller drive before Cutter Magnetic clutch for roller drive behind Cutter Clutch for roller drive MSC Cutter Cutter motor Pressure in FOCRT Paper transport motor Motor of paper guide adjustment Flap movement Turn Roller drive for the 90° rotation Roller pressure motor Interlock switch CRT unit locked in Interlock switch cover front bottom right DPU door open detection - message to MSC DPU door open detection - message to FOCRT unit Reset switch for FOCRT unit AGFA MSC 100, MSC 200 DPU Technical Documentation Troubleshooting Paper Magazine Drive Designation LA3AMD LA4AMD LS8AMD - LSBAMD LSCAMD - LSDAMD LSGAMD MC2AMD MC4AMD MO3AMD MO4AMD Function LED indication (red) magazine must not be removed LED indication (green) magazine may be removed Paper width detection on magazine Paper surface detection on magazine Magazine locked detection Magnetic clutch for roller set in the magazine Magnetic clutch for the paper transport in the automatic paper guide Paper transport Magazine drive Activation of the Sensors and Loads in the Service Menu All sensors and loads can be checked in the service menu. The following graph shows the locations of the individual components. AGFA MSC 100, MSC 200 DPU 02.11.98 /PN 8102 4.51 Troubleshooting Technical Documentation Block Circuit Diagram of the DPU n 4.52 02.11.98 /PN 8102 AGFA MSC 100, MSC 200 DPU Technische Dokumentation Ersatzteile / Spare Parts / Pièces Détachées Inhalt / Contents / Table des matières Seite / Page DPU Digital Print Unit Überblick / DPU Digital Print Unit Overview / Vue d’ensemble du DPU Digital Print Unit......5.3 DPU Digital Print Unit 8508/400 Netzteil / Power Supply Unit / Bloc secteur 51D-0701...............................................................................................5.4 Umlenkrollen-Einheit / Turn Roller Unit / Galet de renvoi 51D-0103..........................................................................5.8 Papierführungs-Einheit / Paper Guide Unit / Guidage papier 51D-0105..................................................................5.12 Schneideeinheit / Cutter Unit / Couteau 51D-0107..................................................................................................5.16 Papiertransport-Einheit / Paper Drive Unit / Transport papier 51D-0120.................................................................5.20 Magazinantrieb / Magazine Drive Unit / Entraînement de cassette 51D-0113 ........................................................5.26 FOCRT AG850 (1/2) ................................................................................................................................................5.32 FOCRT AG850 (2/2) ................................................................................................................................................5.34 AGFA MSC 100, MSC 200 DPU 03.06.98/ PN 7020 5.1 Ersatzteile / Spare Parts / Pièces Détachées 5.2 03.06.98/ PN 7020 Technische Dokumentation AGFA MSC 100, MSC 200 DPU Technische Dokumentation Ersatzteile / Spare Parts / Pièces Détachées DPU Digital Print Unit Überblick / DPU Digital Print Unit Overview / Vue d’ensemble du DPU Digital Print Unit dpu35.cdr AGFA MSC 100, MSC 200 DPU 03.06.98/ PN 7020 5.3 Ersatzteile / Spare Parts / Pièces Détachées DPU Digital Print Unit Power Supply Unit Technische Dokumentation 8508/400 51D-0701 dpu28.cdr 5.4 03.06.98/ PN 7020 AGFA MSC 100, MSC 200 DPU Technische Dokumentation Ersatzteile / Spare Parts / Pièces Détachées DPU Digital Print Unit Power Supply Unit Pos. Item no. Pos. 8508/400 51D-0701 Teil-Nr. Part no. No. de ref. ABC Code Bezeichnung Description Désignation 1 P4 -87594 9OH63 Nivellierschraube Adjuster Vis d’ajustage 2 P4 -87595 96RPC Druckplatte Spacer Plaque de pression 3 P4 -87596 96RQE Stellfuß Spacer Pied 4 P4 -2928(1/1) Schalter RS-803NO (Reed) Switch RS-803NO (Reed) Commutateur RS-803NO (Reed) 5 P3 -E4176 Folie Sheet Feuille 6 P5A-E4280 Schnipselbehälter, vollständig Slug box assy Réservoir, compl. 7 P5A-E4500 51D-PRD Gedruckte Schaltung 51D-PRD PCB assy 51D-PRD Circuit imprimé 8 P4 -E4384 Luftfilter Air filter Filtre à air 9 P4 -4071(1/1) Luftfilter FL-12 Air filter FL-12 Filtre à air FL-12 10 P4T-E4420 Abdeckung, oben (B) Top cover (B) Capot en haut (B) 11 P4T-E4428 Abdeckung, hinten Rear cover Capot, arrière 12 P5A-E4407 Abdeckung links, vollständig L-Cover Sub assy Capot à gauche, compl. 13 P4 -5180(3/1) Kugelrastung C-90-2 Ball catch C-90-2 (female) Arrêtage à billes C-90-2 14 P4 -E4348 Winkel Lock plate Equerre 15 P4 -E4189 Schraube Screw Vis 16 P5A-E4403 Abdeckung, vorne (A), vollständig Front cover (A) Sub assy Capot avant (A), compl. 17 P4 -2928(3/1) Magnet M-803 Magnet M-803 Aimant M-803 18 P4 -5179(3/1) Kugelrastung C-90-2 Ball catch C-90-2 (male) Arrêtage à billes C-90-2 19 P4 -6008 Griff Handle Poignée 20 P4 -6009 Klemme Clamp Agrafe 21 P5A-E4404 Abdeckung, vorne (B), vollständig Front cover (B) Sub assy Capot avant (B), compl. AGFA MSC 100, MSC 200 DPU Bemerkungen Remarks Remarques 03.06.98/ PN 7020 5.5 Ersatzteile / Spare Parts / Pièces Détachées DPU Digital Print Unit Power Supply Unit Technische Dokumentation 8508/400 51D-0701 dpu28.cdr 5.6 03.06.98/ PN 7020 AGFA MSC 100, MSC 200 DPU Technische Dokumentation Ersatzteile / Spare Parts / Pièces Détachées DPU Digital Print Unit Power Supply Unit 8508/400 51D-0701 Pos. Item no. Pos. Teil-Nr. Part no. No. de ref. 22 P5A-E4405 Abdeckung, vollständig Cover Sub assy Capot, compl. 23 PA4-43530 Sensorplatine Y176D1 PCB assy Y176D1 Platine de capteur Y176D1 24 PA4-43535 Sensorplatine Y177PD1 PCB assy Y177PD1 Platine de capteur Y177PD1 25 P4 -6072 Schnappverschluß B-1047 UI Snap lock B-1047 UI Obturateur B-1047 UI 26 P5A-E4504 51D-EXI Gedruckte Schaltung 51D-EXI PCB assy 51D-EXI Circuit imprimé 27 P4 -5904 Antistatikbürste Brush Brosse anti-statique A (T) P5A-E4605 Netzteil (CE) Power supply unit (CE) Bloc secteur (CE) A (U) P5A-E4615 Netzteil (UL) Power supply unit (UL) Bloc secteur (UL) 1A P4 -1521 Mikroschalter SS-01GL Micro switch SS-01GL Microcommutateur SS-01GL 2A P4 -4199(2/1) Buchse für Netzteilanschluß (10BASE-T) Jack for power supply connection (10BASE-T) Jack pour connexion au bloc secteur (10BASE-T) 3A P4 -4200 Relais G7L-2A-T (6VDC) Relay G7L-2A-T (6VDC) Relais G7L-2A-T (6VDC) 4A P5A-E4587 Kabelbaum WHD05N19, vollständig Wire harness WHD05N19 assy Câble WHD05N19, compl. 5A P4 -2944(7/1) Überlastschalter W28XQ1A-4 Circuit protector W28XQ1A-4 Interrupteur de surcharge W28XQ1A-4 6A P4 -2944(8/1) Überlastschalter W28XQ1A-5 Circuit protector W28XQ1A-5 Interrupteur de surcharge W28XQ1A-5 7A P4 -4202 Netzteil PS HWM600-32 Jack for power supply connection PS HWM600-32 Jack pour connexion de bloc secteur PS HWM600-32 8A P4 -4242 AC Netzanschluß (Eingang) FN9222-10-06 AC Connection to the power supply (inlet) FN9222-10-06 AC Connexion au bloc secteur (entrée) FN9222-10-06 9A P4 -4203 AC Netzanschluß (Ausgang) AC Connection to the power supply (outlet) AC Connexion au bloc secteur (sortie) 10A P4 -4243 HauptschaIter CP30-N-108-10 Breaker ICP30-N-108-10 Commuteur principal ICP30-N-108-10 P5A-E4192 FOCRT-Block (AG850) DPU Engine assy (AG850) Bloc FOCRT (AG850) F G ABC Code Type 8508/410 AGFA MSC 100, MSC 200 DPU Bezeichnung Description Désignation Bemerkungen Remarks Remarques für 53A-CPU for 53A-CPU pour 53A-CPU see FOCRT IP Image Prozessor IP Image Processor IP Image Processor 03.06.98/ PN 7020 5.7 Ersatzteile / Spare Parts / Pièces Détachées Umlenkrollen-Einheit / Turn Roller Unit / Galet de renvoi Technische Dokumentation 51D-0103 dpu29.cdr 5.8 03.06.98/ PN 7020 AGFA MSC 100, MSC 200 DPU Technische Dokumentation Ersatzteile / Spare Parts / Pièces Détachées Umlenkrollen-Einheit / Turn Roller Unit / Galet de renvoi Pos. Item no. Pos. Teil-Nr. Part no. No. de ref. ABC Code Bezeichnung Description Désignation B P5A-E4000 Umlenkrollen-Einheit, vollständig Turn roller unit assy Galet de renvoi, compl. 1B P4 -E4057 Rolle Roller Rouleau 2B P4 -5981(2/1) Lager Bearing Palier 3B P3 -E4002 Platte 1 Plate 1 Plaque 4B P4 -E4003 Achse Shaft Axe 5B P4 -E4066 Lagerbuchse Collar Douille de palier 6B P3 -E4004 Führung Guide Guidage 7B P3 -E4005 Achse M2.5 Shaft M2.5 Axe M2.5 8B P4 -E4006 Rolle Roller Rouleau 9B P4 -E4007 Stift Pin Broche 10B P4 -5470(19/1) Abstandshalter Spacer Ecarteur 11B P5A-E4025 Führung (Ausgang), vollständig Guide (Out) assy Guidage (sortie), compl. 12B P3A-E4026 Führung, vollständig Guide assy Guidage, compl. 13B P5A-88188 16B P4 -E4012 Hebel Lever Manette 17B P4 -6069 Lager B-F5-53 Bearing B-F5-53 Palier B-F5-53 18B P4 -E4013 Feder Spring Ressort 19B P4A-E4044 Nocke N, vollständig Cam N assy Came N, compl. 20B P4 -5682(1/1) Segmentscheibe M3x4 Set screw M3x4 Disque M3x4 21B P4 -E4016 Winkel Plate Equerre 22B P5A-88180 83E9T 83E1C AGFA MSC 100, MSC 200 DPU 51D-0103 Bemerkungen Remarks Remarques MF148ZZMC3D4MS MF148ZZMC3D4MS MF148ZZMC3D4MS 50A-SN3 Gedruckte Schaltung 50A-SN3 PCB assy 50A-SN3 Circuit imprimé 50A-SN1 Gedruckte Schaltung 50A-SN1 PCB assy 50A-SN1 Circuit imprimé 03.06.98/ PN 7020 5.9 Ersatzteile / Spare Parts / Pièces Détachées Umlenkrollen-Einheit / Turn Roller Unit / Galet de renvoi Technische Dokumentation 51D-0103 dpu29.cdr 5.10 03.06.98/ PN 7020 AGFA MSC 100, MSC 200 DPU Technische Dokumentation Ersatzteile / Spare Parts / Pièces Détachées Umlenkrollen-Einheit / Turn Roller Unit / Galet de renvoi Pos. Item no. Pos. Teil-Nr. Part no. No. de ref. ABC Code 23B P3 -E4454 Rolle Roller Rouleau 24B P4 -5002(21/1) Lager MF148ZZ Bearing MF148ZZ Palier MF148ZZ 25B P4 -E4471 Hülse Sleeve Baque 26B P4 -E4068 Abstandshalter Spacer Ecarteur 27B P4 -E4049 Abstandshalter Spacer Ecarteur 28B P4 -E4455 Abstandshalter Spacer Ecarteur 29B P4A-E4050 Nocke T, vollständig Cam T assy Came T, compl. 30B P4A-E4052 Hebel T, vollständig Lever T assy Manette T, compl. 31B P4 -E4054 Mitnehmer T 1 Dog T 1 Entraîneur T 1 32B P4 -E4023 Mitnehmer T 2 Dog T 2 Entraîneur T 2 33B P4 -E4055 Winkel Plate Equerre 34B P4A-E1753 52A-SN1 Gedruckte Schaltung Typ A 52A-SN1 PCB assy Type A 52A-SN1 Circuit imprimé Type A 35B P3 -88600 36B P4 -E4038 Achse Shaft Axe 37B P4 -E4040 Feder Spring Ressort 38B P3 -E4042 Papierführung Paper guide Guidage papier 39B P3 -E4056 Abdeckung Cover Capot 40B P4 -E4213 Platte 4 Plate 4 Capot 4 82D7C AGFA MSC 100, MSC 200 DPU Bezeichnung Description Désignation 51D-0103 Bemerkungen Remarks Remarques Kupplung (Eingang) Coupling (In) Couplage (entrée) 03.06.98/ PN 7020 5.11 Ersatzteile / Spare Parts / Pièces Détachées Technische Dokumentation Papierführungs-Einheit / Paper Guide Unit / Guidage papier 51D-0105 dpu30.cdr 5.12 03.06.98/ PN 7020 AGFA MSC 100, MSC 200 DPU Technische Dokumentation Ersatzteile / Spare Parts / Pièces Détachées Papierführungs-Einheit / Paper Guide Unit / Guidage papier Pos. Item no. Pos. Teil-Nr. Part no. No. de ref. ABC Code Bezeichnung Description Désignation C P5A-E4100 Papierführungs-Einheit Paper guide unit Guidage papier 1C P1A-E4103 Grundplatte 1, vollständig Plate 1 assy Plaque de base 1, compl. 11C P4 -3788 DC Motor DC Motor Moteur DC 17C P4 -86364 18C P4 -86365 Achse Shaft Axe 19C P4 -5981(2/1) Lager Bearing Palier 20C P4 -71185 21C P4 -E3342 Zugfeder Spring Ressort de traction 22C P4 -5470(19/1) Abstandshalter Spacer Ecarteur 23C P2 -E4120 Umlenkung Turn guide Guidage de renvoi 24C P4 -E4121 Mitnehmer 2 Dog 2 Entraîneur 2 25C P3 -E4127 Achse Shaft Axe 26C P4 -E4188 Druckfeder Spring Ressort à pression 27C P4 -E4067 Hülse Sleeve Baque 28C P3 -E4195 Rolle Roller Rouleau 29C P4 -5002(21/1) Lager MF148ZZ Bearing MF148ZZ Palier MF148ZZ 30C P4 -E4068 Abstandshalter Spacer Ecarteur 31C P4 -E4049 Abstandshalter Spacer Ecarteur 32C P3 -88600 33C P4A-E4050 Nocke T, vollständig Cam T assy Came T, compl. 34C P4 -E4123 Mitnehmer 3 Dog 3 Entraîneur 3 9BMCY 9BK6F 82D7C AGFA MSC 100, MSC 200 DPU 51D-0105 Bemerkungen Remarks Remarques DME33S37G-129 DME33S37G-129 DME33S37G-129 Rolle Roller Rouleau MF148ZZMC3D4MS MF148ZZMC3D4MS MF148ZZMC3D4MS Lagerbuchse C Collar C Douille de palier C Kupplung (Eingang) Coupling (In) Couplage (entrée) 03.06.98/ PN 7020 5.13 Ersatzteile / Spare Parts / Pièces Détachées Technische Dokumentation Papierführungs-Einheit / Paper Guide Unit / Guidage papier 51D-0105 dpu30.cdr 5.14 03.06.98/ PN 7020 AGFA MSC 100, MSC 200 DPU Technische Dokumentation Ersatzteile / Spare Parts / Pièces Détachées Papierführungs-Einheit / Paper Guide Unit / Guidage papier Pos. Item no. Pos. Teil-Nr. Part no. No. de ref. ABC Code 35C P4A-E4129 Hebel, vollständig Lever assy Manette, compl. 36C P4 -5461(8/1) Schraube M3x12 Screw M3x12 Vis M3x12 37C P4 -E4128 Rändelschraube Knob Vis moletée 38C P4 -E4144 Zugfeder Spring Ressort de traction 39C P5A-88180 40C P4 -E4137 Winkel Plate Equerre 41C P5A-88834 50A-SN6 Gedruckte Schaltung 50A-SN6 PCB assy 50A-SN6 Circuit imprimé 42C P4 -E4138 Winkel Plate Equerre 43C P4 -E4139 Winkel Bracket Equerre 83E1C AGFA MSC 100, MSC 200 DPU Bezeichnung Description Désignation 51D-0105 Bemerkungen Remarks Remarques 50A-SN1 Gedruckte Schaltung 50A-SN1 PCB assy 50A-SN1 Circuit imprimé 03.06.98/ PN 7020 5.15 Ersatzteile / Spare Parts / Pièces Détachées Schneideeinheit / Cutter Unit / Couteau Technische Dokumentation 51D-0107 dpu31.cdr 5.16 03.06.98/ PN 7020 AGFA MSC 100, MSC 200 DPU Technische Dokumentation Ersatzteile / Spare Parts / Pièces Détachées Schneideeinheit / Cutter Unit / Couteau Pos. Item no. Pos. D Teil-Nr. Part no. No. de ref. ABC Code Bezeichnung Description Désignation P5A-E4200 Schneideeinheit Cutter unit Couteau 1D P4 -6073 Messerblock, vollständig Cutter assy Bloc de couteau, compl. 2D P2 -E4201 Führung 1 (Messer) Guide 1 (Cutter) Guidage 1 (couteau) 3D P5A-E4215 Führung 2, vollständig Guide 2 Sub assy Couteau 2, compl. 4D P2 -E4202 Führung 2 (Messer) Guide 2 (Cutter) Guidage 2 (couteau) 5D P5A-88192 6D P4 -6066 Bürste Brush Brosse 7D P4 -6067 Bürste Brush Brosse 8D P1 -E4203 Rahmen (Messer) Frame (Cutter) Bâti (couteau) 9D P3 -E4195 Rolle Roller Rouleau 10D P4 -5002(21/1) Lager MF148ZZ Bearing MF148ZZ Palier MF148ZZ 11D P5A-E0171 Rolle, vollständig Roller Sub assy Roulea, compl. 12D P4 -86364 13D P4 -86365 Achse Shaft Axe 14D P4 -5981(2/1) Lager Bearing Palier 15D P4 -71185 16D P4 -E4067 Hülse Sleeve Baque 17D P4 -E4455 Abstandshalter Spacer Ecarteur 18D P3 -88600 19D P4A-E4218 Hebel, vollständig Lever assy Manette, compl. 20D P4 -5682(12/1) Gewindestift M4x6 Screw M4x6 Vis sans tête M4x6 83ETW 9BMCY 9BK6F 82D7C AGFA MSC 100, MSC 200 DPU 51D-0107 Bemerkungen Remarks Remarques 50A-SN4 Gedruckte Schaltung 50A-SN4 PCB assy 50A-SN4 Circuit imprimé Rolle Roller Rouleau MF148ZZMC3D4MS MF148ZZMC3D4MS MF148ZZMC3D4MS Lagerbuchse C Collar C Douille de palier C Kupplung (Eingang) Coupling (In) Couplage (entrée) 03.06.98/ PN 7020 5.17 Ersatzteile / Spare Parts / Pièces Détachées Schneideeinheit / Cutter Unit / Couteau Technische Dokumentation 51D-0107 dpu31.cdr 5.18 03.06.98/ PN 7020 AGFA MSC 100, MSC 200 DPU Technische Dokumentation Ersatzteile / Spare Parts / Pièces Détachées Schneideeinheit / Cutter Unit / Couteau ABC Code Bezeichnung Description Désignation 51D-0107 Pos. Item no. Pos. Teil-Nr. Part no. No. de ref. Bemerkungen Remarks Remarques 21D P5A-E4221 22D P4 -5892 23D P4A-E4204 Nocke, vollständig Cam assy Came, compl. 24D P4 -5682(13/1) Gewindestift M4x8 Set screw M4x8 Vis sans tête M4x8 25D P4 -E4206 Segmentscheibe Dog Disque 26D P3 -E4207 Grundplatte (Messer) Base (cutter) Plaque de base 27D P3 -E4210 Platte 1 Plate 1 Plaque 1 28D P4 -E4216 Platte 5 Plate 5 Plaque 5 29D P4 -E4217 Platte 6 Plate 6 Plaque 6 30D P5A-E4220 Platte 2, vollständig Plate 2 Sub assy Plaque 2, compl. 31D P3-86488 Platte 2 Plate 2 Plaque 2 32D P4 -4043(2/1) Abstandshalter M2 L=4 Spacer M2 l=4 Ecarteur M2 l=4 2SQ-4 2SQ-4 2SQ-4 33D P4 -4043(8/1) Abstandshalter M2 L=10 Spacer M2 l=10 Ecarteur M2 l=10 2SQ-10 2SQ-10 2SQ-10 34D P4A-E1753 50A-SN1 Gedruckte Schaltung Typ A 50A-SN1 PCB assy Type A 50A-SN1 Circuit imprimé Type A 35D P4A-E4208 Hebel, vollständig Lever assy Manette, compl. 36D P3 -E4212 Platte 3 Plate 3 Plaque 3 37D P4 -E4213 Platte 4 Plate 4 Plaque 4 38D P4 -E4219 Platte 7 Plate 7 Plaque 7 Motor, vollständig Motor assy Moteur, compl. 9BK26 AGFA MSC 100, MSC 200 DPU Getriebekopf 6H18 Gear head 6H18 Tête d’engrenage 6H18 03.06.98/ PN 7020 5.19 Ersatzteile / Spare Parts / Pièces Détachées Technische Dokumentation Papiertransport-Einheit / Paper Drive Unit / Transport papier 51D-0120 dpu32.cdr 5.20 03.06.98/ PN 7020 AGFA MSC 100, MSC 200 DPU Technische Dokumentation Ersatzteile / Spare Parts / Pièces Détachées Papiertransport-Einheit / Paper Drive Unit / Transport papier Pos. Item no. Pos. Teil-Nr. Part no. No. de ref. ABC Code Bezeichnung Description Désignation E P5A-E4230 Papiertransport-Einheit Paper drive unit Transport papier 1E P5A-E4257 Papiertransport, vollständig Paper drive Sub assy Transport papier, compl. 2E P3A-E4231 Rahmen A, vollständig Frame A assy Bâti A, compl. 3E P4 -E0172 Rolle Roller Rouleau 4E P4 -6010(2/1) Lager Bearing Palier 5E P3A-E4233 Rahmen B, vollständig Frame B assy Bâti B, compl. 6E P4 -E0062 Stange B Stay B Tige B 7E P4 -E0054 Abstandshalter Stay Ecarteur 8E P4 -86094 Achse Shaft Axe 9E P4 -86028 10E P4 -5682(11/1) 11E P4 -86029 12E P4 -5682(13/1) Gewindestift M4x8 Set screw M4x8 Vis sans tête M4x8 13E P4 -5584(23/1) Riemen B150MXL9.5 Belt B150MXL9.5 Courroie B150MXL9.5 14E P4 -5584(25/1) Riemen B175MXL9.5 Belt B175MXL9.5 Courroie B175MXL9.5 15E P4 -5584(25/1) Riemen B180MXL9.5 Belt B180MXL9.5 Courroie B180MXL9.5 16E P4 -5002(21/1) Lager MF148ZZ Bearing MF148ZZ Palier MF148ZZ 17E P3 -E0011 Achse Shaft Axe 18E P3 -E0012 Achse Shaft Axe 19E P3 -E4238 Achse Shaft Axe 20E P5A-E4269 Magnetkupplung, vollständig (CF) Clutch assy (CF) Embrayage, compl. (CF) 9BMV2 51D-0120 Bemerkungen Remarks Remarques MR84ZZMC3D4MS MR84ZZMC3D4MS MR84ZZMC3D4MS Riemenscheibe 30 Pulley 30 Disque à courroie 30 Gewindestift M4x5 Set screw M4x5 Vis sans tête M4x5 9BMW4 AGFA MSC 100, MSC 200 DPU Riemenscheibe 48 Pulley 48 Disque à courroie 48 03.06.98/ PN 7020 5.21 Ersatzteile / Spare Parts / Pièces Détachées Technische Dokumentation Papiertransport-Einheit / Paper Drive Unit / Transport papier 51D-0120 dpu32.cdr 5.22 03.06.98/ PN 7020 AGFA MSC 100, MSC 200 DPU Technische Dokumentation Ersatzteile / Spare Parts / Pièces Détachées Papiertransport-Einheit / Paper Drive Unit / Transport papier Pos. Item no. Pos. Teil-Nr. Part no. No. de ref. ABC Code 21E P5A-E4270 Magnetkupplung, vollständig (CB) Clutch assy (CB) Embrayage, compl. (CB) 22E P5A-E4271 Magnetkupplung, vollständig (MC) Clutch assy (MC) Embrayage, compl. (MC) 23E P5A-E4273 Magnetkupplung, vollständig (TR) Clutch assy (TR) Embrayage, compl. (TR) 24E P44-E0058 Riemenscheibe 30 Pulley 30 Disque à courroie 30 25E P4 -E0010 Scheibe Plate Rondelle 26E 7.0214.106.28 27E P4 -E4239 Platte 2 Plate 2 Plaque 2 28E P4 -E0006 Abstandshalter Spacer Ecarteur 29E P5A-E4260 Motor, vollständig Motor assy Moteur, compl. 30E P4 -4034 Schrittmotor KH-56KM2-020 Step motor KH-56KM2-020 Moteur pas à pas KH-56KM2-020 31E P4 -86032 32E P4 -86110 Motorhalterung Motor holder Support moteur 33E P4A-86083 Platte A, vollständig Plate A assy Plaque A, compl. 34E P3 -88600 82D7C Kupplung (Eingang) Coupling (In) Couplage (entrée) 35E P3 -88601 82D6A Kupplung (Ausgang) Coupling (Out) Couplage (sortie) 36E P4 -E4757 Scheibe Washer Rondelle 37E P5A-E0037 Block, vollständig Block Sub assy Bloc, compl. 38E P5A-E4261 Sensoreinheit, vollständig Plate 1 Sub assy Unité capteur, compl. 39E P3 -E4235 Platte (Sensor) Plate 1 (Sensor) Plaque (capteur) 40E P4A-E4236 Achse (Sensor) Shaft (Sensor) Axe (capteur) 41E P4 -E4237 Feder (Sensor) Spring (Sensor) Ressort (capteur) UCFVS 9BM1D AGFA MSC 100, MSC 200 DPU Bezeichnung Description Désignation 51D-0120 Bemerkungen Remarks Remarques Gewindestift M3x5 Set screw M3x5 Vis sans tête M3x5 Riemenscheibe 48 (Motor) Pulley 48 (motor) Disque à courroie 48 (moteur) 03.06.98/ PN 7020 5.23 Ersatzteile / Spare Parts / Pièces Détachées Technische Dokumentation Papiertransport-Einheit / Paper Drive Unit / Transport papier 51D-0120 dpu32.cdr 5.24 03.06.98/ PN 7020 AGFA MSC 100, MSC 200 DPU Technische Dokumentation Ersatzteile / Spare Parts / Pièces Détachées Papiertransport-Einheit / Paper Drive Unit / Transport papier Pos. Item no. Pos. Teil-Nr. Part no. No. de ref. ABC Code 42E P4 -3815 Photosensor Photo sensor Photo capteur 43E P4 -5016 Schnappverschluß Catch Arrêtage 44E P5A-E4240 I-Basis, vollständig I-Base Sub assy I-Base, compl. 45E P2 -E4241 Basis (B-1) Base (B-1) Base (B-1) 46E P2 -E4242 Basis (B-2) Base (B-2) Base (B-2) 47E P5A-E4263 Block (B-5) Sub, vollständig Block (B-5) Sub assy Bloc (B-5) Sub, compl. 48E P2 -E4243 49E P2 -E4248 50E P2 -E4244 Basis (B-3) Base (B-3) Base (B-3) Führung (Basis) Guide (base) Guidage (base) Basis (B-4) Base (B-4) Base (B-4) 51E P4 -E4245 Stift Pin Broche 52E P5A-E4249 Winkel S Bracket S Equerre S 53E P4A-43535 Y177PD1 Gedruckte Schaltung Y177PD1 PCB assy Y177PD1 Circuit imprimé 54E P4A-43530 Y176PD1 Gedruckte Schaltung Y176PD1 PCB assy Y176PD1 Circuit imprimé 55E P4A-E4254 B-Winkel, vollständig B-Bracket assy B- Equerre, compl. 56E P4 -E4246 Winkel 1 (Basis) Bracket 1 (Base) Equerre 1 (base) 57E P4 -E4247 Winkel 2 (Basis) Bracket 2 (Base) Equerre 2 (base) 58E P3 -E4256 Platte Plate Plaque 59E P3 -E4065 Führung Guide Guidage AGFA MSC 100, MSC 200 DPU Bezeichnung Description Désignation 51D-0120 Bemerkungen Remarks Remarques 03.06.98/ PN 7020 5.25 Ersatzteile / Spare Parts / Pièces Détachées Technische Dokumentation Magazinantrieb / Magazine Drive Unit / Entraînement de cassette 51D-0113 dpu33.cdr 5.26 03.06.98/ PN 7020 AGFA MSC 100, MSC 200 DPU Technische Dokumentation Ersatzteile / Spare Parts / Pièces Détachées Magazinantrieb / Magazine Drive Unit / Entraînement de cassette Pos. Item no. Pos. Teil-Nr. Part no. No. de ref. ABC Code Bezeichnung Description Désignation 0 P5A-E4299 Magazinantrieb, Typ A Magazine drive unit, Type A Entraînement de cassette, Type A 1 P3A-E0060 Rahmen L (A), vollständig Frame L (A) assy Bâti L (A), compl. 2 P4 -E0172 Rolle Roller Rouleau 3 P4 -6010(2/1) Lager Bearing Palier 4 P4 -E0062 Stange B Stay B Tige B 5 P4 -E0054 Stange Stay Tige 6 P1 -E0063 Rahmen L (B) Frame L (B) Bâti L (B) 7 P4 -86094 Achse Shaft Axe 8 P4 -86028 9 P4 -5682(11/1) 9BMV2 51D-0113 Bemerkungen Remarks Remarques MR84ZZMC3D4MS MR84ZZMC3D4MS MR84ZZMC3D4MS Riemenscheibe 30 Pulley 30 Disque à courroie 30 Gewindestift M4x5 Set screw M4x5 Vis sans tête M4x5 10 P4 -86029 9BMW4 11 P4 -5682(13/1) 12 P4 -5584(14/1) 82DQD Zahniemen Belt Courroie dentée 118MXL9.5 118MXL9.5 118MXL9.5 13 P4 -5584(15/1) 82DSH Zahniemen Belt Courroie dentée 232MXL9.5 232MXL9.5 232MXL9.5 14 P4 -5002(21/1) Lager MF148ZZ Bearing MF148ZZ Palier MF148ZZ 15 P3 -E0012 Achse Shaft Axe 16 P5A-E0173 Magnetkupplung, vollständig Clutch assy Embrayage, compl. 17 7.0214.106.28 18 P4 -E0006 19 P3 -88600 82D7C Kupplung (Eingang) Coupling (In) Couplage (entrée) 20 P3 -88601 82D6A Kupplung (Ausgang) Coupling (Out) Couplage (sortie) Riemenscheibe 48 Pulley 48 Disque à courroie 48 Gewindestift M4x8 Set screw M4x8 Vis sans tête M4x8 UCFVS Gewindestift M3x5 Set screw M3x5 Vis sans tête M3x5 Abstandshalter Spacer Ecarteur AGFA MSC 100, MSC 200 DPU 03.06.98/ PN 7020 5.27 Ersatzteile / Spare Parts / Pièces Détachées Technische Dokumentation Magazinantrieb / Magazine Drive Unit / Entraînement de cassette 51D-0113 dpu33.cdr 5.28 03.06.98/ PN 7020 AGFA MSC 100, MSC 200 DPU Technische Dokumentation Ersatzteile / Spare Parts / Pièces Détachées Magazinantrieb / Magazine Drive Unit / Entraînement de cassette Pos. Item no. Pos. Teil-Nr. Part no. No. de ref. ABC Code 21 P3 -E0011 Achse Shaft Axe 22 P5A-E0057 Magnetkupplung, vollständig Clutch assy Embrayage, compl. 23 P4A-E0058 Riemenscheibe 30 Pulley 30 Disque à courroie 30 24 P4 -E0010 Platte Plate Plaque 25 P5A-E0007 Motor (Rolle), vollständig Motor (roller) assy Moteur (rouleau), compl. 26 P4 -4038 Schrittmotor Step motor Moteur pas à pas 27 P4 -86032 28 P4 -86110 Motorhalterung Motor holder Support moteur 29 P4A-86083 Platte A, vollständig Plate A assy Plaque A, compl. 30 P3 -E0015 Achse Shaft Axe 31 P4 -8518 Riemenscheibe 48 Pulley 48 Disque à courroie 48 32 P4 -8519 Riemenscheibe 16 Pulley 16 Disque à courroie 16 33 P4 -5569(33/1) Riemen 146XL075 Belt 146XL075 Courroie 146XL075 34 P4 -5002(3/1) Lager Bearing Palier 35 P4 -E0014 Lagerbuchse Collar Douille de palier 36 P4 -5957(2/1) Paßfeder 3x3 L=28 Parallel key 3x3 L=28 Ressort d’assemblage 3x3 L=28 37 P3 -E0009 Achse Shaft Axe 38 P4 -8517 Riemenrad40 Pulley 40 Disque à courroie 40 39 P5A-E0005 Motor (Kassettenkern), vollständig Motor (magazine core) assy Moteur (noyau de cassette), compl. 40 P4 -4034 Schrittmotor Step motor Moteur pas à pas 41 P4 -8516 Riemenscheibe 12 Pulley 12 Disque à courroie 12 9BM1D AGFA MSC 100, MSC 200 DPU Bezeichnung Description Désignation 51D-0113 Bemerkungen Remarks Remarques KH-56QM2-008 KH-56QM2-008 KH-56QM2-008 Riemenscheibe 48 (Motor) Pulley 48 (motor) Disque à courroie 48 (moteur) F688ZZS (NSK) F688ZZS (NSK) F688ZZS (NSK) KH-56KM2-020 KH-56KM2-020 KH-56KM2-020 03.06.98/ PN 7020 5.29 Ersatzteile / Spare Parts / Pièces Détachées Technische Dokumentation Magazinantrieb / Magazine Drive Unit / Entraînement de cassette 51D-0113 dpu33.cdr 5.30 03.06.98/ PN 7020 AGFA MSC 100, MSC 200 DPU Technische Dokumentation Ersatzteile / Spare Parts / Pièces Détachées Magazinantrieb / Magazine Drive Unit / Entraînement de cassette ABC Code Pos. Item no. Pos. Teil-Nr. Part no. No. de ref. 42 P4 -E0186 Platte (Motor) Plate (motor) Plaque (moteur) 43 P4 -8520 Umlenkung 16 Idler 16 Renvoi 44 P4 -5002(25/1) Lager MF106ZZS Bearing MF106ZZS Palier MF106ZZS 45 P4A-E0018 Platte (Umlenkung), vollständig Plate (Idler) assy Plaque (renvoi), compl. 46 P4 -86113 Stift Pin Broche 47 P5A-E0037 Block Sub, vollständig Block Sub assy Bloc Sub, compl. 48 P4 -E0138 Steckerhalter (U) L Connector holder (U) L Support de connexion (U) L 49 P4 -E3950 Platte L Plate L Plaque L 50 P5A-E1021 52A-MAD Gedruckte Schaltung 52A-MAD PCB assy 52A-MAD Circuit imprimé 51 P5A-88196 83FDA 50A-WDT Gedruckte Schaltung 50A-WDT PCB assy 50A-WDT Circuit imprimé 52 P5A-88314 83FGB 50A-LED Gedruckte Schaltung 50A-LED PCB assy 50A-LED Circuit imprimé 53 P2 -E0034 Sensorabdeckung L Sensor cover L Capot de capteur L (A25-52) (A25-52) (A25-52) 54 P4 -E0073 Steckerhalter (F) L Connector holder (F) L Support de connexion (F) L (A01-52) A01-52) (A01-52) 55 P4 -E4757 Scheibe Washer Rondelle 56 P4 -5300(3/1) Abstandshalter BB L=60 Spacer BB l=60 Ecarteur BB l=60 57 P4 -1058(4/1) Abstandshalter KGLS-6S Spacer KGLS-6S Ecarteur KGLS-6S AGFA MSC 100, MSC 200 DPU Bezeichnung Description Désignation 51D-0113 Bemerkungen Remarks Remarques 03.06.98/ PN 7020 5.31 Ersatzteile / Spare Parts / Pièces Détachées FOCRT Technische Dokumentation AG850 (1/2) dpu26.cdr 5.32 03.06.98/ PN 7020 AGFA MSC 100, MSC 200 DPU Technische Dokumentation Ersatzteile / Spare Parts / Pièces Détachées FOCRT Pos. Item no. Pos. AG850 Teil-Nr. Part no. No. de ref. ABC Code Bezeichnung Description Désignation 0 P5A-E4192 FOCRT (DPU-Antrieb, vollständig) FOCRT (DPU Engine assy) FOCRT (DPU Entraînement, compl.) 1 S9+10751-105 Platte, seitlich, links (vorne) Plate, side, LHS (front) Plaque, côté, à gauche (avant) 2 S9+10751-004 Platte, seitlich, rechts (hinten) Plate, side, RHS (back) Plaque, côté, à droite (arrière) 3 S9+10752-001 Strebe (Ausgabeseite) RT Block, dispenser, RT Contre-fich (sortie) RT 5 S9+10853-002 Druckstück BRKT links Cam follower bracket BRKT, LHS Pièce de pression BRKT à gauche 6 S9+16828294-001 Andruckrolle Pressure roller Galet de pression 7 S9+16738273-134 Flanschkugellager Ball bearing, flanged Roulement à billes (bride) 8 S9+16758128-101 Distanzscheibe, rostfrei Spacer .125, stainless Ecarteur (disque), sans rouille 9 S9+16828304-001 Lagerplatte, Abdruckrolle Bearing plate, pressure roller Palier, Galet de pression 10 S9+16738290-068 Spiralfeder (Verlängerung) Spring, helical, extension Ressort, hélicoïdal (rallonge) 11 S9+16828319-006 Arm, geschweißt Arm, weldment Bras, soudage 12 S9+19771-001 Achse (Nocke) Shaft, Cam Axe (came) 13 S9+10772-001 Nocke Cam Came 14 S9+10773-003 Druckstück BRKT rechts Contoured part BRKT, RH Pièce usinée BRKT à droite 15 S9+10774-001 Kupplung, Motor Coupling, motor Couplage, moteur 16 S9+16828312-001 Achse rechts Shaft right , pivot Axe à droite 17 S9+16828319-001 Arm vollständig, geschweißt Arm assy, weldment Bras compl., soudage 18 S9+16828330-003 Papierführung, oben Paper guide, upper Guidage papier en haut 19 S9+16828319-002 Arm vollständig, geschweißt Arm assy, weldment Bras compl., soudage 20 S9+16828319-003 Arm vollständig, geschweißt Arm assy, weldment Bras compl., soudage 21 S9+16775275-011 Federscheibe Washer (spring) Rondelle (ressort) AGFA MSC 100, MSC 200 DPU Bemerkungen Remarks Remarques 03.06.98/ PN 7020 5.33 Ersatzteile / Spare Parts / Pièces Détachées FOCRT Technische Dokumentation AG850 (2/2) dpu27.cdr 5.34 03.06.98/ PN 7020 AGFA MSC 100, MSC 200 DPU Technische Dokumentation Ersatzteile / Spare Parts / Pièces Détachées FOCRT AG850 Pos. Item no. Pos. Teil-Nr. Part no. No. de ref. ABC Code 22 S9+16779214-012 Feder Spring, helical Ressort 23 S9+16828293-002 Antriebsachse, Gummi Shaft, drive, rubber (covered) Arbre d’entraînement (caoutchouc) 25 S9+16828705-001 Magnethalter Pole piece magnet Fixation (aimant) 26 S9+16781258-903 Magnet Magnet Aimant 27 S9+16738290-067 Spiralfeder (Verlängerung) Spring, helical, extension Ressort, hélicoïdal (rallonge) 28 S9+16828316-002 Nocke Cam Came 29 S9+16828495-001 Buchse Drill bushing Douille 30 S9+AN960C416 Scheibe Washer Rondelle 31 S9+16828198-006 Andruckstück, vollständig Pressure pad assy Pièce de pression, compl. 32 S9+16726506-005 Winkel Retaining strap Equerre 33 S9+10782-002 Papierführung unten, hinten Paper guide LWR rear Guidage papier en bas, arrière 34 S9+10802-002 Papierführung unten, vorne Paper guide LWR rear Guidage papier en bas, avant 35 S9+10803-003 Abstandsstück, Papierführung hinten Spacer, rear guide Ecarteur, guidage papier en arrière 36 S9+10806-001 Winkel, Motoraufbau Bracket, motor mounting Equerre, construction de moteur 37 S9+16828321-001 Motor, DC (A6A1, A7) Motor, DC (A6A1, A7) Moteur, DC (A6A1, A7) 38 S9+10939-002 Winkel, Sensor MTG Bracket, sensor MTG Equerre, capteur MTG 39 S9+MS16624-1025 Sicherungsring Retaining ring Circlip de retenue 40 S9+MS51957-12 Schraube 4-40 X .18L Screw 4-40 X .18L Vis 4-40 X .18L 41 S9+MS35338-40 Sicherungsscheibe #4 Washer, lock #4 Rondelle de retenue #4 42 S9+99000230-404 Gewindestift M4x4 L Set screw M4x4 L Vis sans tête M4x4 L 43 S9+MS90707-1025 Sicherungsring Retaining ring Circlip de retenue AGFA MSC 100, MSC 200 DPU Bezeichnung Description Désignation Bemerkungen Remarks Remarques 03.06.98/ PN 7020 5.35 Ersatzteile / Spare Parts / Pièces Détachées FOCRT Technische Dokumentation AG850 (1/2) dpu26.cdr 5.36 03.06.98/ PN 7020 AGFA MSC 100, MSC 200 DPU Technische Dokumentation Ersatzteile / Spare Parts / Pièces Détachées FOCRT AG850 Pos. Item no. Pos. Teil-Nr. Part no. No. de ref. ABC Code 44 S9+MS35756-1 Scheibenfeder DIN 6888 Woodruff key DIN 6888 Rondelle elastique bombée DIN 6888 45 S9+AN960C416L Scheibe Washer Rondelle 46 S9+16757313-020 Scheibe Shoulder washer Rondelle 47 S9+16828360-102 Kabel W3 Cable, hall effect W3 Câble W3 49 S9+16825235-585 Schraube mit Scheibe M4x10 L Screw with washer M4x10 L Vis avec rondelle M4x10 L 50 S9+16825235-586 Schraube mit Scheibe M4x12 L Screw with washer M4x12 L Vis avec rondelle M4x12 L 52 S9+99000343-001 Sicherungsscheibe M2 Washer, lock, M2 Rondelle de retenue M2 53 S9+99000201-110 Schraube PNH M2x10 L Screw PNH M2x10 L Vis PNH M2x10 L 54 S9+10942-001 CCA, Sensor CCA, sensor CCA, capteur 55 S9+MS35206-215 Schraube 4-40x.312L Screw 4-40x.312L Vis 4-40x.312L 56 S9+16829347-001 Stopp-Pin Stop, diverter pin Arrêt (broche) 57 S9+16829348-001 Achse Shaft, diverter Axe 58 S9+16825235-587 Schraube mit Scheibe M4x16 L Screw with washer M4x16 L Vis avec rondelle M4x16 L 59 S9+16737979-801 Nylonscheibe 505ID Washer, flat, nylon, 505ID Rondelle (nylon) 505ID 60 S9+16759863-195 Greifring ø .245 Retaining ring ø .245 Bague ø .245 61 S9+16759163-021 Feder .029x1.0L Spring .029x1.0L Ressort .029x1.0L 62 S9+16815400-001 Kabelklemme Clamp, loop Borne (câble) 63 S9+16815400-002 Kabelklemme Clamp, loop Borne (câble) 64 S9+MS35338-135 Sicherungsscheibe #4 Washer, lock #4 Rondelle de retenue #4 67 S9+16758128-098 Abstandshalter .031, rostfrei Spacer .031, stainless Ecarteur .031 sans rouille 68 S9+99000229-003 Scheibe, flach, M3 Washer, flat, M3 Rondelle, plat, M3 AGFA MSC 100, MSC 200 DPU Bezeichnung Description Désignation Bemerkungen Remarks Remarques 03.06.98/ PN 7020 5.37 Ersatzteile / Spare Parts / Pièces Détachées FOCRT Technische Dokumentation AG850 (2/2) dpu27.cdr 5.38 03.06.98/ PN 7020 AGFA MSC 100, MSC 200 DPU Technische Dokumentation Ersatzteile / Spare Parts / Pièces Détachées FOCRT AG850 Pos Item no. Pos. Teil-Nr. Part no. No. de ref. ABC Code Bezeichnung Description Désignation 69 S9+11057-001 Winkel, DPU Bracket, DPU Support Equerre, DPU 70 S9+16829326-001 Block, DPU-Aufbau, links Block, DPU mount, left Bloc, construction DPU, à gauche 71 S9+16829326-002 Block, DPU-Aufbau, rechts Block, DPU mount, right Bloc, construction DPU, à droite 72 S9+16829327-001 Feder, DPU Spring, DPU locating Ressort, DPU 73 S9+10752-101 Block LT Block, dispenser, LT Bloc LT 74 S9+16825235-545 Schraube PNH M3x10 L Screw PNH M3x10 L Vis PNH M3x10 L 75 S9+16738290-069 Feder (Verlängerung) Sprint, extension Ressort (rallonge) 76 S9+11113-001 Distanzscheibe Spacer Ecarteur (disque) 77 S9+16825235-601 Schraube Screw Vis 78 S9+16828844-003 Aufkleber, mechanische Gefahr Label, mechanical hazard Etiquette, danger mécanique 79 S9+16610282-008 Lagerscheibe (SHIM) Bearing SHIM Palier, disque (SHIM) 80 S9+16758128-091 Abstandshülse Spacer, Sleeve, round .004“ thk Baque 81 S9+16758128-094 Abstandshülse Spacer, Sleeve, round .010“ thk Baque 82 S9+16758128-097 Abstandshülse Spacer, Sleeve, round .016“ thk Baque 99 CM+9.9999.1081.0 Klebebandrolle CRT Tape roll Bande adhésive Bemerkungen Remarks Remarques ■ AGFA MSC 100, MSC 200 DPU 03.06.98/ PN 7020 5.39 Technical Documentation Contents Contents Page Installation.....................................................................................................................6.3 Components of the type ...................................................................................6.3 Prerequisites.....................................................................................................6.4 Software of the IP .............................................................................................6.4 Connecting the IP .............................................................................................6.4 Preparation of the Network Connection of the IP ...................................................6.6 General regarding the network connection.......................................................6.6 The network installation on the IP.....................................................................6.7 Settings on the IP when the TCP/IP protocol is used with the DCHP server ...6.7 Preparation of a Windows NT Workstation.............................................................6.9 Selection of the network protocol......................................................................6.9 Entering the identification ...............................................................................6.10 Entering the IP address (only for the TCP/IP protocol) ..................................6.11 Specifying new users......................................................................................6.12 Allowing access of the workstation to the IP...................................................6.14 Specifying a drive ...........................................................................................6.15 Preparation of the Windows 95 Workstation.........................................................6.16 Selection of the network protocol....................................................................6.16 Entering the identification ...............................................................................6.17 Defining the access control.............................................................................6.17 Defining a new user........................................................................................6.18 Allowing access of the workstation to the IP...................................................6.19 Specifying a drive ...........................................................................................6.20 Technical Data ............................................................................................................6.21 Hardware ........................................................................................................6.21 Software .........................................................................................................6.22 Names in the system ......................................................................................6.22 Structure of directories ...................................................................................6.23 Description of the structure of directories.......................................................6.23 Description of the INI Files....................................................................................6.24 CONFIG.INI ....................................................................................................6.24 FILTER.INI......................................................................................................6.25 INDEX.INI .......................................................................................................6.26 MSC_IP.INI.....................................................................................................6.28 Circuit Diagrams ...................................................................................................6.29 Wiring in the MSC...........................................................................................6.29 Cable Index Printer Data ................................................................................6.30 Cable Index Printer Scan................................................................................6.30 Cross Connect Ethernet Cable.......................................................................6.31 Spare Parts .................................................................................................................6.32 AGFA MSC 100, MSC 200 DPU 03.06.98/ PN 7020 6.1 Contents 6.2 Technical Documentation 03.06.98/ PN 7020 AGFA MSC 100, MSC 200 DPU Technical Documentation Image Processor Installation Components of the type 1 2 3 4 5 6 7 8 Index Image Processor Cable Index Printer Data Cross Connect Ethernet cable 100T-Base Cable Index Printer Scan Power cable (used for the DPU) Installation CD and Boot diskette Power cable 3 wires (to connect the IP in the DPU) Cleaning cloths with box AGFA MSC 100, MSC 200 DPU 03.06.98/ PN 7020 6.3 Image Processor Technical Documentation Prerequisites The IP (Image Processor) serves as interface between the workstation and the DPU. All digital images that are sent by the workstation to the IP via Ethernet are printed by the DPU. More detailed information about the prerequisites of the workstation are given in the chapter Installation of the DPU Documentation, or can be obtained from our local subsidiary. We recommend the Agfa DPU Handshake Software for better adjustment of the digital images to the paper width in use. Software of the IP The IP is delivered with an operative Software. Should a new installation be required, the Software can be ordered under P/N CM+9.8508.9949.0. It can then be used for reinstallation. Information about Update versions can be obtained from your local service subsidiary. Connecting the IP 1 2 3 4 5 6 7 8 Power cable Connection for a serial mouse (not needed for normal operation) Index Printer Scan Keyboard connection (not needed for normal operation) Index Printer Data Ethernet connection Connecting cable to the FOCRT GND connection for the IP q Put the IP into the free compartment on the left side of the FOCRT unit q Connect the cables shown above to the IP. q Take the power cable that is normally used for the screen. Connect the other end to the high-voltage output in the DPU. 6.4 03.06.98/ PN 7020 AGFA MSC 100, MSC 200 DPU Technical Documentation Image Processor q Link the GND connection of the IP with the frame of the DPU. q Run the cables to the Agfa computer as shown in the following figure. q Link the connections of the Index Image Processor „Index Printer Scan“ and „Index Printer Data“ to the MSC to the connections carrying the same name. On the machines MSC 100 and MSC 200, the connections can be found after removing the indicated cover. 1 2 Connector Index Printer Data Connector Index Printer Scan AGFA MSC 100, MSC 200 DPU 03.06.98/ PN 7020 6.5 Image Processor Technical Documentation Preparation of the Network Connection of the IP General regarding the network connection It should be clarified prior to the installation in which network neighborhood the DPU will be used. Possible network types: A. Peer to Peer (simplest type of network connection) t Required Hardware: Protocol: Note B. 6.6 Ethernet 10 Base T or 100 Base T Cross Connect cable, comprised in the scope of delivery (Twisted Pair) NetBEUI If the cross connect cable cannot be used (e.g. too short), it is not possible to use a commercial 1:1 network cable. The special wiring is given in the chapter with the circuit diagrams. Networks with several Windows 95 or Windows NT workstations 03.06.98/ PN 7020 AGFA MSC 100, MSC 200 DPU Technical Documentation t Required Hardware: Protocol: C. Image Processor Ethernet 10 Base T or 100 Base T Standard network cable (Twisted Pair) for every workstation and IP -- Hub, not included in the scope of delivery Hub (distributor function) NetBEUI Larger network Basically, the structure is the same as under B. In most cases, the TCP/IP protocol is used. It may be that a DHCP Server allocates the TCP/IP addresses centrally. In this case, the IP has to be modified (see Preparation of a Windows 95 Workstation). The network installation on the IP The IP is factory-equipped with an Ethernet interface board. The following network protocols have been prepared: − NetBEUI − TCP/IP The network is selected automatically on the IP. For TCP/IP, additional modifications may have to be performed on the IP. Settings on the IP when the TCP/IP protocol is used with the DCHP server Note These settings are only required when larger networks are used and the network server allocates the TCP/IP addresses centrally (DCHP Server) q Select START/SETTINGS/CONTROL PANEL q Click the icon Network twice q Select Protocols. q Click on TCP/IP so that the line is activated (grey background). AGFA MSC 100, MSC 200 DPU 03.06.98/ PN 7020 6.7 Image Processor Technical Documentation q Go to Properties and click on Obtain an IP address from a DHCP server 6.8 03.06.98/ PN 7020 AGFA MSC 100, MSC 200 DPU Technical Documentation Image Processor Preparation of a Windows NT Workstation t The workstation should be equipped with an Ethernet board. Selection of the network protocol Basically, we recommend to use the NetBEUI protocol. If the TCP/IP protocol is used, some additional settings have to be performed on the IP. q Select START/SETTINGS/CONTROL PANEL q Click the icon Network twice q Select Protocols. q If neither NetBEUI nor TCP/IP appears in the window, at least one of the two has to be installed under Add... q Select the protocol in use. AGFA MSC 100, MSC 200 DPU 03.06.98/ PN 7020 6.9 Image Processor Technical Documentation Entering the identification q Go to Identification q Click on Change q Enter AGFA_DPU under Workgroup. The entry under Computer Name can be freely selected. This concludes the settings on the workstation. All modifications are saved and validated when the window is closed by Close. If the protocol TCP/IP has been selected, a few additional settings have to be performed: − For small networks, the IP address has to be entered on the workstation (see the following chapter). − If a larger network with a DHCP Server is used, then this has to be set on the IP. 6.10 03.06.98/ PN 7020 AGFA MSC 100, MSC 200 DPU Technical Documentation Image Processor Entering the IP address (only for the TCP/IP protocol) q Select START/SETTINGS/CONTROL PANEL q Click on the icon Network twice q Select Protocols. q Click on TCP/IP so that the line is activated (grey background). q Go to Properties and enter an address that differs from that of the IP (see Technical Data). The example shown below can be used. AGFA MSC 100, MSC 200 DPU 03.06.98/ PN 7020 6.11 Image Processor Technical Documentation Note If several workstations are used, a different address must be specified for each one of them. The selection is free or the address is entered by the network administrator in a larger network. Specifying new users The user name and the password have to be entered so that the workstation can transmit the image files to the IP. Note The following setting is only possible if the user of the workstation has administrator rights; i.e. the operator has to log in as administrator user when starting the NT. Select START/Programs/Administrative Tools/User manager The User Manager is opened. q Select in the menu User the sub-point New User to create a new user q Enter all data as shown in the figure below. A different text may be entered under Full Name and Description. The password for the user IMAGE is: MSC IMAGE and MSC have to be written in capital letters! 6.12 03.06.98/ PN 7020 AGFA MSC 100, MSC 200 DPU Technical Documentation Image Processor q The passwords have to be entered as shown in the example below. q Then click on Groups. Here, the user rights are specified. As shown in the figure above, Users must be entered in the left box. If this is not the case, the privilege Users has to be searched in the right box and clicked. Add will enter it in the left box. The User Image may also get other rights on the workstation. On the IP, Image has always only normal User rights. AGFA MSC 100, MSC 200 DPU 03.06.98/ PN 7020 6.13 Image Processor Technical Documentation Allowing access of the workstation to the IP q Start the Windows Explorer q Search Network neighborhood q After clicking +, Dpu_ip should appear. The network connection is established. Then specify a drive for the connection. 6.14 03.06.98/ PN 7020 AGFA MSC 100, MSC 200 DPU Technical Documentation Image Processor Specifying a drive q Select Tools/Map network drive q A free drive is proposed. We recommend to use a higher letter, e.g. H. q Enter the path given in the example below. q Confirm with OK. After pressing <F5> (display refreshed) the DPU appears with the selected drive. This concludes the network preparations. AGFA MSC 100, MSC 200 DPU 03.06.98/ PN 7020 6.15 Image Processor Technical Documentation Preparation of the Windows 95 Workstation Note The workstation has to be equipped with an Ethernet board. Selection of the network protocol Basically, we recommend to use the NetBEUI. If the TCP/IP protocol is used, some additional settings have to be performed on the IP. q Select START/Settings/System control q Click on the icon Network twice q Select Configuration q Check whether NetBEUI exists. If not, this protocol has to be installed by the workstation owner. See also Register 1, Installation. Note 6.16 If the Windows 95 workstation is to be integrated into an existing network, the TCP/IP protocol may have to be selected. 03.06.98/ PN 7020 AGFA MSC 100, MSC 200 DPU Technical Documentation Image Processor Entering the identification q After selecting the protocol, go to Identification q Enter AGFA_DPU under workgroup. The entries under Computer name and Description can be performed at will. Defining the access control q Select Access control q Set the method shown below. q This concludes the network settings. Confirm the entries by pressing OK. AGFA MSC 100, MSC 200 DPU 03.06.98/ PN 7020 6.17 Image Processor Technical Documentation Defining a new user The user name and the password have to be entered so that the workstation can transmit the graphics to the IP. The user and the password are checked automatically when a network board is installed. In this case, the data below has to be entered. The following procedure has only to be followed when an additional user (in this case the DPU) is created. Note q Select Close all programs and log on as a different user? This line only appears when a network exists already. q The Welcome window is opened. Enter the following in capital letters: Note − User name <IMAGE> − Password <MSC> The entry of the password is hidden. The new user has thus been created and the access to the IP is possible. 6.18 03.06.98/ PN 7020 AGFA MSC 100, MSC 200 DPU Technical Documentation Image Processor Allowing access of the workstation to the IP q Start the Windows Explorer q Search Network neighborhood q After clicking +, Dpu_ip should appear. The network connection is established. Then specify a drive for the connection. AGFA MSC 100, MSC 200 DPU 03.06.98/ PN 7020 6.19 Image Processor Technical Documentation Specifying a drive q Select Tools/Map network drive q A free drive is proposed. We recommend to use a higher letter, e.g. H. q Enter the path given in the example below. q Confirm with OK. After pressing <F5> (display refreshed) the DPU appears with the selected drive This concludes the network preparation. 6.20 03.06.98/ PN 7020 AGFA MSC 100, MSC 200 DPU Technical Documentation Image Processor Technical Data Hardware Chassis Value Line (small tower) max. dimensions HxWxD: 400mm x 200mm x 420mm Power supply unit min. 200 VA Voltage selector (outside): 110V / 230V (±15%) Immediate power-on after switch-on of the mains voltage (no relay switch) PCI Motherboard BAT; min. 4xPCI-Slot; min. 3xISA-Slot CPU Pentium 166 MHz MMX Memory 64MB EDO; 512 kB PB-Cache Hard disk EIDE 2 GB (Manufacturer: Western Digital) Floppy disk drive 1,44 MB CD-ROM ATAPI drive (8 ports) Graphic board Winner Trio 2 MB; in the first PCI slot from above Interfaces Ethernet board: 3COM 905 TX 10/100 Mbit RJ45; in the second PCISlot from above (Slot must be interruptible). Frame Grabber board of Matrix Vision; Agfa version; in the third PCISlot from above (Slot must be interruptible). F/Port-Parallel Interface (fast Centronics-compatible parallel interface of WARP-9; the board must be installed in the top ISA-Slot because of the position of the connector). Set Jumper for LPT2: Port-Adr. = 278H, IRQ =5 2 x RS-232 (with FIFO; COM1 = 9 poles; COM2 = 25 poles) 1 x Parallel (EPP/ECP) Monitor non Keyboard non Mouse non Cable • Power cable with earth leakage circuit breaker and connector for cold appliances (straight) (approx. 2m) (for all cables: Version corresponding to C standard) • Monitor power cable (0,5...1m) with plug and socket for cold appliances • Frame grabber special cable 2,5 m (see Appendix D) Serial RS232 cable 2,5 m (25p D-Sub connector - 25p D-Sub socket connector; see Appendix B) Screened Ethernet cable for 100 Base-T data transfer with RJ-45 connectors; length 5m; Important: Cross-connect version for peer to peer connection without a hub, i.e. inputs and outputs coupled crosswise. AGFA MSC 100, MSC 200 DPU 03.06.98/ PN 7020 6.21 Image Processor Technical Documentation Software Operating system Windows NT 4 Workstation (English version) on CD Installation Special Bios-Setup settings: Booting only from C:\ No keyboard error message The Boot virus check has to be switched off IRQ 5 must be reserved for the ISA board (F/Port) Important for TX97 Motherboard: In CHIPSET FEATURES SETUP the following entry is necessary: 8-bit I/O Recovery Time : 4 BUSCLK! (The following settings are contained on the installation CD or the installation diskette) Windows NT 4.0 Service pack 3 Tweak UI (from MS Freeware: Powertoys) Driver for Ethernet board Driver for Matrix Vision Frame Grabber Network protocols: NetBEUI TCP/IP Users and names in the system Tree of directories Desktop surface Specifying the user access for the individual users Monitor resolution (service purposes) must be set to 1024 x 768 pixels and 256 colours. Two ‘Profiles’ for normal operation and for the service mode with monitor, keyboard and mouse Selection window reduced to 3 sec upon the system start Data carriers Windows NT 4 English (Original CD + 3 Microsoft diskettes) Windows NT 4 Emergency Disk Media with drivers: VGA, CDROM, NIC Installation CD + Installation diskette (contains the IP Software and all tools required for the configuration of the system) Names in the system Computer NetBIOS Workgroup TCP/IP address (C class) TCP/IP-Subnet address Administrator Local user Network user Service technician 6.22 03.06.98/ PN 7020 Name / Number Password Rights DPU_IP AGFA_DPU 192.11.97.10 255.255.255.0 Administrator DPU IMAGE IP_SERVICE AGFA_MUNICH AGFA MSC DPU_SERVICE ADMINISTRATOR ADMINISTRATOR USER ADMINISTRATOR AGFA MSC 100, MSC 200 DPU Technical Documentation Image Processor Structure of directories Description of the structure of directories dpu: Directory for network data exchange The network user has only access here msc_ip + Subdirectories: AGFA MSC 100, MSC 200 DPU All program and data files for the operation of the IP as DPU control computer 03.06.98/ PN 7020 6.23 Image Processor Technical Documentation Description of the INI Files The following description only contains the files that are relevant for the service. CONFIG.INI [Generals] IIPCMD_LOG = 1 BouncedFrame = 2 DX_Output=0 Recording of a log file 1=yes, 0=no [Printer] ; 5 CRT exposure LastUsedPrinter = 5 ; CRTMarginMM is valid only, if CRTTopMarginMM or CRTBottomMarginMM not set !!! ;CRTMarginMM = 0 Cut length corrections for digital prints Output of the DX code on the Indexprint 0 no; 1 yes Indication of the Indexprinter 3 = Mitsubishi; 4 = LCD; 5 = DPU ; Top margin is added to total paper length CRTTopJPGMarginMM = 0 CRTTopBMPMarginMM = 0 ; Bottom margin is added to total paper length CRTBottomJPGMarginMM = 0 CRTBottomBMPMarginMM = 0 ; Offset of image top from paper top not added to total paper length ; Note: if Offset + image length > paper length - than image bottom will be cut! CRTOffsetMM = 0 ; Offset of image top from paper top only valid for Indexprints! CRTIndexTopMarginMM = 5 MinSheetLength = 120 MaxSheetLength = 315 CRTHorzDPI = 294 CutLengthOffsetMM = 3 CRTSlugWidthMM = 3 [IPStorage] MaxStoredIPs=11 [Selector] PrintSelectedFrames=0 6.24 03.06.98/ PN 7020 AGFA MSC 100, MSC 200 DPU Technical Documentation Image Processor FILTER.INI [Density_Correction] BereichBlue = 00 MaxFaktorABlue = 0.00 MaxFaktorBBlue = 0.00 BereichGreen = 00 MaxFaktorAGreen = 0.00 MaxFaktorBGreen = 0.00 BereichRed = 00 MaxFaktorARed = 0.00 MaxFaktorBRed = 0.00 AGFA MSC 100, MSC 200 DPU Colour corrections of a frame on the Indexprint 03.06.98/ PN 7020 6.25 Image Processor Technical Documentation INDEX.INI [Generals] DX_Output = 0 SharpenFactor = 60 IndexCamera=1 [135_Setup] Blue = 0.060 Green = 0.040 Red = 0.080 SlopeOverBlue = 0.000 SlopeOverGreen = 0.000 SlopeOverRed = 0.000 SlopeUnderBlue = 0.000 SlopeUnderGreen = 0.000 SlopeUnderRed = 0.000 [APS_Setup] Blue = 0.000 Green = 0.000 Red = 0.000 SlopeOverBlue = 0.000 SlopeOverGreen = 0.000 SlopeOverRed = 0.000 SlopeUnderBlue = 0.000 SlopeUnderGreen = 0.000 SlopeUnderRed = 0.000 [AutoCalibration] AGBlue = -0.739 AGGreen = -0.709 AGRed = -0.809 AGSBlue = -0.093 AGSGreen = -0.053 AGSRed = -0.162 AGCycles = 13 [CRT_LOGOS] ; Bitmaps for ’135’ layouts on 3.5" and 4" paper 135_CRT_1_25 = .\data\bmps\135C28I.bmp 135_CRT_2_25 = .\data\bmps\135C28R.bmp 135_CRT_1_40 = .\data\bmps\135C40I.bmp 135_CRT_2_40 = .\data\bmps\135C40R.bmp ; Bitmaps for ’135’ layouts on 5" and 6" paper 135_CRT_1_25b = .\data\bmps\135C28BI.bmp 135_CRT_2_25b = .\data\bmps\135C28BR.bmp 135_CRT_1_40b = .\data\bmps\135C40BI.bmp 135_CRT_2_40b = .\data\bmps\135C40BR.bmp 6.26 03.06.98/ PN 7020 Output of the DX code on the Indexprint: 0 no; 1 yes Sharpening the Indexprints: The greater the value, the sharper the Indexprint See INDEX in IP_MC.DAT: 1 Index Camera installed; 0 not installed Production setting Indexprints 135 The values entered on the MSC are entered here Production setting APS Indexprint The values entered on the MSC are entered here These values are altered when the IP logic is adjusted. (e.g. AUTOC = -10). After termination, these parameters should not be altered any more. AGCycles is the number of films that were printed in this mode. List of paths of the different Logos for Indexprints used for film size 135 and small Layouts Indexprints with less than 28 views Indexprints with more than 28 views List of paths of the different Logos for Indexprints used for film size 135 and large Layouts Indexprints with less than 28 views Indexprints with more than 28 views AGFA MSC 100, MSC 200 DPU Technical Documentation ; Bitmaps for APS layouts APS_CRT_1_25 = .\data\bmps\APSC25I.bmp APS_CRT_3_25 = .\data\bmps\APSC25R.bmp APS_CRT_1_40 = .\data\bmps\APSC40I.bmp APS_CRT_3_40 = .\data\bmps\APSC40R.bmp [CRT_Fonts] FrameNrFont = .\data\fnts\_nfont24.fnt ;TextFont = .\data\fnts\_jap36.fnt TextFont = .\data\fnts\_font36.fnt TitleFont = .\data\fnts\_font36.fnt SmallTitleFont = .\data\fnts\_nfont24.fnt SmallFIDFont = .\data\fnts\_nfont24.fnt ;TitleFont = .\data\fnts\_jap36.fnt DateTextFont = .\data\fnts\_symb36.fnt DXFont = .\data\fnts\_nfont24.fnt SmallDateTextFont = .\data\fnts\_symb36.fnt SelectionFont = .\data\fnts\_nfont24.fnt ;SelectionFont = .\data\fnts\_jap36.fnt [Selection] Selection1 =hole/label Selection2 =under exposed Selection3 =over exposed Selection4 =fogged [FilmInfo] FilmTitle =No film title AGFA MSC 100, MSC 200 DPU Image Processor List of paths of the different Logos for Indexprints used for film size APS Indexprints with less than 28 views Indexprints with more than 28 views List of paths of the text fonts. They may be interchanged, if desired. Lines beginning with a semicolon are intended for the Japanese market. Do not delete the semicolon! Indication of the selection criterion, see chapter ?? Operation Hole/Sticker Underexposed Overexposed Scattered light If no title is stored on an APS film, the text indicated here appears 03.06.98/ PN 7020 6.27 Image Processor Technical Documentation MSC_IP.INI Only the data relevant for the service is listed here. All other parameters must not be altered. [FrameValue] FrameValueRed=64 FrameValueGreen=64 FrameValueBlue=64 Thickness=2 [Debug] UseDebugOutput = 1 SendExtraSerialInfo = 0 [Directories] DigitalImagesPath = \dpu [AutoCorrection] AutoCal = 1 MeanValueLut = .\data\luts\msclog.ini RGBDataOut = 1 [Serial] SerPort = 2 ExtraInfoPort = 1 [Parallel] ParPort = 2 CRTUseFPORT = 1 6.28 03.06.98/ PN 7020 Layout of the frame of each view on the Indexprint By modifying these three values, the colour and brightness of the frame may be altered. Width of the frame in pixels. The higher the value, the more the image is cropped Data output Data output on screen, 0 no; 1 yes Data output via serial interface, 0 no; 1 yes Definition of the sub-directory from which the digital files are printed The AUTOC parameter of the file IP_MC.DAT is entered here. Application of the serial interface Port 2 linked with the MSC (Index Printer Scan) Mouse connection Application of the parallel interface free FOCRT connected to the FPORT AGFA MSC 100, MSC 200 DPU Technical Documentation Image Processor Circuit Diagrams Wiring in the MSC External Connector board ST 3 IPC Distributor ST 2 ST 3 CCD Kamera GND 1 Video 2 GND GC 3 Gain Cont. 4 1 2 20 2 1 1 3 4 21 4 3 2 13 13 9 15 15 10 17 17 11 9 9 7 11 11 8 1 1 3 GND Cam 5 Port P0 6 Port P1 7 Port P2 8 Index Printer Data GND VD 9 VD 10 GND Cam 11 HD 12 +12 V 13 +12 V 14 ST 6 LA-Req. 1 19 19 12 Ret-A 2 20 20 31 Cam-Rdy 3 21 21 13 4 22 22 32 Filter-Rdy 5 23 23 14 Ret-C 6 24 24 33 Ras-Out 7 25 25 15 Ret-D 8 27 26 34 Ret-B ST 5 RISC Controller ST 9 Agfa PC ST 1 ST 2 ST 12 ST 1 R05AMM 17 19 19 3 T05AMM 18 20 20 2 Logic Distributor AGFA MSC 100, MSC 200 DPU Index Printer Scan External Connector board 03.06.98/ PN 7020 6.29 Image Processor Technical Documentation Cable Index Printer Data MSC D-Sub connector 37 pin 20 1 IIP D-Sub connector 26 pin GND 12 Video 2 21 GND GC n.c. 2 Gain Cont. n.c. 9 Port P0 19 10 Port P1 20 11 Port P2 22 7 VD n.c. 8 HD n.c. 3 +12 V 1 12 LA-Req. 26 31 Ret-A 25 13 Cam-Rdy 24 32 Ret-B 23 14 Filter-Rdy 15 33 Ret-C 14 15 Ras-Out 18 34 Ret-D 17 Frame Grabber PCB Cable Index Printer Scan MSC D-Sub, 25 pin 6.30 03.06.98/ PN 7020 IIP D-Sub, 25 pin 2 2 3 3 7 7 AGFA MSC 100, MSC 200 DPU Technical Documentation Image Processor Cross Connect Ethernet Cable AGFA MSC 100, MSC 200 DPU 03.06.98/ PN 7020 6.31 Image Processor Technical Documentation Spare Parts 6.32 03.06.98/ PN 7020 AGFA MSC 100, MSC 200 DPU Technical Documentation Pos Item no. Pos. Teil-Nr. Part no. No. de ref. ABC Code Image Processor Bezeichnung Description Désignation 1 8508/410 Index Image Processor 2 7.8506.1284.0 Kabel Index Printer Data Cable Index Printer Data Câble Index Printer Data 3 7.8508.1294.0 Cross Connect-Ethernetkabel 100T Base Cross Connect-Ethernet cable 100T Base Câble Ethernet „Cross Connect“ 100T Base 4 7.8506.1287.0 Kabel Index Printer Scan Cable Index Printer Scan Câble Index Printer Scan 5 7.8506.1286.0 Netzkabel Power cable Câble secteur 6 7.8506.1282.0 Frame Grabber Karte Frame Grabber PCB Carte Frame Grabber 7 7.0477.1011.0 Netzkabel 3 adrig Power cable 3 wires Câble secteur 3 fils 8 7.0362.6058.0 Reinigungstücher mit Box Cleaning cloths with box Chiffons de nettoyage avec boîte 9 7.8506.1282.0 Frame Grabber Karte Frame Grabber PCB Carte Frame Grabber 10 7.8508.1295.0 F-Port F-Port F-Port 11 7.8508.1293.0 Ethernet Card 10/100 Ethernet Card 10/100 Carte Ethernet 10/100 Bemerkungen Remarks Remarques n AGFA MSC 100, MSC 200 DPU 03.06.98/ PN 7020 6.33 Technical Documentation Contents Contents Page Installation.....................................................................................................................7.3 Hardware and software requirements...........................................................................7.5 Hardware ................................................................................................................7.5 Software..................................................................................................................7.5 Mode of operation.........................................................................................................7.6 Before starting the program ....................................................................................7.6 Default network directory..................................................................................7.6 Offline operation for testing ..............................................................................7.7 Starting DPU Transfer ............................................................................................7.7 Quitting DPU Transfer ............................................................................................7.8 Controls.........................................................................................................................7.9 The Print settings tab..............................................................................................7.9 Print button .......................................................................................................7.9 Cancel button .................................................................................................7.10 Close button ...................................................................................................7.10 Surface ...........................................................................................................7.10 Resolution.......................................................................................................7.10 Image files ......................................................................................................7.11 Print size.........................................................................................................7.11 Priority, Quantity .............................................................................................7.12 Preview...........................................................................................................7.12 The MSC Status tab .............................................................................................7.12 MSC mode......................................................................................................7.12 Defined paper .................................................................................................7.12 Current paper .................................................................................................7.13 Messages .......................................................................................................7.13 Print queue .....................................................................................................7.13 Priority Order ..................................................................................................7.13 Abort Order.....................................................................................................7.13 The Program settings tab .....................................................................................7.14 Surface ...........................................................................................................7.14 Dialog settings ................................................................................................7.14 Directories ......................................................................................................7.15 Back print text.................................................................................................7.16 The Info tab...........................................................................................................7.17 Messages....................................................................................................................7.18 AGFA MSC 100, MSC 200 DPU 03.06.98 /PN 7020 7.1 Contents 7.2 Technical Documentation 03.06.98 /PN 7020 AGFA MSC 100, MSC 200 DPU Technical Documentation Transfer Software Installation The program is supplied on a CD-ROM. q Insert the CD-ROM in the drive. − The installation program is started automatically after you insert the CD-ROM. q If the installation program does not start automatically, open the pop-up menu for the CD-ROM drive (in Windows Explorer, click the right mouse button on the CD-ROM icon) and choose AutoPlay. − The splash screen appears, after which you are prompted to read the license agreement. The program is then installed on the hard disk. − During the installation procedure a new directory C:\DPUprint is created, and the program files and online documentation (PDF files) are copied to that directory. − The installation program creates an entry for the Agfa DPU Transfer Software at three separate locations: in the Start menu, on the Windows desktop and in the StartUp folder in the Start menu. Entries for the online documentation are also created in the Start menu. dpu002d Installation of the software is then complete. DPU Transfer can now be launched by double-clicking on the icon on the Windows desktop or via the menu item in the Start menu. If the entry in the StartUp folder is activated, DPU Transfer will be launched automatically the next time that Windows is started. AGFA MSC 100, MSC 200 DPU 03.06.98 /PN 7020 7.3 Transfer Software Technical Documentation If you do not want to run DPU Transfer every time that Windows is started, you can remove the shortcut from the StartUp folder. q Open the pop-up menu for the Windows taskbar (click the right mouse button on the taskbar), and then choose Properties. q Select the Start Menu Programs tab and click on the Remove... button. q In the Remove Shortcuts/Folders window, open the StartUp folder. q Select the Agfa DPU Transfer Software entry, and then click on the Remove button. q Finally close both of these windows. dpu003d 7.4 03.06.98 /PN 7020 AGFA MSC 100, MSC 200 DPU Technical Documentation Transfer Software Hardware and software requirements Hardware A workstation with a 1.44-Mbyte floppy disk drive and a CD-ROM drive. Minimum system Recommended system Pentium 166 MHz Pentium II 233 MHz (or faster) 64 Mbytes RAM 128 Mbytes RAM 2 Gbytes More than 4 Gbytes 17 inch 20 inch 4 Mbytes graphics memory 8 Mbytes graphics memory 10 Base T 100 Base T Minimum system Recommended system Operating system: Windows 95/98 Windows NT 4 Network software: Hardware drivers installed NetBEUI protocol installed Hardware drivers installed TCP/IP and NetBEUI protocols installed Processor: Memory: Hard disk: Monitor: Graphics card: Network card: Software AGFA MSC 100, MSC 200 DPU 03.06.98 /PN 7020 7.5 Transfer Software Technical Documentation Mode of operation The DPU Transfer Software monitors two directories: the Transfer directory and the Network directory. DPU Transfer starts working as soon as any new images are copied to the Transfer directory. It reads the image files, sends them to the digital printer and then stores them in the directory for printed images (PRINTED) or, if they are not intended for printing or are not available in the correct image format, in the directory for non-printed images (NOTSEND). Before starting the program Default network directory The network directory \\DPU_IP\DPU should be available before DPU Transfer is started. If it is not, a dialog window appears in which the program prompts the user to specify the network directory for the image processor (IP). The necessary network settings are explained in the description of the IP. The network directory for the IP can also be linked to a network drive (for example H:): dpu004d 7.6 03.06.98 /PN 7020 AGFA MSC 100, MSC 200 DPU Technical Documentation Transfer Software Offline operation for testing To allow offline operation of the software (for test purposes), the network directory can be set to C:\DPUprint\DPU. This directory is created as part of the installation procedure. If the network directory is not the IP directory, the images will not be sent to the image processor. Starting DPU Transfer Start the program by double-clicking on the DPU Transfer icon on the Windows desktop (or by double-clicking on Dpu.exe in Windows Explorer). If you are starting the program for the first time and the installation directory is not the default factory setting (C:\DPUprint), you are prompted to specify the working directories (Printed, Notsend, Network). The entries can also be found in the Dpu.ini file (a semicolon at the start of a line marks the start of a comment line): 86%27*)6C(-6)'836=!'@(49TVMRX &%'/94C(-6)'836=!'@(49TVMRX@4VMRXIH 238C7)2(C(-6)'836=!'@(49TVMRX@2SXWIRH FIWYVIXSQSYRXRIX[SVOHMVIGXSV]@(49SR-4EWPSGEPHVMZI,@ 2)8;36/C(-6)'836=!,@ SVYWIXLIGSQTPIXIRIX[SVOTEXL 2)8;36/C(-6)'836=!@@(49C-4@(49 EGXMZEXIXLIJSPPS[MRKPMRIMRWXIEHXSXIWX[MXLSYXRIX[SVO 2)8;36/C(-6)'836=!'@(49TVMRX@(49 When the working directories have been set, the program works in the background after it has been started. This is indicated by the small program icon in the Windows taskbar on the right-hand side. dpu005d Double-clicking on this program icon opens the DPU Transfer dialog window. AGFA MSC 100, MSC 200 DPU 03.06.98 /PN 7020 7.7 Transfer Software Technical Documentation If the network connection has not been established or if it is incorrectly configured, a message appears stating that the STATUS.MSC file cannot be found. dpu006e DPU Transfer expects to find the STATUS.MSC file in the Network directory. The default network directory for the IP is \\DPU_IP\DPU (network directory of the image processor). If the designation on the IP has been changed, the setting must be changed accordingly. For details of how to do this refer to the description of the IP. Quitting DPU Transfer Click the right mouse button on the DPU Transfer icon in the Windows taskbar to open the DPU Transfer pop-up menu. dpu007 Click on the DPU Dialog… menu option to open the DPU Transfer dialog window. Click on Quit to close DPU Transfer. 7.8 03.06.98 /PN 7020 AGFA MSC 100, MSC 200 DPU Technical Documentation Transfer Software Controls The Print settings tab dpu008e Print button Once the settings have been made for the current image, the Print button places the image in the order queue for the digital printer. The image file is moved to the directory for printed images. If the image file is in some way not suitable for printing, a message to that effect appears and the image file is sent to the directory for non-printed images. dpu009e AGFA MSC 100, MSC 200 DPU 03.06.98 /PN 7020 7.9 Transfer Software Technical Documentation Cancel button The Cancel button can be used to ensure that an image is not placed in the queue. In this case the image file is sent to the directory for non-printed images. Close button The Close button closes this dialog window. The program continues working in the background. Any orders still pending are retained and are sent to the printer. Surface The surface can be set to one of four types: Glossy, Matte, Type 3 or Type 4. The definitions of the first two are fixed. The latter two can be defined on the Program settings tab in the Surface group. (The designation should be made in parallel with that in the MSC.) Resolution If the Use default setting is selected, the basic setting (294 dpi) is used. If the Print all option is selected, the image is enlarged or reduced so that the entire image fits on the paper. The printout has a border of varying width, depending on the aspect ratios. If the Best fit option is selected, the image is enlarged or reduced so as to achieve paper filling of at least 100 per cent. This means that the edges of the image file may be cut off to some extent. The printout has no border. If the dpi (dots per inch) field is selected, you can enter specific resolution values. In this way the image can be enlarged or reduced. Large dpi values lead to a reduction of the image, and small values to an enlargement. dpu010e 7.10 03.06.98 /PN 7020 AGFA MSC 100, MSC 200 DPU Technical Documentation Note Transfer Software An image file which has 400 pixels (picture elements or dots) in the x-direction and to which a resolution of 100 dpi has been assigned is precisely 4 inches wide on the printout. Calculation: 400 dots/100 dpi = 4 inches (approx. 10.2 cm) If the image file is assigned a resolution of 200 dpi, the printout is 2 inches wide. Calculation: 400 dots/200 dpi = 2 inches (approx. 5.1 cm) 1 inch is approximately 2.54 cm. Image files The name of the current image file is shown in the upper part. The lower part contains a list of all image files that can be processed. Clicking on a file name in the list makes that file the current file, allowing its settings to be edited. dpu011e Print size The Print size setting provides a list of common paper sizes. If the Auto turn option is activated, the image will be automatically rotated through 90 degrees if necessary to make optimum use of the paper in the printer. This means that portrait and landscape format images (with a size of 10 × 15 cm, for example) can be printed on 4-inch-wide paper and on 6-inch-wide paper. The unit of measurement used (mm, inches, pixels) can be set on the Program settings tab in the Dimension field. With the Auto turn option activated: dpu012e AGFA MSC 100, MSC 200 DPU 03.06.98 /PN 7020 7.11 Transfer Software Technical Documentation Priority, Quantity The assignment of a priority makes it possible to display and process the orders in ascending order of priority under the MSC Status tab. Preview The Zoom slider enlarges and reduces the preview display of the current image (+ and – symbols). Image size indicates the calculated image size at the current resolution. The Paper size is the set value. Image resolution indicates the resolution value (in dpi = dots per inch) on which the calculation of the image size is based. Page fit indicates the degree to which the paper is filled at the current resolution. The MSC Status tab dpu013e MSC mode This field indicates the current mode of the MSC (optical or digital). Defined paper This field contains a list of paper widths for which paper channels have been set up in the MSC. 7.12 03.06.98 /PN 7020 AGFA MSC 100, MSC 200 DPU Technical Documentation Transfer Software Current paper This field shows the width and surface of the paper that is currently held in the left-hand paper tray of the MSC. Messages The messages from the MSC are displayed here. Print queue The queue of files that are on their way to the digital printer can be seen here once again. The two buttons beneath the list can be used to rearrange orders (Priority Order) or delete them (Abort Order). Priority Order If the queue contains high-priority orders, these can be moved to the very top of the queue with this button. To do this, first click with the mouse on the important order and then click on the Priority Order button. The new sequence of orders is not displayed until you click on another tab and then switch back to the status display. Abort Order To delete an order from the queue, select the order in the list and click on this button. The screen display is updated after the current print procedure is completed. AGFA MSC 100, MSC 200 DPU 03.06.98 /PN 7020 7.13 Transfer Software Technical Documentation The Program settings tab dpu014e Surface In these fields names can be assigned to the two types of surface that are listed in third and fourth place in the Surface group on the Print settings tab. The names of these two types should match the settings for the MSC. Dialog settings If the Auto popup option is activated, the DPU Transfer processing window will appear on the screen as soon as an image file is copied to the Transfer directory. If this option is not activated, the processing window must be opened manually by double-clicking on the program icon. If the Auto send option is activated, the images are sent to the printer without any further query, retaining the parameters last set, as soon as they arrive in the Transfer directory. Under Language there is a selection list from which to select the language in which the processing window is to be displayed. The unit of dimension to be used for screen display (mm, inches, pixels) is set under Dimension. 7.14 03.06.98 /PN 7020 AGFA MSC 100, MSC 200 DPU Technical Documentation Transfer Software Directories This field shows a list of the DPU Transfer working directories. Clicking on the directory button to the right of the entry opens a directory dialog via which the entries can be changed or also checked (in particular network drives). dpu015e Network drives can only be accessed if the network and the access rights have been set up on the workstation (refer to the description in the user manual for the IP) and the IP is switched on. The Transfer directory is monitored by DPU Transfer. This means that as soon as a new image file appears in this directory (when somebody copies it into the directory), it is registered by DPU Transfer. The Network directory must point to the network directory of the image processor (IP). DPU Transfer expects to find the status.msc file in this directory. A message along the lines of File not found: STATUS.MSC means that the network drive currently set is incorrect and must be specified correctly, or that there is no network connection. The directory for printed images (PRINTED) is the destination for the image files that have been sent to the printer. The directory for non-printed images (NOTSEND) is where files are stored which have not been sent to the printer. AGFA MSC 100, MSC 200 DPU 03.06.98 /PN 7020 7.15 Transfer Software Technical Documentation Back print text The text selected here is printed on the back of the images. The entry shown in the text entry field at the bottom can be changed. All other texts can be changed in the dpu.ini file. To be able to do this, however, the DPUprint program must first be closed. The ten texts are stored in the Dpu.ini file under the code [BACK_PRINTER], Text1 to Text10. Notes: − Before you make any changes to the Dpu.ini file you should make a backup copy of the INI file. − Do not use a word-processing program (such as MS Word) to make changes to the INI file. If you want to edit the INI file use a simple text editor, such as Notepad (to be found via the Start menu under Programs/Accessories/Editor). The texts are made up of fixed texts and symbolic names. Pure text which will always be printed exactly as it stands is enclosed between single quotation marks. For example: ‘Hello Aunt Ethel’. The names in capitals are symbolic names and are not placed between quotes: DATE – the current date, TIME – the current time, FILENAME – the name of the image file, USER – the name of the user and ORDER – the name of the order. The individual text sections are separated by a plus sign (+). A combination of text and symbolic names for the MSC could look something like this: ‘This picture was printed on ’ + DATE + ‘ at ‘ + TIME + ‘ in London.’ The printout would then be, for example: This picture was printed on 27.05.1998 at 10:30 in London. 7.16 03.06.98 /PN 7020 AGFA MSC 100, MSC 200 DPU Technical Documentation Transfer Software The Info tab dpu016e The Info tab contains information about the program, the program version and the copyright. AGFA MSC 100, MSC 200 DPU 03.06.98 /PN 7020 7.17 Transfer Software Technical Documentation Messages Dialog message Description )VVSV (MVIGXSV]RSXJSYRH '@(49TVMRXor '@(49TVMRX@4VMRXIHor '@(49TVMRX@2SXWIRH The specified directory could not be found. If this message appears when the program is started, immediately after the message appears a dialog window is opened in which you can set the correct directory. Otherwise the directories can be set on the Program settings tab in the fields for the Transfer directory, Network directory, Printed directory and Notsend directory. )VVSV *MPIRSXJSYRH 78%89717' The status.msc file could not be found in the Network directory currently set (the default setting is H:\). The directory must be set to the network directory of the image processor (IP) on the Program settings tab in the Network directory field. )VVSV G@HTYTVMRX@I\EQTPIFQT -PPIKEPMQEKIJSVQEX The example image file contains an error as a result of which it cannot be printed. The image file is sent to the Notsend directory. )VVSV 'ERRSX[VMXI-'* The network directory is no longer accessible. n 7.18 03.06.98 /PN 7020 AGFA MSC 100, MSC 200 DPU