Transcript
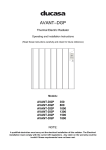
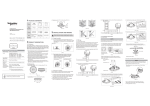
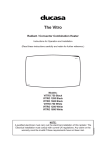
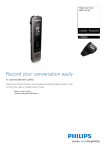
(6)
(7)
(5) (8)
(3)
(4)
1
(5)
(2)
(6)
(9)
(3)
(4)
(3)
5
during recording. It might damage the record files)
(Warning: Do not remove the batteries or disconnect the power adaptor
6).To stop recording, switch to Stop (8)
The red LED (9) lights
5).Place the camera direction (7) then switch to Rec (8)
4).Press the power on button (5), the blue LED (6) lights
adaptor is connected.)
(Suggestion: motion detection would be selected while the power
R: Continue recording M: Motion detection
(2)
(1)
2
(3)
Audio In
Video in
will be disregarded.
6
Note: When PIR sensor is once connected, any other recording mode set beforehand
5).Besides buit-in camera, external camera (5) is also an option.
observing object.
4).Must place the PIR sensor (4) and also the camera (3) to the direction of the
the system comes back to standby mode.
3).The recording time is 5secs and if it does not detect anything during the recording,
Once it is triggered, DVR will start the recording rigth away.
2).When PIR sensor is connected, the detection is on.
1).Follow the illustration to connect the PIR sensor (1) to DVR
Operation
(5)
(1)
(20).Power LED
(21).Recording LED
(22).External Camera Input LED
(23).PIR Input LED
(17).Memory Card Slot
(18).PIR Sensor Input Port
(19).A/V In
4.2. Video Recording (with external PIR sensor)
(4)
(19)
(20) (21) (22) (23)
(14) (11)
(13) (9)
(10)
(15)
( 9 ).HDMI Port
(10).USB Port
(11).A/V Out
(12).Preview
(13).Esc Button
(14).Navigation Switch
(15).Recording Mode Switch
(16).Menu
(17)
(12)
(16)
(18)
(4)
(3)
3
(7)
(6)
(3)
Adapter
(6)
TV
Adapter
(1)
(5)
(9)
4GB
(8)
(5)
Put the memory card (6) to a card reader7and insert to PC to retrieve the files.
5.3 Retrieve the files
3).To escape, press the Esc button
Up / Down : switch the files
Right / Left : control the volume
2).While playing back the videos, push navigation switch (4) to
1).Connect the HDMI cable (5) to TV/monitor to play back the videos.
5.2 Playback
Use the navigation switch (4) to do the setting.
Connect the A/V out cable (1) to DVR and TV or monitor and then power on DVR (2).
5.1. Setting
(2)
(4)
5. Setting / Playback / Retrieve the files
(9).AAA Battery x 4pcs
(7).A/V In Cable
(8).A/V Out Cable
(5).HDMI Cable
(6).Memory Card
(1).PIR Sensor
(2).PIR Sensor Cable
(3).Adaptor
(4).Power Adaptor
(2)
(1)
2. Package Content
Lock
3).Select the recording mode (4)
2).Follow the illustration (3) to insert the memory card.
(1)Batteries or(2)Power Adaptor
1).Select the method of power supply.
Operation
4.1. Video Recording
(7).Rec/Stop Switch
(8).Power On Switch
(5).DC 5V In
(6).Controller Cover
(1).Camera
(2).A/V In / PIR Sensor Input Port
(3).Battery Cover
(4).Battery Slot
(8)
(7)
(1)
1. Name and Parts
DC 5V 3A
4GB
Lock
(1)
(2)
1080p Black Box DVR
Quick Guide
E-BBOX-01
4
switched to the inserted batteries.
disconnected, the power supply will be automatically
(2).Under the above condition, once the power adaptor is
power adaptor as the only source of power supply.
the DC 5V power adaptor is connected, DVR will take the
(1).When the AAA batteries are inserted and in the meantime
Notes:
(2).Connect our DC 5V power adaptor.
(1).Use 4 pieces of AAA batteries.
Two methods of power supply
3. Power supply
V1.0