1
2200CW
OPERATORS MANUAL
DORAN SCALES, INC.
1315 PARAMOUNT PKWY.
BATAVIA, IL 60510
1-800-262-6844
FAX: (630) 879-0073
http://www.doranscales.com
MANUAL REVISION: 0.0
MAN0257
9/12/2007
1
Table of Contents
Introduction.................................................................................................. 3
Unpacking Your Scale ................................................................................ 4
Scale Operation ........................................................................................... 5
Checkweigh Operation ............................................................................... 9
Setpoint Operation .................................................................................... 11
Accumulator and Counter ........................................................................ 13
Single Product Operation ......................................................................... 14
Multiple Product Operation ...................................................................... 16
Setting Time and Date............................................................................... 19
Battery Operation ...................................................................................... 20
2
Introduction
Thank you for purchasing a Doran Scales Model 2200CW Digital Scale Indicator. This
scale uses state of the art technology to provide you with a low cost solution to the most
demanding weighing applications. With ease of use and setup in mind, the scale is
simple to set up and ready to use.
Please be sure to read the entire manual to ensure you obtain all the benefits that the
Model 2200CW can provide. If any questions arise, please feel free to contact the
Doran Scales Technical Support Department at 1-800-262-6844.
The 2200CW offer many features. A few of these features are listed below:
NTEP certification for Class III installations to 10,000d (CoC #06-101)
Display Resolution from 250 to 50,000 divisions
A six digit, 0.56" red LED display for easy reading
Eight output status LEDs
Eight on board open collector outputs
lb, kg, oz, g, lb-oz display units supported
Two configurable duplex serial ports with RS232 support
nonvolatile data storage of all calibration and setup information
Microprocessor monitoring system to prevent scale failure under severe fault
conditions
Support for up to four 350 ohm load cells
115 VAC 50/60 Hz operation standard or 230 VAC 50/60 Hz operation (Optional)
Field selectable digital filtering
Software configurable remote push-button support
Password protected, Front Panel Calibration Access Feature
Battery Operation, internal rechargeable battery provides 50 hours of continuous use
with built in charger (Optional)
4-20mA analog output (Optional)
Wired Ethernet (Optional)
Wireless Ethernet (Optional)
Modbus/TCP (Optional)
RS485 (Optional)
USB (Optional)
Four Internal Mechanical or Solid State Relay outputs (Optional)
Eight External Relay outputs for non-battery models (Optional)
Fiber Optic Communication (Optional)
For a complete list of options, please contact your local Doran Distributor
3
Unpacking Your Scale
Before unpacking your Doran scale, please read the instructions in this section. Your
new scale is a durable industrial product, but it is also a sensitive weighing instrument.
Normal care should be taken when handling and using this product. Improper handling
or abuse can damage the scale and result in costly repairs that will not be covered by
the warranty. If you notice any shipping damage, notify the shipper immediately. Please
observe the following precautions to insure years of trouble free service from your new
scale.
DO NOT drop the scale
DO NOT immerse the scale
DO NOT drop objects on the platform
ONLY pick up the scale base from the bottom of the platform
CAREFULLY remove the scale from the shipping carton
Electrical Connections
Prior to connecting your scale to power, check the serial number tag on the back of
scale for the correct operating voltage. Verify that the power matches the rated voltage.
Be sure the AC power is not excessively noisy - this can occur if large inductive loads,
such as solenoids or motors, are on the same power line. The scale has a filtered power
supply to reduce the effects of normal line noise, but they cannot limit severe
fluctuations. If problems occur, noise producing devices may have to be suppressed to
minimize their effect.
Software Part Number and Revision Level
During power up, the scale will display several messages. The first message is a
display test with all LED segments on (888888). Next, the scale will show the software
part number Su 131 followed by the software revision level rEv 1.0 or higher. When
contacting our service department, please have the software part number and the
revision level available.
4
Scale Operation
UNDER
III
ACCEPT
2200CW
OVER
NET
lb
ZERO
kg
BATT
oz
g
MOT
1
TARE
2
GROSS
NET
3
4
5
ZERO
6
7
8
PRINT
UNITS
[ ON/OFF ]
ENTER
ACCUM
PROD
ID
OVER
CLEAR
SET
POINT
UNDER
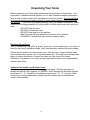
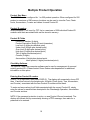
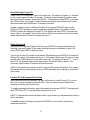
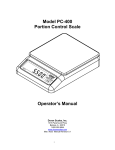
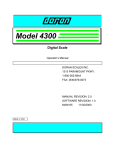
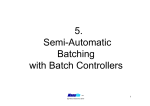
Fig. 1: Model 2200CW Front Panel Layout
LED Annunciators
The Model 2200 (Fig. 1) uses a set of sixteen LED annunciators, in addition to the six
digit LED weight display, to provide information about the status of the scale.
The OVER, ACCEPT, UNDER indicators above main display are use to indicate
checkweight information.
The 8 led indicators below main display are used to indicate: output status during
weighing mode or the current setpoint, preact or ID being edited.
Motion is indicated by the MOT annunciator. Motion is an instability in the
platform weight. The motion sensitivity can be changed in the parameter setup
mode. Some functions like tare, zero and print can only be executed when this
annunciator is lit.
Net mode is indicated by the NET annunciator. When lit, the scale is displaying a
net weight. When not lit, the scale is displaying a gross weight.
Center of zero is indicated by the ZERO annunciator. The ZERO annunciator is
lit when the gross weight is within 0.25 divisions of zero gross weight.
Low battery condition is indicated by the BATT annunciator. Recharge the
battery when this annunciator is lit. The scale can charge while in operation.
Available weight units are displayed by the lb, oz, kg and g annunciators.
5
UNDER
TARE
GROSS
NET
ACCEPT
ZERO
OVER
2200CW
PRINT
UNITS
[ ON/OFF ]
ENTER
ACCUM
PROD
ID
OVER
CLEAR
SET
POINT
UNDER
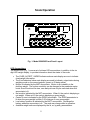
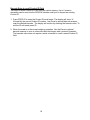
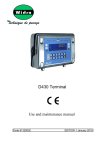
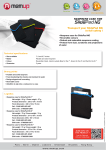
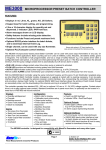
ZERO Displayed Weight
To zero the scale, wait until the scale is stable and press the ZERO button. The scale
will not zero if the scale is in motion as indicated by the motion (MOT) annunciator.
Center of zero is indicated by the ZERO annunciator, which will be lit when the gross
weight is within 0.25 divisions of zero gross weight.
The scale can be zeroed while in the net mode. Press ZERO and the scale will return to
the gross mode and will zero out any weight on the scale platform. The stored tare
value will remain in memory.
The indicator is equipped with a Zero on Demand parameter, which saves the ZERO
push button command and zeros the scale upon the next stable reading. This option
may be activated during the scale setup procedure.
Push Button Tare
To use Push Button Tare, simply place the tare item on the scale platform and press
TARE. The scale will store the tare weight of the item. The net weight is displayed
The TARE weight will remain in memory, even if the indicator is turned off.
Digital Tare Entry
Enter the tare weight value using the numeric keypad, then press TARE to save the tare
weight. After the tare weight is stored, the scale will show the net weight.
6
The tare must be a positive, non-zero weight. If any errors are made while entering the
tare weight, press CLEAR and reenter the weight.
The TARE weight will remain in memory, even if the indicator is turned off.
When configured for 250 products, the Tare weight is stored with the associated Product
ID number.
Tare Recall
To recall the tare weight at any time, press and hold TARE push button for 3 seconds.
The display will momentarily show tArE, then flash the tare weight in the currently
selected units. To exit this mode press CLEAR.
Clear Stored Tare Value
To clear a tare weight press 0 on the keypad then press TARE. This will remove the
tare from memory.
If not cleared, the TARE weight will remain in memory, even if the indicator is turned off.
Barcode Entry of Tare Value
Press and hold the TARE push button for 3 seconds to recall the tare weight. The
display will momentarily show tArE, then flash the tare weight.
Using Doran’s optional barcode scanner, scan the desired barcode. The display will
read SAVEd to indicate the scanned tare weight is saved. The display will flash the new
tare weight scanned from the barcode. No special serial commands are needed prior to
the weight data in barcode value. The barcode value must not exceed the indicator's
count by resolution and can not be greater than the capacity. To exit the recall mode,
press the TARE button.
Toggle Gross and Net Modes
The GROSS / NET pushbutton is use to switch the display mode between the gross
weight and net weight. If a tare value has been entered, then the net value is the gross
weight less the tare weight.
The net mode is indicated on the display with the NET annunciator. If a tare is not
currently stored, the display remains in gross mode when the GROSS / NET pushbutton
is pressed.
Toggle Displayed Weight Units
Press the UNITS button to scroll through all available weight units. The corresponding
weight units annunciator will be lit.
7
The UNITS button can be configured to allow the selection of any combination of units
listed above, preventing accidental selection of undesired units. See the Units
Conversion Setup Parameter in the Instruction Manual MAN0253 for details.
The UNITS button has two parameter menus located in the Cal mode, that can disable
the UNITS button, and select the startup units everytime the scale is turned on. See the
Push Button Function Setup and Startup Units Selection menus in the Instruction
Manual MAN0253 for details.
Data String Output to Printer or Other Device
Wait for the scale to become stable. Press the PRINT button to send data to a printer or
other external devices. To confirm data transmission, the left most display digit will
momentarily display an r.
The PRINT button transmits data through the standard RS-232 port, as well as the
optional RS-485, USB, Ethernet and Wireless Ethernet communication protocols.
The indicator is equipped with a Print on Demand parameter, which saves the PRINT
push button command and transmits data upon the next stable reading. This option may
be activated during the scale setup procedure. The indicator also has several automatic
print options. See the Data Communication Section in the Instruction Manual MAN0253
for details on Further configuration.
Recall and Edit Data Output Formats
Press and hold the PRINT button for 3 seconds to access the Data Output Formats for
both serial ports. Press UNITS button to toggle between the Data Output Formats for
serial Port 1 "For." and serial Port 2 "Fo2.". Use ZERO button to change the output
format setting. Press PRINT or ENTER to saved and exit this mode. The display will
show SAVEd to indicate changes were made to the Output Format setting.
Password Protected Setpoint, Preact, Tare and Check Limit Values
All values can be reviewed, but cannot be changed unless the password is deactivated.
If the password protection is activated, the display will display pass when the SET
POINT, TARE, UNDER or OVER values are changed. Enter the password and press
ENTER, display show PASS then OFF. Press SET POINT, UNDER or OVER to change
or review weight value or press and hold SET POINT to edit or review preacts.
After entering in the new setpoints or preacts TARE, UNDER or OVER Values. Press
hold for 2 seconds the ENTER to activate the password protection.
NOTE: If a Password number has been stored. Upon power up, the password protection
will be activated
8
Checkweigh Operation
Over, Under and Accept Checkweighing Operation
1) Remove all items from the scale platter.
2) Press ZERO to zero the scale. The weight indication should now be zero.
3) Place an item on scale platter and wait for the motion (MOT) to turn off, indicating a
stable weight.
4) If the item is heavier than the over limit, the OVER indicator will light, If the item is
lighter than the under limit, the UNDER indicator will light. If the weight is between
the limits, the ACCEPT indicator will light.
Five Band Checkweighing Operation (optional configuration)
1. Remove all items from the scale platter.
2. Press ZERO to zero the scale. The weight display should now be zero.
3. Place an item on scale platter and wait for the motion (MOT) annunciator to turn off,
indicating a stable weight.
4. If the item is heavier than the high limit, the OVER indicator will flash. If the item is
heavier than the “over” limit but lighter than the “high” limit, the OVER indicator will
turn on. If the item is lighter than the low limit, the UNDER indicator will flash. If the
item is heavier than the low limit but lighter than the under limit, the UNDER indicator
will turn on. If the weight heavier than the under limit but lighter than the over limit,
the ACCEPT indicator will light.
NOTE: The Five band checkweighing operating mode ("5BA", "5BS", "5Bt", "5Bb") is
available in four different optional configurations in the Check Weighing Operation Mode
Menu. See Check Weighing Operation parameter "C.o." in the Instruction Manual
MAN0253 for more details.
Display Check Limit Values
Press OVER or UNDER to display the current check limit values. (Or for 5 Band Check
weighing operation. Press and hold the OVER for the HIGH limit or UNDER for the LOW
limit.) Press UNITS and PRINT to scroll between the available check limits. The top
light bars and the main display will indicate which check limit is being displayed (High,
over, under, Louu). Press CLEAR to exit this mode. The display will read abort to
indicate no changes were made to the check limit values.
Press ZERO to momentarily display the current parameter settings and output logic for
that individual check limit.
9
Change Check Limit Values
Press OVER or UNDER to enter the check limit edit mode. (Or for 5 Band Check
weighing operation. Press and hold the OVER for the HIGH limit or UNDER for the LOW
limit.) The top light bars and the main display will indicate which check limit is being
displayed(High, over, under, Louu).
To change the check limit value, enter the weight value using the numeric keypad.
Press ENTER to accept the change and return to the weigh mode or press UNITS or
PRINT to save and edit other check limits. Press CLEAR to exit this mode.
The display will read abort to indicate no changes were made to the check limit values
or the display will read SaVed to indicate the check limit value is saved.
NOTE: If the password protection is active, no new check limits can be entered. The
display will indicate this by momentarily showing a PASS message, then entering in a
password entry mode.
Barcode Entry of Check Limit Values
Press OVER or UNDER to enter the check limit edit mode. The display will momentarily
show over or under, then flash the current limit weight. Press UNITS or PRINT to
scroll to the desired check limit. The top light bars and the main display will indicate
which check limit is being displayed(High, over, under, Louu). Using Doran’s optional
barcode scanner, scan the desired barcode. The display will read SAVEd to indicate the
scanned weight is saved. The display will flash the new check limit weight scanned from
the barcode. No special serial commands are needed prior to the weight data in barcode
value. The barcode value must not exceed the indicator's count by resolution and can
not be greater than the capacity. The barcode value can be read into each of the
available check limits. To exit the edit mode press the ENTER button.
10
Setpoint Operation
Display Setpoint Values
Press SET POINT to display the current setpoint values. The last viewed or edited
setpoint will be displayed. Press UNITS and PRINT to scroll through the eight available
setpoints. The annunciators below the main display indicate the current setpoint. Press
SET POINT to exit this mode. The display will read abort to indicate no changes were
made to the setpoint values.
Press ZERO to momentarily display the current parameter settings and output logic for
that individual setpoint.
Change Setpoint Values
Press SET POINT to enter the setpoint edit mode. The last viewed or edited setpoint
will be displayed. Press UNITS and PRINT to scroll through the eight available
setpoints. The annunciators below the main display indicate the current setpoint.
To change the setpoint value, enter the setpoint value using the numeric keypad. Press
ENTER to accept the change and return to the weigh mode or press UNITS or PRINT to
save and edit other setpoints. Press SET POINT to exit this mode.
The display will read abort to indicate no changes were made to the setpoint values or
the display will read Saved to indicate the setpoint value is saved.
NOTE: If the password protection is active, no new setpoint values can be entered. The
display will indicate this by momentarily showing a PASS message, then entering in a
password entry mode.
Barcode Entry of Setpoint Values
Press SET POINT to enter the Setpoint edit mode. The display will momentarily show
SEtPt, then flash the current setpoint weight. Press UNITS or PRINT to scroll to the
desired setpoint number. The annunciators below the main display indicate which
setpoint is currently displayed.
Using Doran’s optional barcode scanner, scan the desired barcode. The display will
read SAVEd to indicate the scanned setpoint weight is saved. The display will flash the
new setpoint weight scanned from the barcode. No special serial commands are needed
prior to the weight data in barcode value. The barcode value must not exceed the
indicator's count by resolution and can not be greater than the capacity. The barcode
value can be read into each of the eight available setpoints. To exit the edit mode press
the SET POINT button.
11
Display Preact Values
Press and hold the SET POINT button for three seconds to display the Preact weight
values. The last viewed or edited preact will be displayed. Press UNITS and PRINT to
scroll through the eight available setpoints. The annunciators below the main display
indicate the current setpoint. Press SET POINT to exit this mode, the display will read
abort to indicate no changes were made to the setpoint values.
Press ZERO to momentarily display the current parameter settings and output logic for
that individual preact.
Change Preact Values
Press and hold the SET POINT button for three seconds to enter the preact edit mode.
The last viewed or edited preact will be displayed. Press UNITS and PRINT to scroll
through the eight available preacts. The annunciators below the main display indicate
the current preact.
To change the preact value, enter the preact value using the numeric keypad. Press
ENTER to accept the change and return to the weigh mode or press UNITS or PRINT to
save and edit other preacts. Press SET POINT to exit this mode.
The display will read abort to indicate no changes were made to the preact values or
the display will read Saved to indicate the preact value is saved.
NOTE: If the password protection is active, no new preact values can be entered. The
display will indicate this by momentarily showing a PASS message, then entering in a
password entry mode.
Barcode Entry of Preact Values
Press and hold the SET POINT button for three seconds to enter the preact edit mode.
The display will momentarily show PrEACt, then flash the current preact weight. Press
UNITS and PRINT to scroll through the eight available preacts. The annunciators below
the main display indicate the current preact.
Using Doran’s optional barcode scanner, scan the desired barcode. The display will
read SAVEd to indicate the scanned preact weight is saved. The display will flash the
new preact weight scanned from the barcode. No special serial commands are needed
prior to the weight data in barcode value. The barcode value must not exceed the
indicator's count by resolution and can not be greater than the capacity. The barcode
value can be read into each of the eight available preacts. To exit the preact edit mode,
press the SET POINT button.
12
Accumulator and Counter
Accumulator and Counter Operation
When a manual or automatic print function is executed, the accumulator has the
currently displayed weight added to its’ current value and the counter is incremented.
To confirm an accumulation and counter operation, the left most display digit will
momentarily display an o.
To automatically accumulate, select an auto print function in the parameter setup menu.
To accumulate manually, allow the scale to become stable and press PRINT.
The maximum value that can be shown for the accumulator and counter is 999,999.
When the maximum value is reached, the accumulator or counter will rollover to a zero
value. The accumulator and counter feature can only be used in a non Legal For Trade
application.
For 2200CW model configure for 250 product memory, the Accumulator and Counter
values is stored with the associated Product ID number.
Display Accumulator and Counter Values
Press the ACCUM button to enter the accumulator and counter recall mode. The display
will show Accunn followed by the accumulated weight in the units currently selected in
the weigh mode. Then Countr will be displayed followed by the counter value.
Press ACCUM to exit the accumulator and counter recall mode without changing their
values.
Clear Accumulator and Counter
Press the ACCUM button to enter the accumulator and counter recall mode. The display
will show Accunn followed by the accumulated weight in the units currently selected in
the weigh mode. Then Countr will be displayed followed by the counter value.
Press CLEAR to clear the accumulator and counter values.
Clr Ac and exit from the recall mode.
The display will show
Changing the current display units will clear both the accumulator and counter values.
Accumulator and Counter Data String Output to Printer or Other Device
Press ACCUM to enter the accumulator recall mode. Press PRINT to transmit the LB4
custom data string that contains the accumulator and counter values by default. Both
the accumulator and counter values are cleared after transmission.
See Output Formats in the parameter section and Custom Data String default settings in
the Instruction Manual MAN0253 for more details.
13
Single Product Operation
Product Size Menu
The 2200CW can be configured for 1 or 250 product operation. When configured for one
product, only one memory location is used to store the Tare, Check Limits, Accumulator
and Counter values. There are 8 ID values available for use in this mode.
Product ID number
When the parameter Product Size Menu Prod is configured for one product. There is
only one active product field that is used in memory. The Product ID number becomes a
ID value, The eight ID values in this mode are used for data collection of product,
operator IDs and other information.
Display ID Values
Press PROD ID to enter the ID recall mode. The last viewed or edited ID will be
displayed. The display will show Id, followed by the current ID’s value. Press UNITS
and PRINT to scroll through the eight available IDs. The annunciators below the main
display indicate the current ID location. Press ID to exit this mode, the display will read
abort to indicate no changes were made to the values.
The current ID is the last edited or displayed ID.
Keypad Entry of ID Values
Press ID to enter the ID edit mode. The last viewed or edited ID will be displayed. The
display will show Id, followed by the current ID’s value. Press UNITS or PRINT to scroll
to the desired ID. The annunciators below the main display indicate which ID is
currently displayed.
Enter up to six digits through the numeric keypad. Press ENTER to accept the change
and return to the weigh mode or press UNITS or PRINT to save and edit other IDs. To
exit the ID edit mode press ID.
The display will read abort to indicate no changes were made to the ID values or the
display will read SaVed to indicate the ID value is saved.
Barcode Entry of ID Values
There are two different methods in scanning ID values into a scale. When using a
barcode scanner, up to 20 alphanumeric characters can be read and stored into each of
the eight available ID locations.
14
1. Press ID to enter the ID edit mode. The last viewed or edited (current) ID will be
displayed. The display will show Id, followed by the ID’s value. Press UNITS or
PRINT to scroll to the desired ID. The annunciators below the main display indicate
which ID is currently displayed.
Using Doran’s optional barcode scanner, scan the desired barcode. The display will
read ------ to represent the barcode value. To exit the ID edit mode press ID.
2. When the scale is in the normal weighing operation. Use the Doran’s optional
barcode scanner to scan in a barcode value that begins with a numeric character.
The bar code value does not require a prefaced command to be saved as a value for
ID 1.
15
Multiple Product Operation
Product Size Menu
The 2200CW can be configured for 1 or 250 product operation. When configured for 250
product, a maximum of 250 memory locations can be used to store the Tare, Check
Limits, Accumulator, Counter and values for each Product ID.
Product ID number
When parameter Prod is set for 250. Up to a maximum of 250 individual Product ID
numbers with their associated fields can be stored in memory.
Product ID Fields
Product ID Number (6 digits)
Product Description String (20 ascii characters)
Low Limit (6 digits plus decimal point)
Under Limit (6 digits plus decimal point)
Over Limit (6 digits plus decimal point)
High Limit (6 digits plus decimal point)
Tare (6 digits plus decimal point)
Counter (6 digits)
Accumulator (6 digits plus decimal point;
when printed, 8 digits plus decimal point)
CheckWay Software
The optional Check Way computer software can be use for management of new and
existing product ID’s. Please contact Doran Scales sales department for additional
information on this option.
Entering New Product ID number
Enter a 1 to 6 digit value, then press PROD ID. The display will momentarily show NEUU
then Id and then return to the weigh mode. All fields (Check Limits, Tare, Accumulator,
and Counter) associated with the new Product ID number will be blank.
To enter and save values for all fields associated with the current Product ID, simply
enter the values for each field as descripted in the Checkweigh Operation, Accumulator
and Counter sections.
NOTE: If the password protection is active, no new Product IDs can be entered. The
display will indicate this by momentarily showing a PASS message, then waits for a
password to be entered.
16
Recall Existing Product ID
Press PROD ID to enter the Product ID recall mode. The display will show Id, followed
by the currently active Product ID number. To select another stored ID number, enter
the preexisting ID number, then press ENTER. The display will read SaVed to indicate
the Check Limits, Tare weight, Product Description String, Accumulator and Counter
fields associated with that Product ID number are active.
Another method to select a different Product ID is to press PROD ID, then use the
UNITS or PRINT buttons to scroll through the available Product ID numbers. Press
ENTER to select the displayed Product ID. The display will read SaVed to indicate the
Check Limits, Tare weight, Product Description String, Accumulator and Counter fields
associated with that Product ID number are active.
Delete Product ID
You may wish to remove Product ID’s from your 2200CW to prevent accidental use.
Deleting a unused Product ID will make scrolling through the available Product ID’s,
using UNITS and PRINT a faster process.
Type in the Product ID number to be deleted. Momentarily press PROD ID to recall the
Product ID number. The display will show Id, followed by the Product ID number. Press
and hold the CLEAR button for more the 2 seconds. The display will show Clr ID and
then done. All fields associated with that Product ID number will be cleared. The
previously used Product ID number will become active.
NOTE: If the password protection is active, Product IDs cannot be deleted. The display
will indicate this by momentarily showing a PASS message, then entering in a password
entry mode.
Product ID Field Password Protection
With password protection enabled, the user will be able to recall Product ID’s, but not
alter any of the associated Product ID fields. The user will also be prohibited from
creating or deleting any Product IDs.
To disable password protection, enter the password and press ENTER. The display will
show PASS then OFF to indicate password protection is off.
NOTE: If a password number has been stored. Upon power up, the password protection
will be activated.
To enable password protection, press hold ENTER for 2 seconds to activate the
password protection.
17
Barcode Entry to recall Product ID Field
Two ways to recall Product ID Field from the scale’s memory. Up to 6 numeric
characters can be read into the 2200CW barcode serial port to request an existing
Product ID.
1. Press PROD ID to enter the Product ID recall mode. The display will show Id,
followed by the current Product ID number. Use Doran’s optional barcode scanner,
scan the desired barcode. The display will confirm by showing the barcode value. To
exit the ID edit mode press ID.
2. When the scale is in the normal weighing operation. Use the Doran’s optional
barcode scanner to scan in a barcode value that begins with a numeric character.
The barcode value does not require a serial command to recall a saved Product ID
field.
18
Setting Time and Date
Press and hold the decimal point button on the keypad until date is displayed. The
current date flashes on the display. To toggle between the current time and date, press
the decimal point button. When time is displayed tinne is shown on the display.
To change the date, display the date and enter the month, followed by the day and year.
Press UNITS and PRINT to change the current selection. The field that is being edited
flashes on the display. Enter a leading zero when entering a single digit year, month or
day. Press UNITS until the display reads saved to confirm the date changes are saved.
To change the time, display the current time and enter the time in 24 hour format. Press
UNITS and PRINT to change the current selection. The field that is being edited flashes
on the display. Enter a leading zero when entering a single digit hour, minute or second.
Press UNITS until the display reads saved to confirm the date changes are saved.
19
Battery Operation
Indicators with the battery option installed are equipped with an internal rechargeable
sealed lead-acid battery and charging circuit. The scale is designed to run continuously
for 50 hours (with one 350 ohm load cell) on a fully charged battery. To significantly
extend this battery life, be sure the Unit On Timer parameter is enabled, which will
power down the scale automatically after a period of non-use. The default setting shuts
off the indicator after 30 seconds of non use. When plugged in, the indicator will remain
on continuously.
Power Up and Power Down
Connect the indicator to a compatible power source and the indicator will turn on.
To turn on the scale, press and release the ZERO button.
To turn off manually, press and hold the ZERO push button until the display
shows "rEL Pb." Then release the ZERO button and the scale will turn off.
The scale will turn off automatically when the scale is stable for a period of time defined
by the Unit On Timer parameter. The default setting is 30 seconds.
Use of multiple load cells, Fiber Optic, Ethernet, 4-20mA, Wireless Communication,
Remote Display, USB or Relay options will reduce battery life. For multiple load cell
applications, battery life is significantly reduced. For example, with a four, 350 load
cell configuration, the low battery indication will begin at about 39 hours of continuous
use. Load cells with higher input impedance values such as 1000 will display low
battery indication after 47 hours.
The charging circuit will fully charge the battery in approximately four to eight hours
whether the scale is on or off. To charge the battery, simply plug the line cord into a
standard 115V (230V optional) wall outlet. The scale can be used while recharging the
battery, in fact, the scale can be used with the AC charger cord plugged in on a
continuous basis. Note: Indicators installed with multiple load cells, Fiber Optic,
Ethernet, 4-20mA, Wireless Communication, Remote Display or Relay options will
increase charge time.
If an AC power failure occurs with the charger plugged in, the scale's battery
immediately takes over to provide uninterrupted scale operation.
The BATT annunciator indicates that the battery is in need of recharging. The scale will
continue to operate accurately for approximately one hour (with one 350 ohm load cell)
after the BATT annunciator is lit. When the battery is too low to operate the scale, the
scale simply turns off and will not turn on again until the battery is recharged. At this
point, when the ZERO (ON/OFF) is pressed, the BATT annunciator will be lit as the
scale performs its display test and then the scale will shut down immediately.
The battery should be able to support at least 300 recharges before the end of the
battery life is reached. This is an estimate as many factors can affect battery life like,
severe temperature changes and charging before the scale displays Low Battery.
20