1
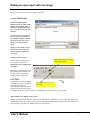
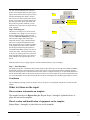
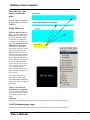
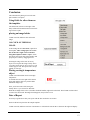
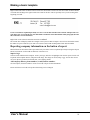
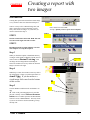
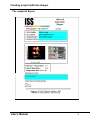
ThermoRx PRO
Making a basic report and template
Original date of manual 08/21/03
Revised 09/24/03
Copyright 1997 - 2003.
All rights to this manual are reserved by EIC, Inc.
Reproduction of any graphics, text, concepts, or ideas
expressed or implied can only be done by written
permission from EIC, Inc.
Table of Contents
Chapter 1
Introduction
Purpose of this manual ............................................................................................
Using the software for the first time.......................................................................
What FAST REPORT is all about .........................................................................
Directories created during software installation...................................................
Files included for use in this manual......................................................................
CAUTION ON Loading reports .............................................................................
Chapter 2
[1]
[1]
[1]
[1]
[2]
[2]
Making an easy report with one image
The basic of a report ................................................................................................ [3]
Protected Areas .......................................................................................................3
None protected areas ..............................................................................................3
Image holder. ..........................................................................................................3
Fields ......................................................................................................................3
STEPS to making a report ...................................................................................... [4]
STEP 1 ....................................................................................................................4
STEP 2 ....................................................................................................................4
Step 3 .......................................................................................................................4
Step 4 complete report ............................................................................................4
A Obtain the maximum temperature on the image...........................................4
B Go back to the report......................................................................................5
C Fill in text sections of the report. ..................................................................5
D Date Field......................................................................................................5
E Print the report...............................................................................................5
F. SAVE THE REPORT....................................................................................6
Chapter 3
Making a basic template
Creating a basic template........................................................................................ [9]
Introduction .............................................................................................................9
Making the template ................................................................................................ [9]
The title ...................................................................................................................9
Step 2 position the rectangle ............................................................................10
Step 3 size the rectangle...................................................................................10
User’s Manual
i
Step 4 place your text in the rectangle. ............................................................10
Step 5 Removing a border ...............................................................................10
Step 6. Protecting text ......................................................................................11
Step 7 - Extra flourishes...................................................................................11
Conclusion ............................................................................................................11
Other text items on the report .............................................................................. [11]
Place customer information on template. .............................................................11
Place Location and identification of equipment on the template .........................11
Place the text comments: on the template ............................................................12
Using fill in text ....................................................................................................12
Fill in for Report done for................................................................................12
Fill in for Location and identification of equipment........................................12
Comments ........................................................................................................12
Label Maximum image temp .................................................................................12
Conclusion .............................................................................................................. [13]
Using fields for other items on the template. ........................................................13
placing an image holder .......................................................................................13
Date of Report .......................................................................................................13
Reporting company information on the button of report. ................................. [14]
import a logo ....................................................................................................14
Add company address, phone numbers, e-mail, and fax numbers...................14
Chapter 4
Making a template with two images
Creating an advanced template. .......................................................................... [15]
Introduction............................................................................................................ [15]
Extra helpful functions ..........................................................................................15
Placing the company logo. ....................................................................................16
.........................................................................................................................16
Step 2 Size and shape the logo.........................................................................16
Placing a border around sections of the template. ...............................................17
Draw a border ..................................................................................................17
Placing two images in a template. ........................................................................18
File Date ...............................................................................................................18
Using difference field ............................................................................................19
ii
Table of Contents
Chapter 5
Creating a report with two images
Introduction............................................................................................................ [21]
STEP 1 ..................................................................................................................21
STEP 2 ..................................................................................................................21
Step 3 .....................................................................................................................21
Step 4 .....................................................................................................................21
Step 5 .....................................................................................................................21
Step 6 .....................................................................................................................22
Step 7 .....................................................................................................................22
Step 8 .....................................................................................................................23
Step 9 .....................................................................................................................23
The completed Report ........................................................................................... [24]
User’s Manual
iii
iv
CHAPTER 1
Introduction
Purpose of this manual
This manual is written to answer the need for knowledge on how to make a simple, and basic report and template.
ThermoRX is a template reporting software. A template once created can be used again and again. An initial investment of
time will result in reports that not only are professional looking, but consistent. Upgrades to the software do not remove
these templates.
Using the software for the first time
The software is set with the defaults required to make your first report. Resist the temptation to begin tweaking these to your
own particular specification, INITIALLY. What are some of these defaults. Palettes, temperature scale, fast report is turned
on, color bar text, and above all a set of default directories in the ThermoRX directory, such as images, reports, templates,
and palettes.
Included with the software is a set of images which you can use to become familiar with the software. These are all in the
images directory and are of course K6000 thermal images.
If you need more exact information CLICK on File and then CLICK on Getting Started. This will load a complete 100 page
manual on ThermoRX PRO. Using the latest Adobe, also loaded, you can mark, print, search, in short do almost anything to
customize you help.
What FAST REPORT is all about
Items 1 through 7 are explained without screenshots and graphics in Chapter 2. The purpose in this is to list simply for you
the steps so that you can see that this is not an involved process. The majority of time will probably be spent in creating a
template.
The 7 steps to making a report
1.
2.
3.
4.
5.
6.
7.
CLICK on TOOL bar that loads template.
Select template (first time only)
Select image from gallery
Update image from Image Editor with rectangle tool, and if
needed listen to audio information.
Update report with text information.
Save report and select new image.
Repeat steps 4 thru 7 for subsequent images.
NOTE: if you use common text or boiler plate, a substantial amount
of time for item 5 can be saved.
Directories created during software
installation
To the left are the directories created by default when the software is
installed. For now ignore the batch directory which had a use in previous.
User’s Manual
1
Introduction
Files included for use in this manual
Sample template is used in the
next chapter.
Directory mopping is set so that
you will not need to search for
anything. It is found in the above
list directories under TEMPLATE.
The same hold true for the SAT
files shown to the left. A note
about the IDX file: The IDX file
allows fast loading and should not
be removed. These are found in
images directory. Mapping is set
so that you will not need to look
for these in the next chapter.
CAUTION ON Loading reports
You must be careful about images loaded in the Image Editor. If these images are used in a report - they are marked
as THERMAL, and will then REPLACE the image that belongs in the report.
Always keep this in mind when viewing your reports. First clear everything out of the Image Editor by closing the
image in the image editor.
User’s Manual
2
CHAPTER 2
Making an easy
report with one image
The basic of a report
Protected Areas
Items on this report, such as, the
Title, Report done for, Location
and Identification of equipment,
and comments, etc. are protected.
These cannot be changed or moved
during the making of a report.
None protected areas
These areas show up as aqua color,
which boundaries the text. This
COLOR DOES NOT PRINT.
You can also place in these text in
these areas at the time you make
the template. At the time you make
the report you can accept this text,
erase it, or modify it word by word.
This is called boiler plate. You
may have standard text for your
comments which is always
included.
Using this feature will result in
making quicker report.
Image holder.
This report has one thermal image.
When an image is placed in this
holder, it will have a color bar on
the left or right, and also show
annotations placed on the image.
Fields
There are 2 on this report: date of
report, and rectangle temperature.
User’s Manual
3
Making an easy report with one image
STEPS to making a
report
Once again, change NOTHING in
the software, and once you have
ThermoRX up and running, step
right into the following.
STEP 1
Place mouse here and CLICK.
Tool tip - Quickly create a report from a template.
STEP 1
CLICK on this item in the
TOOL BAR. This tool is located
on the right side of the tool bar.
STEP 2
DOUBLE CLICK on this item
sample template 1.eic-tem
shown on the dialog to the right.
STEP 2
Select sample template
STEP 3
Step 3
When you loaded this template, a
directory of images will be displayed. Double CLICK your left
mouse button on HY680057.SAT
to load the image into the Image
Editor and the Report.
This report has only a thermal
image and this image is marked as
a thermal image.
RESULTS. The report will then
show the selected image in the
formerly black image holder
with a color bar and temperature scale. If you right click the
mouse on the color bar you can
remove it or place it on the opposite side.
RESULTS - image
will replace the
black place holder.
Step 4 complete report
A Obtain the maximum temperature on the image.
CLICK on Window and then
click on the thermal image you
are placing in the report. This
will bring you to the image editor,
which enables the placing of any
temperature tool on the selected
User’s Manual
Click on this file to
open Image Editor
and work on this file.
4
image.
Place a rectangle temperature on the image.
CLICK on the rectangle temperature tool. The mouse cursor
turns into a +. Place this +
where you want to start the
rectangle -- this is usually the
upper left hand corder. How the
left button of the mouse down
and drag a rectangle on the hottest part of the image. Then
release the mouse button and
position the leader and text for
the best visibility.
For complete information on
using all of the software temperature tools turn to Getting
Started Manual chapter 9
B Go back to the report
Go back to the window menu
and click on the Report 1. The
image on which you placed a
rectangle is now changed and
has a rectangle temperature tool
applied to it. In addition the
rectangle field to the right of
the image is filled in with a MX
of 140.62 degrees F.
C Fill in text sections of
the report.
The text sections with address,
and location of image, and
comments are now filled in as
shown to the left
NOTE. A default font and font
attributes have been placed on
the sample template. WHILE
YOU ARE MAKING THE
REPORT - you can change
these by using the tool bar
located on the menu bar.
D Date Field.
The date field at the bottom of
the report is advanced automatically and filled in for you.
E Print the report.
5
Making an easy report with one image
The printed report is shown on the next page as an insert.
F. SAVE THE REPORT
CLICK on FILE and then
CLICK on Save as. Click on the
folder as shown to the right. A
directory is available for you to
use, or you can create your own
directory.
STEP F
Save the report. It is a good practice, at least for the first time, to
go to Windows Explorer and double check all your work, even to
check if you really saved the
report.
STOP - you have made a report
and saved it. The next step is to
use that template to make your
next report.
G Make your next report.
CLICK on the tool shown to the
left, with the tool tip shown,
Refresh this report with data from
new images.
Click on this tool IF YOU want to
select a new template
This brings you back to the start of
the reporting session with one difference, you are using the same
template for all of your work.
CAUTION
STEP
If you wish to use another template
Click
on
this
tool
to
start
your
you must click on the tool immedinext report.
ately to the left of the tool
described above and select another
template. Do not make the mistake
of selecting this tool by accident. Follow very carefully what it says in G above. Very carefully.
G
This is all there is to making a basic report.
Frankly we do not know if this effort to provide you with the basic information to create a report quickly and easily
has succeeded. Above all we do not want to provide confusing and misdirecting information. We have done our very
best to provide you a good start. Thanks for all your effort thus far.
User’s Manual
6
7
Making an easy report with one image
User’s Manual
8
CHAPTER 3
Making a basic
template
Creating a
basic template
Introduction
The software includes a
template called sample
template 1. This was used
in the previous section to
make the basic report.
Load this template by
going to File and then
CLICKING on OPEN.
Double click on the file
named Sample Template
1. In this section we will
use this template to learn
the basics of creating a
template. This will not
cover everything the software can do. Refer to the
results of the complete
template shown on the
RIGHT. This shows the
results of making a template. Our intention in all
this is not to make you
think that this format for
the template or report, is
what you should use.
After you have learned the
basic you can create whatever template you want.
Making the
template
The title
Click the left button of the
mouse anywhere within
the borders of the text
object, or title shown
below. Black rectangles,
called handles, will appear
on each corner of the
INDICATING that you
have selected this text
object Now press the
User’s Manual
9
Making a basic template
delete key on your computer keyboard and it will be erased.
Step 1
CLICK the mouse on the menu bar called objects, then click on abc Text Annotation.
step 3
step 4
step 1
step 2
Step 2 position the rectangle
Click outside this resulting rectangle and then click inside it. Place the mouse cursor inside the rectangle and click
and hold down the left mouse button. Move the rectangle to a desired location. The grids on.1 centers will snap this
object to a position. Release the mouse cursor. Black rectangles, handles remain.
Step 3 size the rectangle
Place the mouse cursor on a rectangle, and then click and while holding down the mouse drag the rectangle to a new
size to the right, and then down several grids. The result is shown in step 3 above.
Step 4 place your text in the rectangle.
Place the mouse cursor inside the rectangle created in step 3, and double click the left mouse button. You will not
have a flashing vertical bar on the extreme left side of the rectangle. Write your text for the title bar. You will probably want nice heavy black text. Use the tool bar to select Trial Black and font size 16. Then type in your text like Title
Bar for Theorem Report. The result is shown in step 4 on the previous page.
Step 5 Removing a border
User’s Manual
10
You may want to finish this part of the template by removing the border. Do this by placing the mouse cursor in the title bar text object
and then uncloaking show border. You now
have a heavy text object written and correctly
placed. If you want to tweak the position simply click outside the object, click inside and
drag to the new position. Similarly you can
adjust the size if your text is too big for the size
of the rectangle.
Step 6
depressed key text is protected.
Step 6. Protecting text
The title text is an object you do not want to
accidentally erase, change, or move when you
use the template to make a report. The software has a function called protect. Select the
title text with a single click of the mouse.
Notice that the key is gray, which means the
title text is not protected and then becomes
black, meaning the key is available. The KEY
is also slightly raised like a button, and then
become depressed showing that protection
exist FOR THIS OBJECT, when you click on
it with your mouse. Check if protection exist,
in any text, by selecting the text to check and
observing what the key does. If it is down, as
in the example to the right the object is protected.
Step 7
Protection makes it easy to supply templates with the assurance that they can’t be changed.
Step 7 - Extra flourishes.
You might want to place a bar almost directly under the above title and to the left. CLICK on the OBJECTS MENU,
and CLICK on LINE. A line diagonal line is placed at the report. Click on this line and black rectangles appear at
either end, showing the line is selected. Place the mouse on these rectangles and drag (as we said already hold down
the left mouse button and move the mouse) the object to where you want it. When you get it below and parallel to the
text, you will probably want to make the line thicker. Do this by selecting the line, and then right clicking for a menu.
Conclusion
This concludes the placing of a title text objects. Every text object is used, adjusted, and placed in exactly the same
manner.
Other text items on the report
Place customer information on template.
The sample has the text Report done for: Repeat Steps 1 through 6 explained above to
place this text on the template.
Place Location and identification of equipment on the template
Repeat Steps 1 through 6 to place this text on the template.
11
Making a basic template
Place the text comments: on the template
Repeat Steps 1 through 6
to place this text on the
template.
Using fill in text
Fill in for Report done for
Drag a text object under the text
Report done for:. This is done
as in Steps 1 through 3. In this
case there are two differences,
we place no text inside this rectangle, and WE DO NOT USE
THE PROTECTION KEY.
You can remove the border as
described in step 5 above. When
not protected, and when the
template is loaded for use in a
report, this fill in area shows up
as a blue color. THIS COLOR
IS NOT PRINTED IN YOUR
FINAL REPORT. It is intended
as a guide. Within the boundaries of this text object you can
place any text you wish - and
you can change the font if
desired - though this will slow
report making by causing you to
take extra steps.
Fill in areas.
You can also write in text as
boiler plate, AT THE TIME
YOU MAKE THE TEMPLATE
which can be edited or modified
at later date.
Fill in for Location and
identification of equipment
In the same manner as described
above create a fill in text holder
or object for this item on the
report.
Comments
In the same manner as described above create a fill in text holder or object for this item on the report.
Label Maximum image temp
In the same manner as described above create a fill in text holder or object for this item on the report.
User’s Manual
12
Conclusion
This concludes the placing of text in the template with abc text objects.
Using fields for other items on
the template.
The fields menu is shown to the right. It has
many useful and essential functions for the making of a basic report.
placing an image holder
CLICK on Fields, and then click on thermal
image.
DO CLICK ON THERMAL
IMAGE.
A black image PLACE HOLDER, is placed on
the template. Allow enough space for a color
bar on the left or right or not at all when
using this template to make a report. At this
time aspect ratio is not done in the template, and
proper aspect is done by dragging the size.
Selecting the image is the same as for any
object. You can place the image exactly where
you want it on the grid, or size to any size, even
a whole page in size. The aspect ratio is always
initially set correctly.
Placing rectangle temperature
object
CLICK on Fields and then click on rectangle
temperature.
A field like the one to the right will be shown.
Select and drag this field to a position under
Maximum image temp.
Since you do not want a able, having one
already above it, you can remove this label.
While the rectangle field is select ( remember the black handles) right click on the field. Then CLICK on Show Label
to remove the check mark. Rectangle then disappears, and you have a N/A.
Date of Report
It is always a good idea to date your report with the date on which it was written.
Such a field has been placed on the sample template.
CLICK on Fields, and then CLICK on Current Date. A field with the current date as shown on the right will display.
13
Making a basic template
Right CLICK and CLICK on Show Label to remove the check mark to remove the text current date. Grab the handles
of current date and drag to the right to make more room for the date. This is especially true if you are starting at the
beginning of month.
Create a text field as explained previously. size it to cover the date and show the text Date of Report. The current date is now covered by the new text field. Make careful note of the information in this paragraph, because
this could cause a lot of frustration.
Right Click on the selected current date and click on to back.
The current date will display inside the rectangle create by the text Date of Report. You can leave the border around
the DATE of report if desired. If you want it in red select and CLICK on Background Color and select RED.
Reporting company information on the button of report.
Mark off the are at the bottom of the report with a heavy line. Place a line as explained previously in using the Objects
Menu, line function. Set the width or thickness of the line to a 4.
import a logo
CLICK on File and then click on Import. Locate your logo, and select or highlight. Then click on open. The file will
be placed on the template. Resize, and position the image. The image can be tiff, bmp, or jpg. You can also elect to
use a text object to put done in bold and color your company initials.
Add company address, phone numbers, e-mail, and fax numbers.
Click on Objects, and select TEXT to create a text field or object for this information.
Protect all of these text fields to keep them from being erase or changed.
User’s Manual
14
CHAPTER 4
Making a template
with two images
Creating an
advanced template.
Introduction
The software includes a template
called sample advanced template. Load this template by
going to File and then CLICKING on OPEN. Double click on
the file named Sample Template
2. In this section we will use this
template to learn the following:
1.
2.
3.
4.
Making a template with
thermal and visual
images
Placing a company logo
File Date
Using the difference
field.
This will not cover everything
the software can do of course.
Refer to the results of the complete template shown on the
RIGHT. An actual copy of this
template is added at the end of
this manual. To save time and
avoid confusion, ONLY the differences from Chapter 3 are covered. All the details of making
the rest of the template can be
found in Chapter 3 and should be
understood.
Extra helpful functions
A function that is a help in
visualizing where your fill in
text are located in the final report is the preview report function. Set the check and it will show these text blocks. The
purpose of this function is help you see what is keyed or protected. If this function is left on you will not see the results
of colors, which can be confusing. To make this clear, functions such as border color will seem to have no effect if this
preview report function is left on. This function is intended only for viewing and should be left off.
An important function is refresh. Click on this to remove ARTIFACTS or GARBAGE from your template work and
to CLEAN up.
User’s Manual
15
Making a template with two images
Placing the company logo.
WHITE area.
We have created a company logo using
word and then saving it as a bmp. You
can load this template and then experiment with the logo in Sample template
2.
The import function is used to place files
on the template.
.
Step 1 Obtain the LOGO
CLICK the mouse on the File Menu, and
then click on import. Find your LOGO
and then double click on it to load it into
the template. You do not care where it is
positioned at this time. This logo is not
transparent and will cover parts of the
template that it falls on. Leave transparent off for this work.
Handles
Step 2 Size and shape the logo.
Click on any of the black rectangles,
called handles. While holding down the
mouse button drag these to proper size
the rectangle. When the size is correct
you can position the finished logo.
NOTE - make sure that aspect is
turned on with a check mark in the
speed menu. Get this menu by placing
the mouse on the logo and then right
clicking the mouse. As long as this
function is on, you can resize the logo
as desired. Drag the handles up,
down, left, or right, or even diagonally.
A drop down import selection dialog
shows the kind of files that can be
loaded with this function.
CLICK on Key to protect your work on
the Logo, or imported file.
User’s Manual
16
Placing a border around
sections of the template.
Create the CUSTOMER, LOCATION, COMPONENT, and CONNECTION, text, with its noneprotected fill in text blocks. These
are shown in color. Be sure to protect the headings, such as customer,
etc., with the KEY.
Once again, refer to Chapter 3 of
this manual for information you
need to create this text block.
Draw a border
CLICK on the OBJECTS menu and
CLICK on Rectangle. A white rectangle will drop on the template. Use
the handles to drag this rectangle
over the section of text described
above. If these handles, indicating
selection do not come up at once,
click the mouse anywhere off the
rectangle, and then click on the rectangle.
Handles
Then RIGHT CLICK the mouse on
the rectangle which covers the section of text, and CLICK on Transparent. The section of text becomes
visible through the rectangle just
placed OVER the text, because it
not has the transparent attribute.
If desired you can make the border
darker and heavier. Do this by
selecting the rectangle so that the
handles show. Then place the mouse
curser exactly on the border and
then right click, and then click on
Line Width. Use the resulting dialog
to set the border width to any thickness desired. When done CLICK on
KEY to protect it.
This places one border around the
text object. You may elect to use a
border or none at all of course.
You can also make a double line
around the text block. Place one
more rectangle and position and
size for double line. Set the line width and make transparent. And you can even make this any color you wish
17
Making a template with two images
Placing two images in a
template.
A template marks all the properties
you associated with a thermal or
visual image in a BLACK PLACE
HOLDER. These are marked as
thermal or visual. All changes,
and editing are done in exactly
the same way you change any
object you place in a template.
Place a thermal image as described
in the chapter 3 by clicking on
Thermal Image, and laying down a
black thermal place holder. You
can place the color bar when you
are making a report, so be sure to
allow for this possibility.
Then CLICK on Visual Image. Size
and position this rectangle correctly
so that the final size of the visual
image becomes reasonable. IT IS
VERY IMPORTANT TO HAVE
ASPECT RATIO ON, to insure
that the final report will look correct. Aspect ratio was covered in
the Placing a Logo section. THE
RULE IS - and image will be
adjusted to fit into any size place
holder you make.
Date Field
Use these functions to
create a thermal and
visual place holder.
Once the template is made you
can’t adjust the image size while
making a report. You can if you
wish place a thermal and visual
image in the Image Editor to help
visualize the final results. You must
then mark the images manually as
visual and thermal. The result is
that these images will always be
present in the template. Clearing
these out is a matter of several extra
steps.
File Date
You can place a field called a date
field under the image as shown
above. This will provide a date on
which the image was created. Click
on File Date in Fields menu and place the File Date in the desired position
User’s Manual
18
Using difference field
A difference field will report the
temperature rise of a Fault over a
Reference temperature.
Included in the software are the
labels Fault, and Reference. When
you use Point 1 it will have automatically a label Fault. Point 2 will
have Reference.
CLICK on Fields and then CLICK
on Temperature difference.
Assume you plan on 2 points, a
Fault, and Reference. These have a
DEFAULT label associated with
them.
Result
Step 1
Step 2
Step 4
Step 3
Ignore the software place holder
Const OC-Const 0C.
Step 1
CLICK on Left Side.
Step 2
CLICK on Point 1.
RESULT Point 1 - Const OC
Step 3
Click on Right Side
Step 4
Use the up down arrow to set index
to 2. And Click on Point
Result
Point 1-Point2
This is your equation - the software
will take Point 1 and subtract it
from Point 2 giving you a rise in temperature over a reference. In a report any annotations including the one in this
difference dialog will show as Fault - Reference.
19
Making a template with two images
User’s Manual
20
CHAPTER 5
Creating a report with
two images
Introduction
Creating this report with a thermal and visual image
is very similar to what was described in chapter 2.
STEP 1
Caution: Always select a thermal image first, and
then a visual image. This assumes that you will
always have these two images. If you do not, use
cancel as described in Step 4.
STEP 1
Place mouse here and CLICK.
Tool tip - Quickly create a report from a template.
STEP 3
CLICK on this item in the TOOL BAR. This tool
is located on the right side of the tool bar.
STEP 2
STEP 4
DOUBLE CLICK on sample template 2.eic-tem.
This template was setup in Chapter 4.
Step 3
When you load this template, a thumbnail directory
of images will be displayed. Double CLICK your left
mouse button on thermal 2.eic-img. load
the image into the Image Editor and the Report.
Notice the windows screen says Select the Thermal
Image as shown to the right.
Point Temp
tool
Step 4
When Step 3 is done, the windows screen says Select
the Visual Image. CLICK your left mouse button on
A
visual 2.jpg. If you do not have a
visual image click cancel on the bottom
of this screen.
B
Step 5
Click on Windows and then click on Thermal 2.eicimg.
A. Click on the point temperature tool. Note that
this tool is already selected. Release the mouse
button, move to another position, and then RIGHT
CLICK to access a SPEED MENU. This only works
if you are careful not to deselect (handles go away)
the temp tool.
User’s Manual
C
21
Creating a report with two images
Click on Set Color, and then change color to
RED. Red was selected to be most visible on
the final printed report.
B Click on Set Font. Set the Font to 36
C Click on Set Line Width. Set the line to 5.
This is usually visible on a printed report.
The results of your work is shown to the right.
Step 6
Click on Windows and then click on Thermal
2.eic-img.
Repeat Step 5 for a Reference temperature. Do
not change the color since white is very visible
on a black area of the image.
The results of your work is shown to the right.
If you are curious about where the labels Fault
and Reference came from, CLICK on OBJECT
menu and CLICK on Assign Labels. In this
control you can change the label to anything
you wish.
A
B
Step 7
CLICK on Windows and then CLICK on
Visual 2.jpg.
You should place an arrow at the location of
the Fault temperature.
A. Click on the ARROW ANNOTATION
tool. Release the mouse button, move
to another position, and then RIGHT CLICK to
access a SPEED MENU. This only works if
you are careful not to deselect (handles go
away) the tool.
B Click on Set Line Width. Set the width of
the arrow at 28.
The results of your work are shown to the right
User’s Manual
22
Step 8
CLICK on Windows
and CLICK on Report
to go back to the report
you are making.
The results are that the
thermal image has a
fault and reference and
that the temperature rise
has been filled in. The
visual image has a very
visible arrow.
Step 9
Complete the report by
filling in the areas that
are colored (remember
this is fill in areas).
The completed report is
shown on the next page. A printed example is included with this report. This report is not intended to reflect the
contents of reports for commercial use, and is intended primarily to illustrate more advanced steps in making a
report.
23
Creating a report with two images
The completed Report
User’s Manual
24