1
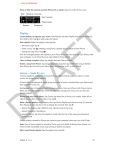
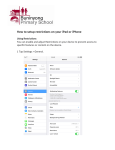
iPad 101: Getting to Know Your Device Presented by Steven Butler Part 1: Getting to Know the iPad The iPad is a powerful tool that can be used to complete many aspects of tasks that used to require a personal computer. With the apps that are now available, it is possible to create, edit and annotate documents using nothing but an iPad. Before you can get started in some of the higher level aspects of using the iPad for productivity, it is important that you know how to navigate around the user interface. Since a keyboard is an optional accessory, the iPad was designed to be used primarily with touch. The problem is that with only one navigation button (the home button), some tasks are not as intuitive as you would expect. GETTING TO KNOW THE USER INTERFACE . First it is important to know what everything on the iPad is called. This H o m e Bu tton will allow you to better understand how to navigate your device. The sole button on the front of the device (just below the screen), is called the home button. This is the button you use to wake up your device, exit apps and to access the multi‐tasking menu. If you are in an app, clicking the home button takes you back out to the home screen. If you have multiple home screens, you can always return to your main home screen by clicking the home button while in a different screen. Additionally, double‐pressing the home button brings up the multi‐tasking menu. This menu allows you to quickly switch between apps, or to close an app. Once you bring up the multi‐tasking menu, you simply click on the app that you want to switch to, or if you want to close an app you swipe up from the preview window. (This October 16, 2014 1 iPad 101: Getting to Know Your Device Presented by Steven Butler will force close an app if you find the app has become unresponsive). The multi‐tasking menu is especially useful when you are working on things like briefs. The other buttons on your device(when holding in portrait mode) are the power button that is on the top of the iPad, the mute/orientation switch on the right side of the device (near the top), followed by the volume up and down buttons. These buttons are really self‐explanatory, with the exception of the mute/orientation lock. This switch is configured in the settings, and is the only button that you get any customization choice with. Power Button Mute/Orientation Lock Volume To determine how the side switch will be used, you have to go into the settings app. Once you open settings, click on “General” (which should be in the third group of settings), and near the middle of the general settings, there is an option “USE SIDE SWITCH TO”. If you would like the switch to be used to easily mute your iPad, select “Mute”. If you would prefer to use the switch to quickly lock the orientation of your device (this means that even as you turn your device from portrait to landscape, it will not change the screen), select “Lock Rotation”. If you do a lot of reading on your iPad, and have problems with the page switching orientations on you when you don’t want it to, you may want to choose to have the switch “Lock Rotation”. If you are having a difficult time choosing what you want to use the switch for, don’t worry, I will also show you a shortcut to get to the one you didn’t select when we get to control center. October 16, 2014 2 iPad 101: Getting to Know Your Device Presented by Steven Butler Bonus Tip: There are some hidden features that you can access with the power button and the volume up key. If you press the power button and the home button at the same time and then let go, you capture a screenshot (I use that for doing things like preparing these materials!). If you have the camera app open, you can use the up volume button to snap a picture. Finally if you have completely froze your iPad and it won’t respond to anything, holding down the power button and the home button at the same time will usually force a reset. Just wait for the Apple logo to appear and then you can let go. NOTIFICATION CENTER , CONTROL CENTER , SEARCH AND MORE ! Now that the easy things are out of the way, let’s learn what you can access with gestures. Gestures are used not only to access features of the iPad, like Control Center, Spotlight Search, and Notification Center, but to also increase your productivity by allowing you to quickly exit apps, switch apps, and to access the multi‐tasking menu. Notification Center Notification Center houses app notifications and today widgets (calendar, reminders, and event summary). Notification Center can easily be accessed by swiping down from the top of your screen. Start your swipe at the bezel and pull down. Once you pull down the notification shade, you can see any notifications that you have missed. This could include messages, reminders, or apps communicating information with you. The Notification Center is a powerful tool, but honestly it is one that is rarely used. By default, the notification center can be accessed both when your device is unlocked and locked. Even if you allow it on the lock screen, you can individually decide whether you want an app to be able to notify you when the screen is locked. October 16, 2014 3 iPad 101: Getting to Know Your Device Presented by Steven Butler To fine‐tune your Notification Center options, open the iPad Settings app, and select Notification Center. Within the Notification Center options, there is a section titled, “Access On Lock Screen”. This is where you decide whether to show the Today View (your calendar and reminders) and Notifications on a locked device. (These instructions are for iOS 7, if you have already upgraded to iOS 8, you access the option of whether to show notifications on your lock screen within the Passcode settings panel. Once you are in the passcode section, you can turn off an on access to Notifications and Today within the “Allow Access When Locked” settings panel.) If you want to have access to some notifications on your lock screen, but not all, this is accomplished by fine tuning your Notification settings on an app by app basis. Again you open settings, but then you click on the app within the Notification settings that you want to fine‐
tune. In the example on the right, you can see the various options that you have within individual apps. You get to choose whether you are prompted by the app when it wants to notify you by choosing “Alert Style”. Even if you select “None” for the alert style, the app can still put messages in the “Notification Center” if you have “Alerts” configured to “Show in Notification Center”. Finally this is also where you decide whether to “Show on Lock Screen”. October 16, 2014 4 iPad 101: Getting to Know Your Device Presented by Steven Butler Control Center Now that you have the Notification Center figured out, it is time to learn about Control Center. Control Center is a lot less cluttered than Notification center, but it includes shortcuts to making various setting changes to your device. Within Control Center, you can adjust the volume of your iPad, change the brightness setting, and enable or disable Airplane Mode, WiFi, Bluetooth, and Do Not Disturb. Control Center also hosts the settings for Air Drop (for sharing files), and AirPlay (for sharing your display or sound with compatible devices). Accessing Control Center is quite easy. You simply swipe up from the bottom of your screen. Like notification Center, it is best to start swiping from just below the screen (with your finger on the bezel). Once you swipe up, you can let go and Control Center should be showing. Airplane mode, WiFi, Bluetooth, and Do Not Disturb Settings are signified by circular icons in the center of Control Center. If the icon is white, the setting is on. If the icon is black, the setting is off. The fifth circular icon will be different depending on whether you are using your side switch for Mute control or Orientation Lock. If the side switch is being used for Mute, the fifth icon is used to control Orientation Lock. If the side switch is being used for Orientation Lock, you will have a mute setting here. Further Detail: Do Not Disturb is a setting that allows you to work distraction free. When Do Not Disturb is enabled, notifications do not sound or show on your screen. Do not Disturb can be scheduled to come on automatically at set times, or it can simply be enabled manually. Within the Do Not Disturb Settings in the Settings App, you have options to “Allow Calls From” certain contacts, to allow repeated calls, and to have Do Not Disturb enabled “Always” or “Only while iPad is locked”. During presentations and Court Appearances, I always try to remember to enable Do Not Disturb. October 16, 2014 5 iPad 101: Getting to Know Your Device Presented by Steven Butler AirDrop and AirPlay show you whether they are enabled by their color. If AirDrop is in white, you have it enabled. AirDrop allows you to quickly share documents, photos, or contact information with other iOS users nearby. If AirPlay is in white, that means that you are currently exporting your sound or video to another device. There are also two icons on the right side of the Control Center that allow quick access to both your Clock and your Camera. Finally, on the left side of control center, you have buttons for controlling the sound or video on your device. The back, play and forward buttons will control whichever app was last playing a media file. Just like Notification Center, Control Center is available on your Lock Screen by default. Unlike Notification Center, you cannot fine tune Control Center access on the Lock Screen. You can either access Control Center or not. My recommendation for the legal community is to disable Control Center on the Lock Screen. This is because if it is enabled, a malicious person could easily disable Find My iPhone by placing your iPad in Airplane Mode if they stole it. To disable access to control center on your Lock Screen, simply go into the iPad Settings app, select Control Center, and then turn off “Access on Lock Screen”. Spotlight Search Of the basic skills that are needed to navigate the iPad, the Spotlight Search is probably the one I use most. Spotlight Search is a powerful tool for finding information on your iPad. You can use Search to find installed Applications, Contacts, eMail Messages, Music, Notes, Calendar Events, Reminders or even Messages. To perform a search in iOS 7 or above, you simply swipe down on your screen when you are on a home screen (any screen with the grid of icons). Tip: Since the gesture for bringing up Spotlight Search is similar to the gesture used to access Notification Center, I normally suggest that you begin swiping from somewhere in the center of the screen when you want to use Search. Once you swipe down, a search box will show at the top of your screen (just below the status bar). From here, you just start typing in your search term. You will see results from any of the categories that you allow Spotlight Search access to. Once the results are showing, you can click on the result you want to select or swipe up and down the list to see more results. To dismiss the Search results, you just press the home button or press “Cancel” next to your search term. October 16, 2014 6 iPad 101: Getting to Know Your Device Presented by Steven Butler If the item you press is an Application, that app will launch for you. If your result is an email message, it will open the message, and if it is a contact, it will open up your Contacts app with that person selected. Bonus Tip: If you have a lot of apps installed on your iPad, and you don’t always remember which screen or folder the app is in, using Spotlight Search allows you to quickly find and launch the app. The most important setting for Spotlight Search is what information you want to be searchable. To access Spotlight Search settings, open up the iPad Settings app. Select General settings, then within the General category, you will see Spotlight Search. Once in the Spotlight Search settings, you can arrange the order of the results by dragging the category up and down the list. If you do not want a category to appear in your results, you press it to deselect it. Any item that currently shows in your searches will have a check mark next to it. There no other settings that you have to worry about, and the search is performed locally on your iPad. October 16, 2014 7 iPad 101: Getting to Know Your Device Presented by Steven Butler Multi‐Tasking Gestures Multi‐Tasking Gestures can be enabled in the iPad Settings app and allow you to complete several tasks without using your home button. If the Gestures are turned on, you can use four or five fingers to show your home screen, bring up the multi‐tasking menu, or switch apps. To show your home screen, you simply make a pinching gesture with your hand on the screen. In other words, spread out your fingers in a circle and while touching the screen, close your fingers together. To bring up the multi‐tasking menu, you simply drag four fingers up your screen. Finally, if you want to swipe between your most recently launched apps, you drag four fingers left or right on your screen. To enable Gestures, go to the iPad Settings app. Within Settings, choose General, then make sure that the Multitasking Gestures setting is set to enabled. READ THE MANUAL ! Having mastered the basics of Navigating your iPad, your thirst of knowledge probably has you longing for more. Luckily, Apple has enough money to hire much better writers than me. Even though a manual is not included in the box with your iPad, Apple is generous enough to make one available on the web or as a free download within iBooks. (Don’t ask me why they don’t automatically install it for you, maybe they are afraid that with such important apps like Newsstand, Stocks, Passbook and Podcasts taking up space you will run out of room?) For the web‐based version of the user manual, visit http://support.apple.com/manuals/. You will find links for a PDF version of the User Guide, PDF version and iBook version. As new versions of iOS are released, the manuals are all updated. The PDF of the iOS 8 iPad User Guide has plenty of detail for you and comes in at about 160 pages. If you are running an older version of iOS, select the option to “Browse by Product” on Apple’s User Manual page, and you can find older versions of the User Guide. October 16, 2014 8 iPad 101: Getting to Know Your Device Presented by Steven Butler You can also download the manual directly from the Apple iBooks app. If you are not sure if you have iBooks installed, use a Spotlight Search to try to find it. If iBooks is not installed, it can be downloaded for free from the Apple App Store. Just search for iBooks and install it. Once you launch iBooks, you can select any of the buttons on the bottom of your screen, other than “My Books” to browse the iBooks store. Once in the iBooks store, use the search box in the top right of app to search for “iPad User Guide”. In the results, you want to find the User Guide that is published by Apple Inc. It is likely that books by other publishers will be in the search results, just make sure to select the Guide published by Apple that corresponds to your version of iOS (it will definitely be one of the free options). Once you download the User Guide, it will be available within “My Books”. Simply press My Books, and it will be one of your options. You can then learn more about the iPad in any of your free time. Bonus Tip: You can determine your version of iOS by going to the Settings App and selecting General, then “About”. Within “About” you will find the version of iOS you are running about midway down the screen. You can also find your model number in this screen. The iOS version is straightforward and gives you the exact version number. The model number is a little more cryptic (combination of letters and numbers), but if you do a quick web search of the model number, it will easily identify what generation of the iPad you are running. October 16, 2014 9 iPad 101: Getting to Know Your Device Presented by Steven Butler CONCLUSION Having completed this lesson, you should now be able to use Notification Center, Control Center, Spotlight Search, Multitasking Gestures, and know how to access the iPad User Guide published by Apple. This knowledge provides you with the basic skills needed to use your iPad effectively. You can now search for information on your device, quickly change settings, manage notifications, and switch between multiple apps quickly by using gestures or the Multitasking Menu. You also now know how to disable features that potentially make your device less secure. With this general knowledge, you now can transition to using apps for creating and editing documents. October 16, 2014 10