1
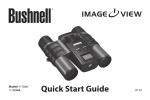
Magnify
Capture
Save
5M P C a m e r a w i t h
22x m ag n i f i c at i o n
D i g i ta l s p ot t i n g s co p e
User Manual
Model: 111545
Lit. #: 98-1411 / 02-12
English
2
3
Parts and Controls Guide
English
(G) LCD Display
(K) Remote
Jack
(L) USB
Port
(D) OK/PLAY
Button
(M) Card
Slot
(E) SNAP
Button
(C) Up/Down
Arrow Keys
(N) Zoom
Ring
(H) Power
LED
(J) Diopter
Adjustment
(A) ON/OFF (B) MENU
Button
Button
(O) Focus Knob
(F) Eyepiece/Camera
Select Slider
(I) Battery
Compartment
3
BASIC SETUP
Loading Batteries
Slide the battery cover (I) open in the direction indicated by the arrow, then swing it out to the right. Insert two
“AAA” Alkaline or Lithium batteries into the compartment in the direction indicated inside, then replace the
cover, sliding it back into place until it clicks. Note: Rechargeable NiMh type batteries may also be used, but
some may not deliver adequate current to power the camera and display.
By default, the ImageView scope will automatically power off if no buttons or controls have been pressed for
two minutes. This helps save power and extend battery life when the camera is accidently left on. However,
when you are first learning to use your ImageView you may want to keep the power on as you become familiar
with the features and controls. This can be done by changing the “Auto Power Off” option in the Setup menu
to “Off” (please refer to the “Main Menu-Options and Settings” section of this manual).
Inserting An SD Card
The camera has no internal memory, and must be used with an SD or SDHC memory card (not included, up
to 32GB capacity). If no card is inserted, the display will indicate “No SD Card” when the ON button is pressed.
Insert your SD card into the slot (M) on the left side of the scope (move the rubber cover flap out of the way-see
“Parts & Controls Guide” ), label side up with the “notched” corner on the right as indicated by the card icon
below the slot. Note: be sure the power is turned off before inserting or removing cards to prevent possible
loss of files or damage to the card. A new card will not require formatting, but a card that has been previously
used in other devices (cameras, mp3 players, etc) should be formatted by the ImageView scope before you
start taking photos (see “Format” in “Main Menu-Options and Settings”). Note that formatting will erase all files
previously stored on the card, so be sure they have been downloaded and saved on your computer first if
you wish to keep them.
4
BASIC SETUP
Setting the Diopter Adjustment
Before you begin taking photos, a simple one-time adjustment may be made to ensure that you can switch
over to “Camera” mode and take a sharp photo of any subject once you have it focused in the scope’s eyepiece.
This process will compensate for any variations in the eyesight or vision of the individual user:
1. Leave the rubber eyecup in its “up” position if you are not wearing glasses, or roll it down if you are.
2. Raise the LCD display (G) and move the slider (F) to the “Camera” position. Point the scope at a distant
object with fine detail such as a tree or sign, and adjust the Focus knob (O) until it appears as sharp as
possible on the display screen.
3. Move the slide lever back over to the “Eyepiece” position, and set the Zoom ring (N) so the green dot
(just left of 15x) is lined up with the red index dot. This is roughly the same magnification as what the
camera captures (about 22x). Look through the eyepiece. DO NOT READJUST THE FOCUS KNOB. If the
subject does not appear sharp to your eye, rotate the rubber diopter adjustment ring (J) at the base of
the eyepiece. This compensates for any difference in between your vision and the correct focus for the
camera’s digital sensor and LCD display.
Once set, note the position of the silver dot on the diopter adjustment ring relative to the “+ /0 / -” scale on
the scope. With the diopter adjustment set to this position, you should be able to get sharp photos/videos
of a subject at any distance by simply adjusting the main focus knob while you look through the eyepiece,
then switching over to “Camera”. There is no need to re-adjust the diopter adjustment, unless you share the
ImageView scope with another user, or if your eyes become tired over a long period of use.
For important shots, you may want to take the precaution of double checking focus on the LCD display too. If
you are having trouble fine tuning focus when viewing the LCD, try pressing the UP arrow key (C) to zoom in
(up to 4x digital zoom is available), then focus. Be sure to use the DOWN key to zoom back to 1.0x (no digital
zoom, optical magnification only) after you adjust the focus if you do not want to use digital zoom when you
take the photo.
5
TAKING STILL PHOTOS
Taking Still Photos
After completing the basic setup as described on the previous pages, you are ready to take a photo:
1. With the ImageView scope securely mounted on a tripod, raise the LCD display (G) and briefly press and
release the ON/OFF button (A)-the power LED (H) lights and the startup screen is displayed, followed by
the live image from the camera lens. The display also shows the battery condition, number of photos
remaining, and the current resolution/quality settings. (Fig. 1, DISPLAY ICONS/MENU SCREENS)
2. The ImageView scope is already set up for high resolution and quality, as well as automatic exposure and
color balance when it is turned on for the first time, so you’re ready to take photos under most conditions
with no need to change anything. For more details regarding the various available options and how to
change the settings from their defaults, please refer to the “Main Menu-Options and Settings” section
in this manual.
3. When the Eyepiece/Camera (F) select slider is in the “Eyepiece” position, the image formed by the
objective (front) lens is directed to the eyepiece rather than the digital camera sensor, so the LCD display
will not let you see the “live image”. In other words, the ImageView operates just like any conventional
spotting scope with no camera. The scope’s zoom eyepiece provides optical zoom from 15x to 45x
magnification, while the camera’s magnification is fixed at approximately 22x. If you want to preview
the framing of your subject as you are looking through the eyepiece prior to taking a photo, rotate
the zoom ring so that the green dot on the ring is opposite the red index dot (this sets the eyepiece to
about 22x magnification). When you are ready to take a photo, be sure to move the slide lever over
to “Camera”-otherwise your photo will be partially or entirely black. Also, you will then be able to use
the LCD display for preview and review as you take photos-however, it is possible to take photos/videos
without raising or viewing the display, as long as the slider is in the Camera position.
4. Although the SNAP button (E) on the scope may be used to take photos, it is highly recommended that
6
TAKING STILL PHOTOS
you plug the supplied remote shutter cable into the “Remote” jack (K) to obtain sharper results, free
of vibration. Press the button on the remote to take a photo. The display will black out briefly, before
showing the captured image for a second or two. The “blackout” is normal as the image is being stored
on the SD card, especially with high resolution images that generate large files. When the display icons
reappear, you’re ready to shoot again.
5. The “remaining photos” counter at the top of the screen will drop by one number after each photo (or
two, depending on your subject and settings) is taken. When the display indicates “Disk full” when SNAP
is pressed, you are out of card memory (file storage space), and will need to download the photos you
have taken so they can be deleted to make room in the memory for new photos, or you may remove the
SD card and install a new card if you are on a trip away from your computer.
6. For additional magnification while taking photos, digital zoom is available. Press the UP arrow key to
zoom in. You will see the result on the live preview display screen, as the digital zoom indicator increases
(in 0.2x increments up to 4.0x). Press the DOWN arrow key to zoom back out. To turn off all digital zoom
(22x optical magnification only), keep pressing or hold the DOWN key until the zoom indicator goes
back down all the way to “1.0x”.
7. To review a photo after you take it, press the OK/PLAY button twice to enter Review mode. To see
previous photos, press the UP arrow key-each press takes you back one photo, and pressing the DOWN
arrow key moves forward towards more recent photos. Press the OK/PLAY button again to return to
the Still Photo mode (live preview). See the section “Review Menu-Options and Settings” for details on
deleting photos and protecting important photos.
NOTE: Use care during handling to avoid touching the exposed lenses of the ImageView spotting scope to prevent degrading the image
quality. Clean the lenses only with camera lens cleaning tissue or microfiber cloth, after removing loose dust or dirt with a blower brush
or “canned air”. Camera lens cleaning fluid may be used if necessary (lightly moisten the lens tissue, do not apply directly to the lens),
avoid the use of other liquids of any type.
7
Shooting Videos
Shooting Videos
To switch from Still Photo to Video mode, press OK/PLAY once. The Video mode icon (movie camera) will
appear at the top left corner of the LCD (Fig.3, DISPLAY ICONS/MENU SCREENS), indicating you are in Video Mode.
Press the SNAP button (preferably on the remote cable) to start recording a new video clip, and press it again
to stop recording. The recording time is limited only by the amount of memory currently available on the SD
card. You may record a single long video until you run out of memory or multiple shorter videos by stopping
and starting recording whenever you wish by pressing SNAP. The counter at the top of the display shows the
time elapsed since the recording was started.
Videos are recorded as “.avi” format files, with VGA resolution (640x480 pixels per frame, 30 fps rate). Note that
the “Quality” and “Image Size” settings in the Main menu do not affect videos, only still photos. See “Video
Menu-Options and Settings” if you would rather shoot lower resolution (320x240) videos for a reduced file
size.
Press the OK/PLAY button to enter Review mode if you wish to watch a video after you shoot it. Press the
SNAP button to begin playback, press it again to stop playback. During playback, the counter at the top of the
LCD displays elapsed time. Press the UP arrow key to review previous video or still photo files. Press the OK/
PLAY button once to exit Review mode and return to Still Photo mode, or press it twice to enter Video mode
again if you want to shoot more videos.
8
DISPLAY ICONS / MENU SCREENS
Fig. 1
Still Photo Mode
(Live Preview
Screen)
White Balance
Photo or
Video Mode
Scene
Preset
Remaining
Photo Capacity
Card Inserted
Resolution
Quality
ISO (Auto)
Exposure
Battery
Level
Fig. 2 Main
(Setup) Menu
Fig. 3 Video Mode
(Live Preview)
Fig. 4 Review Menu
9
MAIN Menu-Options and Settings
The Main Menu-Options and Settings
As mentioned earlier in this manual, your ImageView spotting scope is already set for high resolution and
quality right out of the box. Exposure, white balance, and other variables are set automatically. This means
that you will get good results for most subjects and lighting without the need to go into the menu to change
any settings. However, we recommend that you become familiar with the options available in the Setup
Menu (Fig.2, DISPLAY ICONS/MENU SCREENS) so that you can improve your photos if, for example, you decide they are
coming out too dark (common for snow scenes with most cameras), or too blue (on an overcast day or in the
shade). Here are the steps for changing the settings of some of the most commonly used options:
Setting the Menu Display Language
(English, French, Spanish, German, Italian, Portuguese, Chinese 1, Chinese 2)
This option allows you to select your preferred language for all menu screens. Raise the LCD display (G) and
press the ON/OFF (A) button. Press the MENU button (B) to enter the Setup Menu. Press the UP arrow key (C) 3
times to highlight “Language”, press OK/PLAY (D), select your language with the UP/DOWN arrow keys, then
press OK/PLAY to confirm the setting. Press MENU to return to Still Photo mode (live preview screen).
Setting the Date and Time/Imprint Option
This setting will ensure that the date and time will be correct, and provides the option to imprint it on your
photos/videos. After pressing MENU to enter the Setup menu, use the UP/DOWN arrow keys to highlight
“Date”, and press the OK/PLAY button. Select “Set Date”, press OK/PLAY. Set the date and time, using the UP/
DOWN arrow keys to make changes, and pressing the SNAP button to lock in each setting and move to the
next field. Note: the time setting uses the 24 hour format (2 PM=14). Finally, select the date format you prefer
(e.g., MM/DD/YY).
10
MAIN Menu-Options and Settings
After you finish setting the date & time, press the OK/PLAY button to return to the live preview screen (still
photo mode). If you want the date and time to be imprinted on your photos and videos, change the setting
under “Date” in the Setup menu from “Off” to “On” by selecting “On” with the UP arrow key, then pressing OK/
PLAY.
Changing the Auto Power Off Time
By default, the ImageView scope will automatically turn off after two minutes of inactivity (no buttons
pressed). This helps to extend the battery life. However, when you are first learning to use the camera you
may want power to remain on longer, while you get familiar with the features and controls. To change this,
press MENU to enter the Setup menu, use the UP/DOWN arrow keys to highlight “Auto Power Off”, and press
the OK/PLAY button. Select “Off” if you want the power to remain on until you turn it off manually with the
ON/OFF button (A). Press OK/PLAY to confirm your setting, then exit the Setup menu by pressing MENU.
Formatting an SD Card
Before you begin using an SD card that was previously used in other devices, you should prepare it to store
the ImageView camera’s files by formatting it. Note that the “Format” operation will erase all files on your card
-make sure you have first backed up any files you wanted to keep. Press MENU to enter the Setup menu. Press
the UP arrow key twice to select “Format”, then press OK/PLAY. Press the UP arrow key to highlight “OK”, then
press OK/PLAY. Press SNAP to highlight “Yes” (this extra step helps prevent accidently erasing all your photos-just
stay on “No” and press OK/PLAY to avoid formatting), then press OK/PLAY to format the SD card. You will then
be returned to the Still Photo mode live preview screen.
11
MAIN Menu-Options and Settings
Using the Other Menu Options and Settings
Press the MENU button to enter the Main menu. Use the UP/DOWN arrow keys to highlight an option within
the menu, then press OK/PLAY if you wish to change the settings for that option. Use the UP/DOWN keys
to select the setting you want, then press OK/PLAY to confirm this setting. Press SNAP to move to the next
section of the menu (Scene>Image Size>Setup). Press MENU at any time to exit the menu and return to the
live preview screen. Here are all the options and settings available in the Main menu, along with descriptions
of what they do (default settings are indicated in bold):
OPTION
SETTINGS
DESCRIPTION
SETUP Submenu (Use Up/Down arrow keys to highlight desired option, then press OK/PLAY to select it)
12
Exposure
-3 to +3 EV (default=0)
Provides manual under/over exposure adjustment . Minus
values produce darker photos, plus values lighter. When a
subject is mostly bright (snow scene), you may need to add
some “+” EV to avoid underexposure.
ISO
Auto, 100, 200, 400
Sets the sensor’s sensitivity to light. “Auto” will
automatically select lower ISO in bright light, higher ISO in
lower light.
White
Balance
Auto, Daylight, Cloudy,
Incandescent, Fluorescent
Sets the reference for neutral white, so that colors are
reproduced correctly. If “Auto” does not provide good
results, try the setting that matches the light source.
MAIN Menu-Options and Settings
OPTION
SETTINGS
DESCRIPTION
Sharpness
Normal, Sharp, Soft
Sets the amount of sharpening applied by the internal
processor. You may want to select “Soft” if you prefer to add
sharpening later using photo software on your PC.
Quality
Super, Fine, Normal
Sets the amount of .jpg file compression, which affects the
quality of the photo and the size of the file it creates. This
can be used independently of Image Size to store more
photos with lower quality if you choose. “Super” produces
the highest quality, but also generates larger files that fill
available memory quicker.
Date
On, Off, Set Date
Set Date and then select “On” to imprint date & time on
photos.
Auto Power
Off
1 minute, 2 minutes, 3
minutes, Off
Sets the interval after the last action (pressing any button)
before the camera turns off to conserve battery power.
Select “Off” to prevent auto shutoff altogether. Default
setting is power off after three minutes elapses.
Language
English, Spanish, French,
German, Italian, Portuguese,
Chinese 1, Chinese 2
Selects preferred language for all menu display screens.
Frequency
50 Hz, 60 Hz
Set to the AC line frequency for your country. Mainly affects
videos shot under fluorescent lighting.
13
MAIN Menu-Options and Settings
14
OPTION
SETTINGS
DESCRIPTION
Format
OK, Cancel
Press the UP arrow key to highlight “OK” and press OK/
PLAY. Press SNAP to highlight “Yes”, then press OK/PLAY to
erase all files on the SD card and return to the live preview
screen. When an SD card is inserted that has been used
previously in other devices, formatting it before starting to
take photos is recommended (be sure any files you want to
keep have been downloaded and backed up first).
Default
Setting
OK, Cancel
Select “OK” and press OK/PLAY to restore all settings for
all options (in all menus) to their original factory default
settings.
IMAGE SIZE
(press SNAP
from Setup
Menu)
8M*, 7M*, 5M, 3M, 2M, VGA
* via software interpolation.
Actual sensor resolution is
5MP.
Sets resolution for still photos in pixels/megapixels. Higher
resolution settings produce sharper/larger prints but
require more space on the SD card. Use lower settings to
store more images on the SD card, or for email.
SCENE (press
SNAP from
Image Size
Menu)
Auto, Scenery, Sport
“Scenery” preset increases depth of field for landscapes.
“Sport” preset sets shutter speed as high as possible for the
current light level.
VIDEO Menu-Options and Settings
The Video Menu-Options and Settings
To view the Video menu, the ImageView scope must first be in Video mode. From Still Photo mode (regular
camera icon at top left of the screen), press OK/PLAY once. The video camera icon appears at top left, and the
scope is now ready to shoot videos (press SNAP to start/stop a video recording). To enter the Video menu from
this preview screen, press MENU. The Video menu has just two options, white balance and image size (choice
of two video resolution settings). Within each option, use the UP/DOWN arrow keys to highlight the setting
you want, then press OK/PLAY to confirm. To move from White Balance to Image Size, press SNAP. Press
MENU to exit the Video menu and return to the video mode live preview screen.
OPTION
SETTINGS
DESCRIPTION
White
Balance
Auto, Daylight, Cloudy,
Incandescent, Fluorescent
Sets the reference for neutral white, so that colors are
reproduced correctly. If “Auto” does not provide good
results, try the setting that matches the light source.
Image Size
640x480, 320x240
Set the video clip resolution (pixels per frame)
15
REVIEW Menu-Options and Settings
The Review Menu-Options and Settings
The Review menu contains has three options related to reviewing your stored photos or videos. First, enter
Review mode-press OK/PLAY twice (the first press switches to Video mode). Use the UP/DOWN arrow keys to
step through your photos. Once you are already in Review mode, press MENU to enter the Review menu (Fig.4,
DISPLAY ICONS/MENU SCREENS). As described previously, use the UP/DOWN keys to select the setting you want,
then press OK/PLAY to confirm this setting. To move from Rotation>Protect>Delete, press SNAP. Press MENU
to exit the Review menu and return to the review mode screen. When finished reviewing images, press OK/
PLAY to return to the still photo mode live preview screen.
16
OPTION
SETTINGS
DESCRIPTION
Delete
Single, All
>(Cancel, Execute)
Select “This Image” to delete only the currently displayed photo/
video, or select “All” to delete all photos saved on the SD card
(be sure you have downloaded any that you wanted to keep
first). After pressing OK to confirm, you can still select “No” (if you
change your mind or selected the wrong option) or highlight
“Yes” (press SNAP), then press OK to delete the current photo or
all photos, depending on which selection you made in the first
step. Note: photos that have been “locked” cannot be deleted
(see “Protect”).
Protect
Lock, Unlock
Lets you protect the displayed photo or video from being
accidently deleted. See “Delete”
Rotation
90°, 180°, 270°, Cancel
Allows rotating photos that were taken with the scope oriented
in non-horizontal positions so they may be viewed more easily.
TWO-Year LIMITED WARRANTY
Your Bushnell® product is warranted to be free of defects in materials and workmanship for two years
after the date of purchase. In the event of a defect under this warranty, we will, at our option, repair
or replace the product, provided that you return the product postage prepaid. This warranty does
not cover damages caused by misuse, improper handling, installation, or maintenance provided by
someone other than a Bushnell Authorized Service Department.
Any return made under this warranty must be accompanied by the items listed below:
1) A check/money order in the amount of $10.00 to cover the cost of postage and handling
2) Name and address for product return
3) An explanation of the defect
4) Proof of Date Purchased
5) Product should be well packed in a sturdy outside shipping carton, to prevent damage in transit,
with return postage prepaid to the address listed below:
IN U.S.A. Send To: Bushnell Outdoor Products
Attn.: Repairs
9200 Cody
Overland Park, Kansas 66214
IN CANADA Send To:
Bushnell Outdoor Products
Attn.: Repairs
25A East Pearce Street, Unit 1
Richmond Hill, Ontario L4B 2M9
For products purchased outside the United States or Canada please contact your local dealer for
applicable warranty information. In Europe you may also contact Bushnell at:
Bushnell Germany GmbH
European Service Centre
Mathias-Brüggen-Str. 80
D-50827 Köln
GERMANY
Tel: +49 221 995568-0
Fax: +49 221 995568-20
FCC Compliance Statement:
This equipment has been tested and found to comply with the limits for a Class
B digital device, pursuant to part 15 of the FCC Rules. These limits are designed
to provide reasonable protection against harmful interference in a residential
installation.
Operation is subject to the following two conditions: (1) This device may not cause
harmful interference, and (2) this device must accept any interference received,
including interference that may cause undesired operation.
This equipment generates, uses and can radiate radio frequency energy and, if
not installed and used in accordance with the instructions, may cause harmful
interference to radio communications. However, there is no guarantee that
interference will not occur in a particular installation. If this equipment does cause
harmful interference to radio or television reception, which can be determined
by turning the equipment off and on, the user is encouraged to try to correct the
interference by one or more of the following measures:
· Reorient or relocate the receiving antenna.
· Increase the separation between the equipment and receiver.
· Connect the equipment into an outlet on a circuit different from that to which the
receiver is connected.
· Consult the dealer or an experienced radio/TV technician for help.
The device does not contain any user-serviceable parts. Repairs should only
be made by an Authorized Bushnell repair center. Unauthorized repairs or
modifications could result in permanent damage to the equipment, and will void
your warranty and your authority to operate this device under Part 15 regulations.
The shielded interface cable which is provided must be used with the equipment
in order to comply with the limits for a digital device pursuant to Subpart B of Part
15 of FCC Rules.
This warranty gives you specific legal rights.
You may have other rights which vary from country to country.
©2012 Bushnell Outdoor Products
Windows is a registered trademark of Microsoft Corporation in the United States and other countries.
Mac and Mac OS are trademarks of Apple Inc., registered in the U.S. and other countries.
Specifications and designs are subject to change without any notice or obligation on the part of the manufacturer.
17
DIGITAL SPOTTING SCOPE
For further questions or additional information please contact:
Bushnell Outdoor Products
9200 Cody, Overland Park, Kansas 66214
(800) 423-3537 • www.bushnell.com
©2012 Bushnell Outdoor Products
88