1
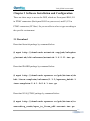
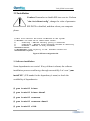
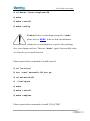
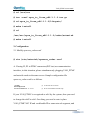
V100_PTMC user manual OpenVox Communication Co.Ltd V100_PTMC OpenVox V100_PTMC User Manual Date: 21th Feb, 2012 Version: 2.2 OpenVox Communication Co. LTD. URL: www.openvox.cn 1 V100_PTMC user manual OpenVox Communication Co.Ltd Most Advanced Asterisk Cards Address: F/3, Block No.127, Jindi Industrial Zone, Shazui Road, Futian District, Shenzhen, Guangdong 518048, China Tel:+86-755-82535461, 82535095, 82535362, Fax:+86-755-83823074 Business Contact: [email protected] Technical Support: [email protected] Business Hours: 09:00-18:00(GMT+8) from Monday to Friday URL: www.openvox.cn Thank You for Choosing OpenVox Products! OpenVox Communication Co. LTD. URL: www.openvox.cn 2 V100_PTMC user manual Copyright Copyright© 2011 OpenVox Inc. All rights reserved. No part of this document may be reproduced without prior written permission. Confidentiality Information contained herein is of a highly sensitive nature and is confidential and proprietary to OpenVox Inc. No part may be distributed, reproduced or disclosed orally or in written form to any party other than the direct recipients without the express written consent of OpenVox Inc. Disclaimer OpenVox Inc. reserves the right to modify the design, characteristics, and products at any time without notification or obligation and shall not be held liable for any error or damage of any kind resulting from the use of this document. OpenVox has made every effort to ensure that the information contained in this document is accurate and complete; however, the contents of this document are subject to revision without notice. Please contact OpenVox to ensure you have the latest version of this document. Trademarks All other trademarks mentioned in this document are the property of their respective owners. EMC FCC Part 15 Class B EN55022 Class B EN55024 Safety EN60950 OpenVox Communication Co. LTD. URL: www.openvox.cn 3 V100_PTMC user manual Contents General Safety Instructions ........................................................................................ 5 Test Environments ....................................................................................................... 6 Chapter 1 Overview ..................................................................................................... 7 1.1 What is Asterisk ................................................................................................ 7 1.2 What is V100_PTMC ....................................................................................... 8 Chapter 2 Hardware Setup ......................................................................................... 9 2.1 Hardware Introduction ...................................................................................... 9 2.2 Dip Switch Setup ............................................................................................ 11 2.3 LED Indicator ................................................................................................. 12 2.4 Hardware Installation Procedures ................................................................... 13 Chapter 3 Software Installation and Configuration ............................................... 15 3.1 Download ........................................................................................................ 15 3.2 Installation ...................................................................................................... 16 3.3 Call Test .......................................................................................................... 22 Chapter 3 Reference .................................................................................................. 24 Appendix A Specifications ........................................................................................ 25 Appendix B Transcoding........................................................................................... 27 OpenVox Communication Co. LTD. URL: www.openvox.cn 4 V100_PTMC user manual General Safety Instructions CAUTION 1. The PxCC that has V100_PTMC card installed must comply with the country specific safety regulations. 2. Only service personnel should install V100_PTMC card. 3. Before you install V100_PTMC card or remove the cover from your PMC carrier, Unplug the power cord from the computer. 4. For avoiding personal injuries and damage to your computer, and V100_PTMC card, make sure the card’s bezel is secured to the PMC carrier ’s Chassis ground by fastening the card with the screw. 5. Electrical Surges, ESD are very destructive to the equipment. To avoid it, make sure there is a low impedance discharge path from your computer to Chassis ground. 6. To reduce the risk of damage or injury, follow all steps or procedures as instructed please. OpenVox Communication Co. LTD. URL: www.openvox.cn 5 V100_PTMC user manual Test Environments CentOS-5.5 Kernel version: 2.6.18-194.el5 V100_PTMC: opvx_tc_linux_x86-1.1.0 Asterisk: 1.6.2.11 DAHDI: dahdi-linux-complete-2.4.1.2+2.4.1 Hardware: Openvox V100_PTMC OpenVox Communication Co. LTD. URL: www.openvox.cn 6 V100_PTMC user manual Chapter 1 Overview 1.1 What is Asterisk The Definition of Asterisk is described as follows: Asterisk is a complete PBX in software. It runs on Linux, BSD, and Windows (emulated) and provides all of the features you would expect from a PBX and more. Asterisk does voice over IP in four protocols, and can interoperate with almost all standards-based telephony equipment using relatively inexpensive hardware. Asterisk provides Voicemail services with Directory, Call Conferencing, Interactive Voice Response, and Call Queuing. It has support for three-way calling, caller ID services, ADSI, IAX, SIP, H323 (as both client and gateway), MGCP (call manager only) and SCCP/Skinny (voip-info.org). Operating System Linux and FreeBSD OpenSource Drivers Asterisk®,DAHDI, Zaptel,Bristuff,Misdn and ISDN4BSD Protocol SIP, IAX, SS7, MGCP, H323, R2 and more.. Applications IVR, CRM, FAX, E-mail, CallCenter, Billing and your application.. SIP phone Switch Asterisk VOIP PBX Analog phone PC+Softphone Figure 1 Topology OpenVox Communication Co. LTD. URL: www.openvox.cn 7 V100_PTMC user manual 1.2 What is V100_PTMC The V100_PTMC is a high density codec transcoding card. In addition, it is extended to provide voice quality processing features such as voice echo cancellation and adaptive noise reduction. The V100_PTMC is a PTMC, which is compliant with PCIMG2.15/ IEEE1386, IEEE1386.1, and can be integrated into customer’s Compact PCI system. The V100_PTMC also features Ethernet ports and local_CT bus on board. And it can also handle IP TO IP or IP TO TDM transcoding. The V100_PTMC is composed of a core module and a PTMC extender board. The core module contains Vocallo DSP, RAM, Flash, Power Supply, UART, 2 Giga Macs and TDM bus interfaces. The extender PTMC board contains PMC connectors, Giga NIC, Glue, Dip Switch, RJ45 interface of front panel. It connects core module and PCC/PTxCC. Target Applications Hosted VoIP Gateway Conferencing Server IVR Server Distributed Office PBX Call Centers OpenVox Communication Co. LTD. URL: www.openvox.cn 8 V100_PTMC user manual Chapter 2 Hardware Setup There are some points that should be paid attention to when set up V100_PTMC. In addition, OpenVox design and manufacture V100_PTCCEVB evaluation board to help the customers to evaluate the V100_PTMC on standard PCI bus. The following is the V100_PTMC image P4 P3 P2 P1 Figure 2 V100_PTMC 2.1 Hardware Introduction 1. Vocallo DSP and Core Module The Vocallo DSP, which is used to address transcoding, is located in the OpenVox Communication Co. LTD. URL: www.openvox.cn 9 V100_PTMC user manual core module. The media flow enters and exits through inherent MAC interface and TDM bus interface while the control flow enters and exits just through inherent MAC interface. 2. Giga NIC The Giga NIC located in extender PMC board bridges the host located in PCC/PTxCC through PCI bus to the vocallo DSP through Eth1. 3. Front Panel RJ45 The front panel RJ45 in extender PMC board supports to provide the packet interface to access the DSP. In some applications, the remote host can communicate with the Vocallo DSP through the front panel RJ45 interface. The interface is always available except PT5MC option is chosen. 4. P4 in PTMC Connectors The P4 is another packet interface to access the DSP. This interface enables when PT5MC option is chosen. 5. PTMC Connectors There are four PTMC connectors, which are compliant with PCIMG2.15 (PTMC) electrical specification and IEEE1386, IEEE1386.1 (PMC) OpenVox Communication Co. LTD. URL: www.openvox.cn 10 V100_PTMC user manual mechanical specifications, located in V100_PTMC. 6. Glue The glue located in extender PMC board bridges the UART and H.110 bus in PMC carrier/PTxCC to the Uart and TDM bus in core module. 2.2 Dip Switch Setup The Dip switch located at extender PMC board is for configuring the V100_PTMC options. The following is the Dip Switch Outline. Figure 3 Dip Switch Pin 1 is Vocallo DSP Device ID option. If it is ON, the DSP ID is 0x FE. If it is switched to OFF (default), that means the DSP ID is 0x FF. If dual V100_PTMCs are provided on the same PCC/PTCC, one of them should be set to 0x FE, and the other should be set to 0xFF. Pin 2 is TDM clock of Vocallo DSP enable option. If it is ON, the TDM clock is disabled (default). If it is switched to OFF, the TDM clock is enabled. OpenVox Communication Co. LTD. URL: www.openvox.cn 11 V100_PTMC user manual Pin3, Pin4 and Pin5 are PTMC configuration options. The V100_PTMC supports 3 PTMC configurations (PT2MC, PT3MC, PT5MC) via Pin3, Pin4, and Pin5. Status “ON” represents binary digital “1”, while “OFF” means 0. For Example, if Pin3-Pin5 is set to 010, PT2MC (default) configuration is enabled. If Pin3-Pin5 is set to 011, PT3MC configuration is enabled. If Pin3-Pin5 is set to 101, PT5MC configuration is enabled. 2.3 LED Indicator There are 4 LEDs located on the front panel. Figure 4 Front panel The T/R flash indicates the front panel RJ45 or P4 in PTMC connectors packet interface is transmitting or receiving data normally. The LNK light indicates the front panel RJ45 packet interface or P4 in PTMC connectors packet interface is linking up. The CFG2/3 is PT2MC/PT3MC indicator. If the CFG2/3 is red, which means V100_PTMC is PT2MC option and the PTCC is PT2CC compliant. While if CFG2/3 is green, it means V100_PTMC is PT3MC OpenVox Communication Co. LTD. URL: www.openvox.cn 12 V100_PTMC user manual option and the PTCC is PT3CC compliant. The CFG5 is PT5MC indicator. Green light means V100_PTMC is PT5MC option and the PTCC is PT5CC compliant. 2.4 Hardware Installation Procedures 1. Make sure the V100_PTMC is compatible with your PCC/PTCC. V100_PTMC can be worked together with PCC32, PCC64, PT2CC, PT3CC and PT5CC theoretically. In practice, Electrical compatibility of combinations that include user-defined I/O, whether PMC or PTMC compliant, must be taken into account. The V100_PTMC I/O pins are 5V tolerant for 3.3V. It is recommended that you may consult to our technical support whether the V100_PTMC suits your application.V100_PTCCEVB is a PCI card for evaluating V100_PTMC’s availability. 2. Make sure the PCC/PTxCC that has V100_PTMC installed complies with the country specific safety regulations. 3. Power off your PCC/PTxCC and unplug it from its AC power source. 4. Wear an Anti-static Wrist Strap on your wrist. 5. Configure the Dip Switch to the right position. 6. Open the cover of the Comppact PCI Platform. OpenVox Communication Co. LTD. URL: www.openvox.cn 13 V100_PTMC user manual 7. Remove the filler plate from the front panel of the PCC/PTxCC. (See Figure 5) 8. The V100_PTMC must be positioned with care to avoid damaging components against the voltage key post. 9. The V100_PTMC bezel enters the front panel of the PCC/PTxCC into alignment with the signal connectors. (See Figure 5) 10. Mount the screws. (See Figure 5) 11. Replace the cover of the PCC/PTxCC. 12. Plug the UTP cable into RJ45 Jack of the V100_PTMC only if the Media/Control Path is the front panel RJ45/UTP. 13. Plug the AC power source. Figure 5 View V100_PTMC Installations OpenVox Communication Co. LTD. URL: www.openvox.cn 14 V100_PTMC user manual Chapter 3 Software Installation and Configuration There are three ways to access the DSP, which are Front panel RJ45, P4 in PTMC connectors (Back panel RJ45 on your server) and P1, P2 in PTMC connectors (PCI bus). So you are able to select a type according to the specific environment. 3.1 Download Download Asterisk package by command below: #_wget_http://downloads.asterisk.org/pub/telephon y/asterisk/old-releases/asterisk-1.6.2.11.tar.gz Download DAHDI package by command below: #_wget_http://downloads.openvox.cn/pub/drivers/da hdi-linux-complete/releases/1.3.3/openvox_dahdi-l inux-complete-2.4.1.2+2.4.1.tar.gz Download V100_PTMC package by command below: #_wget_http://downloads.openvox.cn/pub/drivers/tr anscoding_cards/opvx_tc_linux_x86-current.tar.gz OpenVox Communication Co. LTD. URL: www.openvox.cn 15 V100_PTMC user manual 3.2 Installation Caution: Remember to disable SELinux service. Perform "vim /etc/selinux/config", change the value of parameter SELINUX to disabled, and then reboot your computer please. # This file controls the state of SELinux on the system. # SELINUX= can take one of these three values: # enforcing - SELinux security policy is enforced. # permissive - SELinux prints warnings instead of enforcing. # disabled - SELinux is fully disabled. SELINUX=disabled # SELINUXTYPE= type of policy in use. Possible values are: SELINUXTYPE=targeted Figure 6 SELinux configuration file 1. Software installation Some dependencies are crucial. If any of them is absent, the software installation process would not go through successfully. Let’s run "yum install XX" (XX stands for the dependency’s name) to check the availability of dependencies. # yum install bison # yum install bison-devel # yum install ncurses # yum install ncurses-devel # yum install zlib OpenVox Communication Co. LTD. URL: www.openvox.cn 16 V100_PTMC user manual # yum install zlib-devel # yum install openssl # yum install openssl-devel # yum install gnutls-devel # yum install gcc # yum install gcc-c++ # yum install libxml2 # yum install libxml2-devel If there is no kernel source in the system, users should also install it by running like: # yum install kernel-devel If the dependency has been installed, system indicates that nothing to do which means you could go to the next one directly. Otherwise, the system will keep on installing it. Among DAHDI, Asterisk and V100_PTMC, let’s install DAHDI firstly. Please execute those commands under the directory of /usr/src/ in generally: # cd /usr/src # tar –xzvf openvox_dahdi- linux-complete-XX OpenVox Communication Co. LTD. URL: www.openvox.cn 17 V100_PTMC user manual # cd dahdi-linux-complete-XX # make # make install # make config Caution: If there is something wrong after "make", please refer to HERE. In the url link, the moderator introduces you a method how to patch. After patching, save your changes and exit. Then run "make" again, if successfully done, it is time for you to install Asterisk. Please operate those commands to install Asterisk. # cd /usr/src/ # tar –xzvf astersik-XX.tar.gz # cd asterisk-XX # ./configure # make # make install # make samples Please operate those commands to install V100_PTMC OpenVox Communication Co. LTD. URL: www.openvox.cn 18 V100_PTMC user manual # cd /usr/src # tar –xzvf opvx_tc_linux_x86-1.1.0.tar.gz # cd opvx_tc_linux_x86-1.1.0/libopxtc/ # make install # cd /usr/src/opvx_tc_linux_x86-1.1.0/codec/asterisk # make install 2. Configuration 2.1 Modify openvox_codec.conf # vim /etc/asterisk/openvox_codec.conf A. If using P1,P2 in PTMC connectors(PCI bus) as communication interface, in this situation, please simultaneously plugging V100_PTMC and asterisk cards to the same server. Sample configuration file openvox_codec.conf is as follows. [ethX] baseudp=5000 Vocalloaddr=10.1.1.10 // V100 NIC device name // IP of V100 Multicore-DSP chip If your V100_PTMC is recognized as eth1 by the system, then you need to change the ethX to eth1. One thing you need to note is place V100_PTMC NIC IP and vocalloaddr IP to same network segment, and OpenVox Communication Co. LTD. URL: www.openvox.cn 19 V100_PTMC user manual make these two IPs are different. B. If using Front panel RJ45 or Back panel RJ45 on your server as communication interface, please directly ignore step 2.2 below. In this case, you will need another PC to provide power to V100_PTMC. Plug V100_PTMC to the PC, and then connect the Asterisk server with the PC over cable or other network devices.Sample of configuration file openvox_codec.conf are as follows. [ethX] Baseudp=5000 Vocalloaddr=192.168.2.186 // the IP is available The X in ethX means the number of the network device that connects with Asterisk server. For example, if your server has two network interface cards, one is eth0, and the other is eth1, and suppose to connect eth1 with V100_PTMC, then you will need to modify X to 1 and modify vocalloaddr to the same network segment as eth1.You can also connect the V100_PTMC through other devices, such as router、switches and so on. 2.2 Setting V100_PTMC NIC IP by running the below command. Right here, let’s take eth1 for an example. # vim /etc/sysconfig/network-scripts/ifcfg-eth1 OpenVox Communication Co. LTD. URL: www.openvox.cn 20 V100_PTMC user manual Set BOOTPROTO =static Add two line: IPADDR=10.1.1.80 NETMASK=255.255.255.0 # Realtek Semiconductor Co., Ltd. RTL-8139/8139C/8139C+ DEVICE=eth1 BOOTPROTO=static ONBOOT=yes HWADDR=a0:98:05:02:00:01 NETMASK=255.255.255.0 IPADDR=10.1.1.80 Figure 7 ifcfg-eth1 configurations After the network settings, remember to perform "service network restart" to restart the network and activate V100_PTMC NIC. See more V100_PTMC details by "ifconfig". 2.3 Before starting Asterisk, please run "vim /etc/asterisk/modules.conf", and add a line "noload => res_timing_pthread.so" at the end of modules.conf, it will disable the timing module. Otherwise, it’s going to display many errors from asterisk. 2.4 Enable asterisk by running "asterisk –vvvvvvvgc", if it has been started before, run "asterisk -r" instead. In the CLI, perform "module load codec_openvox.so" to load V100_PTMC driver. After entering into CLI, type "op" and press Tab. If it displays openvox, which means installation finished elementarily. Please also perform other OpenVox Communication Co. LTD. URL: www.openvox.cn 21 V100_PTMC user manual commands to check related information, for instance, run "openvox show translators" to show supportive code conversion mode. *CLI> openvox show translators Ilbc to g726 G726 to ilbc g723 to g726 . . Ulaw to g722 G729 to ulaw ulaw to g729 It will show license information as below after run "openvox show license". *CLI> openvox show license License info: max=256, current=0. 3.3 Call Test Run command below to register two SIP phone, and add configuration at the end of sip.conf. # vim /etc/asterisk/sip.conf OpenVox Communication Co. LTD. URL: www.openvox.cn 22 V100_PTMC user manual [666] type =friend user=666 secret=666 host=dynamic context=from-internal allow=all canreinvite=no [888] type=friend user=888 secret=888 host=dynamic context=from-internal allow=all canreinvite=no Figure 8 SIP phone register Add dial plan at the end of extensions.conf. # vim /etc/asterisk/extensions.conf [from-internal] exten=>666,1,Dial(sip/666) exten=>666,2,Hangup() exten=>888,1,Dial(sip/888) exten=>888,2,Hangup() Figure 9 dialplan Follow the above dialplan to configure two SIP phones, one chooses G711 alaw/ulaw as audio encoding pattern, and the other choose G729. If call normally, it means installation is successful. OpenVox Communication Co. LTD. URL: www.openvox.cn 23 V100_PTMC user manual Chapter 3 Reference www.openvox.cn www.digium.com www.asterisk.org www.voip-info.org www.asteriskguru.com Tips Any questions during installation, please consult in our forum or look up for answers from the following websites: Forum wiki OpenVox Communication Co. LTD. URL: www.openvox.cn 24 V100_PTMC user manual Appendix A Specifications Dimension • Compliant with IEEE1386 mechanical specifications • 149.0x74.0mm (PCB) Interfaces •PCI : 32bit 33/66MHz •Local CT •10/100/1000 BASE-T RJ45 •UART •Backplane Gbe •PMC Connector Power Requirements • 2.2A @3.3V Operating Temperature Range •0 to 50 °C Humidity •10 to 90% NON-CONDENSING OpenVox Communication Co. LTD. URL: www.openvox.cn 25 V100_PTMC user manual Hardware and Software Requirements •PCC,PT2CC,PT3CC,PT5CC •Windows/Linux in Host OpenVox Communication Co. LTD. URL: www.openvox.cn 26 V100_PTMC user manual Appendix B Transcoding Codec Support •G.711 •G.729 •iLBC •G.722 •GSM •AMR •G.723 •G.726 •SIREN14 Transcoding Table transcode r Source code ilbc g722 g723 g726 g729 alaw ulaw √ ilbc gsm amr siren14 √ √ √ √ √ √ √ √ √ √ √ √ √ √ √ √ √ √ √ √ √ √ √ √ √ √ √ √ √ √ √ √ √ √ √ √ √ √ √ √ √ √ √ g722 √ g723 √ √ g726 √ √ √ g729 √ √ √ √ alaw √ √ √ √ √ ulaw √ √ √ √ √ √ gsm √ √ √ √ √ √ √ amr √ √ √ √ √ √ √ √ siren14 √ √ √ √ √ √ √ √ √ √ “√” means the two codes are able to be transcoded. OpenVox Communication Co. LTD. URL: www.openvox.cn 27