1
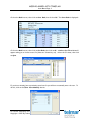
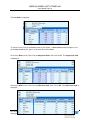
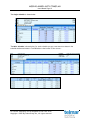
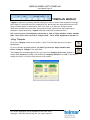
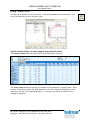
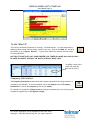
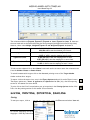
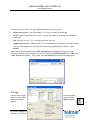
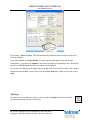
MEDIAPLANNER+ WITH TIMEPLAN User Manual Page 1 MEDIAPLANNER+ WITH TIMEPLAN User Manual 2015 For further assistance call the Helpdesk on 020 7467 2575 Copyright 2015 By Telmar Group Inc., All rights reserved MEDIAPLANNER+ WITH TIMEPLAN User Manual Page 2 INTRODUCTION ...................................................................................... 3 STARTING MEDIAPLANNER+ ........................................................................ 3 WIZARDS .............................................................................................. 3 To Create A New Target Audience .................................................................................................................. 4 Save Own Media.................................................................................................................................................... 7 Rank Mode (Cover, Cost, Difference, Composition) ...................................................................................... 8 Single/Multi Schedule Mode ............................................................................................................................. 11 Cumulative Cover Mode ..................................................................................................................................... 13 Optimisation Mode ............................................................................................................................................. 14 TIMEPLAN MODULE .................................................................................15 Using Timeplan .................................................................................................................................................... 15 This example shows a 5 week campaign using weekly/monthly magazines ........................................ 16 Viewing Timeplan curves ............................................................................................................................... 17 Another example shows a 8 week campaign using National Dailies ..................................................... 17 Another example shows a 12 week campaign using weekly/monthly magazines ............................... 18 To Add/Remove Target Audiences ................................................................................................................ 18 To Rename Target Audiences .......................................................................................................................... 19 To Select/Deselect Publications..................................................................................................................... 19 To Enter Costs For Publications ..................................................................................................................... 19 To Save A Cost File or Select a Cost File .................................................................................................... 20 To Change The Layout Displayed .................................................................................................................... 20 To Sort By A Column.......................................................................................................................................... 20 To Create A Graph Of A Selected Column Of Data................................................................................... 20 To Use ‘What If’ ................................................................................................................................................. 21 Frequency Distribution ..................................................................................................................................... 21 SAVING, PRINTING, EXPORTING, EMAILING ...................................................22 Saving .................................................................................................................................................................... 22 Printing .................................................................................................................................................................. 23 Exporting .............................................................................................................................................................. 24 Emailing ................................................................................................................................................................. 25 HOW DO I CREATE A COVER RANK FOR NATIONAL DAILIES? ...............................27 HOW DO I CREATE A SINGLE SCHEDULE PLAN FOR NATIONAL DAILIES? ................28 HOW DO I CREATE A MULTI SCHEDULE PLAN FOR NATIONAL DAILIES? .................29 HOW DO I OPTIMISE A SCHEDULE TO A SPECIFIC BUDGET? ................................30 HOW DO I SAVE A PROJECT FILE? ...............................................................31 HOW DO I PRINT A REPORT? .....................................................................32 HOW DO I EXPORT A REPORT INTO ANOTHER APPLICATION? ..............................33 GLOSSARY ............................................................................................34 For further assistance call the Helpdesk on 020 7467 2575 Copyright 2015 By Telmar Group Inc., All rights reserved MEDIAPLANNER+ WITH TIMEPLAN User Manual Page 3 INTRODUCTION Mediaplanner provides instant evaluation of the effectiveness of press schedules against any number of pre-defined target markets. It can provide analysis on existing schedules based on reach, frequency, audience and cost. STARTING MEDIAPLANNER+ Click on Mediaplanner+ from the main Telmar screen and you will see the box below which gives you a choice of Wizards to use or Expert Mode for more experienced users. WIZARDS The Wizards take you through the steps to create a rank, single, multi, cumulative cover and optimisation analysis. Rank Mode allows you to rank your publications by coverage, cost or composition against a given target audience(s). Single Schedule Mode allows you to view a single target audience with or without costs. Multi Schedule Mode gives you the option of viewing multiple target audiences with more than one schedule at a time. This wizard is identical to the single schedule mode. Cumulative Cover Mode uses a multi schedule to calculate the coverage build for each schedule shown in 000’s and/or %’s. Optimisation Mode enables you to quickly find the optimum schedule against either a budget or coverage target. For further assistance call the Helpdesk on 020 7467 2575 Copyright 2015 By Telmar Group Inc., All rights reserved MEDIAPLANNER+ WITH TIMEPLAN User Manual Page 4 Time Schedule Mode allows you to plan seasonal campaigns in order to ensure that the desired coverage and frequency is achieved within the campaign period. To Create A New Target Audience If you are using one of the Wizards and the target audience you wish to use is not already listed and you wish to create a new target audience, click on the New Target button. If you are in a schedule and you wish to create a new target audience to add to the schedule, click on the Target button on the toolbar and then click on the New Target button. The Select Survey screen is displayed:--- To filter the list of surveys, enter NRS in the Search box, then click on the By Survey Description option and only those surveys with NRS in the description will be displayed. Select the survey you wish to use, then click on OK. For further assistance call the Helpdesk on 020 7467 2575 Copyright 2015 By Telmar Group Inc., All rights reserved MEDIAPLANNER+ WITH TIMEPLAN User Manual Page 5 This will take you to the coding screen: Select the coding for the target audiences you wish to set up, then click on Next. In this example, we have chosen to use ABC1 and C2DE as two separate target audiences. Highlight the two codes, then click on - the coding moves to the coding grid on the right hand side. Then click on Next. N.B. The other buttons you usually use to create combinations of demographic groups for your audiences (ANY, ALL, AND, OR and NOT) are also shown in the bar between the code sections and the coding grid and can be used in the usual way. For further assistance call the Helpdesk on 020 7467 2575 Copyright 2015 By Telmar Group Inc., All rights reserved MEDIAPLANNER+ WITH TIMEPLAN User Manual Page 6 Next, the Select Media screen shows the Available Media sections in the selected survey – open a publications section and/or sub-section and double click to select a title or click on a title, then click on the button and it will move to the box on the right hand side. To move a title back, click on the Title, then click on the button. Select your titles, then click on OK. If you regularly use the same titles, you may wish to save the selection as an Own Media file – see below. For further assistance call the Helpdesk on 020 7467 2575 Copyright 2015 By Telmar Group Inc., All rights reserved MEDIAPLANNER+ WITH TIMEPLAN User Manual Page 7 Save Own Media Select the titles as shown above, then click on Own Media… and select Save Own Media and enter a name for the titles in the Own Media Description, then click on OK. Another window will appear containing the same name, click on Save – this is saved into your default Telmar folder. Own Media codes are shown in the Select Media screen on the left hand side under Own Media – double click to open the section and any own media codes that have been set up will be shown in the list – titles from these lists can be selected as normal. For further assistance call the Helpdesk on 020 7467 2575 Copyright 2015 By Telmar Group Inc., All rights reserved MEDIAPLANNER+ WITH TIMEPLAN User Manual Page 8 Rank Mode (Cover, Cost, Difference, Composition) It is possible to rank your publications by coverage, cost or composition against a given target audience(s). You can either select the Rank wizard when you first open Mediaplanner or click on the Rank button in the toolbar. Select a demographic group by highlighting the file name you require and click on OK. Select a demographic group by highlighting the file name you require and click on OK. There are 4 different types of rank methods you can use:Cover Rank – sorts by Readership ‘000 Cost Rank – sorts by CPT AIR (Cost per Thousand Average Issue Readership) Composition Rank – sorts by Composition % Difference Rank – if you have more than one target audience, this displays the difference between the two target audiences both in ’000 and as a % See examples shown below:- For further assistance call the Helpdesk on 020 7467 2575 Copyright 2015 By Telmar Group Inc., All rights reserved MEDIAPLANNER+ WITH TIMEPLAN User Manual Page 9 Click on the Rank button, then click on Cover Rank, then click on OK. The Cover Rank is displayed:- Click on the Rank button, then click on Cost Rank, then click on OK. A Select Cost File window will appear asking you to choose a cost file (these are followed by .cst). Select the file name, then click on Open. If you do not already have a previously saved cost file you will have to manually enter the cost. To do this, click on the Enter Costs Manually button. For further assistance call the Helpdesk on 020 7467 2575 Copyright 2015 By Telmar Group Inc., All rights reserved MEDIAPLANNER+ WITH TIMEPLAN User Manual Page 10 The Cost Rank is displayed:- To save the costs click on the Costs button on the toolbar. A Save Costs window will appear click on the Save Costs button, type in a file name and click on Save. Click on the Rank button, then click on Composition Rank, then click on OK. The Composition Rank is displayed:- Click on the Rank button, then click on Difference Rank, then click on OK. The Difference Rank is displayed:- For further assistance call the Helpdesk on 020 7467 2575 Copyright 2015 By Telmar Group Inc., All rights reserved MEDIAPLANNER+ WITH TIMEPLAN User Manual Page 11 Single/Multi Schedule Mode Single Schedule allows you to view a single target audience with or without costs. Multi Schedule gives you the option of viewing multiple target audiences with more than one schedule at a time. You can select the Single Schedule or Multi Schedule wizard when you first open Mediaplanner or click their button in the toolbar. Select a demographic group by highlighting the file name, then click on OK. You are then asked: ‘Would you like to use costs?’ Choose one of the three options – click File to load costs from file - click Manual to enter costs manually - click Cancel to not use costs at this time. If you choose File to load costs from file, the Select Cost File window showing any saved cost files – click on a file, then click on Open. If you choose Manual to enter costs manually, the Costs Input window appears – enter the costs against each title in the Unit Cost column, then click on OK. For further assistance call the Helpdesk on 020 7467 2575 Copyright 2015 By Telmar Group Inc., All rights reserved MEDIAPLANNER+ WITH TIMEPLAN User Manual Page 12 The Single Schedule is shown below:- The Multi Schedule is shown below, for each schedule you get a new insertion column in the schedule window and totals in Total Window at the bottom of the screen.:- For further assistance call the Helpdesk on 020 7467 2575 Copyright 2015 By Telmar Group Inc., All rights reserved MEDIAPLANNER+ WITH TIMEPLAN User Manual Page 13 Cumulative Cover Mode You can select the Cumulative Cover mode when you first open Mediaplanner or click the button in the toolbar. Select a demographic group by highlighting the file name, then click on OK. The Cumulative Cover Columns window appears asking you to enter the required insertion level for each column. Tick the boxes to Show Cover 000 and Show Cover %, then click on OK. The Cumulative Cover window will then be displayed:- You can use Cume Cover to determine the ideal level of insertions to have per publication before cover starts to plateau, i.e. any additional insertions would not provide much greater coverage. For For further assistance call the Helpdesk on 020 7467 2575 Copyright 2015 By Telmar Group Inc., All rights reserved MEDIAPLANNER+ WITH TIMEPLAN User Manual Page 14 example, InStyle’s cover increases only slightly with each insertion so it wouldn’t be useful to have more than one insertion if we were aiming towards C2DE’s. Optimisation Mode You can select the Optimisation mode when you first open Mediaplanner or click the button in the toolbar. Firstly, select a demographic group by highlighting the file name and clicking on OK. If already in Mediaplanner, make sure that there are no insertions placed in any publications, then click on the Optimise button on the toolbar. It will ask ‘Would you like to use costs?’ select either File, Manual or Ignore. The Minimum and Maximum Insertions columns will be added to the schedule and the Optimise dialog box opens up. NB YOU SHOULD NOT OPTIMISE WHEN YOU ARE IN TIMEPLAN MODE, ONLY IN SINGLE SCHEDULE AND MULTI SCHEDULE MODE. You can now choose to Optimise to… Maximise Coverage or Frequency Goal and insert the frequency goal using the arrows, then you can choose to Stop At… a Budget or % Reach. You also have the ability to change the length of your campaign (the default is 12 weeks). This campaign length determines the level of Maximum Inserts available in the optimisation. However, the Maximum Insertions can be manually changed if the default does not suit your needs. You can also change the Number of Results to display. Once you have selected all your options, click on the Go button. You will be asked if you are sure you wish to Optimise Now – click on Yes. Once the optimisation strategy you selected has been achieved, the optimised schedules will be displayed in the Schedule window and the results in the Totals window of the planning screen. For further assistance call the Helpdesk on 020 7467 2575 Copyright 2015 By Telmar Group Inc., All rights reserved MEDIAPLANNER+ WITH TIMEPLAN User Manual Page 15 TIMEPLAN MODULE Timeplan is essential for planning seasonal campaigns in order to ensure that the desired coverage and frequency is achieved within the campaign period. We all know that some publications are still being read many weeks or months after their cover date. It is important for agencies and advertisers to know exactly how their anticipated coverage is spread over time, especially for seasonal or coupon advertising. Timeplan uses NRS readership accumulation data. NB, certain features of Mediaplanner should only be used in Single Schedule or Multi Schedule mode. They will not work correctly in Timeplan mode. These include Optimisation and What if. Using Timeplan Click on the Timeplan button on the toolbar or select Time Schedule when you first open Mediaplanner. If you are already using Mediaplanner, you MUST go back into Single Schedule mode before clicking on Timeplan in the top toolbar. The Campaign Period window appears, here you can set the Campaign Start Date (default is today’s date), Duration (13 weeks is the default) and Campaign End Date. Click OK. If you need to change the period, click on the Period button in the toolbar. For further assistance call the Helpdesk on 020 7467 2575 Copyright 2015 By Telmar Group Inc., All rights reserved MEDIAPLANNER+ WITH TIMEPLAN User Manual Page 16 This example shows a 5 week campaign using weekly/monthly magazines Enter your insertions into each week of the schedule against each title – the Total Uses, Reach [000], Reach %, GRP and Net GRP are displayed in the Totals window. The Schedule window shows the insertions for each week against each title. Tip – you can click and drag an insertion from one box to another if you put one in the wrong place! The Totals window shows the coverage for the 5 weeks of the campaign as it cumes by week. There could be a difference between the Total Plan Reach in the first column (15.42%) and the reach achieved at the end of the campaign period (13.25%), i.e. coverage can continue to build after the campaign has finished. For further assistance call the Helpdesk on 020 7467 2575 Copyright 2015 By Telmar Group Inc., All rights reserved MEDIAPLANNER+ WITH TIMEPLAN User Manual Page 17 Viewing Timeplan curves You may wish to view the curve for each title – click on the Curves button on the toolbar, then click on the publication title to see their graph. Another example shows a 8 week campaign using National Dailies The Schedule window shows the insertions for each week against each title. The Totals window shows the coverage for 8 weeks of the campaign as it cumes by week. There could be a difference between the Total Plan Reach in the first column (46.53%)and the reach achieved at the end of the campaign (46.49%) i.e. coverage can continue to build after the campaign has finished. For further assistance call the Helpdesk on 020 7467 2575 Copyright 2015 By Telmar Group Inc., All rights reserved MEDIAPLANNER+ WITH TIMEPLAN User Manual Page 18 Another example shows a 12 week campaign using weekly/monthly magazines Enter your insertions into each week of the schedule against each publication. The Schedule window shows the insertions for each week against each publication. The Totals window shows the coverage for the 12 weeks of the campaign as it cumes by week. There could be a difference between the Total Plan Reach in the first column (17.55%) and the reach achieved at the end of the campaign period (16.83%), i.e. coverage can continue to build after the campaign has finished. SCHEDULE FEATURES To Add/Remove Target Audiences If you wish to work with more than one target audience created from the same demographic file, click on the Target button and highlight the file name you wish to use, then click on OK. If you are looking at more than one target audience on the screen you can switch from one target to another and view readership figures by clicking on the tab title of the target. For further assistance call the Helpdesk on 020 7467 2575 Copyright 2015 By Telmar Group Inc., All rights reserved MEDIAPLANNER+ WITH TIMEPLAN User Manual Page 19 To remove a target, right click on the tab title and select Remove. To Rename Target Audiences To rename a target audience, right click on the tab title and select Rename – enter the new name in the Target Description or Tab Description boxes, then click on OK. Target Description Tab Description To Select/Deselect Publications If you only want to show some of your publications at any time, click on the Media button and move the publication over from the Selected Items window to the Deselected Items window using the arrows. To Enter Costs For Publications Click in the Unit Cost column beside a publication, then type in the cost and press Enter, the cost will be entered in the Unit Cost column for that publication and the Cost per Thousand will be calculated automatically. Alternatively, you can click on the Cost button and select a cost file, then click on Open or click on Enter Costs Manually and enter the costs, then click on OK. Repeat for each publication. For further assistance call the Helpdesk on 020 7467 2575 Copyright 2015 By Telmar Group Inc., All rights reserved MEDIAPLANNER+ WITH TIMEPLAN User Manual Page 20 To Save A Cost File or Select a Cost File Once you have inserted the unit costs against each publication, you can save these costs in a Cost File for use another time. To save the cost file click on the Cost button, then click on Save Costs, enter a file name (name.cst) then click on Save. Once you have saved a cost file, you can use it again with other Mediaplanner runs. Click on the Cost button and select the name of your cost file (name.cst) and Open. Only the publications that have a cost in the cost file will be inserted in the schedule. To Change The Layout Displayed Click on the Layout button the screen is divided into Planning Calculations and Result Calculations. To hide or show headings use the arrow buttons to move the headings across to the right-hand box. The Up and Down buttons allow you to alter the order of the headings, then click on OK. To Sort By A Column Select the column heading you wish to sort and click on the Sort button. By default the column will be sorted in descending order. This can be changed by right-hand clicking on the column and selecting Sort Ascending. To Create A Graph Of A Selected Column Of Data Click on the heading of the column you wish to graph, then click on the Graph button. A graph will be created showing the data in the default graph format. Alternatively, highlight only the publications you wish to graph, then click on the graph button. To change the graph type click on the vertical bar, horizontal bar, line, pie or area graph icon. To save the graph click on Options and Save As. You can save the graph as a metafile (.wmf), enhanced metafile (.enf) or bitmap file (.bmp). Alternatively, copy your graph – copy to clipboard as metafile, copy to clipboard as bitmap and copy to clipboard as values. To paste your graph into Excel click on the Edit, Paste menu and the graph will be displayed. To print a graph, click on the Options button and Print. For further assistance call the Helpdesk on 020 7467 2575 Copyright 2015 By Telmar Group Inc., All rights reserved MEDIAPLANNER+ WITH TIMEPLAN User Manual Page 21 To Use ‘What If’ This facility calculates the amount of coverage - achieved and lost - for each publication by adding and subtracting insertion levels, chosen by the user. Click on the What If… button in the toolbar ot go to Options, What If…. Type in each column the required insertion levels for each publication. NB THIS FEATURE DOES NOT WORK PROPERLY IN TIMEPLAN MODE AND SHOULD ONLY BE USED IN SINGLE SCHEDULE OR MULTI SCHEDULE MODE ONLY. By adding 1 insertion to Hello the reach will increase by 3.76 %. Frequency Distribution The Frequency Distribution window shows the frequency with which the target audience is reached by the schedule. To view this window click on the Options menu and Frequency Distribution or click on the Frequency button on the toolbar. It is possible to change the frequency level by using the dropdown menu. You can also group frequencies together by clicking Options, Groups…. For further assistance call the Helpdesk on 020 7467 2575 Copyright 2015 By Telmar Group Inc., All rights reserved MEDIAPLANNER+ WITH TIMEPLAN User Manual Page 22 The columns available are Exposed, Exposed %, Exposed at Least, Exposed at Least %, these are the most used and are defined below using the above example (each publication had 4 insertions). However, there is also Weight, Weighted Exposed % and Weighted Exposed At Least %. Exposed Exposed % Exposed at Least Exposed at Least % 2,380,000 ABC1’s saw the schedule just once. 642,000 ABC1’s saw the schedule just 3 times. 8.99% of ABC1’s saw the campaign only once. 2.42% of ABC1’s saw the campaign only 3 times. 6,304,000 ABC1’s saw the campaign once or more. 2,857,000 ABC1’s saw the campaign 3 or more times. 23.8% of ABC1’s saw the campaign at least once. 10.8% of ABC1’s saw the campaign at least 3 times. To hide certain columns click on the Columns button and use the arrows to move the columns across from the Hidden Columns to Shown Columns. To switch between multi targets click on the downward pointing arrow of the Target Market window to show other targets. To export click on the export icon, once in the Export Options window click on the Export button. The export options are – direct to application; to clipboard and to file (.xls). See the exporting section of this manual for more details. To print click on the Print Icon and select your print options in the Printing Options window. Click Print. See the printing section of this manual for more details. SAVING, PRINTING, EXPORTING, EMAILING Saving To save your report, click on For further assistance call the Helpdesk on 020 7467 2575 Copyright 2015 By Telmar Group Inc., All rights reserved the File menu and select ‘Save As’. MEDIAPLANNER+ WITH TIMEPLAN User Manual Page 23 You have the choice of four file types depending on what you want to save: Project (Mediaplanner Project Files .MPF) - A Project file saves the whole plan Target (Telmar Target Files .Dem, .Deu) - A Target file allows you to change the filename of your target Cost (Cost file .Cst, Cos, Trc) – this allows you save the costs Template (Mediaplanner Template .MTF) - If you customise the toolbar layout and want to save it as your new template select this option to save or save (‘Save As’) as a default. (‘As a default’). Select one of the above options and a Plan Information window appears inviting you to type information relating to your schedule. If you do not wish to use Plan Information click on OK. Next a Save As window will appear. Type a name in the File name box and click on the Save button. Printing You have two choices – button or use the File Print and the Print appears. For further assistance call the Helpdesk on 020 7467 2575 Copyright 2015 By Telmar Group Inc., All rights reserved click on the Print menu and select Options window MEDIAPLANNER+ WITH TIMEPLAN User Manual Page 24 Within the Printing Options window the Plan report is printed by default, if you wish to print the Frequency Distribution report tick the box on the left hand side. The Media and Total Columns can be edited before printing each report, click on the Edit button and move the headings across from Hidden Columns to Shown Columns or vice versa. To add or change the headers and footers click on the Headers/Footers. To change the font, Title and to add a logo click on Preview and select Configure. Select the Only Media with insertions so only those publications with inserts are printed. If you want to only show a top number of publications on your report click on Only show top x Media. Click on the Target or Weeks button to select all or some targets/ weeks for printing. The Plan Information button allows you to display general information that can be printed on reports. To print click on the Print button. To view before printing click on the Preview button. Exporting If you wish to export your report into Excel select the Export button on the toolbar, alternatively, click on the File menu and select Export. Within the Export Options window click on the Export button. The options are – Direct to application; To Clipboard; and To File (.xls). For further assistance call the Helpdesk on 020 7467 2575 Copyright 2015 By Telmar Group Inc., All rights reserved MEDIAPLANNER+ WITH TIMEPLAN User Manual Page 25 If you select – Direct to Excel, Excel will automatically launch and open the exported file as an Excel spreadsheet. If you select Direct to Acrobat Reader, the report will autimatically be exported as a pdf. Alternatively, if you select To Clipboard a picture will be taken of the Planning screen. Open Excel and click on the Edit, Paste menu and your report will be displayed. If you select To file you will be asked to give your Microsoft Excel file (xls) a name, type a name in the box and click on Save. Once in Excel click on the File, Open menu, select your file and click on Open. Emailing You may be set up to email your report, to do this click on the Email button on the toolbar. You will be presented with the screen below: For further assistance call the Helpdesk on 020 7467 2575 Copyright 2015 By Telmar Group Inc., All rights reserved MEDIAPLANNER+ WITH TIMEPLAN User Manual Page 26 You have the option of emailing three file types: the Project file (mpf) – this file can only be opened in Mediaplanner; the demographic file(s) (dem, deu); and the Report file, this is an Adobe Acrobat (pdf) file. If you wish to send the Project file and the demographic file(s) with the email tick the two options – Include Project File(mpf) and Include Markets(Dem,Deu). To send the Report file click on the Report button, this window is identical to the Printing Options window, make the necessary changes you wish and click on the Back to Email button. By clicking on the Back to Email button you are generating the report. The Project Info button will show you the file name and location of your demographic file. You are advised to always keep the Copy to Self option ticked for your own records. To send your email type the email address in the ‘To’ field, the subject description in the ‘Subject’ field, and the main text in the large window and click on Send. For further assistance call the Helpdesk on 020 7467 2575 Copyright 2015 By Telmar Group Inc., All rights reserved MEDIAPLANNER+ WITH TIMEPLAN User Manual Page 27 HOW DO I CREATE A COVER RANK FOR NATIONAL DAILIES? Step 1 From the Start Up Dialog Box Click on the Rank button. Step 4 Follow the same format to produce a Cost Rank. Step 2 Select a demographic file by highlighting the file name you desire then click on OK. To create a new demographic click on New Target. Step 3 Choose the first option – Cover Rank, click on the OK button and the schedule will be displayed. For further assistance call the Helpdesk on 020 7467 2575 Copyright 2015 By Telmar Group Inc., All rights reserved MEDIAPLANNER+ WITH TIMEPLAN User Manual Page 28 HOW DO I CREATE A SINGLE SCHEDULE PLAN FOR NATIONAL DAILIES? Step 1 From the Start Up Dialog Box Click on the Single Schedule button. Step 2 Select a demographic group by highlighting the file name you desire then click on OK. Go to Step 6. To create a new demographic Click on New Target. Follow all Steps. Step 3 Select the survey you wish to use. Click OK. Step 9 Enter inserts into the Insertions column to plan. Step 8 If you choose the MANUAL button to enter costs manually, a Cost input window will appear allowing you to type costs in the Unit Cost column. Click on OK. Your schedule will be displayed Step 7 If you choose the FILE button to load costs, a Select Cost File window will appear asking you to choose a file and click on Open. Your schedule will be displayed. Step 4 In the coding grid, code up your target(s). Click Next. Step 5 Select National Dailies, found under Publications A.I.R. (Grouped By Frequency). Click OK. Step 6 You are then asked: ‘Would you like to use costs?’ Choose one of the three options – Click FILE to load costs from file or Click MANUAL to enter costs manually or Click IGNORE to not use costs at this time. For further assistance call the Helpdesk on 020 7467 2575 Copyright 2015 By Telmar Group Inc., All rights reserved MEDIAPLANNER+ WITH TIMEPLAN User Manual Page 29 HOW DO I CREATE A MULTI SCHEDULE PLAN FOR NATIONAL DAILIES? Step 1 From the Start Up Dialog Box Click on the Multi Schedule button. Step 2 Select a demographic group by highlighting the file name you desire then click on OK. Go to Step 6. To create a new demographic Click on New Target. Follow all Steps. Step 3 Select the survey you wish to use. Click OK. Step 9 Enter inserts into multiple Schedule columns to plan. Step 8 If you choose the MANUAL button to enter costs manually, a Cost input window will appear allowing you to type costs in the Unit Cost column. Click on OK. Your schedule will be displayed Step 7 If you choose the FILE button to load costs, a Select Cost File window will appear asking you to choose a file and click on Open. Your schedule will be displayed. Step 4 In the coding grid, code up your target(s). Click Next. Step 5 Select National Dailies, found under Publications A.I.R. (Grouped By Frequency). Click OK. Step 6 You are then asked: ‘Would you like to use costs?’ Choose one of the three options – Click FILE to load costs from file or Click MANUAL to enter costs manually or Click CANCEL to not use costs at this time. For further assistance call the Helpdesk on 020 7467 2575 Copyright 2015 By Telmar Group Inc., All rights reserved MEDIAPLANNER+ WITH TIMEPLAN User Manual Page 30 HOW DO I OPTIMISE A SCHEDULE TO A SPECIFIC BUDGET? Step 1 Either select Optimisation in the Start Up Dialog Box or click on the Optimise button in the toolbar. Step 2 Select a demographic group by highlighting the file name you desire then click on OK. Go to Step 6. To create a new demographic Click on New Target. Follow all Steps. To create a new demographic Click on New Target. Follow all Steps. Step 3 Select the survey you wish to use. Click OK. Step 4 In the coding grid, code up your target(s). Click Next. Step 5 Select the media you wish to use. Click OK. Step 9 Two Opt Columns are added to your Schedule window, one with inserts planning just below the budget and one with inserts planning just above the budget. The Totals window displays the Reach, Impacts, Average Frequency and Total Cost of each optimisation. Step 8 You are asked: ‘Optimise Now?’. Click Yes. Step 7 In the Optimise window, under Stop At… enter your budget next to Budget Of…. Click OK. Step 6 You are then asked: ‘Would you like to use costs?’ Either enter costs manually or load a cost file. For further assistance call the Helpdesk on 020 7467 2575 Copyright 2015 By Telmar Group Inc., All rights reserved MEDIAPLANNER+ WITH TIMEPLAN User Manual Page 31 HOW DO I SAVE A PROJECT FILE? Step 1 To save your schedule, click on the File menu and select Save As, Project. Step 2 You are invited to type information relating to your schedule in the Plan Information window. Step 1 You can skip this by clicking OK. Step 3 A Save As window will appear asking you to give your Project a name. Type a name in the File name box and click on Save. The file will be given the extension - .MPF (Mediaplanner Project Files). Step 3 For further assistance call the Helpdesk on 020 7467 2575 Copyright 2015 By Telmar Group Inc., All rights reserved MEDIAPLANNER+ WITH TIMEPLAN User Manual Page 32 HOW DO I PRINT A REPORT? Step 1 To print click on the Print button on the toolbar, or alternatively use the File menu and select Print. Step 2 If you wish to print the Frequency Distribution report, tick the box. Step 3 The Media and Total Columns can be edited before printing each report, click on the Edit button and move the headings across. Step 4 To add or alter headers and footers click on the Headers/Footers button, by default the headers/footers are given a border and grid lines. To use different font settings click on Font. You can also add a logo by clicking Logo and browsing for it. Step 8 The Plan Information button allows you to display general information that can be printed on reports. To view the report before printing click on the Preview button, to print click on the Print button Step 8 Click on the Target button to select all or some targets for printing. Step 7 If you want to only show a top number of publications on your report click on Only show top x Media. Step 6 To print only the publications with insertions tick the Only Media with insertions box. For further assistance call the Helpdesk on 020 7467 2575 Copyright 2015 By Telmar Group Inc., All rights reserved MEDIAPLANNER+ WITH TIMEPLAN User Manual Page 33 HOW DO I EXPORT A REPORT INTO ANOTHER APPLICATION? Step 1 To export your report into Excel select the Export button on the toolbar, alternatively click on the File menu and select the Export To button and click XLS/PDF/CSV…. Step 2 Within the Export Options window click on the Export button. The options are – Direct to Excel; To clipboard; and To file (.xls). Step 3 Exporting – Direct to Excel automatically loads the report into Excel. If you select - To clipboard you will have to open Excel and paste the report in. Alternatively, choosing – To file opens a window asking you to save your report as a xls file giving it a name. For further assistance call the Helpdesk on 020 7467 2575 Copyright 2015 By Telmar Group Inc., All rights reserved MEDIAPLANNER+ WITH TIMEPLAN User Manual Page 34 GLOSSARY Term Explanation Readership (000) The number of people in a target audience who have seen a single (or average) issue of a publication, shown in units of 1000. % Readership The number of people within a target audience who have seen a publication expressed as a percentage of that target audience. Reach (000) The number of people in the target audience (shown in units of 1000) exposed to a schedule at least once. Reach (%) The number of people exposed to the schedule at least once, shown as a percentage of the target audience. Unit Cost The cost of one insertion in a publication Insertion The number of advertisements placed in a publication Total Cost The number of insertions times the unit cost Avg Frequency The average number of times each person is exposed to the schedule Total Impacts (000) The total number of exposures of a target audience to a schedule regardless of the number of times one person is exposed. The sum of all the publications’ Cum OTS. Total GRPs Total Gross Rating Points. The sum of the ratings for a schedule. It is calculated by dividing Total Impacts by the Population of the Target Market x 100 Net GRPs The sum of the ratings for an individual week of a schedule (within Timeplan) CPT The cost of reaching 1,000 different people in the target audience. Composition Index An index showing how likely someone in a target audience is to have seen a publication. Calculated by dividing the percentage of a publication’s readership who are within the target audience by the percentage of the composition base who are in the target audience, multiplied by 100. Composition Audience (000) The number of people in the composition base who been exposed to a single (or average) issue of a publication, show in units of 1000. % Composition The number of people within a target audience who have seen a publication, expressed as a percentage of those who have seen it in the composition base (normally the group entered as the Universe). Cum % Coverage The number of people who will see at least one of a number of insertions expressed as a percentage of the target audience. For further assistance call the Helpdesk on 020 7467 2575 Copyright 2015 By Telmar Group Inc., All rights reserved MEDIAPLANNER+ WITH TIMEPLAN User Manual Page 35 Term Explanation Cum Coverage 000 If multiple insertions are placed in a publication this will show the number of people in a target audience (shown in units of 1000) who will see at least one of these. CPT Net Coverage The cost of exposing 1000 people in a target audience to a schedule at least once. APX % The % of the average page exposed. CPT APX The total number of exposures + APX factor switched on, divided by the cost of reaching 1000 people. Unit cost = CPT (Cost per 1000) APX APX Impacts CPT AIR The cost of reaching 1000 people average issue readership: Unit Cost = CPT A.I.R A.I.R Adjustment Factors The readership of a publication will be adjusted by the figure entered here. Impact Factors This factor allows you to account for qualitative values of different ads in the same schedule (for example page size or B&W / Colour). Solus Reach % This gives you the % of solus readers of the publication Media Code A 3 letter mnemonic, unique to each publication, by which Mediaplanner can recognise it. Input Order A ranking figure showing the order in which the publications were selected. Population The number of people in the target population Sample The number of respondents which the population figure is based upon Exp. At Least % The percentage of the target audience exposed to a schedule at each frequency level or higher. Exposed % The percentage of the target audience exposed to a schedule at each frequency level and no more. Weight This column shows the weight for a given frequency level in the frequency distribution window. Weight Exposed % The percentage of the target audience exposed to each frequency level and no more. Effective Delivery (x+) The percentage of different people in the target audience exposed to the media schedule at a specified frequency level. For further assistance call the Helpdesk on 020 7467 2575 Copyright 2015 By Telmar Group Inc., All rights reserved