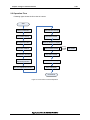
1
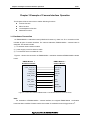
To our customers, Old Company Name in Catalogs and Other Documents On April 1st, 2010, NEC Electronics Corporation merged with Renesas Technology Corporation, and Renesas Electronics Corporation took over all the business of both companies. Therefore, although the old company name remains in this document, it is a valid Renesas Electronics document. We appreciate your understanding. Renesas Electronics website: http://www.renesas.com April 1st, 2010 Renesas Electronics Corporation Issued by: Renesas Electronics Corporation (http://www.renesas.com) Send any inquiries to http://www.renesas.com/inquiry. Notice 1. 2. 3. 4. 5. 6. 7. All information included in this document is current as of the date this document is issued. Such information, however, is subject to change without any prior notice. Before purchasing or using any Renesas Electronics products listed herein, please confirm the latest product information with a Renesas Electronics sales office. Also, please pay regular and careful attention to additional and different information to be disclosed by Renesas Electronics such as that disclosed through our website. Renesas Electronics does not assume any liability for infringement of patents, copyrights, or other intellectual property rights of third parties by or arising from the use of Renesas Electronics products or technical information described in this document. No license, express, implied or otherwise, is granted hereby under any patents, copyrights or other intellectual property rights of Renesas Electronics or others. You should not alter, modify, copy, or otherwise misappropriate any Renesas Electronics product, whether in whole or in part. Descriptions of circuits, software and other related information in this document are provided only to illustrate the operation of semiconductor products and application examples. You are fully responsible for the incorporation of these circuits, software, and information in the design of your equipment. Renesas Electronics assumes no responsibility for any losses incurred by you or third parties arising from the use of these circuits, software, or information. When exporting the products or technology described in this document, you should comply with the applicable export control laws and regulations and follow the procedures required by such laws and regulations. You should not use Renesas Electronics products or the technology described in this document for any purpose relating to military applications or use by the military, including but not limited to the development of weapons of mass destruction. Renesas Electronics products and technology may not be used for or incorporated into any products or systems whose manufacture, use, or sale is prohibited under any applicable domestic or foreign laws or regulations. Renesas Electronics has used reasonable care in preparing the information included in this document, but Renesas Electronics does not warrant that such information is error free. Renesas Electronics assumes no liability whatsoever for any damages incurred by you resulting from errors in or omissions from the information included herein. Renesas Electronics products are classified according to the following three quality grades: “Standard”, “High Quality”, and “Specific”. The recommended applications for each Renesas Electronics product depends on the product’s quality grade, as indicated below. You must check the quality grade of each Renesas Electronics product before using it in a particular application. You may not use any Renesas Electronics product for any application categorized as “Specific” without the prior written consent of Renesas Electronics. Further, you may not use any Renesas Electronics product for any application for which it is not intended without the prior written consent of Renesas Electronics. Renesas Electronics shall not be in any way liable for any damages or losses incurred by you or third parties arising from the use of any Renesas Electronics product for an application categorized as “Specific” or for which the product is not intended where you have failed to obtain the prior written consent of Renesas Electronics. The quality grade of each Renesas Electronics product is “Standard” unless otherwise expressly specified in a Renesas Electronics data sheets or data books, etc. “Standard”: 8. 9. 10. 11. 12. Computers; office equipment; communications equipment; test and measurement equipment; audio and visual equipment; home electronic appliances; machine tools; personal electronic equipment; and industrial robots. “High Quality”: Transportation equipment (automobiles, trains, ships, etc.); traffic control systems; anti-disaster systems; anticrime systems; safety equipment; and medical equipment not specifically designed for life support. “Specific”: Aircraft; aerospace equipment; submersible repeaters; nuclear reactor control systems; medical equipment or systems for life support (e.g. artificial life support devices or systems), surgical implantations, or healthcare intervention (e.g. excision, etc.), and any other applications or purposes that pose a direct threat to human life. You should use the Renesas Electronics products described in this document within the range specified by Renesas Electronics, especially with respect to the maximum rating, operating supply voltage range, movement power voltage range, heat radiation characteristics, installation and other product characteristics. Renesas Electronics shall have no liability for malfunctions or damages arising out of the use of Renesas Electronics products beyond such specified ranges. Although Renesas Electronics endeavors to improve the quality and reliability of its products, semiconductor products have specific characteristics such as the occurrence of failure at a certain rate and malfunctions under certain use conditions. Further, Renesas Electronics products are not subject to radiation resistance design. Please be sure to implement safety measures to guard them against the possibility of physical injury, and injury or damage caused by fire in the event of the failure of a Renesas Electronics product, such as safety design for hardware and software including but not limited to redundancy, fire control and malfunction prevention, appropriate treatment for aging degradation or any other appropriate measures. Because the evaluation of microcomputer software alone is very difficult, please evaluate the safety of the final products or system manufactured by you. Please contact a Renesas Electronics sales office for details as to environmental matters such as the environmental compatibility of each Renesas Electronics product. Please use Renesas Electronics products in compliance with all applicable laws and regulations that regulate the inclusion or use of controlled substances, including without limitation, the EU RoHS Directive. Renesas Electronics assumes no liability for damages or losses occurring as a result of your noncompliance with applicable laws and regulations. This document may not be reproduced or duplicated, in any form, in whole or in part, without prior written consent of Renesas Electronics. Please contact a Renesas Electronics sales office if you have any questions regarding the information contained in this document or Renesas Electronics products, or if you have any other inquiries. (Note 1) “Renesas Electronics” as used in this document means Renesas Electronics Corporation and also includes its majorityowned subsidiaries. (Note 2) “Renesas Electronics product(s)” means any product developed or manufactured by or for Renesas Electronics. Application Note Multimedia Processor for Mobile Applications Camera Interface -------------------------------------------------------------------------------------- EMMA Mobile1 Document No. Date Published S19892EJ1V0AN00 Aug. 2009 2009 Printed in Japan PREFACE PREFACE Purpose The purpose of this document is to specify the usage of EMMA Mobile1 Camera interface. Organization This document includes the following: Introduction Usage of Camera Interface Example of Camera Interface Operation Camera Driver Function Notation Here explains the meaning of following words in text: Related document Note Explanation of item indicated in the text Caution Information to which user should afford special attention Remark Supplementary information The following tables list related documents. Reference Document Document Name Version/date Description S19265EJ1V0UM00_ASMUGIO.pdf 1st Edition SMU&GPIO user’s manual S19268EJ1V0UM00_1chip.pdf 1st Edition 1 chip user’s manual S19285EJ1V0UM00_CAMERA.pdf 1st Edition S19907EJ1V0AN00_GD.pdf 1st Edition GD Spec S19905EJ1V0AN00_I2C.pdf 1st Edition Application Note S19899EJ1V0AN00_LCD.pdf 1st Edition Application Note S19906EJ1V0AN00_IMC.pdf 1st Edition Application Note Camera Interface user’s manual Application Note S19892EJ1V0AN00 PREFACE Disclaimers The information contained in this document is subject to change without prior notice in the future. Refer to the latest applicable data sheet(s) and user manual when designing a product for mass production. No part of this document may be copied or reproduced in any form or by any means without the prior written consent of NEC Electronics. NEC Electronics assumes no responsibility for any errors that may appear in this document. NEC Electronics does not assume any liability for infringement of patents, copyrights or other intellectual property rights of third parties by or arising from the use of NEC Electronics products listed in this documents or any other liability arising from the use of such products. No license, express, implied or otherwise, is granted under any patents, copyrights or other intellectual property rights of NEC Electronics or others. Descriptions of circuits, software and other related information in this document are provided for illustrative purposes in semiconductor product operation and application examples. The incorporation of these circuits, software and information in the design of a customers’ equipment shall be done under the full responsibility of the customer. NEC Electronics assume no responsibility for any losses incurred by customers or third parties arising from the use of these circuits, software and information. While NEC Electronics endeavors to enhance the quality, reliability and safety of NEC Electronics products, customers agree and acknowledge that possibility of defects thereof cannot be eliminated entirely. To minimize risks of damage to property or injury (including death) to persons arising from defects in NEC Electronics products, customers must incorporate sufficient safety measures in their design, such as redundancy, firecontainment and anti-failure features. Note) 1. “NEC Electronics” as used in this document means NEC Electronics Corporation and also includes its majority-owned subsidiaries. 2. “NEC Electronics products” means any product developed or manufactured by or for NEC Electronics (as defined above) 3. All trademarks or registered trademarks are the property of their respective owners. Registered trademarks ® and trademarks™ are not noted in this document. Application Note S19892EJ1V0AN00 INDEX 4/51 CONTENTS Chapter 1 Introduction ................................................................................................................. 8 1.1 Outline .................................................................................................................................... 8 1.2 Development Environment..................................................................................................... 8 Chapter 2 Usage of Camera Interface......................................................................................... 9 2.1 Camera Interface Function..................................................................................................... 9 2.2 Operation Flow......................................................................................................................11 2.3 Details .................................................................................................................................. 12 2.3.1 Camera Initialization ...................................................................................................... 12 2.3.2 Set Camera Timing........................................................................................................ 14 2.3.3 Set Input/Output Size .................................................................................................... 16 2.3.4 Set Frame Address........................................................................................................ 17 2.3.5 Set Reduction ................................................................................................................ 19 2.3.6 Set Transfer Processing ................................................................................................ 20 2.3.7 Set Level Adjustment..................................................................................................... 21 2.3.8 Open Camera Interrupt.................................................................................................. 21 2.3.9 Start DMA Transfer ........................................................................................................ 21 2.3.10 IMC/LCD Setting for Display ....................................................................................... 22 2.3.11 Camera DMA Transfer ................................................................................................. 22 2.3.12 Stop DMA Transfer ...................................................................................................... 22 2.3.13 Close Camera Interrupt ............................................................................................... 22 2.3.14 Stop LCD Display ........................................................................................................ 22 Chapter 3 Example of Camera Interface Operation.................................................................. 23 3.1 Hardware Connection .......................................................................................................... 23 3.2 Initialization........................................................................................................................... 24 3.2.1 Operation Flow .............................................................................................................. 24 3.2.2 Operation Detail............................................................................................................. 25 3.2.2.1 Config Camera Interface as Default ...................................................................................... 25 3.2.2.2 Init Camera Sensor Module................................................................................................... 28 3.2.2.3 Init IMC/LCD for Display........................................................................................................ 28 3.3 Example of Preview Function............................................................................................... 29 3.3.1 Operation Flow .............................................................................................................. 29 3.3.2 Operation Detail............................................................................................................. 30 3.3.2.1 Preview Start ......................................................................................................................... 30 3.3.2.2 Preview Stop ......................................................................................................................... 30 3.4 Example of Mirror Function .................................................................................................. 31 3.4.1 Operation Flow .............................................................................................................. 31 3.4.2 Operation Detail............................................................................................................. 31 3.5 Example of Level Adjustment Function................................................................................ 32 3.5.1 Operation Flow .............................................................................................................. 32 3.5.2 Operation Detail............................................................................................................. 32 Application Note S19892EJ1V0AN00 INDEX 5/51 3.6 Example of Reduction Function ........................................................................................... 33 3.6.1 Operation Flow .............................................................................................................. 33 3.6.2 Operation Detail............................................................................................................. 34 APPENDIX A Camera Driver Function ....................................................................................... 36 A.1 Function List......................................................................................................................... 36 A.2 Global Variable Define ......................................................................................................... 36 A.3 Structure Define ................................................................................................................... 37 A.3.1 em1_cam_gain_t........................................................................................................... 37 A.3.2 em1_cam_size_t ........................................................................................................... 37 A.3.3 em1_cam_frame_t ........................................................................................................ 37 A.3.4 em1_cam_sensor_t....................................................................................................... 38 A.3.5 em1_cam_data_t .......................................................................................................... 38 A.4 Function Details ................................................................................................................... 39 A.4.1 Camera Initialization Function....................................................................................... 39 A.4.2 Camera Gain/Offset Setting Function ........................................................................... 40 A.4.3 Camera Gain/Offset Setting Function ........................................................................... 41 A.4.4 Camera Frame Setting Function................................................................................... 42 A.4.5 Camera Timing Setting Function................................................................................... 43 A.4.6 Camera Mirror Setting Function.................................................................................... 44 A.4.7 Enable/Disable Camera Interface Function .................................................................. 45 A.4.8 Camera DMA Start Function ......................................................................................... 46 A.4.9 Camera DMA Stop Function ......................................................................................... 47 A.4.10 Camera Interrupt Open Function ................................................................................ 48 A.4.11 Camera Interrupt Close Function ................................................................................ 49 A.4.12 Camera Interrupt Handler Function ............................................................................ 50 ANNEX Modification History....................................................................................................... 51 Application Note S19892EJ1V0AN00 INDEX 6/51 LIST OF TABLES Table 1-1 Hardware Environment ....................................................................................... 8 Table 1-2 Software Environment......................................................................................... 8 Table 2-1 Basic Capture Function....................................................................................... 9 Table 2-2 Reduction Function ............................................................................................. 9 Table 2-3 Flipping Function................................................................................................. 9 Table 2-4 Level Adjustment Function................................................................................ 10 Table 2-5 Parameters of Camera Timing.......................................................................... 14 Table 2-6 Discription of Input/Output Size ........................................................................ 16 Table 2-7 Description of Frame Address .......................................................................... 17 Table 2-8 Description of Transfer Processing................................................................... 20 Table 3-1 Description of Camera Interface Initialization ................................................... 25 Table 3-2 Description of Camera Timing Setting .............................................................. 26 Table 3-3 Description of Camera Input/Output Size Setting ............................................. 26 Table 3-4 Description of Frame Address Setting .............................................................. 26 Table 3-5 Description of Transfer Processing Setting ...................................................... 27 Table 3-6 Description of Level Adjustment ....................................................................... 27 Table A-1 LCD Driver Function List .................................................................................. 36 Table A-2 Global Variable Define...................................................................................... 36 Table A-3 Structure Define................................................................................................ 37 Table A-4 Structure of em1_cam_gain_t .......................................................................... 37 Table A-5 Structure of em1_cam_size_t........................................................................... 37 Table A-5 Structure of em1_cam_frame_t........................................................................ 37 LIST OF FIGURES Figure 2-1 Display Progress When Use IMC .................................................................... 11 Figure 3-1 Connection between EMMA Mobile 1’s Evaluation Board and Camera Board23 Figure 3-2 Initialization before Test................................................................................... 24 Figure 3-3 Operation Flow of Preview Start Function ....................................................... 29 Figure 3-4 Operation Flow of Mirror Function ................................................................... 31 Figure 3-5 Operation Flow of Level Adjustment Function................................................. 32 Figure 3-6 Operation Flow of Scale Down Function ......................................................... 33 Figure A-1 Camera Controller Initialization ....................................................................... 39 Figure A-2 Camera Gain/Offset Setting ............................................................................ 40 Figure A-3 Camera Gain/Offset Setting ............................................................................ 41 Figure A-4 Camera Frame Setting .................................................................................... 42 Figure A-5 Camera Timing Setting.................................................................................... 43 Figure A-6 Camera Mirror Setting ..................................................................................... 44 Application Note S19892EJ1V0AN00 INDEX 7/51 Figure A-7 Camera Interface Enable/Disable Setting ....................................................... 45 Figure A-8 Camera DMA Start .......................................................................................... 46 Figure A-9 Camera DMA Stop .......................................................................................... 47 Figure A-10 Open Camera Interrupt ................................................................................. 48 Figure A-10 Open Camera Interrupt ................................................................................. 49 Figure A-12 Camera Interrupt Handler.............................................................................. 50 Application Note S19892EJ1V0AN00 Chapter 1 Introduction 8/51 Chapter 1 Introduction 1.1 Outline This document will show users how to operate Camera interface on EMMA Mobile1 evaluation board. More details about Camera interface feature please refer to EMMA Mobile 1 Camera interface user’s manual. 1.2 Development Environment Hardware environment of this project is listed as below. Table 1-1 Hardware Environment Name Version Maker EMMA Mobile 1 evaluation board (PSKCH2YS-0016-01) - NEC Electronics M20 Kyoto Microcomputer Co. Ltd PARTNER-Jet ICE ARM Software used in this project is listed as below. Table 1-2 Software Environment Version Maker GNUARM Toolchain Name V4.3.2 GNU WJETSET-ARM V5.10a Kyoto Microcomputer Co. Ltd Application Note S19892EJ1V0AN00 Chapter 2 Usage of Camera Interface 9/51 Chapter 2 Usage of Camera Interface 2.1 Camera Interface Function EMMA Mobile 1 Camera interface supports following function. 1) Basic capture function Table 2-1 Basic Capture Function Item Description Image size Max: 4088 pixels (horizontal) x 4092 pixels (vertical) Input data format YUV422 (Support two orders: U0Y0V0Y1 or Y0U0Y1V0) Output data format YUV 422 Interleave YUV 420/422 Semi-Planar YUV 420/422 Planar Data sampling Rising edge Falling edge Both edges Sampling mode Vertical/horizontal sync signal sampling Enable signal sampling ITU-R BT.656 encoding Byte lane switch 2) Big/little endian or 32-bit units specification Reduction Table 2-2 Reduction Function Item 3) Description Sampling method Nearest-neighbor sampling Range 1 to 1/16 (can be set to any size) Horizontal/vertical flip Table 2-3 Flipping Function Item Flipping mode Description No flip Horizontal flip Vertical flip Horizontal and vertical flip (180º rotation) Application Note S19892EJ1V0AN00 Chapter 2 Usage of Camera Interface 4) 10/51 Level adjustment Table 2-4 Level Adjustment Function Item Description Gain range Ygain : 0 to 255/128 Ugain : 0 to 255/128 Vgain : 0 to 255/128 Offset range Yoffset : -128 to 127 Uoffset : -128 to 127 Voffset : -128 to 127 Note: Following formulary shows the relationship between input Y/U/V value and output Y/U/V value. Yout = Yin * Ygain + Yoffset Uout = Uin * Ugain + Uoffset Vout = Vin * Vgain + Voffset Application Note S19892EJ1V0AN00 Chapter 2 Usage of Camera Interface 11/51 2.2 Operation Flow Following figure shows the flow chart of camera. Start Camera Initialization Open Camera Interrupt Set Camera Timing Start DMA Transfer Set Input/Output Size IMC/LCD Setting for Display INT occur Set Frame Address Camera DMA Transfer Set Reduction Function Stop DMA Transfer Set Transfer Clear Camera Interrupt Processing Function Set Level Adjustment Function Stop LCD Display Normal End Figure 2-1 Flow Chart of Camera Operation Application Note S19892EJ1V0AN00 INT Handle Chapter 2 Usage of Camera Interface 12/51 2.3 Details 2.3.1 Camera Initialization Camera initialization progress includes two steps: 1) Camera module initialization This step is different according to the type of camera module. For details, please refer the User’s Manual of camera sensor module. 2) Camera interface initialization EMMA Mobile 1 camera interface initialization including following sequences: Switch pins to camera function Register list: CHG_PINSEL_G00 CHG_PINSEL_G64 CHG_PINSEL_SD1 CHG_PINSEL_G80 Enable input function and pull-down setting for camera pins Register list: CHG_PULL_G72 CHG_PULL2 CHG_PULL_G88 Driver capability setting: Register list: CHG_DRIVE0 CHG_DRIVE1 CHG_DRIVE2 Clock setting Register list: ASMU_GCLKCTRL0 ASMU_AHBCLKCTRL0 ASMU_APBCLKCTRL0 Note ASMU_DIVCAMSCLK Note: The source clock of CAM_SCLK can be selected as PLL2 (default value is 499.712MHz) or PLL3 (default value is 229.376MHz). fcam_sclk = fsource / DIV The DIV range is from 1 to 32. Application Note S19892EJ1V0AN00 Chapter 2 Usage of Camera Interface Reset and cancel reset camera Register list: ASMU_RESETREQ0ENA ASMU_RESETREQ0 Application Note S19892EJ1V0AN00 13/51 Chapter 2 Usage of Camera Interface 14/51 2.3.2 Set Camera Timing The camera timing of EMMA Mobile 1 should be setting according to connected sensor module’s features. About mainly parameters of camera timing, please refer Table 2-5. Table 2-5 Parameters of Camera Timing Item Description Input data Note format Output data Note format Data sampling Sampling mode Signal polarity Limit value DATA_ID = 0 (CA_CSR) Y0U0Y1V0 DATA_ID = 1 (CA_CSR) YUV 422 Interleave PIXELMODE = 1 (CA_CSR) PIXEL_YUV = 0 (CA_CSR) MAINYUV = 0 (CA_DMACNT) YUV 422 Semi-Planar PIXELMODE = 0 (CA_CSR) PIXEL_YUV = 0 (CA_CSR) MAINYUV = 0 (CA_DMACNT) YUV 422 Planar PIXEL_YUV = 1 (CA_CSR) MAINYUV = 0 (CA_DMACNT) YUV 420 Semi-Planar PIXELMODE = 0 (CA_CSR) PIXEL_YUV = 0 (CA_CSR) MAINYUV = 1 (CA_DMACNT) YUV 420 Planar PIXEL_YUV = 1 (CA_CSR) MAINYUV = 1 (CA_DMACNT) Rising edge VS_DET = 0 (CA_CSR) HS_DET = 0 (CA_CSR) DATA_DET = 0 (CA_CSR) CLK_DEGE = 0 (CA_CSR) Falling edge VS_DET = 1 (CA_CSR) HS_DET = 1 (CA_CSR) DATA_DET = 1 (CA_CSR) CLK_DEGE = 0 (CA_CSR) Both edges VS_DET = 0 (CA_CSR) HS_DET = 0 (CA_CSR) CLK_DEGE = 1 (CA_CSR) VS/HS signal sampling SYNCTYPE = 0 (CA_CSR) SYNCMODE = 0 (CA_CSR) Enable signal sampling SYNCTYPE = 0 (CA_CSR) SYNCMODE = 1 (CA_CSR) ITU-R BT.656 encoding SYNCTYPE = 1 (CA_CSR) SYNCMODE = 0 (CA_CSR) Positive logic For VS: VS_POL = 0 (CA_CSR) For HS: HS_POL = 0 (CA_CSR) Negative logic For VS: VS_POL = 1 (CA_CSR) For HS: HS_POL = 1 (CA_CSR) of Conforms to ITU-R BT.656 YUV output data Related Register U0Y0V0Y1 LIMITSEL = 0 (CA_CSR) (Y: 16 to 235, U and V: 16 to 240) Application Note S19892EJ1V0AN00 Chapter 2 Usage of Camera Interface Item 15/51 Description All 8 bits are valid Related Register LIMITSEL = 1 (CA_CSR) (Y, U and V: 0 to 255) Byte lane switch Note For YUV 422 Interleave: Select the range of Y0, Y1, U0, V0. For YUV 420/422 Semi-Planar: (1) Select the range of Y0, Y1, Y2, Y3 (2) Select the range of U0, V0, U1, V1 For YUV 420/422 Planar: (1) Select the range of Y0, Y1, Y2, Y3 (2) Select the range of U0/V0, U1/V1, YUV_OD_BYTELANE (CA_OD_BYTELANE2) Y_BYTELANE(CA_OD_BYTELANE2) DATA_OD (CA_CSR) Y_BYTELANE and UV_BYTELANE (CA_OD_BYTELANE2) Y_BYTELANE UV_BYTELANE (CA_OD_BYTELANE2) U2/V2, U3/V3 Note: More details about the data format and byte lane switch please refer to “4.10 Data Format” of EMMA Mobile 1 Camera Interface User’s Manual. Register list: CA_CSR CA_DMACNT CA_OD_BYTELANE CA_OD_BYTELANE2 Application Note S19892EJ1V0AN00 Chapter 2 Usage of Camera Interface 16/51 2.3.3 Set Input/Output Size Table 2-6 shows the description of input/output size. Table 2-6 Discription of Input/Output Size Item Input Note size Description For VS/HS sync signal sampling: When rising or falling edge: CA_X1R = HS blank * 2 CA_X2R = CA_X1R + input width * 2 CA_Y1R = VS blank CA_Y2R = CA_Y1R + input height When both-edge: CA_X1R = HS blank CA_Y1R = VS blank CA_X2R = CA_X1R + input width CA_Y2R = CA_Y1R + input height Note: The value set to CA_X3R is ignored. More details, please refer to “4.9.1 Vertical/horizontal synchronization signal sampling” of EMMA Mobile 1 Camera Interface User’s Manual. For enable signal sampling: (Normal) When rising or falling edge: CA_X1R = 0 CA_X2R = input width * 2 CA_Y1R = 0 CA_Y2R = input height When both-edge: CA_X1R = 0 CA_X2R = input width CA_Y1R = 0 CA_Y2R = input height CA_X3R = input width * 2 CA_X3R = input width For enable signal sampling: (Cropping) When rising or falling edge: CA_X1R = Cropping starting pixel * 2 CA_X2R = Cropped image X size * 2 CA_X3R = Effective image X size * 2 CA_Y1R = Cropping starting line CA_Y2R = Cropped image Y size + CA_Y1R When both-edge: CA_X1R = Cropping starting pixel CA_X2R = Cropped image X size CA_X3R = Effective image X size CA_Y1R = Cropping starting line CA_Y2R = Cropped image Y size + CA_Y1R Note: Be sure to set CA_X3R. More details, please refer to “4.9.2 Enable signal sampling” of EMMA Mobile 1 Camera Interface User’s Manual. For ITU-R BT.656 signal sampling: When NTSC: CA_X1R = 272 CA_X2R = 1712 CA_Y1R = 0 CA_Y2R = 243 When PAL: CA_X1R = 284 CA_X2R = 1724 CA_Y1R = 0 CA_Y2R = 288 Note: The value set to CA_X3R is ignored. More details, please refer to “4.9.3 ITU-R BT.656 signal sampling” of EMMA Mobile 1 Camer a Interface User’s Manual. Application Note S19892EJ1V0AN00 Chapter 2 Usage of Camera Interface Item Output Note size 17/51 Description CA_DMAX_MAIN = output width CA_DMAY_MAIN = output height For YUV 422 Interleave mode: CA_LINESIZE_MAIN = output width * 2 For YUV Semi-Planar and YUV Planar mode: CA_LINESIZE_MAIN = output width Note: More details about input size setting, please refer to “4.9 Restrictions on Data Transfer Range Values” of EMMA Mobile 1 Camera Interface User’s Manual. More details about output size setting, please refer to “4.8 Data Transfer Range Specification” of EMMA Mobile 1 Camera Interface User’s Manual. Register list: CA_X1R CA_X2R CA_X3R CA_Y1R CA_Y2R CA_DMAX_MAIN CA_DMAY_MAIN CA_LINESIZE_MAIN 2.3.4 Set Frame Address Camera Interface of EMMA Mobile 1 supports two frames: A/B frame. The parameters of frame address include YPLANE_A/B (the transfer destination address of Y plane data), UVPLANE_A/B (the transfer destination address of UV plane data) and VPLANE_A/B (the transfer destination address of V plane data). Table 2 -7 shows the description of frame address setting according to data format type. Table 2-7 Description of Frame Address Data Format Frame Address YUV422 interleave Only set YPLANE_A/B YUV 420/422 Semi-Planar Need set YPLANE_A/B and UVPLANE_A/B YUV 420/422 Planar Need set YPLANE_A/B, UVPLANE_A/B and VPLANE_A/B Register list: CA_YPLANE_A CA_YPLANE_B CA_UVPLANE_A CA_UVPLANE_B Application Note S19892EJ1V0AN00 Chapter 2 Usage of Camera Interface 18/51 CA_VPLANE_A CA_VPLANE_B CA_MAINFRM Remark: More details about frame address setting, please refer to “4.10.2 Memory mapping” of EMMA Mobile 1 Camera Interface User’s Manual. Application Note S19892EJ1V0AN00 Chapter 2 Usage of Camera Interface 19/51 2.3.5 Set Reduction The reduction method of EMMA Mobile 1 is nearest-neighbor sampling, which copies the nearest neighbor pixels of an original image to the pixel positions of a reduced image. Following show the reduction formulary. Output size = Input size * 64 / (64 + RATIO) The range of RATIO is 0 to 959, so the reduction ratio is 1 to 1/16. Register list: CA_XRATIO_MAIN CA_YRATIO_MAIN CA_DMACNT Remark: More details about reduction setting please refer to “4.7 Reduction Method” of EMMA Mobile 1 Camera Interface User’s Manual. Application Note S19892EJ1V0AN00 Chapter 2 Usage of Camera Interface 20/51 2.3.6 Set Transfer Processing The transfer processing of EMMA Mobile 1 includes 3 functions: frame skipping, transfer mode and horizontal/vertical flip control. Table 2-8 shows the description of transfer processing setting. Table 2-8 Description of Transfer Processing Function Description Frame skipping Including 4 types: (1) No skipping (2) 1/2 skipping (3) 1/3 skipping (4) 1/4 skipping Transfer mode Including 3 types: (1) Single transfer (2) Repeat transfer (frame fixed) (3) Repeat transfer (double) Horizontal/vertical flip control Including 4 types: (1) No flip (2) Horizontal flip (3) Vertical flip (4) Horizontal and vertical flip (180º rotation) Register list: CA_DMACNT CA_MIRROR Remark: More details about transfer processing setting, please refer to “4.11 Transfer Processing” of EMMA Mobile 1 Camera Interface User’s Manual. Application Note S19892EJ1V0AN00 Chapter 2 Usage of Camera Interface 21/51 2.3.7 Set Level Adjustment Level adjustment function is used to adjust gain and offset for the input data level. More details about lever adjustment, please refer to “4.6 Level Adjustment” of EMMA Mobile 1 Camera Interface User’s Manual. Register list: CA_BNZR CA_BNGR CA_CBZR CA_CBGR CA_CRZR CA_CRGR 2.3.8 Open Camera Interrupt Camera interrupt of EMMA Mobile 1 has 4 types: 1) main frame overrun 2) main frame transfer completion 3) transfer error 4) vertical synchronization More details about camera interrupt, please refer to “3.2.1 Interrupt registers” of EMMA Mobile 1 Camera Interface User’s Manual. Register list: CA_ENSET CA_ENCLR CA_FFCLR INTC_IT0_IEN0 SEC_IT0_IENS0 Remark: More details about INTC_IT0_IEN0 and SEC_IT0_IENS0 register, please refer to EMMA Mobile 1 One Chip User’s Manual. 2.3.9 Start DMA Transfer Issue camera DMA request to start DMA transfer Register list: CA_DMAREQ Application Note S19892EJ1V0AN00 Chapter 2 Usage of Camera Interface 22/51 2.3.10 IMC/LCD Setting for Display Through IMC/LCD setting, camera image data will be displayed on LCD panel. Remark: More detail about IMC and LCD setting, please refer to EMMA Mobile 1 IMC User’s Manual and EMMA Mobile 1 LCDC User’s Manual. 2.3.11 Camera DMA Transfer After issue camera DMA request, camera interface will start to capture image data from external camera sensor module and save data in specified frame address. In this step, some interrupts should be issued and registered interrupt handler function will be called to handle issued interrupt. Register list: CA_STATUS CA_FFCLR 2.3.12 Stop DMA Transfer Cancel camera DMA request to stop DMA transfer Register list: CA_DMASTOP 2.3.13 Close Camera Interrupt This step will clear all camera interrupts. Register list: CA_ENSET CA_ENCLR CA_FFCLR INTC_IT0_IEN0 SEC_IT0_IENS0 2.3.14 Stop LCD Display This step will stop LCD display. Remark: More detail about LCD setting, please refer to EMMA Mobile 1 LCDC User’s Manual. Application Note S19892EJ1V0AN00 Chapter 3 Example of Camera Interface Operation 23/51 Chapter 3 Example of Camera Interface Operation This chapter will show users how to realize following functions. Preview function Mirror function Level adjustment function Reduction function 3.1 Hardware Connection On EMMA Mobile 1 evaluation board (PSKCH2Y-S-0016-01), there is a JP11 connection which includes all pins of camera interface. For camera evaluation, EMMA Mobile 1 camera board is designed. This board includes: 1) an external camera sensor module 2) power supply circuit for sensor module 3) a connection which is suitable for JP11 Figure 3-1 shows the connection of EMMA Mobile 1 evaluation board and EMMA Mobile camera board. EMMA Mobile 1 Evaluation Board CAM_YUV[7:0] EMMA Mobile 1 Camera Board DATA[7:0] CAM_HS VSYNC CAM_VS HSYNC CAM_CLKI PIXCLK CAM_SCLK SCLK IIC2_SCL SCL IIC2_SDA SDA A_RESETB RESET VP5R0 VDD_5R0 Figure 3-1 Connection between EMMA Mobile 1’s Evaluation Board and Camera Board Note: For evaluation of EMMA Mobile 1 camera interface, the original EMMA Mobile 1 evaluation board has been modified. Please confirm the number of evaluation board is bigger than 50th. Application Note S19892EJ1V0AN00 Chapter 3 Example of Camera Interface Operation 3.2 Initialization 3.2.1 Operation Flow Figure 3-2 shows the operation flow of initialization before test. Start Config Camera Interface as Default Init Camera Sensor Module Init IMC/LCD for Display End Figure 3-2 Initialization before Test Application Note S19892EJ1V0AN00 24/51 Chapter 3 Example of Camera Interface Operation 25/51 3.2.2 Operation Detail 3.2.2.1 Config Camera Interface as Default This step will init camera interface, set camera timing, set input/output size, set reduction, set frame address, set transfer processing, set level adjustment and open camera interrupt. 1) Init Camera Interface Table 3-1 shows the description of camera interface initialization. Table 3-1 Description of Camera Interface Initialization Sequence Registers Description (1) Switch pins to CHG_PINSEL_G00[9:8] = 11b (CAM_SCLK) camera function CHG_PINSEL_G64[31:22] = 1111_1111_11b (CAM_YUV[4:0]) CHG_PINSEL_SD1[1:0] = 10b (CAM_YUV[7:5], CAM_VS, CAM_HS) CHG_PINSEL_G80[25:24] = 10b (CAM_CLKI) (2) Enable pins input CHG_PULL_G72[31:12] = 0100_0100_0100_0100_0100b function (CAM_YUV[4:0]) CHG_PULL2 [23:12] = 0100_0100_0100b (CAM_YUV[7:5], CAM_VS, CAM_HS) CHG_PULL_G88 [19:16] = 0100b (CAM_CLKI) (3) Driver capability Set driver capability to max value setting CHG_DRIVE0[29:28] = 11b CHG_DRIVE1[21:20] = 11b CHG_DRIVE1[13:12] = 11b CHG_DRIVE2[1:0] = 11b (4) Clock setting Set division of CAM_SCLK ASMU_DIVCAMSCLK = 0x113 bit[9:8] = 01b - Set PLL3 (229.376MHz) as source clock bit[4:0] = 0x13 - Division ratio is 20. fcam_sclk = 229.376MHz/20 =11.468MHz close camera clock ASMU_AHBCLKCTRL0[12] = 0b (disable automatic control of CAMLP) ASMU_APBCLKCTRL0[3] = 0b (disable automatic control of CAMPCLKLP) ASMU_GCLKCTRL0[22:20] = 000b (stop clock supply for camera interface) open camera clock ASMU_GCLKCTRL0[22:20] = 111b (supply clock for camera interface) ASMU_AHBCLKCTRL0[12] = 1b (enable automatic control of CAMLP) ASMU_APBCLKCTRL0[3] = 1b (enable automatic control of CAMPCLKLP (5) reset camera ASMU_RESETREQ0ENA[12] = 1b (enable camera reset) ASMU_RESETREQ0[12] = 0b (reset camera) ASMU_RESETREQ0[12] = 1b (cancel reset of camera) ASMU_RESETREQ0ENA[12] = 0b (disable camera reset) Application Note S19892EJ1V0AN00 Chapter 3 Example of Camera Interface Operation 26/51 2) Set Camera Timing Table 3-2 shows the description of camera timing setting. Table 3-2 Description of Camera Timing Setting Item Description Related Register Input data format U0Y0V0Y1 DATA_ID = 0 (CA_CSR) Output data format YUV 420 Planar PIXEL_YUV = 1 (CA_CSR) MAINYUV = 1 (CA_DMACNT) Data sampling Rising edge VS_DET = 0 (CA_CSR) HS_DET = 0 (CA_CSR) DATA_DET = 0 (CA_CSR) CLK_DEGE = 0 (CA_CSR) Sampling mode Enable signal sampling SYNCTYPE = 0 (CA_CSR) SYNCMODE = 1 (CA_CSR) Signal polarity Positive logic For VS: VS_POL = 0 (CA_CSR) For HS: HS_POL = 0 (CA_CSR) Limit value LIMITSEL = 0 (CA_CSR) of Conforms to ITU-R BT.656 YUV output data (Y: 16 to 235, U and V: 16 to 240) Byte lane switch No use No setting 3) Set Input/Output Size Table 3-3 shows the description of input/output size setting. Table 3-3 Description of Camera Input/Output Size Setting Item Description Related Register Input size Input width = 640 Input height = 480 CA_X1R = 0 CA_X2R = 1280 CA_X3R = 1280 CA_Y1R = 0 CA_Y2R = 640 Output size Output width = 640 Output height = 480 CA_DMAX_MAIN = 640 CA_DMAY_MAIN = 480 CA_LINESIZE_MAIN = 640 4) Set Frame Address Table 3-4 shows the description of frame address setting. Table 3-4 Description of Frame Address Setting Data Format YUV 420 Planar Frame Address YPLANE_A = 0x32000000 YPLANE_B = 0x32100000 UVPLANE_A = 0x3204B000 UVPLANE_B = 0x3214B000 VPLANE_A= 0x3205DC00 VPLANE_B= 0x3215DC00 Application Note S19892EJ1V0AN00 Chapter 3 Example of Camera Interface Operation 27/51 5) Set Reduction Because the input size is same with output size, reduction function is not used as default. The related register setting is as following. CA_DMACNT[3] = 0b – does not resize main frames 6) Set Transfer Processing Table 3-5 shows the description of transfer processing setting. Table 3-5 Description of Transfer Processing Setting Item Description Related Register Frame skipping No skipping PCULLR = 00b (CA_DMACNT) Transfer mode Repeat transfer (double) MAINMODE = 11b (CA_DMACNT) Flip control No flip MAIN_MIRROR = 00b (CA_MIRROR) 7) Set Level Adjustment Table 3-6 shows the description of level adjustment setting. Table 3-6 Description of Level Adjustment Item Gain value Description Ygain = Ugain = Vgain = 128 Related Register CA_BNGR = 0x80 CA_CBGR = 0x80 CA_CRGR = 0x80 Offset value Yoffset = Uoffset = Voffset =0 CA_BNZR = 0 CA_CBZR = 0 CA_CRZR = 0 8) Open camera Interrupt This step will cancel camera interrupt masking, clear camera interrupt and enable camera interrupt. The setting of related registers is as following. CA_ENSET = 0x0E – cancel overrun/transfer completion/transfer error interrupt masking CA_FFCLR = 0x0F – clear all interrupt INTC_IT0_IEN0[21] = 0b & SEC_IT0_IENS0[21] = 0b – enable camera interrupt Application Note S19892EJ1V0AN00 Chapter 3 Example of Camera Interface Operation 28/51 3.2.2.2 Init Camera Sensor Module For initialization of camera sensor module, IIC2 interface of EMMA Mobile 1 is used to write/read registers of camera sensor module. About the usage of IIC2 interface of EMMA Mobile 1, please refer to “EMMA Mobile 1 IIC Application Note”. More details about registers of camera sensor module please refer to the User’s Manual of camera sensor module. 3.2.2.3 Init IMC/LCD for Display In this sample, LCD and IMC module will be called to display the rotated image. So need to initialize LCD and IMC module. More detail about these two modules, please refer to “EMMA Mobile 1 IMC Application Note” and “EMMA Mobile 1 LCDC Application Note”. Application Note S19892EJ1V0AN00 Chapter 3 Example of Camera Interface Operation 29/51 3.3 Example of Preview Function 3.3.1 Operation Flow Start No Preview Start? Yes Preview Start Have Previewed? Yes No Enable Camera Interface (call em1_cam_enable() function) Start LCD Display No Preview Stop? Yes Preview Stop Have Stopped Preview? Yes No Disable Camera Interface (call em1_cam_enable() function) No Quit? Yes End Figure 3-3 Operation Flow of Preview Start Function More details about the functions used in this example please refer to “APPENDIX A Camera Driver Function” Application Note S19892EJ1V0AN00 Chapter 3 Example of Camera Interface Operation 30/51 3.3.2 Operation Detail 3.3.2.1 Preview Start 1) Enable Camera Interface It will call “em1_cam_enable()” function. In this function, following operations are executed. Step 1: cancel camera hardware reset CA_MODULECONT = 0x01 Step 2: Start camera DMA transfer CA_DMAREQ = 0x01 2) Start LCD Display This step will call “em1_lcd_start()” function. More detail about this function, please refer to “EMMA Mobile 1 LCDC Application Note”. 3.3.2.2 Preview Stop In this step, will call “em1_cam_enable()” function. In this function, following operations are executed. Step 1: wait until DMA transfer stop. Read the CA_DMAREQ register. If register bit0 is 0, it means that DMA transfer has been stopped. Step 2: camera hardware reset CA_MODULECONT = 0x0 Application Note S19892EJ1V0AN00 Chapter 3 Example of Camera Interface Operation 31/51 3.4 Example of Mirror Function 3.4.1 Operation Flow Start Change Mirror Value? No Yes Modify Mirror Value and Setup Camera Mirror No Quit Yes End Figure 3-4 Operation Flow of Mirror Function Note: Please confirm that preview has been started before mirror function test. 3.4.2 Operation Detail Mirror function of EMMA Mobile 1 Camera Interface has 4 types: 1) No flip 2) Horizontal flip 3) Vertical flip 4) Horizontal and vertical flip (180º rotation) In this example, users will choose the mirror type and then call “em1_cam_set_mirror()” function to setup camera mirror. In this function, will set following registers. CA_MIRROR[3:2] (set flip mode) 00b – No flip 01b – Horizontal flip 10b – Vertical flip 11b – Horizontal and vertical flip (180º rotation) CA_UPDATE = 0x01 (update flip mode setting) Application Note S19892EJ1V0AN00 Chapter 3 Example of Camera Interface Operation 32/51 3.5 Example of Level Adjustment Function 3.5.1 Operation Flow Start Change gain/offset value? No Yes Modify Gain/Offset Value and Setup Level Adjustment No Quit Yes End Figure 3-5 Operation Flow of Level Adjustment Function Note: Please confirm that preview has been started before level adjustment function test. 3.5.2 Operation Detail About the range value of gain/offset, please refer to “Table 2-4 Level Adjustment Function”. In this example, users will change the gain/offset value and then call “em1_cam_set_gain()” function to setup level adjustment. In this function, will set following registers. CA_BNZR CA_BNGR CA_CBZR CA_CBGR CA_CRZR CA_CRGR CA_UPDATE = 0x01 (update gain/offset setting) Application Note S19892EJ1V0AN00 Chapter 3 Example of Camera Interface Operation 33/51 3.6 Example of Reduction Function 3.6.1 Operation Flow Start Reduction Operation? No Yes Modify Output Size Hide display of camera image Stop Camera DMA Transfer Setup Output Size Start Camera DMA Transfer Show Display of Camera Image No Quit Yes End Figure 3-6 Operation Flow of Scale Down Function Note: Please confirm that preview has been started before scale down function test. Application Note S19892EJ1V0AN00 Chapter 3 Example of Camera Interface Operation 34/51 3.6.2 Operation Detail 1) Modify Output Size About the reduction range, please refer to “Table 2-2 Reduction Function”. In this example, the limit value of output size is as following. Max width: 640 max height: 480 Min width: 128 min height: 96 Width step: 32 height step: 24 2) Hide Display of Camera Image This step will call “em1_imc_hide()” function and“em1_imc_refresh()” function. More detail about this function, please refer to “EMMA Mobile 1 IMC Application Note”. 3) Stop Camera DMA Transfer This step will call “em1_cam_dma_stop()” function. In this function, will set following registers. CA_DMASTOP = 0x01 (stop DMA transfer) Read the CA_DMAREQ register until DMA transfer has been stopped. If register bit0 is 0, it means DMA transfer have been stopped. CA_FFCLR = 0x0F (clear all interrupt) 4) Setup Output Size This step will set reduction function and following registers are used. CA_DMAX_MAIN (set the number of horizontal pixels to be transferred) CA_DMAX_MAIN = output width CA_DMAY_MAIN (set the number of lines to be transferred vertically) CA_DMAY_MAIN = output height CA_XRATIO_MAIN (set the reduction ratio in the horizontal direction ) XRATIO = 64 * input width/output size – 64 CA_YRATIO_MAIN (set the reduction ratio in the vertical direction ) YRATIO = 64 * input height/output height – 64 CA_LINESIZE_MAIN (set the number of horizontal pixels to be transferred) Because the data format of camera sensor module is YUV 420 Planar mode, set the value of output width to CA_LINESIZE_MAIN CA_DMACNT[3] (set resize or doesn’t resize) It the output size is same with input size, set CA_DMACNT[3] to 0b. It the output size is smaller than input size, set CA_DMACNT[3] to 1b. 5) Start Camera DMA Transfer This step will call “em1_cam_dma_start()” function. In this function, will set following register. CA_DMAREQ = 0x01 (start DMA transfer) Application Note S19892EJ1V0AN00 Chapter 3 Example of Camera Interface Operation 35/51 6) Show Display of Camera Image This step will call “em1_imc_l2x_config” function, “em1_imc_show()” function and “em1_imc_refresh()” function. More detail about this function, please refer to “EMMA Mobile 1 IMC Application Note”. Application Note S19892EJ1V0AN00 APPENDIX A Camera Driver Function 36/51 APPENDIX A Camera Driver Function A.1 Function List The following table shows the camera driver interface functions: Table A-1 LCD Driver Function List Class Function Name External function em1_cam_init em1_cam_set_gain em1_cam_set_size em1_cam_set_frame em1_cam_set_timing em1_cam_set_mirror em1_cam_enable em1_cam_dma_start em1_cam_dma_stop em1_cam_set_INT_on em1_cam_set_INT_off INT_cam_irq Function Detail Camera interface initialization Gain/offset parameters setting Input/output size parameters setting Frame parameters setting Timing parameters setting Mirror parameters setting Enable/disable camera interface Start camera DMA transfer Stop camera DMA transfer Open camera interrupt Close camera interrupt Camera interrupt handler A.2 Global Variable Define Table A-2 Global Variable Define Variable Name g_frame_count Detail Count the frame number of camera DMA transfer Application Note S19892EJ1V0AN00 APPENDIX A Camera Driver Function 37/51 A.3 Structure Define Table A-3 Structure Define Structure Name em1_cam_gain_t em1_cam_size_t em1_cam_frame_t em1_cam_sensor_t em1_cam_data_t Detail Gain/offset parameters setting structure Input/output size parameters setting structure Frame parameters setting structure Sensor parameters setting structure Camera parameters setting structure A.3.1 em1_cam_gain_t Table A-4 Structure of em1_cam_gain_t Member Detail uchar y_gain Y gain value uchar u_gain uchar v_gain U gain value V gain value char y_offset char u_offset Y offset value char v_offset V offset value U offset value A.3.2 em1_cam_size_t Table A-5 Structure of em1_cam_size_t Member Detail int width Width size int height Height size A.3.3 em1_cam_frame_t Table A-5 Structure of em1_cam_frame_t Member uchar framenum uint A_y_addr uint A_uv_addr int A_v_addr uint B_y_addr uint B_uv_addr uint B_v_addr Detail The number of total frame Y data address of A frame UV data address of A frame V data address of A frame Y data address of B frame UV data address of B frame V data address of B frame Application Note S19892EJ1V0AN00 APPENDIX A Camera Driver Function 38/51 A.3.4 em1_cam_sensor_t Member Detail uint hblank The blank value of CAM_HS signal uint vblank uchar sample_mode uchar yuv_format BOOL data_id BOOL data_od BOOL limit_set BOOL vs_det BOOL hs_det BOOL clk_edge BOOL data_det BOOL vs_pol BOOL hs_pol The blank value of CAM_VS signal The sampling mode YUV data format Input data format Output data format Data limit setting CAM_VS detect timing CAM_HS detect timing CAM_CLKI detect timing Detect timing of data sampling Polarity of CAM_VS Polarity of CAM_HS A.3.5 em1_cam_data_t Member Detail em1_cam_sensor_t sensor em1_cam_size_t in_size em1_cam_size_t out_size em1_cam_gain_t gain em1_cam_frame_t frame uchar transfer_mode uchar mirror_mode uchar skip_mode Sensor parameters setting structure Input size parameters setting structure Output size parameters setting structure Gain/offset parameters setting structure Frame parameters setting structure Camera transfer mode Camera mirror mode Camera skip mode Application Note S19892EJ1V0AN00 APPENDIX A Camera Driver Function 39/51 A.4 Function Details A.4.1 Camera Initialization Function [Function Name] em1_cam_init [Format] void em1_cam_init (void); [Argument] None [Function Return] None [Flow Chart] Start Switch pins to Camera function CHG_PINSEL_G00 CHG_PINSEL_G64 CHG_PINSEL_SD1 CHG_PINSEL_G80 Setting input enable for Camera CHG_PULL_G72 CHG_PULL_2 CHG_PULL_G88 Driver ability configuration Setting Camera output clock frequency Clock and Reset setting about Camera module CHG_DRIVE0 CHG_DRIVE1 CHG_DRIVE2 ASMU_DIVCAMSLCLK ASMU_GCLKCTRL0ENA ASMU_GCLKCTRL0 ASMU_AHBCLKCTRL0 ASMU_APBCLKCTRL0 ASMU_RESETREQ0 ASMU_RESETREQ0ENA Init global variable for frame count End Figure A-1 Camera Controller Initialization [Note] None Application Note S19892EJ1V0AN00 APPENDIX A Camera Driver Function 40/51 A.4.2 Camera Gain/Offset Setting Function [Function Name] em1_cam_set_gain [Format] void em1_cam_set_gain(em1_cam_gain_t *gain); [Argument] em1_cam_gain_t *gain – the structure pointer for gain/offset parameters [Function Return] None [Flow Chart] Start Set gain/offset value Set update register CA_BNGR CA_CBGR CA_CRGR CA_BNZR CA_CBZR CA_CRZR CA_UPDATE End Figure A-2 Camera Gain/Offset Setting [Note] None Application Note S19892EJ1V0AN00 APPENDIX A Camera Driver Function 41/51 A.4.3 Camera Input/Output Size Setting Function [Function Name] em1_cam_set_size [Format] uchar em1_cam_set_size(em1_cam_data_t *cam); [Argument] em1_cam_data_t *cam – the structure pointer for camera parameters [Function Return] DRV_OK DRV_ERR_PARAM [Flow Chart] Start Parameters check? Error Return DRV_ERR_PARAM Ok Set input window Set output window Set reduction CA_X1R CA_X2R CA_X3R CA_Y1R CA_Y2R CA_LINESIZE_MAIN CA_DMAX_MAIN CA_DMAY_MAIN CA_DMACNT CA_XRATIO_MAIN CA_YRATIO_MAIN Set transfer mode and skip mode CA_DMACNT CA_FRAME Set update register CA_UPDATE Return DRV_OK Figure A-3 Camera Gain/Offset Setting [Note] None Application Note S19892EJ1V0AN00 APPENDIX A Camera Driver Function 42/51 A.4.4 Camera Frame Setting Function [Function Name] em1_cam_set_frame [Format] void em1_cam_set_frame(em1_cam_frame_t *frame); [Argument] em1_cam_frame_t *frame – the structure pointer for frame parameters [Function Return] None [Flow Chart] Start Set Frame A Use two Frames? CA_YPLANE_A CA_UVPLANE_A CA_VPLANE_A Error Set Frame B CA_YPLANE_B CA_UVPLANE_B CA_VPLANE_B Return DRV_ERR_PARAM Figure A-4 Camera Frame Setting [Note] None Application Note S19892EJ1V0AN00 APPENDIX A Camera Driver Function 43/51 A.4.5 Camera Timing Setting Function [Function Name] em1_cam_set_timing [Format] uchar em1_cam_set_timing(em1_cam_sensor_t *sensor); [Argument] em1_cam_sensor_t *sensor – the structure pointer for sensor parameters [Function Return] None [Flow Chart] Start Parameters check? Error Return DRV_ERR_PARAM Ok Set Camera control register Set Camera transfer control register Set byte lane control register CA_CSR CA_DMACNT CA_OD_BYTELANE CA_OD_BYTELANE2 Return DRV_OK Figure A-5 Camera Timing Setting [Note] None Application Note S19892EJ1V0AN00 APPENDIX A Camera Driver Function 44/51 A.4.6 Camera Mirror Setting Function [Function Name] em1_cam_set_mirror [Format] void em1_cam_set_mirror(uchar mirror); [Argument] uchar mirror – mirror mode [Function Return] None [Flow Chart] Start Set mirror value CA_MIRROR Set update register CA_UPDATE End Figure A-6 Camera Mirror Setting [Note] None Application Note S19892EJ1V0AN00 APPENDIX A Camera Driver Function 45/51 A.4.7 Enable/Disable Camera Interface Function [Function Name] em1_cam_enable [Format] void em1_cam_enable( BOOL flag ); [Argument] BOOL flag – enable/disable flag [Function Return] None [Flow Chart] Start Enable camera interface? Yes No Cancel camera hardware reset Start DMA transfer (call em1_cam_dma_start() function) CA_MODULECONT CA_DMAREQ Stop DMA transfer (call em1_cam_dma_stop() function) Hardware reset about Camera interface CA_DMASTOP CA_DMAREQ CA_FFCLR CA_MODULECONT End Figure A-7 Camera Interface Enable/Disable Setting [Note] About “em1_cam_dma_start()” function and “em1_cam_dma_stop()” function, please refer “A.4.8 Camera DMA Start Function” and “A.4.9 Camera DMA Stop Function”. Application Note S19892EJ1V0AN00 APPENDIX A Camera Driver Function 46/51 A.4.8 Camera DMA Start Function [Function Name] em1_cam_dma_start [Format] void em1_cam_dma_start( void ); [Argument] None [Function Return] None [Flow Chart] Start Start DMA transfer CA_DMAREQ End Figure A-8 Camera DMA Start [Note] None Application Note S19892EJ1V0AN00 APPENDIX A Camera Driver Function 47/51 A.4.9 Camera DMA Stop Function [Function Name] em1_cam_dma_stop [Format] void em1_cam_dma_stop( void ); [Argument] None [Function Return] None [Flow Chart] Start CA_DMASTOP Stop DMA transfer DMA stopped? No Clear camera interrupt Yes CA_DMAREQ CA_FFCLR End Figure A-9 Camera DMA Stop [Note] None Application Note S19892EJ1V0AN00 APPENDIX A Camera Driver Function 48/51 A.4.10 Camera Interrupt Open Function [Function Name] em1_cam_set_INT_on [Format] void em1_cam_set_INT_on( void ); [Argument] None [Function Return] None [Flow Chart] Start Cancel camera interrupt mask CA_ENSET Clear all camera interrupt CA_FFCLR Enable camera interrupt INTC_IT0_IEN0 SEC_IT0_IENS0 End Figure A-10 Open Camera Interrupt [Note] None Application Note S19892EJ1V0AN00 APPENDIX A Camera Driver Function 49/51 A.4.11 Camera Interrupt Close Function [Function Name] em1_cam_set_INT_off [Format] void em1_cam_set_INT_off( void ); [Argument] None [Function Return] None [Flow Chart] Start Disable camera interrupt INTC_IT0_IEN0 SEC_IT0_IENS0 Mask all camera interrupt CA_ENCLR Clear all camera interrupt CA_FFCLR End Figure A-10 Open Camera Interrupt [Note] None Application Note S19892EJ1V0AN00 APPENDIX A Camera Driver Function 50/51 A.4.12 Camera Interrupt Handler Function [Function Name] INT_cam_irq [Format] void INT_cam_irq( void ); [Argument] None [Function Return] None [Flow Chart] Start Read interrupt status and clear interrupt Frame transfer complete interrupt? CA_STATUS CA_FFCLR Yes No Count frame number Print interrupt type End Figure A-12 Camera Interrupt Handler [Note] None Application Note S19892EJ1V0AN00 ANNEX Modification History 51/51 ANNEX Modification History Number Ver 1.00 Modification Contents Author New version Application Note S19892EJ1V0AN00 Date Aug,4,2009