1
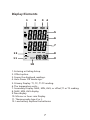
Dual Channel Digital Thermometer
User Manual
12
Contents
1.Specifications.............................................................................................. 4
2.Features............................................................................................................ 5
3.Button................................................................................................................. 6
4.Setup Options................................................................................................. 8
5.Auto Power Off mode.......................................................................... 9
6.Measuring Temperatures................................................................. 9
The two input contact thermometers offer fast response and
laboratory accuracy. These thermometers work with tow K-type
or J-type thermocouples as temperature sensors, and it offered
0.1°C/0.1°Fresolution.
1.Specifications
General Specifications
Battery
AAA 3 x 1.5V
Operating Temperature 0°C to 50°C (4°F to 122°F)
Noncondensing
Storage Temperature
10°C to 50°C (14°F to 122°F)
Temperature Range:
K type thermocouples
-200°C to 1372°C (-328°F to 2501 °F)
J type thermocouples
-210°C to 1100°C (-346°F to 2012°F)
Temperature accuracy
T1, T2
[0.15%rgd+1°C(1.8 °F)]
Above –100°C (-148°F)
T1, T2
[0.5%rgd+2°C(3.6 °F)]
Blow –100°C (-148°F)
T1-T2
[0.5%rgd+1°C(1.8°F)]
Display Resolution
0.1°C /°F / K <1000 ,1°C /°F / K >1000
4
2.Features
• Large backlit display shows any combination of T1, T2, T1-T2, plus
MAX, MIN, AVG.
• Relative time clock on MAX MIN and AVG provides a time reference
for major events.
• Electronic Offset function allows compensation of thermocouple
errors to maximize overall accuracy.
• Work with tow K-type or J-type thermocouples as temperature
sensors.
• Readout in °C, °F, or Kelvin (K).
• Auto Power Off mode (Sleep mode) increases battery life.
5
3.Button
• Press
to turn the thermometer on or off.
• When the thermometer is in Setup mode, press
option and press
Enter
Enter
to enter a setup
again to store the displayed setting in memory.
T1 T2
• Press
T 1 -T 2
• Press
CFK
to toggle showing the T1, T2, and T1-T2 (differential
temperature measurement) in the primary and secondary.
to switch between Celsius (°C), Fahrenheit (°F), and Kelvin
(K).
• Press
HOLD
to freeze or unfreeze the displayed readings. When the
thermometer is in Setup mode, press HOLD to scroll to the Setup
option you want to change or press HOLD to increase the displayed
setting.
• Press
Max
Min
to step through the maximum, minimum, and average
readings. When readings, shows the maximum, minimum, and
average of the logged readings. To exit the MIN/MAX/AVG mode,
press the
button for 3 seconds to return to normal operation.
When the thermometer is in Setup mode, press to scroll to the
Setup option you want to change or press
to decrease the
displayed setting.
Max
Min
Max
Min
Max
Min
• Press
Set
button to turn on the backlight. Press it again to turn off
the backlight. Press Set button for 3 seconds to start or exit Setup.
(See "Changing Setup Options.")
6
Display Elements
4
1
2
3
SETUP
OFFSET
HOLD
5
T1
°C
°F
K
T2
T1
6
7
T2
12
REC
MAX
MIN
AVG
8
TYPE
11
KJ
hour:min
min:sec
9
10
1. Entering or Exiting Setup.
2. Offset option.
3. Freeze the displayed readings.
4. Auto Power Off mode sign.
5. Primary Display: T1, T2, T1-T2 reading.
6. The temperature units. .
7. Secondary Display: MAX, MIN, AVG, or offset,T1 or T2 reading.
8. MAX, MIN, AVG display.
9.Time display.
10. Min:sec or hour: min Display.
11. Thermocouple type K or J.
12. Low battery. Replace the batteries.
7
Using the thermocouple (s)
• Plug the thermocouple(s) into the T1or T2 input connector(s).
• Press to turn on the thermometer. After 1 second the thermometer
displays the first reading. If no thermocouple is plugged into the
selected input or the thermocouple is "open," the display shows "- - - -".
Changing Setup Options
Use Setup to change offset, sleep mode settings. The thermometer
stores the settings in its memory.
4.Setup Options
Option
Menu item
Settings
Type
TYPE
K or J
Offset
OFFSET
T1 or T2
Sleep Mode
SLP
On (sleep mode on)or
0FF (sleep modeoff)
Entering or Exiting Setup
When the thermometer is in Setup mode, the display shows SETUP.
Press Set button for 3 seconds start or exit Setup.
Changing a Setup Option
• Press
• Press
• Press
MAN
NIM
HOLD
or
Enter
to indicate that you want to change this setting.
HOLD
or
MAN
NIM
to scroll to the setup option you want to change.
until the setting you want to use appears on the
display.
• Press
Enter
to store the new setting in memory.
Notes:
Setup is disabled in MIN MAX mode.
8
Offset
The primary display shows the temperature plus the offset and the
secondary display shows the offset. .You can store individual offsets
for T1, T2.
5.Auto Power Off mode
The thermometer enters sleep mode (default). That is to say, the meter
will automatically shut off after 20 minutes if no button press occurs
for 20 minutes.
When the thermometer is in Setup mode, the display shows SETUP.
Press HOLD or
to scroll to the “ SLP ” page . Press Enter to indicate “On”
or “OFF”. Press HOLD or
until the setting you want to use appears on
the display. Press Enter to store the new setting in memory. On (sleep
mode on) or 0FF (sleep mode off).
MAN
NIM
MAN
NIM
6.Measuring Temperatures
Connecting a Thermocouple
To change the thermocouple type, see “Changing Setup Options.”
The North American ANSI Color Code is:
Type
J
K
Color
Black
Yellow
• Plug a thermocouple into the input connector(s).(Make sure that
the polarity is correct.)
• Set the thermometer for the correct thermocouple type.
Displaying Temperatures
• Press to select the correct temperature scale.
• Hold or attach the thermocouple(s) to the measurement location.
CFK
The temperature reading appears in the primary display.
9
• Press to toggle between showing the T1, T2, , and T1-T2 readings
in the primary or secondary display.
Notes
The display shows "- - - -" when a thermocouple is not connected.
The display shows OL (overload) when the temperature being measured
is outside the thermocouple’s valid range.
T1 T2
T 1 -T 2
Holding the Displayed Readings
• Press
HOLD
to freeze the readings on the display .The display shows
HOLD.
• Press
T1 T2
to toggle showing the T1, T2, or T1-T2 readings in the
primary or secondary display.
• Press
T 1 -T 2
HOLD
again to turn off the HOLD function.
Viewing the MIN, MAX, and AVG Readings
• Press
MAN
NIM
• Press
MAN
NIM
to step through the maximum (MAX), minimum (MIN), or
the average (AVG) readings. The elapsed time since entering MIN
MAX mode, or the time at which the minimum or maximum occurred
appears on the display.
button for 3 seconds to exit MAX, MIN and AVG mode
Using the Offset to Adjust for Probe Errors
Use the offset option in Setup to adjust the thermometer’s readings to
compensate for the errors of a specific the thermocouple and IR
temperature. The allowable adjustment range is ± 5.0 0C or ± 9.0 0F.
• Plug the thermocouple into the input connector.
• Place the thermocouple in a known, stable temperature environment
(such as an ice dry well calibrator).
• Allow the readings to stabilize.
• In Setup change the offset until the primary reading matches the
calibration temperature.(“Changing Setup Options.").
10
Replacing the Batteries
•
•
•
•
Turn off the thermometer if necessary.
Loosen the screw and remove the battery door.
Replace 1.5V batteries.
Replace the battery door and tighten the screw.
11
12