1
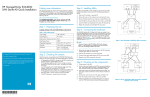
HP StorageWorks EVA4100
SAN Starter Kit quick installation
Finding more information
This document provides an overview of the steps to install the HP
EVA4100 SAN Starter Kit. For more information, see the list of
information sources in the HP EVA4100 SAN Starter Kit release notes,
available on the Manuals page of the HP Business Support Center
website:
http://www.hp.com/support/manuals
Click Disk Storage Systems under Storage, and then select HP
StorageWorks 4100/6100/8100 Enterprise Virtual Arrays under EVA
Disk Arrays.
Section 1. Preparing the site
To ensure continuous, safe, and reliable operation, ensure that the
EVA4100 operating environment meets the following requirements:
Table 1 Site requirements
4. Insert the HBA into the empty PCI-e slot, and then press firmly to
seat the HBA.
Server X
2. Install an SFP transceiver in a licensed switch port.
Front: 16 inch (406 mm)
Rear: 11.8 inch (300 mm)
Fourth edition: July 2007
The information in this document is subject to change without notice.
Windows is a U.S. registered trademark of Microsoft Corporation.
Printed in Puerto Rico.
www.hp.com
Section 2. Checking kit contents
The following items are included in the HP EVA4100 SAN Starter Kit.
Verify that you have all the items listed before beginning the installation.
• HP StorageWorks EVA4100—Includes two HSV200-B controllers and
one disk enclosure, all preinstalled in the rack
• HP StorageWorks SAN Switch 4/8 Base—Provides a connection
between the EVA4100 and the servers; preinstalled and cabled in
the rack
• Four HP StorageWorks FC2142SR 4Gb PCI-e HBAs (LPe1150)—Installed
in the servers connected to the EVA4100
• HP EVA4100 SAN Starter media kit—Includes Emulex EZPilot and HP
StorageWorks Command View EVA management software
• Fiber optic cables—Used to connect the switch to the HBAs
• 4 Gb SFP Transceivers—Inserted into the switch ports
• License Entitlement Certificate for HP StorageWorks Command View
EVA —Enables up to 4 licenses to use (LTUs), for a total of 4TB
Section 3. Installing HBAs
An HP FC2142SR HBA must be installed in a server PCI-e slot. HBA
installation procedures vary by server; however, the following procedure
is typical:
1. Ensure the computer is powered off.
*5697-6725*
2. Open the server cover.
3. Remove the blank panel from an empty x4 or higher PCI-e bus slot.
Drive Enclosure
B
A
(installed and cabled
in the rack)
A
Figure 1 Non-HA (high availability) SAN connections
Server Z
3. Connect a fiber optic cable between the SFP and a server HBA.
Server X
4. Repeat the previous 3 steps for each HBA that will be connected to
the switch.
HBA
HBA
(Windows management
server running Emulex EZPilot
and HP Command View EVA)
HBA
HBA
5. Start the server. For each Found New Hardware dialog box that
appears, click Cancel.
Switch 2
Section 5. Powering on the components
© Copyright 2006 Hewlett-Packard Development Company, L.P.
B
25178c
2.7A
Clearance
FP1
FP2
EVA4100
Controller
B
Loop
Pair 1
FP1
FP2
EVA4100
Controller
A
Loop
Pair 1
There are 16 ports on the HP 4/8 Base SAN Switch, but only
ports 0 through 7 are licensed for use. The label on the switch
indicates which ports are available for use.
Input Current - Maximum per line
10%–90% non-condensing
Switch
Server W
NOTE:
47–63 Hz
Humidity
HBA
HBA
The EVA4100 and the HP 4/8 Base SAN Switch are installed in the rack
and cabled before shipment. The only remaining task is to connect a
fiber optic cable from a port on the switch to each server HBA. The
non-high availability (HA) SAN connections used with the standard
product are shown in Figure 1. This is the configuration used in most
installations. The HA SAN connections used with an optional second
switch are shown in Figure 2.
Input frequency
50°–95°F (10°–35°C)
HBA
Section 4. Connecting the hardware
1. Remove the dust caps from the connectors on the SFP transceivers
and fiber optic cables you will be using.
Operating Temperature
HBA
6. Close the server cover.
180–254 VAC
638W
Server Y
5. Secure the HBA's mounting bracket to the case with the panel clip.
Input voltage
Total System Power
Server Z
(Windows management
server running Emulex EZPilot
and HP Command View EVA)
Switch 1
1. Connect power to the rack.
2. Switch on the circuit breakers on both EVA rack power distribution
units. Verify that the drive enclosure is operating properly. The
status indicator and the power indicator should be on (green).
FP1
FP2
EVA4100
Controller
B
Loop
Pair 1
FP1
FP2
EVA4100
Controller
A
Loop
Pair 1
3. Wait three minutes and verify that all disk drives are ready. The
drive ready indicator and the drive online indicator should be on
(green).
4. Set the power switch on the rear of the upper controller to On.
B
Drive Enclosure
B
5. Wait 10 seconds, and then power on the lower controller.
A
(installed and cabled
in the rack)
A
6. When the switch and controllers have completed their power-on
sequence, continue with Section 6.
25177b
Figure 2 HA (or dual-fabric) SAN connections (requires
second switch)
Section 6. Entering the world wide name
and checksum
Enter the EVA4100 world wide name (WWN) and checksum using the
Operator Control Panel (OCP) on the front of one of the controllers.
Labels attached to the front of the rack beside the controllers identify
the WWN and checksum.
For more information on using the OCP, refer to the HP StorageWorks
4x00/6x00/8x00 Enterprise Virtual Array user guide.
1. Press
Press
or
until the first character of the WWN is displayed.
to accept this character and select the next character.
2. Repeat Step 1 to enter the remaining characters.
4. Verify that the initial WWN checksum displays 0 in both positions.
• If you registered previously, License owner (End-User) information
automatically populates.
• If you did not register previously or if you did not select the I am
the License owner box, enter your contact information under
License owner (End-User) information.
5. Press
Click Next.
3. Press Enter to accept the WWN and select the checksum entry
mode.
Press
or
until the first checksum character is displayed.
to accept this character and select the second character.
or
until the second character is displayed. Press Enter
6. Press
to accept the checksum and exit.
Section 7. Obtaining an HP Command
View EVA license
HP recommends that you obtain the license key from the HP Webware
website. See your License Entitlement Certificate for other options to
request a license key if you are unable to use the online option.
NOTE:
If the Windows management server has Internet access, you
can obtain a license key during installation of the EZPilot
management software See Section 8. The installation procedure
includes a link to the HP Webware website in the EVA Setup
license options window.
To obtain a license key from HP Webware:
1.
Go to http://webware.hp.com and click Generate license(s) under
Webware licensing.
2. Obtain the HP order number from the License Entitlement Certificate,
enter it in the Order number box, and then click Next.
Based on information obtained from the order, a list of available
products appears on the Product selection window.
3. Select the product identified on your License Entitlement Certificate
from the product list, and then click Next.
The Order product(s) detail window opens.
4. Enter the following information:
• The Number of LTUs listed as Quantity Ordered on your License
Entitlement Certificate (typically 4)
• The WWN for the array
Use the WWN value that you entered in Section 6. Use the
exact format displayed in the OCP (xxxx-xxxx-xxxx-xxxx [19
alphanumeric characters including dashes]).
The License certificate page appears.
7.
Click the link on the certificate page to save the license
key/password file in the format filename.dat.
8. Save the licence key/password file to a location of your choice.
You will use it in Section 8.
9. Exit the web browser.
5. Follow the on-screen instructions to install the EZPilot management
software.
8. When the creation is complete, click Next.
Section 9. Installing EZPilot on a
Windows non-management server
You must install the EZPilot software on all Windows non-management
servers connected to the EVA4100.
1. Insert the EZPilot Windows Installation CD into the drive on the
Windows non-management server.
The server must be running Windows Server 2003 SP2.
The EZPilot dialog box opens.
Prerequisites for installing EZPilot
Before installing the EZPilot software, ensure the following conditions
are met:
• Record the switch IP address, gateway, and subnet mask. You will
use this information during installation.
• Remove any Emulex, Brocade, or HP StorageWorks software
currently installed on the server.
Section 8. Installing Emulex EZPilot on
the Windows management server
There must be only one Windows management server connected to the
EVA4100. During the installation, the SAN components are configured
and the EVA4100 is initialized. For more information on EZPilot, see
the Emulex EZPilot User Manual.
To install Emulex EZPilot Manager and HP Command View EVA on
a Windows management server:
1. If you did not save the license key/password file on the server
or on a networked drive mapped to the server, copy the license
key/password file generated in Section 7 to the management server.
2. Insert the EZPilot Windows Installation CD into the drive on the
Windows server you will use as the management server.
2. Click Next.
The Installation Options dialog box opens.
3. Click Install.
Do not select the HP EVA Management Server box.
4. Follow the on-screen instructions to install the non-management
software.
Repeat this procedure to install EZPilot on all Windows non-management
servers connected to the EVA4100.
Section 10. Creating logical drives using
EZPilot Manager
To make the EVA4100 storage available to your servers, you must create
logical drives and assign them to the appropriate host. This is done
using EZPilot Manager. For complete information on creating logical
drives, see the Emulex EZPilot User Manual.
NOTE:
You must install the Emulex driver and utilities on any Linux
servers connected to the EVA4100 to make them visible to
EZPilot Manager and to assign logical drives to your Linux
servers (see Section 11).
The server must be running Windows Server 2003 SP2.
3. After the file is verified, the EZPilot dialog box opens. Click Next.
The Installation options window opens.
1. On your Windows management server, click Start.
2. Select All Programs > Emulex > EZPilot Manager Utility.
EZPilot Manager launches, displaying the Discovery Information
screen.
If you are obtaining the license key during EZPilot installation,
you can copy the WWN from the EZPilot EVA Setup license
options window and paste it into the web browser.
3. If there are no logical drives on the EVA4100, you will be prompted
to create them with the EZPilot Add logical Drive Wizard. Click Yes.
4. Select the Logical Drive Type you want to create, assign a size, and
optionally a name to the new logical drive, and then click Next.
Click Next.
The Members sign-in window opens.
The Logical Drive Host Assignment dialog box opens.
5. Enter your information:
• If you registered previously, enter your email address and
password in the Existing members box, and then click Sign-in.
• If you did not register previously, enter your email address,
create a password, and then reenter your password in the First
time users box. Click Sign-in.
5. Select the host (and its adapters) to which you want to assign the
logical drive. If Assign to this host only is selected, only
the local host and its adapters are displayed. Typically, a logical
drive is assigned to only one host. Click Next.
The Logical Drive Initialization and Volume Access dialog box
opens.
The Address Information window opens.
6. You can optionally format the drive and assign a drive letter or
mount directory, and then click Next.
6. Complete the requested information.
The Logical Drive Creation dialog box opens.
If you are the license owner, select the I am the License owner box.
4. Select the HP EVA Management Server box, and then click Install.
7. To create the logical drive, verify the logical drive parameters, and
then click Create Logical Drive.
The Finish window opens.
9. To create an additional logical drive, click Next, and then repeat
Step 4 through Step 8.
10. When you are finished creating logical drives, clear the Create
another logical drive box, and then click Finish.
Section 11. Installing the Emulex driver
and utilities on a Linux non-management
server
This section applies only if you are connecting Linux servers to the
EVA4100. A Linux non-management server must be running one of the
following Linux versions:
• Red Hat Enterprise Linux 4 (latest update)
• SUSE Linux Enterprise Server 9 (latest service pack)
• SUSE Linux Enterprise Server 10 (latest service pack)
For complete instructions on installing the Emulex drivers and utilities
for Linux, see the documentation on the Emulex Linux Installation CD
included in the HP EVA4100 SAN Starter Media kit.
To create a Linux non-management server:
1. Ensure a supported version of the Linux operating system is installed
on the server.
2. Update with the ProLiant Support Pack (for HP servers).
3. Install the Emulex driver for Linux.
4. Install the Emulex HBAnyware utility to configure the HBAs with the
correct firmware/BIOS.
5. Install the Emulex MultiPulse utility on your system to allow for
multipathing in a High Availability (HA) environment.