1
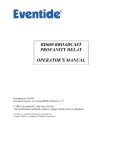
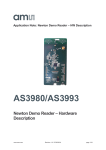
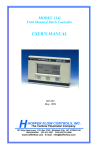
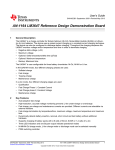
FloodStop by OnSite PRO™
Leak Detection & Automatic
Water Shut-off System
Installation and
Operating
Manual
• Canbetestedatanytimewiththetouchofabutton
• Canaccommodateadditionalwaterleaksensors
• 1YearLimitedWarranty
4. Position the FloodStop Valve so that the arrow on the
side of the valve is pointing to the water heater. Install
the FloodStop Valve between the rigid water line
coming from the manual cold water valve and the
water heater.
This Package Contains:
A (1) FloodStop Motorized Brass
Valve
B (1) Control Panel
C (1) Leak Sensor with Paper Sleeve
D (1) AC Adaptor
E (1) Wire Harness
F (1) Hook & Loop Mounting Pad
G (2) Mounting Screws with Anchors
NOTE: The FloodStop Valve should be installed within 2
feet of the water heater so that the Leak Sensor can lay
flat on the floor.
B
A
Cold
D
F
G
E
C
Check to make sure everything in the package matches the Contents Listing above.
Read the instructions thoroughly before installing or operating the FloodStop system.
© 2012 OnSite PRO Inc.
FloodStop Water Heater Kit
FloodStop by OnSite PRO
™
Congratulations on your purchase of a FloodStop by OnSite PRO™
electronic water leak detection and automatic water shut-off kit for
water heaters. This product has been designed to give you years of
reliable service and minimize home water damage by detecting water leaks and
automatically shutting off the water supply.
To ensure proper installation and to maximize the performance of your
FloodStop water leak detection system, please read this manual
thoroughly.
PLEASE READ CAREFULLY BEFORE PROCEEDING:
If a leak is detected, the FloodStop Valve will shut off the water going to the
water heater. This will stop the continuous flow of water from the water supply
to the water heater. However, all or some of the water that is already in the water
heater may still leak out onto the floor.
NOTE: This unit was shipped with an installation and operating manual that
contains important information about its operation. If you are
installing this unit for use by others, we recommend you leave this manual – or a
copy of it – with the user.
Water Heater Kit FEATURES:
• ControlPanelhaseasytoread,lightedfunctionbuttons
• ACPowerwithbatterybackup–Forcontinuedoperationinthe event of power outages
• Solidbrass,fullportmotorizedballvalvefordependable,long
lasting performance
• Valveautomaticallyshutsoffthewatersupplywhenaleakisdetected
• Automaticmonthlymaintenancecyclingofthevalvetoensurereliableoperation
• Valvecanbeopenedandclosedwiththetouchofabutton
• Activatesanaudiblealarmwhenaleakisdetected
• Mutebuttontosilencetheaudiblealarm
• Canberesetandreusedcontinuouslywiththetouchofabutton
4.
Warning: Do not put finger(s) inside FloodStop Valve. Risk of serious injury may occur.
Caution: Do not grip plastic motor drive for leverage when tightening FloodStop Valve.
Preparation
5. Mount the FloodStop Control Panel in an easily
accessible location within 30 inches of the FloodStop
Valve. You may mount the panel using the screws and
anchors or Hook & Loop Mounting Pad provided. When
using the Hook & Loop Mounting Pad, make sure the
adhesive is put on a clean, dry surface.
5.
NOTE: Depending on the location you pick, and the distance
between the Control Panel and the FloodStop Valve, you
may need to purchase a FloodStop Control Panel to Valve
Extension Wire, Model # CEXT-09 (available where you
purchased your FloodStop System).
6. With the contacts of the wire harness connector facing
you, plug the 6-pin connector end of the Wire Harness
into the bottom of the Control Panel.
6.
WARNING:
- For use with water only.
- Do not install on gas line.
6 pin connector
STOP: You may need to purchase additional fittings to install the FloodStop Valve. If you
are not sure how to install the FloodStop Valve to your existing water line, we recommend that you contact a licensed Plumber.
(NO) Output &
Sensitivity Adj
Installation
1. Shut off main water supply valve.
1.
Step 4 instructs you to install the FloodStop Valve
between the rigid water line coming off the manual
cold water valve and the water heater. Most rigid
lines will be copper. Evaluate your line and determine which size adapter fitting you will need. Then
determine what size union you will need between
the FloodStop Valve and the water heater. Note that
in some cases you can use a flexible or corrugated
water heater connector in place of a union.
7. Take the short round wire coming from the Control
Panel and plug it into the wire coming from the
FloodStop Valve. Make sure the arrow on the
side of each plug lines up with each other.
NOTE: The Leak Sensor comes with a paper sleeve. If the
Leak Sensor is going to be placed in a metal water heater
pan, make sure you leave the paper sleeve on. If the Leak
Sensor makes contact with metal, it will signal the
FloodStop Valve to shut off. The paper sleeve acts as a
barrier between the Leak Sensor and the metal. When the
paper sleeve becomes wet, it will signal the FloodStop Valve
to shut off. If the Leak Sensor will not be contacting metal,
you may remove the paper sleeve.
CAUTION: Make sure the FloodStop Valve is not
connected to the adaptor fitting(s) when soldering.
8. Connect plug on end of long flat wire coming from
Control Panel to either set of prongs on the Leak
Sensor, pushing until plug snaps in place. Then place
Leak Sensor on the floor next to the water heater,
preferably on the side that is in line with the floor drain.
2. Open faucet nearest water heater to relieve
water pressure.
NOTE: Additional Leak Sensors can be connected together
for added protection. For additional Leak Sensors, purchase FloodStop Water Leak Sensor, Model # XS-01 (available where you purchased your FloodStop System).
CAUTION: Do not place Leak Sensor or cord in a walk way
or other location that may cause someone to trip and fall.
3. Shut off the manual cold water valve that supplies
water to the water heater. Note that the top of the
water heater will usually be marked “Cold” or “Inlet”
at the point where the cold water line is connected.
7.
3.
8.
9. Plug the pin on the end of the AC Adaptor cord into the bottom of the Control Panel, and then plug AC Adaptor
into a wall outlet. Green indicator lights will start to
flash, showing you have power. Note that a red low battery indicator light will also flash about every 30
seconds, and the unit will beep once a minute until the batteries are installed.
9.
Helpful Hints
• If the Leak Sensor Paper Sleeve is misplaced or becomes unusable, a paper towel can be used in its place.
•
NOTE: If a nearby wall outlet is not available you will need to
purchase a thin low voltage FloodStop “AC Adaptor
Extension Wire” Model # WAE-09 (available where you
purchased your FloodStop System). This wire extends the
length of the AC Adaptor cord.
The Leak Sensor has two sets of prongs so you can connect additional Leak Sensors. This is helpful when you have the Leak Sensor placed inside a water heater pan, but also want one outside the pan to sense other leaks such as a pressure relief valve failure. You can also link them together so they are positioned at different locations around your water heater.
• Once a month, the FloodStop Valve will automatically close and open by itself. The Control Panel is programmed to run this cycle to ensure that the valve continues to function properly
in the event that it needs to shut off the water.
• Hanging Wires may be tied together using twist ties (Not provided).
CAUTION: Do not plug the AC Adaptor into an
extension cord.
10. FloodStop has a battery backup system that allows the unit to continue working in the event that you have a power outage. To set up the backup system, open the front of the Control Panel and install 4 fresh
AA alkaline batteries (batteries not included). The low battery indicator light will now stop flashing and the
beep will stop.
10.
CAUTION: Replace batteries once a year or sooner as
necessary. If batteries need to be changed sooner, a red low
battery indicator light will flash and a beep will sound.
Installation
11. Shut off the previously opened faucet and turn on both valves that were shut off in steps 1 and 3.
Check for leaks. Note that a green status light on the Control Panel will indicate whether the FloodStop Valve is open or closed.
Problem What to Check
- Make sure there is power to the outlet.
Status light does not light
- Unplug AC Adaptor cord from Control Panel and plug back in.
- If an AC Adaptor extension wire was used, unplug both ends and reconnect.
- Make sure fresh batteries are in the Control Panel.
No water comes out of hot side of faucet
- Push Open button to make sure FloodStop Valve is open.
- Make sure the manual cold water valve is open.
- Make sure a manual hot water valve was not accidentally closed.
Problem What to Check
Top button opens FloodStop Valve
Middle button closes FloodStop Valve
Bottom button mutes the audible alarm that sounds when a leak is detected
3
2
1
Testing Your FloodStop System
1. Push the Open button to make sure FloodStop Valve is open.
• When the FloodStop Valve is opening or closing, you will hear the valve motor operating for a
few seconds.
2. Saturate a rag with water and squeeze over Leak Sensor, or dip the Leak Sensor into a small bucket of water. Once the Leak Sensor is wet, it will signal the FloodStop Valve to close, then an audible alarm will sound and a red light will flash.
• Push the Mute button to silence the alarm, and note that the red light will continue to flash. This means the FloodStop Valve is closed, and will remain closed until you push the Open button.
• Before the FloodStop Valve can be opened, the Leak Sensor needs to be dry. There is no need to unplug the AC Adaptor when drying off the Leak Sensor.
• The water test can be done with the paper sleeve still on the Leak Sensor. Note that the paper sleeve is reusable, but once it gets wet you will need to let it air dry flat before placing it back on the Leak Sensor.
Leak Sensor becomes wet but FloodStop Valve - Locate plug connection between Control does not close (continued) Panel and FloodStop Valve. Unplug the connection and reconnect, making sure arrows on the side of plugs line up.
- If an AC Adaptor extension wire was used, unplug both ends and reconnect.
- Make sure fresh batteries are in the Control Panel.
FloodStop Valve closed but now will not open
- Make sure both sides of Leak Sensor are dry.
The alarm goes off for no apparent reason
- Leak Sensor is touching metal, or the
concrete is sweating causing high humidity. Correct the problem by placing the Paper Sleeve on the Leak Sensor, or use a paper towel as a barrier.
Manual Operation of FloodStop Valve
1. Unplug the connection between the Control Panel and the FloodStop Valve.
2. Pull the plastic motor cover off the FloodStop Valve and slide it down the wire until it stops at the plug. Note that no tools are needed to remove the cover.
3. Use a marker and draw a line across the top of the plastic motor housing. This way once the motor is removed you will know how to reposition it for assembly.
4. Remove the 4 screws using a Phillips head screwdriver.
5. Place thumb and finger on plastic gear and rotate clockwise to open valve or counter clockwise to close it.
- Make sure main water shut-off valve is No water comes out of hot or cold side of faucet
open.
- Make sure both sides of Sensor are dry.
FloodStop Valve does not operate
- Make sure there is power to the outlet.
- Unplug AC Adaptor cord from Control Panel and plug back in.
How to Operate your Control Panel
1.
2.
3.
Troubleshooting
Problem What to Check
FloodStop Valve does not operate (continued)
- Unplug 6-pin connector from Control Panel and plug back in.
- Locate plug connection between Control Panel and FloodStop Valve. Unplug the connection and reconnect, making sure arrows on side of plugs line up.
- If an AC Adaptor extension wire was used, unplug both ends and reconnect.
- Make sure fresh batteries are in the Control Panel.
Leak Sensor becomes wet but FloodStop Valve
- Unplug long flat wire from Leak Sensor
does not close and reconnect.
- Make sure there is power to the outlet.
- Unplug AC Adaptor cord from Control Panel and plug back in.
- Unplug 6-pin connector from Control
Panel and reconnect.
This equipment has been tested and found to comply with the limits for a Class B digital device,
pursuant to part 15 of the FCC Rules. These limits are designed to provide reasonable protection
against harmful interference in a residential installation. This equipment generates, uses and can
radiate radio frequency energy, and if not installed and used in accordance with the instructions, may
cause harmful interference to radio communications. However, there is no guarantee that interference
will not occur in a particular installation. If this equipment does cause harmful interference to radio or
television reception, which can be determined by turning the equipment off and on, the user is encouraged to try to correct the interference by one or more of the following measures:
• Connect the equipment into an outlet on a circuit different from that to which the receiver
is connected.
• Consult the dealer or an experienced radio/TV technician for help.
FloodStop Water Heater Kit
1 Year Limited Warranty
OnSite PRO Inc. warrants the enclosed FloodStop product to be free from defects in materials or
workmanship, under normal use and service, for a period of one (1) year from the date of purchase.
If at any time during the warranty period the product is determined to be defective, OnSite PRO Inc.
shall repair or replace it (at our option). The warranty is limited to defective parts as stated. All costs
of removal and installation of the FloodStop product, including the replacement of warranty parts, are
the responsibility of the purchaser. The manufacturer shall not be liable for incidental, consequential,
or special damages arising at, or in connection with product use or performance, except as may
otherwise be accorded by law. Some states do not allow the exclusion limitation of incidental or consequential damages, so the limitation may not apply to you. Any damage to this FloodStop product as
a result of misuse, abuse, neglect, accident, improper installation, or any use violating the instruction
manual furnished by us will void this warranty. This warranty does not cover damages or loss caused
by defects, and the owner’s use of the FloodStop product confirms the understanding that this product does not constitute an insurance policy, and is only a loss mitigation product used to reduce the
risk of water damage.