1
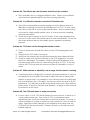
AquaC RX-1 Calcium Reactor
Rated for reef tanks up to 400 gallons
Thank you for purchasing an AquaC RX-1 Calcium Reactor. For best results,
please read through this instruction manual before installing the reactor on your
system.
During or after installation, do not hesitate to contact our technical support team
at 858-689-1121 or [email protected] if you have any questions about
your new calcium reactor.
List of Contents
RX-1 Calcium Reactor
Eheim 1250 pump
Intake tubing (blue)
Effluent tubing (red)
CO2 tubing (black)
CO2 check valve
Effluent valve
1.
2.
3.
4.
5.
6.
7.
pH probe holder
CO2 recirculation line
input line
effluent line and valve
bubble counter
CO2 check valve
union lid
We have included enough tubing for
standard installations. If you require greater
lengths of tubing, you can use standard ¼”
polyethylene tubing (RO tubing) supplied by
your local hardware store.
Equipment You Will Need
You will need to purchase a CO2 tank,
regulator, and needle valve in order to run
the RX-1 reactor. Many retailers sell this
equipment as a package deal, or you can
buy them individually. Fill the tank at a local
welding supply company with carbon dioxide
gas. You will also need calcium carbonate
media, such as Carib Sea ARM. We’ve used coarse and fine ARM media with
excellent results, but any commercially available media should work fine.
You will also need a reliable pH, alkalinity and calcium test kits in order to fine
tune the reactor.
The RX-1 includes a port for a pH probe, which comes from the factory plugged
with a piece of delrin rod. It is not necessary to use a pH probe with the RX-1, but
doing so can help you achieve maximum efficiency. If you don’t plan on using
a probe, leave the rod in place.
AquaC, Inc. © 2007 All rights reserved.
Got questions? Send them to [email protected]
How Calcium Reactors Work
It is very important to maintain the proper amounts of calcium and alkalinity in a
reef tank. Both can be quickly depleted by growing organisms, and need to be
supplemented in order to maintain levels equivalent to natural sea water. A
calcium carbonate reactor is the easiest and most accurate method of
maintaining calcium and alkalinity.
A calcium reactor works by dissolving small amounts of solid calcium carbonate
media into liquid form, which is then dosed back to the tank. The concentrated
liquid that is added back to the tank contains the correct ratio of calcium to
alkalinity, which is essential to maintain the proper balance of water chemistry.
Unlike most additives or kalkwasser, a properly functioning calcium reactor
should maintain the appropriate balance between calcium and alkalinity over
the longterm.
The reactor is filled with calcium carbonate media (such as reef sand, shells, etc.)
and saltwater. A small amount of carbon dioxide is added to the water inside
the reactor, which lowers the pH to a range of 6.5-6.8. At such a low pH, the
calcium media begins to dissolve, thereby releasing the calcium and alkalinity
ions so that they can be dosed back to the aquarium. This solution is very
concentrated, so only a small amount of liquid, or effluent, needs to be dripped
back to the aquarium.
Over time, both the calcium media and carbon dioxide gas will become
depleted. The rate of consumption will depend on your aquarium’s calcium
demand, but in most cases you can expect the reactor to work for several
months without any major maintenance. It is important to periodically check the
CO2 input rate (measured in bubbles per minute) and the effluent drip rate, to
make sure that everything is flowing smoothly. Also, it is critical that you test your
aquarium’s calcium and alkalinity levels with a reliable test kit on a regular basis.
Introduction to the RX-1
The AquaC RX-1 is a very advanced calcium reactor. Unlike most other reactors,
the RX-1 is designed to be as hassle-free as possible. At the heart of the reactor
is the powerful Eheim 1250 pump, which leads the industry in performance and
reliability. Schedule 80 PVC fittings and unions are used throughout, as well as
John Guest Speedfit connectors. The RX-1 is reverse-flow (water circulates up
and through the media, keeping fine particles in suspension). Extra CO2 is
recirculated through the pump, for efficient gas consumption. A screw-on lid
makes for easy media addition, without any screws or wingnuts to fiddle with.
The RX-1’s box design holds more media than any other reactor in its class.
Finally, the RX-1 does not need a feed pump like most competing products.
AquaC, Inc. © 2007 All rights reserved.
Got questions? Send them to [email protected]
Installation
First, you should perform a basic water chemistry assessment which includes tests
for pH, calcium and alkalinity. Write these results down in a logbook for future
reference. If your results fall outside of the ranges listed below, do not proceed.
You will need to adjust these levels before you hook up the RX-1. This is very
important! For more info on this topic, see “A Word on Calcium and Alkalinity”
below.
Acceptable Range for Calcium and Alkalinity
2.5-4.0 meq/L (7-11 dKH) alkalinity and 375-450 ppm calcium
Do not proceed if your results fall outside this range!
Fill the reactor with your preferred brand of media. Do not overfill the reactor!
Leave at least 2-3” of space between the media and the top of the reactor. If
you overfill the reactor, media could get sucked into the pump intake, which is
located on top of the reactor. We recommend that you rinse the media
thoroughly before using, even if the manufacturer says it isn’t necessary.
Next, connect the CO2 tank to the bubble counter using the black tubing
provided. Place the plastic check valve inline between the reactor and the
CO2 tank – you can use scissors to cut the tubing wherever you prefer. Verify
that the arrow on the check valve is pointing in the direction of CO2 flow,
otherwise it won’t work. Do not open the flow of CO2 at this time – keep
everything shut off. Verify that all the valves on the CO2 tank are closed, and
then proceed.
Now you can connect the intake (blue) and effluent (red) tubing to the reactor
and run them to the sump. Do not turn on the CO2 flow at this time. Position the
effluent valve several inches above the water line in the sump, and secure it in
position using a zip-tie or other means. For best results, the effluent should be
dosed into a turbulent area of the sump. Open the effluent valve all the way.
Position the intake tubing several inches below the water line, in a calm area of
the sump. Secure its position and verify that the intake won’t be exposed to air
or excessive microbubbles.
Once the tubing is in position, slowly fill the reactor with water from the aquarium.
Fill the reactor as high as possible, and then close the lid. Plug in the Eheim
pump and water should begin to circulate through the reactor. It will be difficult
to tell if water is circulating, but the easiest way to verify that the pump is working
is to look for movement at the bottom of the reactor, underneath the black
sponge. You should see some fine particules getting blown around, which
verifies that everything is running.
Let the reactor run for 5-10 minutes, or until the water inside the chamber clears.
Take this opportunity to verify that there aren’t any leaks from any of the fittings.
The clear bubble counter should fill with water automatically. After several
minutes, check to see if water is exiting the effluent valve and flowing back to
AquaC, Inc. © 2007 All rights reserved.
Got questions? Send them to [email protected]
the sump. If water is not flowing back to the sump, try sucking on the effluent
valve to help get it started, or move the valve to a lower position. Once water is
flowing back to the sump, adjust the effluent valve until the drip rate is
approximately 1-2 drips per second.
Next, slowly open the main valve on the CO2 tank. Then, slowly open the
secondary valve until the gauge reads 15 PSI, or to the manufacturer’s
recommendation. Finally, slowly open the needle valve, keeping an eye on the
bubble counter. If you open the needle valve too much, you risk flooding the
reactor with CO2. It might take a while for CO2 to start flowing into the bubble
counter, but once it does, adjust the flow so that you’re getting approx. 1 bubble
per second.
The reactor is now running, but there is still some work to be done. Over the
course of the next week or two, you will need to fine tune the flow of CO2 and
effluent to match your aquarium’s calcium/alkalinity demand. All tanks are
different, and testing your water chemistry is the only way to determine these
settings.
Fine-Tuning the RX-1
Once the reactor is running, you will adjust the flow of CO2 and effluent to
match your aquarium’s calcium/alkalinity demand. The RX-1 will work most
efficiently if the internal pH is between 6.5-6.7. For best results, do not set the
internal pH lower than 6.5 or higher than 6.8.
Two controls are used to adjust the output from the reactor: the effluent valve, or
the amount of water that flows through the reactor, and the needle valve, which
controls the amount of CO2 that enters the reactor (measured in bubbles per
minute).
The amount of calcium and alkalinity that is added back to the aquarium is
adjusted by these two controls, and finding the proper balance between CO2
and effluent flow is the trick. We recommend that you start with approx. 1
bubble per second CO2 and 1-2 drips per second effluent. If you are using a pH
probe, this will help you monitor the reactor’s internal pH. You can also measure
the pH of the effluent with a test kit, if you don’t have a probe. Allow a few hours
before you measure the effluent pH, as it will take some time for the reactor to
settle in.
Every day or two, test your aquarium’s calcium and alkalinity levels and write
them down in a logbook. If these levels are rising above the desired range, you
should slow the flow of CO2 and effluent drip. If these levels are falling or still
below the desired range, adjust the flow higher. It will take a couple of weeks
(at least) to figure out the proper flow rates, and remember that these can
change over time as corals grow, or if you add or remove organisms from the
tank.
AquaC, Inc. © 2007 All rights reserved.
Got questions? Send them to [email protected]
A Word on Calcium and Alkalinity
Before installing your new calcium reactor, it is important that your aquarium’s
calcium and alkalinity be in the correct range. If these levels are out of balance
to begin with, the reactor will not get them back to normal. Calcium and
alkalinity problems are very common, but most are solved fairly easily. A set of
reliable test kits is mandatory, so check to be sure that your kits aren’t expired or
contaminated, which could lead to erroneous results. For best results, use two
sets of redundant kits. This will allow you to cross-reference the results and certify
their accuracy.
Natural seawater contains 2.5 meq/L alkalinity and 400 pmm calcium. As far as
reef tanks are concerned, a range of 2.5-4.0 meq/L (7-11 dKH) alkalinity and 375450 ppm calcium is considered acceptable. If one or both of these values fall
outside this range, you will need to make an adjustment before using a reactor.
If both values fall within or very close to this range, no adjustment is necessary.
Scenario #1: Calcium is too high, Alkalinity is too high
Solution: This is an easy problem to correct. If you leave the tank alone, both
values should naturally fall back into the desired range all on their own. Once
they enter the desired range, you can install the reactor.
Scenario #2: Calcium is too low, Alkalinity is too low
Solution: This is also an easy problem to correct. Both calcium and alkalinity are
too low. Install the RX-1 reactor and you should be able to bring these levels
back into the recommended range. Once calcium and alkalinity are within
range, you will have to slow the output from the reactor, to prevent them from
rising too high.
Scenario #3: Calcium is too low, Alkalinity is within range
Solution: A little more complicated than above, but fairly common. In this
situation, you want to raise the calcium level while leaving the alkalinity
unchanged. The easiest way to do this is to use one of the commercially
available calcium chloride supplements, or only the calcium component of a 2part solution such as AquaC Complete. Add these chemicals to the aquarium
slowly, and test your water often while making changes.
Scenario #4: Calcium is within range, Alkalinity is too low
Solution: This is also a common situation, which can be remedied by adding an
alkalinity supplement. There are commercially available alkalinity supplements,
or you can also use baking soda or washing soda, which is much less expensive.
Before making large adjustments to alkalinity using off-the-shelf chemicals, we
recommend that you research this topic thoroughly!! Simply Google “calcium
AquaC, Inc. © 2007 All rights reserved.
Got questions? Send them to [email protected]
and alkalinity in an aquarium” and you will find a wealth of information to point
you in the right direction.
In extreme cases where the balance of calcium and alkalinity is way off, or if the
above solutions have not worked, it might be necessary to adjust these values by
making a number of large water changes. If you are using a quality brand of salt
that is mixed according to manufacturer directions, you should be able to
correct for any calcium and alkalinity problem by making water changes.
Maintenance
The RX-1 needs very little maintenance, but there are a few things you should
check on a regular basis to keep it running smoothly. It is always a good idea to
visually check the CO2 input rate and the effluent drip rate, whenever
convenient. These rates can slowly change due to backpressure on the tubing,
or due to sediment build-up inside the effluent line. Occasionally, you might find
it necessary to open the effluent valve all the way to clear any build-up, and
then adjust it back to normal. If you notice that the effluent drip rate is not
holding constant, remove the valve and clean it thoroughly under some warm
water.
Over time, a small amount of sediment will accumulate underneath the sponge
at the bottom of the reactor. This is normal and shouldn’t be cause for concern.
The Eheim draws water from the top of the reactor, so this sediment is not in
danger of being sucked into the pump. Although cleaning the inside of the
reactor shouldn’t ever be necessary, you can use a garden hose to blast out any
sediment if you so desire.
The Eheim pump does not need to be serviced as long as the reactor appears to
be running smoothly. If you notice a drop in production or any sort of problem
with water flow, or hear grinding noises, you should remove the pump from the
reactor and clean it out. The pump can be removed by unscrewing both
unions, and the entire impeller assembly can be taken apart for cleaning.
We recommend that you refill the reactor with additional media whenever you
notice that 50% of the original substrate has been dissolved. Fill the CO2 tank as
needed.
Some Do’s and Don’ts
DO NOT adjust the reactor’s internal pH any lower than 6.5. Doing so will cause
the media to dissolve too quickly, turning into a mud-like paste. This will clog the
reactor and prevent it from operating normally.
DO test your aquarium water for calcium, pH, and alkalinity on a regular basis. It
is impossible to run the RX-1 correctly without knowing these values. We suggest
that you keep a log book to record your results.
AquaC, Inc. © 2007 All rights reserved.
Got questions? Send them to [email protected]
DO NOT make large adjustments to the CO2 flow or effluent drip too rapidly. It is
best to make small adjustments, and then wait at least 12-24 hours before testing
the water to see how the changes affect the system.
DO contact our technical support staff at 858-689-1121 or
[email protected] if you have any questions about your RX-1.
Trouble Shooting
Problem #1: Water doesn’t circulate through the reactor on start-up
A. Check to make sure that the flow of CO2 is off when you are filling the
reactor and starting it for the first time. Do not start the reactor while CO2
is flowing.
B. Verify that the effluent valve is open when initially filling the reactor with
water. Leave the valve open when you start the pump. If the valve is
closed, air will be trapped inside the plumbing and could prevent the
pump from starting.
C. Verify that the reactor is completely full of water before starting the pump.
Problem #2: Water doesn’t flow from the effluent valve back to the sump
A. This is a common situation and is easily fixed. When you first start the
reactor, water might be circulating through the chamber but it doesn’t
have enough oomph to get pushed back to the sump, due to the air that
is trapped inside the effluent hose. Try lowering the effluent valve as low
as possible – that might be enough to get it started.
B. If lowering the effluent valve isn’t enough to get the flow going, suck on
the effluent valve/hose end to get it started. Once water is flowing, you
can adjust the valve to slow the flow to the desired amount.
C. If neither of the above work, examine the position of the reactor relative
to the sump water level. If the reactor is positioned much lower than the
sump level, you might need to raise it up on a platform.
Problem #3: CO2 builds up inside the chamber too quickly, shutting off
circulation inside the reactor
A. We designed the RX-1 to handle a certain amount of excess CO2 – the
extra gas will get recirculated back through the pump. If the flow of CO2
is too high, however, a large gas bubble will accumulate at the top of the
reactor and it will eventually shut down circulation. If this is the case, you
are using too much CO2.
B. It’s good practice to use the least amount of CO2 as needed – don’t
overdue it.
AquaC, Inc. © 2007 All rights reserved.
Got questions? Send them to [email protected]
Problem #4: The effluent drip rate fluctuates and will not stay constant
A. This is probably due to a clogged effluent valve. Clean out the effluent
valve and hose periodically to keep them running smoothly.
Problem #5: It is difficult to maintain a constant CO2 bubble rate
A. One of the main problems people experience with calcium reactors is
difficulty in keeping a constant and reliable input of CO2. In most cases,
this is due to the use of a low-quality needle valve. We recommend that
you invest in a high quality needle valve, or even a precision metering
valve for best results.
B. Check the output pressure on the CO2 tank. If the output pressure is set
too low, it could cause the needle valve to work inconsistently. Do not set
the output pressure above the needle valve’s maximum operating
pressure.
Problem #6: CO2 does not flow through the bubble counter
A. Check to make sure that all the valves on the CO2 tank/regulator are
open.
B. Verify that the CO2 tank is not empty.
C. Verify that the check valve is positioned correctly (arrow denotes flow).
D. Check to make sure that the solenoid on the CO2 regulator is on, and
that it isn’t damaged. Sometimes, a broken solenoid will appear to be
functioning fine when in fact it is preventing the flow of CO2. To test this,
unhook the CO2 hose from the reactor and see if it bubbles in a cup of
water.
Problem #7: Either calcium or alkalinity is out of range, but the reactor is working
A. A calcium reactor is designed to maintain the proper balance of calcium
and alkalinity, but it shouldn’t be used to adjust the ratio of these levels
relative to each other. For example, if your calcium level is fine (400 ppm)
but your alkalinity is low (1.5 meq/L), the reactor will not be able to fix this
imbalance. You will have to adjust these levels using some other method.
Please read “A Word on Calcium and Alkalinity” on page 4 of this manual
for more info on this topic.
Problem #8: The CO2 tank seems to empty too quickly
A. In most cases, a 10 lb. CO2 bottle will last for many months, or even up to
a year under normal use. If your rate of CO2 consumption seems
mysteriously fast, you should check all connections for leaks. One way to
check for leaks is to create a solution of soapy water (3:1 ratio of water to
soap). Apply this solution liberally to the regulator and valves near the
CO2 tank (not the reactor itself). If there is a leak, you should see small
bubbles appear.
AquaC, Inc. © 2007 All rights reserved.
Got questions? Send them to [email protected]
AquaC Limited Warranty
Limited Warranty
AquaC, Inc. (“AquaC”) warrants to the original purchaser that, except for
limitations and exclusions set forth below, this product shall be free from defects
in materials and workmanship for a period of one year from the date of original
retail purchase (“Warranty Period”). The obligation of AquaC under this warranty
shall be limited to repair or replacement, at AquaC’s option, without charge, of
any part or unit that proves to be defective in material or workmanship during the
warranty period.
Exclusions From Warranty
This Warranty applies only to defect in factory materials and workmanship. Any
condition caused by accident, abuse, misuse, or improper operation, violation of
instructions furnished by AquaC, destruction or alteration, improper electrical
voltages or currents, or repair or maintenance attempted by anyone other than
AquaC, is not a defect covered by this Warranty. In such cases, AquaC may
charge you for materials and labor, even during the Warranty Period. Parts
subject to wear and tear in normal usage are not covered by the Warranty.
Implied Warranties
Under state law, you may be entitled to the benefit of certain implied warranties.
These implied warranties will continue in force only during the Warranty Period.
Some states do not allow limitations on how long an implied warranty lasts, so
the above limitation may not apply to you.
Incidental or Consequential Damages
Neither AquaC nor your retail dealer or selling distributors has any responsbility
for any incidental or consequential damages including without limitation,
commercial loss or profit, or for any incidental expenses, expenses, loss of time,
or inconvenience.
Other Legal Rights
This Limited Warranty gives you specific legal rights. You may also have other
rights which vary from state to state.
Customer Service and Technical Support
858-689-1121 phone
858-564-3419 fax
[email protected]
AquaC, Inc. 7949 Stromesa Ct., Ste. E San Diego, CA 92126
AquaC, Inc. © 2007 All rights reserved.
Got questions? Send them to [email protected]