1
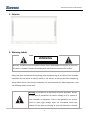
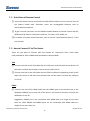
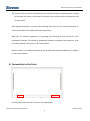
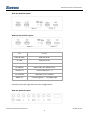
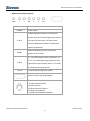
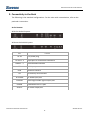
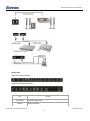
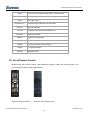
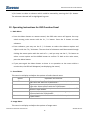
Interactive Flat Panel User Manual Interactive Flat Panel HARDWARE USER MANUAL Document Released 5.1.2015 Interactive Flat Panel User Manual © 2015 Sonnoc 1 Interactive Flat Panel User Manual Contents 1. EXTERIOR .................................................................................................................... 3 2. WARNING LABELS ....................................................................................................... 3 3. ATTENTION PRIOR TO USE ........................................................................................... 4 4. SAFETY WARNINGS ...................................................................................................... 5 5. SAFETY PRECAUTIONS ................................................................................................. 7 6. PRODUCT MAINTENANCE ............................................................................................ 8 7. QUICK START ............................................................................................................... 9 8. CONNECTIVITY IN THE FRONT .................................................................................... 11 9. CONNECTIVITY IN THE BACK ...................................................................................... 14 10. USE OF REMOTE CONTROL......................................................................................... 16 11. OPERATING INSTRUCTIONS ........................................................................................ 18 12. OPERATING INSTRUCTIONS FOR OSD FUNCTION PANEL.............................................. 20 13. MAINTENANCE .......................................................................................................... 21 14. TROUBLESHOOTING .................................................................................................. 22 Interactive Flat Panel User Manual © 2015 Sonnoc 2 Interactive Flat Panel User Manual 1. Exterior 2. Warning Labels WARNING RISK OF ELECTRIC SHOCK NOT don’t OPEN disassemble this device at your own Warning: To reduce the risk of electricDO shock, discretion. If needed, contact the professional maintenance personnel for service. Safety has been considered during design and manufacturing of this device, but improper operation still may cause an electric shock or fire. Hence, to prevent this from happening, please follow these rules during installation, use and maintenance. Before operation, read the following safety instructions. Warning This product is an extremely sensitive apparatus. Hence, for the sake of prevention of electric leakage or fire, protect it from rainwater or dampness. There is the possibility an electric shock as some high voltage wires are assembled inside this product. Do not open its housing at your own discretion. Contact Interactive Flat Panel User Manual © 2015 Sonnoc 3 Interactive Flat Panel User Manual a qualified maintenance personnel if needed. This symbol is to remind users to properly use this device following the instructions in this user manual to prevent damages. FCC Warnings The result of test in accordance with Part 15 of FCC Rules shows that this product complies with the restriction requirements specified for Class B equipment. The restrictions for Class B equipment are for providing reasonable protection and avoiding this product to cause harmful interference during installation and use. This product generates, uses and emits radio frequency energy. If you don’t abide by the instructions in this user manual to install and use this product, it may cause harmful interference to radio communications. If this product does cause harmful interference to radio or television reception, you may adopt one or more of the following measures to correct the interference. Increase the distance between this product and the radio communication device. Adjust or relocate the position of the radio communication product’s antenna. Connect this product and the radio communication product to different lines. Contact local reseller for technical consultation. To ensure this product to comply with FCC requirements all the time, use the grounding power cord and the ferrite core shielded video wire attached to this product. 3. Attention Prior to Use 3. 1 Remote Control Battery The life cycle of this battery is about one year (may be a little different due to your frequency of use); if the effective service distance of the remote control reduces and its Interactive Flat Panel User Manual © 2015 Sonnoc 4 Interactive Flat Panel User Manual sensitivity becomes low, replace the two batteries with new ones. 3. 2 How to Handle Uplift this device before handling. Handle it by two or more persons at least to keep it stable and avoid damaging its housing. Pay attention to not scratch the screen during handling. 3. 3 Moisture or Condensation When this product is moved suddenly from a cold place to a warm place or from a room with an electric heater to other places in winter, the screen may become misty, or doesn’t display the colors in some pictures, or the colors may be uneven, which will be caused due to moisture condensed inside the device. Wait for a moment till the moisture evaporates fully and the screen display will become normal. 4. Safety Warnings If any smoke comes out of the device, shut the power switch and unplug the power cord immediately. Then, consult the reseller at once. Continuing using this product under such a condition will likely cause a fire or electric shock! If there is no image on the screen or no audio output, turn off the power and unplug power cord immediately. If this device falls to the ground or its housing is damaged accidentally, turn off the power and unplug the power cord at once, and then ask your local reseller for inspection. To prevent causing a fire or electric shock, discontinue usage. Never plug or unplug this device’s power cord with wet fingers, or an electric shock may occur. Interactive Flat Panel User Manual © 2015 Sonnoc 5 Interactive Flat Panel User Manual Protect the power plug from too much dirt and dust, or it will degrade the insulation of the plug. Remove them regularly to prevent causing a fire. As some high voltage wires and breakable elements are installed inside this device, don’t maintain, modify or disassemble it at your own discretion, so as to prevent causing an electric shock, fire or damage to internal components. For details of maintenance, refer to the Quality Guarantee and consult the reseller. The device is limited to the 120V AC power socket only, don’t use it beyond the range of rated voltage (120V AC), or a fire or electric shock may be caused. Don’t touch the antenna or power cord during thunder or lightning. Suggest unplugging the device from the power socket immediately at the very start of thunder, but never touch the antenna lead to prevent electric shock. To prevent causing a fire due to the abnormal increase of temperature inside the device, don’t expose it to high temperature or direct sunlight. Strongly suggest not using extension cords or share the wall plug with other power consuming units; if it's necessary to use extension cords, check if their rated voltages are acceptable, or a fire may be caused if too much load is placed on them. Don’t place vase, flowerpot, glasses, cosmetics, and chemical container, liquid or small metal object on this device. A fire or electric shock may be caused in case of any liquid or small object falling into it. If a small object falls into it, turn off power, unplug the power cord immediately and then consult the reseller. To prevent causing a fire or electric shock, protect foreign substances falling into this device. If any falling, turn off the power and unplug its power cord at once and then consult the reseller. Pay special attention to prevent children stuffing foreign substances into this device. To avoid influencing the image quality and causing a fire or electric shock, don’t expose this device to oily fume, steam, near a heater or a place with too much dust. Interactive Flat Panel User Manual © 2015 Sonnoc 6 Interactive Flat Panel User Manual 5. Safety Precautions Don’t make the vent holes on this device jammed or place this device with its screen upwards, sideward or downwards. Don’t place it in a closet or bookcase with poor ventilation. It is required that the distance between its back cover and the wall should be more than 15cm. Don’t place it on a blanket or flammable objects or cover it with a curtain or tablecloth. A fire may be caused under either of above mentioned conditions. This device should be installed in a flat and solid place with proper ventilation. Don’t place heavy objects on this device, so as to prevent it from being unstable and causing damages due to the falling of this device or heavy objects. Handle this device by two or more persons. Before handling, unplug its power cord and remove its antenna and all other devices connected with it. Handle with care to prevent impacting it or damaging its screen. Never stand or sit on this device. For families with children, special attention should be paid to prevent them climbing up the TV for playing, so as to protect this device from moving, turnover, damages or causing other injuries. Don’t remove its back cover, housing panel or any other covers, or an electric shock may be caused due to some high voltage wires laid inside it. If any need of adjustment or maintenance, contact the reseller. Don’t place this device or its power cord near a heater, or a fire may be caused due to the deformation and melting of housing or power cord surface after being heated. Unplug the power cord of this device first before cleaning or maintenance, or an electric shock may be caused. In cleaning its screen, use a soft cloth to prevent the screen surface being scratched (refer to contents in the section of maintenance). Don’t cut off, twist, bind, modify or bend wires, use or pull them forcibly or place some heavy objects on its power cord, or a fire or electric shock may be caused due to damages of the power cord. If any damage on the power cord, contact with the reseller. Don’t place this device on shaking, inclined or vibrating objects, or it may fall on the ground or turn over, causing injuries or damages. Interactive Flat Panel User Manual © 2015 Sonnoc 7 Interactive Flat Panel User Manual When this device is not in use for a long time, unplug its power cord. 6. Product Maintenance 6. 1 Touch Screen Maintenance ① Wipe dust gently on touch screen with a buckskin or high-end glass cloth ② Use the whiteboard LCD screen special detergent to clean fingerprints and oil on the touch screen. Wipe the screen from the center of the screen to the borders until the touch screen is cleaned. ③ Do not let the water flow to the interface between screen and the box to avoid short circuit burned monitor. ④ Do not use a hard towel to scrub the surface of the touch screen so as not to affect the display. ⑤ Deal with indelible stains, use scotch tape to patch on the screen, and then peel off. 6. 2 Monitor Maintenance ① The monitor will be burned due to the long period of display. If not in use, be sure to turn off the monitor, or reducing the brightness of the screen. In addition, if continually displaying a fixed content, it may cause some LCD pixels overheat and cause internal burns. Therefore, turn off the screen, or run a screen saver, or display all white whiteboard screen. ② Avoid unnecessary vibration: Due to sensitive parts, vigorous shaking may cause damage to the screen. 6. 3 Daily Use Instructions ① Control the environment humidity ② To protect data and increase equipment life time, turn on /off and operate the Interactive Flat Panel User Manual © 2015 Sonnoc 8 Interactive Flat Panel User Manual machine correctly. ③ Follow the correct order to start-up and shutdown the machine. Turn on the power first and then turn on the monitor. Turn on the computer at last. Turn off the computer first and then turn off the monitor. Wait until both computer led light and monitor led light are off then turn off the power. ④ Do not write or paint on the infrared border. Or damage infrared border with any object. Clean the dust regularly on the infrared border. The dust may affect the touch function. 7. Quick Start 7. 1 Power on & off ① Make sure the power cord is properly connected (this device’s power socket is at the left side of the screen when you are standing in the front of the screen) and the power supply is installed in safe environment without any hazard. ② After turning on the power switch beside the power socket, the remote control receiving window at the lower right corner of the front of this device will turn red and then the device is ready to start up. ③ The Power button on remote control and the "POWER" at the lower right corner of the screen share the same functions; when the remote control receiving window turns red, pressing the POWER button or the power button on remote control can turn the receiving window green and meanwhile the device enters the booting interface. ④ After successful boot-up, you may start other operations. ⑤ When the device is on, pressing the POWER button once or that on remote control can turn the receiving window red, then, the device enters the standby mode. ⑥ When the device is in standby mode, turning off the power switch beside the power socket (at the left side provided you are in the front of the screen) can light off the receiving window and then the device will be shut down normally. Interactive Flat Panel User Manual © 2015 Sonnoc 9 Interactive Flat Panel User Manual 7. 2 Quick Start of Remote Control ① Invert the remote control and install two AAA alkaline batteries, then, put the cover of the battery holder back. Attention: never use rechargeable batteries such as nickel-cadmium batteries. ② To get a channel you want, use the SIGNAL SOURCE button on remote control with UP, DOWN and OK buttons. Channels include AV, TV, YPbPr, VGA, HDMI, etc. ③ For details of remote control functions, refer to Part 10 "Use of Remote Control" in this user manual. 7. 3 How to Connect PC to This Device There are two ways to connect with the outside PC: connection with a VGA cable (self-provided) or with a HDMI cable (attached or self-provided). VGA ① Connect one end of the VGA cable with the VGA port at the left side of the device and the other end with the VGA port used to connect with the PC. ② Connect one end of the USB cable with the TOUCH USB port (supporting touch) at the lower left corner or left side of the device front and the other end with the USB port on the PC. HDMI ① Connect one end of the HDMI cable with the HDMI1 port on the device front or the HDMI2(or HDMI3) port at one side of the device, and connect the other end with the HDMI port on the PC. Suggestion: HDMI1 port is for connection with HDMI cable at a length of not more than 3m, while HDMI2 and HDMI3 ports are for connection with HDMI cable at a length of not more than 5m. Interactive Flat Panel User Manual © 2015 Sonnoc 10 Interactive Flat Panel User Manual ② Connect one end of the USB cable with the TOUCH USB port (supporting touch control) at the lower left corner or left side of the device front and the other end with the USB port on the PC. After a good connection, you may start switching the screen of your external computer to screen of this device for display and touch operations. Now you can perform operations of inputting and marking on the outside PC with whiteboard software. For details of whiteboard software installation and operation, refer to relevant specific instructions in this user manual. Notice: If there is any difference between the product and what described here, is subject to the actual product. 8. Connectivity in the Front Control panel at the left side, there are 2 configurations: Interactive Flat Panel User Manual © 2015 Sonnoc 11 Interactive Flat Panel User Manual With the Android system Without the Android system Port Function USB1 & USB2 USB port of PC PC USB USB port of PC POWER LED Power indicator of PC PC ON/OFF Power ON / OFF button of PC TOUCH 1-3 TOUCH USB port 1 - 3 TV / Android USB port of TV / Android HDMI 1-3 Connecting port 1 - 3 of HDMI cable Control panel at the right side, there are configurations: With the Android system Interactive Flat Panel User Manual © 2015 Sonnoc 12 Interactive Flat Panel User Manual Without the Android system Port POWER Function Power switch Volume adjustment button. To adjust the volume, press the left and right arrow keys on V- & V+ the menu on the screen. For other items, select the adjustment value in submenu for increase or decrease. MENU Button of display switch for menu that appears on the screen “P-”: for confirming to enter a submenu; “P-” P- & P+ & “P+”: for switching among submenus and signal source input modes; when in TV mode, for switching among channels. TV / AV For switching among input modes Remote control receiving window Main menu button, features include: 1. Switch Android and PC 2. Switch channel 3. Adjust the audio volume 4. Energy-saving button 5. Activate SonnocBoard Software Interactive Flat Panel User Manual © 2015 Sonnoc 13 Interactive Flat Panel User Manual 9. Connectivity in the Back The following is the standard configurations. For the units with customization, refer to the particular instructions. At the bottom With the Android system Without the Android system Port AC IN Function The power plug TV USB 1 - 2 Input port for multimedia USB device HDMI 1 - 3 HD multimedia interface VGA VGA input port RJ45 Network interface SD SD memory card interface PC AUDIO PC audio input port COAXIAL SPDIF digital audio signal output port PHONE EARPHONE OUTPUT port AV OUT AV video output port Interactive Flat Panel User Manual © 2015 Sonnoc 14 Interactive Flat Panel User Manual At the side With the Android system Without the Android system Port PC AUDIO RS232 Function PC audio input port RS232 interface Interactive Flat Panel User Manual © 2015 Sonnoc 15 Interactive Flat Panel User Manual YPbPr YPbPr Audio L, R AV IN AV Audio L, R Use for either coaxial cable, BNC or common RCA Left and right audio ports of YPbPr signals AV video input Left and right audio ports of AV videos AV OUT AV video output TV USB Input port for multimedia USB device OPTICAL Optical interface PHONE Earphone output port RF IN RF input TOUCH Touch connection USB interface TV WIFI TV radio interface MIC IN Headset input 10. Use of Remote Control Before using the remote control, install batteries properly. With the remote control, you can operate this device over long distance. With the Android system Without the Android system Interactive Flat Panel User Manual © 2015 Sonnoc 16 Interactive Flat Panel User Manual Mute After pressing the Mute button, the device will enter mute mode, with a mute sign on the upper left corner of its screen. If you press the Mute button again, the mute mode will be removed, and the mute sign will disappear. Automatic Channel Search This function only works with TV source for searching TV channels. Power Saving Mode Press this button to start switching power saving levels among Low, Medium and High. Sound Mode Press the “S.MODE” button to start switching the sound effects among Standard, Movie, Music, Sport and User. Volume After pressing the VOL up and down arrow button, the volume adjustment bar will be displayed on OSD. When the device is in mute mode, pressing this button may release it from the mute mode. Video Switched to video signal: Video 1, Video 2 and Video 3. Energy Save Press the “E. Save” button to enter the auto power-off time setting. You may select the off time among 0 min (Disable energy save), 15 min, 30 min, 45 min and 60 min. Image Mode Switch the image modes cyclically among Standard, Soft, User and Dynamic, press the “I.Mode” button. TV If you press the TV button when the device is not in the TV source, the device will switch from any other signal source to a TV channel. Channel information will be displayed on the OSD. Power (Standby Button) This button works under all states. When the device is in standby mode, all other buttons will not work. Pressing the Standby button during normal working of the device can bring the device to the standby mode, with all indicators off and the fan cooling program on. All buttons will not work during the fan cooling. The device will take about one minute to enter the standby mode. Signal Source Select and switch among all input signal sources of TV, Video, Color Temperature, PC, HDMI 1, HDMI 2, Display Information All input information such as AV1, AV2, AV3, S-VIDEO1, S-VIDEO2, etc. will be displayed. In TV mode, the channel No. and the image mode will be displayed. If you press again this button now, the OSD disappears. Previous Button This button works only with TV signal source. To get the previous program, press this button once. If you press this button again when you are watching Channel 15, the Channel 30 will be switched to. Channel information will be displayed on OSD. Channel Press the “CH” up and down arrow button for quick selection among channels. This function works only with Interactive Flat Panel User Manual © 2015 Sonnoc 17 Interactive Flat Panel User Manual HDMI 3, Multimedia 1 and Multimedia 2. OK Press this button to confirm your selection. Menu This button works under all modes. After pressing it, the OSD function options will be displayed. Audio Set the audio mode. Screenshot When you insert the SD card, you can make a screenshot of the current page. Aspect Set the screen aspect ratio. Home Go to Android Homepage. TV source. Channel information is displayed on OSD. DIS Display screen resolution. Numeric keys (0-9) All numeral keys only work with TV source for quick selection or switching among TV channels. EPG Only function in TV mode. Chlist Display the channel list in TV mode. Move and delete the channel etc. 3D Set the playback of 3D video. 11. Operating Instructions 1. Power On / Off After connecting to the power supply, press once on the power switch button at one side of the device, then, the power indicator at the lower right corner of the device turns on. If the indicator turns red, it means the device is in standby mode. It will turn green after booting the screen through pressing once the Power button on remote control or POWER at the lower right corner of the screen. Attention: Don’t power on and off the device repeatedly within a short time. 2. Input Switching You may switch among input signals with the TV/AV button: press the Signal Source button to display signal menu, the P+/P- button to select the input signal and the TV/AV button to confirm the input signal. You may switch among TV, Video, Color Temperature, PC, HDMI1, HDMI2, HDMI3, Multimedia 1 and Multimedia 2. Interactive Flat Panel User Manual © 2015 Sonnoc 18 Interactive Flat Panel User Manual Attention: signals cannot be input only with the Signal Source button; you need to select the input signal with the Up and Down keys in options and then press the OK button to enter. 3. Volume Control To turn up or down the volume, press the V+/V- button on the panel or remote control. The volume adjustment menu will be displayed on the screen. 4. Mute To mute the device, press the Mute button on remote control, and a mute sign will be displayed on the screen. Press it again to unmute. 5. Display Input Signal on the Screen After pressing the Display Information button on remote control, the information of current input signal will be displayed on the screen; such information will disappear automatically in several seconds. 6. Quick Return To return to the previous program, press the "Previous" button on remote control. If you have not seen any program before, it will not work if you press this button. 7. Operation Menu You may make adjustments for TV settings with the menu that appears on the screen. 8. Menu Button The main menu, including channels (only available under TV mode), images, sound, time, settings and lock, will be displayed through pressing the Menu button. You may use the Interactive Flat Panel User Manual © 2015 Sonnoc 19 Interactive Flat Panel User Manual V-/V+ button to select a submenu which could be entered by pressing the P-/P+ button. The submenu selected will be highlighted in green. 12. Operating Instructions for OSD Function Panel 1. Main Menu Press the Menu button on remote control, the OSD main menu will appear. You may switch among main menus with the V+ / V- button. Press the P- button to enter submenu. Enter submenu, you may use the P- / P+ button to select the submenu option and adjust it with the TV / AV button. The next level of submenu could be entered through clicking the menu option with the mark of < >, and you may use the P- / P+ button to select a menu option and the MENU button to confirm. To back to the main menu, press the Menu button. If you press again the Menu button or there is no operation on the menu within a certain time, the OSD will disappear (not displaying the menu). 2. Sound Menu This menu is to display and adjust the options of audio channel menu. Option Sound Effect Balance Automatic Volume Surround Fiber Mode Operation and Function Adjust the audio effect. Switch among Standard, Movie, Music, Sport and User with the TV/AV button. Adjust the volume proportion of loudspeakers on the left and right sides. Select options with the TV/AV button. Adjust the volume to the optimum. Switch between On and Off with the TV/AV button. Adjust the surround settings. Switch among On, Off and Surround with the TV/AV button. Adjust the proportion of bass and treble. Select options with the TV/AV button. 3. Image Menu This menu is to display and adjust the options of image menu. Interactive Flat Panel User Manual © 2015 Sonnoc 20 Interactive Flat Panel User Manual Option Image Mode Color Temperature Zoom Mode Noise Reduction Operation and Function Enter the image adjustment mode with the TV/AV button. Adjust the color temperature of screen image. Switch among Standard, Warm, Cool and User with the P-/P+ button. Adjust the image scale. Enter the options by pressing the TV/AV button and select images with different scales using the P-/P+ button. Enter the options by pressing the TV/AV button and switch among High, Medium, Low, and Off using the P-/P+ button. 4. Channel Searching Menu This menu is to display options of menus for operation of TV. Press the P-/P+ button to select submenus. This menu works only in TV mode. Option Automatic Channel Searching Manual Channel Searching Function and Operation Select the automatic channel searching option in the channel setting submenu and then press the TV/AV button to enter the automatic channel searching. The channel numbers will be updated automatically during automatic channel searching till the searching ends. To enter manual channel searching, press the ←→ buttons in the manual channel searching operation and function menu; then, you can search channels on the basis of the current frequency. During searching, the progress displayed on the OSD will change over time to remind the user that the searching is processing. Once the signal of a TV station is detected, the manual searching submenu will be displayed on the OSD, with the frequency and frequency band of the TV station displayed. The user may manually change settings on sound and channel number. If changes are detected during searching, a prompt will pop up reminding the user that some settings have been changed and it's required to save the set value After saving, the manual searching submenu will appear again on the OSD, with the frequency option and Yes for memory option selected; then, the user can press the MENU button to continue searching manually. 13. Maintenance Early failures could be prevented. Careful and regular cleaning can extend the service life of this device. But, before cleaning, be sure to turn off the power supply and unplug the power cord. Interactive Flat Panel User Manual © 2015 Sonnoc 21 Interactive Flat Panel User Manual Screen cleaning 1. Method of keeping the screen clean: add a little softening agent or detergent into warm water and then moisten a soft cloth with the water to wipe the screen. 2. If some water left on the screen, dry it in air before booting the device. Housing cleaning 1. In removing the dirt and dust on device housing, wipe with a soft, dry lint-free cloth. Never use a wet cloth. 2. Don’t disassemble this device by non-professionals. If there is any problem, contact your local authorized maintenance personnel. 14. Troubleshooting No power No image Poor reception Clear image but no sound Normal sound but poor color quality Grainy screen and noise Double image or unreal image Check if the device's AC power cord is well inserted into the power socket. If still fails, unplug the power cord and insert it again after 60 seconds and then start the device again. Check the connection of antenna on the back of the device and then try it again in other channels. High buildings or mountains around will lead to unreal image or double image, but you may adjust the image quality manually by referring to instructions in the section of "Manual Channel Searching" or changing the receiving direction of outdoor antenna. If you're using an indoor antenna, it will be more difficult in receiving signals in some cases, but the image quality could be improved through changing its receiving direction. If the receiving effect is not improved, you need to use an outdoor antenna. Turn up the volume or check if the device is in mute mode; if yes, unmute it through pressing the MUTE button on remote control. Increase the contrast and brightness. Check the connection of antenna on the back of this device. The antenna may not be placed properly. Use a high directive antenna to improve the image quality. Interactive Flat Panel User Manual © 2015 Sonnoc 22 Interactive Flat Panel User Manual Remote control doesn’t work. Screen is too bright or dark (under PC Mode) Aim your remote control at the remote sensor on the device in operating. If it still doesn't work, check if the plastic release paper is removed or if the batteries are installed properly. If necessary, replace its batteries. The device will switch to the halted mode automatically if it still fails to receive any signals in 15 minutes. Adjust the contrast and brightness in the main menu. Sonnoc Inc. 11940 Goldring Road, Suite D Arcadia, CA 91006 www.sonnoc.com [email protected] Interactive Flat Panel User Manual © 2015 Sonnoc 23