1
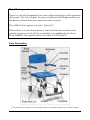
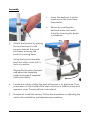
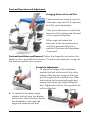
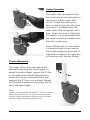
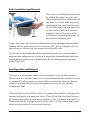
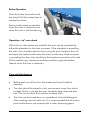
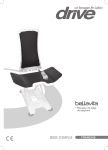
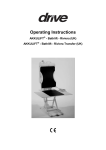
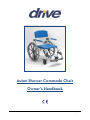
Aston Shower Commode Chair Owner’s Handbook Aston Shower Commode (CWC003) Page 1 of 12 Introduction – Aston Shower Commode Chair These instructions aid the user and/or carer about the safe and efficient use of this product, including assembly, cleaning and maintenance, and operation of the product. Ensure that you fully read these instructions before using this product. The product is a CE marked as a class 1 medical device. It can be used as aid for showering or toileting. It comes with a potty and lid or can be wheeled over most conventional and disabled toilets. It is suitable for a single occupant up to 160kg (25 stone) for the standard version and 260kg (39 stone) for the bariatric version. The device is available as an attendant propelled version with 4-braked castors, or a user propelled version with 2-braked castors and 24” rear wheels. It is constructed from aluminium and polyurethane (PU) with stainless steel fasteners so is suitable for use in a bathroom environment. Personal Safety Read these instructions carefully before use. Check all components are secured before use. Only use on level ground. When stationary apply the brakes on the wheels. Ensure the brakes are released before the chair is moved again. Always ensure that the device is stationary and braked applied when transferring to and from the device. Swing away the leg rests before getting in or out of the device. The user should always remove their feet from the leg rests before swinging the leg rests away. Do not lean out of the device. Ensure that all castors and wheels are set to the same height and that there is not a significant tilt on the seat. Be careful of pinch points when rising from or lowering on to the seat, or when you are removing the potty. When issuing or reissuing, a risk assessment of the user’s stability for the device may be required. The chair should also be checked and cleaned as described in the care and maintenance section. Aston Shower Commode (CWC003) Page 2 of 12 Risk of Entrapment There is a risk of entrapment from user’s thighs slipping in to the aperture of the seat. This risk is higher for users whom have slim thighs and/or use the device without footrests, aperture cover or potty. The width of the hygienic cut out is 75mm (3”). Where there is a risk of entrapment, users should use a comfort seat without hygienic cut out which is available as an additional item from Drive Medical. The product ref for this seat is CWC003CS. Parts Description The model shown above is the standard Aston commode (without 24” wheels fitted). Aston Shower Commode (CWC003) Page 3 of 12 Assembly 3. 1. Insert the backrest in to the receivers on the chair base (see photo) 2. Secure by installing the backrest knobs (arrowed). Install by screwing the knobs in clockwise. Attach the footrest by placing the top bracket in to the receiver tube at the top of the frame, ensuring the footrest is swung back. Swing the footrest towards the front of the chair until it locks in position. Repeat for the other footrest and adjust the footplate height and angle if required (see instructions) 4. Locate the seat by sliding the back of the seat in to the frame. Then press down on the whole of the seat until secure. Add the potty and aperture cover if required (see instructions). 5. If required, install the castors. Follow the procedure on adjusting the castors for installation and adjustment procedures. Aston Shower Commode (CWC003) Page 4 of 12 Footrest Operation and Adjustment Swinging Footrests In and Out The footrests can swing in and out if the user requires this. If required, first flip up the footplates. Then, press the lever to unlock the footrest whilst rotating the footrest in the required direction. When required, rotate the footrests to the forward position until they automatically lock in position. Flip down the footplates if required. Footrest Installation and Removal Follow the Assembly instructions for details on how to install the footrests. To remove the footrests, swing out the footrest and lift up to remove. Footplate Adjustment. 1. To adjust the height of the footplate, slacken the bolt at the end of the white tubing of the leg rest, using an allen key and turning the bolt anticlockwise. Slide the footrest to the required height and secure the footrest by retightening the bolt. Tighten the bolt by turning clockwise with an allen key. 2. To adjust the footplate angle, slacken the bolt near the bottom of the inner tube (chrome). Adjust the footplate to the required angle and resecure the bolt. Aston Shower Commode (CWC003) Page 5 of 12 Castor Operation LOCK UNLOCK The castors can be locked so that the wheel cannot move forwards or reverse nor will the castor fork swivel. To lock the castor press down on the locking tab with a foot (as shown). To release press the other side of the locking tab with a foot. Unless the chair is fitted with 24” wheels, it is recommended that the castors are always locked when the chair is stationary. Note: If fitted with 24” rear wheels, it is essential that the rear castors are locked and pointing forward. If unlocked or locked at an angle they will interfere with the rear wheels. Castor Adjustment The height of the chair and seat can be altered by adjusting the castor height. To adjust the castor height, remove the ‘E’ clip or nut and bolt (arrowed). Reposition the castor stem to the required position and reattach the ‘E’ clip or nut and bolt. Repeat for the other 3 castors ensuring they are all set at the same height. Note: Models will be supplied with either ‘E’ clips or a nut and bolt to secure the castor. ‘E’ clips do not require any tools for height adjustment, whereas the nut and bolt solution requires a spanner and allen key. Aston Shower Commode (CWC003) Page 6 of 12 Potty Installation and Removal The potty is installed and removed by sliding the potty in to the two rails mounted to the underneath of the seat. To install, slide the potty underneath the seat from the rear of the chair, ensuring the potty sits on both rails of the seat. Ensure nobody is sat on the chair when installing or removing the potty to prevent any trapping risk. Cover the potty with the lid to reduce the risk of spillages and carefully dispose of the potty contents in a sluice or WC. Do not dispose of in an open drain or sink as this can cause serious health risks. The potty can be cleaned and disinfected manually or in an autoclave / aqueous decontamination machine. It should be cleaned after each use. Replacement potties are available from Drive Medical under product code Z33303-16. Seat Operation and Removal The seat is a horse shoe shape with removable cover for the aperture. When used as a shower chair, it is recommended that the aperture cover is removed to allow better access to the occupant for cleaning. Ensure weight is not applied directly to the aperture cover as this can fall through the seat. The seat clips on and off the frame. To remove the seat for cleaning, first remove the potty and aperture cover. Then lift up the front for the seat to release and slide the seat away from the chair. To attach the seat first locate the seat by sliding the back of the seat in to the frame, then press down on the whole of the seat until secure. Aston Shower Commode (CWC003) Page 7 of 12 Arm Operation The arms can flip up to aid side transfer. Simply lift the front of the arms to flip up, and then push down to lower. The brakes should always be applied before transferring. 24” Rear Wheel Kit - Installation There is an optional kit available for the Aston commode which adds two 24” wheels and brakes, to allow the commode to be propelled by either an attendant or the commode user (part code CWC003KIT). To install: 1. Without the 24” wheels, set the castor height to suit to the user. 2. Swivel the two rear castors so they are pointing forward and then lock. This is to prevent the castors interfering with the 24” wheels when installed. 3. Install the two brackets which receive the axles for the 24” wheels so that the rear castors will be approximately 3mm from the ground when the 24” wheels are added. 4. The wheels have quick release pins as axles. Press the button on the quick release pin and insert through the centre of the wheel and then insert the wheel and axle into the bracket mounted to the chair. After installing, release the button and check the wheels are secured on to the frame. Repeat for the other wheel. 5. Install the brakes in the position shown overleaf, ensuring that the brakes operate securely, correctly and easily. Quick Release Wheel Operation To remove or install the rear wheels without tools, press the button on the quick release pin in the centre of the wheel whilst pulling or pushing to insert or remove the wheel. Ensure the wheel is secure before use. Aston Shower Commode (CWC003) Page 8 of 12 Brake Operation Push the brakes forward to lock the wheel. Pull the brakes back to release the brake. UNLOCK LOCK Ensure both brakes are applied when the chair is stationary and when the user is side transferring. Operation – 24” rear wheels When the 24” rear wheels are installed, the chair can be propelled by either the attendant or the chair occupant. If the attendant is propelling the chair, they should propel the chair using the push handle at the rear and apply the castor brakes when the chair is stationary. If the occupant is propelling the chair, they should use the handrims mounted on the side of the wheels to go, manoeuvre and stop and then apply the brakes (above) when the chair is stationary. Care and Maintenance Before each use of the chair, the brakes and tyres should be checked. The chair should be stored in a dry environment, away from direct sunlight. When in storage the chair should be kept clean and dust free. This can be done with a duster or damp cloth. The chair can be hosed down or wiped down with mild detergent. After washing, wipe the chair dry. It is recommended that all castors, joints and fasteners are sprayed with a water dispersing agent. Aston Shower Commode (CWC003) Page 9 of 12 The polyurethane (PU) and plastic parts of the commode can be cleaned is an aqueous decontamination machine at 80ºC. Cleaning the aluminium frame in this way is not recommended as it could cause damage to paintwork. The device has an estimated service life of 6 years in a single user domestic environment, provided that the device has been maintained in line with manufacturer’s recommendations. If the device is used in a multi user environment (such as a nursing home or hospital) then service life may be reduced. It is recommended that the device is serviced at least annually. If the device is subject to heavy use and/or use in a multi user environment then we recommend the device is serviced more frequently. The issuer or user should routinely check the following items, and when the device is reissued. It is recommended that a Drive Medical dealer services the wheelchair annually, where these items should be repaired, replaced, adjusted and/or lubricated if required: Tyre wear Wheel bearings Castors Brakes Leg rest locking mechanism Seat and Back Pads Arm Pads Quick Release Pin Potty and Lid ‘E’ clips Aston Shower Commode (CWC003) Page 10 of 12 Shower Commode Specification CWC003 (18” seat – attendant propelled): Overall (cm): 90L x 56W x 98 - 103H Seat (cm): 42D x 46W x 51 - 56H Armrest (cm): 30L x 5W x 71 – 76H Pan Clearance: 44.0 x 49.0cm Total Weight: 13.4kg Weight Limit: 160kg (25 stone) CWC003SP (18” seat – user propelled): Overall (cm): 108L x 69W x 99 - 101H Seat (cm): 42D x 46W x 51 - 56H Armrest (cm): 30L x 5W x 72 – 76H Pan Clearance: 44.0 x 47.8cm Total Weight: 19.4kg Weight Limit: 160kg (25 stone) CWC003HD (22” seat – attendant propelled): Overall (cm): 90L x 65W x 98 - 103H Seat (cm): 42D x 55W x 51 - 56H Armrest (cm): 30L x 5W x 71 – 76H Pan Clearance: 44.0 x 49.0cm Total Weight: 17kg Weight Limit: 260kg (39 stone) CWC003HDSP (22” seat – user propelled): Overall (cm): 108L x 78W x 99 - 101H Seat (cm): 42D x 55W x 51 - 56H Armrest (cm): 30L x 5W x 72 – 76H Pan Clearance: 44.0 x 47.8cm Total Weight: 23kg Weight Limit: 260kg (39 stone) Aston Shower Commode (CWC003) Page 11 of 12 Warranty Your Drive branded product is warranted to be free of defects in materials and workmanship for one year from date of purchase. This device was built to exacting standards and carefully inspected prior to shipment. This warranty is an expression of our confidence in the materials and workmanship of our products and our assurance to the customer. In the event of a defect covered by this warranty, we will at our option supply parts or replace the device. This warranty does not cover device failure due to owner misuse or negligence, or normal wear and tear. The warranty does not extend to non-durable components, such as rubber accessories, castors and grips, which are subject to normal wear and need periodic replacement. If you have any queries or require full warranty conditions, please contact your Drive stockist. This does not affect your statutory rights. Drive Germany: Drive Medical GmbH & Co. KG Leutkircher Straße 44 D-88316 Isny/Allgäu (Germany) Web www.drivemedical.de Drive UK: Drive Medical Limited Ainley’s Industrial Estate, Elland. UK WEST YORKSHIRE HX5 9JP Web www.drivemedical.co.uk Document Code: CWC003_IFU (Issued 08/15) Aston Shower Commode (CWC003) Page 12 of 12