1
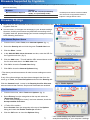
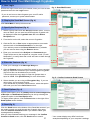
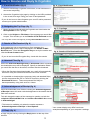
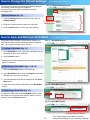
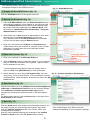
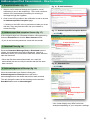
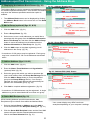
Secure File Exchange Service Cryptobin User's Manual Mar, 2014 (c) copyright NRI SecureTechnologies,Ltd. Browsers Supported by Cryptobin The functionality of the Cryptobin has been verified on the following list of supported browsers (as of Oct 2013). [Microsoft Windows] Browser Microsoft Internet Explorer Mozilla Firefox Version 6.0, 7.0, 8.0, 9.0, 10.0 (in Desktop mode), 11.0 (in Desktop mode) 24.0 •JavaScript and cookies must be enabled. •The above list of supported browsers is subject to change without notice. Browser Settings Make sure you are connected to the Internet and have access to the fig. 1 : IE Internet Options Cryptobin web site. In most cases, no changes are necessary to your browser settings. However, should you encounter any difficulties connecting to the Cryptobin web site, please change your browser settings according to the following instructions. For Internet Explorer Users 1. From the menu, select Tools, then Internet Options. (fig. 1) 2. Select the Security tab and click the green Trusted sites icon. 3. Click the Sites... button. 4. In the Add this Web site to the zone: text box, enter the URL for the Cryptobin web site. (fig. 2) 5. Click the Add button. This will add the URL entered above to the list of trusted web sites in the Web sites: box. fig. 2 : IE Trusted Sites 6. Click OK to close the Trusted sites dialog. 7. Click OK to close the Internet Options dialog. * The above procedure assumes all other browser settings are set to default. If any of the other settings may have been changed, then from the menu go to Tools, then Internet Options and select the Security tab. Click the Custom Level... button in the Security level for this zone area and ensure that Cookies, Scripts and Downloads are enabled. fig. 3 : Firefox Options For Firefox Users 1. From the menu bar, select Tools then Options. (fig. 3) 2. Select Privacy from the categories at the top and select the “Remember history”. If “Use custom settings for history” has been selected, check the Accept cookies from sites. 3. < Firefox 22 or earlier > Select Content from the categories at the top of the Options dialog and check the Enable JavaScript checkbox. 4. Click the OK button to close the Options dialog. 1 * Your screen display may differ from these examples depending on your computer's settings. How to Send Your Mail through Cryptobin 1. User Login fig. 4 : Send Mail Screen Access the login screen from your browser, enter your user ID and password then click the Login button. * If you do not know or have forgotten your user ID and/or password, contact your system administrator. 2. Display the Send Mail Screen (fig. 4) 3. Specify Recipient Click Send Mail on the top left menu bar. 3. Specify the Recipient (fig. 4) 1. Select a group name from the Group pull-down menu. A list of users to whom you can send a mail through the Cryptobin will be displayed under the Cryptobin user tab in the Select Recipient area. 2. From the list on the left, select the users to Cryptobin. 3. Click the To, Cc, or Bcc button as appropriate to move each 4. selected user to the Users Selected box on the right. Contents If you add any users to the Users Selected box by mistake, you can remove them using the Remove button. 4. Enter your comments in the Subject and Comment boxes. These will be sent to the recipient as a regular e-mail (“E-mail Notification”) to notify them that a mail was sent to them through the Cryptobin. 5. Send Options 4. Enter the Contents (fig. 4) 1. Enter your message in the Message Body box. 2. Click the Browse button to select files saved on your computer that you would like to attach to your mail through the Cryptobin. (Up to five files can be attached to one mail.) * Some restrictions may apply for files size greater than or equal to 20MB. Click [Restrictions] for more information. fig. 5 : Confirm Content to Send Screen 3. Select whether you are using an Encryption Key. If you are using a key, you must enter it twice. If you would like to provide a password hint, select that option and enter your hint in the Set a hint text box. 5. Send Options (fig. 4) Various send options such as Validity Period, Acknowledgement of Receipt and Notification E-mail may be set by selecting the respective option in the Send Option area. To display these options, click the Show button to the right of the Send Option section header. 6. Send (fig. 5) Click the Send button at the bottom of the Send Mail screen if you are ready to send your mail through the Cryptobin right away. Click the Confirm and Send button if you need to check your message before sending it. After you have finished checking your message in the Confirm Content to Send screen, click the Send button to send it. 2 * Your screen display may differ from these examples depending on your computer's settings. How to Receive and Reply to Cryptobin fig. 6 : E-mail Notification 1. E-mail Notification (fig. 6) 1. When a mail through Cryptobin is delivered, e-mail notification is sent to the recipient(s). 2. Access the Cryptobin login page by clicking on the URL provided in the e-mail, then login using your user ID and password. * If you do not know or have forgotten your user ID and/or password, contact your system administrator. 2. Navigating the Top Page (fig. 7) fig. 7 : Top Page 1. Newly received mails through the Cryptobin are listed under the New Uploads on the Top Page. 2. Click on the Subject or File Name of the message you would like to open. This will take you to the Details of File Received screen. 2. New Uploads * You may also receive messages by clicking Received Mail List menu. 3. Details of File Received (fig. 8) If the sender has set an encryption key for a message, the Encryption Key text box will be displayed in the Details of Mail Received area. Enter the Encryption Key as set by the sender and click the Show Content button. fig. 8 : Details of File Received Screen * If you do not know the Encryption Key, check with the sender. 4. Attached Files (fig. 9) When the Download Message Body or Download button is pressed, the download screen will be displayed. Specify a destination where you would like the files to be saved, and then start the download. 3. Enter Encryption Key * When the files have been downloaded, an e-mail will automatically be sent to notify the sender that the files have been received. fig. 9 : Attached Files * It is possible to download the comments, body and attached file(s) as one compressed file (ZIP or TAR+GZ format) by clicking the Download All button. These compressed files may be decompressed by using tools such as +Lhaca. 6. Reply 5. Acknowledgement of Receipt (fig. 9) Once the downloads have finished, clicking the Acknowledgement of Receipt button will send a acknowledgement to the sender that all files were received. 4. Download This will change the status of the message in question on both the recipient’s Received Mail List and sender’s Sent Mail List screens to Acknowledged. * This button is available only when the sender requests a Acknowledgement of Receipt in Send Options. 5. Acknowledgement of Receipt * Your screen display may differ from these examples depending on your computer's settings. 6. Reply (fig. 9) A reply may be sent by clicking the Reply button at the top of the window. 3 How to Change the Default Settings (Only When Necessary) fig. 10 : Default Setting Screen Follow these instructions to change the default settings for sending a mail through the Cryptobin. Changes made here will be reflected in all future messages sent. 3. Click the Save button Default Settings (fig. 10) 1. Click the Settings button in the menu bar, then on Default Setting. 2. Enter your desired default values for each field. 1. Click the Default Setting menu 3. Click the Save button to save your new settings. 2. Enter default values How to Save and Retrieve Draft Mails Frequently used message content and/or settings can be saved as draft mails and retrieved later for repeated use. (Up to 20 draft mails can be saved.) (Only When Necessary) fig. 11 : Send Mail Screen 1. Saving a Draft Mail (fig. 11) 1-2. Click the Save button 1. In the Send Mail screen, create the message that you would like to save as a draft mail. 2. Click the Save button. * Attachments and Encryption Keys can not be saved as part of a draft mail. 2. Retrieving a Draft Mail (figs. 12 & 13) 1. Click the Draft Mail button in the menu bar. 2. In the Draft Mail screen, click the Subject of the draft mail that you would like to retrieve. 3. The selected draft mail will be displayed in the Send Mail screen. * A draft mail may also be retrieved from the Send Mail screen. fig. 12 : Draft Mail Screen 3. Removing a Draft Mail (fig. 12) 2-1. Click the Draft Mail menu To remove a draft mail, go the Draft Mail screen, select the check box of the draft mail that you want to remove, and then click the Remove button. 2-2. Click the Subject fig. 13 : Send Mail Screen 2. Select the Subject and click the Retrieve button 4 * Your screen display may differ from these examples depending on your computer's settings. Address-specified transmission (Optional Service) * The following sections only apply to users who have entered into a separate contract for this optional service. fig. 14 : Send Mail Screen 1. Display the Send Mail Screen (fig. 14) Click the Send Mail button on the top left menu bar. 2. Specify the Recipients (fig. 14) 1. Click the E-Mail Address tab in the Select Recipient section 2. Specify and enter the recipient’s e-mail address in you may also click Recipient on the Address Book button to select e-mail addresses that have been previously registered in the Address Book. (See the section on Address-specified transmission - Using the Address Book for details.) 2. Click the To, Cc, or Bcc buttons as appropriate to move each selected user to the Users Selected box on the right. If you add any users to the Users Selected box by mistake, you can remove them using the Remove button. 3. Contents 3. Enter your comments in the Subject and Comment boxes. These will be sent to the recipient as a regular e-mail (“E-mail Notification”) to notify them that a mail was sent to them through the Cryptobin. 3. Enter the Contents (fig. 14) 4. Set Reply Options 4. Send Options 1. Enter your message in the Message Body box. * Requires Reply Option Contract 2. Click the Browse button to select files saved on your computer that you would like to attach to the Cryptobin. (Up to five files can be attached to one mail.) * Some restrictions may apply for files size greater than or equal to 20MB. Click [Restrictions] for more information. fig. 15 : Confirm Content to Send Screen 3. Select whether you are using an Encryption Key. If you are using a key, you must enter it twice. If you would like to provide a password hint, select that option and enter your hint in the Set a hint text box. 4. Send Options (fig. 14) Various send options such as Validity Period, Acknowledgement of Receipt and Notification E-mail may be set or permit settings for Conditions for address-specified mail reply may be changed, by selecting the respective option in the Send Option area. To display these options, click the Show button to the right of the Send Option section header. 5. Send (fig. 15) Click the Send button at the bottom of the Send Mail screen if you are ready to send your mail through the Cryptobin right away. Click the Confirm and Send button if you need to check your message before sending it. After you have finished checking your message in the Confirm Content to Send screen, click the Send button to send it. 5 * Your screen display may differ from these examples depending on your computer's settings. Address-specified transmission - How to receive 1. E-mail Notification (fig. 16) fig. 16 : E-mail Notification 1. When a mail is delivered through the Cryptobin, e-mail notification is sent to the recipient(s). The e-mail contains a random URL (web address) necessary for receiving a message through the Cryptobin. 1. Click the URL 2. Click on the URL provided in the notification e-mail to access the Address-specified reception page. * If clicking on the URL in the e-mail does not take you to the web site, copy and paste the URL into your browser to access the page. fig. 17 : Address-specified reception Screen 2. Address-specified reception Screen (fig. 17) If the reception page has a Password field for a Encryption Key, enter the Password and click the Show Content button. * If you do not know the password, check with the sender. 2. Enter the Password 3. Attached Files (fig. 18) When the Download Message Body or Download button is clicked, the download screen will be displayed. Specify a destination where you would like the files to be saved, and then start the download. * When the files have been downloaded, an e-mail will automatically be sent to notify the sender that the files have been received. fig. 18 : Attached Files 4. Acknowledgement of Receipt (fig. 18) Once the downloads have finished, clicking the Acknowledgement of Receipt button will send a acknowledgement to the sender that all files were received. This will change the status of this message on the sender’s Sent Mail List screen to Acknowledged. 3. Download 4. Acknowledgement of Receipt * Your screen display may differ from these examples depending on your computer's settings. 6 Address-specified transmission - How to reply * The following sections only apply to users who have entered into a separate contract for this optional service. (Optional Service) fig. 19 : Address-specified reception Screen 1. Address-specified reception Screen (fig. 19) A reply can be sent to the sender if you sent the original message giving permission to reply through the Cryptobin. Click the Reply button at the bottom of the Address-specified reception screen to go to the New Mail screen. 2. New Mail Screen (fig. 20) The New Mail Screen is displayed. 3. Enter the Contents (fig. 20) 1. Reply 1. Enter the message in the Message Body to reply. 2. Click the Browse button to select files saved on your computer that you would like to attach. (Up to five files can be attached to one mail.) 3. In the Password section, select whether you will reuse the same password that was used when you received the original message, or whether you would like to change it. If you are changing the password, you will be asked to enter the new password twice. You also will have an opportunity to enter a hint for the new password in the Set a hint text box. fig. 20 : New Mail Screen 4. Check the Notification E-mail check box if you would like to receive e-mail notification when the recipient downloads the files that you send. 4. Send (fig. 20) Click the Confirm Content to Send button to confirm the content of your message, and then click the Send button to send it. 3. Contents 4. Confirm the Contents Before Sending * Your screen display may differ from these examples depending on your computer's settings. 7 Address-specified transmission - Using the Address Book 1. Displaying the Address Book Screen (fig. 21) fig. 21 : Address Book Screen The Address Book is used to manage e-mail addresses used for Address-specified transmission. This function is available only when the Address-specified transmission option is enabled. 2-1. Add a Group 3-1. Add an Address 1. The Address Book screen can be displayed by clicking the Address Book button in the menu bar or in the Send Mail screen. 4-1. Select Address(es) 2. Add a Group (optional) (figs. 21 & 22) 1. Click the Add button. (fig. 21) 4-2. Set to Mail Recipient 2. Enter a Group Name. (fig. 22) 3. Select one or more e-mail addresses you would like to associate with this group from the Address Information Not in This Group list, and then click the Add to Group button to move the selected e-mail address into the Address Information in This Group list. (fig. 22) fig. 22 : Group Edit (Add) Screen 2-2. Enter a Group Name 4. Click the Add button to complete registering e-mail addresses in the Group. (fig. 22) * A maximum of 100 groups may be registered. Each group may have a maximum of 100 e-mail addresses associated with it. 2-3. Add to Group 3. Add an Address (figs. 21 & 23) 2-4. Add 1. Click the Add button. (fig. 21) 2. Enter the Name, E-mail Address and Organization (optional) fields. (fig. 23) fig. 23 : Address Edit (Add) Screen 3. Select the group with which you wish to associate the new e-mail address from the Group Not Belongs To list. Click the Add to Group button to move the selected group to the Group Belongs To list. If no Group is selected, the new e-mail address will automatically be placed in the Unaffiliated group. (fig. 23) 3-2. Enter an address information 3-3. Add to Group 4. Click Add to complete address registration. (fig. 23) * A maximum of 1000 addresses may be registered. A single address may not be associated with more than one group. 3-4. Add 4. Set to Mail Recipient (fig. 21) When sending Address-specified transmission, Mail Recipients may be chosen from within the Address Book. 1. Select a desired Group or Address and click Add to move the selection to the Recipient Setting list. (fig. 21) 2. Click the Set to Mail Recipient button and the Send Mail screen will open with the selected addresses already filled in the Users Selected field. (fig. 21) 8 * Your screen display may differ from these examples depending on your computer's settings.