1
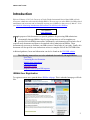
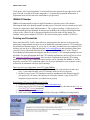
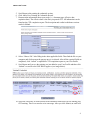
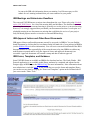
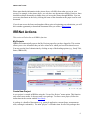
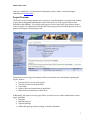
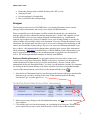
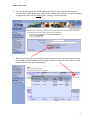
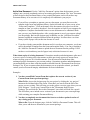
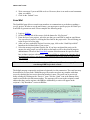
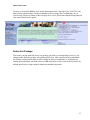
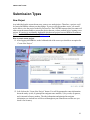
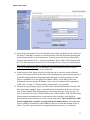
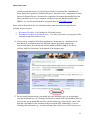
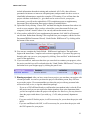
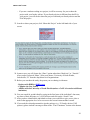
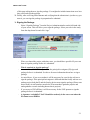
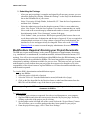
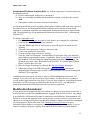
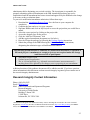
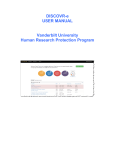
UNIVERSITY OF NORTH FLORIDA Institutional Review Board (IRB) Guide to IRBNet: Version 2 11-15-2013 Table of Contentsi Introduction 2 Sign this Package 13 IRBNet User Registration 2 Submit this Package 13 IRBNet ID Number 2 Send Mail 14 Training and Credentials 3 Delete this Package 15 IRB Meetings and Deadlines 4 Submission Types 16 New Project 16 IRB Approval Letters and Board Documents 5 IRB Forms, Templates, and Guidance 5 Sharing a project 19 IRBNet Actions 6 Signing the Package 21 My Projects 6 Submitting the Package 22 Create New Project 6 Revisions (modifications required) 22 Project Overview 6 Reportable Events 23 Non-Compliance 23 Designer 7 Revise an Existing Document 8 Protocol Deviation 23 Add a New Document 9 Unanticipated Problems Involving Risk 24 Amendments 24 Contact Information 25 IRB Documents 10 View/Update/Delete 11 Create New Package 12 Lock Status 12 Share this Project 12 Click on the topic titles above to navigate to that section of the guidance document. IRBNET USER’S GUIDE Introduction Effective February 6, 2012, the University of North Florida Institutional Review Board (IRB) will only accept new submissions electronically through IRBNet. The next step is to utilize IRBNet for IRB protocol amendments and extensions and we anticipate requiring use of IRBNet for that activity by March 1. 2014 (see Guide for Submitting Amendments and Extensions for Old Projects in IRBNet) Web Address: www.irbnet.org. T he purpose of this document is to provide guidance for processing IRB submissions electronically through IRBNet. Step-by-step instructions as well as snapshots are provided for each IRBNet transaction. Additionally, each instruction will include a list of required study documents and forms to be attached with a submission in IRBNet. These documents are necessary to facilitate your IRB reviewers’ knowledge of your study. Finally, this document will also provide some instructions on how to complete each of the UNF IRB forms. Additional guidance, forms and information can also be found on the UNF IRB website. The following transactions are to be submitted electronically through IRBNet: New Study Continuing Review/Extension Modification/Amendment Close/Final Report Reportable Events Response/Follow-up to IRB requests IRBNet User Registration To register as a new user, open the above IRBNet webpage. This is what the homepage will look like: 2 IRBNET USER’S GUIDE Click on the “New User Registration” icon located below the login at the top right corner of the page. The link is circled in red in the image above. Complete the registration information. A registration email will be sent to the email address you provided. IRBNet ID Number IRBNet will automatically assign a 6-digit ID number to each new project. The number following the dash is the package number for that project. Therefore, a newly created project will always be 6 digits then a dash and the number 1. The 1 refers to package 1 of the project. For each subsequent package submitted for that project in IRBNet, the last digit following the dash will go up one. However, the 6 digit project number before the dash will not change. For example, a new project might be #123456-1. Revisions to that project would be #123456-2. Training and Credentials Please note that all PIs, Co-PIs, data collectors, and personnel who interact or intervene with participants, and personnel who have access to identifiable information must be CITI certified in the protection of human subjects. If you or any of your study personnel have not completed CITI training, you can do so by following this link: www.citiprogram.org and completing either basic course in “Group 1 Biomedical Research Investigators and Key Personnel” or the “Group 2 Social Behavioral Researcher Investigators and Key Personnel” CITI training depending on your discipline. For more information about the CITI training requirements, please feel free to review the FAQs on UNF IRB CITI Training. After you have completed the required CITI training, please save a copy of your completion report so that it can be uploaded into IRBNet. It will be necessary to save the CITI completion reports for all project personnel to your computer as they will need to be submitted with your project package. There are two ways to document your CITI within IRBNet: 1. Document the CITI training in your IRBNet User Profile (only needs to be done once every 3 years and will make your CITI training visible for all your projects) 2. Include a copy of your CITI completion report as attachment on the Designer page for your project (if you choose, this option you will need to submit a copy of your CITI completion report each time you submit a new project). Documenting CITI on your IRBNet User Profile: 1. Complete the required CITI training (www.citiprogram.org) 2. Save a copy of your CITI completion report on your computer (directions in the FAQs on UNF IRB CITI Training document) 3. Log into IRBNet (www.irbnet.org) 4. Click User Profile on the top right hand side of the page in IRBNet (see image below) 3 IRBNET USER’S GUIDE 5. Scroll down to the training & credentials section, 6. Click Add a New Training & Credentials Record 7. Document the information about your study (i.e., document type, effective date, expiration date). The effective date is the date you passed CITI. All information can be found on the CITI completion report. The description and credits/credit hours sections can be left blank. 8. Select “Choose File” after filling in the other applicable fields. Then find the file on your computer and click open on the pop-up once it is selected. After all the required fields are completed, click “Attach” to upload the CITI completion report to your User Profile. 9. Scroll down until you see the training you just added to your User Profile and then click “Submit” to send it to the UNF IRB to approve (see image below). 10. Select the University of North Florida as the institution with which you are sharing your CITI training. There is no need to write a message. After you click submit, an email will 4 IRBNET USER’S GUIDE be sent to the IRB with information about your training. It will be necessary to click submit for each training/credential that you want connected to your profile. IRB Meetings and Submission Deadlines The convened UNF IRB meets at various times throughout the year. Please refer to the Schedule on the UNF IRB Website for a list of the meeting dates and deadlines. The deadline for submitting for review at a convened meeting is generally two weeks prior to a convened meeting. However, it is strongly suggested that you submit your documents more than 2 weeks prior to a scheduled meeting in case documents are missing that could delay the review of your project. Only full board projects must be reviewed at a convened IRB meeting. IRB Approval Letters and Other Board Documents IRB approval letters and board documents can only be accessed via IRBNet. You can find the board documents by clicking the Reviews button on the left hand side of your package in IRBNet (see the IRBNet FAQs for more information). You will receive an email notification of the IRB’s determination but it is the responsibility of the research team to log into IRBNet to address any modifications requested and/or verify the Approval Letter and approved document(s) are accessible. Approved documents will contain a stamp and date to indicate approval. IRB Forms, Templates, and Guidance Some UNF IRB forms are available on IRBNet for download and use. The North Florida – IRB Protocol application is not available in this library and must be completed and adjusted on the Designer page in IRBNet (see the IRBNet FAQs for more information). More information about new submissions is included below. If you would like to access the forms and templates library, you can do so at any time by clicking on “Forms and Templates” option on the left-hand side of your screen under “Other Tools.” 5 IRBNET USER’S GUIDE Please note that the information in the picture above will differ from what you see on your screen. For example, in the picture above, we only have one document available. However, there should be multiple documents available when you access the library through IRBNet. You can access any document on the list by clicking the name of the document or the paper icon for each document. If you do not access the forms and templates library prior to beginning your submission, you will have another opportunity to download documents when you create a New Project. IRBNet Actions This section will describe each IRBNet function. My Projects IRBNet will automatically open to the My Projects page after you have logged in. This section allows you to view all studies that you have created or to which you have been shared access. You may sort the list of submissions by clicking on any of the heading options (e.g., Study Title, Status, IRBNet ID). Create New Project A new project is created in IRBNet using the “Create New Project” menu option. This function only creates new studies. It does not start a new package. To create a new project, follow the instructions in the section entitled New Study. A package is a bundle of documents (e.g., protocol application, consent forms, measurement tools, training & credentials). The term “project” is a blanket term for all of the packages that 6 IRBNET USER’S GUIDE make up a submission. If you need more information, please contact a research integrity administrator ([email protected]). Project Overview The Project Overview page appears once a project is created and allows a research team member to get general information regarding the status of the project as well as quick links to other functions within IRBNet. You can get to the project overview page only after you have begun work on at least one submission. From the My Projects page you can reach the project overview page by clicking on a desired project title. The project overview page lets members of the research team view information regarding the project, such as: Personal level of access to the project The status of the current transaction Lock status Status of previous transactions (if applicable) Shared access permissions of other users Additionally, the project overview page allows you direct access to other administrative menu pages, including: Designer Share this project Sign this package Submit this package (unless package is already submitted) 7 IRBNET USER’S GUIDE Delete this package (only available for those with “full” access) Send project mail Previous package(s) (if applicable) Review details for the current package Designer The Designer is used to access UNF IRB forms, view attached documents for the current package, add new documents, and access review details for IRB documents. When you initially access the designer it will be to attach documents for your submission package. After you have submitted a package, that package is “locked” and cannot be revised. After the IRB has reviewed your package and made a determination (e.g., modifications required, project approved), you may be asked to revise your existing package or you may be asked to submit a new package with revised documents. If you are revising documents for your submission, the designer page also allows you to revise your existing project documents or add entirely new documents to your package. Always revise a previous document submitted if you have a choice – this maintains the document history properly in the system. More information about submitting a New Study is included below. After the IRB has made a determination, you may be required to make changes to an existing document or to upload a new document for review. The following details and examples are directly from IRBNet: Revise an Existing Document: Use this option when you want to add or create a new version of an existing project document. IRBNet creates a new version of your document and retains all historical versions as part of your Document History. The new version will be automatically tied to the Document History. You may view the historical versions of a document by clicking on the Document History icon. Please note that if you have not uploaded multiple version of the same document, you will not see the document history icon ( ). 1. From the list of Documents from Previous Packages at the bottom of the page, download the document to be revised by clicking on the name of the document under the heading “Document Type” or on the paper icon. 2. Make any necessary changes to the downloaded document, and save the revised document to your computer. 3. Click on the pencil icon for the document you are updating in the Designer. This will allow you to replace the previous version with the newly revised version of the document. 8 IRBNET USER’S GUIDE 4. You will then be prompted to attach a document. Browse your computer and select the revised version of the document to upload, make changes to Document Type and Description as appropriate, and click the Update button. The page will look like this: 5. When you click Update, the revised document will appear in the current document package (New and Revised Documents in this Package) with a revision history that reflects versions of that document from previous packages. \ 9 IRBNET USER’S GUIDE Add a New Document: Use the "Add New Document" option when the document you are adding is not a revised or updated version of an existing project document. The "new" document will not be tied to the Document History of any existing document, and it will not have any Document History of its own since it is a completely new addition to your project. If you will use a template to generate your new document, you must first access the template in the forms and templates library. On the left-hand side of your screen, select “Forms and Templates.” Click on the name of the document or the paper icon for the template or form you wish to download. Save the template or form to your computer for completion. Complete downloaded forms or create documents to be submitted. Make sure you save your finished product. After your document is saved, you can now upload it to the package. Back on the designer page in IRBNet, use the “Add New Document” button to upload the completed document into the package. It will not have a revision history (stack of paper icon) at this time because it is new. If you have already generated the document and it is saved on your computer, you do not need to download a template from the forms and template library. You can go straight to the “Add New Document” button to upload the new document into the package. It will not have a revision history (stack of paper icon) at this time because it is new. What about copies of existing documents? Committee members and administrators often need to access copies of existing project documents, such the previously approved Consent Form, when reviewing your new or revised documents. You do not need to attach these older, unchanged project documents to your current package. Committee members and administrators can automatically access these older documents as needed from the "Documents from Previous Packages" list. If you are unsure about the documents you are required to submit, you should contact your local research integrity administrator for more information. Examples: 1. You have a modified Consent Form that replaces the current version of your Consent Form from a previous package. What To Do: Access the designer page for your project by clicking the “my projects” button on the left-hand side of the screen. From there you can click on the title of the project you are revising. This will bring you to the project overview page where you can click “designer.” Locate your Consent Form in the "Documents from Previous Packages" list and click the "Revise this Document" icon which will look like a pencil. This will allow you to include a new version of your document in your current package while retaining your complete Document History. 2. You have a completely new document that is not a revised or updated version of any existing project document. What to Do: From the designer page, click the "Add New Document" button. This will allow you to add the new document to your current package. 10 IRBNET USER’S GUIDE Please note that there are multiple ways that the Designer can be accessed: 1. Clicking on the “Continue” icon when creating a new project 2. Clicking on the “Designer” icon from the Project Administration menu 3. Clicking on the blue “Designer” link while in the “Project Overview” page 4. Clicking on the blue package type hyperlink while previewing the “Project History” IRB Documents IRBNet sends an automatic email after a decision has been made by the UNF IRB and when IRB documents such as approval letters are published in IRBNet. To access the IRB documents within IRBNet, log into IRBNet, click the title of the project for which you want to see a board document, then click the Reviews Button on the left hand size of the page. Board documents (e.g., acknowledgement letter, modifications required letter, approval letter) can be accessed from the last table “Board Documents”. Click on either the blue hyperlink text or the document icon to view and print the document(s). See the section Response/Follow-up to a request from the IRB for instructions on replying to modifications requested by the IRB. View/Update/Delete Icon Icon function View/download document Update/Revise/Edit document Delete document See document history Attached documents can be viewed at any time by any shared user. To view attached forms, click on the view icon of the document from the list of project documents. The update function will let you replace the current attached document with a new revised document. The delete function will completely remove a file from IRBNet. The update and delete functions can only be conducted by shared users with Full or Write privileges. These functions should occur before 11 IRBNET USER’S GUIDE submitting a project package. Using the update or delete functions after submitting will create a new package instead of updating the one already submitted. Create New Package Please note that creating a new package is different than creating a new project. Another package may be prepared while a package or multiple packages are pending review. However we strongly recommend that you avoid doing this as it may delay the review of your protocol documents. Only an individual with Full access to the project can create a new package. To create a new package: 1. 2. 3. 4. 5. Log into IRBNet Click into your project in IRBNet by clicking the title of the project. Click the “Project History” button the left-hand side of your screen. Click the “Create New Package” button in the middle of the page. Click “Work in progress (Not submitted)” to access the Designer page for your new package (also may be called “New Document Package” in some instances). IRBNet will now default to this package when you re-enter the project. Alternatively, a new package can be created from the “Designer” when you try to add a new document. Simply accept the warning to create a new package. Lock Status The IRB administrator may unlock a package if it is missing documents required for review or if requested by a PI (as long as the package is not already under review by an IRB member) Contact an IRB administrator via email to request the project package be unlocked. Please provide an accurate IRBNet ID and package # and a brief reason for the request in the message. Please note: your project will only be unlocked if no IRB action has occurred and the package is not being reviewed by the IRB at the time of the request. If the package is being reviewed, the package may not be unlocked. Share this Project Other members of the research team may need access to the project to read the protocol or documents, attach documents, sign the project, and/or submit the project for IRB review. The Principal Investigator (PI) must sign each project transaction to be submitted to the IRB. When possible, the UNF IRB asks that the PI be the one completing the package. Permissions Full: User may manage all aspects of the project. The user may give and change permissions associated with the project. You may have more than one manager to a project. 12 IRBNET USER’S GUIDE Write: User may co-edit the project with owner, but not give or change permissions. Any changes a person with "write" access makes to a document using the project designer will automatically transfer across to the owner's copy. Read: User may only access a read-only PDF of the project. All other management features are disabled. Use this level of permission if you only need that person to sign the project. Although any individual can sign the project, only an individual with Full access may submit the project to the IRB. The individual creating a new project will automatically be assigned Full permissions. Shared access for research team members can be changed at any time. Only individuals with full access may share a project with others. New staff should be entered as soon as they have met the UNF IRB requirements for new research staff conducting research (e.g., CITI training). Departing staff should be removed promptly. The addition/removal of research staff share permissions does not involve review by the IRB if the project is exempt. However, if the project has been approved as expedited or full board, the addition of new personnel will require IRB review and approval. The PI should ensure share permissions are current and accurate to ensure unwarranted access by non-research team individuals. More information about project sharing is included below in the New Study section. Sign this Package The Principal Investigator must sign the initial package for each new project. If you are a researcher unaffiliated with UNF, it will be necessary for you to designate a UNF sponsor for your project. This sponsor will need to sign the package before it can be submitted to the UNF IRB. If you are a student, it will be necessary for your faculty advisor to sign the package. If the principal investigator is different than the faculty advisor on a student project, both the PI and the faculty advisor must sign the package. Packages that have not received the proper signatures will be returned without review. More information about project sharing is included below in the New Study section of this document. Submit this Package A research team member with Full share access may submit the transaction to the IRB after the necessary individuals have signed the submission. To submit a project package: 1. Click on “Submit this Package” from the Project Administration menu options or click on the “here” hyperlink on the Project Overview page. 2. Ensure that the University of North Florida, Jacksonville, FL is highlighted and then click the “Continue” icon. 3. Select the Submission Type from the drop down menu. If it is an entirely new submission, please select “New Project.” If you are responding with revisions based on a review memo, please select “Revisions” as the submission type. 13 IRBNET USER’S GUIDE 4. Write a message if you would like to do so. However, there is no need to send comments when you submit. 5. Click on the “Submit” icon. Send Mail The Send Mail page allows research team members to communicate to each other regarding a specific project. In order to use the mail feature, you must open a specific project for which you would like to generate an email. Please complete the following steps: 1. Login to IRBNet 2. On the left-hand side of the screen, click the button for “My Projects” 3. From the list of your projects, select the one that you would like to send an email about. You can select a project by clicking the blue link for the project title. This will bring you to the Project Overview page. 4. After you have reached the Project Overview page, click on the “Send Project Mail” button on the left-hand side of your screen. 5. Select the message recipients from the list. If you have not shared the project with anyone, the only people you will be able to send mail to will be the research integrity administrators. Please see the New Study section of this document for specifics about how to share a project with someone. If you would like to send mail to someone who is not shared on a project, you must use your standard email rather than the IRBNet send mail function. The sender should include themselves on the email list so they will receive a copy of the email sent through IRBNet for their records. The default message requests the recipient to login and view the transaction. The email text may be modified to fit your needs. Within the page, the sender can select any member with share access by checking the box next to that team member’s name. The email can be previewed before sending by clicking on the “Preview” icon. Click the “Send” icon at the bottom of the email to send to the selected team members. The message will be sent to the recipient’s email address that they used to register with IRBNet. Additionally, a notice will appear in the recipient’s “My Reminders” section in IRBNet. 14 IRBNET USER’S GUIDE To reply to an email in IRBNet, click on the information in the “Message Type” field. This will show you the email message. On the top heading of the message, there is a link that you can click to reply. Please see image on the next page for a visual. (Please note that the background on your screen should not be green.) Delete this Package If necessary, anyone with full access to a package can delete a created package; however, any changes made while the package was pending will be lost. After a project has been submitted, the package will be locked and you will be unable to delete or manipulate it. A package can remain open indefinitely and used at the next IRB transaction. It does not necessarily need to be deleted should you no longer plan to submit the intended transaction. 15 IRBNET USER’S GUIDE Submission Types New Project Any individual on the research team may create a new study/project. Therefore, a project could be created in IRBNet without your knowledge. If you were not given share access, you would not be able to view the project in the My Projects list. The UNF IRB requests that you contact all other research team members to ensure the project has not yet been created before creating a new project. If a project is accidentally duplicated such that one project has two IRBNet ID numbers, please contact an IRB administrator ([email protected]). How to create a new project: 11. After logging into IRBNet, on the left-hand side of the screen you should see an option for “Create New Project.” 12. Left click on the “Create New Project” button. You will be prompted to enter information about the study: a) title, b) principal investigator name and title, c) key words, d) sponsor, and e) internal reference number. The title information and principal investigator information you include here will be used throughout your submission so make sure you check it for accuracy. 16 IRBNET USER’S GUIDE 13. The principal investigator (PI) is the individual who will be responsible for the conduct of the project. Although we strongly recommend that the PI be the individual generating the project paperwork, this is not a requirement. If project paperwork is being completed by someone other than the PI (e.g., research coordinator), please "share" this document with the PI so that both parties have full access. Directions on how to share are outlined below. Only faculty, staff, master thesis students, and doctoral dissertation students are permitted to be PIs on IRB submissions. For non-master’s projects and honors theses a faculty advisor must be listed as the PI on the submission. 14. In the keywords field, please specify keywords that can be used in a search to find this project. In the sponsor field, list the name of the funding agency sponsoring the project (if applicable) and upload the funding application and approval (when appropriate). If the project is unfunded, leave the sponsor field blank. Finally, we ask that you leave the institutional reference number field blank. After you have completed all the appropriate fields, click “Continue”. Clicking continue automatically saves your data. 15. On the next page (designer page), you will be able to download documents from the UNF documents library (step 1). Step 1 is optional and most researchers do not use it because they already completed the documents prior to accessing this page. If you use step 1, be sure to select the University of North Florida in the “select a library” field. The documents library contains informational how-to documents, forms, templates, and checklists. Download any document that you will use in your submission. The North Florida – IRB Protocol application cannot be accessed from the documents library. The application will be available electronically within IRBNet in the next section and outlined in Step 2 below. If you have generated your own supplemental documents (e.g., recruitment, 17 IRBNET USER’S GUIDE consent, measurement tools), it will only be necessary to download the “Attachment A: Study Details for Expedited or Full Board Projects” document or the “Attachment B: Study Details for Exempt Projects” document for completion. Documents downloaded from the library should be saved to your computer, completed, resaved, and then uploaded into IRBNet. You can also download these documents from the UNF IRB website). Please refer to the guides below for information about what documents are required to be included for a new project: Documents Checklist - For Expedited or Full board projects Documents Checklist for Exempt Projects - Use only if you believe your project will be declared exempt from further review 16. After you have completed all of the supplementary documents (e.g., Attachment A or Attachment B, recruitment materials, informed consent documents, permissions, measurement tools), these documents must be added to IRBNet (step 2). Do this by clicking “Add New Document” at the bottom of the designer page. 17. On the Attach Document page, you should select the document type you are uploading from the drop down list (e.g., Training/Certification, Consent Form, Questionnaire/Survey). If you do not see an option that describes your document type, please choose “other” and then add a description of the document to the description field. Additionally, if you are including other personnel (e.g., research assistants, data collectors), it will be necessary to 18 IRBNET USER’S GUIDE include information about their training and credentials. All Co-PIs, data collectors, personnel who interact or intervene with participants, and personnel who have access to identifiable information are required to complete CITI training. If you will not share the project with these individuals (i.e., give them read or write access to your project documents), you will need to upload their CITI completion reports as supplementary documents. More information about project sharing is included below. 18. Upload the file by clicking “Choose File” and then selecting the document from where it is saved on your computer. After you have selected the correct document file from your computer, click the “Attach” button. You can only add one document at a time. 19. After you have added all of your supplementary documents click “Add New Document” one last time. Rather than choosing a file to upload from your computer, add the On-Line Document (IRBNet Document Wizard) “North Florida- IRB Protocol” by clicking add at the bottom of the screen. 20. You can now complete the North Florida – IRB Protocol application. The application begins with instructions. Complete each section as appropriate. If you must stop part way through, make sure you save your progress by clicking “Save and Exit” at the bottom left corner of the application. 21. If you save and exit, make sure that when you come back to continue your progress, select the project on which you will work and select the “North Florida- IRB Protocol” from your document list in your designer page by clicking the pencil icon. 22. Sharing a project: After you have created a new project, you can share your project with relevant personnel. As soon as you share the project with another person, they will have access to the project. We recommend that you share the project with any personnel who will need to read, revise, or sign the submission package. - If you are a UNF affiliated faculty or staff member (non-student) who is also the PI on this project and you are not required to obtain signatures from your department chair, you are not required to share the project with anyone else. However, you may choose to share the project with others if you wish (e.g., Co-PI, other personnel, department chair). - If you are not the PI for this project, it will be necessary for you to share the project with the PI. - If you are unaffiliated with UNF, it will be necessary for you to share the project with the UNF sponsor for your project. 19 IRBNET USER’S GUIDE - If you are a student working on a project, it will be necessary for you to share the project with your faculty advisor. If your faculty advisor is different from the PI for your project, you will need to share the project with both your faculty advisor and the PI of the project. 23. In order to share your project, click “Share this Project” on the left-hand side of your screen. 24. In most cases, you will choose the “Share” option rather than “Multi-site” or “Transfer.” After you have selected “Share,” (blue text) choose “University of North Florida, Jacksonville, FL” from the drop down list of organizations. 25. Before you can share the study, the person you are sharing it with must: - Register with IRBNet (IRBNet.org) - Complete the User Profile - Affiliate with the University of North Florida (unless a Co-PI is located at a different institution) 26. You can search for an individual by typing in the first letter of the individual’s last name, any letter of their full name, or * to list all users and click on the “Search” icon. 27. After you have identified the individual to whom you would like to give access, place a mark in the appropriate level of access next to the research team member’s name. 28. If you need the selected personnel to sign the package (e.g., PI, faculty advisor, UNF sponsor), please include a message to them in the “Your Comments” section at the bottom 20 IRBNET USER’S GUIDE of this page asking them to sign the package. You might also include instructions as to how they assess and sign the package. 29. Finally, after reviewing all documents and verifying that the submission is just the way you want it, you can sign the package in preparation for submittal. 30. Signing the Package: - Select “Sign this Package” from the Project Administration bar on the left-hand side of your screen. This will allow you to sign the package. Select your role in the study from the drop down list and click “sign.” - - - - When you shared the project with other users, you should have specified if you want them to sign the package before it is submitted. Who is required to sign the package? At a minimum, UNF’s IRB requires that the principal investigator (PI) sign each package before it is submitted. See above for more information about how to sign a package. As noted above, if you are a student, it will be necessary for your faculty advisor to sign the package. If the principal investigator is different than the faculty advisor on a student project, both the PI and the faculty advisor must sign the package (Please note that a faculty or staff member must be the PI on non-thesis graduate projects and undergraduate research including honors thesis projects). If you are not a UNF affiliate, it will be necessary for the UNF sponsor to sign the package before it is submitted. A signature ‘on behalf of’ the PI should be used only in the rare event when the PI cannot access IRBNet. 21 IRBNET USER’S GUIDE 31. Submitting the Package: - After your project package is complete and signed by all necessary persons, you can submit the package by clicking “Submit this Package” on the Project Administration bar on the left-hand side of your screen. - Select “University of North Florida, Jacksonville, FL” from the list of organizations and then click “Continue.” - Select the submission type from the drop down menu. If this is a new submission, select “New Project” from the list of options. If you have comments that you would like to send to the research integrity administrators and/or reviewers, please include that information in the “Your Comments” section of the page. - Click “Submit” when you are done. IRB Projects generally take between four to six weeks between the time of submission and the time of approval. If you are required to submit multiple revisions or if a large volume of projects have been submitted, the timeline for review and approval may be elongated. Please refer to the UNF IRB Planning Guide or contact a research integrity administrator for more information. Modifications Required: Revising your Project Documents The IRB may request modification(s) to the protocol application or supplementary documents (e.g., attachment A or attachment B, recruitment materials, informed consent documents, CITI training). You will receive an email notification within IRBNet from the IRB informing you that a board document has been published in IRBNet. The board may publish a response to your submission by making a document available for you to review. This letter may ask you to make modifications or it may indicate that your project has been approved or disapproved. It is the responsibility of the research team to log into IRBNet to view these documents and address any modifications requested. To view the IRB’s determination and modification request: 1. Log into IRBNet 2. Select the project (click title of project) 3. Select the “Reviews” from the administrative menu (left-hand side of page) 4. Click on the blue hyperlink for the Decision Letter or other board documents from the IRB. This will download a copy of the letter to your computer. When responding to the IRB’s review memo, create a new package to include your revised documents in IRBNet To make revisions: 1. Complete your revisions as requested. Save the revised documents to your computer. 2. Sign into IRBNet and select the correct project from the My Projects page. Do this by clicking on the title of the project you are revising. 3. On the toolbar on the left-hand side of the screen click on the “Project History” button. This will allow you to see all the packages that have been started for your project. 4. From the project history page, click “Create New Package.” 22 IRBNET USER’S GUIDE 5. You should see a new entry in the list of packages. This entry should be titled “Work in progress (Not submitted).” Click on the link for “Work in progress (Not submitted)” to begin your new package. 6. Attach a revised document or add new project documents to the new package by following the instructions for adding new documents in the Designer section of this document. 7. Submit the documents to the IRB by following the Submit this Package instructions and designating the submission type as a “Revision.” Reportable Event Non-Compliance: any action or activity associated with the conduct or oversight of research involving human subjects that fails to comply with federal or state regulations or institutional policies and procedures governing human subject research or the requirements or determinations of the IRB. Non-compliance reports should be designated as an “Other Reportable Event” when selecting the Submission Type during submission. Protocol Deviation: An alteration/modification to the IRB approved protocol that is not approved by the IRB prior to its initiation or implementation. Recruitment, informed consent, and data collection are not permitted without final IRB approval. Final IRB approval will be confirmed when the IRB publishes the stamped and dated approval documents within IRBNet. The approval letter will outline the conditions of your approval. If you have not received a stamped and dated approval from the IRB, please contact a research integrity administrator for more information. The PI is responsible for ensuring that the study does not deviate from the IRB-approved protocol, except in such cases where it is necessary to avoid an immediate hazard to the participant. The PI must report any protocol deviations or violations and when possible, should request permission from the IRB to deviate from the protocol prior to conducting the deviation. Non-compliance reports should be designated as an “Other Reportable Event” when selecting the Submission Type during submission. 23 IRBNET USER’S GUIDE Unanticipated Problems Involving Risk: any incident, experience, or outcome that meets the following criteria: a) Event is unanticipated, unforeseen, or unexpected b) There is a reasonable possibility that the problem is related or caused by the research, AND c) Participants or others are at an in increased risk of harm An Unanticipated Problem Involving Risk to Participants or Others could result from a protocol deviation. However, an Unanticipated Problem could also involve the loss of study forms, consents or a participant complaint. An Unanticipated Problem also needs to be reported to the IRB. The submission type for an unanticipated problem involving risk will be “Unanticipated Problem (UP)”. To submit a reportable event: 1. Download the event report form and save the form to your computer for completion. 2. Complete the form and save it to your computer. 3. Sign onto IRBNet and click on My Projects to access the project for which you are reporting 4. Select the correct project by clicking on the project title 5. Create a new package for your project 6. Go to the Designer page of your new package 7. Click the “Add New Document” icon and add the Event Report Form you completed along with any supporting documents, as applicable. Please see the Designer section of this document for more information about navigating through the Designer page. For document type select either “Reportable Event (Non-AE)” or “Unanticipated Problem Report” from the drop down list. 8. Have the PI sign the package by following the Sign this Package instructions 9. Submit the package to the IRB following the Submit this Package instructions, designating the submission type as either a Other Reportable Event or an Unanticipated Problem (UP) as applicable. In addition to the event report, you may be asked to submit additional documentation. For example, if you will revise any of your protocol procedures, it will be necessary to submit a revised protocol application with your report. If you will make changes to your informed consent documents, it will be necessary to submit those documents for review. Any additional or pertinent information should be submitted with your report as applicable. Modification/Amendment If your project has been approved and you would like to change your procedures or materials, it may be necessary to submit an amendment before engaging in the revised activities. Any change to an expedited or full board project must be submitted as an amendment. That amendment will need to be reviewed and approved before you begin your revised activities. If you plan to make changes to an exempt project, please note that only substantive changes will need to be submitted for exempt projects. Please refer to the UNF Standard Operating Procedures for more information about changes to exempt projects that might necessitate an amendment. If you are unsure of whether your project requires an amendment, please contact a research integrity 24 IRBNET USER’S GUIDE administrator before beginning your revised activities. The investigator is responsible for promptly submitting protocol amendments to the IRB. Amended procedures may not be implemented until the amendment has been reviewed and approved by the IRB unless the change is necessary reduce or eliminate harm. To process a modification/amendment submission, follow these steps: 1. Download the Amendment Request Form. Save the form to your computer for completion. 2. Complete the form and save it to your computer. 3. Sign onto IRBNet and click on My Projects to access the project that you would like to amend 4. Select the correct project by clicking on the project title 5. Access the designer page for the project 6. Click the “Add New Document” icon 7. Add the required amendment documents (see list below) 8. Have the PI sign the package by following the Package Signing instructions 9. Submit the package to the IRB following the Submit this Package instructions, designating the submission type as Modification/Amendment The following documents must be submitted for modification/amendment of expedited or fill board projects. Amendments to exempt projects are not required unless the change could increase risk to participants: Amendment Request Form Updated protocol application New or revised materials (e.g., informed consent document, measurement tool) – anything that will be affected by the changes you are proposing in your amendment. Additional sections of this guidance document will be added as needed. If you have questions about information in this document or about research integrity in general, please contact one of the research integrity administrators. Research Integrity Contact Information: Phone: (904) 620-2455 Email: [email protected] Mail: Office of Research and Sponsored Programs Research Integrity University of North Florida Building 3, Room 2501 1 UNF Drive Jacksonville, FL 32224-7699 i Information in this guide was obtained from many sources including but not limited to the Code of Federal Regulations (45 CFR 46), the Office for Human Research Protections (http://www.hhs.gov/ohrp/), the IRBNet forum, and the Anne Arundel Medical Center IRBNet User Manual. 25