1
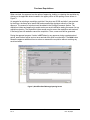
User Reference Manual
Creating Purchase Requisitions
Using Req. UI
September - 2002
Purchase Requisitions
Table of Contents
Section / Topic
Page
Table of Contents....................................................................................................................... 2
Introduction ................................................................................................................................ 3
How to use this Manual .................................................................................................. 3
Objectives ...................................................................................................................... 3
Purpose .......................................................................................................................... 4
Overview ........................................................................................................................ 4
Terminology..................................................................... Error! Bookmark not defined.
Types of Requisitions ...................................................... Error! Bookmark not defined.
Requisition UI Header Screen ......................................... Error! Bookmark not defined.
G/L Header Screen.......................................................... Error! Bookmark not defined.
Lines Header Screen ....................................................... Error! Bookmark not defined.
Drop Down Menus and Command Bar ............................ Error! Bookmark not defined.
Req. UI Messages ........................................................... Error! Bookmark not defined.
Requisition UI Header Screen Field Details ..................... Error! Bookmark not defined.
G/L Header Screen Field Details ..................................... Error! Bookmark not defined.
Lines Header Screen Field Details .................................. Error! Bookmark not defined.
Logging into Req. UI ........................................................ Error! Bookmark not defined.
1.0
Create a Standard PO Requisition................................... Error! Bookmark not defined.
2.0
Create a UPO Requisition ............................................... Error! Bookmark not defined.
3.0
Create a Change Order Request ..................................... Error! Bookmark not defined.
4.0
Create a Confirming PO Requisition ................................ Error! Bookmark not defined.
5.0
Create a Blanket Release Requisition ............................. Error! Bookmark not defined.
Create a Blanket Release/Not Confirmed ........................ Error! Bookmark not defined.
Create a Blanket >$25,000/Confirmed............................. Error! Bookmark not defined.
6.0
Build a General Account Ledger ...................................... Error! Bookmark not defined.
7.0
View a Purchase Requisition ........................................... Error! Bookmark not defined.
8.0
Revise a Purchase Requisition ........................................ Error! Bookmark not defined.
Using the Find Button. .................................................... Error! Bookmark not defined.
Using the Inquiry Button ................................................. Error! Bookmark not defined.
Using the Requisition/UPO # Ellipse Button ................... Error! Bookmark not defined.
9.0
Inquiry a Purchase Requisition ........................................ Error! Bookmark not defined.
Requisition Inquiry Screen ............................................... Error! Bookmark not defined.
Search for a Requisition .................................................. Error! Bookmark not defined.
10.0 Attachments ................................................................................................................... 9
10.1 Create a Standard PO Requisition ......................................................................... 9
10.2 Create a UPO/Blanket Requisition ........................................................................11
10.3 Create a Change Order Request ..........................................................................13
10.4 Create a Confirming PO Requisition .....................................................................14
10.5 Create a Blanket Requisition ................................................................................16
Create a Blanket Release/Not Confirmed .............................................................16
Create a Blanket >$25,000/Confirmed ..................................................................16
2
Rev: 0
Date: 09/30/02
Purchase Requisitions
Introduction
This user manual is designed for personnel who are responsible for ordering and/or requisitioning the
goods and services required by their departments. It is designed as a quick reference on creating,
revising, and viewing purchase requisitions in the Req. UI system. Samples of screens, menus, and data
fields, along with step-by-step instructions are included for your reference.
Business Systems has developed this manual to be a valuable desktop reference and helpful training
guide. Your comments and suggestions for improvement are greatly encouraged.
How to use this Manual
The first part of the manual Introduction, Purpose through Screen Field Details, was developed to give
the user an overview of the requisition process, terminology, types of requisitions, different screens
encountered, and detailed field descriptions. Sections 1.0 through 9.0 explains how to create, revise and
inquiry eight types of purchase requisitions. The last part of the manual, Section 10 – Attachments,
contain job aids that can be used as quick reference guides when initiating the different types of
purchase requisitions.
Objectives
Upon completion of this module, the student will be able to:
•
STATE the purpose of a purchase requisition.
•
DESCRIBE the process flow when initiating a purchase requisition.
•
DEFINE the terminology used when initiating a purchase requisition.
•
DESCRIBE the types of purchase requisitions.
•
IDENTIFY a Requisition UI, G/L, and Lines Header screens.
•
DESCRIBE the Requisition drop down menus and command buttons.
•
DEFINE the fields on a Requisition UI, G/L, and Lines opening screens.
•
CREATE the following requisitions:
−
Standard PO
−
UPO
−
Change Order Request
−
Confirming PO
−
Blanket
•
BUILD a General Ledger Account
•
VIEW a purchase requisition.
•
REVISE a purchase requisition.
•
INITIATE a purchase requisition inquiry.
3
Rev: 0
Date: 09/30/02
Purchase Requisitions
Purpose
A purchase requisition is the procedural method by which departments may request the
purchase of goods and/or services which may require processing by Purchasing, usually
because of the dollar value, the nature of the purchase, or the type of goods and services. The
purchase requisition is the official document used to initiate a purchase transaction with all
outside vendors.
Overview
A properly completed and authorized purchase requisition submitted to the Purchasing Division
authorizes Purchasing to spend your funds for the material or service listed on the requisition.
This is done through the creation of a purchase order. Advance planning by departments for
their needs is extremely important. Time factors for generating the purchase requisition,
obtaining necessary prior approvals, processing through Purchasing, procurement and delivery
times must all be considered in determining an adequate lead-time.
The decision and steps involved in creating the following requisitions are outlined in Table 1.
•
•
•
•
Blanket Release/Not Confirmed
Blanket > $25,000/Confirmed
Computer Related
Phone and Furniture
If Request Is For
•
•
•
•
Safety Equipment
Standard PO
UPO/Blanket Release
Vehicle and Radio
And
Then
1. Material
Is NOT an inventory item
1.
2.
3.
4.
2. Material
1. Is an inventory item
2. In stock
3. NOT urgent
Prepare a Pick List
3. Material
1. Is an inventory item
2. NOT enough in stock
3. Is urgent
Contact Inventory Control
4. Service
1.
2.
3.
4.
Access Req. UI.
Fill in header info.
Add lines.
Submit Req. to Workflow
Access Req. UI.
Fill in header info.
Add lines.
Submit Req. to Workflow.
Table 1 – Requisition Process
4
Rev: 0
Date: 09/30/02
Purchase Requisitions
The graphical display of a purchase requisition process flow, shown in Figure 1, is applicable to
the following requisition types:
Blanket Release/Not Confirmed
Blanket > $25,000/Confirmed
Change Order Request
Computer Related
•
•
•
•
Requester has a
need for nonmaterial
(Service)
•
•
•
•
*Confirming PO
Phone and Furniture
Safety Equipment
Standard PO
•
•
UPO/Blanket Release
Vehicle and Radio
* Requester has
a need for
material
No
Is it an Inventory
item?
Yes
Is there enough
in stock
Yes
Pick
List
No
Create a requisition
or change order
using Req. UI
Fill in
required
fields
Contact
Inventory
Control
Yes
No
Is it urgent?
Hot File Process
** Add lines
Work flow
Approval
Process
* For a Confirming P.O. Req. the user needs to know the following:
- Exact Cost per item
- Vendor
- Total $
** Not applicable to a Change Order Request
Figure 1 – Requisition Flow Path
5
Rev: 0
Date: 09/30/02
Purchase Requisitions
Depending on the user’s requirements, as shown in the flow diagram, either a requisition is
submitted into the Workflow process or a pick list is created for the required goods or services.
Pick lists are documents used by the requestor to communicate to storeroom personnel the
required stock item, quantity, and date. The warehouse personnel subsequently use this
information to assist them in picking the item(s) in a logical sequence and when requested,
delivering them to the appropriate location. Additional information on Pick lists may be found in
the Creating a Pick List User Manual.
The requisition is routed into the Workflow approval process after the
button is
clicked on the Submit to Workflow Header prompt. The Workflow program will read and sort
each requisition by type, requestor, and total dollar amount for proper signature authority
routing. Computer Related, Phone and Furniture, and Vehicle and Radio requisitions require an
additional signature level and is an example of what the Workflow program identifies during a
sort routine. The Workflow program will also recognize capital numbers in the general ledger
and requisitions over $15,000; then route to the capital budget approver in Finance.
Table 2 lists the required authorized signatures and dollar limits for requisition approval.
Title
Amount Authorized
Supervisor
$1,500
Manager
$3,500
Director
$7,500
Deputy General Manager
$15,000
General Manager
$25,000
Table 2 – Authorization Limits for Requisition Approval
NOTE: A detailed description of the signature requirements may be found at Signature
Authority located on the Hydroweb at:
Departments
−
−
Support Services
−
Purchasing
−
Procedures
−
LVVWD & SNWA Purchasing Guidelines, Section 2, Authorized
Signatures
6
Rev: 0
Date: 09/30/02
Purchase Requisitions
Workflow will build a route based on all the input parameters and then generate an email
directed to the first signature approver as shown in Figure 2.
Figure 2, Email Example Generated by Workflow
7
Rev: 0
Date: 09/30/02
Purchase Requisitions
When received, the approver has the option of approving, holding, or rejecting the requisition by
clicking on the applicable button located in the upper portion of the opening screen shown in
Figure 3.
An example for rejecting a requisition would be if the price was $1390 and after it was received
by the Buyer, the actual price was $1690 and exceeded the signature authority of the first
approver. The reason for rejection would be added in the Routing/Comments section. The
requisition initiator and approver(s) would receive an email notification stating the reason for any
requisition rejection. The requisition initiator would need to correct the requisition and resubmit,
if the item(s) are still needed or cancel the requisition. Then, a new route will be generated.
During the approval process, if action is NOT taken by any approver during a predetermined
period, email notices will be sent out as a reminder that action must be taken. The Hold button
allows the approver additional time to review or research the requisition without receiving any
email reminders.
Figure 3, Workflow Email Message Opening Screen
8
Rev: 0
Date: 09/30/02
Purchase Requisitions
10.0 Attachments
This section of the User Reference Manual was designed to be removed and used at your
workstation as a quick reference job aid while creating a requisition.
10.1 Create a Standard PO Requisition
ACTION
1.
LOG into Req. UI
2.
CLICK on the New button
3.
CLICK the Requisition Type arrow and SELECT Standard PO
4.
CLICK the Requisitioned For arrow and SELECT the name of the
person making the request for purchase or the person the
requisition should be routed to.
5.
CLICK the When Delivered Notify arrow and SELECT the persons
name that should be contacted when the item is received.
6.
CLICK the Deliver to Location arrow and SELECT the delivery
location how/where the item will be received.
7.
CLICK the Requisition Priority arrow and SELECT the level of
priority to be assigned to the requisition.
8.
CLICK the Deliver by arrow and SELECT the date from the
calendar or enter the date by typing directly into the field.
9.
ENTER a statement or comment regarding the end use of the
item.
SCREEN DISPLAY
10. CLICK on the ellipse and Click on the vendor name. ENTER
vendor ID or vendor name and PRESS ellipse.
11. ENTER any notes or directives.
12. CLICK the GL button at the bottom of the screen.
9
Rev: 0
Date: 09/30/02
Purchase Requisitions
ACTION
SCREEN DISPLAY
13. ENTER the G/L Account #.
14. CLICK on the Save button and then CLICK the Close button.
15. CLICK on the Lines button.
16. ENTER the quantity.
17. SELECT the unit of measure. Note: This field defaults to ea
(each) but can be changed. If item needed is NOT on drop down,
then include in the description.
18. ENTER the unit price.
19. REPEAT until all lines have been added.
20. CLICK the Save button
21. CLICK the Finish button to save the requisition if finished.
22. CLICK the Yes button to submit the requisition into Workflow.
10
Rev: 0
Date: 09/30/02
Purchase Requisitions
10.2 Create a UPO/Blanket Requisition
ACTION
1.
LOG into Req. UI
2.
CLICK on the New button
3.
CLICK the Requisition Type arrow and SELECT UPO/Blanket
Release.
4.
CLICK the Requisitioned For arrow and SELECT the name of the
person (the book owner) making the request for purchase.
5.
ENTER the Requisition/UPO number.
6.
CLICK the Deliver to Location arrow and SELECT the delivery
location how/where the item will be received.
7.
CLICK the Requisition Priority arrow and SELECT the level of
priority to be assigned to the requisition.
8.
CLICK the Deliver by arrow and SELECT the date from the
calendar or enter the date by typing directly into the field.
9.
ENTER a statement or comment regarding the end use of the
item.
SCREEN DISPLAY
10. If a Blanket, CLICK on the ellipse and CLICK on the vendor name.
ENTER vendor ID or vendor name and PRESS ellipse. If nonblanket, then ENTER vendor info in the Vendor field.
11. ENTER any notes or directives for Purchasing, Vendor, etc.
12. CLICK the GL button at the bottom of the screen.
13. ENTER the G/L Account #.
14. CLICK on the Save button and then CLICK the Close button
11
Rev: 0
Date: 09/30/02
Purchase Requisitions
ACTION
SCREEN DISPLAY
15. CLICK on the Lines button .
16. ENTER the quantity.
17. SELECT the unit of measure. Note: This field defaults to ea
(each) but can be changed. If item needed is NOT on drop down,
then include in the description.
18. ENTER the unit price.
19. REPEAT until all lines have been added.
20. CLICK on the Save button .
21. CLICK on the Line Items button.
22. CLICK on the Cancel button
23. CLICK the Finish button to save the requisition if finished.
24. CLICK the Yes button to submit the requisition into Workflow.
12
Rev: 0
Date: 09/30/02
Purchase Requisitions
10.3 Create a Change Order Request
ACTION
1.
LOG into Req. UI
2.
CLICK on the New button
3.
CLICK the Requisition Type arrow and SELECT Change Order
Request.
4.
CLICK the Requisitioned For arrow and SELECT the name of the
person making the request for purchase or the person the
requisition should be routed to.
5.
CLICK the When Delivered Notify arrow and SELECT the persons
name that should be contacted when the item is received.
6.
CLICK the Requisition Priority arrow and SELECT the level of
priority to be assigned to the requisition.
7.
CLICK the Deliver by arrow and SELECT the date from the
calendar or enter the date by typing directly into the field.
8.
ENTER the purchase order number into the Change PO # field.
9.
ENTER the reason for the change in the Special
Instructions/Comments field.
SCREEN DISPLAY
10. CLICK the Save button.
11. CLICK the Yes button to submit the requisition into Workflow.
13
Rev: 0
Date: 09/30/02
Purchase Requisitions
10.4 Create a Confirming PO Requisition
ACTION
SCREEN DISPLAY
1.
LOG into Req. UI
2.
CLICK on the Find button.
3.
ENTER the requisition number in the message box and CLICK OK.
4.
CLICK on the Edit button located on the command bar at the
bottom of the Purchase Requisition screen.
5.
CLICK the When Delivered Notify arrow and SELECT the persons
name that should be contacted when the item is received.
6.
ENTER any notes or directives.
7.
CLICK the G/L button at the bottom of the screen.
8.
At the G/L Account # field, CHANGE the third, fourth, and fifth
numerical segments to a valid G/L account number.
9.
CLICK on the Save button and then CLICK the Close button.
10. CLICK on the Lines button.
11. ENTER the quantity.
12. ENTER the unit price.
14
Rev: 0
Date: 09/30/02
Purchase Requisitions
ACTION
SCREEN DISPLAY
13. CHANGE the Line Description to reflect the item(s) being
requested.
14. REPEAT until all lines have been added.
15. CLICK the Save button
16. CLICK the Finish button to save the requisition if finished.
17. CLICK the Yes button to submit the requisition into Workflow.
15
Rev: 0
Date: 09/30/02
Purchase Requisitions
10.5 Create a Blanket Requisition
Create a Blanket Release/Not Confirmed
Create a Blanket >$25,000/Confirmed
ACTION
1.
LOG into Req. UI
2.
CLICK on the New button
3.
CLICK the Requisition Type arrow and SELECT either a Blanket
Release/Not Confirmed, Blanket Release>$25,000/Confirmed
or a UPO/Blanket Release.
4.
ENTER the UPO number from the requestor’s UPO book if the
requisition type is UPO/Blanket.
5.
CLICK the Requisitioned For arrow and SELECT the name of the
person making the request for purchase or the person the
requisition should be routed to.
6.
CLICK the When Delivered Notify arrow and SELECT the persons
name that should be contacted when the item is received.
7.
CLICK the Deliver to Location arrow and SELECT the delivery
location how/where the item will be received.
8.
CLICK the Requisition Priority arrow and SELECT the level of
priority to be assigned to the requisition.
9.
CLICK the Deliver by arrow and SELECT the date from the
calendar or enter the date by typing directly into the field.
SCREEN DISPLAY
10. ENTER a statement or comment regarding the end use of the
item.
11. At the Blanket # field, CLICK the ellipse button to select the
applicable blanket number.
12. ENTER any notes or directives.
13. CLICK on the Lines button.
16
Rev: 0
Date: 09/30/02
Purchase Requisitions
ACTION
SCREEN DISPLAY
14. ENTER the quantity.
15. ENTER the unit price.
16. CLICK the Save button to save the line.
17. ENTER the G/L Account # .
18. CLICK the Save button
19. CLICK on the Line Items button.
20. REPEAT until all lines have been added.
21. When all lines have been entered, CLICK the Cancel button to
delete the new line.
22. CLICK the Finish button to save the requisition.
23. CLICK the Yes button to submit the requisition into Workflow.
17
Rev: 0
Date: 09/30/02