1
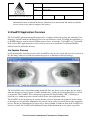
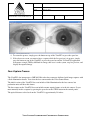
521 TAYLOR WAY, SAN CARLOS, CA, 94070
TEL: 650-802-9685 WWW.VISTAIMAGING.COM
PREPARED BY:
CHRIS DOPP (VISTA IMAGING INC.)
NAME:
VISTAEY2 INSTALLATION & VCVIEWEY2 USER MANUAL
DATE:
SEPT 17, 2012
VERSION:
1.4
Page 1 of 9
VistaEY2 Installation & User Manual
Version 1.4
Copyright 2012 Vista Imaging, Inc.
VISTA IMAGING INCORPORATED CONFIDENTIAL INFORMATION
521 TAYLOR WAY, SAN CARLOS, CA, 94070
TEL: 650-802-9685 WWW.VISTAIMAGING.COM
PREPARED BY:
CHRIS DOPP (VISTA IMAGING INC.)
NAME:
VISTAEY2 INSTALLATION & VCVIEWEY2 USER MANUAL
DATE:
SEPT 17, 2012
VERSION:
1.4
Page 2 of 9
VistaEY2 Overview
The VistaEY2 multi modal imaging device is integrated into a housing intended for fixed location use on a
tripod or similar mounting apparatus, and is not designed or intended for free handheld operation. The
VistaEY2 provides a high quality solution for iris and face image capture for biometric applications. The
main features of the VistaEY2 device are:
•
•
•
•
•
•
•
•
The VistaEY2 is a fully WinLogo certified device which means the drivers are certified and the
device can be installed into Windows without any user intervention.
Supports both 32-bit and 64-bit Windows XP, Vista, & 7 platforms.
Dual iris camera – placed behind a dual eye wide cold mirror to allow the user to easily align them
selves for automatic dual iris acquisition. Nominal distance to the eye from the VistaEY2 device is
15 inches
Face camera – located below the iris sensor, the 5MP full color face sensor with integrated flash
allows easy capture of the user’s face at a nominal distance of 24 inches.
Acoustic distance sensor allows the user to easily determine and position themselves to the correct
distance from the VistaEY2 device for easy auto acquisition of the dual irises.
A RGB LED to assist the target user with the auto acquisition process during dual iris captures.
The tri-colored LED provides an intuitive indication to the user of their distance to the VistaEY2.
It is Blue when the user is too far away, Red when the user is too close, and Green when the user is
in the correct distance range.
Integrated microphone on the front & integrated speaker on the rear which perform as standard
Windows USB audio devices.
Detachable USB 2.0 interface on the rear.
VISTA IMAGING INCORPORATED CONFIDENTIAL INFORMATION
521 TAYLOR WAY, SAN CARLOS, CA, 94070
TEL: 650-802-9685 WWW.VISTAIMAGING.COM
PREPARED BY:
CHRIS DOPP (VISTA IMAGING INC.)
NAME:
VISTAEY2 INSTALLATION & VCVIEWEY2 USER MANUAL
DATE:
SEPT 17, 2012
VERSION:
1.4
Page 3 of 9
VistaEY2 Installation Procedure
Following is the procedure for installing the VistaEY2 demo utilities, connecting and enumerating the
VistaEY2 device, and operating the VcViewEY2 application.
1. Place the content of the VcViewEY2 demo application into a unique directory on you Windows
system. The unzipping process of the “VcViewEY2_Demo_YYMMDD.zip” archive will create
the following directory structure:
•
VcViewEY2_Demo
• Exe
• Firware
• Install
• Redist
2. If you have ever had a demo application installed on this computer and desire to uninstall the
package run the “uninstall_xxx.bat” batch file located in the INSTALL directory
3. To install the drivers onto the Windows run the “install_xxx.bat” batch file located in the
INSTALL directory, where xxx is for the x86 (32bit) or x64 (64bit) platforms
4. Place the VistaEY2 device on a tripod or similar mount device and connect the VistaEY2 device to
a USB port on the Windows system. Since the drivers are WinLogo certified, Windows will
VISTA IMAGING INCORPORATED CONFIDENTIAL INFORMATION
521 TAYLOR WAY, SAN CARLOS, CA, 94070
TEL: 650-802-9685 WWW.VISTAIMAGING.COM
PREPARED BY:
CHRIS DOPP (VISTA IMAGING INC.)
NAME:
VISTAEY2 INSTALLATION & VCVIEWEY2 USER MANUAL
DATE:
SEPT 17, 2012
VERSION:
1.4
Page 4 of 9
automatically locate and install the drivers without any user intervention and inform you that the
device is ready to use when it completes this process.
VcViewEY2 Application Overview
The VcViewEY2 demonstration application provides a software solution for testing and evaluating Vista
Imaging’s VistaEY2 multi-modal imaging device on your Windows system. To launch the application go
to the EXE directory created in the installation process above, and run the “VcViewEY2.exe” application.
If the VcViewEY2 application fails to start is may be necessary to install the Visual Studio Runtime
utilities located in the Redist directory.
Iris Capture Process
It will automatically detect the presence of the VistaEY2 device on your system and start a live preview of
the dual image camera in a reduced resolution for preview, as illustrated in the below image.
The VcViewEY2 comes with default setting which will allow the device to auto acquire dual iris images
when the distance is correct (approx 15 inches from the face), and the iris position and quality is assessed
as acceptable. The VistaEY2 device incorporate proprietary Iris Pupil Finding (“IPF”), technology to
locate the eyes within the preview stream to allow for the auto acquisition feature.
The VistaEY2 device incorporates an acoustic distance sensor to determine the distance from the camera
to the target user to control the illumination for power & safety, and to assist with the iris auto acquisition
process. For the iris illumination if no target user is detected within 24 inches in front of the VistaEY2 for
at least 3 seconds, the VistaEY2 will automatically turn off the illumination to save power (especially
VISTA IMAGING INCORPORATED CONFIDENTIAL INFORMATION
521 TAYLOR WAY, SAN CARLOS, CA, 94070
TEL: 650-802-9685 WWW.VISTAIMAGING.COM
PREPARED BY:
CHRIS DOPP (VISTA IMAGING INC.)
NAME:
VISTAEY2 INSTALLATION & VCVIEWEY2 USER MANUAL
DATE:
SEPT 17, 2012
VERSION:
1.4
Page 5 of 9
useful in portable applications). Also if the target user is too close to the device (10 inches or less), the
VistaEY2 will automatically turn off the iris illumination to protect the user’s eyes from unneeded NIR
(Near Infra Red) emission as an added safety measure.
As described above, the VistaEY2 incorporates an RGB LED to assist the target user with self alignment
in the auto acquisition process during dual iris captures. The tri-colored LED provides an intuitive
indication to the user of their distance to the VistaEY2. It is Blue when the user is too far away, Red when
the user is too close, and Green when the user is in the correct distance range.
To assist the system operator to help direct the target user with alignment VcViewEY2 provides a live
preview as detailed in the above image. If the Preview Overlay is enabled, then we overlay a RGB circle
(illustrated in the above images by the Green circle with cross hairs over the center of the detected iris)
that the operator can monitor to determine the current relative distance to the target user. This allows the
operator to direct the user to move closer or further away from the VistaEY2 to get into the optimal range
for the iris capture. As with the RGB LED detailed above, the rectangle color Red indicates too close,
Blue indicates too far away, and Green indicates the target user is in the optimal range.
The intended steps of the iris auto acquire procedure are very straight forward and are as follows:
1. With VcViewEY2 running in live preview, place your face in front of the VistaEY2 so you can see
both of your eyes center both vertically and horizontally in the oval mirror.
2. You should start out approximately 16 to 24 inches away from the VistaEY2. This will cause the
RGB LED to turn Blue and the iris illuminators will turn on when you are sensed in front of the
VistaEY2 camera. Slowly move your face closer to the VistaEY2 keeping your eyes centered both
vertically and horizontally until the RGB LED turns Green. If it goes Green and then turns RED
you have moved in too fast and overshot the optimal distance of approximately 15 inches from the
VistaEY2, where the irises are optimally captured. If so, pull back until the RGB LED turns green.
You need to be in the optimal distance for approximately ¾ of a second (750 msec) for the autoacquire process to complete.
3. The VcViewEY2 application will detect the auto acquire satisfied state of the camera and capture a
large 2560 by 960 image from the camera, then it will locate the left and right irises within this
large dual eye image and produce individual VGA (640x480) images for both eyes and save all
images to the directory on the Windows system where the VcVewEY2 applications is located. It
also will save a large 2560 by 960 image file with dash line overlay indicating the areas of the
image that were saved to the individual left and right VGA iris images. It will then stop the live
preview and display the two found iris images as illustrated below.
VISTA IMAGING INCORPORATED CONFIDENTIAL INFORMATION
521 TAYLOR WAY, SAN CARLOS, CA, 94070
TEL: 650-802-9685 WWW.VISTAIMAGING.COM
PREPARED BY:
CHRIS DOPP (VISTA IMAGING INC.)
NAME:
VISTAEY2 INSTALLATION & VCVIEWEY2 USER MANUAL
DATE:
SEPT 17, 2012
VERSION:
1.4
Page 6 of 9
4. To restart the process, simply press the button on top of the VistaEY2 or press the space bar.
5. If for what ever reason you want to force a capture while the live preview is in process, simply
press the button on top of the VistaEY2 or press the space bar and the VcViewEY2 application
will capture a single 2560 by 960 dual iris image, then save it to the system, stop live preview, and
display the captured image.
Face Capture Process
The VistaEY2 also incorporates a 5MP full 24bit color face camera to facilitate facial image captures with
a flash illumination feature. You select the face camera under the Video Source Menu.
The initial version of the VistaEY2 does not include a flash illumination for the face camera, but
production units will have this feature.
The face camera on the VistaEY2 does not include an auto acquire feature as in the iris camera. So you
must manually invoke a capture by pressing the space bar or the STILL button in the control panels.
The optical distance to the face from the VistaEY2 is approximately 24 inches.
VISTA IMAGING INCORPORATED CONFIDENTIAL INFORMATION
521 TAYLOR WAY, SAN CARLOS, CA, 94070
TEL: 650-802-9685 WWW.VISTAIMAGING.COM
PREPARED BY:
CHRIS DOPP (VISTA IMAGING INC.)
NAME:
VISTAEY2 INSTALLATION & VCVIEWEY2 USER MANUAL
DATE:
SEPT 17, 2012
VERSION:
1.4
Page 7 of 9
Camera Control Panels
The VcViewEY2 also incorporates Control Panels selectable in the Camera Setting Menu for each camera
to allow you to alter and control the format & resolution of preview & still captures as detailed in the
following dialog picture.
The VcViewEY2 also incorporates Control Panels selectable in the Camera Setting Menu for each camera
to allow you to alter and control all of the camera features as detailed in the following dialog picture.
Feel free to play with the controls to see what effect they have.
VISTA IMAGING INCORPORATED CONFIDENTIAL INFORMATION
521 TAYLOR WAY, SAN CARLOS, CA, 94070
TEL: 650-802-9685 WWW.VISTAIMAGING.COM
PREPARED BY:
CHRIS DOPP (VISTA IMAGING INC.)
NAME:
VISTAEY2 INSTALLATION & VCVIEWEY2 USER MANUAL
DATE:
SEPT 17, 2012
VERSION:
1.4
Page 8 of 9
VISTA IMAGING INCORPORATED CONFIDENTIAL INFORMATION
521 TAYLOR WAY, SAN CARLOS, CA, 94070
TEL: 650-802-9685 WWW.VISTAIMAGING.COM
PREPARED BY:
CHRIS DOPP (VISTA IMAGING INC.)
NAME:
VISTAEY2 INSTALLATION & VCVIEWEY2 USER MANUAL
DATE:
SEPT 17, 2012
VERSION:
1.4
Page 9 of 9
One of the unique features of the VistaEY2 camera is the ability to attempt to detect if the subject is alive
during iris acquisitions. If “LiveEye Detection” is enabled, VcViewEY2 will perform a dual iris capture
with the flash illumination turned on during the second iris capture and then measure for a change in the
pupil diameter to attempt to determine if the subject is alive. If it is successful it will overlay there results
over the images on screen.
If you need to restore the settings back to the default state simply choose the Load Defaults in the Camera
Setting Menu.
Have Fun!
VISTA IMAGING INCORPORATED CONFIDENTIAL INFORMATION