1
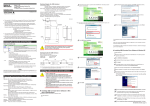
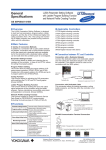
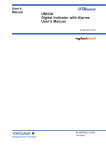
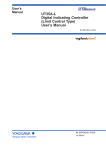
Read Me First
IM 05P05A01-01EN
2. Operating Environment
LL50A
Parameter Setting Software
with Ladder Program Building Function and Network Profile Creating Function
Installation Manual
2nd Edition : Nov. 2009
This manual describes the installation/uninstallation of LL50A.
Product Registration
Thank you for purchasing YOKOGAWA products.
YOKOGAWA provides registered users with a variety of information and services.
Please allow us to serve you best by completing the product registration form
accessible from our homepage.
http://www.yokogawa.com/ns/reg/
Contents
Introduction
1. Safety Precautions
2. Operating Environment
3. Installing USB Converter Driver Software
4. Installing LL50A Parameter Setting Software
Introduction
n Checking the Contents of the Package
Before using the product, refer to the table of Model and Suffix Codes to make sure
that the delivered product is consistent with the model and suffix codes you ordered.
Also make sure that the following items are included in the package.
Model and Suffix Code
Model
Suffix code
• Logon in Windows XP:
-Log on using the user name of Administrators group.
-The program does not start normally if the user name not
belonging to the Administrators group is used for loggong on.
CAUTION
• In Windows Vista, install USB converter driver software as an
administrator.
• Avoid entering just the drive as the installation location, such as
C:\. Enter the full directory path.
• Before installing USB converter driver software, quit all running
applications.
• When reinstalling USB converter driver software, uninstall the
installed USB converter driver software first, and then reinstall
USB converter driver software.
Description
Parameter Setting Software (with Ladder Program Building Function
and Profile Creating Function)
-00
Applicable OS: Windows XP Professional (with Service Pack 2 or later)
Windows Vista Business (with Service Pack 1)
Only the 32 bit version of each of the above OSs
.NET Framework 3.5 installed.
Recommended CPUs:Pentium 4 Processor 2.4 GHz or higher
(3.0 GHz or higher in Windows Vista Business)
Pentium D Processor 2.6 GHz or higher
Pentium Core 2 Duo Processor 1.8 GHz or higher
Pentium Dual-Core Processor 1.6 GHz or higher
Recommended Main Memory:
Windows XP Professional; 512 MB or more
Windows Vista Business; 2 GB or more
Hard disk space:
Program storage capacity: 100 MB or more
.NET Framework 3.5 SP1 storage capacity: 620 MB or more
Display: 1024 x 768 pixels or more
Color: 256 or more colors
Communication port: For communication with a dedicated cable, use the USB port/
one channel.
For communication via an RS-485 communication terminal, use an RS232C port (An RS-232C/RS-485 converter is required; Model ML2 is
recommended)
For Ethernet communication, use 10BASE-T/100BASE-TX.
CD-ROM drive: One (required for installation)
Printer:
Paper size; Letter or A4 (required for printing)
3. Installing USB Converter Driver Software
Thank you for purchasing the UTAdvanced Series Digital Indicating Controller and
LL50A Parameter Setting Software.
This manual describes the installation/uninstallation of LL50A. Please read though
this user’s manual carefully before using the product.
For the function and operating method of LL50A Parameter Setting Software, see
“LL50A Parameter Setting Software User’s Manual (CD-ROM).”
For details of each function, refer to the electronic manual contained in the provided
CD-ROM.
LL50A
PC
Always “-00”
Parameter Setting Software/USB converter driver CD-ROM (Parts No.: L4502XH).... x1
Dedicated cable (Parts No.: A1059UR) and dedicated adapter (Parts No.: L3502LP).... x1
LL50A Installation Manual (this document).................................................. x1 (A3 size)
User’s Manual (CD-ROM)............................................................................ x1
n Installing USB Converter Driver Software in Windows Vista
1. Start Windows.
the CD of LL50A into the CD-ROM drive. The start-up screen appears
2. Insert
automatically.
the connector of dedicated cable to the USB communication port of a
3. Connect
personal computer.
The Found New Hardware screen appears. Click Locate and install driver
software (recommended).
At this point, you have completed installing the driver software in Windows Vista.
n Installing USB Converter Driver Software in Windows XP
1. Start Windows.
the CD of LL50A into the CD-ROM drive. The start-up screen appears
2. Insert
automatically.
Found New Hardware screen appears. Since the CD has already been
5. The
inserted, click Next.
6. The message “Searching disc for software” appears.
7. The message “Installing driver software” appears.
Windows Security screen appears. Click Install this driver software
8. The
anyway.
the connector of the dedicated cable to the USB communication port
3. Connect
of a personal computer.
This automatically starts up the Found New Hardware Wizard. Select No, not
this time. Click Next.
4. Select Install the software automatically (Recommended). Click Next.
message appears to warn that the software you are installing has not
5. Apassed
Windows Logo testing. Click Continue Anyway.
of the USB device driver for the dedicated cable begins. When
6. Copying
installation is completed, a confirmation message appears. Click Finish.
of the virtual COM port driver begins continuously. Select No, not
7. Installation
this time. Click Next.
8. Select Install the software automatically (Recommended). Click Next.
message appears to warn that the software you are installing has not
9. Apassed
Windows Logo testing. Click Continue Anyway.
of the virtual COM port driver begins. When installation is
10. Copying
completed, a confirmation message appears. Click Finish.
The following symbol is used on the instrument. It indicates the possibility of injury
to the user or damage to the instrument, and signifies that the user must refer to
the user’s manual for special instructions. The same symbol is used in the user’s
manual on pages that the user needs to refer to, together with the term “WARNING”
or “CAUTION.”
CAUTION
14. The message “Installing driver software” appears.
of the virtual COM port driver begins. When installation is
15. Copying
completed, a confirmation message appears. Click Close.
4. The User Account Control screen appears. Click Continue.
1. Safety Precautions
Calls attention to actions or conditions that could cause injury to
the user or damage to the instrument or property and indicates
precautions that should be taken to prevent such occurrences.
Windows Security screen appears. Click Install this driver software
13. The
anyway.
At this point, you have completed installing the driver software in Windows XP.
Note: If the start-up screen does not appear automatically and the AutoPlay screen appears, click
Run startup. exe to display the start-up screen.
9. The message “Installing driver software” appears.
of the USB device driver for the dedicated cable begins. When
10. Copying
installation is completed, a confirmation message appears. Click Close.
of the virtual COM port driver begins continuously. Since the
11. Installation
CD has already been inserted, click Next.
Note
Identifies important information required to operate the instrument.
n CD Handling Guideline
Note
• While the CD is being accessed, do not remove the CD from the CD-ROM drive,
cut the power to the PC, or reset the computer.
• Please store your original CDs carefully.
Install the program on your hard disk, and run it from your hard disk during actual
use.
12. The message “Installing driver software” appears.
IM 05P05A01-01EN page /2
n Verifying Installation
Operating procedures and screens in Windows Vista
the instructions appearing on screen. Verify that the dedicated cable is
5. Follow
unplugged. Click Continue.
6. The User Account Control screen appears. Click Continue.
Note2: If you chose Custom, continue the procedure as follows:
Choose each installation method (*1) of LL50A, or Profile and Setting, then click Next.
1. From the Start menu of Windows, select Control Panel > Device manager.
Note 1: From the Start menu of Windows, select Control Panel > System and Maintenance >
Device manager if the control panel's display method is “Control Panel Home.”
Note 2: In Windows XP, from the Start menu of Windows, select Control Panel > System >
Hardware > Device manager and verify the steps 3 and 4.”
2. In Windows Vista, the User Account Control screen appears. Click Continue.
that the virtual COM port driver (1) “YOKOGAWA USB Serial Port
3. Verify
(COMn)” is displayed under “Ports (COM & LPT)” as COM port and the USB
device driver (2) “YOKOGAWA USB Serial Converter A1053UR” is displayed
under “Universal Serial Bus controllers.”
(1)
(2)
COM port number assigned to the dedicated cable can be verified by
4. The
the port number displayed in (1) “YOKOGAWA USB Serial Port (COMn)” of
Device Manager (see the step 3). To change the COM port number, doubleclick (1), select Port Settings tab of Properties screen and click Advanced.
Change the COM port number in the Advanced Settings for COMn screen.
(1)
6. Follow the instructions appearing on screen. Click Finish.
(2)
7. The message “Please wait while Setup configures the components.” appears.
At this point, you have completed uninstalling the driver software.
4. Installing LL50A Parameter Setting Software
8. The message “Setup must reboot before proceeding.” may appear. Click Yes.
• Logon in Windows XP:
-Log on using the user name of Administrators group.
-The program does not start normally if the user name not
CAUTION
belonging to the Administrators group is used for loggong on.
• In Windows Vista, install the software as an administrator.
• In Windows Vista, do not set LL50A user file save directory in
Program Files folder. The LL50A will not work properly.
Also if LL50A user file save directory is set in Program Files
folder on Windows XP personal computer, do not upgrade its OS
to Windows Vista.
• Before installing LL50A Setting Software, quit all running
applications.
• Avoid entering just the drive as the installation location, such as
C:\. Enter the full directory path.
• When .NET Framework 3.5 SP1 is not installed on Windows XP/
Windows Vista personal computer, .NET Framework 3.5 SP1 is
installed to start LL50A.
• When reinstalling LL50A, uninstall the installed LL50A first, and
then reinstall LL50A.
*1: Profile is to install Network Profile Tool.
Setting is to install Parameter Setting Tool.
(1) On the LL50A, select Entire feature will be installed on local hard drive.
(2) On the Profile and Setting, select either Will be installed on local hard drive, or
Entire feature will be unavailable.
13. The Confirm Installation screen appears. Click Next.
message “Installing LL50A” appears. The User Account Control screen
14. The
appears. Click Allow.
9. Personal computer reboots. The LL50A Setup Wizard appears. Click Next.
License Agreement for Package Software Product appears. Read this
10. The
license agreement carefully. If you agree, select I Agree. Click Next.
n Installing LL50A Parameter Setting Software
Operating procedures and screens in Windows Vista
1. Start Windows.
the CD of LL50A into the CD-ROM drive. The start-up screen appears
2. Insert
automatically.
begins. When installation is completed, a confirmation message
15. Installation
appears. Click Close.
The following icons are appeared on the desktop.
[Setting Tool]
[Network Profile Tool]
At this point, you have completed installing the LL50A parameter setting software in
Windows Vista.
For installation of LL50A Parameter Setting Software in windows XP, follow the
message given in each dialog box.
Note: If I Do Not Agree is selected, you cannot install the LL50A. Click Cancel.
Select Installation Folder screen appears. Select Everyone or Just
11. The
me. Click Next.
Note
n Uninstalling USB Converter Driver Software
Operating procedures in Windows Vista
Note: If the start-up screen does not appear automatically and the AutoPlay screen appears, click
Run startup. exe to display the start-up screen.
3. Click LL50A Installation.
.NET Framework 3.5 SP1 is not installed on a personal computer, the
4. When
license agreement for installing it appears. Click Accept.
Unplug the dedicated cable if it is connected to a personal
computer.
When you install the LL50A after "Everyone" is selected, even if other users
log in, it is possible to start LL50A from the Start menu > Programs menu.
When you install the LL50A after "Just me" is selected, even if other users log
in, LL50A is not displayed in the Programs.
n Verifying Installation of LL50A Parameter Setting Software
From the Start menu of Windows, point to All Programs, then UTAdvanced and
verify that the Setting Tool and the Network Profile Tool is registered.
n Uninstalling LL50A Parameter Setting Software
From the Start menu of Windows, select Control Panel > Programs and
Features (*1) > LL50A and uninstall it.
In Windows Vista, the User Account Control screen appears. Click Allow. The
LL50A is uninstalled.
*1: In Windows XP, Add or Remove Programs.
Setup Type screen appears. Select Complete and click Next. (We
12. The
recommend choosing Complete.)
CAUTION
1. Unplug the dedicated cable if it is connected to a personal computer.
the Start menu of Windows, select Control Panel > Programs and
2. From
Features.
YOKOGAWA ELECTRIC CORPORATION
Network Solutions Business Division
2-9-32, Naka-cho Musashino-shi, Tokyo 180-8750 JAPAN
Note: In Windows XP, from the Start menu of Windows, select Control Panel > Add or Remove
Programs and uninstall the driver software.”
YOKOGAWA USB Serial Converter Drivers A1053UR and click
3. Select
Uninstall/Change.
Windows Vista, the User Account Control screen appears. Click
4. InContinue.
message “Copying required files” appears. And then the message
5. The
“Installing .NET Framework 3.5 SP 1” appears.
Note1: If you chose Complete, go to the procedure 13.
YOKOGAWA CORPORATION OF AMERICA
Head office and for product sales
2 Dart Road, Newnan, Georgia 30265, USA
YOKOGAWA EUROPE B.V.
Headquarters
Euroweg 2, 3825 HD Amersfoort, THE NETHERLANDS
www.yokogawa.com/ns
IM 05P05A01-01EN page /2