1
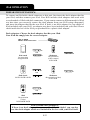
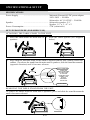
CONTENTS
IMPORTANT SAFETY & NOTICE
........................................................................................
E-1
SYSTEM BASICS
Location of Controls - Main Unit ....................................
Location of Controls - Remote ........................................
Power Supply ..................................................................
Lightcurrent© Wireless Audio Technology .....................
E-2, 3
E-3
E-4
E-4
DIGITAL CLOCK
Digital Clock Function ....................................................
How to Set the “Wake-up” Timer ....................................
E-5
E-5
GENERAL FUNCTIONS
Automatic Power of Sleep Function ................................
Alarm Function................................................................
Electronic Volume Control ..............................................
Music Equalizer ...............................................................
Repeat Playback Function ...............................................
Using the Audio Line in Connection ...............................
Mute Function .................................................................
E-6
E-6
E-6
E-6
E-7
E-7
E-7
RADIO
Operation of Radio ..........................................................
Radio Memory .................................................................
Tuning to a RDS Station ..................................................
E-8
E-8
E-8
CD AUDIO
Insertion & Removal of Discs .........................................
E-9
CD-MP3
What is MP3? ..................................................................
Programming Source Plackback ......................................
How to Play MP3 Discs ..................................................
DVD OPERATION
How to Play DVD-Discs ................................................. E-12 to 15
System Settings ............................................................... E-15 to 21
USB & SD CARD
USB Flash Pen Drive and SD Card MP3 Playback .........
E-22
iPod OPERATION
Preparation of iPod Dock ................................................
Operation with iPod.........................................................
E-23
E-24
SPECIFICATIONS & SET UP
Specifications ..................................................................
Set up Procedure..............................................................
E-25
E-25
WALL MOUNT SET UP
Wall Mount Set up ...........................................................
E-26
E-10
E-10, 11
E-11
IMPORTANT SAFETY & NOTICE
The lightning flash and arrowhead within the triangle is a warning sign alerting you of “dangerous
voltage” inside the product.
CAUTION
RISK OF ELECTRIC SHOCK
DO NOT OPEN
WARNING:
To reduce the risk of electric shock, do not remove cover (or back). No user-serviceable
parts inside. Refer servicing to qualified service personnel.
CAUTION:
The exclamation point within the triangle is a warning sign alerting you of important instructions
accompanying the product.
Grounding or polarization. The precautions should be taken so that the wider blade of the AC plug
must match the slot in receptacle “wall socket”.
Do not expose to dripping or splashing liquids!
Invisible laser radiation when open and interlocks defeated. Avoid exposure to beam.
WARNING:
To reduce the risk of fire or electric shock, do not expose this appliance to dripping or splashing liquids.
The mains plug is used as the disconnect device and it shall remain readily operable. To completely
disconnect the power input, the mains plug of the apparatus must be disconnected from the mains completely.
NOTE:
Caution symbols are printed on rear of unit. Please refer to instruction manual.
PLEASE NOTE:
You will find the caution rating label for this product located on the rear of the unit.
To ensure safe use of this product, please follow the advice below:
1. The apparatus and its accessory AC power adaptor should not be exposed to dripping or splashing, liquids
and no objects containers with liquids should be placed on the apparatus.
2. The marking and rating label is located at rear panel of the both subwoofer speaker box and digital audio
shelf system.
3. The on/ standby key does not isolate the product from the power supply. To be completely disconnect the
power input, the mains plug and its accessory AC power adaptor shall be disconnected from the mains.
The mains plug and its accessory AC power adaptor should not be obstructed or should be easily accessed
during intended use.
4. Under the influence of electrostatic phenomenon, the product may malfunction and power will need to be
reset.
5. Excessive sound pressure from earphones and headphones can cause hearing loss.
6. Battery should not be exposed to excessive heat such as sunshine, fire or the like.
7. Danger of explosion if battery is incorrectly installed. Replace only with the same or equivalent type.
8. When electrostatic discharge (ESD) occurs at the front surface (whether metal or plastic) or near any
part or any button of this unit, or at the USB port and/ or SD-card slots, there may be a possibility that
the product may stop operating and/ or shut down immediately. This is a normal condition and intended
to protect the unit and internal components against damage. In such a case, please reset the unit (by
disconnecting and reconnecting the AC-power source) to revert the unit to normal operation.
E-1
SYSTEM BASICS
LOCATION OF CONTROLS - MAIN UNIT
1
2
7
6
8
9
10
5
11A
11B
4
12
13
14
15
3
17 18
16
19
22
29
23
20
30
21
31
24
32
25
28
33
26
34
27
37
35
39
40
46
41
49
42
43
47
44
45
36
38
48
E-2
50
SYSTEM BASICS
SPEAKERS:
1. SPEAKERS (LEFT & RIGHT)
2. STANDS (FOR SPEAKERS)
MAIN UNIT:
3. DESK STAND (FOR MAIN UNIT)
4. CD/ CLOCK/ RADIO DIGITAL
MULTIFUNCTION DISPLAY
5. CD DOOR (MOTORIZED)
6. FUNCTION KEY
7. TUNER/ BAND KEY
8. EQUALIZER KEY
9. OPEN/ CLOSE KEY
10. ON/ STANDBY KEY
11A. REMOTE CONTROL SENSOR
11B. LIGHTCURRENT © TRANSMITTER
12. FAST BACK/ TUNE DOWN KEY
13. PLAY/ PAUSE KEY
14. FAST FORWARD/ TUNE UP KEY
15. VOL. + KEY
16. BACK/ MEM - KEY
17. STOP KEY
18. NEXT/ MEM + KEY
19. VOL. - KEY
20. USB SOCKET
21. SD-CARD SOCKET
22. HDMI OUT SOCKET
23. AUDIO OUT SOCKETS
24. COAXIAL DIG. OUT SOCKET
25. VIDEO OUT SOCKET
26. S-VIDEO SOCKET
27. OPTICAL OUT SOCKET
28. COMPONENT VIDEO SOCKETS
29. DOCK VIDEO OUT SOCKET
30. AUX IN SOCKETS (LEFT & RIGHT)
31. SUBWOOFER OUTPUT SOCKET
32. DOCK SOCKET
33. DC INPUT JACK (DC 12V
)
34. HEADPHONE JACK
SUBWOOFER:
35. LIGHTCURRENT © RECEIVER
36. BASS VENT
37. AMBIENT LIGHTING
38. SUBWOOFER SPEAKER
39. AUDIO INPUT JACK
40. BASS LEVEL CONTROL (MIN/ MAX/ NORMAL)
41. SPEAKER-OUT SOCKETS (LEFT & RIGHT)
42. CONTROL OUT JACK
43. DC OUTPUT JACK (DC 12V
)
44. SUBWOOFER POWER ON/ OFF SWITCH
45. SUBWOOFER AC CORD & PLUG
iPod Docking Platform:
46. POWER AND AUDIO SOURCE INDICATOR
LIGHTING
47. CAVITY FOR DOCK ADAPTOR
48. STAND (FOR iPod DOCKING PLATFORM)
49. DOCK ADAPTOR FOR iPod
(SEVERAL DIFFERENT ADAPTORS ARE
PROVIDED)
50. iPod DOCKING PLATFORM CONNECTOR
LOCATION OF CONTROLS - REMOTE
1
3
4
2
5
6
7
8
9 10 11
12 13 14
15 16 17
18
19
20
22
21
23
24
25
26
27 28 29
30 31 32
33 34 35
36 37 38
39
1.
2.
3.
4.
5.
6.
7.
8.
9.
10.
11.
12.
13.
14.
15.
16.
17.
18.
19.
20.
OPEN/ CLOSE KEY
ON/ STANDBY KEY
DVD/ USB/ SD KEY
AUX/ DOCK KEY
TUNER KEY
SLEEP KEY
TIMER KEY
ALARM KEY
CLOCK KEY
SLOW/ INTRO KEY
AUDIO/ STEREO KEY
TITLE/ PLAYLIST + KEY
STEP/ ALBUM + KEY
GOTO/ TRACK + KEY
ANGLE/ PLAYLIST - KEY
ZOOM/ ALBUM - KEY
SUBTITLE/ TRACK - KEY
OSD/ INFO KEY
A - B/ RDS KEY
REPEAT KEY
E-3
21.
22.
23.
24.
25.
26.
27.
28.
29.
30.
31.
32.
33.
34.
35.
36.
37.
38.
39.
RANDOM KEY
NUMBER KEYS
PLAY/ PAUSE KEY
STOP KEY
VOLUME - KEY
VOLUME + KEY
MUTE KEY
UP KEY
EQ KEY
BACK/ TUNE DOWN KEY
ENTER KEY
NEXT/ TUNE UP KEY
BACK/ MEM- KEY
DOWN KEY
NEXT/ MEM+ KEY
MENU KEY
SETUP KEY
PROG./ MEM. KEY
BATTERY COMPARTMENT
SYSTEM BASICS
POWER SUPPLY
- This set works on normal household AC-power.
- Make sure the set voltage of the unit matches your local voltage.
- Insert the plug of the AC-cord (for both unit and the subwoofer) into a wall outlet with
AC-power.
- Press the power on/off switch to turn “on” the unit and also the subwoofer.
CONNECTION OF SPEAKER BOXES (WITH SUBWOOFER)
- Unwrap the speaker-cords of both speaker-boxes.
- Please notice that each speakers cord consists of 2 wires, one is “clear” and one has a
black line.
- Insert the “clear” wire of the left speaker-box into the “red” ( + ) speaker connector beside
the main-unit, which has the “L” indication (next to the speaker-connector).
- Insert the “black” wire of the left speaker-box into the “black” ( - ) speaker connector
beside the main-unit, which has the “L” indication (next to the speaker-connector).
- Repeat the above 2 steps for the “right” speaker box, but this time, inserting them into the
red & black connectors which have the “R” indication.
- When inserting each wire into a connector, press downwards on the connector’s plastic
knob (red or black part) & push the exposed metal end of the wire all the way into the
hole above this knob.
- Place the speaker boxes as far apart as possible for best sound effect.
SUBWOOFER - BASS LEVEL CONTROL
- The bass level can be adjusted by the bass level control at the rear of the subwoofer, you
can adjust it anytime as desired.
LIGHTCURRENT© WIRELESS AUDIO TECHNOLOGY
The lightcurrent© technology uses safe invisible infrared light to wirelessly transmit count.
But unlike normal infrared systems, this new technology, lightcurrent© functions much
like a light-bulb, doing away with the need for line-of-sight, covering a wide area range
and eliminating radio frequency emissions/interference. The docking platform transmits
an uncompressed audio signal in all directions, which bounces off walls, ceilings, and
even furniture in your environment, eventually reaching (at the speed of light) the wireless
2.1 channel speaker system - providing the luxury of cordless, uncompressed, noise-free,
uninterrupted audio with unmatched sound quality.
E-4
DIGITAL CLOCK
DIGITAL CLOCK FUNCTION
The set has a built-in digital clock, which is displayed into 2 situations:
(1) When the set is in “standby mode” (the display will automatically always show the
correct time). In this situation, the blue backlight is dimmed (to save electricity).
(2) When the set is in “on mode” (the blue backlight of the display is “on” in this mode, to
indicate that the set is powered “on”). In this situation the LCD display normally does
not automatically show the current time. But you can press the “clock” key on the remote
control to display the current time on the LCD screen for approximately 10 seconds.
(3) How to set the correct time:
The unit must be in standby mode and the keys for setting the time found on the remote
control. Follow the below procedures:
Press and hold the Clock key for more then 2 seconds to enter
into clock setting mode.
While “CLK 12” or “CLK 24” is flashing, use the or keys to select
between the clock format. Once desired format is flashing,
press the Clock key to confirm the selection.
Use the
or
keys to set the “HH” (hour). Then press the Clock key
to confirm the setting.
Repeat above step to input & confirm the “MM” selection. The clock
will begin to function after settings are complete
*Note: During clock setting if no button is pressed within several seconds, the system will exit clock setting
mode automatically. The clock settings will be crossed and need of resetting if power cord of unit is
disconnected as a power failure.
HOW TO SET THE “WAKE-UP” TIMER
1. On standby, press and hold the Timer key on the remote control for more than 2 seconds
to start timer setting mode. The wake up source will flash on the display (for example:
disc or USB).
2. Press or keys on remote control to select the source for timer:
iPod
CARD
USB
DISC
TUNER FM
*The unit LCD display will show “disc” for sources CD-audio, CD-MP3 and DVD.
3. Press Timer on the remote control to confirm the setting.
4. Repeat step 2 and step 3 to set volume and the timer on and off times.
The timer is now fully programmed and the unit will automatically switch “on” (& “off”)
at the set times, as long as the timer function is “active”
- Press the Timer key on the remote control to turn the timer on or off. The “timer” icon
will appear on the display if time is “on”.
*Note: - The timer-off function will not be activated if the start and stop time are the same.
- During timer setting, if no button is pressed within several seconds, the system will exit the time
setting mode automatically.
E-5
GENERAL FUNCTION
AUTOMATIC POWER OF SLEEP FUNCTION
The set has a special sleep timer function which can automatically switch off the unit. This
is useful for sleeping to music at night. Press Sleep to set the sleep timer as follow:
90
MINS
80
MINS
70
MINS
60
MINS
50
MINS
40
MINS
30
MINS
20
MINS
10
MINS
SLEEP OFF
While sleep mode is activated, you can check the remaining time
During “on mode” press Sleep key on the remote control to view the remaining time.
- “xxxmin” will be displayed. “xxx” is the remaining time in minutes.
To deactivate the sleep timer
- Press Sleep repeatedly during sleep time checking until sleep icon is off, or press on/
standby key to have unit in “standby mode”.
ALARM FUNCTION (BEEP-BEEP ALARM)
The set has an alarm function, which can be set as follows:
- In standby mode, press and hold the Alarm key (on the remote control), the display will
show on hh:mm , and you will see “hh” is flashing.
- Use the or keys to change the desired setting. Press Alarm key to confirm selection.
- Repeat above to steps to confirm the minutes setting and activate alarm.
*Note: During alarm settings, if no button is pressed within several seconds, the system will exit the timer
setting mode automatically. Press the Alarm key repeatedly to shuffle between activating and
deactivating the alarm.
ELECTRONIC VOLUME CONTROL
- This unit uses an electronic volume control (push button type) .
- To increase or decrease the loudness of unit, press the volume up (vol +) or volume down
(vol -) keys respectively.
- Release the key when volume level is at the desired loudness.
- Sometimes, especially during listening to the radio, you may notice a “Click-Click-Click”
(repeating) sound when you are increasing or decreasing the volume. This is a normal
condition & the sound will disappear when you release the volume key (when you reach
the desired volume level).
MUSIC EQUALIZER
- Press EQ key (on remote control) repeatedly to choose the desired sound effect according
to the music you are listening to :
EQ OFF
CLASSIC
ROCK
JAZZ
E-6
POP
BASS
GENERAL FUNCTION
REPEAT PLAYBACK FUNCTION
- At anytime during playback:
- Press Repeat key repeatedly to select
REPEAT 1
= To repeat the current track only
REPEAT DIRECTORY
= Repeat all songs from currently selected folder/ directory
REPEAT ALL
= To repeat all tracks (full CD )
USING THE AUDIO LINE IN CONNECTION (AUX-INPUT)
- You can connect the audio output of an external device such as a MP3 player to this unit,
to listen to the sound of that device through the high quality amplifier of this music system.
- To connect the external device please use a standard rca cable to connect the “audio lineout” of the device (left and right channels) to the “AUX line-in” RCA jacks (left & right)
on the rear panel of this unit.
- Switch the function “AUX-in” using the Function key or AUX/Dock key on remote
control.
- Make sure that the speakers are connected to the main unit.
- Switch on the power of the main unit and the external device (eg. MP3-player).
- Start playback of the external device and adjust the volume control of the main unit to the
desired level.
- Remember to switch off the power of the music system (main unit) when you are finished
using the external device.
MUTE FUNCTION
- This set has a mute function to enable you to turn off the volume temporarily.
- Press the Mute key (on remote control) once, the volume will turn off and the “mute”
symbol will show on the display.
- To resume the sound, simply press the Mute key again.
E-7
RADIO
OPERATION OF RADIO
- Press Tuner key to select tuner FM band.
- Press and hold Tune Down/
or Tune Up/
key to search stations automatically,
once a station is found, the search will automatically stop.
- To tune to a weak station, briefly press Tune Down/
or Tune Up/
key repeatedly
until the display shows the desired frequency or when the best reception has been obtained.
RADIO MEMORY (STATION PRESET MEMORY STORAGE)
1. Press Tune Down/
or Tune Up/
key to get to the desired frequency.
2. Press Prog/Mem. key on remote control to active the preset number for storing.
/Mem.
3. If you wish it store the radio station to another preset number, press
/Mem.
to select the desired present number.
4. Press Prog/Mem. on remote control to store the radio station.
- Repeat step 1 to 5 to store other preset radio stations.
or
*NOTE:
- During programming, if no button is pressed within several seconds, the system will exit
program mode automatically.
/Mem. or
/Mem. , the saved radio
- To recall any saved memory, simply press
band will be recalled.
- To clear the memory of any position, simply save a new station to the same memory
position.
- You can store up to 20 stations for FM in the memory. When a preset radio station is
selected, the preset number appears on the display.
TUNING TO A RDS STATION (FM ONLY)
In tuner FM mode, press Tune Down/
or Tune Up/
key to tune to a RDS station.
/Mem. or
/Mem. key on the remote control to select preset RDS station.
Press
DISPLAY RDS STATION INFORMATION
Press OSD/Info key on the remote control to display station information (If available for
station):
1. RDS name
2. Radio text
3. RXS type (pty)
4. RDS time
5. PI code
E-8
CD AUDIO
INSERTION AND REMOVAL OF DISCS
- Press the DVD/USB/SD key on the remote control until disc mode is indicated on the
LCD display. Use the Open/Close key to slide open/close the disc tray.
- Carefully place a compact disc (CD/CD-MP3/DVD) onto the center spindle with the label
side (printed side of disc) facing upwards. Close the disc tray.
- After a few seconds, the disc will begin automatic playback or display the disc’s front
menu (dependent on disc type and format).
Important: Always hold a CD by it’s edges. Avoid getting any finger-prints, smudges or dirt
onto the surface of a disc. In case this happens, use a special CD-cleaning cloth or cleaning
kit to remove the dirt or smudges.
NORMAL CD OPERATION
- Press On/Standby key to switch on the unit and insert a CD disc as described. Playback
shall begin automatically in a few seconds.
- At anytime during playback, use the Play/Pause key to pause or resume playback of disc.
- At anytime during playback, press the Stop key to stop operation of the set. Press the
Stop key twice to reset the set to the first track
- At anytime during playback, press and release the Next/Tune Up or Back/Tune Down
key to skip forward or backwards by one track, as desired.
- At anytime during playback, press and hold the Next/Tune Up or Back/Tune Down key
to select speed at which to fast-forward (cue) or fast-reverse (review) the specific track:
2X
8X
4X
20X
- During fast-forward or fast reverse, press the Play/Pause key to resume normal playback.
E-9
CD-MP3
WHAT IS MP3 ?
- MP3 (MPEG 2, layer 3) is a digital file format for audio (music).
- You can download MP3 songs from many websites on the internet (please observe the
copyright regulations of your country).
- MP3 songs are much smaller in memory size compared with normal CD-audio format
songs. This is called “compression” & it allows much more recording time on a standard
CD than the normal 74 minutes (for normal CD-audio).
- The exact length of recording time depends on the “compression rate” of the MP3 song
you have downloaded.
- Compression rate is specified in “kbps” (kilobits per second). For example : “128 kbps”:
The higher this number, the bigger the MP3 file size (the better the sound quality) and
the lower the recording time on a CD-R. Normally based on 128 kbps, you should have
approx. 250-300 minutes of recording time on a CD-R.
- MP3 songs can be recorded with some “text information” as part of the same file. It consists
of (among other details:)
- File name (song name)
- Artist name
- There are basically 2 ways to make an MP3-CD with your favorite songs :
- Download MP3 songs from internet & burn them on a CD-R disc on your computer.
- Convert CD-audio files (from a normal music CD) onto your computer into MP3
format, using a kind software called “CD-ripper”.
(Which is freeware/shareware on internet).
* Important : Please always respect intellectual property and copyrights!
PROGRAMMING SOURCE PLACKBACK
- This unit can be programmed to play any sequence of upto 16 tracks/chapter, as desired.
- Always press the Stop key twice before starting the programming.
1. Switch on the set and select the source. Then press Stop key.
2. Press and hold 2 seconds the Prog/Mem. key on the remote control. The external screen
if connected, will shown on display:
- Use the number keys to enter the track/ chapter information in the current memory position.
- Switch to the next memory position by using the
Tune Down/
Tune Up /
navigational keys.
- Repeat above two steps for programming. Once complete, use the above mentioned
navigational keys to highlight the “play” option on screen. Then press the Enter key to
begin program playback.
E-10
CD-MP3
- To stop playback from program memory but keep the program in memory, press the Stop
Play/Pause key to resume normal playback, or access the program
key twice. Press the
menu to begin program playback.
- To clear (cancel) the entire program, stored in memory, simply enter the program menu,
via the Prog/Mem. key, and select the “clear” option by using the navigatinal and enter
keys.
HOW TO PLAY MP3 DISCS
- Switch “on” the unit using the On/Standby key.
- Insert an MP3 CD into the player as described.
- Playback shall begin automatically in a few seconds and disc menu displayed on the TV
screen, if connected to the TV.
- Use the or , Tune Down/
or Tune Up/
navigational keys to enter the directory
and highlight the desired folder and file. Press enter key to start playback of highlighted
file or first track of highlighted folder.
- At anytime during playback, press and release the Next/Mem.
or Back/Mem.
key
to skip forward or backwards by one track, as desired.
- At anytime during playback, press and hold the Next/Tune Up or Back/Tune Down key
to select speed at which to fast-forward (cue) or fast-reverse (review) the specific track:
2X
8X
4X
20X
- During fast-forward or fast reverse, press the Play/Pause key to resume normal playback.
- At anytime during playback, press the Stop key to stop playback from the set.
This will reset the set to the first track, whereby pressing the Play/Pause key, after the
stop key, shall start playback from the first track and folder on the CD-disc.
Note: For CD-MP3 discs the reading time may exceed 10 seconds due to the large number of songs compiled
onto the disc.
E-11
DVD OPERATION
HOW TO PLAY DVD-DISCS
- Switch “on” the unit using the On/Standby key.
- Insert an DVD-disc into the player as described.
- The display will indicate the current scene/ chapter number, as well as the playtime of the
scene/chapter.
- If the DVD-disc has a front menu feature and is first displayed, use the Tune Down/
/
Tune Up/
/ / navigational & “enter” keys to highlight and select available options
on the DVD-disc.
- At anytime during playback, press the Play/Pause key to pause playback, or resume
playback from pause mode.
/Mem. or
/Mem. to skip backward or
- At anytime during playback, press the
forward by one scene/ chapter.
- At anytime during playback, press the Tune Down/
or Tune Up/
keys to review
(fast back) or cue (fast forward) at one of the following speed:
BACKWARD x 4
BACKWARD x 2
FORWARD x 2
FORWARD x 4
FORWARD x 20
FORWARD x 8
PLAY
BACKWARD x 8
BACKWARD x 20
- At anytime during playback, press the Slow key to have the DVD-disc playback at one
of the following speeds:
SF 1/2
SF 1/3
SF 1/4
SF 1/7
SF 1/6
SF 1/5
PLAY
- At anytime during playback, press the Stop key twice to cancel playback. Pressing the
Stop key once during playback stops the playback and stores the position in memory.
When pressing Play/Pause next time, playback shall restart from the position in memory.
* Helpful Hint:
If you are having trouble playing a certain disc, remove the disc and try a different one.
Improper/ non-supported formatted disc will not play on this DVD player.
STEP FUNCTION
- At anytime during playback, press the Step/Album+ key repeatedly to proceed with
playback frame by frame.
- Press the Play/Pause key for resume normal playback.
A-B REPEAT FUNCTION
The A-B repeat function lets you mark a segment to repeat, between the beginning “A” and
the end “B” of the segment you want to review.
- At anytime during playback, press the A-B/RDS key at the beginning “A” segment.
- Press again the A-B/RDS key at the end “B” of the segment you want to review.
E-12
DVD OPERATION
- Note that when the A-B/RDS key is pressed during A-B repeat operation, A-B repeat is
cancelled and playback as per normal.
AUDIO LANGUAGE FUNCTION
- At anytime during playback, repeatedly press the Audio/Stereo key until the desired
audio language is selected.
- The audio language option will be displayed at the top of the screen.
- The audio language options that can be selected are dependent on the audio languages
available on the DVD-disc.
SUBTITLE LANGUAGE FUNCTION
- At anytime during playback, repeatedly press the Subtitle/Track- key until the desired
subtitle language is selected.
- The subtitle language option will be displayed at the top of the screen.
- The subtitle options are dependent on the subtitle languages available on the DVD-disc.
ZOOM FUNCTION
- At any time during playback, press the Zoom/Album- key on the remote to switch between
the following zoom modes:
ZOOM 2
ZOOM 3
ZOOM 4
ZOOM 1/4
ZOOM 1/3
ZOOM 1/2
ZOOM OFF
- Note that the screen will display “invalid key” if the DVD does not have this option
available.
CAMERA ANGLE
- At anytime during playing, press the Angle/Playlist- key repeatedly to select different
desired angles.
- Note that the screen will display “invalid key” if the DVD does not have this option
available.
OSD FUNCTION (ON SCREEN DISPLAY)
- At anytime during playback, press the OSD key repeatedly to display or dismiss the disc
information on screen.
MENU FUNCTION
- At any time during playback press either the Menu or Title/Playlist+ key to access the
DVD menu.
- Use the Tune Down/
/ Tune Up/
/ / navigational keys on the remote control
to navigate the menu.
- Use the Enter key to select menu options and additional features available on disc.
E-13
DVD OPERATION
PLAYBACK FROM THE DESIRED TRACK OR CHAPTER
- Playback of the DVD-disc can be from a desired scene/chapter, if the DVD-disc has a
built-in menu.
- Access the menu and highlight the movie chapter/ scenes option, use the Tune Down/
/
Tune Up/
/
/
and Enter navigational key to select options, scenes/ chapters
and begin playback.
PLAYBACK FROM THE DESIRED TIME CODE
- At anytime during playback, press the Go to/Track+ key to display as below:
TT
04/14
CH
TOTAL CHAPTER
TITLE NOW
PLAYING TITLE
020/29
00:0..
NOW
PLAYING
TOTAL
CHAPTER
CHAPTER TIME
- Select the desired title, chapter or chapter time by using the Tune Down/
/ Tune Up/
keys.
- Then enter the number keys directly.
- Press the Enter key to confirm the input.
- The player will start playback from input marker
- To cancel input, when timer key is displayed press the Go to/Track+ key to cancel and
return to normal playback.
PROGRAMMING FOR DVD-DISC PLAYBACK
- Press & hold the Prog/Mem. Key on remote control for 2 seconds to enter “program
mode”.
- The screen will display as follow:
1
2
3
4
T
-----
:
:
:
:
C
-----
5
6
7
8
T
-----
:
:
:
:
C
-----
9
10
11
12
T
-----
:
:
:
:
C
-----
13
14
15
16
T
-----
:
:
:
:
C
-----
- Use the Tune Down/
/ Tune Up/
/
/
keys to select T (title) or C (chapter),
upto 16 positions can be programmed.
- Enter the number keys directly for the title then chapter.
- Highlight and select the “play” on screen function by using the Tune Down/
/
Tune Up/
/ / and Enter navigational keys.
- To cancel input, press the Prog/Mem. key again to cancel and return to normal playback.
E-14
DVD OPERATION
REPEAT PLAYBACK
- At anytime during playback, press the Repeat key to playback your favorite track, scene/
chapter or the entire disc repeatedly.
- Pressing the Repeat key once displays the current status. Each press there after switches
the repeat mode:
REP : OFF
REP : CHAPTER
REP: TITLE
REP: ALL
- Note that depending on the DVD-disc, the repeat function may not be active.
SYSTEM SETTINGS
BASIC SETUP
1. General steps of setup menu
a.) In disc, USB or card mode, press the setup key on the remote control, the main setup
menu appears as below. When the main menu id displayed, the DVD system will auto
pause.
b.) Press Tune Down/
and Tune Up/
key to highlight the icon of the desired page,
then press or Tune Up/
key to activate that page; for example, if you want to setup
the audio page, press Tune Up/
key to highlight the audio icon, the audio page will
be displayed on the screen.
c.) Press key to highlight the desired option, press enter or Tune Up/
key to select,
the choices of that option appear on the right; for example, press key to highlight the
brightness option, then press enter key to select, the brightness choices that appear on
the right.
d.) Press setup key again to exit setup menu.
E-15
DVD OPERATION
2. Setup items introduction
System setup
• TV system
Check the color system of your TV, the you can choose the TV system required in the
DVD setup menu.
- NTSC : Choose this setting if your DVD player is connected to a ntsc TV.
- PAL : Choose this setting if your DVD player is connected to a pal TV.
- AUTO : Choose this setting if your DVD player is connected to a Multi-system TV.
• Screen saver
If the screen saver is on, when your DVD player is in stop, open, or a no disc state, or
there is a frame frozen for more than 3 minutes, the screen saver will be displayed. This
feature can protect the screen From being damaged.
- On : Choose this setting to activate the screen saver.
- Off : Choose this setting to cancel the screen saver.
• VIDEO
- Interlace-yuv : Choose this setting if your DVD player is connected to a TV with Y, CB,
CR video cables.
- P-scan : Choose this setting if your DVD player is connected to a progressive scan TV
with Y, PB, PR video cables.
- S-video : Choose this setting if your DVD player is connected to a TV with S-video
cables.
NOTES :
- If composite video is connected to your TV, the submenu interlace-yuv must be selected.
- If the component cable (Y, PB/CB. PR/CR) is connected to your TV, for interlace TV or progressive scan
TV, the submenu P-scan ypbpr must be selected.
REMARK : Do not connect component cable or S-video to TV simultaneously.
E-16
DVD OPERATION
• HD OUTPUT
Choose this setting if your DVD player is connected to a TV with hdmi Cable.
- 480p choose this setting if your TV supports 480p
- 720p choose this setting if your TV supports 720p
- 1080i choose this setting if your TV supports 1080i
- 1080p choose this setting if your TV supports 1080p
If your TV cannot support the setting being chosen, there will be no Video output from
TV.
• TV TYPE
- 16 : 9 (wide screen) : Choose this setting if your DVD player is connected to a wide
screen TV. If you choose this setting and you don’t have a wide screen TV, the images
on the screen may appear being distorted due to vertical compression.
- 4 : 3 LB (letter box) : Choose this setting if your DVD player is connected to a normal
ratio TV. You’ll see the movies in their original aspect ratio (height-to-width ratio).
You’ll see the entire frame of the movie, but it will take up a smaller portion of the
screen vertically. The movie might appear with black bars at the top and bottom of the
screen.
- 4 : 3 PS (pan & scan) : Choose this setting if your DVD player is connected to a normal
ratio TV. You can fill the entire screen of your TV with the movie. This might mean that
parts of the picture (the left and right edges) won’t be seen.
Notes :
The image display ratio is related to the recorded disc format. Some discs cannot display images in the aspect
ratio you choose.
If you play a disc recorded in 4:3 format on a wide screen TV, black bars will appear on the left and right
side of the screen.
You must adjust the screen setting depending on the type of the television you have.
E-17
DVD OPERATION
• PASSWORD
The password option is locked by default, and you cannot set the ratings limit or change
the password. In order for the ratings feature to work, the password mode must be turned
on. if you want to set the ratings limit, you will need to enter the default password, which
is 0000, then press enter key to confirm. To change the password, you will be prompted
for the old password, then be prompted for a new one. Enter a 4-digit number (this is your
password).
• RATING
Press
or
key to go to the rating option, you can setup the parental rating when the
password has been entered. The following settings are available 1 to 8.
• NOTES :
- 1 G : Suitable for all ages.
- 2 : Level 2.
- 3 PG : Only with parental guidance.
- 4 PG 13 : Not suitable for children udder the age of 13, from 13 to 18 only under parental
guidance.
- 5 : Level 5.
- 6 R : May contain violence or sex scenes, can only be viewed by under the age of 18
with parental guidance.
- 7 NC-17 : Only for adult, not for those under 17.
- 8 : Only for adults.
If the password option is locked, you can’t set the rating limit. The rating limit doesn’t
work when the password option is unlocked.
• DEFAULT
Choose this option to restore all the setup options to their default settings.
E-18
DVD OPERATION
LANGUAGE SETUP
• OSD LANGUAGE
Highlight the OSD language option, and press
or
key to choose the OSD language
you prefer. Press enter key to confirm, and the OSD will be displayed in that language.
AUDIO SETUP
• OP MODE
- Line out : Choose this setting to line out the input signal. It will be more suitable for
playing in the night time, for the output volume is low.
- RF remod : It will be more suitable to choose this setting for playing in the day time,
for the output volume is high.
• DYNAMIC RANGE
This adjustment attempts to make high volume sounds more quiet and soft sounds louder
to give an more acceptable sound output.
• DUAL MONO (LEFT + RIGHT)
Choose this option to setup the L and R mono output modes, there are four modes in this
option :
Stereo, mono L, mono R, and mix mono; it is mainly used in karaoke mode.
E-19
DVD OPERATION
VIDEO SETUP
• BRIGHTNESS
Press or key to move the scroll bar and adjust the brightness.
• CONTRAST
Press or key to move the scroll bar and adjust the contrast.
• SATURATION
Press or key to move the scroll bar and adjust the saturation.
• ANGLE SWITCH
Press or key to select angle switch on or off.
E-20
DVD OPERATION
SPEAKER SETUP
• DOWNMIX
Press or key to move the cursor to select the following.
- LT / RT : Choose this setting, if original movie recorded to the disc was encoded in the
pro logic dolly digital format.
- Stereo : Choose this setting, when playing DVD will produce, two channel signals from
the left and right soundtrack; when playing CD will produce, a stereo signal to the
speakers.
- VSS : choose this setting, when playing a disc recorded with 5.1 channel sound format
will produce a virtual surround sound effect from the main soundtrack through the
speakers.
DIGITAL SETUP
• AUDIO OUT
Highlight the audio out option, and press
or
key to choose the audio output mode
you prefer. Press enter key to confirm. There are 3 optional audio output modes : Spdif /
off, Spdif / Raw, and Spdif / PCM.
- Spdif / off : No audio signal output from the coaxial output jack.
- Spdif / Raw : Choose this setting if your DVD player is connected to a power amplifier
with a coaxial cable; when playing a disc recorded with dolby digital, DTS and MPEG
audio format, the corresponding digital signals will be output from the coaxial output
jack. This player’s digital coaxial output jack is designed for connection to a dolby
digital, DTS, or MPEG receiver or decoder.
- Spdif / PCM : Choose this setting if your DVD player is connected to a 2-channel digital
stereo amplifier. When playing a disc recorded with dolby digital and MPEG audio
formats, audio signals will be modulated into a 2-channel PCM signal, and it will be
output from the coaxial output jack.
E-21
USB & SD CARD
USB FLASH PEN DRIVE AND SD CARD MP3 PLAYBACK
- The unit is equipped with a USB socket for standard USB flash drives (compatible with
USB version 1.1 & 2.0) and a SD-card socket, which can play MP3 files stored on the
USB flash drive (also known as “pen drives”, and SD-card (of 4 GB maximum capacity).
- To utilize this function, ensure the USB and/ or SD-card is connected, repeatedly press the
DVD/USB/SD key on the remote control or FX/Function on unit key until the desired
source is indicated on the LCD display.
- Press
and
or Tune Down/
or Tune Up/
keys to enter the directory and
highlight your desired folder and file. Press Enter to start playback of the selected file.
/Mem.
/Mem.
- Press
or
to skip forwards or backwards during playback.
- Repeatedly press and hold the Tune Down/
or Tune Up/
keys to select the speed
at which to fast cue or back cue through a song during playback:
2X
TUNE UP/
4X
TUNE UP/
*At anytime during fast/ back cue, press the
return to normal play back speed.
8X
TUNE UP/
20X
Play/Pause key on the remote control to
Note: To avoid damage to your files, do not plug in or unplug your card/ USB during
playback. Press Stop or power off first.
FILE PLAYBACK OPTIONS
You can select the file type. To do this, please select one of the following three icons shown
at the bottom of the screen:
1. “
” : music files
2. “
” : picture files
3. “ ” : video files
Important
Removal of USB drives & SD-cards
Never remove (or unplug) SD-cards or USB-drives from the set during playback of
MP3 songs from these media. Always press Stop first and then press Function key
to switch to another source (eg. “radio” or “CD”) before removing or unplugging
USB/ SD memory, to prevent damage to your song files or memory devices.
E-22
iPod OPERATION
PREPARATION OF iPod DOCK
To connect an iPod with a dock connector to this unit, first insert the dock adaptor that fits
your iPod, and then connect your iPod. Your HiFi includes dock adaptors that work with
several models of iPod with dock connectors. If you want to connect a different model of iPod
at a later time, you can easily remove the dock adaptor from your Hi-Fi using a fingernail,
and insert the adaptor that fits the new iPod. If there is no dock adaptor for your model of
iPod included with your Hi-Fi, an adaptor may have been included with your iPod. Please
check inside the box of the iPod you purchased for a plastic dock adaptor.
Dock adapters: Choose the dock adapter that fits your iPod.
Your iPod fits snugly into the correct adapter.
THE NUMBER
SHOWS WHICH iPod FITS
OR
iPod touch
1st generation
2nd generation
14
iPod nano
5th generation
(video camera)
8GB 16GB
16
9
17
OR
iPod classic
80GB 120GB 160GB
10
18
iPod nano
4th generation (video)
8GB 16GB
9
OR
10
iPod
5th generation
(video)
30GB 60GB 80GB
FOR OTHER iPod MODELS:
If there is no dock adapter for your model of iPod included, you can also
use the dock adapter which was included in the box with your iPod itself.
E-23
iPod OPERATION
OPERATION WITH iPod
- Connect the iPod docking platform with the Hi-Fi main unit.
- Connect the iPod to the iPod docking platform as described.
- Press the “function” key until the iPod docking platform shows a blue light.
- Press the Play
key on the remote control, then the iPod docking platform to begin
playback.
- The iPod display will indicate the information of the current song.
- At anytime during playback, press the Play
key to pause playback. Press Play
key to resume playback of the same song & position.
- Always press Play
key for a few seconds to stop operation of the set.
- At anytime during playback, press and release the Next
or Back
key to skip
forward or backwards by one song, as desired.
- At anytime during playback, press and hold the Next
or Back
key to fastforward (cue) or fast-reverse (review) the specific song, which is currently playing.
- You can operate the iPod using either the remote control or directly with the iPod itself.
- When the iPod has been connected with the unit, it will start charging the battery of the
iPod.
- Never remove (or unplug) the iPod from the set during playback, always hold the
Play
key for a few seconds to turn off the iPod power and then press the “iPod/
AUX” key to switch to “AUX” mode before removing or unplugging the iPod, to prevent
damage to your song files or memory devices.
IMPORTANT
Please note that when connecting a iPod video, the error message “The currently
attached accessory is not supported by this iPod.” Will be displayed as there is no
video input/output.
However, all audio functions will operate normally as outlined above.
E-24
SPECIFICATIONS & SET UP
SPECIFICATIONS
Power Supply
: .......................................... Main unit: External AC-DC power adaptor
100V-240V ~ 50/60Hz
Subwoofer: AC 110/220V ~ 50/60Hz
Speaker
: .......................................... Subwoofer speaker: 5¼”
Speaker 1½” x 2 + 4” x 2
Power Consumption : .......................................... 57W (subwoofer)
SET UP PROCEDURE (FOR SHELF USE)
ATTACHING THE TABLE STAND TO THE UNIT:
1. Place the stand under the main unit or 2. Slide the stand upward (see diagram
speakers
below).
3. Stop when the indicator mark on the stand is aligned with the lock symbol on the rear
cabinet. (To release the stand from the main unit or speakers, slide the stand downwards
(opposite direction) until it becomes releases.
INDICATOR MARK
WHEN THE
INDICATOR MARK
ON THE STAND
IS ALIGNED
WITH THE LOCK
SYMBOL , THE
BASE IS
PROPERLY
INSTALLED.
CLICK
LOCK SYMBOL
REMOVING THE TABLE STAND FROM THE UNIT:
To remove the stands from the main unit or speakers, press and slide the stand downwards
until it becomes released.
RELEASE
PRESS
RELEASE
PRESS
E-25
WALL MOUNT SET UP
WALL MOUNT SET UP
- This unit (main unit, speakers & docking platform) can be mounted on to a wall surface.
- Type of screws used for wall-mounting: 3.5 x 34mm ba (8 pcs)
IMPORTANT PRECAUTIONS
Not all types of walls are suitable or strong enough to support the weight of this unit. Please
refer to a specialist to make sure that your wall is suitable, before wall mounting. Drilling
of holes must also be done by an experienced specialist, to avoid injury and damage to your
walls. Never place objects on top of the speakers when they are wall mounted.
ATTENTION:
IF THIS UNIT IS WALL MOUNTED, PLEASE USE ONLY THE SCREWS & WALLSTUDS PROVIDED.
E-26