1
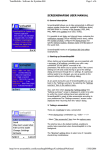
PenPower Super ScanEYE
User Manual
Version 2.0
Created January 2005
Contents
Chapter 1 Product Features ............................................................................1-1
Chapter 2 Installation ......................................................................................2-1
2.1 Accessories ...........................................................................................................2-1
2.2 Product Contents ..................................................................................................2-1
2.3 System Requirements ...........................................................................................2-1
2.4 Hardware Installation ...........................................................................................2-2
2.5 Super ScanEYE Installation .................................................................................2-3
Step 1: Set up USB Cable on your PC ..................................................................2-3
Step 2: Install the Desktop Application.................................................................2-4
Step 1: Establish Pen-PC Communications..........................................................2-6
Chapter 3 Main Function ................................................................................3-1
3.1 Hardware Button ..................................................................................................3-1
3.2 Main Function Flow Chart ...................................................................................3-2
3.3 Addition Function Flow Chart ..............................................................................3-3
3.4 Main Function Layout ..........................................................................................3-4
Chapter 4 Dictionary Program .......................................................................4-1
4.1 Scanning Techniques ............................................................................................4-1
4.2 Single Word Translation .......................................................................................4-3
4.3 Phrase Translation ...............................................................................................4-5
4.4 Sentence Translation ............................................................................................4-7
4.5 Dictionary Program Function ...............................................................................4-9
Chapter 5 Scan and Store ................................................................................5-1
5.1 Edit Current File ...................................................................................................5-1
5.2 Creating New File ................................................................................................5-1
5.3 Open File ..............................................................................................................5-2
5.4 Delete File ............................................................................................................5-2
5.5 Set Scanning Direction .........................................................................................5-2
5.6 Set New File Language .........................................................................................5-2
5.7 Beam Current File ................................................................................................5-3
Chapter 6 Data Transfer ..................................................................................6-1
6.1 Super ScanEye Program ......................................................................................6-1
6.2 Connecting Super ScanEYE to the PC ..................................................................6-2
Connection Wizard .........................................................................................6-2
Manual Connection ...........................................................................................6-4
6.3 Data Transfer ........................................................................................................6-6
Data Transfer Setting............................................................................................6-6
Transfer Data........................................................................................................6-7
6.4 Editing data Within Super ScanEYE Manager .....................................................6-8
Chapter 7 Scan to PC .......................................................................................7-1
Chapter 8 Additional Functions .....................................................................8-1
8.1 Install Add-on Programes..................................................................................8-1
8.2 Address Book Component ...................................................................................8-3
New Address .......................................................................................................8-3
View Addresses ...................................................................................................8-4
Settings ................................................................................................................8-5
Beaming .............................................................................................................8-5
Edit Address Book in Super ScanEYE Manager ..................................................8-6
8.3 Internet Link Component .....................................................................................8-7
New Link ............................................................................................................8-7
View Link ...........................................................................................................8-7
Settings ...............................................................................................................8-7
Edit Internet Link in Super ScanEYE Manager ..................................................8-8
8.4 Table Component..................................................................................................8-9
Edit Current File...................................................................................................8-9
Settings ..............................................................................................................8-10
New File ............................................................................................................8-10
Open File...........................................................................................................8-10
Delete File ........................................................................................................8-10
Edit Table in Super ScanEYE Manager ............................................................8-11
8.5 Add/Delete Software..........................................................................................8-12
8.6 Install External Dictionary.................................................................................8-13
8.7
Transtar..........................................................................................8-14
Chapter 1 Product Features
Chapter 1 Product Features
Scanning/Recognition/Translation 3-In-1
Combining the functions of scanning, recognition, translation, it provides immediate
translation once scanning has completed. The Super ScanEYE can also be used to scan
words directly into application programs.
Scanning Input Method
The Super ScanEYE’s memory enables quick scanning and input of words, even articles.
Super ScanEYE is Light in Weight and User-Friendly
It provides great assistance when users are gathering or translating data.
Human Voice Reading for English Document
Human voice reading is available for all English sentences or single words that are
scanned.
Combination of Address Book, Internet Link and Tables
Super ScanEYE can scan name card, communication document, for example, email,
documents or Internet Link and save these data in the appropriate file type.
Sophisticated Recognition System
Using the most advanced words recognition techniques availability globally, it
can
recognize both horizontally aligned or vertically aligned words. Right-handed or
left-handed users setting are available too.
Computer Connection and Data Organization
By connecting the Super ScanEYE to the computer, direct transfer of data into the
computer and backup of data is easy.
Extra Software
The installation CD includes an extra translation software, Transtar, which can help to
shorten the translation time.
1-1
1-2
Supper ScaneEYE
Chapter 2 System Installation
Chapter 2 System Installation
2.1 Accessories
Super ScanEYE
Registration Card
Registration Card
User Manual
2 AAA batteries
Installation CD
Earpiece
USB Conversion Cable
2.2 Product Properties
CPU: ARM7TDMI
RAM: 128MB
ROM: 2MB
Flash: 6MB
Computer Cable Connection: USB conversion cable.
Scanner Head: 128 line and image sensor.
Scanning Analysis: 400 DPI.
Display Screen: 61mm × 20mm.
Power: 2 × 1.5 V AAA batteries.
Weight: 90g (without batteries).
Size: 163mm × 38mm × 23mm.
2.3 System Requirement
Traditional Chinese Windows 95 /98 /NT /ME /2000 /XP
16MB RAM.
8MB free hard drive space.
CD ROM (program installation).
Computer must have USB port.
2-1
2-2
Supper ScaneEYE
2.4 Hardware Installation
in built speaker
display screen
button
power on/off
scanner head
protection casing
Take off Super ScanEYE battery cover and put in 2 AAA batteries.
battery cover
battery compartment
RAM
earphone connection
PC connection
Infrared communication port
Chapter 2 System Installation
2.5 Super ScanEYE Installation
Step 1: Set up USB Cable on your PC
1. Insert the installation CD-ROM, the system will automatically load the installation
screen. Select “Super ScanEYE” (Diagram 1). Next select “Install and Set Up Super
ScanEYE” (Diagram 2).
Diagram 1
Diagram 2
2. Entering the next screen that shows installation steps selection, select “1. Set up the
USB Cable on your PC”. Please make sure that the USB cable is not connected to the
computer, then click on “Install Driver” to install the USB connection driver.
Diagram 3
3. Click “Next” to begin installation.
Diagram 4
2-3
2-4
Supper ScaneEYE
4. Click “Finish” to end the installation
and restart the computer. You can also
choose to restart your computer after
the subsequent installation is
completed.
5. After the software installation is
completed, Please click the [>>]
button in Diagram 4 and Diagram 5
will appear. Please refer to Diagram
5 and connect the USB cable to the
computer as shown. Next click the
[ >>] button and return to Diagram 3
that shows installation steps selection,
where you can continue the step 2
installation of Super ScanEYE
controller.
Diagram 5
Step 2: Install the Desktop Application
1. In Diagram 3, select “2. Install the
Desktop Application” to open Diagram
6. Please click on “Install Desktop
Application” to begin installation.
Diagram 6
Chapter 2 System Installation
2. Click “Next” to begin installation.
3. Select the folder destination and click
“Next” to continue.
4. Please enter the user name and the
company name, then click “Next”.
5. Please check the duplicate file setting,
then click “Next” to continue.
2-5
2-6
Supper ScaneEYE
6. The system will enquire whether you
want to load the Super ScanEYE
controller automatically when starting
the computer. Click “Yes” will enable
the Super ScanEYE controller to be
activated automatically when you
switch on the computer.
7. Click “Finish” to end the Super
ScanEYE Controller installation. The
“Super ScanEYE Desktop Application
” program will be shown when you
click on “Start” / “Program”. The Super
ScanEYE Desktop Application icon
will also appear at the bottom right
corner of the computer screen.
8. Click on [>>] button in Diagram 6 and return to Diagram 3, where you can continue to
establish the connection between Super ScanEYE and the computer.
Step 3: Establsih Pen-PC Communications
1. In Diagram 3, select “3. Establish PenPC Communications” to open the
diagram shown on the right. Please
refer to the diagram and connect the
USB cable to the Super ScanEYE.
Click on [>>] button.
2. Please follow the diagram and press the
power button on the Super ScanEYE
screen will show “Main Menu”. Else
please press the
button until “Main
Meu” is shown, then click on [>>]
button.
Chapter 2 System Installation
1. Use the Super ScanEYE direction
button and move down to Option, then
click on [>>] button shown in the right
diagram.
2. Press
button on the Super ScanEYE to enter “Option” screen, then
click on [>>] button.
3. Please use the Super ScanEYE
direction button to move down to
“Advanced Options”, then click on
[>>] button.
4. Please click on Super ScanEYE
button to enter “Advanced Options”
screen, then click on [>>] button in the
diagram.
2-7
2-8
Supper ScaneEYE
7. Please press
button to enter “In
Upgrade Mode” screen, then click on
[>>] button.
8. Please click on “Establish Pen-PC
Communications” button and the
system will establish connection with
Super ScanEYE.
9. After the connection is completed, it will appear a picture. Click on “Confirm”. Next
click on “Quit” to end the installation.
Note 1: The display screen on the Super ScanEYE will show English words. If the
interface language is in Traditional Chinese, please refer to this manual guide to
operate the Super ScanEYE.
Note 2: The above mentioned the three basic steps for Super ScanEYE installation
and setting. If you have not done step 3: “Establish Pen-PC Communications”
, you can refer to Section 6.2 and use the “Communications Wizard” to establish
connection. Please refer to Chapter 8 for the additional software installation,
such as Transtar.
Chapter 3 Main Function
Chapter 3 Main Function
3.1 Hardware Button
: power on/off
: confirm, select or proceed to next screen
: cancel, back to previous screen
: up
: down
: right
: left
Use the buttons to explore and select the functions
Select the function
Use the direction button and move to the required function. Press
choice. Press
if you want to go back to the previous menu.
to confirm your
Error Message
When error message appears due to improper usage, such as scanning too fast, press
to select the error message.
3-1
3-2
Supper ScaneEYE
3.2 Main Function Flow Chart
Scan and Translate
Hear English Speech
Set Volume
Set Speaking Speed
View Translated Words
Select Dictionary
Scan Now
Chinese to English
English to Chinese
Chinese T.
Chinese S.
English
Scan to PC
Main Menu
Horizontal
Vertical
Scan and Store
Edit Current File
Create New File
Open File
Set Scanning Direction
Horizontal
Vertical
Chinese Traditional
Chinese Simplified
English
Set New File Language
Beam Current File
Send Stored Files to PC
Set Interface Language
Set Right/Left-Handed
Options
Set Black/White Text
Chinese Traditional
English
Left-Handed
Right-Handed
Black Text
White Text
Set Auto Shut-Off Time (1~4 Minutes)
Set Contrast (0~15)
Advanced Options
Information
View Battery Status
View Memory Status
View Serial Number
Versions & Copyrights
Enter Upgrade Mode
Set Serial /IR Comm.
(Serial Port /Infra-Red
Set Baud Rate
(9600/19200/28400/57600/11520)
Compact Memory
Chapter 3 Main Function
3.3 Addition Function Flow Chart
open word/symbol list
New
Address
Resume Editing
Activate Overwrite Mode
Insert Line
Delete Line
Clear Line
Numeric
Scanning Opitons
Multiple Lines
Additional Software Function Menu
Address Book
View Addresses
Settings
Scroll Screen
Auto Advance
Auto Name
Select Fields
Fields Settings
Send Address
Receive Address
Beaming
Resume Editing
Activate Overwrite Mode
Insert Line
Delete Line
Clear Line
View Link
Scanning Opitons
Settings
Scroll Screen
Auto Advance
Link Abbreviation
Next Link Language
Table
Scroll Screen
Auto Advance
Right-to-Left Table
New File
Open File
Delete File
Set New File Language
Numeric
Multiple Lines
Chinese Traditional
Chinese Simplified
English
open word/symbol list
Edit Current File
Settings
First Name
Last Name
Title
Commpany
Address
Business Phone
Business Fax
Mobile Phone
E-mail
Web Page
Home Phone
Home Fax
Notes
open word/symbol list
New
Link
Internet Link
Title
Commpany
Address
Business Phone
Business Fax
Mobile Phone
E-mail
Web Page
Home Phone
Home Fax
Notes
Resume Editing
Activate Overwrite Mode
Clear Text
Numeric
Scanning Opitons
Multiple Lines
Chinese Traditional
Chinese Simplified
English
3-3
3-4
Supper ScaneEYE
3.3 Main Function Layout
Dictionary Program
Translation from English to Chinese after Super ScanEYE scan in the English document.
(Please refer to Chapter 4: Dictionary Program.)
Scanning Input To Computer
Connect the Super ScanEYE to the computer using the connection cable allows direct
input transfer into the computer application program. (Please refer to Chapter 7: Scanning
to computer.)
Scan and Store
Input and edit data (Please refer to Chapter 5: Scan and Store.)
Data Transfer
To synchronize or transfer the data between Super ScanEYE notebook and the computer.
(Please refer to Chapter 6: Data Transfer.)
Selection
User can select the interface language left-handed or right-handed usage.
1. Interface Language
Set the interface language. The default language is traditional Chinese.
2. Left-hand/Right-hand Usage
Set the left-hand/right-hand usage. The default setting is right-hand usage, scanning
from left to right. If the setting is left-hand usage, please scan from right to left.
3. Reverse White Setting
Select the scanning of usual words or scanning of reverse white words. If the setting
is scanning of reverse white words, Super ScanEYE can scan in light coloured words
with dark coloured background.
Chapter 3 Main Function
4. Automatic Power Off Time
By default, if the device is not in use for 60 seconds, it will power off automatically.
The default power off time can be altered and reset.
5. Contrast Setting
Set the contrast and brightness of the device. The bigger the number, the darker the
display screen.
6. Other Setting
Update setting, connection setting, data transfer speed setting and data compress setting are available. (Please refer to Chapter 6: data transfer.)
Information
Displays SuperScaEYE hardware information.
1. Battery Status
Examine how much power is left for the battery.
2. Memory Status
Examine the memory usage by diagrams indicating the space in use and space unused.
3. Super ScanEYE Serial Number
Examine the Super ScanEYE serial number.
4. Read Me
Examine the Super ScanEYE model number, copyright information and the operating
environment model number.
3-5
3-6
Supper ScaneEYE
Chapter 4 Dictionary Program
Chapter 4 Dictionary Program
Dictionary program translate English to Chinese. Using Super ScanEYE to scan English
document directly and translate it instantly to Chinese.
4.1 Scanning Techniques
Penpower Super ScanEYE can be used to scan many kinds of character. The size must be
between 6 and 22 biggest font 8mm). It can scan in any words with different background
colours except ‘red words with white background’ or vice versa and also’ blue words with
black background’ and vice versa.
1. Take off the protection cap, then press
to power on.
2. Select “Scan and Translate” from the menu. Press
when the screen shows “Scan
Now” message, and the scanner is ready for scanning. As the red light at the scanner
head is blinking, this indicates that scanning can begin. Press
for options.
Press the left-right direction button to select Traditional Chinese to English dictionary
or English to Traditional Chinese dictionary. Under the English to Traditional Chinese
dictionary mode, the English words can be scanned and translated into Chinese
readily. Under the Traditional Chinese to English dictionary mode, the Traditional
Chinese words can be scanned and translated into English readily.
Attention: The red light should be blinking during scanning. Otherwise, please power
off the scanner and power on again.
3. Left-hand/Right-hand Setting: If you are using your left hand to operate the scanner,
please set to left-hand usage in the setting. Please refer to Chapter 3, Section 3.3.
4. Scanning Direction Setting: Default setting is auto-detection. Users can follow the
words direction and do a vertical or horizontal scanning, so as to increase the scanning
recognition speed. Please to Chapter 5 Section 5.5.
4-1
4-2
Supper ScaneEYE
5. Word Scanning
* Place scanner head at the starting word position at about half an inch from it.
* Hold the Super ScanEYE and tilt the scanner head at an angle between 75-90 degree,
allowing the scanner head to touch the article lightly.
* For horizontally aligned words, scan from left to right. If left-hand option has been
set, scan from right to left.
* For vertically aligned words, scan from top to bottom, keeping the scanner head
consistently at the center of the vertically aligned words.
* When the scanner head has scanned in the final word, remove the scanner from the
article and the scan in words and its translation will be shown on the screen.
75o~90o
6. Rescan the wrong words
Rescan the wrong words: If there are errors in the words being scanned, please follow
step 5 above to rescan the incorrect words.
Chapter 4 Dictionary Program
4.2 Single Word Translation
Translation From Single Traditional Chinese Word To English
If the Chinese word is scanned one at a time, the English translation will be shown after
the Chinese word.
For example, when the Chinese word
“掃” is scanned, the translation screen
display will be as shown below.
1. Different translations will be separated by the punctuation “;”. Use the up-down
direction button to scroll for more translation contents.
2. If the display remains at the translation screen, you need not go back to the previous
dictionary program screen. You can continue to scan in new word and it will replace
the old word that you scan in before.
Translation From Single English Word To Chinese
If you scan in a single word at a time, the screen displays two rows after scanning. The
top row shows the single English word and bottom row shows the Chinese translation.
For example, when the single word ‘“row” is scanned, the translation screen display will
be as shown below.
1. The single English word that is scanned in will have its word and translation shown on
the display screen.
2. Press up-down button to scroll the screen to check for more translation.
3. Press
and the English word will be read out aloud.
4. If the display remains at the translation screen, you need not go back to the previous
dictionary program screen. You can continue to scan in new word and it will replace
the old word that you scan in before.
5. Word with multiple meanings: When the single word being scanned has two or more
translation, Super ScanEYE will list out all the translation and give each translation a
number.
4-3
4-4
Supper ScaneEYE
6. Word Listing Symbol: When a single word has multiple meanings,
will be shown
at the top right-hand corner of the screen. Press
and the word listing will be
shown. Select one of them from the list and check its translation.
(A). Words with multiple meanings.
Example: “row” has three different meanings. After scanning, press
screen will show the screen as follow.
Select “row2”, press
and it shows the second translation of “row”.
Select “row3”, press
and it shows the third translation of “row”.
, the
(B). Single word with multiple related words
Example: “walking” (adjective) is related to “walk” (verb). When “walking”
is scanned in the translation screen will have a symbol
, indicating there
are other related words and other translations available. Press
word listing menu. Select the word then press
and enter the
to read the translation.
Chapter 4 Dictionary Program
4.3 Phrase Translation
Translation From Chinese Phrase To English
After scanning in the Chinese phrase, this phrase will be shown on top of the screen. The
first word of the phrase will be shown in reverse-white format. The bottom of the screen
will show the translation for this phrase. Press the up-down direction button to scroll for
more explanation related to this phrase. After the explanation of the phrase, the screen
will show the English translation for the individual reverse-white Chinese word.
Press
to return to the screen where the phrase is shown. Press the left-right direction
button to view the translation for the individual word.
Example:
Scan Chinese phrase “資料”.
The top of the screen will show “資” in the reverse-white format and the bottom of the
screen will show “資料 information”. Press the up-down direction button to scroll for
more explanation.
After the explanation of the phrase, the screen will show the English translation for the
reverse-white Chinese word “資”.
Press
to return to the screen where the phrase “資料” is shown. Press the left-right
direction button to convert “料” into reverse-white format to view the English translation
for the word “料”.
4-5
4-6
Supper ScaneEYE
Translation From English Phrase To Chinese
After scanning in the phrase, this phrase will be shown on top of the screen. The
first word of the phrase will be shown in reverse-white format. Press
and see the
translation for this phrase.
In the translation screen, the top right-hand corner has the symbol
obtain the related words and read its related translation.
, press
to
Example:
Scan in the phrase “take out”.
The top portion of the screen shows “take” in reverse-white format and below shows
again take out in the normal format.
Press
to view the translation screen for the phrase “take out”. If you want to check
the translation of the single word “take”, press
. Then you can view the word list
menu. Next select the single word “take” and press
and you can view the translation
of “take”.
Chapter 4 Dictionary Program
4.4 Sentence Translation
Translation From Chinese Sentence To English
After scanning in the Chinese sentence, this sentence will be shown on top of the screen.
The first word of the sentence will be shown in reverse-white format. The bottom of the
screen will show the translation for this word.
1. Use the left-right direction button to scroll and view the sentence scanned.
2. If the word in reverse-white format does not form a phrase with the next word, the
English translation for the word will be shown below; if the word in reverse-white
format form a phrase with the next word, the English translation for the phrase will
be shown below. Please refer to section 4.3 on how to view the word translation and
phrase translation.
Example: Scan in the Chinese sentence “掃譯筆是很實用的掃描翻譯工具”. In this
sentence, “實用” is a phrase. When “實” is in the reverse-white format, the bottom of
the screen will show “實用” and the English translation “實用 practical”.
3. Press the up-down direction button to scroll and view the translation contents.
4. Press
to return to the screen where the sentence is shown. Next press the left-right
direction button to scroll for translation of other words.
5. If the screen is still at the translation display mode, you need not return to the previous
dictionary display mode. You can continue to do scanning. The current words will be
replaced by the newly scan-in words.
4-7
4-8
Supper ScaneEYE
Translation From English Sentence To Chinese
If you scan in one whole sentence at a time, the top of the screen will show the
sentence you have scanned in. The bottom of the screen will show the translation of the
reverse-white words of the sentence on top.
1. The whole sentence scanned in may not appear in full as screen space is limited. You
can scroll left or right to view the sentence.
2. The English single word selected currently will be shown in the reverse-white format.
If it is a single word, the Chinese translation will be shown below. If it forms a phrase
with the word next to it, the bottom will show this English phrase. Please refer to
Section 4.3 method to check the Chinese translation of the phrase.
Example: Scan in the sentence “They moved in yesterday”. Since “move in” is a
phrase, when “move” is shown in reverse-white format, the bottom of the screen will
show the phrase “move in”.
3. Press the up-down button to scroll for the translation.
4. Press
and you can check the translation of the single word “move”.
5. If you activate the “automatic reading” (please refer to section 4.5), whenever single
word is shown in the reverse-white format, this word will be read aloud. If you want
the device to read aloud the whole sentence, please scroll to your leftmost screen until
the speaker icon becomes reverse-white format.
6. If the screen is still at the translation display mode, you need not return to the previous
dictionary display mode. You can continue to do scanning. The current words will be
replaced by the newly scan-in words.
Chapter 4 Dictionary Program
4.5 Dictionary Program Function
As mentioned above, after you enter the dictionary program, you can scan in English
words and check their Chinese translation. Press
to alter the dictionary functions
required and press
to return to the scanning state.
1. Automatic Voice Reading
Set the automatic voice reading to listen to its pronunciation. Only English voice
reading is available currently. Press
to check and uncheck the automatic voice
reading.
2. Volume Control
Use up-down button to modify the volume.
3. Voice Reading Speed
Use left-right button to modify the voice reading speed.
4. Scanning History Record
Show the most recently English words being checked. Scroll up and down for these
English words. Press
to check their Chinese translation.
5. Select Dictionary
You can select the translation dictionary you need from those that you have installed.
Attention: History record can store 80 single words at most. When the storage is full,
the earliest scanned English word will be deleted as newer words will be stored.
4-9
4-10
Supper ScaneEYE
Chapter 5 Notebook
Chapter 5 Scan and Store
Select “Main Menu” / “Scan and Store”, press
to enter Scan and Store menu. You
can open new or old files, edit files or delete files. The direction of scanning and the
language of the new file can be set. When the setting is done, you can use the Super
ScanEYE to input data directly and also transfer data to the computer using infrared light.
5.1 Edit Current File
1. Using up-down button, select “Edit Current File”, press
current file.
to open and edit the
2. Using the direction button to move the cursor to the position where you want to insert
new words. Scan in new words and these will appear before the reverse-white word.
3. The most recent words that are scanned in will be shown in reverse-white format. By
pressing the direction button, these words will be shown in normal format.
4. Press the direction button to select the word to be deleted and these words will be
shown in reverse-white format. Next press
to delete the word.
5. When the cursor is positioned at the last line of the document, a new paragraph will
begin by pressing the down button. Every paragraph of the document is separated by a
horizontal line.
5.2 Create New File
Using the direction button, select “Create New File” and press
the Scan and Store, and scanning can begin.
to open a new file in
When scanning has completed, press
to return to the “Scan and Store” and this
document will be saved in the Super ScanEYE. The file name will be given by Super
ScanEYE in order such as “file001”, “file002”.
5-1
5-2
Supper ScaneEYE
5.3 Open File
Open an existing file in Notebook
Using the up-down button, select “Open File” then press
. Next use the up-down
button to select the file to be opened and press
. Once this file is opened, it will be set
as the current file and you can select “Edit Current File” to modify the file.
5.4 Delete File
Delete an Old File in Notebook
Using up-down button, select “Delete File” then press
. Next press up-down button to
select the file to be deleted and press
to delete the file.
5.5 Set Scanning Direction
If you are sure of whether you are scanning horizontally or vertically, you can set the
scanning direction. This will enhance the speed of scanning and recognition.
Using up-down button, select “Set Scanning Direction” then press
. Next use the
up-down button to select the scanning direction and press
to begin scanning.
5.6 Set New File Language
By setting the Super ScanEYE “language recognition core”, it can recognize English,
traditional Chinese and simplified Chinese. The default setting is traditional Chinese.
Before opening a new file, please set the language according to the article you intend to
scan in. Different setting will have different recognition outcome.
Using up-down button, select “Set New File Language”, press
.
Chapter 5 Notebook
After the language setting is done, you can open a new file and scan in the words.
If you set the language to English, you can scan hyphen words.
Example:
Super ScanEYE enables you to translate a sentence in seconds.
Scan in the first line. While the first sentence is still in reverse-white format, continue to
scan in the second line, and this will enable “trans” and “late” to combine and become a
single word “translate”.
5.7 Beam Current File
Using infrared light, we can transfer files between 2 Super ScanEYE.
Position 2 Super ScanEYE such that their infrared ports face each other.
Next use up-down button to select “Beam Current File”. Press
begin.
and file transfer will
5-3
5-4
Supper ScaneEYE
Chapter 6 Data Transfer
Chapter 6 Data Transfer
We can upload the data to the computer to do editing and printing.
6.1 Super ScanEYE Program
Go to “Start”/ “Program” / “Super ScanEYE”/ “Super ScanEYE” to open the Super
ScanEYE program. The bottom right-hand corner will show the Super ScanEYE icon
.
6-1
6-2
Supper ScaneEYE
6.2 Connecting Super ScanEYE to PC
Refer to Section 2.5, “Step 3: Establish Pen-PC Communications”, where the installation
CD-ROM is used.
If you have not done this installation step previously, you can use the Super ScanEYE
connection wizard to automatically set the connection between Super ScanEYE and PC
or you can manually set the connection yourself.
Connection Wizard
1. Connect one end of the USB cable to the computer USB port and the other end to the
Super ScanEYE connection pin.
2. From Super ScanEYE manager menu, select “Read Me”/ “Connection Wizard” to
open the connection wizard window.
3. Please follow the six steps shown in the diagram below in order to complete the
connection between Super ScanEYE and the computer.
1. Turn your Pen ON.
2. In the Main Menu scroll to “Options” and press ENT.
3. Scroll to “Advanced Options” and press ENT.
4. Scroll to “Set Serial/IR Comm” and press ENT.
5. Scroll to “Cable” or “Infra-Red” depending on the type of communications you are
using, and press ENT.
6. Press ESC until you return to the Main Menu.
4. Please select USB interface, then press “Next”.
Chapter 6 Data Transfer
5. From the Super ScanEYE Main Menu, press “Options”/“Advanced Options”/“Enter
Upgrade Mode”. Press
to enter “In upgarde Mode”, then press “Next” to detect
the connection.
6. Press “Next” to Finish the connection.
6-3
6-4
Supper ScaneEYE
Manual Connection
Please use manual connection only when connection wizard is unable to establish
connection between Super ScanEYE and the computer.
1. Connect one end of the USB cable to the computer USB port and the other end to the
Super ScanEYE connection pin.
2. Set the Super ScanEYE Hardware “Advanced Options”. Power on the Super ScanEYE. From the main function menu, press “Options”, “Advanced Options” then set
the “Set Serial /IR Comm.” and “Set Baud Rate”. Please select “Cable” for the “Set
Serial /IR Comm”. Set the Baud Rate at “11520”.
3. From the computer “Control”/ “System” / “Device Manager”, open “Device Manager
”. Under the “Ports (COM & LPT)”, select COM1 or COM2, the communications port
between Super ScanEYE and the computer.
Attention: You need to test and confirm whether COM1 or COM2 is the communication
port. Simply select one of the connection port, if the connection fails and transfer
of data is not possible between Super ScanEYE and the computer, you can select
the other connection port.
Chapter 6 Data Transfer
4. Once the connection port is selected successfully, right-click on this communication
port and select content to open “Communication port Properties” dialogue box. Next
select “Port Settings” tab then set the bits per second to be 115200. Click “OK”.
5. From Super ScanEYE Manager function menu, select “Pen Communications”/
“communications settings” to open “communications settings” dialogue box.
6. Set the serial port exactly like step 2 COM1 or COM2. Next set the Baud Rate to be
115200. Press “OK” to complete the connection.
6-5
6-6
Supper ScaneEYE
6.3 Data Transfer
Data Transfer Setting
From Super ScanEYE Manager function menu, select “Pen Communications” / Send
Setting”. Alternatively click the icon at the bottom
right-hand corner of the
computer screen, select data transfer to open “Send Setting” dialogue box.
You can select the name for the Super ScanEYE that is connected to the computer.
Select one application program, click “modify” to open “modify data transfer setting”
dialogue box. You can modify every application program data transfer mode. Some of the
data transfer mode is disabled, depending on the individual application program.
1. Synchronize Super ScanEYE and computer data.
2. Upload data from Super ScanEYE to PC.
3. Download data from PC to Super ScanEYE.
4. Do not transfer any data.
Chapter 6 Data Transfer
In the Scan and Store, only the function of uploading data from Pen to PC is available.
If “Flush” is checked, once the data is transferred from Pen to the PC, the data in Pen
will be deleted.
If you want to simultaneously transfer data or synchronize data with other application
software, such as Word, Outlook, please check “Pen to PC ”, then press “Host Setting”,
then select the application software that you want to transfer data or synchronize data.
Transfer Data
When you have completed all the above steps of hardware and software setting, power
on Pen, select “Main Menu” / “Send Stored Files to PC” and press
. The system will
execute according to what transfer mode you have previously selected and begin the
data transfer between Pen and PC. When data transfer is completed, a prompting screen
stating “Data transfer completed successfully” will appear. Click “OK”.
6-7
6-8
Supper ScaneEYE
6.4 Edit Data Within Super ScanEYE Manager
Super ScanEYE manager has a Scan and Store editing page. By right-clicking the mouse
on the notebook editing page, you can open the shortcut menu. You can also select the
tools and function from the top to execute the same command.
When other software has been installed, such as communication record, webpage link
and forms, there will be an editing page for each application. Identically you can edit the
files within their editing page.
Edit Scan and Store
Select Scan and Store icon, and enter Scan and Store editing page. Then select one of the
files, right-click to open shortcut menu and you can add or remove the selected files.
When you have chossen the file, the right-side space will show the file content. It is
managed in paragraph with a maximum of 190 words in each program.
Select one paragraph and right-click on your mouse to open shortcut menu, where you
can open, delete or edit the chosen paragraph.
You can also double-click on the paragraph to do editing for that paragraph.
Chapter 7 Scan To The Computer
Chapter 7 Scan to PC
When the computer and Super ScanEYE are connected, Super ScanEYE can be used to
scan words directly into applications, such as Word, Excel, Outlook.
1. Please make sure that Super ScanEYE manager on the computer is activated and the
icon will appear at the bottom right of the screen.
2. Open the application software such as Word, Excel where you want to scan and input
word.
3. Go to Super ScanEYE “main function” / “scan to computer”, enter “Begin Scanning”
interface, as shown in the screen below.
By default, the system will scan in Traditional Chinese words horizontally.
You can click on the left-right direction button to select the scan language, including
Traditional Chinese, Simplified Chinese and English.
In the Traditional Chinese or Simplified Chinese mode, you can click on the up-down
direction button to select horizontal scan or vertical scan.
4. When the scan language and scan direction are selected, please refer to Section 4.1
scanning techniques to scan words into the computer.
7-1
7-2
Supper ScaneEYE
Chapter 8 Additional Functions
Chapter 8 Additional Functions
8.1 Install Add-on Programes
1. Insert the installation CD-ROM, the
system will automatically load the
installation screen. Select “Super ScanEYE”.
2. Please select “Add-on Programs for
Super ScanEYE”.
3. Please select the additional component
that you want to install, such as
“Address Book”. (Here we use “install
address book” as an example to explain
the installation method.)
8-1
8-2
Supper ScaneEYE
4. Please check that Super ScanEYE is connected correctly and is at the “In upgarde
Mode”. Click “OK” to update the Super ScanEYE. When the Super ScanEYE has
been successfully updated, pleas click “OK” to continue.
5. The installation program will ask whether you want to duplicate Super ScanEYE
component in the computer to do backup. Click “Yes” to duplicate Super ScanEYE
component under the Super ScanEYE installation content.
6. New Add/ Remove Pen component history record interface will reflect the names of
all the new add-on component. When the installation is completed, the successful
upgrade screen will appear. Click “OK” to complete the installation.
7. The other additional component installation is similar as the above mentioned.
Chapter 8 Additional Functions
8.2 Address Book Component
Select “Main Menu”/ “Address Book”, press
to enter address book function menu.
You can input new address book or view existing address book. By using the setting
function to set the screen scrolling method, automatic naming and data language, we
can select and set the location, and also transfer address book and name-card data using
infrared light.
New Address
1. Using up and down button to select new address, press
blank document.
and you can add a new
2. Use the up and down button to select the space, such as name, designation,
company, address, telephone, and use the Super ScanEYE to scan in the information.
The information will be saved after the recognition process is completed.
3. Every input scanning will replace the previous information of the category chosen. If
you want to edit a category, press the directional buttons and enter the edit mode, then
scan in the data.
4. Press
to open edit function menu.
ResumeEditing: Return to edit function.
Activate Overwrite Mode: Set the new input words to replace the original words.
Insert Line: Insert a blank new line at the cursor position.
Delete Line: Delete the line at the cursor position.
Clear Line: Clear the line of content at the cursor position.
Scanning Options: Set the words of scanning to be numeric, multiple line or vertical
scan
5. At the edit mode, press
to open the list of letters and symbols, in order to key in or
delete English words, numbers, punctuations or symbols.
8-3
8-4
Supper ScaneEYE
6. Upon completion of editing, select “OK” and press
to return to address book
function menu. The edited information will be saved automatically in the address
book. You can also press
to select whether you want to save the information, then
press
.
Word / Symbol List:
1. English Letter: Move the cursor to select a letter and this letter will be shown in
reverse-white format. Press
to key in the letter at the cursor position. When the
letter is the reverse-white format, you can press the up-down button to select the
different representation of the letter.
2. Punctuation: Use the left-right button to select the punctuation icon and press
Next select the punctuation and press
to key in the punctuation.
3. Number: Use the left-right button to select the number icon and press
the number and press
to key in the number.
.
. Next select
4. Single Symbol / Multiple Symbol: Set single symbol input or multiple symbol input.
If single symbol input is chosen, only one symbol can be key in, before the symbol list
is closed and returned to edit mode. If multiple symbol input is chosen, you can key in
multiple symbol. Press
to close the symbol list and return to edit mode.
5. Delete Symbol: Delete the reverse-white symbol.
6. Space: Insert a blank space at the cursor position.
View Addresses
Using up-down button, select “view address book”, then select the name of the
address book that you want to view. Press
to view the details by scrolling up and down
the category of contents.
Press
to enter the edit mode. Press
again to open word / symbol list and do edition manually by keying in the data, or press
to open edit function menu.
Chapter 8 Additional Functions
Settings
Use the up-down button and select “settings”. Press
menu.
to open the setting function
1. Scroll Screen: Set whether to show the scrolling effect when screen goes to the next
line.
2. Auto Advance: After scanning in the data for a certain category, automatically skip to
the next category.
3. Auto Name: After scanning in the English name, automatically save the surname and
name in two different space.
4. Next Address Language: Set Super ScanEYE recognition language. Default language
is traditional Chinese.
5. Select Fields: Set the categories that allows input and modification. Tick those
categories that you want to be shown.
6. Field Settings: Set the category type and the data it can key in, such as number or
multiple lines.
Beaming
Use the infrared to transfer data between Super ScanEYE.
1. Send Address: Send address from one to another Super ScanEYE or PDA.
2. Receive Address: Receive address book from other Super ScanEYE.
3. Send Business Card: Send the business card data to other Super ScanEYE.
4. Select Business Card: Select the business card that you want to send and press confirm
to send it.
Transfer Method:
Position two Super ScanEYE such that their infrared ports face each other.
For Super ScanEYE that is sending data, select “Send Address”. Press
and names of
address book will appear. Use up-down button to select the address book that you want to
send, then press
again.
8-5
8-6
Supper ScaneEYE
For Super ScanEYE that is receiving data, select “Receive Address” and press
.
Edit Address Book in Super ScanEYE Manager
Select “Address Book” icon and go to edit address book interface. The space on the right
will show the address book content.
Select one of the address data and right-click to open shortcut function menu and you can
edit the data.
Chapter 8 Additional Functions
8.3 Internet Link Component
Select “Main Menu” /“Internet Link”. Press
to enter Internet Link function menu.
You can insert new link, view existing link, set the viewing method and also name the
language of the link.
New Link
1. Using up-down button, select new link. Press
to add a new webpage link.
2. Use Super ScanEYE to directly input data into the cell chosen. The data will be saved
in the cell after recognition. Please input the webpage information at “Internet Link”
and input the description at the “description space”.
3. Every input scanning will replace the previous input. If you want to further edit certain
category, you can use the direction button to enter edit mode of that category and scan
in the data.
4. Under the edit mode, press
to open word/symbol list.
Attention: Refer to Section 8.2 if you want to scan in input under edit mode, make use
of edit function menu or make use or word/symbol list to key in word/symbol.
5. After completion of editing, press up-down button and select “confirm”. Press
to
return to Internet Link function menu and the data will be saved in the Internet Link.
You can also press
to select whether to save the Internet Link, then press
.
View Link
Using up-down button, select “view link”. Press
to enter the list of webpage link.
Select the webpage you want to view and press
to view the details of the webpage.
Press
to enter edit mode, you can edit the webpage link data. Press again to open
word/symbol list. Press
to open edit function menu.
Settings
Use up-down button to select “settings”. Press
to go to setting function.
1. Scroll Screen: Set whether to show the scrolling effect when the screen is changing
lines.
2. Auto Scrolling: After scanning in data for a cell, automatically jump to the next cell.
8-7
8-8
Supper ScaneEYE
3. Internet Link Abbreviation: When you scan in the webpage, if you leave the
description blank, the computer will automatically duplicate the Internet Link
information on the “description” category. Select Internet Link Abbreviation will
duplicate only the company's name in the description cell.
4. Next Link: Set the scanning language. The default language is Chinese Traditional.
Edit Webpage Link in Super ScanEYE Manager
Select “Internet Link” icon, go to webpage link edit. The right-hand side space will show
the content of the Internet Link.
Select one of the link, right-click the mouse to open the function menu to add, delete, edit
or open the Internet Link.
You can also double-click on the Internet Link to do editing.
Chapter 8 Additional Functions
8.4 Tables
Select “Main Menu”/ “Tables”. Press
to enter form function menu. You can add,
open, edit or delete the files and also set the viewing method and set the language for new
files.
Edit Current File
1. Use up-down button to select “Edit Current File”. Press
current form data.
and begin edition of the
2. Use direction button to select the cell that needs to be edited. Use Super ScanEYE to
scan in data into the cell. The data will be saved after the recognition process.
3. Every input scanning will replace the previous data tat is scanned. If you want to edit a
certain category, press
to go to the edit mode of that category, the scan in the data.
In the edit mode, press
to open word/symbol list. Press
to open edit function
menu.
Resume Editing: Return to edit mode
Activate Overwrite Mode: Set new input of words, insert cursor position or
replacement of words.
Clear Line: Delete the contents of the category cell chosen.
Select Language: Set the scanning language core. The default language is
traditional Chinese.
Scannign Options: Set the category input as numbers or multiple lines
Insert line: Insert an empty Row at the cursor position.
Insert Column: Insert a column at the cursor position
Delete Line: Delete entire line at the cursor position.
Delete Column: Delete the whole Column at the cursor position.
4. Press left-right button to select column. Press up-down button to select row.
5. Upon completion of input scanning, press
form.
to return to the function menu of the
8-9
8-10
Supper ScaneEYE
Settings
Use up-down button to select “setting”. Press
to open set function menu.
1. Scroll Screen: Set whether to show the scrolling effect when the screen goes to the
next line.
2. Auto Advance: After scanning input for a category, automatically skip to the next
category.
3. Right-to-Left Table: Set the data in the category cell to align on the right.
New File
Build a new table document
1. Using up-down button, select “New File”. Press
and key in file name.
2. Directly scan in the file name, press
to enter edit mode. Press
again to open
word/symbol list and manually key in the English word and symbol. Press
to open
edit function menu.
3. Upon completion, press the direction button to select “OK”. Press
form editing interface.
to enter the
Open File
Open an existing form document. Use up-down button to select “Open File”. Press
to enter open existing file interface. Use up-down button to select the file name that you
want to open. Press
to open the form.
After usage, select “Edit Current File” and all the modified data will be saved in the form.
Delete File
Delete an existing form document. Use up-down button to select “Delete File”. Press
to enter cancel document interface. Use up-down button to select the file name for
removal. Next press
to delete the form.
Chapter 8 Additional Functions
Edit Tabel in Super ScanEYE Manager
Select “Table” icon and go to form edit. In the middle column, select a file. You can
right-click your mouse to open shortcut function menu to add or delete the chosen file.
The right column will show the form content. Select a cell and key in data.
8-11
8-12
Supper ScaneEYE
8.5 Add/Delete Software
Super ScanEYE has many application program software, such as Address Book, Internet
Links, Talbe. You cab add or delete these software according to your needs.
1. Duplicate those new software that you need on the computer, within Super ScanEYE
Manager installation content page “Super ScanEYE Desktop” / “Pen Components”
data file.
2. Connect Super ScanEYE with the PC. Select “Main Menu” / “Options” / “Advance
Options” / “Enter Upgrade Mode”.
3. Execute within Super ScanEYE
manager “Pen Communications” / “
Add/ Remove Pen Communications”.
4. The computer will auto detect the connected Super ScanEYE, and open “New/Delete
Super ScanEYE software” dialogue box.
On the left “Available”, select new software, then press the arrow to add the software to
Super ScanEYE.
On the right “On Pen”, select the software for deletion then press “delete” to delete the
software from Super ScanEYE. Press “Undelete” to cancel deletion. Press “Details” to
view the software details.
If you add a new software, it will appear in Super ScanEYE main function menu
selection.
Chapter 8 Additional Functions
8.6 Install External Dictionary
1. Insert the installation CD-ROM, the system will automatically load the installation
screen. Select “Super ScanEYE”. Next select “Install and Set Up Super ScanEYE”.
2. Please select “Dictionaries (for Pen)”, then select the dictionary that is needed.
3. The installation process is similar to the other previous software installation. Please to
Section 8.1.
8-13
8-14
Supper ScaneEYE
8.7 Transtar
Note: The Transtar application that comes with the SuperScanEYE package can
only be installed and used under Traditional Chinese or Simplified Chinese
environment but not under English environment. The following shows the
installation and usage under Traditional Chinese environment and acts as a
reference for you.
Installation
1. Insert the installation CD-ROM, the system will automatically load the installation
screen. Select “Transtar”. Next select the version “Install ChineseTraditioanl Transtar
Version” or “Install Chinese Simplified Transtar ”.
2. Please select article translation or other types of translation according to your
requirements, then follow the prompting screens to complete the installation.
Chapter 8 Additional Functions
3. When the installation is completed, “Transtar” will appear in the program files and
you can activate the Transtar application from there.
Usage
Here we only use “Article Translation” as an illustration.
1. Execute “Start” / “Program” / “TranStar” / “Article Translation” to activate “Transtar
Article Translation”, as shown in the screen below.
2. Click “New” to open the edit screen and key in the words that you want to translate.
If the translation is from English to Chinese, please click “E to C”; if the translation is
from Chinese to English, please click “C to E”. The translation will appear in the right
cell and you can select whether you want to save or print the translation.
3. You can also click “Open” to open existing files and do a translation for these files.
8-15
PenPower Super ScanEYE V2.0 User Manual
Edition: Released in January 2005
PenPower Technology LTD.,
TEL: 886-3-572-2691
FAX: 886-3-571-6243
Website: http://www.penpower.net
Thchnical Support: [email protected]
Address: 7F, No.47 Lane 2, Sec. 2, Kuang-Fu Road, Hsin-Chu, Taiwan.