1
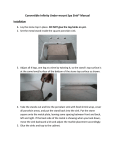
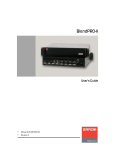
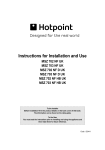
INSTALLATION & OPERATION INSTRUCTIONS PRO-BP-C WWW.PROAPPLIANCES.COM.AU Congratulations on your purchase of a BlendPro Blender Note:Please read through the instructions carefully before using or installing the product and ensure that the manual is kept in a safe place for future reference. The system must be properly installed and located in accordance with the installation instructions before it is used. CUSTOMER CARE: 1300 764 325 Aquaport Corporation Pty Ltd 66-70 Hardys Road Torrensville SA 5031 Telephone: 08 8354 0711 www.proappliances.com.au /proappliances @proappliancesau Electrical Requirements: Australia / New Zealand 240V / 230V 50Hz Due to manufacturing alterations product may vary slightly from that pictured. OPERATION CONDITIONS & SAFETY PRECAUTIONS • All components need to be installed in accordance with the user manual instructions for correct performance of unit. • This appliance is not intended for use by persons (including children) with reduced physical, sensory or mental capabilities, or lack of experience and knowledge, unless they have been given supervision or instruction concerning use of the appliance by a person responsible for their safety. • Children should be supervised to ensure that they do not play with the appliance. • Do not operate any appliance with a damaged cord or plug or after the appliance malfunctions. • If the supply cord is damaged, it must be replaced by the manufacturer, its service agent or similarly qualified person in order to avoid a hazard. • To protect against risk of electrical shock, do not put the main body (motor) in water or any other liquid. • Unplug from outlet when not in use, before assembling or taking off parts and before cleaning. • Avoid contact of moving parts. • Do not use attachments not recommended or sold by the manufacturer as it may lead to fire, electric shock or injury. • Always ensure you switch the blender off at the wall and the motor has stopped completely before disassembling. Warning: Keep hands and foreign objects out of the container while the motor is running. • Do not use outdoors. • Do not use appliance for other than intended purpose. • Do not run the appliance without loading the blender jug. • Do not put any parts into the dishwasher. NOT dishwasher safe. • Always operate the blender with the lid in place. When processing hot beverages, properly secure the lid and measuring cup in place to avoid scalding due to spraying of hot liquids. • Care is needed when handling cutting blades, especially when emptying the bowl and during cleaning. • Do not operate for more than 10 minutes at a time. If the motor has overheated, the temperature monitoring system will trigger and the motor will stop. In the even that this happens please switch off and unplug the appliance from the wall socket and allow to cool down. The motor temperature monitor resets after the appliance has been unplugged from the wall socket for 45 minutes. INSTALLATION AND OPERATING INSTRUCTIONS 3 SAFETY FUNCTIONS Sensor for BlendPro Blender Jug Your BlendPro Blender has 2 safety functions. Your BlendPro is equipped with a safety sensor which detects when the blender jug has been seated onto the motor unit of the BlendPro correctly. Occasionally during the use of the BlendPro you may find that these safety functions have caused the unit to temporarily cease working. This is completely normal and is implemented to protect the user and unit from damage. Overheating Protection The motor of the BlendPro is equipped with a temperature control device. If the motor or the blades turn too slowly due to solid food or lack of fluid there is potential danger in the unit overheating. If your unit should cease working throughout use of the blender please unplug from the wall socket and move into a well-ventilated area. Allow the BlendPro to cool down for approximately 45 minutes and then recommence use. 4 INSTALLATION AND OPERATING INSTRUCTIONS If the blender jug has not been assembled correctly you will not be able to operate the BlendPro. Due to safety reasons please do not attempt to bypass the sensor. A. INSTALLATION INSTRUCTIONS A B Component identification and content check list: Model PRO-BP-C Ref Description Qty C D Main Components A Measuring Cup 1 BLid 1 C Lid seal 1 D Blender Jug 1 E Blade Assembly (pre-assembled)1 1 F Blade Mount (pre-assembled) G Drive Gear (pre-assembled)1 H Fixed Support (pre-assembled)1 I Blender Jug Mat (pre-assembled)1 J Safety Switch K Motor Unit 1 L On/Off Button M Control Panel N Tamper Tool 1 O Power Cord P Non Slip Feet 4 E F G H I N J K L M O P INSTALLATION AND OPERATING INSTRUCTIONS 5 Assembly Instructions: Operating Instructions: 1. Place the BlendPro on a flat level surface. Warning: 2. Assemble the Blender Jug onto the Motor unit and ensure that the Jug is seated correctly (see Fig 1). If the blender jug has been installed correctly you will hear a long beep and the control panel will light up. • Do not operate the product with wet hands as it may cause an electric shock. Note: In order to use your BlendPro it is necessary to place the blender jug on the motor unit properly. If the blender jug is not seated correctly, the BlendPro will not start. 3. Place the lid onto the BlendPro followed by the measuring cup. Ensure that the measuring cup is locked into the lid by aligning the arrow with the closed lock symbols on the lid as per Fig 2. Fig 1 Fig 2 • Do not operate the unit prior to imputing food materials. • Do not operate for more than 10 minutes at one time. Important: To protect the motor and provide you with a long lasting machine the BlendPro has an auto shut down feature. If the components are not installed correctly the system will not operate. If the motor overheats due to extended use of the product the machine will automatically shut down. This is normal and prevents damage to your BlendPro unit. If this occurs switch the machine off and unplug from the wall socket. Check components are correctly installed. The machine will operable again once the unit has been unplugged from the wall for 45 minutes. Refer to safety features on page 4 6 INSTALLATION AND OPERATING INSTRUCTIONS 1. Plug in the BlendPro and turn on at wall socket. 2. The BlendPro has touch panel with several different function keys (Fig 3) a. On/Off Press the on/off button located on the top of the motor unit to switch your BlendPro from energy saving mode to standby mode. If the unit is in energy saving mode it will flash red, the button will light up white if the unit is in standby mode. When your BlendPro is in standby mode, you can switch the BlendPro into energy saving mode by pressing this button again (fig 4) d. Speed setting for Manual Mode In manual mode, the speed can be set from Level 1 to H. The selected speed setting is illustrated by the 10 speed bars (refer to Fig 5) The desired speed is set by tapping the respective level. If you tap level 5, five bars should flash. Fig 3 b. Start/Stop Button The start/stop button will start any pre-set that you have selected by pressing the designated pre-set button. If you have set a speed in manual mode, it will start this speed. To terminate the process press the button again and it will come to a stop. To completely terminate the pre-set press the on/off button once. c. Pulse Button To start the pulse mode, tap the pulse button once and you will see the button flash white. Re-tap and hold down the pulse button to start the pulse mode. In pulse mode the BlendPro will work at the highest speed until you release the pulse button. Fig 4 Fig 5 INSTALLATION AND OPERATING INSTRUCTIONS 7 6 PRE-SET MODES Your BlendPro comes with 6 Pre-set modes. Press the button on the corresponding pre-set and it will be activated. This is confirmed by a short beep and the corresponding pre-set button flashing. Symbol Programme Soup Description Blends soup over an 8 minute period heating soup to nearly 100°c Level 7 for 5 seconds then Level H remains to end of programme Display Remaining Time Use this Pre-set to create delicious homemade sauces. Sauce Level 8 for 2 seconds with a 1 second stop. Remaining Time In total 5 repetitions, Then Level H for 45 seconds Green Smoothie Ideal for making the perfect green smoothie. Total Run time 1 minute Remaining Time Use the soy milk programme to make your own homemade soy milk. Soy Milk Nuts Smoothie Accelerates to Level 5 25 seconds, then level 8 for 30 seconds, Level H until end of run. Use this pre-set to grind coffee beans, nuts and grains Level H for 40 seconds This pre-set is best used for fruit smoothies that do not contain leafy greens. Level H for 8 seconds, stop for 2 seconds. 3 Repetitions. Total run time: 30 seconds 8 INSTALLATION AND OPERATING INSTRUCTIONS Remaining Time Remaining Time Remaining Time Manual Mode In addition to the above 6 pre-set modes you can also run your BlendPro in manual mode. 1. Select the desired speed and tap the start/stop button 2. To end manual mode press the start/stop button again. Operating Tips: The BlendPro is a great addition to any home, allowing the simple preparation of many dishes. The more familiar you are with your BlendPro the easier preparing dishes will be. Below are some tips that will help you get started. • For best results pour liquids and soft ingredients into the blender jug first followed by the harder ingredients such as ice cubes, leafy greens. It may help to add ingredients in 2 or 3 steps. • The Vegetable / Green Smoothie mode should be used for smoothies containing harder ingredients or leafy greens. This will ensure a nice smooth texture. You may wish to add ice for a cool smoothie. • The Smoothie mode should be used for softer ingredients such as fruits. • When preparing nut butter you will need to use the tamper to direct the nuts towards the blades. This process can result in a higher operating termperature so ensure you allow for a few small breaks to allow the device to cool down. • Some nuts such as Almonds will not automatically create a butter, you may need to add a small amount of oil to get a finely ground result. • Blender Jug components come pre-assembled. • Do not overload the unit nor add too little ingredients. • To prevent spillage, do not put liquid in blender jug exceeding the MAX line. • Avoid spills and scalding or splashes of hot food by always ensuring the lid is on during operation. • While preparing thick and sticky ingredients such as dough the motor and blades may become idle. This can occur when an air bubble occurs in the ingredients. Stop the pre-set and remove the air bubble using the tamper piece. INSTALLATION AND OPERATING INSTRUCTIONS 9 Operating the Tamper Cleaning & Maintenance The tamper is used to guide ingredients towards the blades or to remove air bubbles from thick and sticky ingredients such as dough without touching the blade in the blender jug. Note: Please be careful when cleaning the Blender Jug as the blades are very sharp. The tamper also has an integrated temperature gauge so you can ensure your ingredients are prepared at the right temperature, see figure 6. Fill the blender jug with 2 cups of water mixed in with a mild detergent and place onto the base of the bender. Close the lid and repeatedly press the pulse button. Important: Only use the tamper through the lid opening of the measuring cup. Use only the tamper provided, DO NOT use other objects to press the ingredients towards the blades. Alternatively the blender jug can be washed under running water with a soft cloth and mild detergent. 1. To measure the temperature in the blender jug press the on/off button. Do not immerse the motor base in water or any other fluids. 2. Take the measuring cup off the lid, leaving the lid on the blender jug. 3. Place the tamper into the blender jug through the opening. The handle of the tamper will display the temperature in degrees. THE BLENDER JUG IS NOT DISHWASHER SAFE Clean the motor base with a soft damp cloth. Use a moist cloth to clean the tamper. Do not submerge the display in water or any other liquid. Fig 6 Temperature On/Off Button 10 INSTALLATION AND OPERATING INSTRUCTIONS TROUBLE SHOOTING BEFORE YOU CALL FOR SERVICE PLEASE REVIEW THE TROUBLE SHOOTING TIPS FIRST. Problem Possible Cause Solution Unit not plugged in. Check the BlendPro is plugged in and press the on/off button. Incorrect Assembly If the blender jug is not seated correctly the unit will not turn on. Reseat the blender jug. If this has been installed correctly the unit will beep. Ingredient stuck in blades If a large piece of ingredient is stuck at the bottom of the machine, switch the unit off and remove the tamper to remove the stuck item. Air Bubbles Air bubbles can often form in thick and sticky ingredients such as dough. Switch the unit off and use the tamper to press the ingredients down to remove any air bubbles. Overuse of product has caused motor to shut down as a safety precaution. Turn off at power point and allow unit to cool down for 45 minutes before using again. Blender Jug has been over filled Make sure the level of ingredients does not exceed the max fill line Seal on lid damaged or not seated properly Ensure the rubber seal on the lid is seated properly. If seal is missing or damage contact customer service on 1300 764 325 No Power to BlendPro Motor has stopped Leaking INSTALLATION AND OPERATING INSTRUCTIONS 11 RECIPES TO TRY Super Green Smoothie Roast Pumpkin Soup • 2 Medium Green Apples • 1kg roasted pumpkin • 1 Large handful of Spinach • 2 cups reduced sodium chicken stock • 1 Large handful of Kale • Salt and pepper • ½ Small Lime • Thinly sliced fresh chives for garnish • 1 Stick Celery • Sour cream (optional) • ½ Medium Cucumber Place the roast pumpkin, chicken stock and salt/pepper into the BlendPro. • 5cm Chunk Broccoli Select the SOUP pre-set. • 1 Handful of Ice Cubes Serve in bowls with a dollop of sour cream and garnish with fresh chives. • 100ml water • ½ Medium Avocado Optional additions: Rinse the Spinach and Kale in water. Chop all ingredients into reasonable sized portions and place into BlendPro. - roast potato Select the Vegetable/ Green Smoothie pre-set and enjoy! - can of chickpeas - leek or onion (fry in pan with butter first) 12 INSTALLATION AND OPERATING INSTRUCTIONS RECIPES TO TRY Homemade Tomato Sauce Soy Milk • 7 medium Tomatos • 100g Soy Beans • 2 Small Shallots • 1L Fresh Water • 8 Fresh Basil Leaves • Sweetener to taste • 2 Tablespoons of olive oil Boil the soy beans for one hour. • Add pinch of sugar (sweetener) Place beans into BlendPro with fresh water and select the “Soy Milk” Pre-set on the BlendPro. • Fresh Parsley Peanut Butter • Salt & Pepper to taste Place all ingredients into the BlendPro and select the sauce pre-set. • 200g unsalted peanuts Summer Fruit Tingle • About 1-2 tbsp of peanut or vegetable oil • 1 Ripe Banana • Honey (optional) • 6 Large Strawberries • Salt (optional) • 1 Large Mango (pitted) Place peanuts and oil into the BlendPro and select the NUTS pre-set. • 1 Apple Check consistency and add oil as required. Mix manually until a fine paste has been made. This may take some time to complete. • Large handful of Ice Cubes Add honey or salt according to your taste. NOTE: You will need to use the tamper to direct the nuts towards the blades. This process can result in a higher operating temperature so ensure you allow for a few small breaks to allow the device to cool down. • 1 Tablespoon of Natural Yoghurt • 50ml Low Fat Milk Cut mango into small cubes cutting around the seed, Discard seed. Place all ingredients into the BlendPro and Select the smoothie Pre-set. Serve & Enjoy INSTALLATION AND OPERATING INSTRUCTIONS 13 Your Aquaport 12 Month Repair or Replacement Warranty Aquaport offers a 12 month repair or replacement warranty on this product with a 5 year repair or replacement warranty on the motor only. Aquaport warrants this appliance to the first purchaser and subject to the stated conditions: Warranty covers any defects in material or workmanship in the manufactured product within the first twelve months from date of purchase. To make a warranty claim you must call Aquaport on toll free number 1300 764 325 for instructions. Conditions of this warranty: 1. This product has been fully installed in accordance with the user manual installation instructions. 2. The warranty extends only to repairing or replacing any component that proves to be defective in material or workmanship. 3. The warranty does not cover defects occasioned by misuse, alterations, and accidents or used for other than the intended purpose. 4. The warranty does not cover damage to the product caused by accident, fire or floods. 5. Proof of purchase is required for warranty claims. Product will be repairs or replaced at our discretion. Repair or replacement costs will be covered under warranty by Aquaport. 6. This unit is for household use only and warranty is not extended to units used for commercial purposes Goods presented for repair may be replaced by refurbished goods of the same type rather then being repaired. Refurbished parts may be used for the repair of goods. Please keep purchase receipt in a safe place Our goods come with guarantees that cannot be excluded under the Australian Consumer Law. You are entitled to a replacement or refund for a major failure and compensation for any other reasonably foreseeable loss or damage. You are also entitled to have the goods repaired or replaced if goods fail to acceptable quality and the failure does not amount to a major failure. Aquaport Corporation 66 – 70 Hardys Road, Torrensville SA 5031 14 INSTALLATION AND OPERATING INSTRUCTIONS Customer Care 1300 764 325 Phone (08) 8354 0711 BLENDPRO DRY MIX BOWL Keep your wet and dry ingredients separate by purchasing the optional Dry Mix Bowl. The BlendPro Dry Mix Bowl features precision stainless steel blades, made from Japanese High Carbon Steel, designed specially for dry-use applications for efficient grinding, milling and kneading. It is purpose built to grind coffee beans, nuts and whole grains, to knead dough and much more! The dry blades push foods up and away, keeping the mixture cooler so the grinding of the dry ingredients is more efficient. This also assists when kneading sticky dough. To purchase the optional Dry Mix Bowl contact customer service on 1300 764 325 INSTALLATION AND OPERATING INSTRUCTIONS 15 CUSTOMER HOTLINE: 1300 764 325 Aquaport Corporation Pty Ltd 66-70 Hardys Road, Torrensville SA 5031 Phone: 08 8354 0711 Facsimile: 08 8354 0722 Email: [email protected] www.proappliances.com.au /proappliances @proappliancesau