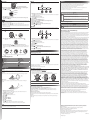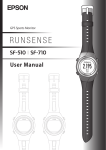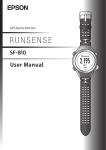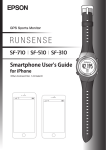
1
GPS Sports Monitor
TM
Creating an account
Caring for your SF-510/SF-710
1. Connect the cradle with a USB cable to the PC on which Epson Run Connect is
installed.
2. Place the product into the cradle.
Your Runsense product is made from materials commonly used in watches and other consumer
products. Since you may wear your product over extended periods, including when you are exercising
and sweating, it is important that you take care of your skin and your product according to these
instructions. Prolonged wearing of your product without proper care could lead to skin irritation or rash.
Check that the contact points on the product are pointing up and match the contact marks on
the cradle.
Contact marks
Quick Start Guide
Please follow the precautions below to ensure full enjoyment and benefit of your Runsense product:
• Keep Runsense and skin clean.
• Keep Runsense and skin dry.
• Give skin a rest and some air.
Proper wear and care of your SF-510/SF-710 is an important part of your enjoyment of this product.
Make sure to see the online User Manual for more detailed information on caring for your product.
Safety Instructions
Epson Run Connect starts.
The following symbols are used in this guide to indicate possible dangerous operations or handling.
Make sure you understand these warnings before using the product.
3. Click Create Account and enter your details.
Warning
This symbol indicates information that, if ignored, could possibly result in
serious personal injury.
Caution
This symbol indicates information that, if ignored, could possibly result in
personal injury or damage the product.
This symbol indicates an action that should be done.
This symbol indicates an action that must not be done.
Notes on Using the Product and Components
Warning
What’s in the box
Watch
Cradle
An optional AC adapter and heart rate monitor chest
strap can be purchased separately.
Uploading your data
Connect your RUNSENSE product to the computer. The following box automatically
appears. Enter your Login ID and Password and click Upload.
Exercise according to your physical capabilities.
Stop exercising and consult your doctor if you feel unwell during exercise.
This product is not intended for use to diagnose, prevent, or treat disease or other conditions, and
is not a medical device. If you have any concerns, consult your doctor before using this product.
Do not use or store this product in the following environments. It may cause an electric shock or
fire, or the product may malfunction or be damaged.
•Locations with very high or low temperatures or humidity
•Near volatile substances
•Dusty places
•Near a strong magnetic field (for example, near a loudspeaker)
Do not disassemble this product, and do not attempt to repair this product by yourself. It may
cause an electric shock or accident.
1. Charging and setup
Do not leave this product within reach of young children.
The cradle cords included with this product contain chemicals, including lead, known to the State
of California to cause birth defects or other reproductive harm. Wash hands after handling. (This
notice is provided in accordance with Proposition 65 in Cal. Health & Safety code § 25249.5 and
following.)
Charge this product before using it for the first time.
1. Connect the cradle to a power source.
»» Using a PC
Connect the cradle’s USB plug to the computer’s USB port.
Do not use a USB hub. Instead, connect the cradle directly to the computer.
Caution
»» Using the optional AC adapter
Connect the cradle’s USB plug to the AC adapter’s USB port.
We recommend using the optional AC adapter (model number: SFAC04). If you do not use a
supported AC adapter, you may not be able to charge the product or it may not operate
correctly.
2. Place the product into the cradle.
Check that the contact points on the product are pointing up and match the contact marks on
the cradle. After placing the product into the bottom of the cradle with the LCD screen facing
out, push carefully on the top of the product until it clicks into place.
Contact marks
Viewing your data
1. Click Start RUNSENSE View on the Run Connect screen. Or visit https://go-wellness.epson.com/runsense-view/.
2. Click the data you want to check from the list.
Persons with high skin sensitivity, eczema, allergies, or asthma may be more likely to experience
skin irritation or an allergic reaction from the Runsense product or similar products. Even persons
without such conditions may start to experience redness or skin irritation on wrists from prolonged
use or if the product is not cleaned regularly as indicated above. If you experience such symptoms:
•Stop wearing and remove your product immediately. Do not put it back on.
•If symptoms persist for more than 2-3 days after removing the product, consult a dermatologist.
•Make sure to follow the wear and care instructions above and in the online User Manual.
NOTE
For information on using RUNSENSE View, see the RUNSENSE View Help.
3. Using the Epson Run Connect app
Installing Epson Run Connect
Using your SF-510/SF-710
This product has a Time screen, Measurement screen, Settings
screen (Settings menu and Measure set. menu), and History screen,
and you can perform operations with the following buttons.
Download and install Epson Run Connect from your mobile device's app store.
When the product is placed correctly, the alarm sounds, the charging screen is displayed, and
charging starts.
3. When charging is complete, remove the product from the cradle.
Hold the cradle and press the product down into the lower part of the cradle to release the
product.
NOTE
The following mobile devices are supported:
• iPhone 4s, iPhone 5, iPhone 5c, iPhone 5s, iPhone 6, and iPhone 6 Plus with iOS 6 or later.
• Mobile products running AndroidTM 4.3 or later with Bluetooth® Smart.
Button
Operation
Time screen
Measurement screen
Settings screen
Pairing your product
1. Start the Epson Run Connect app.
4. Follow the on-screen instructions to set the language, units, and user information.
Set your height,
weight, DOB,
gender, today's
date, and the date
format.
Scroll up
Select the
highlighted
option
2. Tap Pairing.
3. Tap Start Pairing.
4. Press and hold on the watch.
Scroll down
5. When you are in a location with no obstructions overhead, select Yes.
5. Tap OK on your mobile device.
–
Changes between screen.
Confirms a selection.
Long press*1
Turns the power on or off.
Displays the time screen.
(Not available while
measuring.)
From the Settings menu,
the time screen is displayed.
From the Measure set.
menu, the measurement
screen is displayed.
Short press
Turns the light on or off. The light turns on for approximately 10 seconds.
Long press*1
Displays the Measure set.
Displays the Settings menu. menu.
> Settings screen
(Not available while
measuring.)
–
Short press
Performs GPS positioning,
and displays the
Measurement screen.
Starts, stops, or resumes
measuring.
Selects the upper item.
Increases the value.
Long press*1
Changes to indoor mode*2
(GPS off ).
Displays the Time screen.
(Not available while
measuring.)
Selects the upper item.
Scrolls through the values.
Short press
Displays your workout
history.
Records laps while
measuring.
Selects the lower item.
Decreases the value.
Long press*1
Sync to Bluetooth product.
Use this when uploading
measurement data.
Resets*3 while measuring is
stopped.
Selects the lower item.
Scrolls through the values.
Short press
A signal is received from the GPS and time is automatically synchronised.
When Complete is
displayed, press
.
NOTE
When you do not use the product for a while, it enters sleep mode and the time display turns off. This is
not a malfunction as the display is restored the next time you move the product. If time synchronisation
fails, the time screen will automatically be updated the next time a GPS signal has been received. You can
proceed to section 2, “Using RUNSENSE View.”
2. Using RUNSENSE View (Windows® PC)
Installing Epson Run Connect Software
This product allows you to manage measured data using the RUNSENSE View web app. To upload
measurement data, you need to install Epson Run Connect on your Windows PC and connect to the
Internet.
Your product displays a passcode.
6. Enter the 6-digit passcode on your mobile device and tap OK or Pair.
7. Tap OK to finish pairing.
NOTE
For more information on using the Epson Run Connect app, see the online iOS or Android user manual.
*1 Hold down for at least two seconds until the screen changes.
*2 GPS data is not recorded in indoor mode.
*3 When you reset the display, it returns to the status before measuring started allowing you
to start the next measurement. Data that has been measured up to that point is stored in the
product's memory.
If no operations are performed after three minutes when the System settings, User settings, or
History screens are displayed, you are returned to the Time screen.
NOTE
Install Epson Run Connect before connecting the product to your PC.
1. Visit epson.com/support/sf510 or epson.com/support/sf710 (U.S.) or
epson.ca/support/sf510 or epson.ca/support/sf710 (Canada) and download
Epson Run Connect for PC.
2. Run the downloaded file and follow the instructions displayed on the setup
screen.
Using the chronograph
This function allows you to measure split times and lap times simultaneously.
Start
You can record laps by pressing
AT lap function.
Split Time
Measures the elapsed time from the start.
Lap Time
Records the elapsed time for each lap.
on the product during Chronograph measurement, or by using the
AT Lap
Measuring
Starts, stops, or resumes recording.
When a time or distance set in advance is reached, laps are recorded automatically. Set the lap time or
distance. You can set five preset times or distances.
Records laps while measuring.
Resets when recording has stopped.
Change between screens
Notices
Make sure you read the manuals (Quick Start Guide and user manuals) first to use this product safely.
Also, this product is equipped with Bluetooth Smart technology as a built-in wireless function. See the
section "Notes on Electromagnetic Waves" in the online User Manual for further details.
The product may malfunction, or an accident may occur if it is handled incorrectly.
• Keep the manuals handy to help you resolve any problems.
• When taking this product out of the country of purchase, check the laws and regulations in the
destination country before you travel.
• This product is not a medical device. Use this product to track physical exercise.
1. Press on the measurement screen to start measuring.
2. To record a lap, press .
Lap Number
Caution
Lap Distance
1. Display the measurement screen:
Press
on the time screen. GPS positioning starts, and the measurement screen is displayed
once positioning is complete.
Lap Time
3. Press again to stop recording.
4. Press and hold for a few seconds when you have finished recording to reset
the measurement display.
NOTE
• The Chronograph screen is composed of four screens, and you can change the screen display by pressing
. You can change the content displayed on screens 1 to 4 by going to Measure set. > Screen. For more
details, see the online User Manual.
• After resetting, press and hold or for a few seconds to return to the time screen.
• If no operations are made for 60 minutes on a screen other than the measuring screen, the Time screen is
displayed.
• As well as the Chronograph function, there are a variety of other measurement functions. Please see the
online User Manual for details.
3.
4.
5.
6.
7.
8.
9.
on the measurement screen.
Select AT Lap.
Select one of the No Data from 1 to 5.
Select whether to set Time or Distance as the length of the lap.
Set the Time or Distance.
Press to complete the settings.
Hold down again to return to the measurement screen.
Press to start measuring.
Do not wear this product in a bath or sauna. The steam and soap may compromise the water
resistance or cause corrosion.
Notes on Using the Cradle
Warning
Do not use the cradle or AC adapter if they are in any way damaged, faulty or contaminated
by foreign material such as dust, water or dirt. Do not use any adapter other than the specified
adapter for charging.
AT Pause
This fuction stops measuring automatically when you stop running, and resumes when you continue
running.
Checking the history
1. Press
Do not pour water directly from the tap onto this product. The power of the tap water stream may
be strong enough to compromise the product’s water resistance.
2. Display the Measure set. menu:
Hold down
The product is water resistant at 5 bar (5 ATM). Although you can use the product while swimming
and so on, do not perform button operations under water.
Epson America, Inc. Limited Warranty
on the Time screen. The Recall screen is displayed.
One-Year Limited Warranty
What Is Covered: Epson America, Inc. (“Epson”) warrants to the original retail purchaser of the Epson
product enclosed with this limited warranty statement that the product, if purchased new and
operated in the United States, Canada, or Puerto Rico will be free from defects in workmanship and
materials for a period of one (1) year from the date of original purchase. For warranty service, you
must provide proof of the date of original purchase.
2. Press
or
to select the history you want to display, then press
.
1. Display the measurement screen:
Press
on the time screen. GPS positioning starts, and the measurement screen is displayed
once positioning is complete.
2. Display the Measure set. menu:
Hold down
3. To check the history, press
or
to scroll through the history screen.
Detailed recorded results for the activity type, recorded day/start time, time, distance, and
calories burned are displayed on the detailed recall screen. You can also check the pace for
each lap.
3.
4.
5.
6.
7.
on the measurement screen.
Select AT Pause.
Select ON.
Press to complete the settings.
Hold down again to return to the measurement screen.
Press to start measuring.
Maintenance
Cleaning your product
Press
to return to the recall screen. Hold down
to return to the time screen.
To clean the product, wash the contact points lightly with tap water, a damp cloth, and then allow
the product to air dry.
Understanding the icons
Run mode
Split time
Walking mode
Average pace
Bike mode
Stops flashing: The signal is being received from the GPS
(GPS On)
GPS positioning
Calories burned
Stops flashing: Communicating with the HR monitor
Editable data
Distance
Current settings
Stride
Contact points
Lap
If charging or communicating becomes unstable, clean the contact points on the product and the
cradle with a damp cotton swab.
Do not use any cleaning products on this product.
Setting goals
Resetting your product
Goals
You can reset the system by following the steps below.
This function allows you to measure until a set time or distance is reached.
Time race
Allows you to set a time as your goal and measure the remaining time until that goal is reached.
Distance race
Allows you to set a distance as your goal and measure the remaining distance until that goal is
reached.
Hold down all of the buttons (
/ / /
).
The screen is reset and the product restarts.
Initialize the product after restarting. See section 1, "Charging and setup."
Setting data and measurement data remain as they were before the reset was performed.
NOTE
The time screen will automatically be updated the next time a GPS signal has been received.
What Epson Will Do To Correct Problems: If your product requires service during the limited warranty
period, please call the Epson ConnectionSM at the number on the bottom of this statement and
be prepared to provide the model, serial number, and date of original purchase. An Epson service
technician will provide telephone diagnostic service to determine whether the product requires
service. If service is needed, Epson will, at its option, repair or replace the defective unit, without
charge for parts or labor. When Epson authorizes an exchange for the defective unit, Epson will
ship a replacement product to you, freight prepaid, so long as you use an address in the United
States, Canada, or Puerto Rico. You are responsible for securely packaging the defective unit and
returning it to Epson within five (5) working days of receipt of the replacement. Epson requires a
debit or a credit card number to secure the cost of the replacement product in the event that you
fail to return the defective one. When warranty service involves the exchange of the product or of
a part, the item replaced becomes Epson property. The exchanged product or part may be new
or equivalent to new in reliability and performance, and at Epson’s option, the replacement may
be another model of like kind and quality. Exchange or replacement products or parts assume the
remaining warranty period of the product covered by this limited warranty.
What This Warranty Does Not Cover: This warranty covers only normal use in the United States,
Canada or Puerto Rico. This warranty does not cover normal wear and tear; including nicks
and scratches, and battery life, unless the damage was caused by a manufacturing defect in
materials and workmanship. This warranty does not cover damage caused by parts or services
not manufactured, distributed, or certified by Epson nor any losses attributable to the loss or
restoration of customer data. Epson does not warrant that the operation of the product will be
error-free, that we will correct errors, or your use of the product and software will be uninterrupted.
This warranty does not cover misuse caused by high impact wear or damage caused by exposure
to water as specified in the product user manual. This warranty does not cover skin irritation arising
from wear. See the Runsense User’s Guide and Quick Start Guide for wear and care instructions.
This warranty is not transferable. Software for this product is not covered under this warranty.
See the Epson Runsense Website for software warranties. Epson is not responsible for warranty
service should the Epson label or logo or the rating label or serial number be removed. Epson is
not responsible for warranty service should the product fail to be properly maintained or fail to
function properly as a result of misuse, abuse, improper installation, neglect, improper shipping,
damage caused by disasters such as fire, flood, and lightning, improper electrical current, software
problems, interaction with non-Epson products, or service other than by Epson or an Epson
Authorized Servicer. Postage, insurance, or shipping costs incurred in presenting your Epson
product for warranty service are your responsibility. If a claimed defect cannot be identified or
reproduced in service, you will be held responsible for costs incurred.
DISCLAIMER OF WARRANTIES: THE WARRANTY AND REMEDY PROVIDED ABOVE ARE EXCLUSIVE AND
IN LIEU OF ALL OTHER EXPRESSED OR IMPLIED WARRANTIES INCLUDING, BUT NOT LIMITED TO, THE
IMPLIED WARRANTIES OF MERCHANTABILITY, FITNESS FOR A PARTICULAR PURPOSE AND NONINFRINGEMENT. UNLESS STATED HEREIN, ANY STATEMENTS OR REPRESENTATION MADE BY ANY
OTHER PERSON OR FIRM ARE VOID.
Remedies: Your exclusive remedy and Epson’s entire liability for a material breach of this will be
limited to a refund of the price paid for the Epson product covered by this Agreement. Taxes
and shipping will not be refunded. Any action for breach of warranty must be brought within
3 months of the expiration date of the warranty. Epson is not liable for performance delays or
for nonperformance due to causes beyond its reasonable control. EXCEPT AS PROVIDED IN THIS
WRITTEN WARRANTY, NEITHER EPSON NOR ITS AFFILIATES SHALL BE LIABLE FOR ANY LOSS,
INCONVENIENCE, OR DAMAGE, INCLUDING DIRECT, SPECIAL, INCIDENTAL OR CONSEQUENTIAL
DAMAGES, INCLUDING LOST PROFITS, COST OF SUBSTITUTE EQUIPMENT, DOWNTIME, CLAIMS OF
THIRD PARTIES, INCLUDING CUSTOMERS, OR INJURY TO PROPERTY, RESULTING FROM THE USE OR
INABILITY TO USE THE EPSON PRODUCT, WHETHER RESULTING FROM A BREACH OF WARRANTY OR
ANY OTHER LEGAL THEORY. Some jurisdictions do not allow limits on warranties or remedies for
breach in certain transactions. In such jurisdictions, the limits in this paragraph and the preceding
paragraph may not apply.
In Canada, warranties include both warranties and conditions.
Where to get help
Internet support and user manuals
1. Display the measurement screen:
Press
on the time screen. GPS positioning starts, and the measurement screen is
displayed once positioning is complete.
2. Display the Measure set. menu.
Hold down
3.
4.
5.
6.
7.
8.
on the measurement screen.
Select Mode.
Select Goal.
Select Time or Distance.
Set the Time or Distance.
Select OK.
Press to start measuring.
Visit epson.com/support/sf510 or epson.com/support/sf710 (U.S.) or
epson.ca/support/sf510 or epson.ca/support/sf710 (Canada) for solutions to common
problems. You can get tips, usage information, and FAQs, download utilities, view the user
manuals, or e-mail Epson.
Telephone support services
Call (800) 241-5789, (562) 276-4394 (U.S.), or (905) 709-3839 (Canada).
Support hours are 6 am to 8 pm, Pacific Time, Monday through Friday, and 7 am to 4 pm, Pacific Time,
Saturday.
Days and hours of support are subject to change without notice. Toll or long distance charges
may apply.
Arbitration, Governing Laws: Any disputes arising out of this Agreement will be settled by
arbitration to be conducted before a single arbitrator in Los Angeles, California, in accordance with
the commercial Arbitration Rules of the American Arbitration Association, and judgment upon
the award rendered by the arbitrator may be entered in any court having jurisdiction thereof. This
Agreement shall be construed in accordance with the laws of the State of California, except this
arbitration clause which shall be construed in accordance with the Federal Arbitration Act.
To find the Epson Authorized Reseller nearest you, please visit our website at: epson.com.
For product support, please visit our website at: epson.com/support.
To contact the Epson Connection, please call (800) 241-5789 or (562) 276-4394 in the U.S.
and (905) 709-3839 in Canada or write to Epson America, Inc., P.O. Box 93012, Long Beach, CA
90809-3012.
When the set time or distance is reached, the Finish screen is displayed.
An alarm notifies you when you reach 50% and 90% of the set time or distance.
NOTE
Set the Estimated Time or Estimated Distance in your screen settings to view and keep track of your
progress. For more details, see the online User Manual.
EPSON is a registered trademark, EPSON Exceed Your Vision is a registered logomark, and
Runsense is a trademark of Seiko Epson Corporation. Epson Connection is a service mark of
Epson America, Inc.
iPhone is a trademark of Apple Inc., registered in the U.S. and other countries.
The Bluetooth word mark is owned by Bluetooth SIG, Inc.
Android is a trademark of Google Inc.
General Notice: Other product names used herein are for identification purposes only and may
be trademarks of their respective owners. Epson disclaims any and all rights in those marks.
This information is subject to change without notice.
© 2015 Epson America, Inc., 2/15 CPD-42773
Printed in Japan