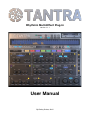
1
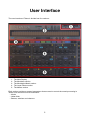
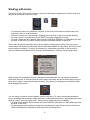
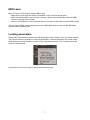
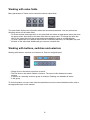
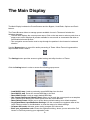
Rhythmic Multi-Effect Plug-In
version 1.1.1
User Manual
By Dmitry Sches, 2015
Welcome to Tantra!
Thank you for choosing Tantra! The main idea behind Tantra is as simple as effective: whenever
you would like to add some rhythmic pattern to any kind of sound, no matter if they flat or dry, a
lifeless basic synth sound or deep evolving pad, if you would like to just reshape your already
created complex arpeggiated sequence and make it sparkle in few clicks, let Tantra do the job!
With 8 powerful multi-stage sequencers you can create rhythmic modulations for various modules
like filter, distortion, delay, lo-fi, glitch, etc. Each module provides many parameters to ensure you
have everything to make your sounds moving and shining. Two layers of available effects allows
you to make independent sub-patterns in your rhythms. Master reverb and equalizer/exciter at the
output form your final sound mix. And finally many presets will guide you through the various
possibilities of shaping your sounds.
We believe you will have lots of fun with Tantra!
2
Table of contents
Installation .............................................................................................4
System requirements ..............................................................................................4
Installation...............................................................................................................4
Demo limitations .....................................................................................................4
Purchasing the Full Version ....................................................................................4
User Interface ........................................................................................5
Working with knobs .................................................................................................6
MIDI Learn ..............................................................................................................7
Locking parameters ................................................................................................7
Working with value fields .......................................................................................8
Working with buttons, switches and selectors .......................................................8
The Main Display ...................................................................................9
Compact GUI mode ..............................................................................................10
The Modulator section ........................................................................11
Drag and Drop ......................................................................................................11
Common settings ..................................................................................................12
Curve mode ..........................................................................................................13
Step mode ............................................................................................................14
Randomizer ..........................................................................................................15
The Layer Effects section ...................................................................16
Common elements................................................................................................18
Filter ......................................................................................................................19
Distortion...............................................................................................................20
Delay.....................................................................................................................21
Lo-Fi......................................................................................................................21
Flanger..................................................................................................................22
Glitch.....................................................................................................................22
The Modulation Matrix ........................................................................23
The Master Section .............................................................................24
Equalizer ...............................................................................................................24
Reverb ..................................................................................................................24
Master output ........................................................................................................25
Credits ..................................................................................................26
Updates, Support and Contact ..........................................................27
3
Installation
System requirements
In order to use Tantra you need a system with at least the following specifications:
• Modern powerful processor with SSE support, dual-core or higher CPU recommended
• Windows XP SP2/XP SP3/Vista/Seven/Eight or Mac OS X 10.6.8 (or later)
• VST 2.4 compatible host software
Installation
Windows: Run the installer to install Tantra. Although the installer automatically detects your VST
plugins folder, make sure that the chosen installation location is correct. If your host software will
not automatically recognize Tantra, refer to your host software’s manual for guide on how to load
VST plugins.
The installer will create two folders on your system. Executable file, manual and uninstaller will be
placed in the chosen installation location. Tantra factory library will be placed in the folder “Tantra”
in your Windows current user’s documents folder. Tantra will never store, delete or modify any
information in your Windows registry.
To uninstall Tantra, run the uninstaller from “Programs->Tantra->Uninstall” in your Windows Start
menu.
Mac OS: Click on the image file to mount it, run the installer and follow the instructions
Demo limitations
The installer installs the Demo Version of Tantra. The Demo Version is 100% identical to the Full
Version, except one limitation. In the Demo Version a noise sample will be played every 90
seconds. The Full Version doesn’t play this noise sample. If you would like to get the Full Version,
you need to purchase it.
Purchasing the Full Version
If you would like to buy the Full Version, please visit our online shop at http://www.dmitrysches.com
and follow our online instructions. After purchasing the Full Version you will receive your personal
registration code. In order to enter the registration code load Tantra and select «Enter your
registration code» in the main menu. Type in your registration name and code in the dialog and
click OK.
After entering the registration code the plugin will automatically unlock the Full Version.
4
User Interface
The user interface of Tantra is divided into five sections:
1.
2.
3.
4.
5.
The Main Display
The Modulator section
The Modulation Matrix section
The Layer Effects section
The Master section
Each section provides a group of parameters that are used to control the sound processing in
Tantra via a common set of GUI elements:
• Knobs
• Value fields
• Buttons, switches and selectors
5
Working with knobs
The most common GUI control in Tantra is the knob. Although the appearance of knobs may vary,
they are all controlled in the same way.
• To change the value of a parameter, left-click on the knob, hold down the mouse button and
drag up or down in vertical direction
• The same results are achieved while dragging the mouse left or right in horizontal direction
• For finer control of a parameter hold the SHIFT key while dragging the mouse
• To reset a parameter to its default value hold the CONTROL (Windows) or CMD (Mac) key and
left-click on the knob.The same result is achieved by double-clicking on the knob
Tantra offers a special convenient way to do modulation assigning and editing. This way can be
successfully used instead of interacting with the Modulation Matrix in many cases. Note that not all
knobs support modulation. To assign a modulation to a parameter right-click on the knob and
select the desired modulation source from the “Add Modulation” submenu of the popup menu.
When at least one modulation source is assigned to the parameter you can edit the modulation
depth with the knob. To do that right-click on the knob, hold down the mouse button and drag up or
down (left or right) in vertical (horizontal) direction. The colored arc displays the modulation depth
while dragging the mouse.
You can assign more than one modulation source to the knob. To select the desired modulation
source for editing the modulation depth right-click on the knob and select an appropriate menu item
“Mod N [+XX%]” from the popup menu. There are also additional actions available:
• To reset the modulation depth hold the ALT and CONTROL (Windows) or CMD (Mac) keys and
left-click on the knob
• To delete/disable all modulations assigned to the parameter right-click on the knob and select
“Remove/Disable All modulations” menu item from the popup menu
6
MIDI Learn
Many of Tantra’s GUI controls support MIDI Learn.
• Right-click on the knob and choose “Start Midi Learn” from the popup menu
• Move the desired MIDI control on your controller. Tantra will automatically detect the MIDI
control and assign it to the knob
• Choose “Clear MidiCC” from the popup menu if you want to remove the learned MIDI control
You can save all MIDI control assignments into a MIDI Map. How to work with the MIDI Map
presets will be explained later.
Locking parameters
Tantra offers a possibility to prevent specific parameters from changes when you switch presets.
This can be useful, for example, to lock the global Mix or Volume parameter at a certain value
while switching through presets. In order to lock a parameter select "Lock" command from the
control's context menu:
Uncheck the "Lock" menu item to unlock the parameter back.
7
Working with value fields
Many parameters in Tantra can be controlled via their value fields.
The value fields display text information about the associated parameter. You can perform the
following actions on the value fields:
• To set the desired value right-click on the value field and select an appropriate menu item from
the popup menu. Note that not all value fields have a popup menu. To change the value leftclick on the value field, hold the mouse button and drag up or down in vertical direction
• To reset a parameter to its default value hold the CONTROL(Windows) or CMD(Mac) key and
left-click on the value field. Additionally you can use a double-click
Working with buttons, switches and selectors
Working with buttons, switches and selectors in Tantra is straightforward:
• Simply click on the button to perform an action
• The first click on the switch enables a function. The second click disables the same function
• A selector is a mutually exclusive group of switches. Enabling one disables all others in the group
To find information on how to work with the specialized controls such as Modulator editor refer to
the appropriate topic in this manual.
8
The Main Display
The Main Display includes the Preset Browser and the Bypass, Undo/Redo, Options and Panic
buttons.
The Preset Browser allows to manage presets available for use in Tantra and includes the
following elements:
• The text area displays the current preset name. Click on the text area to select a patch from a
popup menu, which displays all presets available for use as well as commands that allow to
save/load/reset/reveal presets
• Two navigation arrows can be used to step through the patches in the forward or backward
direction
Use the Bypass button to turn off/on audio processing in Tantra. When Tantra is bypassed the
unprocessed sound is heard.
The Settings button provides access to global setting and utility functions of Tantra
Click the Setting button in order to access the following popup menu:
•
•
•
•
•
•
•
•
Load MidiCC map. Loads a previously stored MIDI Map form the disk
Save MidiCC map. Saves the current MIDI Map to the disk
Reset MidiCC map. Loads an empty default MIDI Map
Use Current Settings as Default Preset. Allows you to mark the current patch as a template
that is loaded when loading the default preset from the Preset Browser
Reset Default Preset. Allows you to set the factory default settings as a default template
Copy/Paste/Reset Layer/Modulator Settings. Use the command to copy/paste state of the
Layer Effects modules or the Modulator or reset the state to its default settings
Compact GUI mode. Activates space-saving compact GUI view mode
Enter your registration code. Shows the registration dialog, where you can unlock the Full
Version of Tantra by entering your registration code
9
Use the Panic button to reset the internal feedback states of all processing modules in Tantra
The Panic function is useful for muting decaying tails of modules like reverb or delay, as well as for
resetting self-oscillations which may occur in filters/delays.
The Undo and Redo buttons allows you to roll backwards or forwards any changes you made
while adjusting any parameter of Tantra. Note please, that even preset changes and randomization
results support undo/redo.
Compact GUI mode
Tantra provides Compact GUI mode, which makes easier to manage Tantra's user interface on
computers with low screen resolutions.
Select "Compact GUI mode" command from the Settings menu to activate it.
In the Compact mode the Effects section consists of two pages, you can access each by clicking
on the Master-Effects switch. If the switch is set to Master position then you can access the
compact version of the Master section
10
The Modulator section
The Modulator section is the heart of Tantra. Modulators generate modulation signals that define
the rhythmic pattern applied to the output sound.
Tantra provides 8 Modulators, which generate complex 32-step envelopes with adjustable shape
and different operating modes. The Modulators presented in the GUI as 8 tabs in the Modulator
section. Use the tab switch to access the settings of each of the 8 Modulators:
Drag and Drop
Tantra offers an easy way to assign and edit modulations. Hold the mouse button down on a switch
with a circle icon and drag onto any desired parameter to assign a modulation:
The switches are highlighted depending on modulations assigned to the respective modulator. The
circle is filled with black color when at least one modulation assigned and green color if modulator's
tremolo is engaged.
For additional convenience, Tantra provides a popup menu, which displays all modulations
assigned to a modulator, where you can adjust modulations for all parameters controlled by the
modulator. Right-click on a corresponding switch with a circle icon to open the menu:
11
Common settings
All of the 8 Modulators have the same settings. There is a set of the most commonly used controls
at the top of the Modulator section:
Use the Speed control to define the actual time period for each of the 32 steps used for envelope
generation. The value field below the Speed knob provides a popup menu which can be useful for
quick selection of a setting. The Sync switch defines whether the generated envelopes are temposynced (ON) or free-running (OFF).
The Smooth control allows you to control the sharpness of the generated envelope. The more the
control is turned to the right the less «clicky» the sound is.
Each Modulator has two built-in modules, Tremolo and PanFlip. The Tremolo modulates the output
volume by the generated envelope, while the PanFlip modulates the output panning. These
modules can be used for creating tremolo/trance-gate and auto-panning effects respectively. The
Tremolo and Pan Flip controls define the amount of modulation applied. Modulations form
different modulators are summed. This allows you to create complex tremolo and pan flip effects.
There also is a Tremolo and PanFlip Destination control:
The control requires some additional explanations. As you will see in the Layer Effects section,
each layer provides serial chain of 6 effects, which process the incoming audio. The Tremolo and
PanFlip modules can be treated as a 7th layer effect, which can be inserted into different positions
of the processing path depending on the Destination control setting.
When «G» («Global») setting is selected, the Tremolo and PanFlip modules are inserted at the
output of the Layer Mixer, after summing the audio output of both layers. The «G» setting is useful
to process the output of both layers with the same Tremolo and PanFlip. In this mode, the position
of the «Tremolo» module of the Routing control of the Layer Effects section does not affect the
processing path order.
The Tremolo and PanFlip modules can be inserted into the serial chain of the Layer as well. You
can use«A» and«B» setting to insert the modules into the Layer A and B respectively. In both
cases, the position of the «Tremolo» module of the Routing control of the Layer Effects section
defines the actual position of the modules in the serial processing chain of each layer.
Thus the actual number of the modules in the serial chains of the Layer A and B depends on the
value of the Destination control. The serial chains contain the additional Tremolo and PanFlip
modules when «A» or «B» setting is selected. However the Tremolo and PanFlip modules are
removed from the serial chains when «G» mode is active.
12
There is the Preset Browser control, which allows you to manage predefined and custom presets
for the Modulator and provides the same functionality and GUI elements as the Main Preset
Browser in the Main Display section:
Modulators in Tantra can operate in two different modes. The Mode selector below the modulator
allows you to switch between modes:
• STEP. In this mode the modulator produces a series of steps with an adjustable level
• CURVE. In this mode the generated modulation signal is a set of variable-slope curves
Curve mode
In Curve mode you can define up to 64 nodes, which connected by curves with adjustable slope.
In order to create your custom modulation shape you can:
• Right-click on the editor to add a node
• Left-click on the node, hold the mouse button down and drag to define the node’s position
• Right-click on the node to delete it. Note that the first and the last node can’t be deleted
• You can delete several nodes with a single click. Right-click on the node, hold the mouse button down and drag over the other nodes you want to delete
• Click on the desired line between two nodes and drag up or down to change the slope. Note
that you don’t need to click exactly on the curve. To reset the slope and make the line straight
double-click on it
In Curve mode you can use one of two available edit modes:
In SLIDE mode, if you change the node’s position, then all nodes to the right of the selected one
change their positions as well. In LOCK mode you can move the node only within the distance
between neighboring nodes. Please note that in Step mode the Slide/Lock switch is disabled:
With the Invert button you can flip the shape of your curve in a single click:
13
Additionally in Curve mode you can adjust overall slope of your shape with the Tension knob:
The Shuffle knob controls the swing amount applied. The swing effect is produced by pulling every
second step of the curve forward in time. Please note, in STEP mode only odd steps are affected
by the swing effect.
Step mode
The Step mode allows you to create modulations composed from series of steps with adjustable
levels and width.
• Left-click on the node, hold the mouse button and drag in horizontal direction to define width of
the step and in vertical direction to define step’s level.
• Right-click on the background between two nodes to reset level of the step
• Left-click on the background and drag the mouse in both directions to consecutively define
levels for multiple steps
You can change the number of steps generated between 32 to 2. Left-click the header of the editor,
hold the mouse button and drag left or right to define number of active steps:
In Step mode you can use the Shuffle control, which operates in the same way as in Curve mode,
but affects odd steps instead of even ones. As well here is the additional Gate knob:
The Gate control allows you to fill each generated step with silence. Width of all steps is shortened
by Gate amount, while start position of each step preserved. Note please, Tension control disabled
in Step mode.
14
Randomizer
There is a Randomizer button, near the modulator's preset browser, which allows you to randomize
patterns in both Curve and Steps mode:
Click the Randomizer button with a question icon to create a random pattern for the selected
modulator's mode. Right-click the Randomizer button to reset pattern to it's default state. Click the
button with a triangle icon to adjust randomizer's options:
The options allow you to define how the randomizer will affect the generated pattern:
• Randomize All. All parameters of the pattern will be randomized
• Randomize Only Positions, Levels, Tensions. Only selected parameter will be randomized
• Generate 32/16 Steps. Defines the length of the generated envelope in Curve mode
• Prefer Dense Sequences. The option allow you to choose how dense generated patterns
should be. If the option unchecked then the generated sequences are scarcely populated. Here
are few examples for both Curve and Steps mode, that show the difference between density
modes
Prefer Dense Sequences : Checked
Prefer Dense Sequences : Unchecked
15
The Layer Effects section
While the Modulators section is the main provider of rhythmic modulations in Tantra, the Layer
Effects section is the main audio processing part, which is guided by the Modulators. Layer Effects
process audio and in response to the applied modulations to form rhythmic pulsations in your
sounds.
Tantra provides 2 groups of 6 high quality processing effects. The groups are called Layer A and B.
You can switch between Layers by using the Layer selector:
Layer A and B are organized as 2 independent stereo channels. Each layer has output Level, Pan
and Bypass controls, that allow you to adjust position and volume of layers in the output mix:
16
With the Serial/Parallel switch you can choose one of two available processing modes:
• Serial configuration, where the output of Layer A is connected to the input of Layer B
• Parallel configuration, when you would like to process input audio by two independent channels
and mix their output
Please note, in Serial mode, the output of Layer A is additionally sent to the output of the section.
In Serial mode Level A and Pan A control the amount and position in the mix of the output of Layer
A that is sent to the section output. If the power switch of the Layer A is turned off then Layer A still
provides the input signal for the Layer B, but the output of Layer A is not sent to the section output.
17
Each layer provides 6 serial processing modules - Filter, Distortion, Delay, Lo-Fi, Flanger and
Glitch. You can adjust processing order of the modules with the Routing control:
Click the module, hold the mouse button and drag in horizontal direction to define the position of
the module in the processing order.
Common elements
The Layer Effects are organized as 6 sections:
Each section has two common elements. With the Mix control you can adjust balance between
Wet and Dry signals in the output of the effect module, while the Bypass switch allows you to turn
the effect on or off:
There is a Randomizer button with a question at the top left corner of each section:
Click the button to randomize parameters of the effect. Note please, not all parameters are
randomized in order to provide more consistent randomization results. For example, the
randomizer doesn't affect Mix and Bypass parameters, Distortion Output, Delay/Flanger Sync,
Glitch Stretch, etc.
Right-click on the Randomizer button to reset the effect to it's default state.
Note please, that you can Undo/Redo randomization results.
18
Filter
Tantra provides a high-quality, analog-modelled multi-mode filter section with basic and advanced
types of filters
There are 3 serially connected filters available for processing. The Multi-mode filter allows you to
choose one of the 12 modes with the Filter Type control:
- Lowpass/Highpass/Bandpass 12 and 24 dB. Analog-modelled filters, with high-quality internal
saturation stage and 12 or 24 dB per octave slope
- Phaser 4p and 8P. 4 and 8 pole phase filter. The filter passes all frequencies through the output,
but alters their phases. The filter can be used for designing phasing effects
- RingMod. Ring modulator, multiplies the input together with a sine wave. Useful for creating
metallic sounds as well as weird or unusual tones
- PitchShift. Frequency shifter, which allows you to alter the pitch of the incoming signal. Useful
for making pitch-slide effects
- OctaveBand. Bandpass filter with an one octave passband width. Useful for making voice and
robotic kind of sounds
- Vowel. Special filter type intended for producing vocoder-like effects. The filter emphasizes frequencies around the points, called formants
The Cutoff and Resonance controls allows you to adjust the filter’s frequency and resonance
respectively.
The output of the Multi-mode filter is processed by a serial chain of additional Low Cut and Hi Cut
additional filters. These two filters can be used for designing creative open-close kind of effects
independent of the main filter.
19
Distortion
This module offers a high quality multi-stage circuit-modelled distortion:
The Drive knob controls the amount of amplification of the incoming signal before it enters the
distortion stages.
Before transforming audio at the main distortion stage it is preprocessed in a special Fuzz stage,
which provides a model of a classic analog fuzz pedal. With the Fuzz control you can adjust the
amount of pre-distortion, which results in altering the high frequency contents.
After the Fuzz section signal enters the main distortion stage. The Tube/Overdr switch allows you
to choose between analog tube simulation and classic overdrive effect mode, which used for
processing in the main stage.
You can use the Mono knob to narrow the output stereo image. When the knob is turned fully to
the right the output signal has identical left and right channels.
The output of the distortion stage is processed by the Tone section, which actually consist of a
specialized filter chain intended for the simulation of tonal changes inside analog comb amplifiers.
Use the Tone control to alter the color of the output sound.
Finally, the Output control allows to adjust the output volume of the signal.
20
Delay
The Delay is the most commonly used effect for adding dimension into sounds. Producing rhythmic
decaying echoes is another major utility of the Delay module.
With the Speed L and R control you can adjust the delay time for the left and right channel
respectively. If the Link switch is turned on, then left and right channel use the same delay. You
can turn off the Link switch in order to control left and right channel separately. The Sync switch
defines whether the delay time calibrated in tempo-synced intervals (ON) or in milliseconds (OFF).
The Ping-Pong switch activates/deactivates special connectors in the internal circuit in order to
achieve a classic ping-pong delay effect.
A part of the output signal is sent back to the input of the Delay effect. The Feedback knob
controls the amount of the output that is sent back. The LP and BP controls allow to adjust the
cutoff frequency of the Lowpass filter and the amount of Bandpass processing applied to the
feedback signal respectively. Bandpass processing is useful for creating more natural echo effects.
Use the IN button to determine whether the input signal should be sent to the delay's input. Can be
useful to bypass the delay effect while preserving decaying echoes at the output.
Lo-Fi
The most common use of the Lo-Fi effect is to destruct the incoming audio signal. Sounds
processed by the Lo-Fi effect get a harsh, digital and dirty character.
The Bit knob allows you to control the amount of sound degradation by reducing the bit depth of
the signal. The Lo-Fi module also includes a decimator stage, which destroys your sounds by
resampling the signal at a lower sampling rate. With the Rate control you can adjust the decimation
factor. You can use the Noise knob to adjust the amount of an additional digital noise that is mixed
with the output signal. And finally you the Tone control allows you to change the color of the output
sound. Algorithms behind the Tone control simulate the spectral loss in the telephone lines.
21
Flanger
The Flanger is a common classic effect produced by mixing the input signal and some number of
its delayed copies. The Flanger widens your sounds and colorizes them.
The effect can operate in Flanger and Phaser mode. Use the PHS switch to activate the Phaser
mode.
Use the Delay control to adjust the delay time between the input signal and its delayed copies. In
the Phaser mode, the Delay controls center frequency. The Feedback knob allows you to define
the amount of output signal that is sent back to the input. The Width knob defines the width of the
produced stereo image. The Tone knob can be used to colorize the output signal by engaging
internal filters in the feedback loop.
The Speed and Sync controls adjust the speed of an internal LFO that is used to modulate the delay time, while the Depth knob defines the modulation depth.
Glitch
Glitch is the most creative and unpredictable effect in Tantra. With the Glitch module you can
create modern kinds of effects known as «Stutter» or «Buffer effects».
The principle behind the Glitch effect can be described as replaying short sections of the incoming
audio. The length of the section is defined by the Buffer Size parameter. The value of the Scale
parameter determines how many times the recorded section will be repeated. The recorded
section can be reversed by activating the Revers switch. Smoothing window can be applied to the
section in order to make the sound less harsh when the Smooth switch is turned on. With the
Stretch control you can slow down the playback rate of the sections.
The Glitch module can record buffer sections only once and then play them back infinitely, which
sounds like sound freezing. The Glitch works that way in Freeze mode of the Mode Selector. On
the other hand, in Run mode the Glitch module re-records the buffer each time all sections have
been played back. In that case you can achieve dynamic or «running» stutter effects.
22
The Modulation Matrix
There are 24 modulation slots to maintain all modulation assignments in Tantra. You can use the
Modulation Matrix to manage all the assignments on a single page. In order to access the
Modulation Matrix click the Matrix button:
Click the Matrix button again to close the Modulation Matrix page or click the Close button with the
«X» icon:
Each slot in the Matrix is used to define the link between Modulation Source and Modulation
Target. Click the Source or Destination text field to access the menu, where you can select
available modulation sources and destinations respectively:
Use the Depth control to adjust the modulation depth. Additionally you can bypass all matrix
assignments by clicking the Bypass switch at the left-top corner of the Matrix, or you can enable/
disable individual slots by clicking the Bypass switch located near each slot.
23
The Master Section
The final processing stage of Tantra is the Master Section. The output signal from the Layer Effects
is passed through the Equalizer, Reverb and Master Output in order to form the final output mix.
Equalizer
The three-band Equalizer in the Master Section can be used to adjust the frequencies of the
sound, before it hits the output:
Use the Bass, Mid and Treble knobs to control the boost of low, middle and high frequency
content respectively. The knobs are bipolar. The boost is zero when the knob is in the center
position. The Frequency controls define the center frequency of the Bass and Mid filters.
Reverb
The Reverb effect is used to add a dimension to your sounds. Additionally, when sound is
processed by trance-gate kind of effects it can lose its depth. In such cases the Reverb is useful to
restore the ambient space.
With the Size control you can adjust the size of the simulated virtual room. Use the Decay to
define the feedback amount for the reverb delays. The Mix control adjusts the balance between
Wet and Dry signal. The Bass and Treble knobs control the boost amount performed by the low
pass and high pass filter inserted into the feedback path. These filters are used to simulate the
dampening of high and low frequencies in natural acoustic spaces.
Use the IN button to determine whether the input signal should be sent to the reverb's input. Can
be useful to bypass the effect while preserving decaying space at the output.
24
Master output
The final adjustment is performed by the Master Output section:
The Volume and Pan knobs control the level and the stereo position of the output sound
respectively. The Dry/Wet knob adjusts the balance between Wet and Dry signal in the mix.
In order to prevent output clipping the Master output provides a limiter. Turn off the Limiter if you
don’t need it. The Output stereo meter will help you to determine if any clipping takes place.
The additional Phase meter displays the correlation between the output left and right channel. It
helps you to check mono compatibility of your sounds. When the stereo channels are in phase, the
indicator moves fully to the top (+1). When the channels have out-of-phase elements, the indicator
goes below zero threshold and displays negative correlation values.
25
Credits
Concept, programming, sound design
Dmitry Sches
Graphic design
VOGER Design
http://vogerdesign.com
https://www.facebook.com/vogerdesign
26
Updates, Support and Contact
If you have any questions, need help or want to check for updates please visit our web site at
http://www.dmitrysches.com. Feel free to use the contact form on the website, we are always
happy to support you.
27