1
Device for Plant Monitoring
SUNNY WEBBOX with Bluetooth® Wireless Technology
Installation Guide
SWebBox20-eng-IUS111411 | 98-0031111 | Version 1.1
US
CA
SMA America, LLC
Legal Restrictions
Copyright © 2011 SMA America, LLC. All rights reserved.
No part of this document may be reproduced, stored in a retrieval system, or transmitted, in any form
or by any means, electronic, mechanical, photographic, magnetic or otherwise, without the prior
written permission of SMA America, LLC.
Neither SMA America, LLC nor SMA Solar Technology Canada Inc. makes representations, express
or implied, with respect to this documentation or any of the equipment and/or software it may
describe, including (with no limitation) any implied warranties of utility, merchantability, or fitness for
any particular purpose. All such warranties are expressly disclaimed. Neither SMA America, LLC nor
its distributors or dealers nor SMA Solar Technology Canada Inc. nor its distributors or dealers shall
be liable for any indirect, incidental, or consequential damages under any circumstances.
The exclusion of implied warranties may not apply in all cases under some statutes, and thus the
above exclusion may not apply.
Specifications are subject to change without notice. Every attempt has been made to make this
document complete, accurate and up-to-date. Readers are cautioned, however, that
SMA America, LLC and SMA Solar Technology Canada Inc. reserve the right to make changes
without notice and shall not be responsible for any damages, including indirect, incidental or
consequential damages, caused by reliance on the material presented, including, but not limited to,
omissions, typographical errors, arithmetical errors or listing errors in the content material.
All trademarks are recognized even if these are not marked separately. Missing designations do not
mean that a product or brand is not a registered trademark.
The Bluetooth® word mark and logos are registered trademarks owned by Bluetooth SIG, Inc. and
any use of such marks by SMA America, LLC and SMA Solar Technology Canada Inc. is under
license.
SMA America, LLC
3801 N. Havana Street
Denver, CO 80239 U.S.A.
SMA Solar Technology Canada Inc.
2425 Matheson Blvd. E, 8th Floor
Mississauga, ON L4W 5K5, Canada
Installation Guide
SWebBox20-eng-IUS111411
3
Important Safety Instructions
SMA America, LLC
IMPORTANT SAFETY INSTRUCTIONS
SAVE THESE INSTRUCTIONS
This manual contains important instructions for Sunny WebBox with Bluetooth system monitoring, that
must be followed during installation and maintenance of the system monitoring.
The Sunny WebBox with Bluetooth is designed and tested according to international safety
requirements, but as with all electrical and electronic equipment, certain precautions must be
observed when installing and/or operating the Sunny WebBox with Bluetooth. To reduce the risk of
personal injury and to ensure the safe installation and operation of the Sunny WebBox with Bluetooth,
you must carefully read and follow all instructions, cautions and warnings in this installation guide.
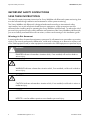
Warnings in this document
A warning describes a hazard to equipment or personnel. It calls attention to a procedure or practice,
which, if not correctly performed or adhered to, could result in damage to or destruction of part or all
of the SMA equipment and/or other equipment connected to the SMA equipment or personal injury.
DANGER
DANGER indicates a hazardous situation which, if not avoided, will result in death or
serious injury.
WARNING
WARNING indicates a hazardous situation which, if not avoided, could result in death or
serious injury.
CAUTION
CAUTION indicates a hazardous situation which, if not avoided, could result in minor or
moderate injury.
NOTICE
NOTICE is used to address practices not related to personal injury.
4
SWebBox20-eng-IUS111411
Installation Guide
SMA America, LLC
Important Safety Instructions
Other symbols in this document
In addition to the safety and hazard symbols described on the previous pages, the following symbol
is also used in this installation guide:
Information
This symbol accompanies notes that call attention to supplementary information that you
must know and use to ensure optimal operation of the system.
Installation Guide
SWebBox20-eng-IUS111411
5
General Warnings
SMA America, LLC
General warnings
General warnings
All electrical installations must be done in accordance with the local and
National Electrical Code® ANSI/NFPA 70 or the Canadian Electrical Code®
CSA C22.1. This document does not and is not intended to replace any local, state,
provincial, federal or national laws, regulation or codes applicable to the installation and
use of the system monitoring, including without limitation applicable electrical safety codes.
All installations must conform with the laws, regulations, codes and standards applicable
in the jurisdiction of installation. SMA assumes no responsibility for the compliance or
noncompliance with such laws or codes in connection with the installation of the system
monitoring.
For all repair and maintenance, always return the unit to an authorized SMA Service
Center.
Before installing or using the Sunny WebBox with Bluetooth, read all of the instructions,
cautions, and warnings on the Sunny WebBox with Bluetooth in this installation guide.
Wiring of the Sunny WebBox with Bluetooth must be made by qualified personnel only.
6
SWebBox20-eng-IUS111411
Installation Guide
SMA America, LLC
Table of Contents
Table of Contents
1
1.1
1.2
1.3
1.4
Information on this Manual. . . . . . . . . . . . . . . . . . . . . . . . 11
Validity . . . . . . . . . . . . . . . . . . . . . . . . . . . . . . . . . . . . . . . . . . . 11
Target Group . . . . . . . . . . . . . . . . . . . . . . . . . . . . . . . . . . . . . . 11
Additional Information . . . . . . . . . . . . . . . . . . . . . . . . . . . . . . . 11
Nomenclature . . . . . . . . . . . . . . . . . . . . . . . . . . . . . . . . . . . . . . 11
2
2.1
Safety . . . . . . . . . . . . . . . . . . . . . . . . . . . . . . . . . . . . . . . . . 12
Appropriate Usage . . . . . . . . . . . . . . . . . . . . . . . . . . . . . . . . . . 12
2.1.1
Supported Products. . . . . . . . . . . . . . . . . . . . . . . . . . . . . . . . . . . . . . . . . . . . 13
2.2
Safety Instructions . . . . . . . . . . . . . . . . . . . . . . . . . . . . . . . . . . . 14
3
3.1
3.2
Unpacking. . . . . . . . . . . . . . . . . . . . . . . . . . . . . . . . . . . . . . 16
Scope of Delivery . . . . . . . . . . . . . . . . . . . . . . . . . . . . . . . . . . . 16
Identifying the Sunny WebBox . . . . . . . . . . . . . . . . . . . . . . . . . 17
4
4.1
4.2
4.3
Device overview. . . . . . . . . . . . . . . . . . . . . . . . . . . . . . . . . 18
LED Overview . . . . . . . . . . . . . . . . . . . . . . . . . . . . . . . . . . . . . . 18
Connection Area Overview . . . . . . . . . . . . . . . . . . . . . . . . . . . 19
Overview Bluetooth Module. . . . . . . . . . . . . . . . . . . . . . . . . . . 20
4.3.1
Bluetooth Module LED Overview . . . . . . . . . . . . . . . . . . . . . . . . . . . . . . . . . 20
4.4
Overview of the LEDs on the Network Connection. . . . . . . . . . 20
5
5.1
5.2
Assembly. . . . . . . . . . . . . . . . . . . . . . . . . . . . . . . . . . . . . . . 21
Mounting / Installation Location Requirements. . . . . . . . . . . . . 21
Determining the Mounting / Installation Location for
Bluetooth PV Plants . . . . . . . . . . . . . . . . . . . . . . . . . . . . . . . . . . 22
5.2.1
Information on SMA Bluetooth . . . . . . . . . . . . . . . . . . . . . . . . . . . . . . . . . . 22
5.2.2
Determining the Mounting / Installation Location . . . . . . . . . . . . . . . . . . . . . 22
5.2.3
Extending the Bluetooth Network with the SMA Bluetooth Repeater . . . . . . 22
5.3
Mounting the Sunny WebBox on the wall . . . . . . . . . . . . . . . . 23
Installation Guide
SWebBox20-eng-IUS111411
7
Table of Contents
SMA America, LLC
5.4
Mounting the Sunny WebBox on the Top-Hat Rail . . . . . . . . . . 24
6
6.1
6.2
Commissioning . . . . . . . . . . . . . . . . . . . . . . . . . . . . . . . . . . 25
Information on Commissioning . . . . . . . . . . . . . . . . . . . . . . . . . 25
Configuring Bluetooth Settings for the Sunny WebBox . . . . . . 26
6.3
6.4
Connecting the Sunny WebBox Directly to the Computer . . . . 27
Configuring Network Settings on the Computer . . . . . . . . . . . . 28
6.4.1
Information on Network Settings on the Computer. . . . . . . . . . . . . . . . . . . . 28
6.4.2
Windows 7, Windows Vista . . . . . . . . . . . . . . . . . . . . . . . . . . . . . . . . . . . . . 28
6.4.3
Windows XP, Windows 2000 . . . . . . . . . . . . . . . . . . . . . . . . . . . . . . . . . . . 30
6.5
6.6
Logging in to the Sunny WebBox . . . . . . . . . . . . . . . . . . . . . . . 32
Configuring Sunny WebBox for the Local Network . . . . . . . . . 33
6.6.1
Information on Integrating the Sunny WebBox into a Local Network. . . . . . 33
6.6.2
Applying Static Network Settings to the Sunny WebBox . . . . . . . . . . . . . . . 33
6.6.3
Connecting the Sunny WebBox to the Local Network . . . . . . . . . . . . . . . . . 35
7
7.1
Extended Configuration. . . . . . . . . . . . . . . . . . . . . . . . . . . 36
Ethernet Network . . . . . . . . . . . . . . . . . . . . . . . . . . . . . . . . . . . 36
7.1.1
Information on Extended Network Settings. . . . . . . . . . . . . . . . . . . . . . . . . . 36
7.1.2
Activating / Deactivating DHCP . . . . . . . . . . . . . . . . . . . . . . . . . . . . . . . . . . 36
7.1.3
Proxy Server . . . . . . . . . . . . . . . . . . . . . . . . . . . . . . . . . . . . . . . . . . . . . . . . . 37
7.1.4
Setting the HTTP Port . . . . . . . . . . . . . . . . . . . . . . . . . . . . . . . . . . . . . . . . . . . 38
7.1.5
Setting the NAT Port . . . . . . . . . . . . . . . . . . . . . . . . . . . . . . . . . . . . . . . . . . . 38
8
8.1
Service Functions . . . . . . . . . . . . . . . . . . . . . . . . . . . . . . . . 39
Updating the Firmware for Sunny WebBox . . . . . . . . . . . . . . . 39
8.1.1
Information . . . . . . . . . . . . . . . . . . . . . . . . . . . . . . . . . . . . . . . . . . . . . . . . . . 39
8.1.2
Firmware update from the Internet (recommended) . . . . . . . . . . . . . . . . . . . 39
8.1.3
Firmware Update via the SD Card . . . . . . . . . . . . . . . . . . . . . . . . . . . . . . . . 41
8.2
Carrying Out Device Updates . . . . . . . . . . . . . . . . . . . . . . . . . 42
8.2.1
Notes . . . . . . . . . . . . . . . . . . . . . . . . . . . . . . . . . . . . . . . . . . . . . . . . . . . . . . 42
8.2.2
Device update via the Internet (recommended) . . . . . . . . . . . . . . . . . . . . . . 44
8.2.3
Device Update via the SD Card . . . . . . . . . . . . . . . . . . . . . . . . . . . . . . . . . . 45
8
SWebBox20-eng-IUS111411
Installation Guide
SMA America, LLC
Table of Contents
8.3
8.4
8.5
Restarting the Sunny WebBox via the User Interface . . . . . . . . 47
Resetting the Sunny WebBox Using the Reset Button . . . . . . . . 48
Determining Current Settings of the Sunny WebBox
via the SD Card . . . . . . . . . . . . . . . . . . . . . . . . . . . . . . . . . . . . 49
9
9.1
9.2
Maintenance and Care . . . . . . . . . . . . . . . . . . . . . . . . . . . 50
Maintenance. . . . . . . . . . . . . . . . . . . . . . . . . . . . . . . . . . . . . . . 50
Care . . . . . . . . . . . . . . . . . . . . . . . . . . . . . . . . . . . . . . . . . . . . . 50
10
10.1
10.2
10.3
Decommissioning . . . . . . . . . . . . . . . . . . . . . . . . . . . . . . . . 51
Disassembling the Sunny WebBox . . . . . . . . . . . . . . . . . . . . . . 51
Packaging the Sunny WebBox . . . . . . . . . . . . . . . . . . . . . . . . . 52
Disposing of the Sunny WebBox . . . . . . . . . . . . . . . . . . . . . . . 52
11
11.1
11.2
Failure Search. . . . . . . . . . . . . . . . . . . . . . . . . . . . . . . . . . . 53
General Troubleshooting for the Sunny WebBox. . . . . . . . . . . 53
Bluetooth Connection . . . . . . . . . . . . . . . . . . . . . . . . . . . . . . . . 58
12
Accessories . . . . . . . . . . . . . . . . . . . . . . . . . . . . . . . . . . . . . 60
13
13.1
13.2
13.3
13.4
13.5
Appendix . . . . . . . . . . . . . . . . . . . . . . . . . . . . . . . . . . . . . . 61
Information on the SD Card . . . . . . . . . . . . . . . . . . . . . . . . . . . 61
Structure of the Config.xml File . . . . . . . . . . . . . . . . . . . . . . . . . 61
Structure of an XML Data File . . . . . . . . . . . . . . . . . . . . . . . . . . 62
Information on your Web Browser . . . . . . . . . . . . . . . . . . . . . . 63
Setting up a Proxy Exception Rule in Internet Explorer . . . . . . . 63
13.6
13.7
Activating IPv6 in Windows XP SP2 . . . . . . . . . . . . . . . . . . . . . 64
Allocating an IP Address in a Local Network . . . . . . . . . . . . . . 64
Installation Guide
SWebBox20-eng-IUS111411
9
Table of Contents
SMA America, LLC
14
14.1
14.2
Technical data. . . . . . . . . . . . . . . . . . . . . . . . . . . . . . . . . . . 65
Sunny WebBox with Bluetooth . . . . . . . . . . . . . . . . . . . . . . . . 65
Plug-in Power Supplies . . . . . . . . . . . . . . . . . . . . . . . . . . . . . . . 66
14.2.1
CINCON, TRG30R 120. . . . . . . . . . . . . . . . . . . . . . . . . . . . . . . . . . . . . . . . 66
14.2.2
TaiyTech, TYT251200200UV/3000 . . . . . . . . . . . . . . . . . . . . . . . . . . . . . . 66
14.2.3
TaiyTech, TYT251200200EU/3000 . . . . . . . . . . . . . . . . . . . . . . . . . . . . . . 66
15
FCC Compliance Information . . . . . . . . . . . . . . . . . . . . . . 67
16
Contact . . . . . . . . . . . . . . . . . . . . . . . . . . . . . . . . . . . . . . . . 68
10
SWebBox20-eng-IUS111411
Installation Guide
SMA America, LLC
Information on this Manual
1 Information on this Manual
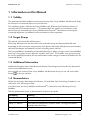
1.1 Validity
This guide described the installation and commissioning of the Sunny WebBox with Bluetooth. Keep
this manual in a convenient place for future reference.
This installation guide is valid for the Sunny WebBox with Bluetooth from Hardware-Version A1
onwards and from Firmware-Version 1.1. This manual does not contain any information on the
devices that are connected to the Sunny WebBox with Bluetooth®. Information concerning the
connected equipment is available from the manufacturer of the equipment.
1.2 Target Group
This manual is for electrically skilled persons.
Electrically skilled persons are those who have received training and demonstrated skills and
knowledge in the construction and operation of this device. Electrically skilled persons are trained to
deal with the dangers and hazards involved in installing electric devices.
The Sunny WebBox is intended for private and industrial use. When you log in to the Sunny WebBox
there are 2 user groups at your disposal, "Installer" and "User". The "Installer" user group may only
be used by qualified personnel who are authorized to make changes to network parameters for the
connected devices.
1.3 Additional Information
Additional information about SMA Bluetooth Wireless Technology can be found in the download
area at www.SMA-America.com.
Also read the user manual of the Sunny WebBox with Bluetooth which you can call via the Help
button
in the user interface.
1.4 Nomenclature
Within this document, SMA America Production, LLC and SMA Solar Technology Canada Inc. are
referred to in the following as SMA.
In this document, the Sunny WebBox with Bluetooth® is referred to in the following as Sunny
WebBox.
The term photovoltaic system is abbreviated to PV plant in this guide.
Formatting
[Save]
"Menu1"
"Menu1 > Menu2"
Example:
Installation Guide
Meaning
Buttons are displayed in square brackets [ ].
Menu items are displayed in quotation marks.
Menu paths are displayed in quotation marks. The angular bracket >
separates individual menus.
Examples are represented in italics.
SWebBox20-eng-IUS111411
11
Safety
SMA America, LLC
2 Safety
2.1 Appropriate Usage
The Sunny WebBox is a data logger that records, logs and makes available the data of a PV plant
via a user interface through the integrated Web server. Additionally, the Sunny WebBox can be used
for remote diagnostics and the configuration of connected devices in a PV plant via the computer.
With the Sunny WebBox, all data of the connected devices can be continually recorded and
evaluated. During operation, the Sunny WebBox records all values of the PV plant every 2 minutes.
Values of currently opened parameter groups are updated every 20 seconds. If the connection
between the Sunny WebBox and the PV plant is broken, the Sunny WebBox with Bluetooth restores
the connection automatically, as soon as this is possible.
The Sunny WebBox is integrated into the Bluetooth plant as a network forming device (Master
device). Network forming devices are principally communication products which form the structure of
the Bluetooth PV plant, and collect, evaluate and process data.
The number of devices which the Sunny WebBox can manage depends on the number of master
devices in the Bluetooth network with the same NetID. If the Sunny WebBox is the only Master in the
Bluetooth network, the Sunny WebBox can manage up to 50 devices. If there are 2 masters present
in the Bluetooth network (e.g. Sunny Explorer or Sunny Beam), a maximum of 25 devices can be
managed by the Sunny WebBox. A maximum of one Sunny WebBox is allowed in a Bluetooth
network with the same NetID. Additional information about SMA Bluetooth Wireless Technology can
be found in the download area at www.SMA-America.com.
The Sunny WebBox is only to be operated using the supplied plug-in power supply and in the voltage
range intended for it.
Do not use the data from Sunny WebBox for billing purposes. Additional costs can be incurred from
the use of the Internet.
The Sunny WebBox is only to be used with original accessories or with accessories recommended by
SMA.
Only use the Sunny WebBox exclusively for the purposes described in the manual.
Carefully read the documentation related to the Sunny WebBox before you commission the
Sunny WebBox.
Also refer to the technical data of the Sunny WebBox.
12
SWebBox20-eng-IUS111411
Installation Guide
SMA America, LLC
Safety
2.1.1 Supported Products
The Sunny WebBox supports the following SMA products:
• SMA inverters with integrated Bluetooth:
– From Software Package 2.06: SB 3000TL-20/SB 4000TL-20/SB 5000TL-20
(SB = Sunny Boy)
– SB 2000HF/SB 2500HF/SB 3000HF
– STP 10000TL-10/STP 12000TL-10/STP 15000TL-10/STP 17000TL-10
(STP = Sunny Tripower)
• SMA inverters with upgraded SMA Bluetooth Piggy-Back from the software version
02.00.00.R. A list of the supported inverters can be found in the SMA Bluetooth Piggy-Back
manual.
• Sunny Matrix from firmware version 2.10.00
•
SMA Bluetooth Repeater
• Sunny SensorBox with SMA Power Injector with Bluetooth
Installation Guide
SWebBox20-eng-IUS111411
13
Safety
SMA America, LLC
2.2 Safety Instructions
Follow all operating and safety instructions in this guide. Failure to follow these instructions can
result in damage to the device and be a danger to persons. If using the
accessories, all the basic safety procedures must be followed, to avoid
dangers like fire, electric shock and injuries to persons.
WARNING
Risk of injury from electric shock.
• Use the Sunny Webbox only in the interior and in a dry environment
• Keep it away from liquids
• Use only a recommended plug-in power supply
• Do not open the plug-in power supply
CAUTION
Danger of stumbling due to incorrectly laid cables.
• Lay cables so that no one stands on them or trips over them.
NOTICE
Humidity can penetrate into the device.
Damage to the device is possible.
• Use the Sunny WebBox only in the interior and in dry environments.
NOTICE
Safety-relevant parameters
You can change the safety-related inverter parameters of your PV plant using the
Sunny WebBox. Incorrectly set parameters can cause connected inverters to deactivate.
This results in yield losses. Usually, these safety-relevant parameters may only be changed
upon consultation with the electric utility company into whose grid you are feeding. In case
of doubts, contact your electric utility company.
14
SWebBox20-eng-IUS111411
Installation Guide
SMA America, LLC
Safety
NOTICE
Touching the components can result in electrostatic discharges.
This can result in damage to or destruction of the device.
• Only qualified personnel may install the Sunny WebBox.
• Do not touch components' connections and plug contacts.
• Ground yourself before working on the device.
Data deviations
The data collected by the Sunny WebBox may deviate from the data of the electricity
meter. The Sunny WebBox data must not be used for billing purposes.
Data loss
The saving procedure for parameters can take up to 30 seconds. Do not disconnect the
Sunny WebBox from the power supply during the saving. Else data can be lost.
Installation Guide
SWebBox20-eng-IUS111411
15
Unpacking
SMA America, LLC
3 Unpacking
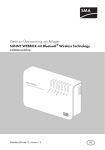
3.1 Scope of Delivery
Check the delivery for completeness and for any external damage. Please contact your dealer if you
find any damage or if there are parts missing.
Position
A
B
C
D
E
F
G
H
I
16
Quantity
1
1
1
1
2
2
1
Description
Sunny WebBox
Plug-in power supply and socket adapter
Network Cable (red)
Network Cable (blue)
Screws (M6)
Screw anchors (M6)
Installation Guide
1
1
(The user manual of the Sunny WebBox can be called up directly from the user
interface or downloaded from www.SMA-America.com)
Drilling template
Quick guide for Sunny WebBox commissioning
SWebBox20-eng-IUS111411
Installation Guide
SMA America, LLC
Unpacking
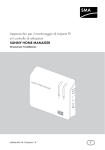
3.2 Identifying the Sunny WebBox
Type label
You can identify the Sunny WebBox using the type label.
The type plate can be found on the back of the enclosure.
Firmware version
The current firmware version can be found on the status
bar in the user interface of the Sunny WebBox.
Installation Guide
SWebBox20-eng-IUS111411
17
Device overview
SMA America, LLC
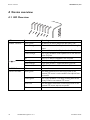
4 Device overview
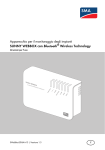
4.1 LED Overview
LED name
"PLANT STATUS"
Status
Glows green
Glows orange
Glows red
Flashes orange
"MODEM"
"DATA UPLOAD"
Off
Glows green
Glows orange
Glows red
Off
Glows green
Flashes green
Glows red
Off
18
SWebBox20-eng-IUS111411
Meaning
All devices in the PV plant have the status "OK".
At least 1 device in the PV plant has the "Warning"
status.
At least 1 device in the PV plant has the "Fault" status.
The Sunny WebBox sends update files to the devices
in the PV plant.
There is no device available in the PV plant.
Default, everything is OK
Login with at least 1 connected device not OK.
Login for all connected devices is not OK.
Not used
The data transmission to the Sunny Portal or an
external FTP server is active and the last upload was
successful.
The Sunny WebBox is currently sending data to the
Sunny Portal or an external FTP server.
The last data transmission to the Sunny Portal or an
external FTP server was not successful.
Data transmission is deactivated.
Installation Guide
SMA America, LLC
LED name
"SD CARD"
Device overview
Status
Glows green
Flashes green
Glows orange
Flashes orange
"SYSTEM"
"POWER"
Flashes red
Off
Glows green
Flashes green
Flashes orange
Flashes red
Glows green
Off
Meaning
The SD card is inserted, writeable, and the free
memory capacity is more than 10 % of the overall
capacity.
The SD card is currently being written to. The free
memory capacity is more than 10 % of the overall
capacity.
The SD card is inserted, writeable and the free memory
capacity less than or equal to 10 % of the overall
capacity.
The SD card is currently being written to. The free
memory capacity is less than or equal to 10 % of the
overall capacity.
The SD card is full or write-protected.
No SD card is inserted.
The Sunny WebBox is operational.
The Sunny WebBox is starting.
The Sunny WebBox is performing a firmware update.
A system error has occurred.
The Sunny WebBox is supplied with voltage.
The Sunny WebBox is not supplied with electricity.
4.2 Connection Area Overview
Position
A
B
C
D
E
F
Description
Connection for GSM antenna cable (not used)
Connection for the plug-in power supply
Module slot for the communication to the PV plant
Module slot (not used)
Network connection for 10/100 MBit Ethernet
SD card slot
Installation Guide
SWebBox20-eng-IUS111411
19
Device overview
SMA America, LLC
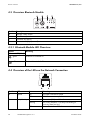
4.3 Overview Bluetooth Module
Position
A
B
C
D
Description
"MODE" rotary switch
"NetID" rotary switch
Bluetooth LED (blue)
Connection display (not used)
4.3.1 Bluetooth Module LED Overview
Status
Meaning
Bluetooth LED (blue)
glows
Bluetooth is switched on.
Bluetooth is switched off.
off
4.4 Overview of the LEDs on the Network Connection
Position LED
A
Speed
B
Status
On
Off
Link / Activity On
Flashing
Off
20
SWebBox20-eng-IUS111411
Meaning
100 MBit connection speed
10 MBit connection speed
Connection (link) established
The Sunny WebBox is currently transmitting or
receiving data (activity).
No connection established
Installation Guide
SMA America, LLC
Assembly
5 Assembly
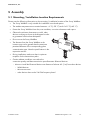
5.1 Mounting / Installation Location Requirements
Please note the following information on the mounting / installation location of the Sunny WebBox:
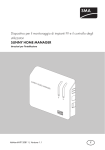
• The Sunny WebBox is only suitable for installation in enclosed spaces.
• The ambient temperature must remain between –4 °F (–20 °C) and +149 °F (+65 °C).
• Protect the Sunny WebBox from dust, wet conditions, corrosive substances and vapors.
• Observe the minimum clearances to walls, other
devices or objects as shown in the diagram in order
to guarantee sufficient heat dissipation.
• Do not cover the Sunny WebBox.
• The distance from the Sunny WebBox to the
inverters may not be greater than the maximum
permitted distance of the corresponding plant
communication type. Note the specifications in the
respective sections.
• During installation, make sure there is optimum
reception for the transmission paths.
• Certain ambient conditions can reduce the
connection quality and data transmission speed between Bluetooth devices.
– Mount or install the Bluetooth device at a distance of at least 4 ft. (1 m) from other devices.
– WLAN devices
– Microwave ovens
– other devices that use the 2.4 GHz frequency band
Installation Guide
SWebBox20-eng-IUS111411
21
Assembly
SMA America, LLC
5.2 Determining the Mounting / Installation Location for Bluetooth
PV Plants
5.2.1 Information on SMA Bluetooth
The devices in your PV plant can communicate and network with a communication device via
Bluetooth. To ensure that the devices communicate with each other and are interlinked, they have to
be set to the same NetID. The NetID is a unique identification number of your PV plant. Thus, the NetID
distinguishes your PV plant from other PV plants.
Determining the NetID for your PV plant.
If your PV plant does not have a NetID yet, you must first determine a free NetID using the
Sunny Explorer software or using the Sunny Beam with Bluetooth and then set this in the
devices of your PV plant.
At the present time, NetID 1 is not supported by the Sunny WebBox.
A direct connection to an individual SMA Bluetooth device via NetID 1 is currently only
possible with the Sunny Explorer software or with the Sunny Beam.
Change the NetID of the Sunny WebBox to the NetID of your PV plant (NetID 2 to NetID F).
5.2.2 Determining the Mounting / Installation Location
Before you mount the Sunny WebBox, you should determine the connection quality at the mounting /
installation location of the Sunny WebBox to your PV plant. The connection quality can be checked
using the Sunny Explorer or the Sunny Beam with Bluetooth. Refer to the user manuals of the relevant
devices. You can change the connection quality by changing the distances of the Bluetooth devices to
one another.
5.2.3 Extending the Bluetooth Network with the SMA Bluetooth
Repeater
The SMA Bluetooth Repeater can help you extend the wireless range of your Bluetooth network. An
SMA Bluetooth Repeater installed on the range limit of the Bluetooth network transmits the data traffic
of the network in its own radio range. This technology enables the setting up of Bluetooth networks
which cover a much larger area than would be possible using the Sunny WebBox alone.
22
SWebBox20-eng-IUS111411
Installation Guide
SMA America, LLC
Assembly
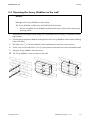
5.3 Mounting the Sunny WebBox on the wall
NOTICE
Damage to the Sunny WebBox or the bracket.
The Sunny WebBox could loosen itself and fall off the bracket.
• Be sure to hold the Sunny WebBox with Bluetooth firmly in place when removing or
inserting cables.
1. Determine the mounting location taking into consideration the mounting / installation location
requirements.
2. Use the drilling template to determine the position of the Sunny WebBox and to mark the drilling
holes with a pen.
3. Drill holes with 1⁄4 in. (6 mm) diameter at the marked points and insert screw anchors.
4. Screw in the screws and leave a 1⁄4 in. (6 mm) clearance between the screw head and the wall.
5. Hang the Sunny WebBox from the screws.
☑ The Sunny WebBox is now mounted on the wall.
Installation Guide
SWebBox20-eng-IUS111411
23
Assembly
SMA America, LLC
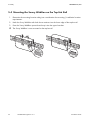
5.4 Mounting the Sunny WebBox on the Top-Hat Rail
1. Determine the mounting location taking into consideration the mounting / installation location
requirements.
2. Hook the Sunny WebBox with both lower retainers into the lower edge of the top-hat rail.
3. Press the Sunny WebBox upwards and snap it into the upper brackets.
☑ The Sunny WebBox is now mounted on the top-hat rail.
24
SWebBox20-eng-IUS111411
Installation Guide
SMA America, LLC
Commissioning
6 Commissioning
6.1 Information on Commissioning
Commission the Sunny WebBox using the Sunny WebBox Wizard
To commission the Sunny WebBox for the first time, use the Sunny WebBox Wizard for the
Sunny WebBox. The Sunny WebBox Wizard is a software package with which you can carry out the
basic configuration of the Sunny WebBox. You can download the Sunny WebBox Wizard from the
download area at www.SMA-America.com. Also remember to refer to the Quick Guide for
commissioning Sunny WebBox
Proceed as follows:
• Configure the Bluetooth settings of the Sunny WebBox (see page 26).
• Connect the Sunny WebBox directly to the computer (see page 27) or to the local network
(see page 35).
• Start the Sunny WebBox Wizard on your computer.
• Follow the instructions in the Sunny WebBox Wizard.
Commissioning the Sunny WebBox without the Sunny WebBox Wizard
Proceed as follows to commission the Sunny WebBox without the Sunny WebBox Wizard:
• Configure the Bluetooth settings of the Sunny WebBox (see page 26).
• Connect the Sunny WebBox directly to the computer (see page 27).
• Configure the network settings on the computer (see page 28).
• Configure the Sunny WebBox for the local network (see page 33).
Installation Guide
SWebBox20-eng-IUS111411
25
Commissioning
SMA America, LLC
6.2 Configuring Bluetooth Settings for the Sunny WebBox
The Bluetooth settings of the Sunny WebBox are to be made using the rotary switch of the Bluetooth
module using a screwdriver (3⁄32 in. (2.5 mm)).
NOTICE
Changing the NetID during operation of the Sunny WebBox
If the NetID of the Sunny WebBox is changed during operation, the Sunny WebBox gets
restarted. Then, all devices with the same NetID are searched for and displayed in the plant
tree.
At the present time, NetID 1 is not supported by the Sunny WebBox.
A direct connection to an individual SMA Bluetooth device via NetID 1 is currently only
possible with the Sunny Explorer software or the Sunny Beam with Bluetooth.
Change the NetID of the Sunny WebBox to the NetID of your PV plant (NetID 2 to NetID F).
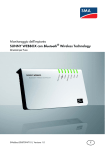
1. Turn the "MODE" rotary switch to position "0". The rotary switch must always be set to position
"0" (status on delivery). Other positions are not permitted and are intended for SMA Service
only.
2. Turn the arrow of the "NetID" rotary switch to the
NetID of the PV plant. For a layout of the switch
positions, see the table.
NetID
0
1 (Status upon delivery)
2-F
Function
Bluetooth is switched off.
No function
Bluetooth is switched on.
The Sunny WebBox can network with all SMA Bluetooth
products with the same NetID. Connecting to the Sunny Beam
with Bluetooth or Sunny Explorer is not possible.
☑ The Sunny WebBox is prepared for Bluetooth communication.
You can now directly connect the Sunny WebBox to the computer with which you would like to
configure the Sunny WebBox (see page 27).
26
SWebBox20-eng-IUS111411
Installation Guide
SMA America, LLC
Commissioning
6.3 Connecting the Sunny WebBox Directly to the Computer
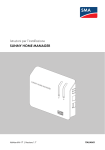
1. Use the blue network cable (Ethernet crossover cable) to connect the Sunny WebBox directly
to the computer (see ➀ ). The terminal on the computer is generally marked with the same
symbol as the network connection of the Sunny WebBox. If necessary, refer to the computer
manual.
Recommendation on network cabling
Should the network cable supplied be too short, observe the following when buying a
longer cable:
• You will need an Ethernet crossover cable.
• Unnecessarily long cables have an adverse effect on the signal quality. The
maximum permitted cable length is 328 ft. (100 m) per segment.
• Use a high quality, at least category 5 (FTP Cat 5) or higher shielded twisted pair
cable.
2. Connect the plug-in power supply to the Sunny WebBox and plug it into the socket outlet
(see ➁ ).
☑ The Sunny WebBox starts up and is ready for operation once the "SYSTEM" and "POWER"
LEDs are green. The start-up procedure can take up to 90 seconds.
– If the "SYSTEM" or "POWER" LEDs are not glow green, please refer to section
11.1 ”General Troubleshooting for the Sunny WebBox” (page 53).
Now set the computer to the network area of the Sunny WebBox (see section 6.4 ”Configuring
Network Settings on the Computer” (page 28)).
Installation Guide
SWebBox20-eng-IUS111411
27
Commissioning
SMA America, LLC
6.4 Configuring Network Settings on the Computer
6.4.1 Information on Network Settings on the Computer
Before you can operate the Sunny WebBox for the first time without the Sunny WebBox Wizard, you
must set the computer to the network area of the Sunny WebBox in its delivered status. Read the
section which relates to the operating system of your computer. If you use an operating system that is
not described, refer to the manual of your operating system to find out how to set the computer to IP
address 192.168.0.100 and the Subnet mask to 255.255.255.0. You can then configure the Sunny
WebBox for a local network from the user interface (see page 33).
User rights in the operating system
You need the respective user rights on the computer used to commission the Sunny
WebBox, in order to be able to make changes to the network settings. If you have any
questions, consult your system administrator.
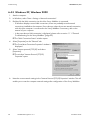
6.4.2 Windows 7, Windows Vista
1. Start the computer.
2. In Windows select "Start"
3. Enter "ncpa.cpl" in the search field and press Enter.
☑ The "Network Connections" window opens.
4. Double-click the LAN connection via which the Sunny WebBox is connected.
– If Windows displays several LAN connections, there are probably several network
connections installed on the computer. Ensure that you select the correct network connection,
with which the computer is connected to the Sunny WebBox. If necessary, refer to the
manual of your computer.
– If no LAN connection is displayed, please refer to section 11.1 ”General Troubleshooting
for the Sunny WebBox” (page 53).
☑ The "Local Area Connection Status" window opens.
5. Select [Properties] on the "General" tab.
28
SWebBox20-eng-IUS111411
Installation Guide
SMA America, LLC
Commissioning
☑ The "Local Area Connection Properties" window is
displayed.
6. Select "Internet protocol version 4 (TCP/IPv4)" and
select [Properties].
☑ The window "Internet Protocol Version 4
(TCP/IPv4) Properties" opens.
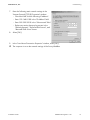
7. Make a note of the network settings in the window "Internet Protocol Version 4 (TCP/IPv4)
Properties". This will enable you to reset the computer network settings after configuration of the
Sunny WebBox.
8. Enter the following static network settings for the
computer in the "Internet Protocol Version 4
(TCP/IPv4) Properties" window.
– Check the field "Use the following IP address".
– Enter 192.168.0.100 in the "IP Address" field.
– Enter 255.255.255.0 in the "Subnet mask" field.
– Delete any entries that may be present in the
"Default gateway", "Preferred DNS server", and
"Alternate DNS server" boxes.
9. Select [OK].
10. In the "Local Area Connection Properties" window,
select [OK].
☑ The computer is set to the network settings of the
Sunny WebBox.
Installation Guide
SWebBox20-eng-IUS111411
29
Commissioning
SMA America, LLC
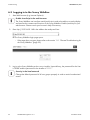
6.4.3 Windows XP, Windows 2000
1. Start the computer.
2. In Windows, select "Start > Settings > Network connections".
3. Double-click the LAN connection via which the Sunny WebBox is connected.
– If Windows displays several LAN connections, there are probably several network
connections installed on the computer. Ensure that you select the correct network connection,
with which the computer is connected to the Sunny WebBox. If necessary, refer to the
manual of your computer.
– In the event that no LAN connection is displayed, please refer to section 11.1 ”General
Troubleshooting for the Sunny WebBox” (page 53).
☑ The "LAN Connection Status" window opens.
4. Select [Properties] on the "General" tab.
☑ The "Local Area Connection Properties" window is
displayed.
5. Select "Internet protocol (TCP/IP)" and select
[Properties].
☑ The window "Internet Protocol (TCP/IP)
Properties" opens.
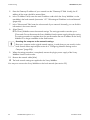
6. Note the current network settings in the "Internet Protocol (TCP/IP) Properties" window. This will
enable you to reset the computer network settings after configuration of the Sunny WebBox.
30
SWebBox20-eng-IUS111411
Installation Guide
SMA America, LLC
Commissioning
7. Enter the following static network settings in the
"Internet Protocol (TCP/IP) Properties" window:
– Check the field "Use the following IP address".
– Enter 192.168.0.100 in the "IP Address" field.
– Enter 255.255.255.0 in the "Subnet mask" field.
– Delete any entries that may be present in the
"Default gateway", "Preferred DNS server", and
"Alternate DNS server" boxes.
8. Select [OK].
9. In the "Local Area Connection Properties" window, select [OK].
☑ The computer is set to the network settings of the Sunny WebBox.
Installation Guide
SWebBox20-eng-IUS111411
31
Commissioning
SMA America, LLC
6.5 Logging in to the Sunny WebBox
1. Start Web browser (e.g. Internet Explorer).
Enable JavaScript in the web browser
The Sunny WebBox user interface needs JavaScript in order to be able to correctly display
and execute the contents and functions of the Sunny WebBox. Enable JavaScript in your
web browser. Please consult your browser's Help if necessary.
2. Enter http://192.168.0.168 in the address bar and press Enter.
☑ The Sunny WebBox login page opens.
– If the page does not open, please refer to the section 11.1 ”General Troubleshooting for
the Sunny WebBox” (page 53).
3. Log in to the Sunny WebBox as the user or installer. Upon delivery, the password for the User
is "0000" and the password for the Installer is "1111".
Security in the local network
Change the default password of all user groups promptly in order to avoid unauthorized
access.
32
SWebBox20-eng-IUS111411
Installation Guide
SMA America, LLC
Commissioning
6.6 Configuring Sunny WebBox for the Local Network
6.6.1 Information on Integrating the Sunny WebBox into a Local
Network.
The next sections describe how to integrate the Sunny WebBox via static network settings into your
local network with a router.
In rare cases, additional network settings are necessary. Examples of further network settings include
integrating the Sunny WebBox via DHCP into your network, there is a proxy server in the network or
making the Sunny WebBox accessible from the Internet. If this is the case, contact your network
administrator and refer to section 7 ”Extended Configuration” (page 36).
Protecting the Ethernet network from external attacks
Protect your Ethernet network through suitable security measures such as a firewall and
through the allocation of secure passwords (see the Sunny WebBox user manual). After
the first login to the Sunny WebBox please change the passwords for each user group.
6.6.2 Applying Static Network Settings to the Sunny WebBox
1. Click the button "Settings" in the toolbar.
2. Select the "External Communication > Ethernet" parameter group.
3. Select [Edit].
4. In the "DNS server IP" field enter the IP address of the DNS server (Domain Name System
Server). Usually, the IP address of the router should be entered here.
Installation Guide
SWebBox20-eng-IUS111411
33
Commissioning
SMA America, LLC
5. Enter the Gateway IP address of your network into the "Gateway IP" field. Usually, the IP
address of the router should be entered here.
6. In the "IP Address" field, enter the static IP address under which the Sunny WebBox is to be
reachable in the local network (see section 13.7 ”Allocating an IP Address in a Local Network”
(page 64)).
7. In the "Subnet mask" field, enter the subnet mask of your network. Normally, you can find this
information in the router manual.
8. Select [Save].
☑ The Sunny WebBox saves the network settings. The saving procedure can take up to
30 seconds. Do not disconnect the Sunny WebBox from the power supply during the saving.
The saving procedure is complete when you are directed to the new IP address or the Sunny
WebBox is no longer available via the web browser.
Resetting the computer to the network settings.
Reset your computer to the original network settings, in order that you can reach it via the
local network when required (see section 6.4 ”Configuring Network Settings on the
Computer” (page 28)).
9. When the saving procedure is completed, remove the plug-in power supply of the Sunny
WebBox from the socket outlet.
10. Remove the network cable (blue).
☑ The local network settings are applied to the Sunny WebBox.
You may now connect the Sunny WebBox to the local network (see section 35).
34
SWebBox20-eng-IUS111411
Installation Guide
SMA America, LLC
Commissioning
6.6.3 Connecting the Sunny WebBox to the Local Network
1. Connect the Sunny WebBox directly to the receiver (e.g. router, switch or hub) of the local
network using the red network cable (patch cable) (see ➀ ). The terminal of the receiver is
normally identified by the same symbol as the Sunny WebBox network connection. If necessary,
please refer to the receiver manual.
Recommendation on network cabling
Should the network cable supplied be too short, observe the following when buying a
longer cable:
• You require a patch cable.
• Unnecessarily long cables have an adverse effect on the signal quality. The
maximum permitted cable length is 328 ft. (100 m) per segment.
• Use a high quality, at least category 5 (FTP Cat 5) or higher shielded twisted pair
cable.
2. Connect the plug-in power supply to the Sunny WebBox and plug it into the socket outlet
(see ➁ ).
☑ The Sunny WebBox starts up and is ready for operation once the "SYSTEM" and "POWER"
LEDs are green. The start-up procedure can take up to 90 seconds.
– If the "SYSTEM" or "POWER" LEDs are not glow green, please refer to section
11.1 ”General Troubleshooting for the Sunny WebBox” (page 53).
The user interface of the Sunny WebBox is now available via the new IP address. You can now make
further settings on the Sunny WebBox. Place the Sunny WebBox at the selected mounting /
installation location.
Installation Guide
SWebBox20-eng-IUS111411
35
Extended Configuration
SMA America, LLC
7 Extended Configuration
7.1 Ethernet Network
7.1.1 Information on Extended Network Settings
Changing extended network settings
Do not change any network settings in the network devices if you are not clear about the
effects of the change. Changes to values could lead to the existing network not functioning
at all or only working partially. If you have any questions, contact your network
administrator.
Sunny WebBox Wizard
It is recommended to use the Sunny WebBox Wizard for commissioning the Sunny
WebBox and for its integration into a network. You can download the Sunny WebBox
Wizard at www.SMA-America.com.
You can assign static network settings to the Sunny WebBox or obtain these dynamically via a DHCP
server. Additionally, a proxy server can be used for the Internet connection.
If you would like to make the Sunny WebBox available on the Internet, for example to allow direct
access to the Sunny WebBox via Sunny Portal, you must configure port redirection in your router. It
may be necessary to adjust the HTTP port and the NAT port.
7.1.2 Activating / Deactivating DHCP
The Sunny WebBox can obtain its network settings via a DHCP server (Dynamic Host Configuration
Protocol). If activated, the IP address, subnet mask, gateway and DNS server are obtained
automatically from the DHCP server during the start of the Sunny WebBox. Use the Sunny WebBox
Wizard to find the Sunny WebBox in your network.
Activating DHCP
1. Select the Sunny WebBox in the plant tree and select "Settings" in the device menu
or
Click the button "Settings" in the toolbar.
2. Select the parameter group "External Communication > Ethernet".
3. Select [Edit].
4. Under "DHCP" select "Yes" in the "Activated" field in order to get the network settings
dynamically assigned.
5. Select [Save].
☑ The Sunny WebBox obtains the network settings automatically via the DHCP server.
36
SWebBox20-eng-IUS111411
Installation Guide
SMA America, LLC
Extended Configuration
Deactivating DHCP
1. Select the Sunny WebBox in the plant tree and select "Settings" in the device menu
or
Click the button "Settings" in the toolbar.
2. Select the parameter group "External Communication > Ethernet".
3. Select [Edit].
4. Under "DHCP", select "No" in the "Activated" field to assign the network settings statically
(see section 6.6.2 ”Applying Static Network Settings to the Sunny WebBox” (page 33)) (Status
on delivery).
5. Select [Save].
6. The network settings are assigned manually.
7.1.3 Proxy Server
If there is a proxy server in your network, enter the proxy settings here. The Proxy settings of the Sunny
WebBox are used for connection to the Sunny Portal and for firmware updates to the Sunny WebBox
or the devices in your PV plant.
Using the Proxy Server
1. Select the Sunny WebBox in the plant tree and select "Settings" in the device menu
or
Click the button "Settings" in the toolbar.
2. In the "Activated" field, select "Yes" to use the proxy server.
3. In the "Login" field, enter the login name for the proxy server.
4. In the "Port" field, enter the network port at which the proxy server is available.
5. In the "Password" field, enter the password for the proxy server.
6. Confirm the password entered in the "Confirm the password" field.
7. In the "Server" field, enter the Proxy Server IP address.
8. Select [Save].
☑ The proxy server will be used.
Not using the proxy server
1. Select the Sunny WebBox in the plant tree and select "Settings" in the device menu
or
Click the button "Settings" in the toolbar.
2. In the "Activated" field select "No" to not use the Proxy server.
3. Select [Save].
☑ The Proxy server will not be used.
Installation Guide
SWebBox20-eng-IUS111411
37
Extended Configuration
SMA America, LLC
7.1.4 Setting the HTTP Port
Adjusting the network ports
Changing the ports is only necessary in rare cases. Before adjusting the ports, contact your
network administrator.
The HTTP port is the network port at which the Sunny WebBox user interface is available. The HTTP
Port is set to 80 by default. Should another port be entered, it should be explicitly specified when the
user interface is invoked.
Example: The Sunny WebBox IP address is 192.168.0.168 and the HTTP port was changed to
8080; thus "http://192.168.0.168:8080" must then be entered in the address bar of the web
browser.
1. Select the Sunny WebBox in the plant tree and select "Settings" in the device menu
or
Click the button "Settings" in the toolbar.
2. Select the "External Communication > HTTP" parameter group.
3. Select [Edit].
4. Enter the required port in the "Port" field. (Status upon delivery: Port 80)
5. Select [Save].
☑ The HTTP port is saved.
7.1.5 Setting the NAT Port
Adjusting the network ports
Changing the ports is only necessary in rare cases. Before adjusting the ports, contact your
network administrator.
During data transmission, the Sunny WebBox sends the IP address and port at which the Sunny
WebBox is available on the Internet to the Sunny Portal. For this, the respective port must be released
by the router. If the NAT (Network Address Translation) in the router is changed, you must specify the
network port set in the router. The NAT Port is set to 80 by default.
1. Select the Sunny WebBox in the plant tree and select "Settings" in the device menu
or
Click the button "Settings" in the toolbar.
2. Select the parameter group "External Communication > Ethernet > Nat".
3. Select [Edit].
4. Enter the required port in the "Port" field.
5. Select [Save].
☑ The NAT port is saved.
38
SWebBox20-eng-IUS111411
Installation Guide
SMA America, LLC
Service Functions
8 Service Functions
8.1 Updating the Firmware for Sunny WebBox
8.1.1 Information
You have the option of updating the Sunny WebBox firmware. The firmware update can be
performed online from the Internet or locally via the SD card. The existing settings of the Sunny
WebBox and data from the PV plant remain available after the update procedure. In order to keep
the Sunny WebBox firmware up to date at all times, automatic firmware updates via the Internet are
recommended.
The update procedure is indicated by the flashing orange "SYSTEM" LED and occasionally by a red
running light across all LEDs. The firmware update is complete when the "SYSTEM" LED glows green.
An update procedure can take up to a maximum of 20 minutes.
The user interface is temporarily unavailable.
During the update, the Sunny WebBox restarts and you cannot access the Sunny WebBox
user interface for a brief period.
Do not disconnect the Sunny WebBox from the power distribution grid during the
update process.
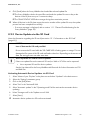
8.1.2 Firmware update from the Internet (recommended)
If the Sunny WebBox has Internet access, you can update the Sunny WebBox via the Internet
automatically or manually.
Activating / Deactivating automatic firmware update
When the automatic firmware update is activated, the Sunny WebBox checks for new firmware
updates once a day. If a new firmware update is available, the Sunny WebBox downloads the
firmware update from the Internet. The update procedure starts automatically the following night
(11:00 p.m.).
Unexpected interruption of an automatically started update procedure
If an automatically started update procedure of the Sunny WebBox is interrupted (e.g. as
a result of a power outage), the Sunny WebBox restarts the update procedure in the next
defined time period.
1. Select the Sunny WebBox in the plant tree and select "Settings" in the device menu
or
Click the button "Settings" in the toolbar.
2. Select the "Device > Update" parameter group.
3. Click on the [Edit] button.
Installation Guide
SWebBox20-eng-IUS111411
39
Service Functions
SMA America, LLC
4. In the "Automatic update" field, select "Yes" in order to activate the automatic firmware update
(status on delivery)
or
In the "Automatic update" field, select "No" to deactivate the automatic firmware update.
5. Select [Save].
☑ The automatic firmware update is set.
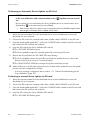
Manually Updating the Firmware
NOTICE
Loss of plant data possible!
Only perform a manual firmware update when the PV plant is not in operation (e.g. during
the night). Otherwise, losses may occur during the recording of the plant data.
You can also carry out manual updates when the automatic firmware update is activated.
1. Select the Sunny WebBox in the plant tree and select "Settings" in the device menu
or
Click the button "Settings" in the toolbar.
2. Select the "Device > Update" parameter group.
3. Select [Edit].
4. In the "Check for update and install it" field, select "Execute".
5. Select [Save].
☑ The Sunny WebBox checks whether a new firmware update is available. If a new firmware
update is available, the Sunny WebBox downloads the firmware update from the Internet and
starts the update procedure.
40
SWebBox20-eng-IUS111411
Installation Guide
SMA America, LLC
Service Functions
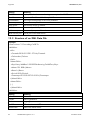
8.1.3 Firmware Update via the SD Card
NOTICE
Loss of plant data possible!
Only perform a manual firmware update when the PV plant is not in operation (e.g. during
the night). Otherwise, losses may occur during the recording of the plant data.
NOTICE
Loss of data on the SD card possible!
Do not remove the SD card while the "SD CARD" LED is flashing green or orange. This can
damage the file system of the SD card and lead to data loss. Depending on the amount of
data, the saving process can take some time.
Use a separate SD card for firmware updates
Use a separate SD card for firmware updates, which contains only the update files for the
Sunny WebBox. If there are update files on the external SD card, exporting XML and CSV
files is deactivated.
Take note of the information on the SD card (see section 13.1 ”Information on the SD Card”
(page 61)).
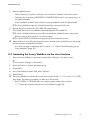
1. Select the required update file in the download section of www.SMA-America.com and
download it to your computer.
2. Connect the SD card to the computer and create a folder called "UPDATE" on the SD card.
3. Copy the downloaded update file (*.up2) to the "UPDATE" folder created on the SD card, and
then remove the SD card from the computer.
4. Remove the plug-in power supply of the Sunny WebBox from the plug socket.
5. Insert the SD card into the SD card slot of the Sunny WebBox.
6. Insert the plug-in power supply of the Sunny WebBox into the socket.
☑ After approx. 90 seconds, the Sunny WebBox is ready for operation and the update process
starts.
Installation Guide
SWebBox20-eng-IUS111411
41
Service Functions
SMA America, LLC
8.2 Carrying Out Device Updates
8.2.1 Notes
You have the facility to update the firmware of the devices in your PV plant via Sunny WebBox. The
Sunny WebBox can be used to update the firmware of the following devices:
• SMA inverters with integrated Bluetooth:
– From Software Package 2.06: SB 3000TL-20/SB 4000TL-20/SB 5000TL-20
(SB = Sunny Boy)
– SB 2000HF/SB 2500HF/SB 3000HF
– STP 10000TL-10/STP 12000TL-10/STP 15000TL-10/STP 17000TL-10
(STP = Sunny Tripower)
• SMA Bluetooth Piggy-Back from software version 02.00.00.R
•
SMA Bluetooth Repeater
• SMA Power Injector with Bluetooth
The device update can be performed online from the Internet or locally via the SD card. The existing
settings of the Sunny WebBox and data from the PV plant remain available after the update
procedure. In order to always keep the firmware of the devices in your PV plant up to date, automatic
device firmware updates via the Internet are recommended.
NOTICE
Updates are not performed for devices with the padlock symbol (
)!
Devices with insufficient access rights (indicated by a lock symbol in the plant tree (
connect to the Sunny WebBox are not updated.
)) to
• If the access rights are insufficient, change the password of the device in question to
the plant password (see the Sunny WebBox User Manual).
Do not disconnect the Sunny WebBox from the power distribution grid during the
update process.
NOTICE
Sufficient DC input voltage is required to update the devices!
In some inverters, a device update is only possible from a certain DC input voltage. The DC
input voltage can be too low for a device update, depending on the time of the day,
weather situation or the status of the PV modules (e.g. covered by snow or leaves).
42
SWebBox20-eng-IUS111411
Installation Guide
SMA America, LLC
Service Functions
NOTICE
Risk of Yield Loss!
For some inverters, device updates are only possible from a specific DC input voltage. The
inverters in question do not feed energy during a device update. This can result in
temporary yield losses.
Update status
The respective update status for the entire PV plant, for the individual devices and update files is shown
on the user interface of the Sunny WebBox.
Update status of the PV plant
The update status for the overall PV plant is displayed in both the status bar and the "Overview" tab
in the plant view.
Symbol Update status
OKa
a
Information
Meaning
No update files are available, or the update function is not
activated.
"There is information on the device update."
Warning
"There are warnings regarding the device update."
Only visible on the "Overview" tab.
Device update status
Update status
"OK"
"Update available"
"Update in process"
"Update failed"
Meaning
No update files are available for this device, or the update
function is not activated.
The update file is ready for sending to the devices in the PV plant.
The update process is underway.
The update process was not successful. The update file was not
sent to all devices in the PV plant.
Status of the update file
Status
"Download available"
"Ready"
"Sending"
"Waiting"
Installation Guide
Meaning
The update file is available for downloading.
The update file was downloaded and can be sent to the devices
in the PV plant.
The update file is being sent to the devices in the PV plant.
The update file is in the queue and will be sent to the devices in the
PV plant as soon as possible.
SWebBox20-eng-IUS111411
43
Service Functions
SMA America, LLC
8.2.2 Device update via the Internet (recommended)
If the Sunny WebBox has Internet access, you can update the firmware of the devices in your PV plant
automatically or manually from the Internet.
Activating automatic device update
If automatic device updates are activated, the Sunny WebBox checks whether a new device update
is available once a day, between 10 pm and 3 am. If a new device update is available, the
Sunny WebBox downloads the device update from the Internet. In SMA inverters with upgraded
SMA Bluetooth piggy-backs, the update process starts on the following day as a result of overnight
shutdown (11 am). For all other supported SMA devices, the update process starts in the following
night (4 am).
Unexpected interruption of an automatically started update procedure
If an automatically started update procedure of the Sunny WebBox is interrupted (e.g. as
a result of a power outage or if the update source changes), the Sunny WebBox restarts
the update procedure the following day.
1. Select "Name of your PV plant" in the plant tree and select "Updates" in the device menu.
2. Select the "Settings" parameter group.
3. Click on the [Edit] button.
4. Select "Yes" in the "Activated" field.
5. Select "Automatic update" in the "Operating mode" field.
6. In the field "Update source", select "Update portal".
7. Select [Save].
☑ Automatic device updating is activated.
Performing a Manual Device Update
1. Select "Name of your plant" in the plant tree, and select "Updates" in the device menu.
2. Select the device type (e.g. SB5000TL-20, SB4000TL-20) for which you want to carry out an
update manually.
3. Select the required update file in the "Available updates" area, and click [Download].
☑ The Sunny WebBox downloads the update file from the Internet and indicates when the
process is complete by marking the update file as "Ready" in the "Available updates" area.
– If the update file cannot be downloaded, your computer's Internet connection may be
interrupted. Reestablish Internet access. If necessary, contact your Internet service provider.
44
SWebBox20-eng-IUS111411
Installation Guide
SMA America, LLC
Service Functions
4. Click [Send] when the Sunny WebBox has loaded the selected update file.
☑ The Sunny WebBox checks the saved files and sends the update file once a day to the
devices in the PV plant on up to 5 consecutive days.
☑ The "PLANT STATUS" LED flashes orange during the transmission process
☑ When all devices in the PV plant report the version number of the update file sent, the update
process has been completed successfully.
– If an error message is displayed, refer to section 11.1 ”General Troubleshooting for the
Sunny WebBox” (page 53).
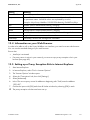
8.2.3 Device Update via the SD Card
Note the information regarding the SD card (see section 13.1 ”Information on the SD Card”
(page 61)).
NOTICE
Loss of data on the SD card possible!
Do not remove the SD card while the "SD CARD" LED is flashing green or orange. This can
damage the file system of the SD card and lead to data loss. Depending on the amount of
data, the saving process can take some time.
Use a separate SD card for device updates.
If there are update files on the external SD card, no XML or SCV files can be exported.
• Use a separate SD card for device updates.
See the User Manual for the Sunny WebBox with Bluetooth for further information on CSV
and XML files.
Activating Automatic Device Updates via SD Card
1. Select "Name of your PV plant" in the plant tree and select "Updates" in the device menu.
2. Select the "Settings" parameter group.
3. Click on the [Edit] button.
4. Select "Yes" in the "Activated" field.
5. Select "Automatic update" in the "Operating mode" field to activate the automatic device
updating.
6. Select "Storage card" in the "Update source" field.
7. Select [Save].
☑ Automatic device updates via SD card are activated.
Installation Guide
SWebBox20-eng-IUS111411
45
Service Functions
SMA America, LLC
Performing an Automatic Device Update via SD Card
NOTICE
In the case of devices with communication errors ( ) updates are not carried
out.
Devices which are not connected to the Sunny WebBox due to a communication error
(indicated by
in the plant tree) are not updated.
• Wait until the devices in question are connected to the Sunny WebBox again before
executing the automatic device update via SD card.
1. Select the required update file in the download section of www.SMA-America.com and
download it to your computer.
2. Connect the SD card to the computer and create a folder called "UPDATE" on the SD card.
3. Copy the downloaded update file (*.up2) to the "UPDATE" folder created on the SD card, and
then remove the SD card from the computer.
4. Insert the SD card into the Sunny WebBox SD card slot.
☑ The "SD CARD" LED flashes green.
☑ The Sunny WebBox copies the selected update file to the internal SD card.
5. Remove the SD card when the "SD CARD" LED stops flashing.
☑ The Sunny WebBox checks the saved files and sends the update file once a day to the
devices in the PV plant on up to 5 consecutive days.
☑ The "PLANT STATUS" LED flashes orange during the transmission process.
☑ When all devices in the PV plant report the version number of the update file sent, the update
process has been completed successfully.
– If an error message is displayed, refer to section 11.1 ”General Troubleshooting for the
Sunny WebBox” (page 53).
Performing a manual device update via SD card
1. Select the required update file in the download section of www.SMA-America.com and
download it to your computer.
2. Connect the SD card to the computer and create a folder called "UPDATE" on the SD card.
3. Copy the downloaded update file (*.up2) to the "UPDATE" folder created on the SD card, and
then remove the SD card from the computer.
4. Insert the SD card into the Sunny WebBox SD card slot.
☑ The "SD CARD" LED flashes green.
46
SWebBox20-eng-IUS111411
Installation Guide
SMA America, LLC
Service Functions
5. Start the update process:
– Select "Name of your plant" in the plant tree, and select "Updates" in the device menu.
– Select the device type (e.g. SB5000TL-20, SB4000TL-20) for which you want to carry out
an update manually.
– In the "Available updates" area, select the required update file and click [Download].
☑ The Sunny WebBox copies the selected update file to the internal SD card.
6. Remove the SD card when the "SD CARD" LED stops flashing.
7. Click [Send] when the Sunny WebBox has loaded the selected update file.
☑ The Sunny WebBox checks the saved files and sends the update file once a day to the
devices in the PV plant on up to 5 consecutive days.
☑ The "PLANT STATUS" LED flashes orange during the transmission process.
☑ When all devices in the PV plant report the version number of the update file sent, the update
process has been completed successfully.
– If an error message is displayed, refer to section 11.1 ”General Troubleshooting for the
Sunny WebBox” (page 53).
8.3 Restarting the Sunny WebBox via the User Interface
1. Select the Sunny WebBox in the plant tree and select "Settings" in the device menu
or
Click the button "Settings" in the toolbar.
2. Select the "Device > System" parameter group.
3. Select [Edit].
4. In the "Initiate device restart" field, select "Execute".
5. Select [Save].
☑ The Sunny WebBox is restarted. The restart was successful if the "SYSTEM" and "POWER" LEDs
glow again. The start-up procedure can take up to 90 seconds.
– If the "SYSTEM" or "POWER" LEDs are not glow green, please refer to section
11.1 ”General Troubleshooting for the Sunny WebBox” (page 53).
Installation Guide
SWebBox20-eng-IUS111411
47
Service Functions
SMA America, LLC
8.4 Resetting the Sunny WebBox Using the Reset Button
You can reset the Sunny WebBox through a small hole in the rear side of the Sunny WebBox, behind
which the Reset button is hidden. For this to be done, the Sunny WebBox must have electrical power.
Data backup
Before you reset the Sunny WebBox, take note of all settings such as network or portal
settings if necessary. In addition save the PV plant data, for example via the SD card or the
FTP download, in order to avoid data losses.
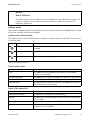
Depending on how long you press the Reset button, the Sunny WebBox performs the actions listed in
the following table.
Duration
1 - 5 seconds
5 - 15 seconds
15 - 30 seconds
Action
Reset the passwords to the delivered status. All other settings and
PV plant data will be saved.
Reset the network settings to the delivered status. All other settings
and PV plant data will be saved.
Resets all settings (event memory, network settings, modem
settings, portal settings and passwords) of the Sunny WebBox
back to the delivered status. PV plant data will be fully deleted.
1. Use a sharp object to press the hidden reset button
through the hole.
☑ The Sunny WebBox is reset.
48
SWebBox20-eng-IUS111411
Installation Guide
SMA America, LLC
Service Functions
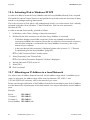
8.5 Determining Current Settings of the Sunny WebBox via the SD
Card
The following steps allow you to determine the current settings and the current firmware of the Sunny
WebBox if you do not have access to the user interface.
Take note of the information on the SD card (see section 13.1 ”Information on the SD Card”
(page 61)).
1. Insert the SD card into the Sunny WebBox SD card slot.
☑ The Sunny WebBox creates a folder with the name "WEBBOX_[Serial number]" on the SD
card and saves the "config.xml" file there. The writing process is complete when the "SD
CARD" LED glows continuously. Example: WEBBOX_0155000123\config.xml
2. When the "SD CARD" LED glows continuously, remove the SD card from the Sunny WebBox
SD card slot.
3. Read the SD card using a computer with an SD card reader.
4. Open the "config.xml" file in the WebBox_[Serial number] folder with a text editor or a web
browser.
☑ Read the values of the network settings of the Sunny WebBox (see section 13.2 ”Structure of
the Config.xml File” (page 61)).
Installation Guide
SWebBox20-eng-IUS111411
49
Maintenance and Care
SMA America, LLC
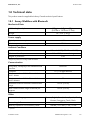
9 Maintenance and Care
9.1 Maintenance
Conduct regular visual inspections of the Sunny WebBox to check for external damage or soiling.
9.2 Care
NOTICE
Damage to the device due to ingress of liquids.
• The Sunny WebBox is not waterproof. Protect the Sunny WebBox from wet
conditions.
• When cleaning the device, only use a lightly moistened cloth in order to prevent
water from entering the device. If there is a considerable amount of dirt, you can also
use a mild, non-abrasive, non-corrosive cleaning agent.
50
SWebBox20-eng-IUS111411
Installation Guide
SMA America, LLC
Decommissioning
10 Decommissioning
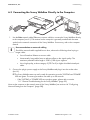
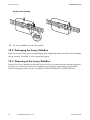
10.1 Disassembling the Sunny WebBox
NOTICE
Loss of plant data possible!
Only disconnect the Sunny WebBox from the power distribution grid when the PV plant is
not in operation (e.g. at night). Otherwise, losses may occur during the recording of the
plant data.
NOTICE
Loss of data on the SD card possible
Do not disconnect the Sunny WebBox from the power distribution grid while the "SD
CARD" LED is flashing green or orange. This can damage the file system of the SD card
and lead to data loss. Depending on the amount of data, the writing process can take some
time.
1. Remove the plug-in power supply of the Sunny WebBox from the socket outlet.
2. Remove the DC plug of the plug-in power supply from the enclosure.
3. Remove the Sunny WebBox network cable.
4. Depending on the mounting type, dismount the Sunny WebBox as follows:
Wall mounting
Installation Guide
SWebBox20-eng-IUS111411
51
Decommissioning
SMA America, LLC
Top-hat rail mounting
☑ The Sunny WebBox has been dismounted.
10.2 Packaging the Sunny WebBox
When returning the device to us, use packaging which adequately protects the device from damage
during transport. If possible, use the original packaging.
10.3 Disposing of the Sunny WebBox
Dispose of the Sunny WebBox at the end of its service life in accordance with the disposal regulations
for electronic waste which apply at the installation site at that time. Alternatively, send it back to
SMA with shipping paid by sender, and labeled "ZUR ENTSORGUNG" ("FOR DISPOSAL").
52
SWebBox20-eng-IUS111411
Installation Guide
SMA America, LLC
Failure Search
11 Failure Search
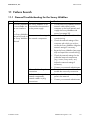
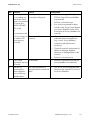
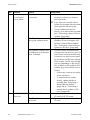
11.1 General Troubleshooting for the Sunny WebBox
No. Problem
1
The Sunny WebBox
is not available via
the user interface.
Cause
Rectification
The Sunny WebBox is not
• Connect the Sunny WebBox with the
connected to the network or
network cable directly to the
to the power supply.
computer or the local network and
supply the Sunny WebBox with
or
power (see page 25).
The Sunny WebBox
Incorrect
network
settings
of
•
Use the Sunny WebBox Wizard for
cannot be found via
the
network
components.
commissioning.
the Sunny WebBox
• Check the network settings of the
Wizard.
computer with which you wish to
access the Sunny WebBox. Align the
network settings if necessary.
• Reset the Sunny WebBox (see page
48) and repeat the commissioning.
• Check the network settings for the
individual network components
(e.g., router, Proxy server, etc.).
Adjust the network settings if
necessary.
A firewall is blocking the
connection.
Defective or damaged
network components,
network cables or plug
connections.
Installation Guide
• Contact your network administrator.
• Deactivate the computer firewall or
enable the necessary connection.
• Replace the defective or damaged
parts in the network.
• Contact your network administrator.
SWebBox20-eng-IUS111411
53
Failure Search
SMA America, LLC
No. Problem
Cause
1
The Sunny WebBox The web browser is
is not available via incorrectly configured.
the user interface.
or
The Sunny WebBox
cannot be found via
the Sunny WebBox
Wizard.
Rectification
• If there is a proxy server in your
network, you must enter an
exception for the proxy server in
your web browser (see section
13.4 ”Information on your Web
Browser” (page 63)).
There is no Internet
• Reestablish Internet access. If
connection.
necessary, contact your Internet
service provider.
The Sunny WebBox has not • Remove the Sunny WebBox plug-in
been started correctly.
power supply from the socket-outlet
and plug it back in after a short time
in order to restart the Sunny
WebBox. Note that this can lead to
loss of collected plant data.
The proxy server does not
• Use a proxy server that supports
support IPv6.
IPv6.
A system error has
• Remove the Sunny WebBox plug-in
occurred.
power supply from the socket-outlet
and plug it back in after a short time
in order to restart the Sunny
WebBox. Note that this can lead to
loss of collected plant data.
2
The "SYSTEM" LED is
flashing red
3
The "POWER" LED is The Sunny WebBox is not
off.
supplied with electricity.
54
SWebBox20-eng-IUS111411
• Contact the SMA Serviceline.
• Check the power supply of the
socket-outlet and rectify any faults.
Installation Guide
SMA America, LLC
Failure Search
No. Problem
Cause
4
The Sunny WebBox The data transfer is
is not sending any incorrectly configured.
data to the Sunny
Portal or the external
FTP server (the
"DATA UPLOAD"
LED is red)
or
The connection test
to Sunny Portal or to There is a fault in the
the external FTP
network.
server was not
successful.
Rectification
• Check the settings of Sunny Portal or
FTP Push (see the Sunny WebBox
user manual).
• Perform a connection test.
• You must be registered for data
transfer to the Sunny Portal. Register
your Sunny WebBox in the Sunny
Portal (see the Sunny WebBox user
manual).
• Check the network settings of the
individual network components
(e.g., router, Sunny WebBox,
computer) and adjust them if
necessary.
• Check the network components for
defects or damage. Replace
defective or damaged parts in the
network.
5
6
Sunny Portal
registration was not
successful.
After an FTP
download, the
Internet Explorer
shows old Sunny
WebBox data.
Installation Guide
Invalid data
• Perform a connection test.
• Perform a connection test (see the
Sunny WebBox User Manual).
The cache properties of
Internet Explorer contain old
data.
• Use an FTP client to load the plant
data from the internal FTP server of
the Sunny WebBox.
SWebBox20-eng-IUS111411
55
Failure Search
SMA America, LLC
No. Problem
Cause
7
The firmware update There is no internet
for connected
connection.
devices failed.
Rectification
• Reestablish Internet access. If
necessary, contact your Internet
service provider.
☑ If you have set automatic device
update, the automatic device update
starts again the following day.
The SD card was removed
during the update process.
The update file was not sent
to the devices in the PV plant
after 5 attempts.
• To start updating the devices
directly, run a manual device update
(see ”Performing a Manual Device
Update” (page 44)).
• Insert the SD card into the Sunny
WebBox SD card slot again and
perform a manual device update
(see ”Performing a manual device
update via SD card” (page 46)).
• Check the status of the Bluetooth
connection for the devices in your PV
plant Please note that the Bluetooth
connection can also be interrupted
by the absence of DC input voltage
of the inverter. The DC input voltage
can vary depending on the time of
day, weather or the condition of PV
modules (e.g. covered with snow or
leaves).
– If necessary, improve the quality
of the connection.
8
56
The "SD CARD" LED The SD card is full.
glows red.
The SD card is writeprotected.
SWebBox20-eng-IUS111411
– To start the device update
directly, update the device
manually (see ”Performing a
Manual Device Update”
(page 44) or ”Performing a
manual device update via SD
card” (page 46)).
• Replace the SD card or format the
SD card in FAT 32 format.
• Remove the write protection of the
SD card.
Installation Guide
SMA America, LLC
No. Problem
Cause
9
After a Sunny
Duplicate Sunny Portal
WebBox is
registration
replaced, Sunny
Portal contains two
plants with the same
name.
Failure Search
Rectification
The Sunny WebBox supplied as a
replacement device logs into the Sunny
Portal with a new plant ID. Sunny Portal
creates a new plant for this plant ID, even
if you gave the plant the same name.
• Assign the plant ID of the old plant to
the replacement device (see the
Sunny WebBox user manual).
• In the replacement device, enter the
e-mail address of a user who has
administrator rights in Sunny Portal
for the plant.
10
11
12
Parameters cannot
be edited.
• In Sunny Portal, delete the new plant
the replacement device created.
• Change the user group.
You do not possess the
necessary rights for the
parameter.
You have an inverter with The configuration of parameters and the
upgraded SMA Bluetooth graphical presentation of monthly and
Piggy-Back with a software annual energy values are not supported.
version lower than
• Update the Bluetooth Piggy-Back
02.00.00.R.
using Sunny Explorer.
LAN connection
No network card driver
• Check the installation of the network
cannot be displayed (Ethernet card) is installed or
adaptor in the Device Manager and
in Windows.
the network card is
reinstall the driver if necessary or
defective.
replace the faulty network card with
a new one.
Fault in the user
JavaScript is not enabled.
• Enable JavaScript in your web
interface display
browser.
Installation Guide
SWebBox20-eng-IUS111411
57
Failure Search
SMA America, LLC
11.2 Bluetooth Connection
No. Problem
1
No Bluetooth
devices are
displayed in the
Sunny WebBox.
2
58
Inverter is not
accessible any
more.
Cause
An incorrect NetID is set.
Rectification
• Set the NetID of the PV plant
(see section 6.2 ”Configuring
Bluetooth Settings for the Sunny
WebBox” (page 26)) and repeat
the commissioning).
The connection to the
• Shorten the distance to the devices
Bluetooth plant is too weak.
or use an SMA Bluetooth Repeater
in order to extend the radio range.
Repeat the commissioning
(see page 25).
There are already 4 masters • Remove a Master and repeat the
connected to the Bluetooth
commissioning process
system.
(see page 25).
• Change the position of the Sunny
There are already 2
WebBox in order to set up a
participants connected to the
device through which you
connection via another device in the
want to set up a connection
plant or remove one master from the
plant. Further information on
to the Bluetooth system.
SMA Bluetooth can be found in the
download section at
www.SMA-America.com
The Bluetooth connection
• Wait until the Sunny WebBox has
was interrupted.
automatically re-established the
connection.
SWebBox20-eng-IUS111411
Installation Guide
SMA America, LLC
No. Problem
2
Inverter is not
accessible any
more.
3
4
Failure Search
Cause
Parameters for the Bluetooth
communication were
changed.
Inverter with upgraded SMA
Bluetooth Piggy-Back is in
night mode.
The inverter has not been set
to the same NetID and
commissioned.
Unknown inverters The set NetID is already
are displayed.
assigned by an external
Bluetooth PV plant.
An inverter is
The inverter with integrated
displayed as
Bluetooth has an old
unknown device in software package (only for
the plant tree.
inverters SB 3000TL-20, SB
4000TL-20, SB 5000TL-20).
Installation Guide
Rectification
When setting parameters that regulate the
Bluetooth connection (e.g. parameters for
the transmitting power and country
parameters), the communication via
Bluetooth is interrupted for some time
because the inverters are carrying out a
reboot of the communications interface.
This does not relate to inverters with
upgraded SMA Bluetooth Piggy-Backs.
• Wait until the inverter has completed
a restart. The inverter is then
accessible again.
• Wait until the inverter is again
working in normal operation. The
inverter is then accessible again.
• The inverter must be set to the NetID
of your PV plant and commissioned.
Contact your installer.
• You must assign the PV plant a free
NetID. Contact your installer.
• Update the software package
version of your inverter to a version
higher than 2.0.
SWebBox20-eng-IUS111411
59
Accessories
SMA America, LLC
12 Accessories
SMA Bluetooth Repeater
SMA order number
BTREP
Description
SMA Bluetooth repeater to increase the range of SMA Bluetooth products
for use indoors
SD Cards
SMA order number
SD-Card 128 MB
SD-Card 512 MB
SD-Card 1 GB
SD-Card 2 GB
60
Description
128 MB Secure Digital Memory Card for Sunny WebBox, I-Grade
512 MB Secure Digital Memory Card for Sunny WebBox, I-Grade
1 GB Secure Digital Memory Card for Sunny WebBox, I-Grade
2 GB Secure Digital Memory Card for Sunny WebBox, I-Grade
SWebBox20-eng-IUS111411
Installation Guide
SMA America, LLC
Appendix
13 Appendix
13.1 Information on the SD Card
To ensure trouble-free working of the SD card, use SD cards available from SMA. Compatibility with
all SD cards available on the market cannot be guaranteed. The Sunny WebBox does not support
SD cards with storage capacities of more than 2 GB or SDHC cards.
Only use SD cards which have been formatted with the FAT32 file system. If necessary, reformat the
SD card using the computer.
The Sunny WebBox converts the SD card's file system to TFAT in order to increase data security. If
you wish to delete everything on the SD card, you must format the SD card on the computer with the
FAT32 file system.
13.2 Structure of the Config.xml File
The "config.xml" configuration file contains information on the Sunny WebBox network settings, the
firmware version and further settings.
Example:
<?xml version='1.0' encoding='utf-8'?>
<WebBox>
<Settings>
<add key='Version' value='1.0.40.B' />
<add key='Plant-ID' value='' />
<add key='User-ID' value='[email protected]' />
<add key='DHCP' value='False' />
<add key='IP-Address' value='192.168.0.168' />
<add key='SubNetMask' value='255.255.255.0' />
<add key='Gateway' value='192.168.0.1' />
<add key='DNS-Server' value='192.168.0.1' />
<add key='NAT-Port' value='80' />
<add key='Webserver-Port' value='80' />
<add key='Webservice-Port' value='80' />
</Settings>
</WebBox>
Setting
Version
Plant ID
User ID
Installation Guide
Meaning
The current firmware version of the Sunny WebBox
Plant ID for Sunny Portal
User ID for Sunny Portal
SWebBox20-eng-IUS111411
61
Appendix
SMA America, LLC
Setting
DHCP
IP address
SubNetMask
Gateway
DNS server
NAT Port
Web server port
Web service port
Meaning
Displays whether the network settings are acquired via DHCP.
The current IP address of the Sunny WebBox
The current Subnet mask of the Sunny WebBox
The set Gateway IP address
The set DNS server IP address
The currently set NAT port
The currently set port of the web server
The set port of the web service
13.3 Structure of an XML Data File
Example:
<?xml version="1.0" encoding="utf-8"?>
<WebBox>
<Info>
<Created>2010-02-10T01:37:04</Created>
<Culture>de</Culture>
</Info>
<MeanPublic>
<Key>Sunny WebBox:155000234:Metering.TotWhOut</Key>
<Mean>761.858</Mean>
<Base>1</Base>
<Period>300</Period>
<Timestamp>2010-02-09T10:55:52</Timestamp>
</MeanPublic>
<MeanPublic>
(...)
</MeanPublic>
<WebBox>
Setting
Info
Create
Culture
UtcOffset
MeanPublic
62
Meaning
Information
Date of generation
Language
Offset in minutes to UTC
Data of the mean values
SWebBox20-eng-IUS111411
Installation Guide
SMA America, LLC
Setting
CurrentPublic
Key
Min
Max
Mean
Base
Period
TimeStamp
Appendix
Meaning
Data of the spot values
Name of the element made up of device name, serial number of the device and
the parameter name. Individual values are separated by a colon.
Example: <Key>Sunny WebBox:155000234:Metering.TotWhOut</Key>
Smallest value in measurement interval / merging
Largest value in measurement interval / merging
Average value in measurement interval / merging
Number of measured values in the interval / Number of merged values
Length of the measurement interval in seconds
Time stamp, at which the average was calculated
13.4 Information on your Web Browser
In order to be able to call up the Sunny WebBox user interface, you need a current web browser.
You can use the standard settings of your web browser.
Ensure that
• JavaScript is activated.
• If a proxy server is active in your network, you must set up a proxy exception rule in your
browser (see page 63).
13.5 Setting up a Proxy Exception Rule in Internet Explorer
1. Start Internet Explorer.
2. In Internet Explorer, select "Tools > Internet Options".
3. The "Internet Options" window opens.
4. Select the "Connections" tab, then click [Settings].
5. Select [Advanced].
6. In the "Do not use proxy server for addresses beginning with:" field, enter the address
192.168.*.
7. Confirm the inputs with [OK] and close all further windows by selecting [OK] in each.
☑ The proxy exception rule has now been set up.
Installation Guide
SWebBox20-eng-IUS111411
63
Appendix
SMA America, LLC
13.6 Activating IPv6 in Windows XP SP2
In order to be able to locate the Sunny WebBox with the Sunny WebBox Wizard, IPv6 is required.
IPv6 stands for Internet Protocol Version 6 and specifies the procedures that are necessary for data
transfer via a package-switching data network.
IPv6 is the successor to IPv4, which is still predominantly found in use in the internet. IPv6 is already
activated in Windows Vista, Windows 7, MacOS and Linux. IPv6 has to be activated in
Windows XP SP2.
In order to activate IPv6 manually, proceed as follows:
1. In Windows, select "Start > Settings > Network connections".
2. Double-click the LAN connection via which the Sunny WebBox is connected.
– If Windows displays several LAN connections, there are probably several network
connections installed in the computer. Ensure that you select the correct network connection,
with which the computer is connected to the Sunny WebBox. If necessary, refer to the
manual of your computer.
– In the event that no LAN connection is displayed, please refer to section 11.1 ”General
Troubleshooting for the Sunny WebBox” (page 53).
☑ The "LAN Connection Status" window opens.
3. Select [Properties] in the "General" tab.
☑ The "Local Area Connection Properties" window is displayed.
4. Activate "Microsoft TCP/IP version 6"
5. Select [OK].
☑ IPv6 is activated.
13.7 Allocating an IP Address in a Local Network
You select a static IP address (Internet Protocol). Use the address range which is available to your
router. In most cases, the address range of the router lies between 192.168.0.1. and
192.168.255.254. If necessary, refer to the manual of your router.
Please note during the allocation of the IP address that the first three address parts of the IP address
must be identical for all participants of the same network. You may not allocate the same IP address
twice.
Example:
Router:
Computer 1
Computer 2
Sunny WebBox
64
192.168.0.1
192.168.0.2
192.168.0.3
192.168.0.168
SWebBox20-eng-IUS111411
Installation Guide
SMA America, LLC
Technical data
14 Technical data
This product meets the applicable Industry Canada technical specifications.
14.1 Sunny WebBox with Bluetooth
Mechanical Data
Width x height x depth
Weight
10 1⁄16 in. x 5 1⁄8 in. x 2 1⁄4 in.
(255 mm x 130 mm x 57 mm)
26 1⁄2 oz. (750 g)
Power supply
Typical power consumption
Maximum power consumption
4W
12 W
Ambient Conditions
Ambient temperature
Relative air humidity
Degree of protection*
‒4 °F ... +149 °F (‒20 °C … +65 °C)
5 % … 95 %, non condensing
IP20
*Degree of protection according to DIN EN 60529
Communication
Sunny Boys, Windy Boys with SMA Bluetooth
interface
Computer
Maximum number of SMA Bluetooth devices
with 1 Master
Maximum number of SMA Bluetooth devices
with 2 Masters
Maximum Bluetooth free-field communication
range
Max. communication range of Ethernet per
segment
Bluetooth
10 / 100 Mbit Ethernet
50
25
328 ft. (100 m)
328 ft. (100 m)
Other
User interface language
Internal ring buffer
Memory expansion via SD memory cards*
German, English, French, Italian, Spanish, Greek,
Korean, Portuguese, Czech, Dutch
12.5 MB
128 MB / 512 MB / 1 GB / 2 GB
* optional
Installation Guide
SWebBox20-eng-IUS111411
65
Technical data
SMA America, LLC
14.2 Plug-in Power Supplies
14.2.1 CINCON, TRG30R 120
Mechanical Data
Width x height x depth
4 1⁄4 in. x 2 1⁄4 in. x 1 5⁄16 in.
(107.8 mm x 57.5 mm x 33.5 mm)
10 32⁄55 oz. (300 g)
Weight
Power supply
Voltage
100 V − 240 V AC, 50 / 60 Hz
Nominal current
0.8 A
14.2.2 TaiyTech, TYT251200200UV/3000
Mechanical Data
Width x height x depth
3 5⁄8 in. x 2 1⁄4 in. x 1 5⁄8 in.
92.0 mm x 58.0 mm x 41.4 mm
8 37⁄61 oz. (244 g)
Weight
Power supply
Voltage
100 V − 240 V AC, 50 / 60 Hz
Nominal current
0.75 A
14.2.3 TaiyTech, TYT251200200EU/3000
Mechanical Data
Width x height x depth
3 5⁄8 in. x 3 9⁄16 in. x 1 2⁄5 in.
92.0 mm x 90.6 mm x 36.0 mm
4 17⁄33 oz. (128 g)
Weight
Power supply
Voltage
100 V − 240 V AC, 50 / 60 Hz
Nominal current
66
SWebBox20-eng-IUS111411
0.75 A
Installation Guide
SMA America, LLC
FCC Compliance Information
15 FCC Compliance Information
Device for plant monitoring from SMA, model Sunny WebBox.
This device complies with Part 15 of the FCC Rules. Operation is subject to the following conditions:
(1) This device may not cause harmful interference, and
(2) this device must accept any interference received, including interference that may cause undesired
operation.
NOTE: This equipment has been tested and found to comply with the limits for a Class A & B digital
device, pursuant to Part 15 of the FCC Rules. These limits are designed to provide reasonable
protection against harmful interference in a residential installation. This equipment generates, uses,
and can radiate radio frequency energy and if not installed and used in accordance with the
instructions, may cause harmful interference to radio communications. However, there is no guarantee
that interference will not occur in a particular installation. If this equipment does cause harmful
interference to radio or television reception, which can be determined by turning the equipment off
and on, the user is encouraged to try to correct the interference by one or more of the following
measures:
• Reorient or relocate the receiving antenna.
• Increase the separation between the equipment and the receiver.
• Connect the equipment into an outlet on a circuit different from that to which the receiver is
connected.
• Consult the dealer or an experienced radio/TV technician for help.
• The user is cautioned that changes or modifications not expressly approved by SMA America,
Inc. could void the user’s authority to operate this equipment.
Installation Guide
SWebBox20-eng-IUS111411
67
Contact
SMA America, LLC
16 Contact
If you have technical problems concerning our products, contact the SMA Serviceline. We require the
following information in order to provide you with the necessary assistance:
• The current firmware version of the Sunny WebBox
• Serial number and hardware version of the Sunny WebBox.
• Type of communication interface between Sunny WebBox and the inverters.
• Type and serial numbers of the inverters connected to the plant.
SMA Solar Technology America, LLC
6020 West Oaks Blvd, Ste 300
Rocklin, CA 95765
Tel. +1 916 625 0870
Tel. +1 877-MY SMA TECH
Tel. +1 877 697 6283 (Toll free, available for USA, Canada and Puerto Rico)
Fax +1 916 625 0871
[email protected]
www.SMA-America.com
SMA Solar Technology Canada Inc.
2425 Matheson Blvd E
8th Floor
Mississauga, ON L4W 5K5
Canada
Tel. +1 877 506 1756 (Toll free for Canada)
[email protected]
www.SMA-Canada.ca
68
SWebBox20-eng-IUS111411
Installation Guide
4."4PMBS5FDIOPMPHZ
XXX4."4PMBSDPN
4.""NFSJDB--$
XXX4.""NFSJDBDPN