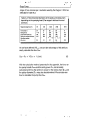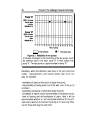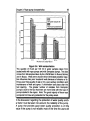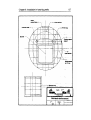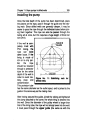
1
1
—
~
-:~
~
—.
~-~-__
The rope pump
The challenge of popular techiiology
-~
•
~
~
~.— —~
Bernard van 1-limert
~OsmundoSoils Orozco
Jan Haemhouts
Orlando Amador G~1Iz
V Region
Rope Pump
1
The rope pump:
The challenge of popular technology
Errata
Unfortunately, in the english edition of the book, some problems
occured in the lay-out, especially in relation to the mathematical
symbols and the indices. If you are just interested In the plain
text, you should not encounter mayor problems. However, if you
are interested en the details of the calculations and formulas,
you will have to use this errata list. For the apendix F
(Calculating pulley wheel and raising main diameters) and the
list of symbols, the corrections needed were so numerous that I
decided to present these paragraphs integrally.
As mentiones in the book, we remain Interested in hearing any
comments on the book, as well as your experiences with the
rope pump.
Arnhem, december 1992
Bernard van Hemert
Oude Velperweg 50
6824 HE Arnhem
Nehterlands
tel. 085 649744
fax.085 644909
-
-
2
ERRi~
- Page 48 first paragraph line 2-3: “and of greater depth” should
read: “even at greater depths”.
- Page 99 first paragraph line 5: “photo #“ should read: “photo
16”.
- Page 110 and following: the terms “stabilizing rock” and
stabilizing stone” are used indifferently: they are indeed
interchangeable.
- Page 124 last paragraph last line: “called” should read: “called
a”.
v
-
Page 127 figure 7.2: “valId for= 0.4 mm” should road: “valid
for a = 0.4 mm”.
- Page 128 figure 7.6: “valid for= 0.4 mm” should read: “valid
for a 0.4 mm”.
J - Page 130 line 3: “the 1/4” protection tube” should read: “the
3/4” protectIon tube”.
- Page 154 Fast paragraph line 3: “with a # 10” should read:
“with a spanner 10”.
- Page 155 first paragraph line 2: “photos # and #“ should read:
“photos 23 and 24”.
- Page 155 first paragraph line 7: “# 10”should read: “spanner
10”.
- Page 210 figure A.9 line 3: “values: = 0.2 mm” should read:
“values: a = 0.2 mm”.
- Page 210 first paragraph line 5: “water up (+)“ should read:
“water up (~
+)“.
- Page 210 first paragraph line 5: “water downwards (+)“ should
read: “water downwards (~
+)“.
- Page 211 equation 4 should read:
(Po- P2) = (Po- Pi) + (P1 P2) = OX g X Hp10 (N/rn2) (4)
Page 213 first paragraph line 6: Vpis 2 rn/s y 0.65 mm., or Vpis 1.4
rn/s and 1.1 mm.” should read: “Vpis 2 rn/s and a o.65 mm, or Vps
-
-
=
1.4m/sanda=1.1 mm.”
I
3
Rope Pump
Page 213 paragraph 2 line 3: “(hyd, model/hyd, real)” should read:”
-
‘“‘1 hyd. modal / ~\ hyd. real.
Page 213 paragraph 3 line 3: “-tub = 71 mm, pls= 69 mm” should
-
-
read: Ø~ub=71 mm, çtp~.=69 mm”.
Page 225 paragraph 2 line 6: “Oude Velperweg 506824 HE Arnhem”
should read:
“Oude Ve!perweg 50
6824 HE Arnhem”.
List of Symbols (page 217)
f
Frecuency of axle revolutIons
s-I
Fh~.N
~
g
rn/s2
N
~
m
0
mm
mm
mm
mm
mm
Hhead
~flandI.
Ørop.
Øpls
m
mm
PIn
W
Po~aW
Qd~ag
m3/s
3/s
3/
m
m,s
Qi.aj m3/s
Qt~
m3/s
Vp,1 rn/s
VOL~Ltr
a
mm
Qio.
0
0.5 -
1
Real force on pump handle
(Fh~l., t.~ ~ flmwc)
Force on pump handle it there were no friction
Gravity acceleration
9.81
Pumping head
Distance between pistons
2-4
Diameter
Pump handle diameter
500
Rope diameter
5
Piston diameter
18 44
Pulley diameter
350 540
RaIsing main diameter
18.2 44.5
Input power, developed by user
30- 150
Output power, resulting in pumped water
Component of loss flow due to drag by piston
Loss flow ( = Q~ 0 ~)
Component of loss flow due to pressure
Real flow
Theoretical flow
Piston speed
1-2
Theoretical volume per rotation
Play between piston and tube
-
-
-
(=
~
-
0
p11)
0.2
-
1
ERRATA
4
fl
flhyd
Pump total efficiency (= flhyd fl~~)
Hydraulic efficiency ( = 0 / 0 t~)
fl~
Mechanical efficiency, defined as loss factor
due to friction
(=F~.t~/F~.
H
*
Pi
Kg /m3 Specific weight of water
m2/s Kinematic viscosity of water
0
V
80 - 95%
80-90%
3.1416
1,000
1 * 1O-°
Appendix F
Calculating pulley
and raising main diameters
(page 204)
In paragraph 7.2 we discussed the selection of the pulley and raising
main dlamet~rsso that the demand of force and power be adjusted to
the optical offer medium (defined by the ergonomic parameters of the
users). In this appendix, we deepen the discussion of the calculations
regarding this topic.
Four categories of parameters enter into play in these calculations:
the ergonomic parameters;
the invariable parameters;
the variable factor that we cannot influence (the pumping head)
and thus;
the two variable parameters that we have at our disposition for
optimizing the system: the pulley and raising main diameters.
-
-
The ergonomic parameters are fixed ranges that we cannot influence.
They are the following:
A
Rope Pump
5
-ØharldLe
Pump wheel handle diameter (500 mm.)
- Fha~ii. Force on the pump handle, between 50 N and 120 N.
P~
Input power developed by user; varies from 40 W to 150 W.
-f
Frequency of axis revolution of the pump handle with a
range of 0.7 - 1 revolution per second.
-
The Invariable parameters that influence the calculation of forces
are:
g
Acceleration of gravity (9.81 m/s2)
-
-fl~
-O ro~.
-Fl
-o
Mechanical efficiency (estimated at 0.8)
Rope diameter (5 mm)
(3.1416)
Specific weight of water (1 ,000 kg/m3)
The variable factor that we cannot influence but which does guide
selection of the diameters is:
Hhead
Pumping head (m)
L.le
-
The two parameters that we can vary tooptimize the system are:
- Øpui Effective diameter of the pulley (mm) and:
ØIub Real interior diameter of the raising main (mm)
-
In working with these formulas, we must respect the units used in this
list. The formula that defines the torque on the pump handle is:
0
Fhandl. = 1 /flmec X
0
-
‘X fl/4 X
(G~t~
- ~
X ~X
gX
Hh~d
(1)
This formula can be simplified by introducing two combined variables:
C
a constant (N/(m1Ltr)), and
VOL~ Volume per revolution (Ltr)
ERRATA
6
oXgX io~
C=
=
______________
7.8
N/
(mxLtr))
(2)
flrcp.X flXOhan~il.
VOLs.~
~
X
H2 /4 X
(~2~
0 ,~)X 10~
(Ltr)
(3)
We note the the volume per revolution VOLI.V combines the only two
variable parameters that define the force over the lever: 0 ~ and 0
In other words: the volume per revolution Is a measure of the forces
acting on the lever.
Now, we must take Into consideration that the speed of the piston
Influences the hydraulic efficiency (see appendix G). The rotating
frequency of the pump handle f assumed as optimum for the user In
th.. range of 0.7 - 1 s-i defines V,i. (speed of the piston), varying
between 1 and 1.5 m/s, while the optimum speed estimated at 1.5 to
2 rn/s. It thus Implies attempting to maintain 0 maximum (540 mm,
which corresponds to a rim of 20”), and varying the diameter of the
raising main 0 ~.
Let’s return to the calculations. Introducing C and VOLr.v (equations 2
ar-~3) in equation 1 gives us:
F~dI. =
VOL
1~x C x Hh~(N)
(4)
and also
Pin
=
Fhancji. X
Oi~an~ii.
X fl X f (W)
(5)
With these formulas (4) and (5) we can calculate with ease the torque
on the pump handle and the input power required in the different
cases. Figure A.8 (not included in this errata, see book) gives the
force on the pump handle as a function of the pumping head, for a
.
Rope Pump
range of five volumes per revolution used by the Region V OAR as
reflected in Table A.3.
Table A.3: Recommended diameters of the pulley and raising main
depending on the pumping head (The ranges in bold are the most
common).
Ran~eoIpunpingheaiis~m)
n
Tie I& pufley
Raisvg main ~)
Pulley dian~leiOpul (Irm)
Rasin
0~l0
I~20
2030
30-40
20
20
20
3i4
540
12
-
20
112’
540
--
~I~2
It?
r
445
540
304
26
12
540
9rnandian~IerOttA,(mmt
VoIurrep~irevolullon
Vc&l~(1i~)
~6
233
~
~
07
Ii?
350
04
-
.
182
025
As we have defined VOL0,, we can take advantage of this entity to
easily calculate the flow Qre~:
Qroai
= fli,yd
X VOLrev
x f (Ltr/s)
(6)
With the calculation method presented in this appendix, the force on
the pump handle Fha~eand the entry power P~,can be easily
calculated and thus the1 optimum
for the raising
main
0 see
~and
may alsovalues
be determined.
We can
also
the
pulley
diameter
0
Pu
how to calculate the pump flow Q~.
U
a
7
-‘
•
t~
a
I..
Advice, printing and dl~trIbutIon:
Editorial ©~ic®
Translation: Amy Banks,
Patricia OKane,
Came Parker.
Donna Vukelich
First English edition: Janauary 1992
1,500 copies
The production of this book was made possible thanks to financing
from the Netherlands Development Organization (SNV).
Any part of this book can be copied, reproduced or adapted to be
more useful in projects, without requesting authors’ permission on the
condition that the sections used be distributed free or at cost and without profit, naming the source.
For any commercial use, written permission from the authors
is necessary.
We would appreciate it if copies of any material using part of this book
could be sent to us at the following address:
DAR—Reg ion V
A.P. 24
Juigalpa
Nicaragua
The rope pump
The challenge of popular technology
Bernard van Hermert,
Osmundo Soils Orozco,
Jan Haemhouts,
Orlando Amador Gaiiz,
participated in this book’s production, as well as all of those
who offered information, suggestions, criticisms, corrections
and photos.
i—
~
LiBRARY. INTERNATIONAL REFEPEI’JCE
•
-
~-JPE FOR ~‘OMML’MTYWATER ~UPFLY
~f’Pf~
QA~ ~TA~~! ~N
2509 AD The Hague
(070) 8~4911ext. 141/142
.~‘-‘
J.
~
i?N:
~‘3~\\\‘~3x1
~0:
~‘~‘
c~O
-w
The development and distribution of the rope pump in Nicara-
gua has taken many years, with various organizations and
many people participating in the process. The combination of
these efforts has made the rope pump what it is today.
Although it fell to me to gather all the experiences and reflect
them in this book, I in no way claim to be the ~authorof the
pump. On the contrary
I therefore dedicate this book to all those who contributed and
continue contributing in their own way and anonymously:
to the children who treat the pump like a toy and thereby submit
it to excellent tests of force;
to the mothers, who as the primary users make comments, criti-
cisms and suggestions coming out of daily use;
to the innovators who continually change components and add
accessories to their own pump;
to the promoters and installers who share all of the “quirks” of
installation in any kind of well;
and finally to the technicians, students and engIneers who with
their calculations, models and designs contribute towards a better understanding of this technology.
I hope that this book will be one more step in the development
and distribution process of this fabulous popular technology that
is the rope pump.
Juigalpa, November 25, 1991
Bernard van Hemert
Summary
The initiatives of many people and institutions have developed
and promoted the rope pump in Nicaragua over the last eight
years. The initiatives include different concepts, designs and
approaches. Development has been primarily directed towards
the drinking water supply from hand—dug wells with depths from
5to 30 meters.
The development and implementation of the pumps has been
within the concepts of “appropriate technology:”
—alt implementation activity begins with a felt need by the
beneficiaries; this also influenced the pump’s design;
—to impact health, it is considered more important to guarantee
large quantities of water in a decentralized form than relatively
small quantities in centralized wells, although this can have a
negative impact on water quality control;
—self—sufficiency in materials and knowledge both at the national level and at the user level when possible;
—certain social control over the pump is necessary, but this is
not considered a limitation; rather it guarantees interest and
care by the users;
—village level operation and management (VLOM);
—local production when possible; and at the least national
production;
—a transfer of technology both to the producer and to the user to
guarantee a foundation of technology in society and its
continuous development, even without outside intervention.
1,500 pumps have been installed in total in both private and
community wells under different implementation approaches:
—self—construction is considered a necessary phase in the
pump’s introduction for initial development and assimilation into
the community;
—sales at both the artisan level and the semi—industrial level are
responsible for the majority of installed pumps;
—institutional rural water supply and sanitation projects have de-
veloped and implemented the pump in excavated and drilled
wells with good results.
The rope pump is inexpensive, efficient and simple. It has a
high efficiency rate and pumps large quantities: from 2 liters per
second at five meters to 0.3 liters per second at 40 meters. The
pump is appropriate for intensive use: it can pump up to 32 barrels daily (8 m3). But even more important than this data is the
fact that the pump is easy to construct, operate and maintain.
One central characteristic of the rope pump is that it can be
easily adapted to different types of construction: in Nicaragua
we know of pumps made only of wood and rubber (materials
cost: US$13) and of models using iron, injected polyethylene
pieces andglazed ceramic (total cost: US$45). In terms of water
quality protection, there is a theoretical possibility of contamina-
tion, but practical data thus far have demonstrated that contamination is no greater than in wells equipped with other pumps.
The pump can be adapted to different conditions: there are special models for drilled wells; to pump water above ground level
(pump on a post) for large volumes (irrigation, cattle watering);
and with movements for a motor or a simple windmill. The last
two models are in the development phase, while the others can
be used without any risk.
New research and development of the-pump are not being carried out in a structured manner for lack of resources directed
specifically to research, but it does take place in an ad—hoc
manner. Research is currently concentrated on drilled pumps
and on the special models already mentioned.
In addition to covering what has been mentioned above, the
book details the design, construction, installation and maintenance of the pump, taking into account all the known options.
TABLE OF CONTENTS
Introduction
Part I:
The Challenge of Popular Technology
The rope pump: a developIng technology
1.1
1.2
1.3
1.4
2.
Afeft need bythe beneficiaries
Impacting health
Self—sufficiency
Social control
Village level operation and management
Local manufacture
Technology transfer
Theoretical—technical concepts
Operation and management
Reliability
Discharge rates,pumping heads, efficiencies
Water quality protection
Costs
49
57
60
64
67
Production
Production levels
4.2 Production organization
4.1
5.
35
38
40
41
42
43
45
46
CharacterIstics
3.1
3.2
3.3
3.4
3.5
4.
7
8
13
25
BasIc rope pump conepts
2.1
2.2
2.3
2.4
2.5
2.6
2.7
2.8
3.
General description of the pump
History of pumping technology
The rope pumpin Nicaragua
Implementation approaches
71
74
PerspectIves
Implementation
5.2 Research and development
5.1
80
81
Part II:
6.
7.
Construction
DescriptIon of the pump
6.1 General description
6.2 The well-slab
6.3 The wheel
6.4 Pistons, rope and raising main
6.5 Guide and stabilizing rock
6.6 The discharge spouts
MechanIcal and hydraulic characteristics
7.1 Ergonomic factors
7.2 Choosing diameters for the pulley wheel
and raising main
7.3 Hydraulic and mechanical efficiency
87
90
92
102
110
112
116
119
123
Part Ill:
Installation, operation and maintenance
8.
InstallatIon in hand—dug wells
8.1 Construction of the slab
8.2 Installation of the pump
9.
133
140
MaIntenance
9.1 Maintenance planning
9.2 Maintenance tasks
10. Trouble shootIng
152
153
157
Part IV:
Special Models
11. Rope pump In drilled wells
11.1 Description
166
11.2 Installation
168
12.1 Description
172
12.2 Installation
173
12. Post—mounted rope pumps
13. High discharge rate rope pumps
14. Motor—driven rope pumps
15. Rope pumps with windmills
Appendix A: Calculating maintenance costs
Appendix B: Materials, tools, gauges and molds
Appendix C: Materials for the pulley wheel
in hand—dug wells
Appendix D: Specifications of PP and PE injected pistons
Appendix E: Specifications of the glazed ceramic guides
AppendIx F: Calculating pulley wheel and
177
179
raising main diameters
204
209
215
217
218
218
220
Appendix G: Calculating hydraulic efficiency
Appendix H: Materials for the pulley wheel on the post
List of symbols
List of Abbreviations
Consulted bibliography
Addresses
FIgure 1.0:
FIgure 1.1:
FIgure 1.2:
Figure 1.3:
Figure 1.4:
Figure 1.5:
Figure 1.6:
Figure 1.7:
List of Figures
Global sketch of the rope pump
Sh aduf
Noria
Noria with chain
Chain pump
Rope pump
The next step?
Condition of rope pumps
-
installed in Bluefields
FIgure 1.8: Hourly discharge rate in the “El Pochote”
hand—drilled well.
Figure 1.9: Rope pumps installed in Nicaragua.
Figure 3.1:
Figure 3.2:
FIgure 3.3:
Figure 3.4:
Figure 3.5:
Figure 3.6:
181
184
188
190
195
197
6
9
9
10
10
11
11
22
15
24
Reliability of two pumps.
Pumping discharge rates.
58
60
Hydraulic efficiency.
Welt contamination
Price structures
Prices of different pumps.
63
64
67
70
Figure 6.1: Complete pump.
Figure 6.2: Concrete well-slab.
86
89
Figure 6.3: The iron wheel.
94
Figure 6.4: How to cut an old tire.
Figure 6.5: Forces acting on pistons vs. washers.
Figure 6.6: Variation of tube diameters.
Figure 6.7: Creation of the “vacuum.”
96
103
104
105
Figure 6.8: Conjunction of guide for hand—drilled wells.
FIgure 7.1: Hydraulic efficiency as a function of gap.
Figure 7.2: Hydraulic efficiency as a function
of piston velocity
Figure 7.3: Hydraulic efficiency.
109
126
Figure 8.1: Slab measurements.
136
FIgure 8.2: Frame slab.
137
127
128
Figure 8.3: Restriction in the flare.
138
Figure 8.4: How to secure the piston to the rope.
Figure 8.5: Conjunction of guide for hand—dug wells.
142
143
Figure
Figure
Figure
Figure
Figure
145
146
147.
169.
174
8.6: How to make the wedge.
8.7: Outlet spout.
8.8: Bearing conjunction
11.1: Stabilizing Stone for a drilled well
12.2: Outlet tubing options for pump on a post.
Figure A.1:
Figure A.2:
Figure A.3:
Figure A.4:
Technical drawing: pulley wheel.
Technical drawing: bearings.
Technical drawing: blocking system.
Gauges for injected pistons.
191
192
193
194
Figure A.5: Technical drawing: solid guide
for hand—dug wells.
201
Figure A.6: Technical drawing: solid guide
202.
Figure A.7: Technical guide: hollow guide.
203
Figure A.8: Pump handle torque.
Figure A.9: Parameters for the model to calculate
208
hydraulic eficiency.
211
Figure A.10: Profile of flow in gap between
piston and tube
Figure A.11: Technical drawing: wheel on a post
210
216
Table 3.1:
Table 3.2:
Table 3.3:
Table 3.4:
Table 4.1:
Table 4.2:
Table 6.1:
Table 6.2:
Table 6.3:
Table 6.4:
List of Tables
Maintenance costs.
Useful life of the pump parts.
Daily pumping hours.
Costs per piece.
Definition of technological production levels.
50
51
61
68
72
Production level of the parts.
73
Advantages & disadvantages of slabs.
Advantages & disadvantages of bearings.
Advantages & disadvantages of systems.
Advantages & disadvantages of 2 pulley
wheel locations.
Table 6.5: Advantages and disadvantages of four types
of protection.
Table 6.6: Basic data about the raising main
91
98
99
100
101
and the pistons.
Table 6.7: Advantages and disadvantages of four types
of pistons.
106
-
107
Table 6.8: Advantages and disadvantages of five types
of guides.
111
Table 6.9: Advantages and disadvantages of PVC or GI
outlet spouts.
113
Table 7.1: Recommended tubing and pulley wheel
diameters.
121
Table 7.2: Advantages and disadvantages
of varying the tubing diameter
122
Table 12.1: Selection of outlet spouts for
post—mounted pumps.
173
Table A.1: Materials, tools and gauges to construct the
“technified” pump.
185
Table A.2: Materials, tools and gauges to construct
the user—built pump.
185
Table A.3: Recommended pulley wheel and raising main
diameters.
186
Photo List
Photo 1 :A developing technology
5
Photo 2:Children pumping
16
Photo 3:One of the pioneers:
Don Pompilio with his wife and grandson
Photo 4: Will it really work?
19
Photo 5:Water to drink, to wash clothes, to bathe...
32
Photo
Photo
Photo
Photo
Photo
6: Women are the primary users of the pump
7:The pump in th-e main room
8:”Our commission is made up only of women”
9:Local production
10:”...I prefer the one I make...”
36
39
40
43
27
Photo
Photo
Photo
Photo
Photo
Photo
Photo
11: Serial wheel production
12:lnjector machine
13: ...andafter
14: Self-built pump
15: Blocking system used in Region V pump
16: Alternative blocking system
17:Making rubber washers
76
78
79
85
100
100
108
Photo 18:Whyso high?
Photo 19:Everyone can participate
28
117
131
Photo 20:Slab frame
135
Photo 21 :Poured slab
Photo 22:Bad location of a protecting tube
135
139
Photo 23:Well—located bearings
Photo 24:Badly—located bearings
148
149
Photo 25:Cracked raising main
Photo 26:Rope in the pulley wheel
157
160
Photo 27:Rope pump on a post
163
Photo 28:Pump in a drilled well
167
Photo 29:Pump on a post
170
Photo 30:Pump for high discharge rates
Photo 31 :Pump with fixed windmill
Photo 32:Pump with moving windmill
Photo 33:Post—mounted pump
Photo 34:Piston gauges
Photo 35:Cinva—ram with gauge for the guide
176
180
182
198
196
198
Introduction
This book, just like the rope pump, is imperfect. And, just like
the rope pump, it is too important to wait for its perfection.
We have just left the decade which took on the challenge to resolve at the very least the problem of water for human consumption, supposedly combining efforts of all the nations of the
world with their technologies. But despite good intentions and
million—dollar investments, the majority of the world’s population
continues to face an infant mortality rate and a series of illnesses which, if it had sufficient water available, would not exist in
such quantities. Even more: in absolute numbers, there are
more people who do not have access to basic water and sanitation services than at the beginning of the decade. The search
for appropriate technologies continues to be an urgent challenge: available to all; inexpensive but efficient; easily built, operated and maintained.
Many individual and institutional initiatives over the last eight
years have developed and promoted the rope pump in Nicaragua under different concepts, designs and implementation approaches as one alternative technology. Development has
been primarily directed towards the drinking water supply from
hand—dug wells from 5 to 20 meters. The pump has been so
successful at the national level that we believe the moment has
arrived to put the Nicaraguan experiences in writing. The initiative and the coordination of this book’s production comes from
the team of the Rural Aqueduct Directive (DAR) in Region V in
Nicaragua. This team has been developing the rope pump for
four years and has been implementing it in rural water supply
and sanitation projects. Many more people and institutions,
however, collaborated and gave their opinions on the content
and form of the book.
Although the information presented covers different areas of interest and is directed towards different impact groups, we decided (for practical reasons) to edit it in a single book. It is likely
2
Introduction
that you will only be interested in one or two of the four parts of
the book.
In the first part we deal with the pump in general terms; its
history, its fundamentals and its characteristics. We also
present the different implementation approaches and production
aspects. The section is directed towards those with general interest; project managers, policy makers, but also for interested
users.
The second part is primarily directed towards technicians and
engineers, and deals with construction aspects. The pump is
described piece by piece with its construction alternatives.
Themechanical and hydraulic characteristics are discussed. If
at times we go into a lot of detail, it is with the goal of being thorough, but for the great majority of the pump’s applications the
theory we present is not necessary.
The third part deals with practical and operating issues like the
pump Installation and maintenance, as well as problems
which can arise in the field.
The fourth part finally describes the special models that have
been developed in Nicaragua: pumps in drilled wells, those for
high discharge rates, post—mounted pumps, pumps with motors
and with windmills. We deal both with general aspects as well
as some aspects of construction and installation.
We have tried to be as objective as possible, but in order to reflect some of the enthusiasm which motivates many of the people involved we have included a series of interviews. The language in the interviews is inevitably very “Nicaraguan”, and it
may be difficult to understand in other countries. We decided,
however, to maintain the local flavor of the language.
Although this book contains all the information necessary for in-
stallers and users of the rope pump, it can probably not be directly understood by them. We recommend in many cases the
development of a pamphlet explicitly directed towards them
Introduction
3
based on their educational levels, cultural customs, and in the
specific characteristics of the pump in their region (ground water
tables, well designs, available technologies and materials, etc.).
It is important to keep in mind while reading this book that there
Is not Just one type of rope pump. In each region, in each situation the pump can have a different design or different materials. Nor is there one implementation approach for the rope
pump. Each initiative has its philosophy and pursues its’objectivos. Although we try to focus on the essential characteristics
that all rope pumps have in common and reflect the different
concepts, designs and approachies, references will inevitably
be defined by the Nicaraguan experience and conditions in general and DAR—Region V in particular. Therefore we don’t discuss only the known alternatives with their advantages and disadvantages, we also try to present the logic that exists behind
each option, so that the reader can decide which solution is the
most appropriate for the specific case, or if there are conditions
which fdvor other alternatives not covered here.
To conclude, it is important to emphasize that we in no way consider the rope pump a “finished product.” We are aware that
development continues, and we hope that this book—in a short
time—will be outdated by other improvements in the pump and
in implementation approachies. Perhaps you, reader, can contributeto this process...
We wish you enjoyable reading, and request that you send us
not only your comments on the book but also your experiences
with the rope pump. (See addresses at the end of the book.)
Bernard van Hemert
Jan Haemhouts
Osmundo Soils Orozco
Orlando Amador Galiz
1
The challenge
of popular technology
If you want to know what a wolf is capable of,
ask the sheep.
if you want to know what technology Is capable of,
ask the poor.
6
First part: The challenge of popular technology
FIgure 1.0: Global sketch of the rope pump
Chapter 1:
A developing technology
When discussing possible solutions to the problem of “underdevelopment” through cooperation programs, the deceptive image
continues that these solutions can only be found in following
the example and imitating the history of industrialized
countries, based on the transfer of technology. The effects of
implementation of technology, however, coincide with what
those who develop the technology seek, but do not necessarily
equally benefit the others. In certain cases the implementation
of an outside technology can negatively affect the development
of communities who have not participated in the formulation of
that technology.
We have worked in Nicaragua based on these beliefs, developing and implementing the rope pump that we will now describe.
Before describing the pump’s implementation approaches in
sections 1.2 to 1.4, we present in section 1.1 a concrete description of the pump.
1.1 General description
The rope pump is inexpensive, efficient and simple. Figure 1.1
demonstrates the pump set up. The heart of the pump is a never—ending rope with pistons. This rope is raised through a
raising main, passes through a pulley wheel and falls free into
the well. Under the water, a guide assures the smooth entrance of the rope and the pistons into the raising main.
Turning the pulley wheel makes the rope move. The pistons
give minimum play in the raising main and suction the water up.
You could say that the whole raising main serves as a long cylinder in which the pistons only move in one direction. When it
gets to the top, the pumped water is diverted to the users bucket.
8
First part: The challenge of popular technology
The basic principle of the rope pump is that simple. In chapter 6
we describe the pump with all its details.
The rope pump is highly efficient and pumps great quantities:
from 2 liters per second at a depth of 5 meters to 0.3 liters per
second at a depth of 40 meters. The pump is appropriate for intensive use: it has pumped up to 32 barrels daily (8 m3). Even
more important than this data is the fact that the pump is easy
to build, operate and maintain.
The pump can be adapted to different conditions: in the fourth
part we describe special models for drilled wells, to pump water
above ground level (pump on a post), for pumping large quantities (irrigation) and run by a motor or a simple windmill.
Now that we know more or less what a rope pump is and what it
can do, we present a brief historical review and describe different implementation approachies currently in Nicaragua.
1.2 Some notes on the history of
pumping technology.
This book does not aim to present the rope pump technology as
something finished. On the contrary, it presents this alternative
as one step in the generation of always more adequate solutions. In this sense we feel it is important to present some historic elements which help to see the logic and the limitations of
the development of this technology.
Since the discovery long ago of waters influence on plant
growth, to today, when man is able to program genetic changes
in those same plants, the problem of controlling and bringing
this vital liquid to necessary level has motivated a combination
of the most varied experiences, abilities and knowledge over
thousands of years.
9
Chapter 1: A developing technology
I
--
Figure 1.1: Shaduf
Figure 1.2: Norta
The first water pumping technique is considered to be the shaduf, developed some 3,500 years ago, and still used today.
Figure 1.2 illustrates that the shaduf is like a lever supported by
a post in the middle. On one end there is a recipient to hold water, and on the other a counterweight, equal to half the weight of
the water and the recipient. This way the operator has to use
the same force to raise the water as to lower the empty recipi-
ent. By dividing the required pumping between a series of shadufs, each one raising the water one level higher, water can be
raised considerable heights with surprising efficiency.
The second basic step in this line of pumping technology is
seen in the development of the norla (translated from Arab:
“the whiner—for the sound produced by the wood materials).
This pump consisted in a series of recipients put around a
wheel (figure 1.3), which can be considered a compound of a
series of levers distributed over a single axle. The lower part is
submerged in water. The wheel turns so that the recipients
leave the water upright, staying full until they reach the top. As
10
First part: The challenge of popular technology
Figure 1.3:
Noila with chain
FIgure 1.4:
Chain pump
they go down the water fails out into a receiving canal. Compared with the earlier system the noria has the great advantage
of allowing continuous movement with no dead time. Just like
the shaduf, the noria continues to be a common mode of water
extraction for many communities, in particular combined with
the tradition of animal traction.
The constructive logic is perfected with ~ variant of the same
norla, in which the wheel functions as a pulley which
moves the recipients on a chain (figure 1.4). Given that the
height of the pumping no longer depends on the wheel’s diameter but rather onthe length of the chain, the wheel’s design is reduced to a pulley wheel which sustains the chain and transfers
the motor force. This Implies a major reduction in its diameter
and the necessary materials, and increases the possibility of
Chapter 1: A developing technology
11
(
Figure 1.5:
Rope pump
pumping from narrower and deeper wells. As the wheel’s diameter is reduced, the height between the position where the recipient begins and finishes emptying is also reduced. That is to
say, there is less water lifted uselessly above the discharge lev-
el, which logically results in greater efficiency.
The next step in the noria’s transformation was the substitution
of the recipients on the chain by walls around the rising chain,
with plates iocated within these walls, set at equal distances
along the whole chain, making the nona into a chain pump.
This description is similar to still existing models, like irrigation
canal pumping, which moves large quantities of water at minimal heights. In this case the pump walls form a canal where the
plates move along the chain. Two pulleys sustain the chain,
with the upper one transferring the motor force to the chain.
12
First part: The challenge of popular technology
The best—known and developed model of the chain pump, illustrated in figure 1.5, is made up of a tube instead of walls and
discs or washers instead of “plates.” In this form the chain
pump had a huge impact from the 16th century to the 19th. In
the middle of the last century one of various uses of these
pumps was as emergency pumps in transatlantic ships, one application which indicates the level of efficiency and reliability.
With the emergence of large—scale industry, and therefore its
preponderance over artesanal production, there was more selective development of technologies, logically in function of critena which favored industry growth. The following are characteristics which promote large—scale industrial growth:
—mInImum weight and volume In relation to potential, which
is achieved using minimum force at high speeds.
—standardization In production and universal use, which
permits centralized, massive and therefore inexpensive production.
—a certain complexity and limited durability, which limits massive plagiarism and maintains demand by avoiding market saturation.
The concept which most closely matches these criteria, among
the broad array of existing pumps, is the centrifugal pump,
based on the creation of centrifugal force, using blades on rotors turned by high—velocity motors. Despite relatively low efficsency, this allows high power transmission at very low volumes.
The concept of pumping with a chain actually contradicts the
above—mentioned characteristics:
—it is relatively large and heavy, and uses great force at limited
speed;
-it can be easily adapted to local craftsperson production;
—it is not as universal as the centrifugal pumps which automatically adapts volume to pumping height;
-~ftonly raises water to the pulley level.
Chapter 1: A developing technology
13
Clearly the chain pump cannot compete with industrial pumping
equipment, and since it does not coincide with interests that directed development of Industrialized countries, its application remained limited to those countries where it formed part of the cultural heritage and where craftsperson production still
predominates.
With third world movements, which since the sixties have promoted a re—thinking of the concept of technological development promoted by industrialized countries, a process of rescue,
experimentation and implementation of technology has begun
which has as its first criteria social—economic utility. Given its
high efficiency and its nature as craftsperson technology, the
chain pump formed part of this technological regeneration,
which is currently more commonly known as “Appropriate
Technology” and in Latin America as “Popular Technology.”
Old chain pump models were changed with the introduction of
modem materials, at the same time overcoming limitations in
the tecinulogy. Beginning in the seventies the pump became
known according to different languages as the bomba de cuerda; rope pump; pompe #a corde. In Latin America the name
was adapted to use the common words for rope; mecate in Nicaragua, lazo in Guatemala, soga in Peru, etc. The modernized
version of the chain pump appeared in the majority of third
world countries, but generally with little success. Its introduction
in Nicaragua, on the contrary, initiated a dynamic process of
creative alternative models which continues broadening.
1.3 The rope pump in Nicaragua.
The rope pump’s history in Nicaragua demonstrates that those
typically considered to be the agents of technology transfer as
not as important In this process as is commonly believed. On
the other hand it confirms the importance of social participation
14
First part: The challenge of popular technology
r
Chapter 1: A developing technology
15
I
0
C,,
a)
-J
a)
(U
a)
(U
-c
C-)
U)
a
Hour of thaday
Figure 1 .8:Hourly discharge rate en the “El Pochote” handdrilled well.
both in the definition of criteria in the technological development
process and in the actual processes of innovation and transfer.
It also demonstrates the necessity of combining the process of
transfer and generation at the community level with some sort of
institutional support. Preliminary studies and experimentation
accelerate the development and transfer of technology.
Rope pump technology was introduced for the first time in Nicaragua in 1983 in the Santa Cruz community (outside of Estell),
with the installation of a prototype in an 18—meter well. The
pump was made at the Center for the investigation of Appropriate Technology (C1TA—1NRA) of the Agrarian ReformMinistry.
This version was based on previous experiences in Haiti, which
were adapted to what was estimated to be the area’s economical and technical level. There was no criteria developed about
16
First part: The challenge of popular technology
Photo 2: LIttle gIrls working the pump
This pump is installed over a drilled well with a 35 meter pumping
head. It yields 32 barrels (8 cubic meters) a day (El Pochote).
possible long term transfer and development, leaving the initiative to those who knew the area best; the local population.
In less than a month spontaneous self—construction and innovation projects began in the community. CITA’s participation consisted of promoting the organization of the community into two
collectives in order to satisfy the need for pumps in the community and to enrich the innovation process, encouraging interaction and solidarity among the peasant—inventors. There was
also institutional support with the supply at cost of PVC tubes,
the experimental distribution of prefabricated rubber pistons,
and the training of peasant—inventors in theoretical aspects of
technology.
Chapter 1: A developing technology
17
Nemeslo Porras Mendieta
What, In your opinion, might be the rope pump’s formula for
success?
“In analyzing its objectives, the uses it fulfills and its implications for
the rural sector, there are direct and indirect benefits. As of now,
the oplnion~regarding this point vary in the extreme; either overwhelming enthusiasm or attributing its achievements to the devil.
The enthusiasts are clear about its popular nature: its revolutionary
undertones as a result of the organization it requires; its promoting
the participation of women, the resulting social changes, and the
rejection of technological dependence. The detractors accuse it of
demagoguery, of being populist and strengthening negative paternalism. And finally, the calmest of these maintain that it is economically impractical. One positive aspect of these discussions is that
they have contributed to the distribution of the rope pumps.”
“I
think that it has had some technological success in the manner in
which it was introduced, and I believe that it has promoted modernization, but not socio—ecoflomic development in terms of rural wellbeing, nutrition, community and national integration, and no notable
changes stemming from its innovative style have come about. The
pump, as with any other technology based on inanimate objects,
does not have the ability to succeed or fail in and of itself. It requires the stimulus, support and enthusiasm- of individuals to give it
life. It has been demonstrated in practical terms that any form of
rope pump construction is successful if itis accompanied by a program of self—generated organization within the communities.”
“The success of the rope pump relies on the manner in which it is
introduced Into a marginalized community, with the only resource
being the community’s desire to participate within a group project,
because the process must involve a program based on the community’s social organization and self—management. The only methodology that results in the successful transfer of technology is that
which takes into account the subjects of development, providing for
their collective participation and unlimited creativity.”
18
First part: The challenge of popular technology
The introduction of glazed ceramic isolators in the wood guide
was one of the most important results of this first phase of construction. This allows the least wear on the rope and the pistons, overcoming the pump’s most obvious weakness. After
about a year of pumping experience with various models and innovations, the user—innovators decided that the rope pump is
the most economical way to “get water out of a weil, cheaper even than taking out water with rope and bucket.”
Although not all changes in the pump’s construction by the
peasants were improvements, it was very important to let the
process develop at the coriitriunity level. The usefulness of the
pump was proved by the way in which the communities appro-
prIated the technology, and slowly lr~ltiatedthe transfer towards a large part of northwestern Nicaragua, including the urban area.
This experience generated enough confidence at the institutional level to program a directed and massive transfer, supporting
the community organization and education processes, promotng latent creativity and intellectual potential around a huge
problem: water.
The first step was to produce a community—oriented flyer (Orozcc, E. 1984), as well as to organize various training workshops
for promoters from the central Rurai Aqueduct Office (DAR) of
INAA, as well as community representatives.
Despite CITA’s efforts to bring INAA into the project, and the
presence of several high—level staff members who were convinced of its importance, no significant advance was made.
During the first years professional and institutional representatives, in contrast to the community acceptance, regarded the
rope pump’s technology with little interest. ~Thisresulted in an
incongruency between the appearance of acceptance and an
-‘declared rejection.
Chapter 1: A developing technobgy
19
Given the success of the rope
pump at a seminar on low-cost
water supply and
sanitation technologies
organized in 1987 by
INAA-PAHO—
UNICEF, a plan
was developed to
produce a senes
of pumps, considering the possibility of implementing the technology in popular
neighborhoods in
Managua.
Shortly
afterwards preparations for pump
production began
near the capital,
with
sales/proPhoto 3: One of the pioneers:
duction coordinatDon
Pompillo
with his wife and grandchild
ed with various
The
photo
also
shows one of the first pumps
popular organizainstalled
in
Nicaragua.
Against the left leg: a
tions and the Del- wooden guide and another
guide with an poregate of the Pres- celain insulator. Against the right leg: a woodident. Priority was en pulley (Santa Cruz).
given to the
project’s social
aspect. Production took place in the San José Industrial
Cooperative with the support of a former CITA advisor.
20
First part: The challenge of popular technology
Don Pompilio
How did you become familiar with the rope pump?
“When the rope pump first came to the CITA—INRA Center, many people
were invited to come and learn about the-project. There were many
projects: with animals, with windmills. But what most attracted my
attention was the little pump, it was the easiest to learn.”
-
What conditIons are necessary for the construction of this type of
pump?
“There is the tube, the rope, the pistons which we might make one by
one, but now that they are made in the factones in Managua, we use
those instead If the client wants them made of old tires, then they are
made of old tires, but if not, then we use the pistons made in Managua.”
“This is what I say to the owner ‘You are going to supply me with the
wood, nails and rope I make nothTng except the- pulley wheel and the
to get mea ceramic i5olator in order to form the guide,
so that the pistons work correctly and won’t wear out To date I have
constructed 290 pumps, that’s all”
guide.’ I tell him
-
What procedures do you follow when they experience problems?
“I explain how to change the pistons and how they have to have the ropes
and the pistons ready, how to make the transfer without taking out the
tube. You just let it go loose, pull II fl revers~eand since it doesn’t draw
water that way, there is less effort in pulling”
Who else participates, or do you make the pumps by yourself?
“I explain to the pump owners that it is important that they pay attention
when I install the pump But there are those that must go off to work,
leaving behind only the women to help And the women are the more
interested, perhaps because~they have had to haul buckets with
thousands of problems. So the women- are- the ones who are more
interested”
Considering these materials, only the ropes should give you troubie.
What about the guides?
“They function but it is not the same because I went about for three years
working with that same foot valve which was already too worn out, it isn’t
the same as with that ceramic isolator You can make them Qf laurel
which is a fine wood, always looking out for wood that lasts long under
21
Chapter 1: A developing technology
water. And I explain to themhow it’s made in terms of cost, If the person is
poor, we help them. If they have family members I explain to them too. If
not, I put it together for free”
Do you think that someone with little knowledge, yet familiar with
agricuiture and cattle raising, could construct and install a pump
simply by observing your pump?
“Many have brought pumps here but they couldn’t install them. I have been
installing the pumps for them They use 9mbaro wood for the guide, and
many have used the lever from a plow guide, they fie up the tube and
through it passes The rope, and they don’t put on any weights. So there are
problems. Someone who had read “Enlace” installed a pump but then came
later to ask me questions. I suppose he gpt it installed because he said that
if he couldn’t do it, he would come get me, but he never came”
What can be said of the companies that install great numbers of
pumps?
“For me it is very nice It’s goodfoi people who have cattle to have access
to water But I do ask myself if these people are training the users of these
pumps in caae they gel damaged. I explain to the people asi am installing:
‘This goes here, and this goes there You’ll put it together like this when it
gets damaged’ Who knows if they are explaining to the user so that the
pumps won’t break down.”
-
Do your procedures work?
“I have had no rejections (of my methods), not a one What happens is, one
has to control the little ones who might want to fool around with the
equipment So I tell the children, ‘No, no, children Thisis not here to be
fooled with’”
-
Based on your experience, what are the merits of the other pumps?
“I don’t like them. I have seen the kind they use to fill the water troughs for
cattle. All of the system located down below is difficult to take out, and the
water has a bad smell. The rope -pumps are mOre hygienic, arid
there’s nothing to rust. With the rope pump all you need is to have its
rope and pistons ready, while with thE other, one always has to be
looking for the people that know how to install the- system. The
pistons don’t have much life, and with so many people coming to get
water, I don’t know what kind of system It could use because it has no
resistance. And when it stops working the people come~,remove the
covers and take out the water with buckets, because the system
doesn’t last long.”
First part: The challenge of popular technology
22
Not functioning:
33
0/
/0
/
J
r
~
Broken gu!de (production fault)
7c~
-
- c
~-~-
.
-.
—
-
Functioning:
-
.
~7
~7
Figure 1.9: ConditIon of rope pumps installed in Bluefleids.
An evaluation of 88 rope pumps two years after emergency installations. Source: SoIls, 0., 1990.
The work included the development of various models, including
the motorized pump and the double handle for drilled wells up to
70 meters; the serial production of ceramic guides using innovations from the Santa Cruz peasants; the current design of pistons and the organization of low—cost production.
After the disaster caused by Hurricane Joan, INAA decided to
install 300 rope pumps in Bluefields as an emergency measure.
This was the first large—scale implementation. Its emergency
nature it created senous difficulties; technical problems given
that the product was not well—tested, and lack of quality control
and social problems because of lack of training and community
participation. Even with these weaknesses, it is interesting to
observe that an evaluative study carried out two years later indicated that 67% of the pumps visited were functioning (even
though there was no maintenance system). 26% of all the
pumps were not working due only to problems with the rope, a
minor repair. Users were generally content with the pump. Taking these circumstances into account, these results are very
positive.
Chapter 1: A developing technok)gy
23
Bit by bit the National Engineenng University (UNI) changed its
policy. The UNI was sponsoring the project in collaboration with
the San José Cooperative, and it prioritized commercial and academic aspects. The cooperative lost its role as protagonist,
stopped producing and limited itself to selling its inventory.
In the same period in 1988, DAR--Region V decided to expenment with the rope pump in one of its institutional rural water
supply and sanitation programs. The iron wheel was reinforced
and embedded in a concrete slab to protect the well. The bearings and the blocking system were improved. After two years of
limited implementation, positive results were seen and the rope
pump was adopted as standard in all DAR—Region V projects.
A sales system was also established, not only of rope pumps
but also of construction materials for improvement of wells, latrines, floors, etc,. all in combination with technical assistance
and sanitation education. A credit fund was established for
groups without resources. In addition to these project activIffes,
it was decided to promote the pump through a publication, a decision which was made a reality through this document.
As a product of the Bluefields and Region V expenence, INAA
decided to incorporate the rope pump in a broad study of low—
cost rural sanitation technologies carried out by the Engineering
University (UN1) in 1989. Although the study had interesting results, it did not go beyond the laboratory phase and had practically no relation with the countryside (See Ballesteros, M,
1991).
Given the great demand generated by the rope pump, in 1990
the TMRope Pump Society was formed. This private initiatIve
took on its business with great energy: traveling from fair to fair,
using radio announcements, and covering the country in trucks
full of pumps, looking for clients. They achieved a monthly sale
rate of 50 to 60 pumps. The society is not only dedicated to
24
First part: The challenge of popuiar technology
sales, but also invests in pump improvements and in the development of special models, trying to monopolize on innovations.
There are also other projects promoting the rope pump, initiated
by organizations like CEPAD, Bridges of Peace and COOPINIC.
Although they do not currently produce great quantities, they accumulate experience and develop different implementation approaches.
For an idea of the number of pumps installed over the last ten
years, see figure 1.10.
ID
>~
ID
a
0
ID
ID
In
C
U)
a
E
0~
Year
FIgure 1.10: Rope pumps Installed In Nicaragua.
Chapter 1: A developing technology
1.4
25
Implementation approaches
After this short historical review, we now analyze three prototypes of rope pump implementation methodology with which we
have experience in Nicaragua: user—building, sales and institutional water supply projects. These prototypes are clearly rudimentary, and each initiative contains elements of all three.
Even so, they are useful to analyze the achievements and limitations of the different possibilities for technology implementation. In each one, we refer to the fundamentals that we detail in
chapter 2.
User—built pumps
The idea of user—built pumps is that the beneficiaries themselves build their own pump with available resources, in some
cases with institutional support. This approach responds to the
reality of many peasants who are not only farmers, but are also
carpenters, masons, etc. In addition, in the countryside there is
often not cash available (to buy a pump), yet tools, construction
materials, knowledge and time are available. Wilian, a promoter
of user-built pumps, comments, “...The most necessary tools
for pump construction are a hammer, a saw, a square, a machete is very important, a hand—drill to make some holes and a
rasp. The leather punch is necessary to make pistons, but
working carefully they can be made pertectly well with a sharp
knife. That is to say it isn’t totally necessary, but we use it to do
the work faster. You don’t need lots of things if you want to do it
simply.”
The pumps built in this way are usually rustic and simple, but
represent the effort of the users themselves. The felt need of
the beneficiaries, self—sufficiency and the transfer of technology
are important advantages of this approach.
One discrepancy between those who have worked with this approachy is related to the manner of communication and promo
tion: if thisis done through construction—training workshops or
26
First part: The challenge of popular technology
Ramón Jimenez Mendoza
self—builder
How did you first hear about rope pumps?
•WelI, quite simply, we participated in the Farmer to Farmer Project,
and through it we were able to obtain a copy of the magazine “Enlace”, in which there was an article that explained about rope
pumps. We needed the pump because with this rope pump my
~obIemscould be solved and it could be constructed very economIcally. No, I have never seen a pump, other than the one that I have
made. No, I haven’t seen one.”
What does one need to construct a pump, In terms of both
knowledge and finances?
“In terms of money, I didn’t spend much because I already had the
tube. I did have to buy the t—joint, and two lengths of rope that I
bought for diez cordobas per rope. That was it. It took us three and
a half days to make it. Sometimes things went wrong and that set
us back somewhat; maybe we made the pulley wheel frame incorrectly and then had to make it over again.”
“In the magazine they explained how to make the washers with a
knife. We made a punch from galvanized tube, and sharpened it.
We put the tire on a block and hit the punch with a mallet, and in this
way we cut the washers. What you need is to have at least some
Idea of what you are doing and where there is a will, there Is a way.
Just a little idea, nothing more; an idea of how it might function better and not malfunction.”
What do you have to say regardIng purchasIng a pump made In
a workshop?
“Well, sure, a pump made of iron is going to last longer because we
are dealing with Iron, but it is also going to cost more. I prefer the
one I make myself for economic reasons, because I try to do it in the
least expensive way possible with whatever I have at hand. With
the pumps made in the workshop, the builder includes all his/her expenses, and can’t charge one peso less. But not with mine; I look
around to see If I might not make it with a little piece of old rope until
I have enough money to buy a new one. That’s the way I made the
pump and now I have water.”
Chapter 1: A developing technology
“Water is the
most important
thing needed
in the home, in
order for one
to feel comfartable when goin~out to do a
job or conduct
business.
One
now
knows that water can be easily obtained In
thehome, and
the important
thing is that
there be an
atxndRnce of
water, easily
obtained and
economical.
-
With this pump
you don’t need
electricity. You
don’t
need
anything, except maybe a
little food to
give
you
strength.”
I~.,..
prefertheonelmaker,_...i...”
Don Ramon Jimenez with his home—made wooden pump Note that he dldn’t use the central rim
of the tises, but only the tread and walls. The outlet spout is a folded sheet of galvanized nofing.
(San Patncio).
27
28
First part: The challenge of popular technology
Photo 4: Will ~ really work?
The whole family participates in the construction of the pump, whether
is be as carpenter or observer. User—builder workshop given by
Wilian, in the white shirt, promoter from ‘Puente de Paz’ (El BrasH).
through promoters, or if it is enough to just see a sample pump
or read an article or flyer (written communication). Another difference is how many and which parts and/or tools are bought or
produced by the users themselves. The tubing is always
bought, but there are variations in pistons and guides.
Another related aspect is that there are not only grass—roots innovations, but there are also mistakes. For this it would be interesting to do follow—up which promotes precise communication to accumulate experiences and avoid repitition of errors.
The great advantage of this approach is that the user
understands the technology, and at any time can repair,
adapt or change the pump. Therefore we can really talk about
Chapter 1: A developing technology
29
a popular technology, and guarantee that there is real interest
and confidence in the new technology. The technology is not
limited to the apparatus, but rather forms part of a broader training and development process, reinforcing confidence in one’s
own creative efforts.
A disadvantage is the limited impact (not everyone has the skill
to build their own pump) and the technical limitations which prevent building pumps for deeper wells. Another problem for
large—scale growth is the lack of a materials distribution network
outside of the regional capitals, especially in terms of small
quantities of tubing and accessories. Institutional projects could
help in this aspect.
Sales
The sale of pumps emerged closely related to the previous approachy. A peasant—after having participated in a pump construction workshop—begins to build and install pumps for other
residents. He develops skills and special tools, without giving
up his previous job. This phenomenon is found frequently.
There are also broader initiatives, where various people work
full—time and have made significant investments to accumulate
pumps, secure transportation, put out publicity, etc.
Both cases demonstrate that the pump is viable: “free—market”
mechanisms show that both builderslinstallers and clients are
interested in the pump. This is the best guarantee that the technology will survive without outside interference.
The greatest emphasis of this approachy is in the felt need of
the beneficiaries (of course) and in !ocal production.
The advantage of this approach is that it is both agile and flexi
ble, and offers accumulated experience (many installed pumps)
which permits innovations not only in the pump itself but also in
its production and installation. If there is not a closerelationship
with the user, there is a danger that the seller forgets the
Fwst pat The challenge of popular technology
30
Altonso Aragôn Amador
Palo de Hule” Promoter
“
What exeotly Is the “P~ode Rule” and how does It function?
“Well, the Palo do Hule Is a foundation ~istbeguining to function.
We’ve been operating for a ye~and m addition to the assistance
we receive from the Dutch, we receive support from the Juan XXIII
Institute with our work here in the store. People with extremely
kmlted resources make their requests, aid m some cases we
provide them with discounts of 30% or 50%, and they can pay over
a period of three months, or simply according to their ability. There
Is a short form that they must till out with their full name, address,
the type of material they are buying, and their signature. There is
also a section in which they state whether they have the ability to
pay the full price, or whether they need credit or a discount”
“In the store we have everything, at least ii terms of tites of all
diameters, wrenchs, everything related to potable water. We also
have chlorine, sand, cement, cement blocks In case one has to
make a rim for their well, or an ~xon, all those things. We have
everything. We’ve also poured concrete floors In the houses of
some poor people~
“In the majority of the wells in which we have installed pumps,
(about 60%), we have done all of the work necessary. induding the
rim, the ~ron all the work, even the storege tank for collecting
the water. mars something that we indude in the installation and
—
sell in the store. When people saw the first pump installed arid
functioning, the rest of the people began to arrive at the store to
see how they could get their own pump.”
How do you traIn people in the use of the pump?
“The training of the users is 100% complete. It only takes a short
time to install the pump about an hour and a half. But in some
cases, for example, when I have to install two pumps in one day, I
dedicate all my time In order that the people learn well. When
possible, we install the pump once, see how it functions, and then
sometimes I take it out again, and tell the users to install it
—
Chapter 1: A developing technology
31
themselves, so they begin with the first steps and finish the job well.”
“in four months I have installed 64 pumps, and they are still
lunctioning. During my first month of work I Installed 11 pumps. And
honestly, I did the rest in just these four months of work. There are
200 requests pending.”
Is It necessary to vIsit the sites to see how the pumps are
functIonIng?
“At least at the- end of each month, or sometimes every 22 days I go
visit the pumps. But its a lot of work for me, and I am just a
promoter, nothing more. I visit a lot of communities. In addition,
there are communities such as those In Serrano, in whIch I have 6
pumps to install during the next month. For me alone, its a lot of
work, but every 22 days I make a run through at least Jerusalen. In
El Almendro I checked out the pumps we installed for the bank and all
are functioning.”
Is there satisfaction In this kInd of work?
“In my opinion, the most unpleasant aspect Is that we are a tiny
business, but, we are not part of the government, and it Isn’t up to us
to go around looking for and talking to the people about bettering their
health conditions, and making latrines. It isn’t our job. All of that Is
the State institutions’ responsibility. But in reality, from what I have
seen, the institutions are not interested. Well, I’ve seen that and it
makes me truly sad.”
“My greatest satisfaction Is that with the use of the pumps I have
seen an improvement in health. That is the principal factor for me;
that all the children are drinking clean water because the well Is kept
sealed, chlorinated, and they will no longer have the problem of
putting a dirty bucket or dirty hands In the well they simply turn the
crank and draw up water. When we first arrive at the site, there are
cases In which one finds cockroaches in the well. So when we do the
installation, when we make the apron and the rim, etc. It the old rIm Is
made of wood, we take out the wood and make sure that the owner
or the user clean out the well. I consider it super important that we
eliminate all the creatures living inside the well and the existent dirty
water, leavIng everything new, including the water.”
—
32
First part: The challenge of popular technology
Photo 5: Water to drink, to wash, to bathe...
For health reasons, the pump should be included as an element
within an Integrated sanitation system; a well, a cement floor, a
bathing area, a draInage pipe for the laundry. Some of these Improvements were financed by “Palo do Hub”. (Jerusalén).
medium and long term needs. This can affect not only the durability of the pump, but also the training of users in maintenance
and repair.
This approach is ideal for private wells, especially when there
are economic benefits from the water (cattle, irrigation). One
problem Is the sector with scarce resources, which should be
covered by a special program of subsidies and/or credits.
Chapter 1: A developing technology
33
Institutional Projects
What we call “institutional projects” are projects (generally with
~internationaifunding sources) which work with an integrated
package of water supply, basic sanitation, health education and
at times many more elements. The rope pump is just one part
of this combination of activities. Generally there are communal
wells, and emphasis is put on the pump’s force rather than on
its cost. Water quality protection is also prioritized. Within this
approacl’ay, impacts on health, local operation and maintenance
and natibhai production are priontized.
It is worth referring to a combination of institutional projects with
private sales; the DAR—Region V initiative offers the sale of construction materials, rope pumps, technical assistance and sanitary education at a reasonable price. This initiativo was described in the above paragraph and in the interview with Alfonso
Arag;n.
One of the advantages of this method is the greater possibility
of impacting the living conditions of the community because of
the Integration of the activities. There are usually resources
and willingness to contribute to the study of the pump and the
production of information and documentation. The greatest
danger is that of working too schematically, and not responding
to the specific needs of the beneficiaries, which results in lack of
interest on their part. Another limitation is that these projects
are limited to specific areas, and many times to specific groups
within those areas.
Up to here we have the description of the three most—developed
implementation approaches in Nicaragua. As can be observed,
each one has strong and weak points, and the reader will have
to decide which is most convenient for each situation and objective. In chapter 2 we pull from these practical experiences various fundamentals which are at the base of the rope pump.
34
First part: The challenge of popular technology
Chapter 2:
Basic rope pump concepts
Different ways of analyzing a problem result in different technological solutions. Behind every technology exists (or existed
originally) certain basic concepts. There was some vision
(whether conscious or unconscious), although it may have been
lost during the technology’s evolution.
In this chapter we try to make concrete some of the concepts
which are at the base of the rope pump as a low—cost popular
technology:
—a felt need by the beneficiaries;
—health impacts;
—self—sufficiency;
—social control;
—village level operation and mangement;
—local manufacture;
—technology transfer;
—technical—theoretical concepts.
In the above section, where we described different approaches
for implementing the rope pump, we implicitly knew these basic
concepts.
The basic concepts do not only refer to the approach of the introduction of the pump but also to the apparatus itself. The aspects are two sides of the same coin; the introduction of a technology with community benefits. They are inseparable.
The basic concept of the rope pump is known as “appropriate
technolOgy.” In literature about technological development of
so—called “third world” countries, the concept of “appropriate
technology” has played a fundamental and increasingly important role.
Chapter 2: BasIc rope pump concepts
35
However, definitions of the concept vary so much that we prefer
not to dwell on this term. Many central elements in definitions of
“appropriate technology” are the same as those described in
this chapter. We can confirm that the rope pump technology is
an appropriate technology.
We now discuss each of the concepts that form the base of the
rope pump as it has been developed and promoted in Nicaragua.
2.1 A felt need
by the beneficiaries
One fundamental concept in all development activity (and therefore in all drinking water supply projects), is that it should begin
from the interests and reality of those benefitting. We must then
first define who are the beneficiaries and the users of drinking
water wells.
The digging and cleaning of a well is considered man’s work.
Wehave experiences in which women participated actively in
digging and masonry work but they are exceptions. In this
sense, it appears logical to organize construction of new water
works with the men. However, women are the most involved in
everything which refers to the supply and management of
drinking water in the house. In this sense, they are the primary
beneficiaries. In terms of pumping water, the situation is more
diverse. We can make a general observation that throughout
Nicaragua in the case of communal pumps, women and children
are usually the ones who gather the water. On the contrary, in
the case of individual family wells with storage tanks, it is usually the man or oldest son who fills the storage tank various times
during the day. There is thus not a clearly—defined impact group
in terms of the pump’s use. Usually men take charge of mainte-
First part: The challenge of popular technology
36
nance, although
there are many
cases in which
women
repair
pumps.
At any
rate,
women
should always
be explicitly Involved In all decisions, activitIes
and
Photo 6: Women are the principal
users of the pump
Pregnant woman staying at the ‘Birthing
Center dr~vingthe daily wash water.
(Nueva Guinea)
1.— the
2.— the
3.— the
4.— the
trainings around
any drinking water
project. We will
thus use the feminine form when
referring to users,
beneficiaries, etc,
although we are
clearly not excluding men. If we ask
any peasant woman for a list of criteria to choose a
source for drinking
water, she will respond with a list
something
like
this:
distance and the topography of the trajectory;
cost per bucket of water;
flavor, color and smell of the water;
social climate around the well;
Chapter 2: Basic rope pump concepts
37
5.— the ease with which water is drawn;
7.— and only maybe at the end would she mention the bacterial
quality of the water.
We may disagree with these priorities, but we have to accept
them as the basis for our activities. It is true that through
health education it could be possible to change these priorities,
but for now this is the basis for action. And if we want the beneficiaries themselves to plan, carry out and maintain their own
water supply system, we have to offer them something that is
important to them and not grasp on to some established plan
(for example PAHO norms, INAA standards, etc).
Once the improvements have been made and enjoyed, the beneficiaries will modify their critena, and see the importance of other improvements. We propose a process of step—by--step
improvements, assimilated one by one by the users, In-
stead of imposing a pre—designed sanitation system.
Let’s keep these considerations in mind while we analyze the
drinking water situation in rural areas. It is relatively easy to dig
wells in many zones; water depth ranges between 5 and 30 meters and the soil is not very rocky. There are villages where half
the houses have wells, and the other half buy their water from
these wells. In these cases, it is ridiculous to tell acommunity to
build one or two community wells, because the people will not
be interested. (We have to remember their list of priorities.)
Another typical situation in rural areas is very dispersed communities extending for kilometers, with micro—nuclei of 4 or 5 houses. A single central well would also not be much use because it
does not fit in with their priorities.
In situations like these, it makes more sense to improve the existing wells: to build the well’s apron, a drainage trough, slab,
and to install a pump which facilitates withdrawing water and
protects the well. Since there are many wells, there is a need
for many pumps; therefore the pump should be inexpensive
(and since there are few users for each pump, it doesn’t need to
38
First part: The challenge of popular technology
be made so strong). Many wells are private, and so a sales policy must be developed to impact these families (whether with
subsidies or not), which once again implies an inexpensive
pump both in construction and in maintenance.
The rope pump fulfills these requirements of price and simplicity, and is an ideal pump for such situations.
2.2 Health Impacts
There can be objections to the above approach by arguing that
a drinking water source should guarantee 100% pure water (the
PAHO philosophy), and that this cannot be achieved by improving existing wells with their faulty construction and poor locations.Vanous studies have demonstrated that the quantity of
water available has more effects on health than its quality. An
abundance of water stimulates its use to wash hands, food, diapers, the bathroom, to clean the house, etc. Apparently, these
are more important sources of contamination than a certain degree of contaminated water being consumed. We don’t want to
say that one doesn’t have to worry about drinking water quality,
but you do have to take into account that the quantity is more
important. The same studies indicate that the quantity of water
used increases significantly when the source is closer.
An area with many dug wells should be taken advantage of,
even when their hygienic conditions or physical characteristics
are not optimal. ft costs the same to install a robust and “hermetical” pump in a new central well as it does to in stall 15 or 20
rope pumps in various private or communal wells, improving the
wells (with slabs, rims, linings, drainage troughs). It must be decided which will be preferred by the community.
In terms of water quality, there is no confusion. When we talk
about limitations in protecting the source, we refer primarily
tothe wells (bad location, proximity of latrines, with no sanitary
seal), and not to the rope pump. As we will see in section 3.4,
Chapter 2: Basic rope pump concepts
P?~oto7: The pump In the parlor
Studies have shown that decreasing the distance to the water
source increases water consumption. This has a positive effect on
39
I
health. (Nueva Guinea)
the rope pump appears to give the same water protection as
“traditional” pumps. It is interesting to mention here a related
aspect, that high water consumption has an unexpected positive
effect; water spends less time sitting in the well, which prevents
excessive bacteria growth in the water.
To conclude this section on health impact, it is important to emphasize the need to accompany the introduction of improved
wells and rope pumps with a thorough health education campaign which should especially emphasize the adequate
transport, storage and use of drinking water. If this does not
take place, the impact on health—which is the final objective of
any drinking water project—will never be achieved.
40
First part: The challenge of popularlechnology
2.3 Self—sufficiency
Another taking—off point in any development activity- should be
that outside~supportnot be perpetual, but only serve as theimpetus to developing viable alternatives. Many times projects
come to an end, donors leave, and only
leave behind a limited
number of wells with
pumps. Rather than
multiply, sooner-or later they break dowrr for
-
lack of maintenance.
This is not development.
The projects
should develop an alternative which is a realistic option for the
benefitting population,
even without the intervention of a donor; an
option that can be produced, bought, installed and repaired.
A pump for rural areas
should be inexpensive
and easy to produce
nationally, preferably
at the local level. The
Photo 8: “...Our commIssion Is
rope pump is one of
solely of women..”
the few technologies Womencomposed
from a potabiewater committeetoknown today which ful- gether at their pump which is~well protected
fills these prerequi- by a bo~and a fence (urban area, Nueva
sites.
Guinea)
Chapter 2: Basic rope pump concepts
41
2.4 Social control
Logically, a piece of equipment like a manual pump that re-
ceives intense use requires certain strength. There will always
be inadequate use, careless users, unruly children, etc., and
any pump should be designed to resist such situations.
Many producers have tried to make pumps which resist any kind
of abuse or vandalism. We think the importance of this should
be put in perspective, because if the users don’t care about the
pump, if they don’t take care of it, clean it, maintain it, or use it
property for drinking water, it will have no impact on health.
(And why install pumps under these conditions? Only to
achieve higher coverage rates?) If a user values the pump she
will automatically care for it, repair it, etc. The rope pump is
based on the principle that the owners/users should take care of
it. If there is no social control, the rope pump will not work (as it
is currently designed), since it is -susceptible to any robbery of
parts or injury.
In the case of community wells, a Drinking Water and Sanitation
Committee of three to four members is usually formed, preferably women, to take charge of organizing care, cleaning, administration and maintenance of the well and the pump. Another successful alternative is the “private—public” well; one family makes
its well available to a defined list of other families, and the pump
is installed. This way, the well is for public use but receives private care.
42
First part: The challenge of popular technology
2.5 Village Level Operation
and Management
One concept which has received growing attention by drinking
water and sanitation project leaders is Village Level Operation
and Management(VLOM). Although there are many different
manifestations of this basic concept, all share various essentials: the community members themselves are able to decide on
all the aspects of pump operation and maintenance; they organize and carry out all activities. Normally there is a drinking water committee and various people trained to make repairs.
The rope pump has all the charactenstics of a good VLOM
pump. But it isn’t only the technical characteristics of a pump
that make it appropriate for VLOM. The whole working method
for developing the water system should work toward a VLOM
situation. There should be support for the formation of a water
supply committee, training of various villagers in pump maintenance, access to necessary tools, spare parts and supplies, etc.
In short; once the system is set up, the community alone
should be able to keep it functioning.
In Nicaragua, the majority of rope pumps have no institutional
maiRtenance system. One exception is the rope pumps installed by DAR—Region V, where there is an institutional operation and maintenance system that primarily limits itself to water
quality control. Repair work is minimal. In the majority of cases
there is training of users around all aspects of pump maintenance, both organizational and technical. There is also a limited network of pump parts sales. Even with these conditions,
the majority of the pumps are in good condition, illustrating that
the rope pump can be maintained perfectly well by the users as
long as they have been given adequate training.
Chapter 2: BasIc rope pump concepts
43
2.6 Local manufacture
Uterature mentions advantages of local production of hand
pumps which include: saving money, greater probability of parts
availability, knowledge to make repairs, and finally, stimulation
of local industry.
Disadvantages
mentioned
in
these studies are:
design limitations
because of low
technological levels and problems
of quality control.
-—
—
-
Clearly the rope
pump concept is
one of local production as much
as possible. The
arguments
are
generally
the
same as those
mentioned above,
but it is worth going Into detail in
some areas:
Self—sufficiency:
In order to reach
the
abovementioned goal of
self—sufficiency,
existing local pro-
Phuli~I:Local production
The Iron worker, Rafael Castilla, with a supply
of he
structural
in his
workshop
where
makes, supports
among other
things,
pulley
wheels for the rope pumps (Juigalpa).
44
First part: The challenge of popular technology
duction structures should be involved. This small local industry
can be supported in its growth by introducing new techniques
and tools; this is part of the development process.
Local Innovation:
The experience and creativity of artisans are essential to the adaptation and development of the rope pump. Their experience
gives them a very different and many times more innovative vision than that of professionals.
Adaptation to local conditions:
When the artisan produces and Installs the pumps and understands the technology, he can then adapt the design to changes
in production conditions (for example; availability of materials,
introduction of new tools, etc).
User—maker relatIonship:
Local production guarantees a certain closeness between the
maker and the user which facilitates spare parts supplies, repairs, adaptations and even the development of special models
adapted to the specific user’s situation. This closeness is a
guarantee of quality, since the maker is continually subject to
quality control in practice by the users.
An extreme case of local production is user—built as it was described in section 1.4. In that case the future owner makes her
own pump. The great advantage is that the owner understands
the technology and at any moment is able to repair it, adapt it
and change it.
-
Chapter 2: Basic rope pump concepts
45
2.7 Technology transfer
A technology which sets out to be “popular and democratic”
must be understood as much as possible both by the makers
and the users. This is necessary to guarantee adequate operation and maintenance, but even more it is the greatest fruit for
the users, for its continued development and for its adaptation to
particular cases. The transparency of its workings and structure
invites owners and users to experiment with the pump, exploring
all of its parts. One can see many pumps with innovated “improvements” made by the users themselves; rubber here, anexIra lever there, more pistons, homemade wooden guides. They
don’t always mean substantial improvements, and are often
based on an incorrect analysis of the problem. At any rate, it indicates that the users have incorporated the technology and are
not afraid of exploring and examining their pump.
The true understanding of a technology therefore implies more
than the handing over of the pump with a supply of spare parts
and a “user’s manual.” It implies the need for users together
with makers to explore the pump with the goal of experimenting,
analyzing and testing new ideas.
We think that this has been the basis of much of the rope
pump’s success in Nicaragua. We can affirm that artisans and
users have supported much of the rope pump’s development.
They have actually played a much larger role than the technicians and engineers.
As we saw in chapter 1, in Nicaragua we have many ways to
promote the technology, ranging from open sales with no training to construction by the users themselves. The latter concept
obviously fits in much better with the philosophy of the rope
pump as described here, but it has its limitations; it demands a
46
First part: The challenge of popular technology
high social and technological level on the part of the promoters.
Even so the t~chnicalpossibilities are limited, preventing the
rope pump’s use at depths greater than 20 meters. At any rate,
we consider essential discussion and understanding of all aspects of the rope pump by its promoters and makers (artisans).
2.8 Technical—theoretical concepts
Up to this point we have only touched on cultural and socioeconomic aspects of the rope pump technology. There are also
fundamental technical considerations that favor the basic rope
pump concept. To explain these, we make a comparison with
reciprocating plunger pumps.
The great majority of hand pumps are of the reciprocating plunger type: They have a cylinder hanging on raising main. A piston moves in the cylinder, driven by the pump rod. The weight
of the water column rests one moment on the piston (sustained
by the sounding line) and the next moment on the foot valve
(sustained by the raising main), in continual alteration. This dynamic load, combined with the shock due to the accelerations
(2) implies fatigue and creep for the sounding line and the raising main, especially in the pipe threads; even more so if these
pieces are made of some kind of plastic. These problems occur
more in pumping heads of more than 40 meters. Because of
the relative elasticity of the plastic materials, the system can
easily begin oscillations at a certain depth, increasing the tensions and the effects of wear and tear even more.
In addition to these construction problems, the effects of alterBesselink et.al., 1990 has measured and calculated factors of 1.2
to 1 .8 with respect to static load.
(2)
Chapter 2: BasIc rope pump concepts
47
nate acceleration and deceleration, both of the sounding line
and of the water column, limit the pump’s mechanic efficiency.
The rope pump, on the contrary, has a great advantage of continous unidIrectional circular movement. There are no alternating
accelerations of either the complete water column nor of the
pieces. This movement implies a minimizing of accelerations
and statIc load (at least in the pieces with the greatest concentration of forces; clearly the axle is subject to a dynamic load)
with all of its advantages in terms of less load on the parts and
fewer mechanical losses. The weight of the water column is
uniformly distributed on the rope within the raising main because of the chain of pistons. The raising main never has to
support a pressure greater than a fev~meters of water column
(the distance between the pistons), in addition to its own weight.
This represents a pressure of only 3% as compared with the
raising main in a plunger pump at the same depth of 40 meters.
The only element which is subject to considerable stress is the
rope, and even so the load is static and much less than the
sounding cord due to the lack of acceleration shocks. This situation implies that we can pump from great pumping heads with
simple PVC tubes. Only the rope has to be strengthened, which
is no technical problem.
The mechanical losses are minimal, which implies much greater
efficiency than with the plunger pumps. The circular movement
of the rope pump’s handle is much easier for the user than the
tilt of a lever. Ergonomics tells us that one can develop much
more potential with a circular movement than with the up and
down movement of a lever with which we are familiar from traditional pumps. There are then two reasons why the rope pump
pumps more water than the plunger pumps: it is more efficient
and it is more ergonomically adapted.
48
First part: The challenge of popular technology
The reduced load on the parts under water and the absence of
threads makes possible the use of non—metallic materials, a~d.tu’~’
~ greater depth, without the danger of drag. And since the rope
pump does not use any metal parts below water, there is no
problem of corrosion is this critical zone.
With these technical—theoretical cdnsiderations we conclude
this chapter on the different basic concepts of the rope pump.
Chapter 3: Rope pump characteristics
49
Chapter 3:
Rope pump characteristics
In this chapter we present the technIcal characteristics of:
-operation and management;
-reliability;
—discharge rates, pumping heads, and efficiency rates;
-water quality control, and;
-costs.
Given that the use of quantitative data cannot be avoided, we
use two typical models as an example: the ‘tochnlfled’ model,
which has been implemented by the DAR-Region V and is amply described in the second part, with an iron wheel, concrete
slab, polyethylene injected pistons (PE) and a glazed ceramic
guide, and the ‘user—built’ model, with a wooden wheel, wooden guide with rubber pistons.
3.1 Operation and management
The rope pump is excellent for operation and maintenance at
the local level or by the owner. This has been proven in practice. Even in the cases where there has not been much emphasis on maintenance issues during implementation, we have noticed a regular state of maintenance of the pump in the majority
of cases: one example is the case of Bluefields, figure 1.8. This
is even more true if users have gone through a real transference
of technology, It is not surprising that in these cases it takes little for them to carry out adequate pump maintenance.
Basically, maintenance is limited to a weekly oiling of the bearings. Two pieces are continually being worn down and need to
be changed once or twice a year: the rope and the pistons.
50
First part: The challenge of popular technology
In Appendix A we estimate the useful life and we calculate the
monthly cost given different conditions for use. In table 3.1 we
give a summary. Table 3.2 illlustrates the useful life in a typical
case.
Table 3.1: Maintenance costs in dollars per month
Technified’ Pump
Discharge
Depth (m)
(m3/day) 10 20
30
‘User-built’ Pump
Discharge
(m3/day)
10
Depth (m)
20
30
8
1.09 1.93 2.76
8
1.09
4
0.92 1.09 1.46
4
0.91 1.08
0.85 0.93 1.04
1.5
1.5
0.86 1.04
The table indicates maintenance costs in dollars per month
(factory sale price) for two cases: ‘technifled’ and ‘user-built’
according to differing conditions for use. Note that the difference
in maintenance costs in both cases is minimal.
Calculation: Appendix A.
-
-
-
The tools necessary to change the rope, pistons, and guide
are limited to a knife and a burning ember. To change the bearings a no. 10 wrench is needed. A saw and PVC glue are required to change the pipes.
As regards personnel required for maintenance, the qualifications necessary in order to do upkeep are minimal, and after a
half-day of training, anyone can do maintenance. The rope and
the pistons can be changed in half an hour (the majority of this
time is occupied in fastening the pistons on the rope), while it
only takes 15 minutes to take out the pump.
In the case of the ‘user-built’ pumps, where rubber pistons and
wooden guides are used, all the parts can be made in the community. In the case of ‘technified’ pumps, PE pistons and glazed
ceramic guides are used so it is necessary to create a system
Chapter 3: Rope pump characteristics
51
Table 3.2: Useful life for pump pieces by month.
Technified’
(glazed ceramic guide;
Part
Rope
Piston
PP or PE pistons)
10
20
Paint
24
Guide
36
Bearings
36
Outlet spout
48
Raising main
48
‘User—built’
(wooden guide
for rubber pistons)
6
18
24
6
36
48
48
48
Pulley wheel
48
The useful life Is given in months for the two cases: ‘technified’ and
‘user-built.’ Conditions are relatively severe, pumping 4 m3 per day
with a pumping head of 24 m. The numbers in hIghlights were determined in the field, the rest are estimates. Calculation: Appendix A.
for parts dIstributIon. This creates dependence. Until now our
experience has been limited to structures directly linked to projects or small businesses that sell rope pumps. In the majority
of cases, this is sufficient, but in the case of institutional projects
with determined ending dates, continuityin the distribution of
parts must be guaranteed through a network of private stores
that guarantee parts at market prices.
Finally, it is important to emphasize that it is preferable to implement a preventive maintenance system rather than a corrective
system by strongly encouraging that the caretakers/owners
keep control over the pump parts that are subject to wear, and
that they change them before they break. This subject will be
elaborated upon in the third section.
In both cases (‘hand-built’ and ‘technified’) we can conclude
with certainty that the rope pump is a pump that completely fills
the requisites of a ‘VLOM.’
52
First part: The challenge of popular technology
Humberto Zapata Sanchez and
Concepción Mendoza Castro
Social Promoters
What Is your work related to the issues of potable water and envIronmental health?
Humberto: I work in the DAR (Rural Aqueduct OffIce) in Boaco,
and my training to be a promoter took place in 1984. During my early experience as a promoter, I worked with small aqueducts and communal wells which were equipped with Demster, 23F and Monitor
pumps. Our work is to see that the communities have access to potable water and that those in the countryside enjoy better health.”
Concepclon: “I was trained to be a promoter in November 1989.
For me, the job of the promoter i~to provide more information to the
community, broaden their knowledge regarding the social needs that
should be taken into account in the rural area, In order to better the
standard of living of the people who live in those communities.”
Through experience, what opinions have you and the communIty members formed regarding the use of the various types of
pumps?
Humberto:” I am familiar with the Indian, the Demster, the Monitor,
and many more. These pumps are very problematic in the rural areas. Beginning with their installation, the pumps require a specialized
team that is familiar with that type of pump. And you need a vehicle,
a number of tools and a lot of people to help you since the tubes and
tools are heavy. One person alone couldnt install a pump. Tha
parts are imported; we don’t make them herein Nicaragua. And as
Nicaragua is a poor country, the communities have few resources to
be going about importing this or that part from abroad in order to
keep the pump functioning. The people say that this type of metal
pump made from galvanized pipe draws up awful tasting water In the
morning, with foul sediment. It takes about half an hour of pumping to
clear the water that had remained in the tube, while with the rope
pump it even comes out colder.”
Chapter 3: Rope pump characteristics
53
“There is more acceptance of the rope pump, seeing as how it Is easier, simpler, and the accessories are well known. It Is so simple that
it gets their attention and interests them because they see that they
can do the installation and repiars and the costs aren’t very high.
None of the community members or ranchers have requested those
kinds of monstrous pumps. They have shown a great interest in the
rope pump, and we have had a big demand for that type of pump, not
only from private individuals, but from the communities with wells.
They haverejected the Indian or Demster type of pump because they
have heard about the experiences of other communities with that
kind of pump. In order to not tell them what kind of system they
should install, we give them the various options, but everyone has
opted for the rope pump because they say that operating the pump is
easier.”
How well Is the rope pump accepted by the users?
Concepclón: “There is a saying that goes: one’s likes are influenced
by what one sees. Perhaps the rural farmworker is not going to understand the technology in depth, such as the technical explanation
of the pump, but he sees a pump functioning and it gets his attention:
Hey, what is this all about, and how does the water come out with
the rope?. He begins to get curious and wants to know more. And
then, this doesn’t get the attention of just the man or the child, but of
the women as well, who say, ‘I can see how it is easier, and how it
will make it easier for me as a woman, and for my child, to obtain
water.’ I can see that they view the pump as attractive, simple and
moreeasily operated.”
Humberto: “Compared to the other pumps, if you are going to tell a
woman what is the first thing to go on a (traditional) pump, you could
mention thousands of things that are going to go. First it might be
the washers, it might be that the sounding rod falls apart, that the rectangular rod breaks, many things can break. So when you talk about
these things with the women, they don’t pay attention and they back
off, saying, ‘This is a subject for the men’.”
“When they ask, What is it that breaks the fastest with this pump?’
and we tell them that it is the rope, and show them how to change
54
First part: The challenge of popular technology
that rope and make the washers, then they say, ‘Ahhhh, that we can
do, no problem.’ and so the women feel they have more of a right to
participate.”
Concepcldn: “Sure, there are a lot of differences and there exists
more acceptance on the part of women. I think that part of this stems
from the fact that generally the women participate more In dealing
with water; it is the woman who uses the water for all the domestic
chores, to drink, to wash dishes, to bathe the children. All of this responsibility falls on the woman, and it is also the woman that is going
to be drawing the water. And so she also uses the pump within the
communities and tries to make a decision: ‘Hey, this is the pump
thats right for a woman’s strength because it is easier to turn the pulley wheel, more water comes out, my container fills up more quickly,
and I am going to be able to manage more water, more efficiently:
So the women can make decisions regarding the type of pump be-
cause in making the comparison with another type of pump, they feel
that it is more complete. In addition, there are women who haveparticipated in the installation, and it is they who have had the responsibility of repairing the rope pump, because it is easier, the accessories
weigh less and everything is easier than the other types of pumps.”
ConcepclOn: “It is popular because in the first place, it is made from
our own materials. It isn’t necessary to bring in parts from some-
where else, and its cost is within reach of people with few economic
resources. It is democratic because practically everyone has the right
to partlcipate in the installation and reparation, including the women
and children. There Is nothing difficult as I see It.”
Humberto: “In regard to the other pump there is no democracy. We
need a technical team, and only this team can do the work so no one
else can participate because they don’t know the system, they can’t
do it. It has to be done by the technical team from 1NAA.”
What Interests are Involved In the marketing of the pump?
Concepclón: “For a promoter, his or her particular interest is social,
to create conditions which are going to improve the living conditions
of the people, of the community, to orient them in how to better their
Chapter 3: Rope pump characteristics
55
situation. Whereas, an individual, or someone who sells pumps has
an economic 1ntere~tin bettering his or her own situation. In fact,
what interests them is filling their own pockets, and they don’t give all
the recommendations necessary in order to assure that the pump
purchased by someone doesn’t fall apart all the time. So their’s is an
economic interest and ours Is social.”
Humberto: “I have even felt more at ease in my work when I arrive
in a community and they say, ‘You know, this pump here broke the
rope because It got stuck, but we already bought a new one and it’s
functioning.’ I feel as though our work has been a success, I feel that
I am developing my work.”
What do you think about the Issues of water quality control and
public supervIsIon In relatIon to the rope pump?
Concepción: “The degree of contamination Is not a function of the
pump or the type of pump one installs in the well. It stems from the
users, because, no matter how well covered or hermetically sealed a
well might be, it the user doesn’t know how to manage the pump, or
doesn’t know how to make proper use or the water, if there has existed no ongoing education regarding sanitation, there tends to be contamination even if they are using a rope pump.”
Humberto: “There Isn’t a need for much public supervision because
the community appreciates a pump of this type; it hasbeen noted in
the communities that it is as though they have more love for a pump
of this type, as though they were seeing it as being weaker. For this
reason, they themselves take more care than they would with the
other pump, with which they might even see If they could hook it up
to an ox. But they feel that it is competent and so they take better
care of that little pump, or show it more love, you might say.”
Who decIdes on what type of pump to use and what lies In store
for the future?
Humberto: “The communities themselves have shown us that the
pump that works for them is the rope pump. We can’t install something that tomorrow will leave the community with the same problem
as before; they have no way of drawing the water, they begin to put
56
First part: The challenge of popular technology
their containers inside the well, and in no time we are back where we
started from, except worse off, because now they have water with a
higher concentration of microbes, there is no circulation, and we are
generating more illnesses in the community with this huge pile of
broken pumps accumulated in x number of months.”
Concepción: “In reality, that is going to depend on the knowledge
that has been acquired regarding improvements to the pump and the
problems that it has resolved in the rural sector. It is going to depend
on the degree of knowledge on the part of both the financing organizations and the (government) institutions, in order to fully understand
that here, in this country, what is needed Is a solution brought about
by ourselves, with our own resources. The rope pump has a better
future because it is more widely accepted due to its low cost and
high output, which is something that is of special interest to the private producer.”
Humberto: “I think that it is better to make use of this type of pump
here because It results better for the communities. I also think that
throughout the time that we have been working, the rope pump has
been in first place here.”
How would you descrIbe your dIrect partIcipation In this
technology?
Concepclón: “In fact, we as promoters have Immersed ourselves in
the development in practical terms. What happens? The engineer
can design the pump, or the man who can build it, builds it. But
those who have experience in using it and those who transmit that
experience are the community and us. And it is as a result of all
these experiences, direct or indirect, that all the Improvements are
made in order to better the technology. So, I feel that we are in fact
in midst of the development of this new technology.”
Chapter 3: Rope pump characteristics
57
3.2 Reliability
In order to elaborate on the subject of reliability, we will begin
with its definition. The definition of the “reliability of equipment”
used most frequently, is the “Mean Time Before Failure”
(MTBF). However, this definition does not take into account the
time necessary for repairing the equipment, and consequently it
is inadequate for disperse potable water systems. In this case,
corrective maintenance is a serious problem, both in financial
terms as well as time.
A different definition is used by Arlosoroff e.a., 1988, defining a
pump’s reliability in the following manner: “Reliability is what mechanical engineers call ‘availability:’ the probability that the
equipment will be functioning on any given day, calculating the
functioning time as a percentage of the total time:
Functioning Time
Reliability =
X 100%
Total Time
-
In this book we use the second definition. The two definitions
are illustrated in figure 3 1. Although pump “B” has a tendency
to fail more frequently than pump “A,” its reliability according to
our definition is greater because repairs can be made more rapidly. it is not necessary to bnng tools, parts, or technicians from
a long distance, and all repairs can be made locally.
The rope pump is a typical example of pump type “B” it is not
very rugged, but repairs are easy and fast. The only aspect to
worry about is the transference of technology to users and the
distribution of parts
First part: The challenge of popular technology
58
Pump A
months
llmoforrep~
MTBF: 18
:
i
t~
2 months
Re~1Nty90%
Pump B
MTBF: 9
monlhs
limo for repek:
iwoek
Ae~th~Hty
95 %
i
a
12
1618
21
24
-
21
30
35 42
45
40
Thne (months)
• I
I
I Pump ~nc~o~ng
FIgure 3.1: RelIability of two pumps
Pump broken down
A ficticious chronogram of the functioning of the two pumps. Given
the definition used-In this book, pump “B” is more reliable than
pump “A.” The rope pump is a typical example of pump “B.”
Reliability, within the d&inition used here, is not just a technical
matter: socio-economic and cultural factors also come into
play, for example:
-motivation of users to take action to repair the pump;
-the possibility of taking water out of the well even if the pump
-
is broken;
-availability and quality of alternative water sources:
-complexity of repairs (costs and availability of necessary parts);
-
-
-
-level of training and self-confidence of users. Here it will be
demonstrated whether or not training was effective for the p~r1n;
cipal users (women) to maintain the pump or if it was only efféctive for those who dug the well (men).
Chapter 3: Rope pump characteristics
59
All of these factors are important points that should be considered in institutional rural water supply and sanitation projects as
well as for the sale of pumps. The use of the rope pump by itself
does not guarantee high reliability, but reliability can potentially
be guaranteed when the users have been trained and are willI ng.
No systematic monitoring in the field has been done using percentages on the pump’s reliability, but we can affirm on the basis of our observations that it is reliable:
-Repairs are generally made within a few days. If the process
drags, it is due to a lack of resources to buy necessary parts.
-Frequently repairs are made by the owner or caretaker.
Sometimes someone is paid, but it is always a community member.
—The lack of tools and technical knowledge is never mentioned
as an obstacle to repairing the pump.
Don Emilio Miranda, a member of the water committee of a
communal well comments:
When the porcelain guide broke, / began to think: Why cant /
make this piece out of wood? Why am I going to go all the way
to Nueva Guinea to buy a new guide if! can make it here in half
a day? And the one that / make will probably function better
that the one that they bring from Managua...”
“...
Thus we conclude, on the basis of our observations, that the
rope pump is reliable.
FIrst part: The challenge ofpopular technology
60
3.3 Discharge rates, pumping heads
and efticlency rates
For users, high water discharge Is almost always of primary importance, more Important than ease of movement. Almost everyone prefers working hard for a strong flow of water rather than
working less but waiting longer to fill their bucket. On various
-
Pumping head (Meters)
—
Mean
—
Minimum
÷
Maximum
Figure 3.2: PumpIng discharge rates
The lines represent the limits between the three zones defined by
Arlosoroff e.a., 1988. The symbols summarize 53 tests done in the
field executed at four wells with difterent users, induding chIldren.
it can be observed that when pumping head Increases, the rope
pump results come closer to the typical zones. This is due to the
following; for cylinder pumps the efficiency Increases with the
pumping head, while In the case of the rope pump It remains the
same (Source: Heuthorst, 1991).
Chapter 3: Rope pump characteristics
61
occasions we had temporarily installed pumps with a greater diameter raising main than that advised by the theoretical norms
of ergonomics (because of a lack of tubes or pistons with the
correct measu rements), but after installing a “better-designed”
pump several weeks later, according to the ergonomic parameters, the users wanted to stay with the original pump. In other
words, we generally found that users apply a potency much
higher than 100 watts. However, we consider that pumps with
heavy action should be avoided in order to keep the pump ac-
cessible to women and children.
Arlosoroff et.al., 1988, defines good discharge rates in figure
3.2, as well as acceptable and unacceptable rates at different
pumping levels. Given that these discharge ~ratesdepend directly on strength developed by the user, the graph is not
unique: a strong man gets more water with the-same pump
than a girl. The rope pump complies perfectly with the established norms demonstrated in the graph: particularly for shallow
wells, the discharge rates are much higher than required.
Given field experience, among others the case study in El Pochote, we can use table 3.3 for an overall idea of the possibilities of a rope pump’s coverage.
-
-
Table 3.3: Hours of DaIly Pumping
Number of Discharge Depth
Users
m3/day
Discharge
10
75
1 .5
200
4.0
0.5
1 .2
400
8.0
2.5 hrs~
0.9 hrs.
2J hrs.
5.Clhrs.
-
-
-
hrs.
hrs.
m
20 m
30
m
0.9 I/s 0.5 I/s 0.3 I/s
1 4 hrs.
5.0 hrs.
7.8 firs.
The daily discharge categones are taken from Arlosoroff, 198g.
The quantity of users is estimated based on this data-assumin~ga
consumption of 20 liters per person per day.
62
First part: The challenge of popular technology
The pump’s efficiency is directly related to daily discharge rates.
Although we analyze the subject of efficiency in depth in chapter 7, it is worth mentioning this dilemma briefly.
The total efficiency of the pump varies between 60 and 90%,
which is high for a manual pump. A high efficiency rate is of
particular importance in the case of deep wells where pumping
water is serious work. In pumps with a pumping head of 35 40
meters (which are the deepest in which we have installed the
rope pump), the efficiency is still good.
-
The total efficiency of a pump is the product of the
hydraulic effIciency multiplied by the mechanIcal
efficiency.
Mechanical efficiency consists of the friction losses between
the different moving parts of the pump. it is difficult to est~blish
the mechanical efficiency by testing but we can estim~teit
based on experiences in the field as between 80-~90%~.
(As explained in Section 2.8, the mechanical losses of a rope pump
are less in principle than those of a reciprocating plunger
pump.)
Thehydraulic efficiency rate consists of the leakage of water
through the narrow ring that exists inevitably between the piston
and the wall of the raising main. This efficiency rate is easy to
measure, and field tests demonstrate that it varies between 80
and 95%. The hydraulic efficiency rate depends on various production factors, principally the play between the piston and the
raising main, and the piston’s velocity. The dependency of
these two factors is demonstrated in figure 3.3.
Chapter 3: Rope pump characteristics
63
a
0
a
C-)
a
~0
>~
—
-
Piston velocity (mis)
Figure 3.3: Hydraulic efficiency
Curves of the theoretical hydraulic efficiency rate of a rope pump
as a function of velocity, for three plays between the piston and
the raising maIn. (1/2” tube, 2m distance between pistons)
(Source: Heuthorst, 1991).
When referring to the pump’s efficiency rate, the subject of ergonomics must be mentioned; the ease of movement, or the
user “efficiency.” ft is known that an easy movement to drive
the pump permits the user to generate more power and become
less tired. The uniform circular movement of the pulley wheel
handle is in this respect much more favorable than the movement of tilting a lever. These are not just the criteria of users in
Nicaragua, but also the conclusions of field and laboratory tests
done in Arlosoroff e.a., 1988.
First part: The challenge of popular technology
64
This aspect could be improved somewhat by including a flywheel ~ the pulley wheel, an element to consider for very deep
wells or high discharge rates.
We thus conclude that in terms of efficiency rates, the rope
pump complies completely with the requirements.
3.4 Water quality protection
One of the principal reasons for installing manual pumps is to
protect the quality of drinking water in the well; the pump seals
the well and impedes the infiltration of contaminated water Although it is true that the rope pump does not seal the well hermeticallly (think about the rope and the openings of the protection tubes), it has been proven to give ample protection. The
concrete slab with the protective tubes makes the infiltration of
contaminated waters that fall on the slab impossible, and the
possibilities of contamination by the rope also seem minimal,
particularly when a protection for the pulley wheel has been installed
Figure 3.4 demonstrates a comparative study of water quality in
sealed wells with a rope pump and with Dempsterpumps. It
can be observed that there are not great differences between
the two categories of wells, and although the sample is small, it
can be concluded that other intangible factors are more rmportant to water quality control than these different types of pumps.
Chapter 3: Rope pump characteristics
65
a
a
0~
a
0
a
0~
1—I-i-Do
Number of E-colisflOOrnI
Figure 3.4: Well contamination
The quantity of E-coli per 100 ml in water samples taken from
sealed wells with rope pumps and with Dempster pumps. The data
comes from 66 samples taken by the UNOM team in Nueva Guinea
and in Boaco. Wells were chosen which eliminated possible negative influences like: poor locationof wells because of streams or latrines; poor lining quality of slab or rim, poor sanitary conditions and
maintenance of well and apron; if chlorination took place after the
last opening. The greater number of samples from Dempster
pumps Is due to the fact that there are more wells with this type of
pump installed in the region. Note: The great majority of these rope
pumps did not have any protection for the pulley wheel.
In the discussion regarding the protection of water quality another factor must be taken into account; the reliability of the pump.
A pump that provides good water quality protection is of little
value if the pump is not reliable; most of the time the users will
First part: The challenge of popular technology
66
be taking water from the well with a bucket on a rope. It is also
important to keep in mind that every time a well is opened, there
is a possibility of contamination, which means that the well
needs to be chlorinated before closing it. If this is not done adequately, the water quality could be affected.
Humberto, a coordinator of promoters, does not leave any
We cannot install something with which the community
will have the same water problems tomorrow--they will have no
way to take out the water, and they begin to drop buckets into
the well and in a short time the situation will be the same as before, even worse because the water is more concentrated with
microbes, there is no circulation and more illness is generated
in the community with all these broken pumps that we will
doubt:
...
have.”
Another aspect in the study is that we have only looked at the
wells in good condition, leaving aside nearly 60% of the wells
with imperfections in construction, location, or maintenance. It
does not make any sense to install a pump that hermeticaily
seals such wells.
Finally, many rope pumps in Nicaragua are installed in wells
without a slab or a wooden cover. Although it is true that in
these cases the well’s protection ts not as good as with a concrete slab, even in these cases the pump’s installation means a
substantial improvement in the hygenic conditions of the beneficiaries because the ease with which users can take out water
encourages them to use greater quantities
(See paragrah 2.2: Impacting health).
Chapter 3: Rope pump characteristics
3.5
67
Costs
The rope pump is very inexpensive; the price of the “technified”
model varies between $43 to $47 according to depth, while the
“user—built” pump costs about $13. This price does not include
the cost of the wooden wheel! The market price of this wood
would be between $8 to $10, but practice demonstrates that old
pieces of wood are almost always used.
Technif~edmoc~i43 $
User-buiil mod~L-
-
-
47 $
45 $
40
C-)
20
13$
10
0
—
lOm
—
2Dm
—
—
30m
________________________
2Dm
PumpTngftead(m)
Wheel
Gu
~
~
--
~R~T
Figure 3.5: PrIce Structure
The price structure of the ‘technified’ rope pump and of the ‘user—
built’ according to the pumping head. Source: author and Bargmann, D. 1991
For an investment program for rural water supply and sanitation
projects this data is not significant; the pump’s cost is a minimum percentage of the total project cost. The other characteristics of the pump are considered more important than the pur-
68
First part: The challenge of popular technology
chase price. For the self—sufficiency of a rural population with
little resources, however, the pump’s cost is very important.
The low cost of the rope pump makes it possible for wide distribution given that many people (family nucleus, or several families), are willing and able of paying this sum for a pump, keeping
in mind the low installation and maintenance costs.
Table 3.4: Costs per piece of rope pump In US dollars
(Pumping Head: 24m.)
Technified Pump
User—built Pump
Value
Piece
$US
Value
0/
$US
%
19%
Wheel (materials)
Wheel (production)
Guide
12.00
18 00
2.50
27%
40%
6%
2.50
Discharge tubes
2.23
Raising Main
Rope and pistons
6.72
3.28
5%
5%
2.23
6.72
7%
1.68
TOTALS:
44.73
-
100%
-
-
13.13
-
0%
-0%
-
17%
51%
13%
100%
Graph 3.5 and table 3.4 demonstrate the costs of the pumps by
piece and depth. The following observations can be made:
The costs increases are relatively small given the depth of
the well; much less than with other pumps. This is due primarily
-
to the use of PVC pipes with a small diameter, a relatively inexpensive product. The following phenomenon can also be ob-
served: greater well depth, smaller pipe diameter and therefore
lower costs of pipes per meter.
Chapter 3: Rope pump characteristics
69
The cost of the rope and the pistons increases almost lineally
with depth; although this cost is relatively low, it does significantly influence the recurring maintenance costs (See section 3.1).
-
When analyzing the data in the graph and chart, the following
conditions must be taken into account:
The same wholesale prices were used for the ‘user—built
pump’ as the ‘technified’ pump. In practice, if the user—built
pump is not supported by a project, its real cost could double or
even triple given the great difference existing between wholesale prices and prices in the departamental tool shops.
Nicaragua today is an expensive country to produce in; production efficiency is very low and salaries are relatively high.
Costs may be lower in other countries.
The values shown are the sale prices of the suppliers of each
piece. The installation and assembling costs are small; in the
case of a wooden cover 1-2 working hours, in the case of a concrete slab 8 working hours. But, the collection of the parts from
the different small businesses that produce them requires a significant investment, i.e.:
the metalworking shop for the wheel;
the rope weaving shop for the rope;
-
-
-
-
-
-
-
-
the injection workshop for the pistons;
the ceramic workshop for the guide, and finally
the factory for the PVC pipes.
The cost of running around to find all thesepieces--althpugh it
could be significant--cannot be quantified and cannot be taken
into account.
-The cost of a machine does not mean much if its useful life is
not known. We estimate the useful life of the wheel (which represents the greatest cost) at about 10 years. The other parts
-
-
- -
will be changed within a certain time period, as shown in Appendix A. We include these expenditures within the mainte-
nance and operation costs.
70
First part: The challenge of popular technology
To compare the cost of the rope pump with other well-known
pumps, see figure 3.6.
——--—
600
__________________________
FumpsThDr
30 m head
-
~
1-
500
4&~S
-
-
400
---———
—
-
Pumps far 12 ñ fteád
~,300
a
a)
LI~
o
ie~s
136-S--
fl
~-100
43S
0
47S
~
Hope
pump
-
T~&~Trümad~ I
Maya
Mk Ill
__
~pIAfdde~Thi~d~an
pump
Mk Ill
FIgure 3.6: Prices of dIfferent pumps
The prices of a rope pump compared with other known pumps
which are competitive in the range of depths of 0-10 meters and
10-30 meters.
In this chapter we analyzed the different characteristics of the
rope pump: operation and maintenance, reliability, discharge
rate, pumping head, efficiency rates, water quality protection
and finally, costs. We now look at production issues.
Chapter 4: Production
71
Chapter 4:
Production
One of the strong points of the rope pump is that it does not require a high level of technology for production, and can be produced in any country with a low industrial development level.
Since many designs of the pump exist it is not possible to generalize and we must differentiate by model and by piece to analyze the aspects of production. We will do this in the second
part. Here we limit the analysis to the production levels required
for typical pump models (section 4.1) and explain how production is organized and how to involve small and micro-industry in
this process (section 4.2).
4.1 Production levels
In order to discuss the feasibility of producing a piece in X or V
location, we define the four technological levels of production in
table 4.1, depending on the tools and materials available at
each level (3).
We have limited the discussion to the tools and materials relevant
for the pump’s production and for the molds, but each of these tools
mentioned is not always required in order to make the pump.
(3)
-
72
First part: The challenge of poptjlar technology
Table 4.1: Definition of technological levels of production
Production
Available tools
Available materials and level
semi-manufactured inputs.
Home
Common carpentry tools
(non-electric).
Fine wood
Sand, cement,
construction iron 114”.
A used tire.
Local
Simple Lathe for
wood,11OV,200W.
Welding electrodes,
construction
iron in different
diameters, galvanized
iron pipes. PE fiber
for rope.
Electrical welder
110 V, 50 A.
Hand wheel to make
rope.
Reglo
nal
Natlo
nal
Steel Lathe at 220 V
Slide guage
Ceramic oven reaching
1 ,300 degrees.
Cinva—ram
Manual Extruder for
PE or PP with 100
N/mm2 pressure:
heating 11 OV.
Iron or Bronze Bar
up to 50mm.
Stoneware Clay
Multiple electnc
extruder for PVC.
PVC as
raw material
Feldspar
PE or PP as raw
material.
Chapter 4: Production
73
Now that the relevant charactoristicsof the different technological levels have been identified, we can analyze which piece can
be produced at each level. This is demonstrated in table 4.2 for
two types of pumps: “technified” and “user-built.”
Table 4.2: Level of production
of the pieces of a rope pump
Home
Local
Regional National
Slab
U,T
Wheel
U
Guide
U
T
Pistons
U
T
Rope
Tubes
T
U,T
U,T
U,T
The Indicator “T” represents the tecnified pump, and “U” the
user—built pump.
As can be observed in table 4.2, the user-built pump could be
built ‘at home,’ requiring that one buy only the rope and the
PVC tubing, which is the greatest obstacle. The technified model can easily be built at the regional level, while the wheel,
which represents 67% of the pump’s value, can be manufactured at a local level. In both cases there is no need to import
parts, although the raw materials (tires, steel, PE) are imported.
First part: The challenge of popular technology
74
In Appendix B we have enumerated in detail all of the matenals,
tools and molds required for the production of the two types of
pumps.
4.2 Production Organization
As we observed in the last paragraph, the technical aspects of
rope pump production are not at all complex. The major difficulty lies in the organization of productIon. Six elements with
very different characteristics need to be collected, probably with
six different suppliers.
For the “technified” pump these are:
materials for the concrete slab at the building materials shop;
the wheel in the metal workshop;
the guide in the ceramics workshop;
the PE or PP pistons in the extrusion workshop;
the rope in the rope shop or in the market and
the PVC tubing in the factory.
Although the metal wheel has been standardized to a maximum
level, it still contains six different iron semi-manufactured inputs,
apart from the old tire, welding, and paint.
-
-
-
-
-
For the user-built pump the situation is a bit simpler, but not
much. Although there are not many sub-products, it is a question of finding all the materials (without exception):
for the cover and the wheel, construction lumber and GI tubing; fine wood for the guide;
an old tire for the pistons;
rope and
PVC tubing.
-
-
-
—
75
Chapter 4: Production
Ignaclo Lopez Perez
Pump workshop
How many pumps do you produce and what are the models?
in terms of quantity, its what we make the most of 70 rope pumps per
month. We are testing a rope pump with an windmill; we’ve already installed it, and produce two per month for drilled wells with a motor. We
are experimenting with a pump to pump wells dry for cleaning. In terms
of hand pumps, it’s the best because it gives the highest output for the
least effort. In addition, it is In higher demand because not every one has
electricity. It has also received a surprisingly strong response.”
What have you done to improve the capacIty of the shop and satisfy
the demand?
“With the Increase in demand, we have had to make special molds in order to decrease person/hours because we have a social commitment to
reduce the costs of production. We decided to come up with better molds
and designs. We did a structural analysis of the equipment in order to
balance time and materials. For example, in welding during fabrication,
and assuring the proper balance of the pulley wheel, we are now welding
the pulley wheel and the handle at the same time. Another example is
using designs that cut back the need for materials. In this way we save
on production costs, and then the prices are lower.”
How do you make Improvements on the pumps?
“When we go into the countryside, we like to see how they work. What
we do is get feedback from the installers, for example, the client doesn’t
like the Sound of the brake. We have very good communication In this respect. We have Improved many details such as the welded joints, the
parts subjected to the most stress. In addition, we maintain our own standards.”
What are the future possibilities for the rope pump?
“The outlook is good for the rope pump in the coming years. It has quite
a prosperous future among the poor. Even if all the rural communities
obtain electrical power, there are not going to be the economic conditions
which would allow every one to buy electric pumps. The rope pump has
been constructed with this In mind, and as long as there exists poor people, we will need to keep pace with the demand, in addition to training our
personnel to face this challenge.”
—
76
First part: The challenge of popular technology
In many developing countries the
communication
systems
are
faulty, and an efficient banking system is not accessible to the majority
of the small workshops.
Distribution of raw materials
or
semimanufactured inputs is not fluid
and supposed delivery dates are
not honored.
)11:
-
of pulley wheels
The use of molds for welding the pulleys Is
one of the innovations that allow for quality
and uniformity, while maintaining high output.
(Ignaclo Lopez Workshop, Managua).
These factors lead
to the inevitable
conclusion
that
the installation of
a rope pump requires excellent
planning.
The easiest solution is to maintain
a large stock of
parts, but this is expensive and requires Inactive capital. It also
can induce poor planning in terms of ordering new sub-products
on time. As one warehouse worker comments frequently:
“...there is still a lot in storage.”
Chapter 4: Production
77
Another strategy used is to gather all the tools to make the majority of the parts within one business: the value of the machinery to produce the wheels, guides, pistons, and rope adds up to
approximately $5,000, which is relatively little.
The advantages of this strategy are:
Easy planning of production:
All of the machine operators know what a rope pump is and
understand the importance of e~hpiece of the pump.
However, the disadvantages are considerable:
The distribution of raw materials and of the products is complex. Only part of the problem has been solved, and it is still
necessary to find a considerable variety of rawmaterial: PE or
PP, six types of steel, welding, paint, PE fiber for the rope, tubing, clay and glaze.
A major part of the machinery is under-utilized (except for the
welding equipment).
The experience and specific knowledge existing in the specialized workshops is not utilized;
This form of production is not based on the existing small industry, and this weakens the society’s assimilation of the technology as discussed in Sections 2.7 and 2.8.
We recommend the organization of production based on a network of existing small and micro-businesses. In order to achieve
this, it is necessary to support and control each of these micro—businesses in the following aspects:
It is very important that the craftspeople understand how the
rope pump works, why it was designed, etc, through practice.
We have had very good results with this strategy as regards motivation as well as generating useful ideas regarding how to produce or adapt sub-products.
Look for ways of payment that help the micro-businesses to invest and grow, for example through payment in imported machinery.
-
-
-
-
-
-
-
-
78
First part: The challenge of poØülar technology
_____
Ji
-c-~
Photo 12: InjectIon machIne before starting
on an order for 6,000 pIstons...
The lever on the left feeds tfte raw material The polyethylene balls descend from the depository through a funnel and pass through the electric heater (the “voltage regulator is seen above) towards the mold (not
installed) To the right, the lever which presses the mold On the chart
in front, a sample o( three molds
with
their 1/2”, 1” and 1/4” pistons.
Emphasize strict delivery dates-, including fines within the contract for days or weeks behind schedule.
From the very beginning demand sufficient quality of the subproducts.
In industry it is common to use a large contract to invest in the
improvement of production methods. In the case of microenterprises we think it is important to explicitly separate the development of a sub-product or new method of production, with
production on a larger scale, making different clauses within the
contract:
-
-
-
Chapter 4: ProductIon
79
Photo 13: ...and after
The mechanism for Introducing the raw material has been improved through the use of an electric motor with a transmission.
This photo shows the opening through which the liquid polyethylene comes out.(Jose Evansto Workshop, Managua).
1. Deveiop a production system, with X and Y molds, for a value
ofxxC$;
2. Produce a quantity of parts at a unitary value of yy C$. The
workshop will not lose much if the effort fails, and wiil not be obligated to deliver products of insufficient quality.
With these observations we conclude the subject of production,
and pass on to the perspectives and future development of the
rope pump.
80
First part: The challenge of popular technology
Chapter 5:
Future Perspectives
In the last chapter in this section we briefly discuss the possible
perspective for the rope pump regarding the implementation of
the present pump (5.1 )and for research and development (5.2).
We also include the possiblttles for the special models of the
rope pump described in the fourth part: the pump on a drilled
well, post—mounted, fcr high discharge, with a motor, and with a
windmill. And finally, we mention some research aspects with
respect to construction, making reference to the respective sections in the second part.
5.1 Implementation
Given the characteristics described previously, we can conclude
that the rope pump can be implemented without any problems
under the following conditions:
The well can be drilled or dug by hand and up to 25 meters
deep.
It can be a public or private well, but there must be some social control.
The daily pumping is 4 m3 or less.
The pump can be a model for an drilled or dug well, with a
high discharge or post—mounted.
With close follow-up, the implementation of the pump under the
following conditions can also be considered:
A well up to 40 meters deep and/or with a demand of up to 8
m3 daily.
A pump with a motor.
In Nicaragua every day the conviction becomes more widespread that the rope pump is truly the most appropriate pump
-
-
-
-
-
Chapter 5: Future Perspectives
81
under the above—mentioned conditions, and as the conviction
spreads so does the demand for the pump, on the part of individuals as well as small and large institutional projects. When
questioned about the future of the rope pump, Humberto, a coordinator of promoters answers: “...this depends on the consciousness regarding the problem that the pump is resolving in
rural communities. This depends ~n the level ofconsciousness
of the donor agencies as well as the institution that assumes
any given project and their ability to recognize that here in this
country, what IS\ needed is something that we can resolve with
our own resources...”
For implementation to be carried out on a greater scale, the
network of producers, suppliers, distributors and installers still
needs to grow. This is important not only to increase coverage,
but also to foment continuous development of the pump; in technical aspects as well as different methodologies forimplementation (user—building, sales, institutional projects). This support
can be given through exchanges of experiences (constructive)
or by competition (conflictive). Given that many enterprises and
private cooperatives are interested in protecting their product
and their market, a combination of these two factors which encourage development would be the most probable.
5.2 Research and development
One central problem in researching the rope pump is that at the
present time no organization is directing resources specifically
towards pump research and development. Consequently, any
research carried out responds only to the necessities of a particular organization at a certain moment, in an ad-hoc manner,
with no medium or long-term planning.
First part: The challenge of popular technology
82
Another related aspect is that the possible applications of the
rope pump cover different fields: the provision of drinking water
through public wells, use of private wells, use of water for cattle,
for irrigation on a small scale, etc. All of these fields have been
traditionally attended to by different organizations. Although for
each application the problems are different (in technical aspects
as much as in the methodology of implementation), it is not recommended that a different organization dedicate itself to each
area. However, in Nicaragua today no multi-disciplinary organization exists that could attend to all of the above mentioned
fields.
For these two reasons it is difficult to predict how and where research will develop in the coming years.
In general, we can define some areas of interest which we
believe should be prioritized:
As regards the model implemented by the DAR-Region V that
is amply described in the second part, the necessity and possibility of improving certain elements should be studied, in particular the blockage system.
For communal wells with more users and less social control
(particularly with drilled wells), a more robust and vandalismresistant model should be developed with better protection particularly for the rope. Price is not important in these cases;
since a drilled well costs between $2,000 $3,000, the $50
$100 for a rope pump is not a signficant component. At the
present time the DAR-Region V is working on this.
It would be interesting to work in the development of pumps
for pumping heads above 40 meters, maintaining high efficiency
rates. At the present time, the DAR-Region V isworking on this.
It would be important to monitor a large quantity of rope
pumps regarding their useful life for different parts, to be able to
know how to improve the design as well as to know the requirements for maintenance and the useful life of the pump, in partic-
-
-
-
-
-
Chapter 5: Future Perspectives
83
ular for the blockage system and the different types of pistons
and guides.
It would be important to more systematically research the protection the rope pump provides against possible contamination
of well water, and the possible measures to improve this protection if necessary.
To attain the highest efficiency rate of the pump, particularly
for great depth and in the long term, the wear on the Injected
pistons of different flexible materials (soft PVC, rubber) that permit less play should be investigated.
As regards the special models described in the fourth part:
The models for drilled wells, for high discharges and post—
mounted do not need to be improved at the moment. However, frequent monitoring would be appropriate.
The motor—driven rope pump functions in a satisfactory
manner for wells that are relatively shallow. It would be important to widen the functioning area and look for its limits (for
example, to what depth can pumping be done from a drilled
well). Frequent monitoring would also be important. At the
present time, the “Rope pump society” is involved in this
-
-
-
-
-
work.
In the rope pump with a windmill, complete development is
still lacking in the construction field, in the study of volumes
pumped according to the wind speed, the demands for irrigation and/or drinking water, and economic feasibility studies
before thinking of implementing it. lgnacio Lopez’ workshop
is involved in the technical development of the windmill.
-
With these perspectives regarding the future we conclude the
first part, which is the general part of the book. In the second
part we will enter into construction details of the pump.
Photo 14 (overleaf): User—built pump
Note the use of only local materials. The use of the container as
the outlet spout is interesting (Chinandega).
2
Construction
if you consult enough experts,
you can confirm any opinion.
86
Second part: Construction
FIgure 6.1: Complete pump
Chapter 6: Description of the pump
87
Chapter 6:
Description of the pump
In this second part, which is directed towards the technicians
who will design and build the pump, we explain its construction
and design in detail.
Following a more detailed general description of the pump than
in section 6.1, we have analyzed the different parts:
slab;
pulley wheel;
pistons, rope, and raising main;
guide and stabilizing stone;
discharge spouts.
We use the pump that DAR-Pegion V is installing in the community wells as an example, but always present other alternatives. We compare the alternatives in tables, in which the option
of DAR-Region V is always in the first column and highlighted.
Where possible, the characteristics are quantified, but in some
cases we give a relative comparative ratihg that varies tetween
very bad and very good:
i—, + and
Not all of the characteristics are mentioned; only those that demonstrate a difference between the alternatives.
If we are aware of alternatives, but do not have hands-on experience with them, we simply mention them in a footnote.
-
-
-
--,
-,
++.
6.1 General Description
Figure 6.1 demonstrates a rope pump such as one installed in
DAR-Region V. The visible part is made up of a pulley wheel
handle which activates a pulley wheel, which is connected to a
support structure through split bearings. The support structure—in this case made of welded iron—can also be made of
88
Second part: Construction
wood. Another visible part is the discharge spout of the PVC
tubes. However, the heart of the pump is a rope that has pistons every two meters. These pistons can be cut from an old inner tube, turned from wood or extruded from PE or PP. The
rope passes over the pulley wheel and enters the protection
tube, which serves as a guide to pass through the well slab of
concrete or wood. Within the well, the rope lowers freely. At
the bottom, under the water level, a guide (of glazed ceramic or
wood) assures the fluid entry of the rope with the pistons in the
raising main (common PVC, with diameter depending on
depth, commonly 1/2”, 3/4” or 1”). When raised, the rope with
the pistons goes inside the raising main and returns by the pulley wheel. In order to leave the most important parts visible, the
figure does not show the pulley wheel protector.
When the pulley wheel handle is turned, the pulley wheel is activated and friction makes the rope turn. The pistons fit with minimum play into the raising main and each one brings a certain
quantity of water up. Once the tube is filled with water, the water column moves uniformly up, pulled by the pistons, with a
speed a little less than the rope (this is due to the leakage between the pistons and the raising main). It can be said that the
entire raising main functions as a a very long cylinder in which
the pistons move in just one direction. At the top, the raising
main is connected to the discharge spout, and through a T—joint
the pumped water is diverted to the users bucket. The outlet
has a larger diameter to permit the water to be diverted around
the pistons and not overflow from the top.
The weight of the water column exerts force on the pistons,
these on the rope, and this transmits by friction the force on the
pulley wheel. When finished pumping, the pulley wheel and the
handle turn back in the opposite direction of the pumping, with
the weight of the water column. At depths greater than ten me-
Chapter 6: Description of the pump
89
ters, a blockage system is needed to prevent the pulley wheel
handle from hitting the users and the loss of the entire water column. Therefore the next user should not have to again fill the
entire raising main, as long as the water has not been lost
through the leakage that always exists between the pistons and
the raising main.
This finishes the general description of the pump along with its
functioning. In the rest of the chapter we describe all of the
pieces of the pump part by part.
=PUfllpauppodstrucwF.
Figure 6.2: Concrete well slab
90
Second part: Construction
6.2 The well—slab
Figure 6.2 demonstrates the well-slab of the well; it is a slab of
iron—reinforced concrete of 1/4” (3/8” if the diameter is greater
than 1.2 m). The pump support is embedded in the slab. The
manhole serves to install and take apart the pump, and to clean
and deepen the well if necessary. It should be located very
close to the support to facilitate installation and taking apart the
pump. Its rim as well as the cover should be of concrete or iron
(iron is more expensive but more hermetic and given the greater
heat also serves to repel insects, etc). The raising main with
the rope inside, comes out of the well through the anchor tube.
The rope crosses over the well-slab going inside the well
through the protection tube. Both are made of PVC embedded in the concrete slab. The use of these tubes, together with.
the rim of the manhole keeps contaminated water that falls on
the well-slab from entering the well. The location of these two
tubes should be precise in order to avoid the rope rubbing
against the openings of the tubes. The use and location of the
base of the discharge spout are obvious. (Section 8.lexp!ains
the construction of the well-slab).
Alternative constructions
Although the model in this book has a concrete well-slab as is
common in rural water supply and sanitation projects, the most
common practice in Nicaragua is to leave the well exposed and
to attach the pump to two wooden beams. It is also common to
have a well-slab of planks. The characteristics of each option
are demonstrated in table 6.1.
Chapter 6: DescrIption of the pump
91
Table 6.1: Advantages and dIsadvantages
of three types of well-slabs.
Criteria
Construction ease
Construction time
and installation
Protection of well
Ease of dismantling
Weight
Useful life
Price of materials
Production level
Years of field
experience
*
1
concrete
+
2
planks
4+
8 wkhrs.
2 wkhrs.
++
+-
-
÷+
150 kg.
20 yrs.
$10.00
home/local
3 yrs.
60 kg.
5 yrs.
$50/$2”
home
8 yrs.
3
2 beams
-
++
2 wkhrs.
--
-
÷±
22 kg.
5 yrs.
$15/$2*
home
8 yrs.
The first price reflects the purchase of the wood at market
price; the second does not take into account the wood’s value.
It is very common In the countryside to simply cut down a few
beams when one needs them.
Alternative 1: The making of the well-slab from concrete requires some knowledge of masonry, as well as a week of curi ng.
92
Second part: Construction
6.3 The pulley wheel
The pulley wheel (see figure 6.3 and Appendix C) is made up
of the support structure, the axle with the pulley wheel and the
pulley wheel handle, and the blockage system. It is the most
complex piece; it contains all the moving parts and is subjected
to the greatest concentration of forces.
The axle, made of a galvanized iron pipe of 1/2” or of 3/4”,
forms one single piece with the pulley wheel handle at one extreme and the pulley wheel at the other. In section 7.1 we explain why the height of the axle should be between 800 and
900 mm, and the radius of the pulley wheel handle between 250
and 300 mm.
Since the support structure is embedded in the concrete, it is
important that the moving parts are easily moved. This is why
the axle rotates in two split bearIngs which are replaceable
with ease and make possible the quick dismantling of the axle.
Figure 6.4 demonstrate~how the pulley wheel is made of two
pieces of inner tube united under pressure by the portable pulleys. The form obtained is a “V,” and guarantees high friction
between the rope and the pulley wheel. The eight pulley supports are connected to the axle through spokes crossed as on a
bicycle. The diameter of the pulley wheel depends, of course,
on the availability of old tires but in section 7.2 we give criteria
regarding the selection of the optimum diameter of the pulley
wheel in relation to the other factors that influence it. We principally use old tires of 20”, with an efective diameter of 540 mm.
It is important that the tires be from heavy vehicles so that they
are rigid and do not open with the pressure from therope.
Chapter 6: Description of the pump
93
The support structure is immoving since it is embedded within
the well-slab; it is important to protect it well against corrosion.
We use an extra thick iron (5/8”) for the feet. The piece can
also be galvanized.4 The structure should resist force from all
directions; particularly from children who use all of their body to
move the pulley wheel handle.
The blockage system (see photos 15 and 16) keeps the pulley
wheel and handle from turning in the opposite direction of the
pumping. It is subject to shocks. Its functioning is simple; the
lever should allow the pins welded into the pulley wheel to go in
one direction but not in the other. The lever is covered with a
hose or inner tube to absorb shocks and lower the noise level
(that bothers users). One weakness of the design Is that It is
Immovlng, given that it is welded to the support structure which
is embedded. When a problem arises, there is no easy solution.
The pulley wheel protector is optional. It is made of sheet
metal and rests on two iron 1/4” supports. Its function is principally to protect the rope and the pistons from the UV rays of the
sun, from the dirty hands of the users (girls), and in some measure, protection from vandalism.
Before considering some construction alternatives, we emphasize the following; the wheel as it is described here and demonstrated in the plans, is made by two small enterprises with the
most common and cheapest materials in Nicaragua. The design can be adapted without any problem to other materials if
these are the most common. The sharp curves can also be
changed by different constructions using welding (e.g. in the pulley wheel handle, the feet).
If the typical design presented in this book is abandoned with all
of its variants described, an infinite number of very different de
94
Second part: Construction
rw~yufissi nand~e
&~pon
Ax~
Puffsyw~
structurs
Support
structurs
Blocicag. system
Chapter 6: Description of the pump
95
protector
R.416n
~
Rope Pump
Iron Wheel
6.3
--
96
Second part: Construction
Ths two sidewalls Joined together
make the pulley wheel
Thitirubody
c~ibs u,.d
~.proIector
Rope Pump
Howto cut an old tire,
N.
5.4
Chapter 6: Description of the pump
97
signs exist that range from only wooden structures to turned axles with ball bearings, etc. All of these are valid and depend on
the creativity of the builder and the materials at their disposition.
However, it is important to always understand the background
behind the construction alternatives to be able to design correctly under different conditions. It is also important to monitor innovations during a sufficient time period before implementing them
on a large scale.
Alternative constructions.
We present here construction alternatives for three parts that
have been discussed continually in Nicaragua in the last few
years: the blockage system, the location of the pulley wheel, the
suspension of the axle, and the pulley wheel protector.
Types of bearings
Traditionally, the rope pumps in Nicaragua have as bearings
simply a fixed piece of tube within which an axle of 1/2” turns.
This construction does not permit the changingof pieces if a
saw and welding is not used. Particularly when the pump is embedded in concrete, it is extremely important to be able to take
out the moving parts for any repair or change. This is why we
have designed split bearings cut from a GI pipe.
(4). We have tried a moving support structure atlach ng~Twi änL’~
chor bolts embedded in the well-slab (similar to the system used with
the Dempster pump), but the screws suffered heavy corrosion.
98
Second part: Construction
Table 6.2: Advantages and disadvantages
of three types of bearings
1
Split
bearings
welded
(Fig. A.2)
2
Split
bearings
bent
3
Fixed
bearings
(Photo 24)
Ease of replacing
axle/bearings
++
Ease of construction
-
-H-
-
--
±+
-
-
Initial price of
bearing conjunction
Price to change
bearing
Years of field
experience
$3.00
$2.50
$1.50
$1.00
-
1 year
$0.4
~-
8 years
Alternative 2: We have confirmed that the users have difficulty
mounting these bearings. A lot of attention must be paid to this
during training. This is why we began to design bearings of
type 1. As the promoter Humberto comments regarding the
bearings: “With these 12 pumps, one was damaged by the
bearings. The kids lose them because the bearings are a little
mobile, and so this has meant that they get lost. The pump continues to turn but the pulley wheel handles gets worn out... -
Chapter 6: Description of the pump
99
Blockage system.
Only in the case of shallow wells or of adult or experienced users can the discarding of the blockage system be contemplated.
In all the other cases, it must be considered as an important security system. A type of construction that can compete with the
design in this book is the pawl shown in the photo #~Seetable)
Table 6.3: Advantages and disadvantages
of the two pulley wheel locations
Rigidity of the support
Maximum force on the bearing
of the pulley wheel*
Maximum force on the bearings
of the handie*
Ease for installing the pump**
Years of field experience
*
**
++
3.1
3.3
3.6
4.3
++
+
1 year
8 years
The maximum force on the bearings is at the same time
a measure according to the maximum load of the axle. It is expressed as a factor of the static force of the weight of the water
column (which is assigned the value of ‘1’). For the two models
the same distance between the raising main and the wall of the
well is assumed.
The distance between the pulley wheel and the manhole
(see figure 6.1) should be minimal to facilitate the dismantling!
installation of the tube of the raising main.
-
100
PhO~11
Second part: Construction
sm~system u~d
in the DAR—Heg Ion V
The rod allows the pins welded to
the pulley to pass In one direction
but not In reverse.
ie~~t.~nau~~
system
This system has the characteristics of a party noIse maker. It is
strong but requires a lot of work
and matertals (E[Pä~âyaI).
-
Table 6.4: Advantages and disadvantages
of two blockage systems
No. of stops per turn
Maximum free angle
Kinetic energy to absorb
Arm (mm)
Energy/arm (JIm)
Shock absorption possibilities
Ease of production and price
Years of field experience
1
2
8
50
(J) 18 J
250 mm
72 JIm
16
22.5
8J
80mm
100 J/m
++
-
+
+
1
1
101
Chapter 6: DescrIption of the pump
Note: A blockage system design exists that consists of three
teeth on the axle which although it does have enough strength,
is well distributed. We mention this case because it is shown in
various photos.
Location of the pulley wheel
While the model described here has a pulley wheel outside the
support, the majority of the pumps in Nicaragua have a pulley
wheel between the two bearings. Although this construction is
not bad in itself, we think that it does not present any advantage
over the design presented in this book. See table 6.4.
In alternative 2, the bearing of the pulley wheel handle is the
only one that is rigid in the direction of the axle.
Protection for the pulley wheel
To protect the rope and the pulley wheel from the sun, dirty
hands, and possible flies, various alternatives exist. Until now
none could be implemented on a large scale, mostly because
the users do not give them priority.
Table 6.5: Advantages and disadvantages
of four types of protection systems
~heet
Metal
Water Protection
Protection against vandalism
Pn)techon of rope
Wood
Nothing
??
??
??
??
-÷
-
-s--i--
—
++
-f-+
++
--
Protection against insect nests
+
+
--
+4
Esthetics
++
-
+
÷4
Aa~eptanceby users
Price
*
Old Tire
??
$6.00
??
$000
-s-
-s--i-
$1310
home
$0.00
home
- -
Level of production
local home
Years of field experIence
1/2 yr. 1/2 yr
1 year
8 years
The first price takes into account the purchase of wood at
market prIce; the second does not take into account the value of
the wood.
102
Second pail: Construction
6.4 Pistons, rope and raising main
The rope within the pistons is 3 to 6 mm in diameter (generally
5), independent of the raising main’s diameter and the depth (at
least up to 40 meters). It is made of PE fibers and with three
strands. It is a very common rope and can easily be made by
any artisan, although good quality guarantees a longer useful
life. The rope is the piece of the pump that wears out the most,
see section 3.1.
The raising main is made of common PVC. Although the procedures for assembling are analyzed in detail in section 8.2, we
give a general description of the tubing here. The difterent
tubes are glued to the flare to the bottom to minimize friction on
the pistons. The extreme interior has a flare to facilitate the entrance of the pistons, and is fixed with an inner tube to the
guide. 0.3m below the well=slab, it is widened with a simple reducer to the diameter of the discharge spout; this tube croses
the well- slab by the anchor tube. The widening of the diameter
is in order to diminish the vertical speed of the water so that it
will come out through the discharge spout and will not flow over.
All of the raising main with the guide and stablizing stone are
hung from the anchor tube through a wedge, made of a piece of
tube with the same diameter as the discharge spout. This is
then connected without glue (to facilitate its dismantling) to the
discharge spout through a T—joint.
The pistons are attached to the rope by a piece of braided rope
and burned at both ends: see section 8.2. If the rope is not
tightly twisted, this method does not work, so the pIstons must
be secured with two simple knots. Particularly when using rubber washers, it is important that the opening through which the
Chapter 6: DescrIption of the pump
Piston
‘V
Downward
friction forces
between tube and p~ston/washer
103
Washer
Upward
driving force
from rope-on plstorl/washeL
-
-
FIgure 6.5: Forces acting on pistons vs. washers
(The hydraulic pressure is not shown to avoid complicating the
figure.) Notice that In the case of the piston, the friction forces
apply below the point of application of the force of the rope. In
the case of the washer the opposite occurs, which provokes a lot
of friction given the instability of the system.
rope comes out is as small as possible to minimize leakage and
so that the tightness of the rope can direct the piston. The distance between pistons varies between 0.5 to 5 meters, depending on the quality of the piston. For example, for a piston with a
play of 0.4mm, we recommend maintaining apprwamately 2 m.
if the play is greater, the distance between the pistons should
be less.
Second part: Construction
104
Through years of experience in Nicaragua, the pistons have
gone through a fundamental improvement process, and it is pri-
marily this improved design which has permitted us to achieve
greater efficiency rates and greater depths than other rope
pumps described in literature. The present pistons are made of
polyethylene (PE) or polyepropilene (PP) injected 5, and has a
conal form. As can be seen in the figure 6.5, the washer, the
point of application of the friction forces (and also the resulting
hydraulic pressure on the piston, is not show in the graphic) is
located at a higher point compared to the force exerted by the
rope on the piston through the knot. This provokes instability,
which should be corrected continuously by more friction. To the
2t0
1 Brand]
23 8
÷
=
used
L
÷
~23
Z
Minimum
Mean
.~
—
~
-‘--~MaxjthuTT1
aa; i..
FIgure 6.6: VariatIon of tube diameters
The figure illustrates the variation of the internal diameter of PVC
tubes of 3/4”SDR 17 from three different factories. Note that the
variation between the diameters of the pistons is much less than
that of the tubes. Source: Heuthorst, 1991.
—
—~
-
Chapter 6: Description of the pump
contrary, in the new model,
the point of application, as
well as the forces of friction
as the result of the hydraulic
pressure, are located below
the upward force of the rope,
creating a stable equilibrium.
In this manner, the friction
between the pistons and the
raising main has been significantly reduced, as well as
the hydraulic losses due to
the pistons leaning.
The
conic form also facilitates the
passage through the guide
and the entrance into the
raising main,
Apart from the form, there is
another crucial factor—the
play between the piston and
the raising main should be
minimal. It is not possible to
diminish the difference between the real diameters below 0.2 mm, because the
105
Water
Tight piston
‘Vacuum
~
_____
Loose
pistons
Water
variation in diameter of the
tubing will not permit it. In
fact,the pistons are made
with greater precision than
the tubing. See figure 6.6.
Minimal play results in very
high hydraulic efficiency
rates, but it also has a cost—
Figure 6.7
Creation of the “vacuum”
106
Second part: Construction
—any imperfection in the tubing obstructs the pistons. An imperfection could be any fissure in the tube (for example in the
flare), a shock received, or dirt. Particuarly if the pumping head
is less, it makes sense to opt for a greater play (up to 1 mm) to
avoid these problems. In section 7.3 we study the effect of play
on efficiency. -For an illustration see table 6.6 for the measures
for pistons and the raising main used in the DAR-Region V.
More important than the minimal play between the piston and
the tube is the uniformity of the measures of the pistons. If they
are not uniform, the leak in one piston will be much less than in
the others, and only some pistons will work: figure 6.7. if a piston comes out tightly, an implosion will be heard given the vacuum created below it. This phenomenon not only negatively affects efficiency, but provokes greater and more irregular forces
in the rope and tubing. This becomes a danger particularly
when the pistons are made and corrected by hand, and at greater depths.
Table 6.6: BasIc data on the raisIng main and the pistons
Characteristics
1
3/4”
1/2”
No. de Ident.
Average interior diameter
SDR 26
SDR 17
SDR13,5
Otub (mm)
30.4 mm
23.3 mm
18.2 mm
Piston diameter Opis(mm)
Play (mm)
Diameter of discharge spout
Depthaptitude(m)
29.8 mm
0.6 mm
11/2”
0-12m
22.8 mm
0.5 mm
1 1/2”
10-25m
17.8 mm
0.4 mm
1”
20-35rr
This data is from pistons and used tubes by the DAR-Region V
This table Is just an Illustration, not for directions!
107
Chapter 6: Description of the pump
Alternative constructions
The pistons can be made in many ways and with many materials (5), according to the necessity for high efficiency and the
possibilities of production. We present here the most common
alternatives with their appraisal, if this data exists.
Table 6.7: Advantages and disadvantages
of four types of pistons
1
PE or PP
injected
Optimumform
Precision/minimal play
2
Soft PVC
++
4
Rubber cut
±
--
3
Wood
-
-
++
-
-i----
--
-I--
Resistance to wear
Maximum depth
Proven (m)
+÷
??
40 m
40 m
Unit Price
0.06 -10$ 0.??
Production level
regional
Years field experience 6 yrs.
-
$
regional
2 (?) yrs.
30 m
$0.10
local
1 1/2 yr~
÷÷
25 m
$0.00
home
8 yrs.
—
Alternative 1: The technical specifications of these pistons are
given in Appendix D.
Alternative 2: In reality, we have not had significant field experience with these pistons.
Alternative 3: These pistons can be made with a simple wood
(5) There is little difference In the mechanical characteristics between
these two materials; both serve as material for the pistons.
108
Second part: Construction
lathe. The wood should be hard, fine, and water resistant.
Preferably it should have resin to serve as a lubricant.(6) Some
types us~din Nicaragua are (in descending order): ambara =
Granadilta (Algergia Retusa); Cortez (Tabebuia Guyacan); Guaplnol(Hymenaea Courbaril); Coyote (Loncho Cartus Latifolius).
Alternative 4: Rubber from an old tire can be used, preferably
between 8-12 mm thickness or from a bought rubber sheet.
The punch should have its point of machibed steel, with an interior diameter that measures 0.1-0.3 mm less than the diameter of the piston desired. The punch is heated and without force
the rubber is perforated. Depending upon the time the piston
remains in the punch and its temperature, the rubber will burn
longer. This influences the final diameter of the piston. A selfbuilder, Done, has a lot of experience with these pistons:
This type of pistons from a rubber tire are easier to make in
the field and cheaper. It is not the same as making it with a hot
punch or with a well-sharpened knife, as going to the factory to
buy it. It is much cheaper to make it in the community.”
N
(6) Teijen, 1986 mentions foam soles from sandals as piston material. Given its flexibility, it could be an interesting option since it
would minimize movement, but we don’t have reliable data on wear.
109
Chapter 6: Description of the pump
Tube the same siso
as the raising main
>
Cut at a 45 angIe
-~_;~
~
~—
-
~Cuttiere
—~-
-
—
Sand to produce a rough surface
HOundoTf1heoutsidj~
9j
of the anchor tube
1 1/4” anchor tube
set In the weii-sia~-
R.gicn
-~
Rope Pump
Raising main
How to make the wedge
88
-~
-
110
6.5
Second part: Construction
Guide
and stabilizing rock
The guide, shown in figure 6~8,is another key piece of the
pump. Its function is to guide the rope and particularly the pistons into the raising main and keep them from rubbing against
its entrance. it is essential with the guide to find the right combination of materials that will not wear out underneath the water—
rope with glaze or glass.
-
While the guide is secured to the raising main witft the inner
tube, the connection with the stabilizing stone is done with a
galvanized wire, rope, or the same inner tube. This stone
weighs between 3-7 kg. and rests at the bottom of the well. It
keeps the raising main from moving and guarantees a minimal
distance between the opening of the tube and the bottom of the
well (-i-_ 0.2m).
-
Alternative constructions
We have had good experience with four types of guides: hollow
and solid glazed ceramic, wood with an isolator, and just wood.
In table 6.8 we present some characteristics of each option.
Chapter 6: Description of the pump
111
Table 6.8 Advantages and disadvantages
of five types of guides
1
Solid
2
3
4
lsolato
Isolator Wood
Glazed
Hollow
Glazed
Ceramic
Ceramic Wood
with
5
with
Cement
Resistance
to Wear
+~
++
++
-
+
++
-
Resistance
to Cracks
Water
resistance
Price
+
+4
+
+-
-
++
-i--i-
-
÷
$1.50
$0.00
$2.50
Level
regional
regional home~ home
home
Years of field
experience
2 yrs.
4
7 yrs.
8 yrs.
$3.00
$3.00
4+
Production
yrs.
Alternatives 1 and 2: A detailed description of their production
can be found in Appendix E.
Alternative 3: This model consists of an isolator from electrical
energy posts secured to a piece of wood.
Alternative 4: In addition to an isolator, this guide has 2 pieces
of tube embedded, one connects with the raising maIn: it is not
necessary to tie it to the raisng main with the inner tube/rubber
strips. Besides, the greater weight makes the stabilizing stone
unneccessary. This guide has considerable advantages. The
only problem with implementation on a large scale is that it can
be difficult to get access to the isolator.
Alternative 5: Regarding the wooden guide, the same observations apply as those made for wooden pistons.
Don Pompilio comments on the useful life compared to the
112
Second part: Construction
guide with isolator:
I brought a new guide with isolator. Before we had put in a piece of wood with a hole, and it was not
working any more because it had had the same guide for three
years. It was too worn down. It was not the same as this one
with the isolator.
6.6 The discharge spouts
The discharge spouts serve to divert the pumped water from the
raising main to the users bucket. As shown in the photographs in thIs
book, it consists of a container with a greater diameter than the raising main, to permit the water to be diverted around the piston. In our
case it consists of pipe with a larger diameter than the raising main
given the relation demonstrated in table 6.6. It includes a T-joint, a
piece of horizontal tube with an elbow at the end (this is not indispensable) and a piece of vertical tube to avoid the water from overflowing. The well-slab is secured through two iron jointings 1/4”. To
permit the dismantling of the pump, the T—joint Is not glued to the raising main.
Construction Alternatives
(7)
Although the great majority of the discharge spouts aremadeiof PVC,
there are some made of galvanized Iron:
(7)
In Guatemala the discharge spout has been replaced in some
experiments with a cement chamber (called a flare). It seems to
work well, but as all other forms it requires a PVC raising main,
We do not see much advantage In using this other construction
method, with a great work investment, for a piece that can be
made with the same standard PVC tubing.
-
Chapter 6: Description of the pump
113
Table 6.9: Advantages and disadvantages
of the PVC and Cl discharge spouts
PVC
Resistance to vandalism
Installation ease
Ufe duration
Priceofal”pipe
Price of a 1 1/2” pipe
*
Galvanized Iron
+÷
-
++
4 years
$1.20
$2.40
—
-
15 years*
$8.40
$12.50
Production level
National
National
Years of field experience
8 years
3 years
Note that this is more than the useful life that we attribute to
the support structure (10 years).
Alternative 2: The use of galvanized iron pipes in the discharge
spouts to guarantee greater protection against vandalism is onlyvalid when the rope also is well-protected, given that this is the
piece most vulnerable to vandalism. Its installation requires
plumbing tools (pipe cutters, adjustable wrenches for pipes).
In this chapter we have discussed the different construction alternatives for all of the elements of the pump: the well-slab, pulley wheel, pistons, rope, tubing, and guide. In the following
chapter, we will see how to calculate certain key measures of
the pump.
114
Second part Construction
Done Bargman and
Willian Israel Torrez Mungula
“Puente de Paz”
What Is the purpose of promoting the use of the rope pump?
“We, as Puente de Paz, have been working here in potable water projects in the countryside. The purpose and objective of installing rope
pumps is to provide a safer method for drawing water. It is also to
have an impact on health, because the well is more or less covered.
When the wells are communal we install the pumps and request that
they use concrete. And when the wells are private, what we do depends on the resources of the individual. But the wells must always
be covered and given a chlorine treatment In order to have a positive
effect on health and make things easier.”
What are the characteristics of your rope pump?
“In the communities, with the owners, we all construct the pumps out
of wood, because the low cost makes it more accesible to the population. The wood can be found in the countryside. We supply the tubes
or we buy imported tubes, and there are homemade ways to construct them. The type of piston we make is totally homemade; we use
an old tire, and the wheel around the handle is also of rubber. Everything is simple.”
•‘ft~type of handle that we use is easy to take apart. There are only
three pieces so it is easier to take apart and put back together. Any
damage to the pump during use can be easily repaired by the user.
even without a wrench, because it is screwed together so with little effort it can be taken apart.”
“If the wood rots, they can look for a carpenter to do the work, while a
pump made of iron would require the help of a welder. And in some
areas where one has to travel for hours, or there is no vehicular access, many people are not going to care enough to do that work
They will just uncover the well and begin to use buckets.”
Chapter 6: Description of the pump
115
Do you conduct maIntenance training?
“The training is sufficient because the user builds alongside us and as
we go along we explain each step. The construction isn’t complicated; there’s only measuring to be done. The Installation is a practical
matter. In terms of maintenance, the owners or the community have
constructed the pumps with us so they feel capable and confident in
taking them apart, putting them back together, and changing parts.”
Who partIcIpates most In the construction and Installation, and-
what have been the results?
“Those that participate most in terms of construction are the men.
When it is time to do the installation, the women become more- involved, but all they have to do is observe. And the women are the
ones that draw the water.”
“The first model we made had its faults, and we went about fixing it
up, adding a few things, putting them on and taking them off until we
had arrived at the model we have now. The experience has yielded
positive results. We show samples to the people, explaining the -advantages and disadvantages. We show them samples of wood and
we provide other, easier alternatives for making the guides, and let
them decide.”
“The rope pump is a technology developed here In Nicaragua. Demster, another type of hand pump, comes from the U.S.; and with the
embargo, who could find replacement parts during the war? Yet, al-
though there Is no longer an embargo in effect, it is difficult and expensive, and access to parts can’t be guaranteed In the countryside,
maybe in the city they are, but not in the countryside.”
“Those that do the construction are the people, the users, with our
help. They support these rope pump projects because they are more
accessible and less expensive. AccordIng to our experience, they
have worked out well so tar. No one has come to us with complaints.
Instead, they help us out, and come to us for help in the construction
of their own pumps.”
116
Chapter
Second part: Construction
7:
Mechanical and hydraulic
characteristics
For easy and efficient operation, it’s important that the pump be
designed according to the size of the user, so thai the human part of the task is easier. This means that the physical
strength of the user must be taken into account when calculating the relationship between the size of the pulley wheel crank
and the force and power needed to operate the pump. The
study of this relationship is called ergonomics.
In this chapter we will first define the relevant ergonomic param-
eters; then we will show how to choose the size of the wheel
and raising main according to the depth of the well; and finally
we will see how these factors influence the efficiency of the
pump. In the text, we will limit ourselves to presenting the--minimum amount of information necessary to understand these phenomena, and we give general instructions. For the complete
calculations, we refer to Appendixes F and G.
7.1 Ergonomic factors
Below we explain the most relevant ergonomic factors. We give
estimated values according to practical experience and the
available literature.
—The determining factor in manual pumping is the available human power, that is, the force with which the user turns the pulley wheel crank. During a period of 1 to 5 minutes, a child can
generate approximately 40 watts, while an adult man can
Chapter 7: MechanIcal and Hydraulic Charactenstics
~18:Whyohl
117
..??
In determining the proper height, one must keep in mind not only
the average height of the users, but the height of the littlest as
well! (El Pochote).
generate up to 150 watts. Let’s visualize these values: a child
who generates a force of 40 watts pumping a well that is 10 meters deep will take a little longer than one minute to fill a 20 liter
bucket. An adult man who generates 150 watts can do the
same in 20 seconds. If, on the other hand, the well is 40 meters
deep, the child will have to pump almost five minutes, while the
adult man can do it in a little more than 1—1/2 minutes.
—To generate maximum power, the maximum force exerted
on the pulley wheel crank should be 50 120 Newtons (5
12 kilos). This is if both arms are used.
—To generate maximum power, the maximum turning speed
of the pulley wheel crank should be 0.7 1 revolutIons per
second.
—
—
—
118
Second part: Construction
It is very important to take into account certain dimensions that
influence how much energy a person can generate and how
long it takes for him/her to get tired:
—Since the operation of the pump consists of a turning motion,
the ideal height of the axle should be a little higher than the average elbow height of the users. At thisheight, there is the least
amount of useless movement of the rest of the body. For Latin
American adult women, the ideal axle height is between 1 and
1.2 meters.
—With the same goal of avoiding useless body movement, the
distance between the axle and the grip of the pulley wheel handle (handle radius) should be equal to the distance between the
elbow and the center of the closed hand. Again, for Latin American adult women, the ideal length is between 0.27 and 0.33
meters.
—To be able to operate the pulley wheel crank with both hands,
the crank handle should be at least 0.3 meters long. The apron
should also be built in such a way that the user can easily position herself.
-
In choosing these dimensions, it is important not only to adapt
them to the average size of the users, but to also take into account the smallest and weakest users. For example, a community well should be designed taking children into account, while
an irrigation pump may possibly be used only by men. The dimensions used by the DAR in Region V for community well
pumps are:
axle height: 0.8 to 0.95 meters
handle radius: 0.28 meters
initial force: 40— 100 watts.
—
—
—
-
-
-
-
With this information we can calculate the amount of water a
person can lift in a given amount of time, and how the load and
the speed of the pulley wheel handle should be-selected for the
119
Chapter 7: MechanIcal and Hydraulic Characteristics
most efficient operation by the user. On this basis, in the next
two sections we calculate the factors that need to be taken into
account so that both the person and the pump perform as efficiently as possible.
7.2 Choosing diameters
for the pulley wheel
and the raising main
When the pumping head is greater, the weight of the water column is also greater. In order to not increase the force required
on the handle given the greater weight of the water column being lifted, we can vary two factors: the diameter of the raising
main and the diameter of the pulley wheel. One user, Ram;n
Ennque, experienced this very directly:
The problem with the pump was that it had a one—inch pipe,
not a 3/4”, and it didn’t work. The bigger the pistons, more
strength was required, and in the 20 meter deep well, it was
hard to turn. The rope wasn’t the problem, the rope worked fine.
Of course, the rope with that kind ofpipe doesn’t last as long because it has to work harder, there’s more tension. When I saw
that the pulley wheel was ruined and had a serious problem, /
brought someone to help. Now, with this 3/4” tube it works fine.
It would be good toput it in all the wells, or in any well that has a
lot of water. ~..
We will discuss first the influence of the diameter of the raising
maIn.
The force on the pulley wheel crank depends on the weight of
the water column lifted by the rope. It is as if the rope was lifting
a very narrow and tall bucket (the width of the raising main
120
Second part: Construction
and the length of the pumping head). If the well is deep, the
force required to turn the crank is greater. lithe diameter of the
raising main is large, the force required Is also greater. This
means that for a shallow well, a bigger diameter raising main
can be used; for a deep well, a smaller diameter tube is preferable. A raising main with bigger diameter requires moreeflort,
but it yields a greater flow of water as well.
It is important to remember that by choosing
a tube with a diameter, for example, two
times greater, the volume of water (and
therefore, the effort as well), Increases by two
multiplied by two, or four times. This is illus=
-
trated in the following graphic.
-
The second influencing factor is the dIameter of the pulley
wheel.
The combination of the crank handle and the pulley wheel acts
like a lever: if the pulley wheel is smaller, the force felt on the
crank handle is also less, but in turning the crank, the rope will
also rise more slowly. Less force needs to be generated, but
the volume -of water lifted is also less. If, on the other hand, the
pulley wheel has a bigger diameter, the force felt on the crank
is also greater, and the rope will rise faster (with more volume).
As we will see in section 7.3, for greatest efficiency, it is best to
try to use the biggest possible pulley wheel.
In general, we recommend the measurements shown in~Table
1. The measurements are general recommendations, and may
vary according to the specific situation and needs ofthausers.
Chapter 7: Mechanical and Hydraulic Characteristics
121
Table 7.1: Recommended pulley wheel
and raising pipe diameters
Pumping head range (m 0-6
0-10
10-20
20-30
30-40
Pulley wheel
20”
20”
20”
20”
12”
11/2”
1”
3/4”
1/2”
1/2”
tire (“)
Raising main (“)
Effective pulley wheel
diameter Opoi (mm)
Raising main diameter
Otub (mm)
540mm 540mm
540mm 540mm 350mm
44.5 mm 30.4 mm 23.3 mm 17.8 mm 17.8 mm
The shadowed ranges are the most common.
The calculations are noted in Appendix F.
We know that there are two factors that we can vary in order to
optimize the system: the diameter of the pulley wheel and the diameter of the raising main. As is seen in Table 7.2, we prefer to
vary the diameter of the raising main tube, leaving the pulley
wheel the same. The other option would be to vary the pulley
wheel, leaving the tube diameter the same. We don’t have
much experience with this alternative, mainly for fear of wearing
out both the rope and the pulley wheel due to the great concentration of stresses that would be required. However, this option
could be advantageous when the variations in the pumping
head are relatively small.
122
Second part: Construction
Table 7.2: Advantages and disadvantages of varying
the diameter of the raising main vs. the diameter
of the pulley wheel
Vary raising main tube
diameter;
maintain pulley wheel diameter
fixed:
Standardization of wheels (1);
range of pipes and pistons.
Implies
greater
initial
Investment (molds for pistons)
and greater diversification of
PVC accesorles and pistons
(15 accesones).
Relatively low costs for deep
wells due to small diameter
tubing.
Maintain raising main tube
diameter;
Vary pulley wheel diameter:
Standardization
of
PVC
accesones and pistons (6
accesones); range of 5
wheels. Getting enough tires
of different sizes may be
difficult.
Costs go up according to well
depth.
=
speed
Slower piston speed at great
depth implies less efliciency.
Force exerted on blocking
system, tension on rope, and
intensity of friction between
rope and pulley wheel do not
significantly vary with well
depth.
Force exerted on blocking
Maximum
piston
assures high efficiency.
system, tension on rope, and
intensity of friction between
rope
and
pulley
Increase significantly
well depth.
wheel
with
Chapter 7: Mechanical and Hydraulic Characteristics
123 ~
7.3 Hydraulic
and mechanical efficiency
Compared to other hand pumps, the efficiency of rope pumps is
quite high. Optimizing efficiency is especially important in very
deep wells and for irrigation applications. Understanding the
factors that influence hydraulic and mechanical efficiency is essential in order to be able to give these aspects the necessary
attention in the design and production phases.
The total efficiency of the pump ranges from 60% to 90%, a
very high percentage for hand pumps. High efficiency is particularly important in deep wells where the pumping of water implies
serious work. In wells with a pumping head of 35 or 40 meters—
—the deepest wells in which we’ve installed rope pumps—the efficiency is still very high, and it is only a question of testing the
pump in even deeper wells to see whether the same efficiency
holds up. The only reason this hasn’t been done is because
there aren’t any deeper wells in the re9ion.
Next, let’s analyze efficiency: the total efficiency of a pump Is
the product of hydraulic efficiency multiplied by mechanical
efficiency.
124
Second part: Construction
Mechanical effIciency is calculated as the loss of friction between the pistons, tubes and water, between the rope and the
pulley wheel, the guide and the water, and in the bearings. By
maintaining the bearings well greased, there’s not much that
can be done to improve this aspect: these frictions are low and
inevitable. It is difficult to accurately measure mechanical efficiency, but on the basis of practical experience, we estimate it
at 80 90%.
—
Hydraulic efficiency consists of the water leakage from the
narrow gap that inevitably exists between the piston and the
wail of the raising main. In other words, It is the difference between the speed of the water column and the speed of the rope
and pistons. This efficiency level is easy to measure, and practical tests demonstrate that it varies between 80 and 95%. Hydraulic efficiency depends on various production factors,especially the play of the pistons and their speed. To
understand more about the influence of each factor, the DAR—
Region V developed a theoretical model that was tested in 53
practical tests (See annex G). The influence of the different factors on hydraulic efficiency is reflected in figures 7.1 —7.3.
Next we introduce the factors that have a bearing on hydraulic
efficiency, in descending order of importance:
—
—
—
—
the
the
the
the
gap between the pistons and the raising main tube;
speed of the pistons;
distance between pistons; and lastly,
diameter of the raising main tube.
The most important factor—and the most difficult to optimizes the gap between the piston and the raising main, called
Chapter 7: Mechanical and Hydraulic Characteristics
125
As is seen in figure 7.1, hydraulic efficiency depends primarily
on this gap; the downward curves are steeper than in the other
graphics. Each tenth of a millimeter is important! We also see
that the efficiency of a wider diameter tube is better than that of
a narrower tube. This can be explained by the ratio of the surface of the ring through which water escapes to the total surface
of the tube. This surface ratio, for a gap of any given measurement, Is always greater in narrower tubes than in wider ones.
Our experience is that the minimum possible gap (difference in
diameter between the raising main and a piston) is 0.2 mm.
Such a small gap can be successfully used only when the tubing is of good quality and is installed with great precision.
Good quality tubing is judged by the uniformity of its interior diameter (see figure 6.6), its roundness, and the absence of irregularities such as, for example, constrictions at the base of the
flare. The installers must work with great precision so that the
pistons don’t stick. They must also be able to detect the inevitable problems that arise with such little play.
We discuss this aspect more fully in Part 3. In less deep wells
in particular, it may be much better to allow for more play, for example, a gap of 0.6 0.8 mm.
—
126
Second part: Construction
a)
C.)
a)
C.)
a)
-o
05
~i6
or~~oa.:
Gap between tube and p~ton~nm)
04
-
-
Figure 7.1: Hydraulic efficiency as a function of the gap
between the pistons and the raising main tube Values
valid for Hpis = 2 m and Vpis = 1.4 rn/s.
The second most important factor is the piston speed (Vpis).
As can be seen in figure 7.2, if the speed drops below 0.8 meters/second (mis), the efficiency level drops drasticaHy, but
)above a velocity of 1.8 m/s, efficiency does not increase significantly. The current speed is generally limited to 1.5 m/s, due to
the diameter of the pulley wheel (maximum 540 mm., that is, a
20” tire), and the ergonomic characteristics of a maximum turning speed of the crank handle of one revolution per second. As
we saw in the previous section, we can vary the force on the
pulley wheel crank handle by varying the diameters of the tube
and of the pulley wheel. This last variation directly affects the
speed of the pistons. It is, therefore, preferable to choose a
Chapter 7: MechanIcal and Hydraulic Characteristics
127
a)
0
a)
C-)
a)
0
2
14
16
PFston velocity Vpis (mis)
Figure 7.2: Hydraulic efficiency as a function of piston
speed Vpls. Values are valid fo~,=0.4 mm and Hpis 2 m.
narrower tube and guarantee greater speed with a bigger pulley
wheel than to do the opposite: use a wider tube with lower
speed. However, with the 20” tires used up until now, it will be
difficult to achieve the 2 m/s speed that it considered optimal.
The third factor is the distance between the pistons (Hpis). Figure 7.3 shows that efficiency drops steadily but not very sharply.
It is logical that minimizing this distance improves hydraulic efficiency, but at the same time, it causes a serious decline in hydraulic efficiency due to the friction between the pistons, water
and raising main. We don’t know the exact magnitude of this friction, but we suspect, based on experience, that the optimal distance is around 2 meters.
In
S~ pst Con*u~o~
a)
C.)
a)
0
a)
0
>‘
25
-
311
1135T11
14
~
Di~ncebeweeripistonsE~I~is
(in)
--
-
FIgure 7.3: Hydraulic performance as a function of the
distance between pistons Hpls.
Values are valid fo~=0.4 mm and Vpis = 1.4 rn/s.
-
As can be seen in the three graphics, a fourth influencing factor
is the diameter of the raising main tube (Otub). We have already explained how this affects efficiency. However, its impact
is not sufficient to be able to optimize the pump’s efficiency. For
example, a 1” tube, at a speed of 0.5 m/s, results in poorer efficiency than a 1/2” tube at a speed of 1 .5 mis, although both
combinations result in the same force exerted on the crank.
Chapter 7: MechanIcal and Hydraulic Characteristics
129
The main point of the graphics is to illustrate the effects of varyIng the different factors. If the dimensions of a pump approximate the values mentioned in the graphics, one can see the
pump’s true hydraulic efficiency. if the values are very different,
the curves will be more or less steep, and the calculations in annex 7 would need to be consulted. However, in the majority of
cases it is not important to know the precise hydraulic efficiency.
Another factor that must be taken into account is that as the
months go by, thi pistons wear out, increasing play and affecting efficiency. Depending on use, we recommend changing the
pistons every year or two, but if high efficiency is required, they
can be changed more frequently.
With the information discussed in this chapter, pumps for allcommon applications can be selected and designed. In other
cases, for example, for very deep wells, for very Dig or very
small wheels, etc. it would be important to refer to the calculations shown in annexes F and G.
Photo 19 (overleaf): A Job for everyone
Pump installation over a drilled well. Note the 1/2” raising main
on the left and the 3/4” protection tube on the right (El Pochote).
3
installation,
operation
and management.
Trust only those
who stand to lose as much as you do
when things go wrong.
Chapter 8:
Installation
in hand—dug wells
In this chapter we give a detailed description of how to install a
rope pump in hand—dug wells with a concrete slab, like that
which is being used in the OAR in Region V in Nicaragua. This
type of slab and pump is only one example; there are many possible alternatives. Although we don’t go into detail about such alternatives here, we do refer to them in the second part.
The installation of the pump in the community well offers an excellent opportunity to train the users in the installation, operation
and maintenance of the pump. Since all the activities are carried
out in the same community, it is feasible for women to participate. As Cony, a promoter points out: “Just about everyone has
the right to participate, and everyone can participate, including
the women. The kids can participate in the installation and repair. It’s not hard at all, that’s how I see it.”
As with any construction project in the countryside, good planning Is essential. Having all the materials and resources in
place, the pump can be installed in less than two half—days; one
to pour the concrete slab, and a few hours the following week to
complete the installation.
Before beginning the collection of materials, the diameters of
the tube and the pulley wheel must be chosen according to the
depth of the well. In section 7.2 we describe these procedures.
133
Chapter 8: Installation In hand-dug wells
8.1 Construction of the slab
Here we list the necessary conditions and tools for the construction of the slab. The quantities listed here for the materiales are
for a slab with a 1.2 meters diameter; for other sizes, the quanitities need to be adapted accordingly. We finish with a summary
of the step—by—step procedures.
Conditions:
—a flat place near the well where the slab can be poured; a
paved space is ideal, but not necessary.
—the possibility of building a fire in the same place (if this is not
possible, the flare can be made before going out to the well).
—at least two people, one of which should have experience in
masonry.
—availability of water to make the mix and to clean the tools.
—previously determined diameters for the raising main and the
pulley wheel.
Necessary tools:
—a machete to clean the pouring area (if necessary)
—a pick to level the pouring area (if necessary)
—chalk to draw on the pavement (if there is a paved area for
pouring)
—a 2 meter x 2 meter sheet of plastic to cover the ground.
—a strip of sheet metal (tin), 75 mm. x 4 meters, to make the Outside slab mold
—2 shovels for mixing the concrete mix
—1 or 2 buckets
—1 or 2 masonry trowels
—1 or 2 pliers to twist the fastening wire
—a metal—cuffing saw
—a wood—cutting saw
-
134
Third part: Installation, operation and management
—a rasp
—a hammer
—a plumb bob
—a 3 meter measuring tape
—a knife
—a bottle with a neck of less than 18 mm. diameter
Optional tools:
—carpenter square
—a 1—meter long board for evening out the surface
—a fine screen sieve to strain sand
Materials:
—3 20—liter buckets of “gravel
—4 20—liter buckets of sand
—100 lbs. of cement
—24 meters of iron rod
—10 meters of #18 or #20 fastening wire
—a pulley wheel of appropriate diameter
—4 meters of 1” x 4” wood for the mold of the manhole and the
base for the outlet spout
—3 meters of 1” x 1 wood for the mold of the border of the manhole
—3 meters of 1” x 2” wood for the manhole cover mold
—approximately 25 2” nails
if the pouring area is dirt, approximately 12 1” stakes, 300
mm. high; if the pouring area is paved, 10 2—5 kilo rocks
—100 mm. PVC delivery tubing. The diameter of the tube should
be bigger than the outlet spout, tube (see table 6.6)
450 mm. of 1” PVC protector tube
-any kind of material that can protect theiresh slab from the
sun (banana leaves, old newspapers, plastic)
—
“
—
Chapter 8: Installation in hand-dug wells
Photo 20: Putting together the
weil slab
The mold for the slab consists of
a band of zinc held in place by
rocks Observe the manhoie, the
anchor tube for the raising main,
the protection tube, the iron rods
fastening the outlet spout
135
Photo 21: Cast well slab
The same slab shown In the photo at left. The pulley, whose only
purpose was to put in place the
the prvtection
tube, is now gone. The protection
tube with its flare Is seen (Papayanchor tube and
al).
Step—by—step Instructions:
it is important not to work alone, but to organize the tasks in
such a way as to involve as many people as possible: men,
women and children. This is not only to make the work easier
and faster, but to show how easy it is to make the slab and install the pump. Many of the activities described below can be
done at the same time.
—Clean the place where the slab will be pour: it should be flat
and preferably level. Lay out the plastic.
—Join the strip of sheet metal in a circle according to the diameter of the well, placing it on top of the plastic, with the stakes or
136
Third part: Installation, operation and management
Chapter 8: Installation in hand-dug wells
137
Relnforcmiil
ci 114” Iron
)I1w%holcovr
-t
138
Third part: Installation, Dperation and management
rocks inside. Be careful not to cut your hands on the sheet metal!
—Determine the position of the pump, -the outlet spout and the
manhole (see figures 8.1 and 8.2).
—Make the frame for the manhole, nailing three1” x 1”s in a U—
shape, leaving the fourth side free to make it easier to lift the
mold. Make the rim frame for the manhole and the frame for the
base of the outlet spout.
—Make a flare on the protector tube (a similar flare will also be
made on the lower tube; this is a more delicate task). The flare
is made by heating the end of the tube over fire and inserting
the bottleneck. It is important not to heattoo much of the tube---—
just the end—or else the tube will get deformed and there will
be a constriction (see figure 8.3) that will interfere with the
movement of the pistons. You can avoid heating too much of
Raising main
Well-made flare
Poorly made flare
Figure 8.3: RestrictIon In the flare
Chapter 8: Installation in_hand-dug_wells
139
the tube by wrapping the tube in wet rags or newspapers, leaving only the end for the flare exposed.
—Roughen the outside lower 100 mm. of the protector tube and
of the PVC delivery tube that will be embedded in the concrete.
The protector tube goes with the flare facing up so that the rope
and pistons can enter easily.
—Cut the iron rod and brace the frame. The distance
between
rods should be 150—200 mm. (See figure 8.2). Position the
pump support, placing it in such a way so that the iron rods don’t
interfere with the correct positioning of the delivery tube and protector tube.
It is important to position these two tubes exactly underneath
the pulley wheel, using the plumb bob. If they are not positioned
PhoIo22: Incorrect placement of the J11’M&Ik~ftt~
This protection tube has no flare, and is badly placed: the rope, and
in particular the knots and pistons rub against the tube and in a few
months will be worn out.
140
Third part: Installation, operation and management
correctly, or if they are not exactly vertical, the rope will rub
against the tubes and will wear out very quickly; see photo #.
When they are correctly positioned, fasten the support to the
frame and the tubes to their respective guides in the wheel, and
if possible, to the frame as well.
Cut, position and fasten the two tall iron rod ‘U’s to the
frame. These will serve to secure the outlet spout.
—Make the mold for the manhole cover, and brace the frame.
Sift half a bucket of sand, to be used later for the surface texturing.
—Make a mixture of 3 buckets of gravel, 3 of sand and 1 of cement. Thoroughly wet the frame and pour the slab. As the concrete fills the frame, take out the stakes or rocks. Make sure the
water and protector tubes stay in their correct and upright position. The thickness of the slab should be 50 to 60 mm. Don’t fill
the mold with cement all the way up to the full height of the
sheetmetal stripi Let the mixture dry about 10 minutes, then position the frame for the manhole nm and the frame for the base
of the outlet spout on the moist mixture, and fill them.
—Wet the frame of the manhole cover and pour it.
Make a mixture of half a bucket of sifted sana and bucket of
cement for the surface texturing.
Protect the slabs from the sun and the wind.
After three hours, flood the slab with water, filling the extra
15—25 mm. of the sheetmetal mold. If this is not
possible,
make sure someone is able to wet the slab at least 6 times a
day for curing.
—
—
—
—
—
8.2 Installation of the pump
One week after the slab is pour, we can begin to install the
pump. But the first thing we must do is guarantee the following
conditions, tools and materials:
Chapter 8: Installation in hand-dug wells
141
Conditions:
—a well that has been washed with its rim at a height of approximately 300 mm and the poured slab cured for a week.
—at least 6 strong people to position the slab on the nm.For the
installation, at least two people—preferably the new owner or
some of the users—are needed.
-
Necessary materials:
—raising main as long as the depth of the well. As we described
in section 6.4, It Is essential that the entIre raising main be of
the same brand and schedule: any difference in diameter in
the tubing can cause serious problems for the pistonsi
—outlet spout: tube reducer, ‘T’ connector, elbow connector, and
approximately 1 meter of outlet tubing (See table 6.6 for dimensions).
—a guide.
—rope (two times the length of the well, plus 2 meters, plus 5%
for the knots).
—sufficient number of pistons (one for each meter of pumping
head).
—rubber inner tube (strips of more or less 30 mm. wide for 2 meters total).
—a stabilizing rock (2 7 kilos), more or less square (cement
blocks work well, but not in acidic water: they will dissolve in a
few months).
—a bit of grease to lubricate the bearings.
—
Optional materials:
—half a bucket of sifted sand
—1/6 bucket of cement
—1 kilo of lime
—wheel protector
—bleach to disinfect the well
142
Third part: Installation, operation and man~gement
Necessary tools:
—adjustable or fixed wrench for the security bolts of the-bearings
—knife
—pliers
-pipe--cutting saw
—PVC glue
hammer
—measuring tape
-
—pole to lift the slab.
—thick fastening wire, longer than the total depth of the well
(at least 7 meters are needed to fasten a tube).
—cigarette lighter to burn the ends of the rope.
Optional materials:
—two buckets
—bricklayers trowel
—pipette, for measuring the bleach.
Step—by—step
Instructions:
—Secure the pistons on the
rope, using a strand about 25
mm. long, braiding the rope
and burning the ends (See figure 8.4). A strand goes both
above and below the piston.
The pistons should be secured about 2 meters apart.
Make sure all the pistons are
facing the same direction.
This task takes a long time.
Children can easily participate.
-
Chapter 6: Description of the pump
Piston
j
Downward
friction forces
between tube and piston/washer
103
Washer
Upward
driving force from rope c~r1ptston/washer
FIgure 6.5: Forces acting on pIstons-vs. washers
(The hydraulic pressure Is not shown to avoid complicating the
figure.) Notice that In the case of the piston, the friction forces
apply below the point of application of the force of the rope. In
the case of the washer the opposite occurs, which provokes a lot
of friction given the instability of the system.
rope comes out is as small as possible to minimize leakage and
so that the tightness of the rope can direct the piston. The distance between pistons varies between 0.5 to 5 meters, depending on the quality of the piston. For example, for a piston with a
play of 0.4mm, we recommend maintaining approximately 2 m.
If the play is greater, the distance between the pistons should
be less.
144
Third part: Installation, operation and management
It can also be done beforehand.
—Widen the flare of one of the tubes, using the same procedure
as for the protector tube (see description above). Be even more
careful this time, because the pistons must be able to pass
through smoothly.
—Plane the inside edges of the raising main and join them with
PVC glue, with the flare facing down to avoid friction and wear
of the pistons in the joints (See figure 8.5). Make sure not to get
the tubes dirty, or the pistons will stick.The lower tube should be
the one with the wider flare. Measure (using the tubes) the total
depth of the well and cut the upper tube, leaving 300 mm.
above the rim.
—Secure the guide with strands of inner tube to the raising main,
making sure the widened flare rests in the groove of the guide
(See figure 8.5). Don’t use more than 2 or 3 layers of inner tube,
as the pressure of each layer adds up and together they could
deform the tube. If the tube has a smaller diameter than the
groove of the guide, reinforce it with a nipple cut from the same
tube to widen its outer diameter and at the same time reinforce
it.
—Using the fastening wire, insert the rope with the pistons into
the raising main tubes, starting from below. Remember to pay
special attention to the direction of the pistonsl
—The rope should pass through the big opening of the guide. It’s
important to demonstrate these steps very clearly to the users/
owners, given that replacement of the rope is the most common
corrective maintenance procedure, and errors often occur (for
example, the rope doesni pass through the guide, or the pistons face downward. Don Ramón had this experience:
.1 installed it wrong, / put the tube in all the way, put the rope
in and didn’t put it through the porcelain piece, which should be
fastened securely with its turns so that the rope and the pistons
don’t hit. / forgot about the porcelain piece, I wanted to turn it
over, but it wouldn’t. When I saw Alfonso, a veiy responsable
N
Chapter 8: installation in hand-dug wells
145
--
Raising m&n~—
Rope
Rare—
~
Rston
krner tube
rock
GIzodw1r.k~
I
146
Third part: Installation, operation and management
Chapter 8: installation In hand-dug wells
147
Nuss
kd. e~
L•~s
148
Third part: Installation, operation and management
I placed bearings
The wide “wing” of the upper bearing half rests against the support
and prevents the bearing halves from rotating. Narrow “wings”
prevent the bearing halves from becoming dislodged (Papayal).
kid, he came to put the tube together. When we turned it over,
the rope entered the tube, cracking it as it went in and all of a
sudden the tube split and the rope broke.
—Test to see if the pistons pass through the guide and easily enter through the flare into the raising pipe.
—Temporarily tie the ends of the rope so they don’t get lost in
the tube.
—Tie the stabilizing rock to the guide with galvanized wire.
—Take the mold off the slab and place it on the rim of the well.
Be careful of your fingers! Make sure the delivery tube sticks out
30 mm. above the slab. If it sticks out more, cut it. Roughen the
inside top part where the wedge will go.
—With an extra piece of raising main tube, make a wedge, as
Chapter 8: Installation in hand-dug wells
149
Photo 24: Poorly placed bearings
The wide “wing” of the upper bearing half is Incorrectly compressed between the support and the ring welded to the axle.
Thus the lower bearing half has too much play and Is coming
loose. We hope to have overcome this problem with the new design presented in Table 6.2 (El Pochote).
shown in figure 8.6.
—Lower the combination of the stabilizing rock, guide, raising
main and rope through the manhole, making sure the raising
main is correctly positioned and constantly checking that the
rope is in the right place: the raising main next to the delivery
tube, the rope loose and next to the protector tube. If the well is
deep, or has a lot of water,this positioning cannot be controlled
or corrected once the tubing is lowered. Keep a certain tension
on the loose rope so it doesn’t get tangled with the guide or the
stabilizing rock.
—Cut, plane and glue the two outlet spout tubes, the elbow connector, the T connector and the tube reducer (See figure 8.7).
—Untie the temporary knot, pass the rope through the delivery
150
Third part: Installation, operation and management
tube and the protector tube (using wire) and through the outlet
spout. Make another temporary knot.
—Insert the raising main into the protector tube, and cut it at
least 30 mm. above the tube’s end. Be careful not to cut the
ropel Inside the well, the raising main should be straight and
vertical, not sagging or warped, but the stabilizing rock should
rest at the bottom. Plane the end of the tube and roughen the
part that will be pressed tight by the wedge (See figures 8.6 and
8.7). It is important that the wedge be made in such a way so
that it will exert even pressure on the raising main (See chapter
10, problem 1)
—Secure the raising main tube to the delivery tube, inserting the
wedge. Gently hammer the wedge.
—Join the outlet spout tube reducer to the raising main tube and
bend the anchors to secure the outlet spout.
It is very important to not use glue on the wedge or on the joint
between the raising main and the outlet spout, as this will make
it impossible to take the pump apart.
—Make a good knot, without tensing the rope, but leaving 100—
200 mm. play. Cut the rope, leaving 100 mm. at either end, burn
the ends and braid them together.
—Grease the bearings and make sure they are correctly positioned. Make sure the bearing halves are in pairs and that the
lower bearing half isn’t the same as the upper one (see figure
8.8 and photos 23 and 24). Insert the bolt without tightening the
nut very much. Screw on the lock—nut.
—Do a test pumping. At first there will be a lot of friction between
the pistons and the tubes due to whatever dirt there may be in
the tubes. If the friction doesn’t disappear after pumping a few
buckets of water, take out the tubing and look for where the pistons are hitting against the tube.
—Once everyone has tried the pump, it’s good to untie the knot
and let the rope fall—as if by accident—into the well, so that the
new owners and users can take apart the pump, retrieve the
Chapter 8: Installation In hand-dug wells
151
rope, and put it back together again. At first they may be afraid,
but in about ten minutes they will feel confident that they can
handle this part of the operation of the pump.
—Put on the rope and wheel protection.
—Seal the slab onto the rim with a mix of cement and sand.
—Place the manhole cover over the manhole and seal it hermetically with a mixture of lime and water. This mixture allows the
cover to be re—opened if the pump ever needs to be taken
apart.
—Disinfect the well with bleach, using the correct amount of
bleach.
—Make sure not to touch the pump while the mixture is drying.
—During the first few hours of operation, the rope and knots will
stretch some and it may be necessary to shorten the rope a little
by cutting It.
Now that we’ve seen how easy it is to install a rope pump,
we can go on to look at the pump’s operation and maintenance,
both of which are, in fact, technically simpler than the installation.
They do, however, require careful attention.
152
Third part: Installation, operation_and management
9:
Maintenance
Chapter
In this chapter we will first analyze maintenance planning and
then give a brief description of the various maintainance tasks.
9.1 Maintenance Planning
As with anything that has moving parts, regular maintenance is
necessary to keep it in good running order and for it to last a
long time. PreventatIve maIntenance is always better than
corrective maintenance; preventative maintenance can be
planned and scheduled according to the users’ convenience, it
is less work, and it helps avoid down time of the pump while you
look for or make replacement parts. Don Ponpilio, a veteran
with these pumps, gives the following advice to his clients: “...As
I explained, in order for the pump to work well, the users should
be careful and fix it before it breaks down. The rope is worn
out? Change it. Explain how to change it, have the rope and the
pistons beforehand, and it can be replaced without having to
take out the pipe. Just loosen the rope, tie on the new one, pull
it in the opposite direction, so that it doesn’t pull up water, and
it’s easy to take out...”
If regular maintenance is done, the pump can last up to 10
years, although it will be necessary to replace some of the major parts.
In annex A, we show a sample calendar of maintenance activities. This calendar is only a guide. A lot depends on the quality
and the kind of rope, pistons, guide, paint and wheel. In the two
calendars shown (one for a “home—made” pump and one for a
“technified” pump), two factors are taken into account: the
pumping head and the amount of water pumped.
Chapter 9: Maintenance
153
9.2 Maintenance Tasks
Here we describe the most common maintenance tasks. They
are listed In descending order of ocurrence. We don’t go into detail when the procedures are similar to those used in the installation, since they are described in Section 8.2.
Changing the rope
Depending on the protection of the pulley wheel, the use of the
pump, and the quality of the guide, the rope should be changed
every once in a while, It is best, and easiest, to do this before
the rope breaks, it is easiest to change the pistons at the same
time you change the rope, even if the pistons are not yet worn
out (they can be saved to be used for the next time you change
the rope). Tie the new rope with the pistons attached to the old
rope (be careful with the direction of the pistons), pass it through
the tubing and when it comes out again, tie it. Thus,it is not necessary to take out the tubing.
Materials needed:
new rope;
— new or used pistons.
Toolsneeded:
cigarette lighter, matches or burning ember;
— knife
—
—
Changing pistons
Pistons usually last about twice as long as the rope. You can
see if they need to be changed by watching and listening to how
fast the water goes down the raising main When you stop pumping. The water shouldn’t go down faster than 0.1 to 0.4 meters
per second. Make sure the new pistons you get are the same
size as the used ones, and that they weren’t made for a different
kind of tubing! Since changing the pistons is done at the same
time as changing the rope, the procedure is the same as above.
154
Third part: Installation, operation and management
Paint
To avoid corrosion, it is essential to paint the pump structure.
It’s not necessary to take it apart, but it is important to clean it
well with a steel brush and sandpaper, and then wipe it oft with
a rag soaked in solvent. Then apply one or two coats of anti—
corrosive paint, and one or two coats of lacquer or shellac.
Sand lightly between each coat.
Materials needed:
— 1/16 liter of anti—corrosive paint
1/16 liter of lacquer or shellac
—
—
solvent
Tools needed:
steel brush
—
—
sandpaper
—
small paintbrush
Changing the guide
It is time to change the guide when you begin to notice that the
rope is wearing out faster than normal. To change the guide,
you have to take out the tubing (see section 111.2), atthough you
don’t have to take the rope out of the tubing.
Materials needed:
new guide
strip of rubber inner tube
Tools needed:
knife
cigarette lighter, matches or burning ember
—
—
—
—
Changing the bearings
When you notice too much play in the bearings, they should be
changed. Just take the rope out of the pulley wheel (without undoing the knot), take out the security bolts with a ~0 or adjustable wrench, and change the two pairs of beanng~halves. The
Chapter 9: Maintenance
155
correct positioning of the bearing halves is very impOrtant (see
figure 8.8 and photos # and #)I!l
Materials needed
2?~
~
two pairs of bearing halves
—
—
grease
Tools needed:
#10 or adjustable wrench
4P~
—
Changing the outlet spout
When the pump is in direct sunlight, the ultra—violet rays Will affect the PVC outlet spout pipe, causing cracks. Changing the
outlet spout is easy and doesn’t require much explanation.
Materials needed:
T connector, elbow connector and outlet spout of the correct
diameter
—
Changing the raising main
If the well has loose sand, the sand will affect not only the pistons but will wear out the raising main as well.
Materials needed:
raising main tubing
strip of innertube
Tools needed:
—knife
cigarette lighter or matches
small tube of PVC glue
a bottle with a neck less than 18 mm. diameter
—saw to cut pipe
—
—
—
—
—
Changing the wheel
Within several years, the intensive use of the pump can weak-
en, and even break, the welding of the spokes. The rope, along
with the effect of the sun, will eventually damage the rubber of
156
Third part: Installation, operation and management
the pulley wheel.
Materials needed:
new wheel
a small amount of grease
Tools needed~
fixed or adjustable wrench
—
—
—
In this chapter we discussed maintenance planning and the necessary tasks to keep the pump in good workina order. in the
next chapter we will analyze some of the most common problems and their solutions (troubleshooting).
Chapter 10: Troubleshooting
157
Chapter 10:
Troubleshooting
In the last chapter of this section, we will look at some of the
most common problems that occur during installation, operation
and maintenance. We’ll describe the symptoms, the possible
causes, and possible solutions. Both the problems and their
possible causes are listed in descending order of probability.
p.--.
—
~-
-~
~
k
F’ ~-Ek~~
~
-~_
•
~
;L
~
.,
•~
~
Photo 25: Broken water raIsing maIn
In the foreground ot this photo is clearly seen the stabili2lng stone,
fastened by a rubber tire to the glazed ceramic guide. The upper
tube Is the protection tube; the lower tube, which i~
the water raising main, has moved downward, and the rope has cracked it. The
pistons catch within the fracture. See problem 4 (Pochote).
‘
158
Third part: Installation, operation and management
Problem 1
Symptoms: the rope moves, but gets stuck at regular intervals.
By
pullingmay
it harder,
it loosens and moves a few meters. The obstruction
vary from
being almost complete, to being barely
noticeable.
Possible causes
Solutions
The raising main has some
defect or obstruction that Is
causing the pistons to rub
or get stuck when they
pass. This couki be:
Find the defect or obstruction by observing
the position of the pistons when the rope
gets stuck. Watch to see If the rope
stretches a lot (this problem is described
below); if It doesn’t stretch much, the problem is close to the top.
1.—Cut the flare and make a new one.
1.— The wkJened flare at
the opening Is constrk~ted.
2.— The Inner tube that ties
the tube to the guide Is too
tight. deforming the tube;
2.— Loosen the innter tube some, using no
more than 3 layers. Did you use the reinforcing nipple? if the defect doesn’t disappear, they only solution is to use higher
schedule tube. This means you also have
to change the pistonsI
3.— Cut the constricted flares, and make
new ones by heating the tube, or use
joints.
4.- Change the damaged part of the tube.
3.— One of the flares is
constricted (a common
manufacturing defect);
4.— Some kind of damage
in the raising main (for example, someone stepped
on it, or it got bent);
5. The inside diameter of 5.— Change tubing suppliers, or use smallthe tube is not uniform er diameter pistons.
—
-
(bad quality).
The same problem, except that it happens every 10 to 30 turns
of the pulley wheel (depending on the depth). The same causes
described above, but they affect only one piston. Identify which
piston has the problem (some irregularity or bigger diameter)
and grind it.
Chapter 10: TrOubleshooting
159
Problem 2
Symptoms: the rope gets completely stuck; it won’t move forwards or backwardé even a millimeter. Aifonso, a promoter in
‘Palo do Hub’ describes the problem like this: N...Jn some of the
visits I’ve made after the pump is working, there have been
some problems. There was one where some garbage got into
the tube, and the rope was completely stuck. But the user fixed
it.
F
Possible causes
Solutions
1.— The rope was very
loose and got tangled in
the guide.
2.— Something is caught
between the flare of the
raising main and a piston
1.— Take out the tubing, untangle the rope
and cut it so that the play is between 100
(for example, an inner
tube or a plastic bag).
and 200 mm.
2.— Take out the tubIng, try to remove
whatever is causing the obstacle (which
may be impossible—in which case you will
have to cut a piece of the tube). As a pre-
ventative measure, keep the slab sealed;
or make a filter around the guide and the
tubes out of a piece of 4” or 6” slotted PVC
tube.
Problem 3
Symptoms: The rope can be moved, with some effort, a few meters forwards or backwards, but then gets stuck. The rope is
very worn out.
Possible causes
Solutions
1.— The guide has come
unstuck from the raising
main; the rope has
dragged along a crack in
the raising main.
2.— A very worn out guide
has been used and ft has
a deep crack.
1.— Cut the affected part of the raising
main and change ft. Make another flare
and carefully secure the guide to the new
tube.
2.— Change the guide.
160
Third part: Installation, operation and management
Photo 26: Rope In the pulley wheel
When the tire walls aren’t very strong, or when the pull on the rope
Is very great, the rope can get caught within the center of the pulley wheel. See problem 5 (San Juan).
Problem 4
Symptoms: The rope gets stuck between the rims of the wheel.
Possible causes
1.— The pulley wheel supports aren’t holding the
two rims of the pulley
wheel together.
Solutions
1 Push the pulley wheel supports together, or insert a wedge between the supports and the rims.
.—
2. Use more spokes, or thicker tires for
the rims.
—
2.— The rims of the pulley
wheel are weak and
spread apart.
A general solution is to cover the ‘V’ of the
pulley wheel with a bed of inner tube. This
will not work if there is too much force: the
rope will slip.
Chapter 10: Troubleshooting
161
Problem 5
The rope slips on the pulley wheel.
Possible causes Solutions
1.— The rope got dirty (probably from the tube) with soap,
1.— Take out the rope and clean it with
oil, grease, or gas), affecting
lots of soap and water.
2.— Change the inner tube packing or
the friction coeffieclent.2.The pulley wheel is not in
enough of a V shape, possibly because the inner tube
packing is too thick.
4.— Too much force on the
rope because the pistons are
the pulley wheel (if ft’s the pulley wheel
itself, it is a production defect).
3.— Shorten the rope by cutting it until it
has a play of 100 to 200 mm. Tensing
the rope is not recommended: it causes
too much friction and wears out the
sticking.
5.— Too much force on the
rope because the diameter of
the tubing is too big.3.- The
rope has too much play. (This
5.— Use smaller diameter tubing for the
raising main. If you want to keep the
guide.
4.-See problem 1.
same volume of water, use a bigger pulley wheel.
problem occurs more frequently in shallow wells that
have a lot of water.)
You hear an ‘imploding’ sound every few turns.
Problem 6
The flow is intermittent. This only happens in deep wells.
Possible causes Solutions
1.— One or more of the pis-
tons has a bigger diameter
than the others and is
working ‘alone’. This produces a ‘vacuum’ underneath the piston.
1.— Figure out which pistons are causing
the problem and fix them by grinding
them.
Photo 27 (overleaf): Post—mounted rope pump
The pump can draw water up to 8 meters above ground level.
One can see the post with tension wires, the water raising main,
and the outlet spout which descends before heading towards
the photographer. The rope hangs unhindered from the upper
pulley, winds almost completely around the pulley wheel, and
enters the protection pipe through the upper guide (Santo Tomas).
4
Special Models
Other people’s tools
only work
In other people’s gardens
Up to this point, we have only discussed rope pumps installed in
hand—dug wells. However, the principle of the rope pump is
that it can be adapted for a variety of specific uses, not only for
pumping drinking water, but also for production applications. In
this last section, we describe five special rope pump models:
in drilled wells
on posts
for high discharge
wiTh a motor
—
—
—
—
—
with a windmill
For each model we discuss the issues involved, its capacity, a
description of the model, and expenences and perspectives.
We feel that the first three models are sufficiently developed so
that they can be used without much problem. For these, we describe their construction and installation, similar to that described in sections two and three (‘Construction’ and ‘Installation, Operation and Management’)lf you are not directly involved
in these activities, you can skip the corresponding sections.
Chapter 11: Rope pumps in drilled wells
165
Chapter 11:
Rope pump in drilled wells
Issues Involved
Although the majority of wells used for drinking water are hand—
dug, machine— and hand—drilled wells are also frequently found.
In the context of this book, the only difference between the two
is depth: hand—drilled wells are generally less than 20 meters
deep, while machine—drilled wells are usually over 60 meters.
In order to not complicate the terminology too much, we use the
term ‘drilled wells’, since most of what we describe can be applied to both machine— and hand—drilled wells.
It is easy to adapt a rope pump for use in a drilled well. It is also
possible to eventually run the pump using an electric or combustion motor to pump very deep water.
Scope of Model
Rope pumps are currently being used in drilled wells (with a
minimum diameter of 4”) with pumping heads of some 40 meters. It seems that even greater depths are feasible, although
they haven’t been tested. The model described here (with two
handles) supplies 8 cubic meters of water per day.
Experiences and perspectives
In various places, pumps have been used on drilled wells without serious problems. The reason that this model pump is not
more widely known than the four or five models that are currently in operation is simply a lack of demand. The model described
in the study of Pochote has worked well under severe conditions
for 9 months without major problems. The DAR—Region V is
166
Fourth part: Special Models
working on developing this model, emphasizing greater depths.
In conclusion, we feel it is appropriate to promote this model on
a broader scale, monitoring its use in deeper wells.
11.1 Description
The main difference between a rope pump for a hand—dug well
and a pump used in a drilled well is the small diameter of a drilledwell (4” to 12”). As the rope leaves the pulley wheel, it is directed by a guide towards the inside of the well (this guide is
the same as the guide underneath). Depending on the form of
the lining tube of the well and the pedestal (if there Is one), the
guide support can be welded to the well’s metal cover or to the
support structure.
The rope lowers into the well through the protector tube. The
function of this tube is greater than in a hand—dug well, as It protects the rope and the pistons from rubbing against the iron lining tube and the wall of the well. (If the well is completely lined
with PVC tubing, it is not necessary to use a protector tube.
In general, the guide will not be placed at the bottom of a drilled
well, but rather 10 meters below the minimum static level, depending on the draw—back of the well. All of the tubing, with the
guide and the stabilizing rock, are suspended from the metal
cover with a clamp covered with inner tube to tighten the tubes
(the weight of the water column always weighs on the rope). To
prevent the raising main from getting deformed (which will affect
the passing of the pistons), the tube reducer between the raising main and the outlet spout should be placed underneath the
cover.
Chapter 11: Rope pumps in drilled wells
167
Another difference
with respect to a
‘normal’ pump is
that drilled wells
don’t have a rim:
the support structure (embedded in
the apron) is taller:
the ideal height for
the axle should be
800 to 900 mm.
Since it is taller, it
needs
to
be
stronger: the iron
legs should be of
3/4” instead of 5/
8”, with support
braces on all four
sides.
In addition, a sec-
ond crank can be
added, increasing
the load on the
Photo 28: Pump over a drIlled well
bearings, the axle,
This pump was designed based on experiences
and the spokes.
with the pump in El Pochote. The axle is a 1/4” GI
For an ideal adappipe, and the pulley is placed between the bearings, but not dire~lyover the center in order to al- tation for various
low for the blocking system. The well is hermetiusers
(including
cally sealed by the slab. (Nueva Guinea)
chiidrenl), the second crank can be
of a different diameter and at a different height (with a platform
or stool).
Fourth part: Special Models
168
Although the current design was developed in the OAR—Region
V, it is a second generation design and has supposedly overcome some of the deficiencies of the earlier models (like the Pochote model), we still don’t have enough long—term experience,
and therefore prefer not to present the detailed plans in this
book: we limit ourselves to showing the photo.
11.2 Installation
The design of the pump (and therefore, the installation) depends mainly on how the the drilled well is built: the material
used, the diameter and height of the well’s lining tube, the dimensions of the base (if it has one), etc.
As with pumps for hand—dug wells, this installation also requires
two half days: one to embed the support structure and the other
for the actual installation.
Embedding the pump
In general, the pump’s support structure is embedded in the
apron. The positioning should be such that the raising main is
exactly plumb underneath the pulley wheel. The base for the
outlet spout should be placed at a height so that it is easy to put
on and take off the bucket. Its section is 150 x 150 mm. minimum, with a reinforcement of four rods. Embed the outlet
spout. If the height of the spout allows, it’s wise to make a platform for the users to put their buckets on, leaving some 500
mm. between the spout and the platform. When you coat the
apron with cement, take into account the space needed by the
two users. At the same time, pour the triangular stabilizing rock
(see figure 11.1).
“
Chapter 11: Rope pumps In drilled wells
169
Installing the pump
Once the total depth of the pump has been determined, place
the pistons on the rope, pass it through the guide and the raising main. Since drilled wells are generally deeper, it may be
easier to pass the rope through the individual tubes before joining them together. The rope can also be passed through the
tubing all at once, but this requires a huge length of thick iron
wire (#12).
If the well is completely lined with
PVC tubing, the
rope can belet
down loose. If the
lining is made of
iron or is only partial,
the
rope
should be lowered
through a protector
tube for the entire
depth of the well in
UnIn~tube ________
order to avoid rub- Figure No. 11: StabIlIzing rock for
bing, wear, and drilled wells.
‘—
contamination.
-
____________________________________
This protector tube
has the same diameter as the outlet spout, and is joined to the
guide in the same way as the raising main.
After having secured the guide, joined the tubing and tightened
the clamp attached to the cover, the whole thing is lowered into
the well. Since the diameter of the pulley wheel is larger than
that of the lining tube, the rope will not simply lower into the well:
it must pass through the upper guide (the same as with the
170
Fourth part: Special Models
lower guide). The
upper guide is fastened with rubber to
the protector tube
and/or to a device
welded to the wheel
support or to the
cover.
The rest of the installation is exactly
the same as with an
ordinary installation.
Extra
materials
needed (in addition
to those needed for
a ‘normal pump’):
—an upper guide
—the lower guide
should be the type
with two grooves for
the two tubes.
—protector tubing for
the total pumping
Photo 29: Post—mounted pump
head (if necessary)
One possible arrangement of the pump on
—steel cover for the a post: filling elevated tanks to create
lining tube, with its closed gravity systems. This model Is from
clamp,
the “Rope Pumps Society” (Los Cedros).
—wood to frame the
apron, the base for the outlet spout, and the platform.
Chapter 12: Post-mounted rope pump
Chapter
171
12:
Post—mounted rope pump
Issues involved
There are many cases in which it is necessary to pump water to
some height above the ground in order to achieve certain pressure. This could be to transport the water through pipes over
long distances or to fill tanks on a tower structure (for example,
to have a closed water system).
Scope of Model
The main limitation of this model is the limited amount of available human energy: filling a 500—liter tank from a 20 meter drop
(for example, from a 15 meter deep well to a tank 5 meters
above ground), takes about an hour, an amount of time we consider to be the daily maximum.
For reasons of stability, and for the mentioned energy limitations, the maximum above—ground height we recommend is
about 8 meters.
The maximum distance water can be transported by pipe is 70
to 100 meters (assuming flat terrain). One problem is the startup: there will inevitably be water wastage at the beginning (overflow ar the outlet), until all the water in the pipe has accelerated
to its speed.
Experiences and development
There are various models that have worked over the last 6
months without problems. We don’t see any particular problems
of wearing out of parts. We consider that this model pump can
172
Fourth part: Special Models
be promoted without any problem. It would be worth monitoring
models that have used long pipes (more than 40 meters) or that
are very high above ground level (more than 5 meters).
12.1 Description
By using a post to support the upper pulley wheel, the raising
main and the outlet spout, water can be raised to a certain
height above ground. The motor force in this case is not applied at the highest point, but rather at the height of the rim with
a normal wheel. The rope goes up through the raising main up
to the post, around the upper pulley wheel (that spins freely),
back down loose and then around the working wheel about
270$ before being guided by the upper guIde into the protector tube to enter the well. This guide is connected with rubber
to the protector tube.
The design of this pump depends primarily on the kind of post
being used. Figure A.1 1 shows the case of a 6 meter high 1” GI
tube, while photo 29 shows a 9 meter high pump.
Another influencing factor is the type of outlet tubing and its
path: seefigure 12.1. If you need to pump water over a long distance, the choice of diameter of the outlet tubing is somewhat
more complicated than for normal pumps. Table 12.1 gives
general indications, but always take into account that at the beginning of the pumping, all the water that is in the tubing must
accelerate, causing initial water wastage.
173
Chapter 12: Post-mounted rope pump
Table 12.1: ChoosIng the diameter of outlet tubing
for rope pumps on posts.
Available
drop(m)
1
2
3
4
5
6
7
8
9
3/4”
7
11
14
18
21
Diameter of outlet piping
1”
11/4”
14
27
39
52
65
78
90
103
30
72
115
158
11/2w
67
149
The table gives horizontal distances (m) over which water
can be pumped depending on the diameter of the tubing (“)
and the available drop (m). It assumes a discharge of 1.1
liters/second.
12.2 Installation
As with pumps for hand—dug wells, two half days are needed:
one for embedding the posts, and the other for installation.
Before beginning, it is important to think about (the possibility of)
the type of outlet tubing to avoid having to make corrections
from the top of the post.
Fourth part: Special Models
174
1Ii~
4rL
CASE 1
CASE 2
The supply tank is lo- The destination of the
cated very close to the water is far away and
well, and the outlet the entire pumping
spout can go directly head is needed. The
to it by air. This situa- depth of the well is
tion is Infrequent.
less than the height of
CASE 3
The depth of the well
is much greater than
the height of the post.
The outlet tubing can
begin at the level of
the rim without much
the post. This is the loss. This Is the most
least recommended desireable situation.
option, given the relative complexity of the
tubing.
FIgure 12.2: Outlet tubing for a post—mounted pump.
Chapter 12: Post-mounted rope pump
175
Embedding the pump
The anchor for the post, the delivery tube and the pump wheel
are in a line, where it is important that the anchor is positioned
on top of the nm so that it is well supported. The protector tube
is located off this line, to prevent the rope from rubbing against
itself.
The anchor is a piece of 1” GI tube embedded in the concrete
slab, sticking out some 50 mm. above the slab. To assure a a
strong embedding in the concrete, pieces of iron are welded
onto it.
Installing the pump
Having placed the slab over the rim, the pump is installed in the
normal way, leaving about 200 mm. of the raising main sticking
out of the delivery tube. The rope immediately passes through
the raising main secured to the lying down post. It is easiest to
fasten all of the tubing and the rope to the post, even though it
is only provisional, before raising the post. This is to minimize
the work that would have to be done above once the post has
been raised.
After securing the tubing to the post, connect the three tensors
and bury the corresponding spikes.
Lifting a 6—meter high post is a job that requires good planning,
and above all, good coordination so that no one is put in danger.
At least one person per tensor is needed to maintain tension
around each spike, two people to lift the post, and a coordinator
to watch and direct. Once the post is upright and the tensors
are tight and secure, the installation of the pump can begin: cut
and connect the two parts of the raising main, guide the rope
through the upper guide, and tie it. Finally, install the outlettubing according to the specifications required by the situation.
176
Fourth part: Special Models
Extra
materials
needed (in addi-ET1 w375 496 m471
tion to those
needed for a ‘nor-ET1 w376 469 m471
mal’ pump):
—40 meters of
#12 wire
—3 0.8 meter iron
or wooden spikes
—an upper guide,
more rope and
pistons
—outlet tubing, according to the
specifications required by the situation.
P~il*I30: A high dI&IIal~J.pump
The photo shows a pump used by the DAR—
RegIon V for emptying the wells. One can
see the two cranks, the absence of a blocking system, and alongside the pulley, a 1 1/2”
piston (Santo Tomas).
Chapter 13:
High discharge rope pumps
Issues Involved
In many areas, the need exists for the ability to pump, using human energy, greater quantities than can be pumped with a normal rope pump. For example, to pump wells dry, irrigate small
areas, water cattle, etc. Many times no energy source other
than human labor is available.
Description of model
(13)
The high discharge rope pump is nothing more than a strong
pump with a larger diameter raising main and two pulley wheel
handles.
The raising main can be 1 1/2 or 2 inches, according to what is
allowable (see annex F for calculations). This Implies that special pistons have to be made, along with a guide and extra—
large stabilizing rock. Since this model has no blocking system,
the construction of the wheel is very simple: the pulley runs between two bearings of the normal design. Nevertheless, the
force is greater and we reccomend the use of 3/4fl iron for the
feet, 3/8” for the spokes with an axle 3/4”.
(13) The literature (tor example, Lambert et al., 1990) mentions
models with raising mains up to 3 or 4”. It also indicates the possibility of installing an inclined pump to pump from lagoons and
canals.
178
Fourth part: Special Models
Scope of model
The limitations are due to the power that the operators are able
to achieve: pumping a well dry with two teams of two men each,
we have reached volumes of 2 Us at 10 meters of pumping
head, but at lower heads higher volumes are sustainable for a
long time. In principle, there are no limits on maximum depth,
always assuming that the optimal raising main diameter Is chosen according to available power.
Experiences and development
There are now various years of experience with these models,
and since the differences with the normal pump are minimal, we
do not feel that there is any limitation in terms of their large—
scale implementation. Neither do we consider it necessary to
go into greater depth concerning their construction and installation.
Chapter 14:
Motor—driven rope pumps
Issues Involved
We have mentioned several times the greatest restriction in the
application of special models: the limited human power and energy available. The motorized rope pump overcomes this limitation, which in principle expands its application to irrigation,
pumping wells dry, fill tanks on platforms, pump water from
great depths, etc. This broader application significantly increases the possibilities of what the rope pump can cover.
Description of the model
A combustion or electric motor works with a small pulley (wheel
of 12”) through a reducer (a v—belt with a small pulley of 12” and
a large, 20” pulley). The greater rotating speeds of the axes impede the use of the simple bearings described in this book: we
reccomend wooden, bronze or ball bearings.
Scope of model
There is not sufficient experience to define with precision the
scope of this model; pumping can be done with a 2.5 kw motor,
for example, 12 m3/hour from a depth of 12 meters, or 4.5 m3/
hour from a depth of 40 meters.
-
Experiences and development
No pump of this model has been functioning for more than several months, and thus we cannot say much about its behavior in
the medium and long term, nor about possible construction
problems related with phenomena such as fatigue, etc. To date,
180
Fourth part: Special Models
we do not have experfances with more than 2~5kw of power,
but nothing indicates that a more powerful motor would not be
feasible. Pumping
heads of more
than 40 meters
should be possible,
although
there are no existing
prototypes
~.&nctioning. We
do not reccomend
the implementation of this pump
model unless it is
for
purposes
—
—
experimental
orunder
the strict monitoring of the manufactu rer.
Photo 31: Pump on a stationary wlndrdll
Note the simple construction of this mill.
The pulley at the far end of the rotor axle immediately activates the pump’s rope. A 1/2”
pump is connected, but to the left can be
seen a 1/4” pump for periods of higher
winds. (Tipitapa).
Chapter 15:
Rope pumps with windmills
Issues involved
In zones with stable wind systems, it could prove interesting to
use wind energy to pump water for cattle, irrigation, or even for
use as drinking water.
The philosophy of rope pumps driven by windmills is to use a
small mill, leaving open the possibility of working the pump by
hand in case of mill or wind failure.
Description of the model
As power is limited, the rotor has a relatively small diameter (3
meters maximum). Although it should always be taken into account that the wind is a very irregular and sometimes even dan-
gerous energy source, the small rotor allows for a relatively simple, but safe, construction model.
Two different designs exist.
The most simple has a fixed head, which doesn’t turn with the
wind. (See photo 32 .) Although its yield is small due to this limitation, the simplicity of the structure is such that this model
could be very interesting. One potential problem is the absence
of a security system.
The second model (see photo 32) does have a head that rotates
on a limited angle (120 degrees), which assures higher yields
but also makes construction more difficult. It does have a security system.
182
Fourth part: Special Models
Experiences and development
Both models are in the technical development phase, and it is
still too early to
predict their potential scope or
characteristics (for
example, the discharge rate according to wind
speed and direction.) While the
concept seems interesting,
both
technical aspects
and economic feasibility still need to
be studied.
With this descrip-
tion of the wind
mill we come to
the end of special
models, and, by
the same token,
we conclude- this
book about the
Photo 32: Pump on a rotatIng wIndmIll
With a tower clearly higher than the station- challenges
that
ary model, this design has a rotating head popular technoloand a security system. At a distance of some gy of rope pumps
3 meters along the ground one can see the poses to all of our
transmission, as well as the pump’s tubing.
readers.
(lgnacio Lopez Workshop, Managua).
A:_Calculating maintenance costs
183
A
r
~-~‘
~
____(I
Appendix
184
Appendix
Appendix A:
Calculating maintenance costs
In this appendix, we present a calendar of maintenance costs,
given the useful life of each of the pieces of the pump. At the
same time, we take this opportunity to detail the calculation of
cost of matenals for maintenance. These costs do not include
labor!
We drew up a series of tables for each rope pump prototype:
the “technified” models (iron wheel, PE pistons, glazed ceramic
guide) and the “user—built” (wooden wheel, rubber pistons and
wooden guide). The useful life is given in months: the figures in
bold type have been verified in the field, while the normal figures are estimates. The tables take into account two factors:
the quantity of water pumped daily and the pumping head (10,
20 or 30 meters).
In terms of daily pumping, we use the categories defined by Arlosoroff, 1988, which are as foliws:
8 m3/day (equivalent to 40 barrels): Intensive use public well
4
m3/day (equivalent to 20 barrels): Normal public well
1.5 m3/day (equivalent to 7 barrels): Private or several family
well
-
-
Photo 33 (overleaf): “Aerla~—pump”pole
The post with stairs and tension wires is clearly observed; the
raising main to the left, and the outlet spout to the right. The
rope with the pistons hangs unhindered from the upper pulley
(Santo Tomas).
A: Calculating maintenance costs
Table A.1 Technlfled pump: daily pumping 8 m3.
Pumping head
Rope
Piston
30 m
20 m
Value Ufe
Value Life
3.10
2.40
2.10
1.60
1.00
2.23
5.60
10 m
Value Life
5
10
24
18
1.10
0.80
3.00
2.50
5
10
24
36
18
48
36
1.00 36
2.23 48
5.23 48
Guide
2.50
5
10
24
12
Bearings
Outlet spouts
Raising main
Axle with pulley and
1.00
1 .27
8.40
12
48
24
pulley wheel handle
20.00 18
20.00 24
20.00 48
Monthly total ($/mo.)
2.76
1 .93
1 .09
Paint
3.00
3.00
2.50
Table A.2: Technified pump: daily pumping: 4 m3.
Pumping head (m)
30 rn
Value Ufe
20m
Value Ufe
lOm
Value Ufe
Rope
Piston
Paint
Guide
Bearings
3.10
2.40
3.00
2.50
1 .00
10
20
24
24
24
2.10
1 .60
1 .60
2.50
1 .00
10
20
24
36
36
1.10
0.80
3.00
2.50
1 .00
Outlet spouts
1 .27
48
2.23
48
2.23 4.8
Raising main
Axle with pulley
and pulley wheel handle
8.40
24
5.60
48
5.23 48
20.00
36
20.00
48
20.00 48
Monthly total ($/mo)
1 .46
1 .09
0.92
10
20
24
48
48
186
Appendix
Table A.3: Technlfled pump; daily Pumping: 1.5 m3.
Pumping head (m)
Rope
-
Piston
Paint
Guide
Bearings
Outlet spouts
Raising main
Axle with pulley
30 m
Value Life
20m
Value Life
3.10
2.40
3.00
2.50
1.00
1 .27
8.40
2.10
1.60
3.00
2.50
1.00
2.23
5.60
20
40
40
48
48
48
48
20
40
24
48
48
48
48
lOm
Value Ufe
1.10
0.80
3.00
2.50
1.00
2.23
5.23
20
40
24
48
48
48
48
and pulley wheel handle
20.00 48
20.00 48
20.00 48
Monthly total ($/mo)
1 .04
0.93
0.85
Table A~4:Technified pump; daily pumping: 4 m3.
Pumping head (m)
20 m
Value Ufe
Rope
Piston
Paint
Guide
2.10
Outlet spouts
2.23
6
48
—
3.00
—
6
18
24
10 m
Value Life
1.10
—
3.00
6
-18
24
2.23
12
48
48
—
Raising main
5.60
48
5.23
Axle with pulley
and pulley wheel handle
2.50
24-
2.50 24
Monthly total ($/mo.)
0.74
0.57
187
A: Calculating maintenance costs
Table A.5: Technified pump; daily pumping: 1.5 m3.
Pumping drop (m)
Rope
Piston
Paint
Guide
Outlet spouts
Raising main
Axle with pulley
20 m
Value Ufe
2.10
12
—
36
3.00
18
—
12
-
2.23
5.60
48
48
and pulley wheel handle
2.50
36
Monthly total ($/mo.)
057
10 m
Value Ufe
1.10
—
3.00
2.23
—
-
12
36
18
-24
5.23
48
48
2.50
36
0A8
188
Appendix
Appendix B:
Materials, tools, gauges and molds
In this appendix we present all the materials, tools and molds
needed for the production of the “technified” and “user—built”
rope pumps. We also give approximate values for machinery,
as well as the tools required for making the molds. We refer to
tables A.1 and A.2 respectively.
Table A.6: MaterIals, tools, gauges and molds needed
forthe construction a “user—buIlt” rope pump
Part
Material
Tool
Slab
Construction
Carpentry
Tools ($30)
Wood
Wheel Wood, 1/2”
Guide
Gl tube
Carpentry
Tools ($30)
Fine wood
Carpentry
Tools ($30)
Pistons Old tires
Rope
Needs
PE fiber
Tubing PVC
Knife fire.
Wheel ($30)
Multiple
extruders
machines
Mold &
Gauge Needs
Tools for
Molds & Gauge~
--
—
—
—
—
Steel mold for
each piston
Simple
—
—
metal lathe
Multiple corr~lex Advanced
molds
lathes and
milling
189
B: Materials, tools, gauges and molds
Table A.1: Materials, tools, gauges and molds needed
for the construction of a “technifled” rope pump.
Part
Material
Tool Needs
Mold & Gauge
Well
Concrete
Normal
Zinc for the
Needs
outer mold ($1),
wood for
Tools for molds
Carpentry and
construction
toolsmanhole
($3)
Wheel Welded
Guide
Electric
Iron
Welder
11OV5OA
($400)
Glazed
1 ,300Q oven
($3,500)
cinvaram
kneaderll0V
Ceramic
—
Wheel gauge($15)
frame gauge ($3)
Electric
Welder
(optional),both
of welded iron
I1OV5OA
Wooden
Carpentry
tools
mold ($20)
($2,500) (not
essential),
ceramic
tools.
Pistons PE, PP in
granules
Manual
($100)
Rope
PE fiber
Tubing PVC
One mold of steel
ext~der11 OV or bronze metal
($60)
Wheel ($30)
MuIt~ple
extruders
Simple lathe,
—
Multiple complex
molds
Advanced
lathes and
milling
machines
Appendix
190
Appendix C:
Materials for the pulley
wheel in hand—dug wells.
Part
Material
mm
quant
Tube”
Tube”
Tube 1/2”
Tube”
Tube”
Iron 1/4”
200
10
1,250
50
50
30
1
4
1
2
2
4
7 Security bolt
8 “U”supportf.beanng
5/16”
1”xl/4”strip
40
120
2
2
9 Protection
10 Support f. protection
11 Pulley
l2Pulleysupport
13 Brake pin
14 Spoke
15 Strut
16 Feet
sheet metal
22
1
Iron”
650
2
Tire
Iron 1/4”
Iron”
Iron 1/4”
Iron 1/4”
Iron
1
170
120
250
1,440
1,200
16
8
16
1
2
17 Base
l8Diagonal
Iron 1/4”
Iron 1/4”
340
460
4
4
19 Tube guide
20 Brake lever
21 Brake absorption
Iron 1/4”
Iron”
Hose
200
105
100
2
1
1
1
2
3
4
5
6
Wheel handle
Bushing
Axle
Superiorbeanng
Inferior bearing
Bearing block pin
22 Brake support
Iron”
160
1
23 Brake security
Iron 1/4”
70
1
24 Brake bushing
Tube 1/2”
25
1
C: Materials for the pulley wheel in hand-dug wells
191
CD
SectIon A-A
r~)
~‘
>
0
a
-
C: Materials for the pulley wheel in hand-dug wells
193
194
Appendix
Materials Total
Material
mm
Tube”
Tube 1/2”
1” x 1/4” points
Iron”
Iron”
340
1,275
240
2,400
2,525
Iron 1/4”
unit
11,930
Old tire
3/16” bolts
Hose
2
100
Injetion oriifice
part
Mate
part
Figure A.4: Gauges for Injected pIstons
0: Soeclflcations of the P.E and PP iniected olstons
195
Appendix D:
Specifications
of the PEand PP
injected pistons.
In this appendix we make some observations about the production of PE and PP injected pistons, the focus is on the molds
and the injector machine.
Mold
Figure A.4 represents the simplest form for a steel or bronze
mold to inject the pistons. All that is required for its fabrication is
a simple lathe. We do not give measurements; they should be
chosen based on the following criteria:
—
—
—
range of interior diameters of the tubing and its uniformity
the play that is to be maintained
the choice of materials, which depends on their composition,
which defines both physical and mechanical charactaristics.
With respect to the mold depicted in the figure, it is possible to
omit the insert, making it one piece with the male part. Nonetheless, this requires more precision while turning the lathe.
The mold is designed in such a way that neither the injection ori-
fice or the union of the female and male parts affects the
smooth surface of the piston’s outer border.
If a milling machine is available, multiple molds may be made,
which would signficantly step up the pace of production.
Injector machine
The injecting machine can be either manual or electric; the pressure in the mold should reach 100 N/mm2. Heating is electric
and the temperature should reach 200 degrees C.
,
~
Photo 34: Piston molds
Three molds for cast pistons, in their simplest form: in the first
row, the female parts; in the second row, the male parts with insorts; and in the last row, the pistons. From left to right: 1/2”, 1” y
1/4” (Jose Evansto Workshop, Managua).
E: Specifications of the glazed ceramic guides
197
Appendix E:
Specifications of
the glazed ceramic guides
In this appendix we describe, step by step, the production process of the glazed ceramic guides; creating the form, first firing,
glazing and second firing. We do this for both the “solid” and
“hollow” models.
We consider some basic equipment and signifIcant experience with ceramIcs to be essentIal; if you do not have this, it
is better to choose another type of guide
Given what has been stated above, in this appendix we will
use fairly technical language without attempting to explain to
“lay” people all the different terms relating to ceramics.
Solid Guides
High—temperature (with a vitrification point of 1,250 to 1,300 degrees) stoneware clay should be used, with little water absorption capacity and maximum shrinkage of 14%.)
Creating the Form
Dry the clay, br~kand grind it, mix it with water and strain
with a sieve of 80 holes per inch (120 is better).
—
Extract the water from the clay slip until the mass reaches the
right consistency.
—
198
Appendix
Photo 35: Clnva—ram with mold for a guIde
Within the cinva—ram there can be distinguished three slabs which form
the rear and the sides of the mold. In the upper section, shown by one of
the cooperative members, can be clearly distinguished the parts sticking
out which will form the trough for the tube and the opening through which
the pistons will pass.
—
There are two options for shaping it:
—A mold with a “cinva—ram” (15) machine. While the clay is
leather hard, one has to cut the orifice that the piston travels
through. (See photo 35.) It must be symetrically smooth.
—
A manual extruder to give its general shape (cut A—A of
plane A.5), and after several days of drying, the curves can be
made with knives.
It is clear that the first method is quicker, and only requires a
simple wooden mold within the “cinva—ram” machine. In the
the “cinva—ram” machine has its principal application in
the production of cement blocks, earth—cement or adobe.
(15)
—
199
E: Specifications of the glazed ceramic guides
shape both of the mold and the mouth of the extruder, a contraction of 10 to 14% total during the whole process must be taken into account.
Dry the guides carefully in a shaded, windless place ~orfive or
six days, then sand them, especially the curves of the orifice.
—
First Firing
As the guides are pieces that are thicker than is normally
found in ceramics (+ 40 mm instead of 8 15 mm), the drying
and firing must be done very carefully in order to avoid cracks.
If cracks are noted, it means that the drying must be done in a
slower fashion. Just before firing, it is preferible to dry them
—
—
several days in the sun (turning them occasionally) or, better
yet, close to an oven at a temperature of 50 100 degrees to
assist in the dryingprocess.
Load the kiln and heat it slowly (1 degree per minute) with the
door somewhat open (to let moisture escape) until reaching the
point where “chemical water” escapes (380
400 degrees).
—
—
—
Maintain the kiln at this temperature to let all moisture escape.
After all the humidity has escaped from the guides, increase
the temperature by 1 degree per minute until reaching 950
1,000 degrees.
Leave the kiln closed as it cools down to avoid thermal shock
(this takes about two days).
—
—
—
Glazing
Obtain the glaze: if you cannot find it, it may be prepared. A
mix of 50% ground glass with 50% feldspar is preferible, or if
not, 50% concrete (volcanic lava) with 50% feldspar. Grind in a
miii and strain to a mesh of 120 holes, per inch.
Clean the guides with a moist sponge and glaze them.
—
—
Appendbc
200
Second Firing
Since one firing has already been done, the temperature can
be raised rapidly according to the capacity of the kiln until the
point of vitrification is reached: 1,200 1,300 degrees. This is
—
—
considered to be a relatively high temperature, but it is neces-
sary to assure the vitrification of the clay and glaze. Now the
piece will not be affected by water.
Leave it to cool down in the kiln.
—
Hollow Guides
This technology, while less apt for our ends given that it is fairly
weak, is very common in the making of ornaments. Liquid deflu ctuated clay slip is used (see figure A.7).
Create the form
The starting point is sets of molds of cast plaster. In the forming of the molds, the contraction has to be taken into account.
The molds are filled with liquid clay, and then emptied out until
a layer of clay forming in the interior part of the mold is noticed.
After several hours, the mold may be opened.
—
—
—
Leave them to dry several days before putting them into the
kiln to fire. As the walls are less thick, the drying and the escape of moisture is not as critical as in the case of the solid
guides.
One alternative that could prove interesting, but which we havenot tested, is that of using the same molds, but leaving them
solid instead of emptying them out.
201
E~Specifications of the glazed ceramic guides
rope
flopepumj,
Solid guide for hand-hugwell
A_S
--
$CALk
__________
‘‘~
-
202
Appendix
flop. pump
Solid guide for drlHed well
A.s
‘.‘
E: Specifications of the glazed ceramic guides
Section A-A’
“~1
Section C-C’
203
Section B-B’
Appendix
204
Appendix F:
Calculating pulley wheel and
raising main diameters
In section 7.2 we discussed the selection of the pulley wheel
and raising main diameters so that the demand of force and
power be adjusted to the optimal offer medium (defined by the
ergonomic parameters of the users). In this appendix, we deepen the discussion of the calculations regarding this topic.
Four categories of parameters enter into play in these calculations:
—
—
—
—
the ergonomic parameters;
the invariable parameters;
the variable factor that we cannot influence (the pumping
drop) and;
the two variable parameters that we have at our disposition for optimizing the system: the pulley wheel and raising
main diameters.
The ergonomic parameters are fixed ranges that we cannot influence. They are the following:
—handle Pulley wheel handle diameter (500 mm.)
Fhandle Torque on the pulley wheel handle, between 50 N
and 120 N.
Pin
Input power developed by user; varies from 40 W
to 150 W.
f
Frequency of axle revolution of the pulley wheel
handle with a range of 0.7 1 revolution / second.
—
—
—
—
F: Calculating pulley wheel and raising main diameters
205
The invariable parameters that influence the calculation of
forces are:
g
Acceleration of gravity (9.81 m/s2)
rope
Mechanical yield (estimated at 0.8)
-rope Rope diameter (5 mm)
!Pl
(3.1416)
Specific weight of water (1,000 kg/m3)
—
—
—
—
—
The variable factor that we cannot influence but which does
guide the selection of the diameters is:
Hhead Pump drop (m)
—
The two parameters that we can vary to optimize the system
are:
-poi
Effective diameter of the pulley wheel (mm) and:
-tub
Real interior diameter of the raising main (mm).
—
—
In working with these formulas, we must respect the units used
in this list. The formula that defines the torque on the pulley
wheel handle is:
Fhandle = 1/rope
pol *V4 (-tub 2—rope 2) *g Hhead (1)
*
*
*
-handle
This formula can be simplified by introducing two combined variables:
C a constant (NI (m*Ltr)), and
VOL rev Volume per revolution (Ltr)
rope
VOL rev
-handle
*
~ *
=
-pci
*
*
=
7.7 (N/(mtLtr))
1/4 * (-tub2—rope2)
*
10—6 (Itr)
(2)
(3)
Appendix
206
We note that the volume per revolution VOLrev combines the
only two variable parameters that define the force over the lever: -tub and -pul. in other words, the volume per revolution is a
measure of the forces acting on the lever.
Now, we must take into consideration that the speed of the piston influences the hydraulic efficiency (see appendix G.) The
rotating frequency of the pulley wheel handle f assumed as optimum for the user in the range of 0.7
1 s—i defines Vpis
(speed of the piston), varying between 1 and 1.5 m/s, while the
optimum speed is estimated at 1.5 to 2 m/s. It thus implies attempting to maintain -pul maximum (540 mm, which corresponds to a rim of 20”), and varying the diameter of the raising
main -tub.
—
Let’s return to the calculations. introducing C and VOLrev
(equations 2 and 3) in equation 1 gives us:
Fhandie = VOLrev C Hhead (N) (4)
*
*
and also:
Pin = Fhandle -handle
*
*
~ f (W) (5)
*
With these formulas (4) and (5) we can calculate with ease the
force on the pulley wheei handle and the input power required in
the different cases. Figure A.8 gives the force on the pulley
wheel handle as a function of the pumping head, for a range of
volume per revolutions used by the Region V OAR as reflected
in Table A.3. In this table we reflect some values for five common volumes per revolution.
F: Calculating pulley wheel and raising main diameters
207
Table &3: Recommended diameters of the pulley wheel
and raising main depending on the pumping head
(The ranges highlighted are the most common).
Range of
pumping heals m)
0—6
Tire br pulley wheel (“) 20”
Raising main (~
11/2
Pulley wheel diameter
0—i 0
10—20
20-30
30—4(
20”
V
20”
20”
20”
1 P2”
1)2”
-
pol (mm)
540
540
540
540
350
Ra~ngmain
diameter (mm)
Volume per
re~hjtion(Ur)
44.5
30.4
23.3
182
182
2.6
12
0.7
0.4
0~
208
Appendix
-
180
160
140
180~•
I
I
PLxnplng head (m)
~JR.nu.c1.cc.pt.bsw~Pu(POeaIR
FIgure A.8: Force on handle and input power
The figure demonstrates the force on the pulley wheel handle and the
power required as a function of depth. It takes into consideration the
four volumes per revolution presented in table A.3: 1.2, 0.7, 0.4, and
0.25 liters. The calculation of lnputpower was made assuming a speed
of f — 0.8 revolutions per second. The two bands give the acceptable
ranges from the ergonomic point of view. As may be noted, the limiting
factor is the input power and not the acceptable forces. In the case that
the pump requires greater forces, the user will turn it more slowly to
maintain sustainable power. That will lower the piston speed and thus,
the yield.
As we have defined VOLrev, we can take advantage of this entity to easily calculate the flow Qreal:
Qreal = hyd VOLrev *f ([Is)
(6)
*
With the calculation method presented in this appendix, the
force on the pulley wheel handle Fhandle and the input power
Pin, can be easily calculated and thus the optimum values for
the raising main -tub and the pulley wheel diameter -p01 may
also be determined. We can also see how to calculate the
pump flow Qreal.
F: Calculating hydraulic efficiency
209
Appendix G:
Calculating hydraulic efticiency
In section 7.3 we discussed the mechanical and hydraulic efficiency of the rope pump, and we referred to this appendix for
the calculations. Thus we now present a theoretical model for
the calculation of hydraulic efficiency, developed by Heuthorst,
1991. We first present the model, and then discuss its validity,
defining its premises and limitations, and comparing it with data
found in the literature.
Presentation of the model
Above all, it is important to emphasize that for convenience, in
this appendix, all the values Introduced In the formulas are
In units of the International unit system. The difference with
the preceding is that all the measures of tube and piston diameters, etc., are in meters and not in milimeters and the flows are
reflected in m3/s instead of Ltrs/s.
To calculate the hydraulic etfienciency hyd, we need to calculate
the loss flow Oloss that drips out in the ndragow ring between
the piston and the wall of the raising main:
1lhyd
~roa
—
‘~thoor
__jl )
°theor
C’ °Ioss
‘~theor
~
-
We define the direction of Qioss downwards as positive (+).
Qteor is easy to calculate:
~theor -
v~
3(ø~
-
(m3/s)
(2)
Qloss = Q pres
—
Qdrag
(m3/s)
(3)
F: Calculating hydraulic efficiency
211
In order to calculate Qloss we define three pressure factors P0,
P1 and p2 (See
figure A.9). The
fall in pressure (
P0 P1) is due to
-
—
friction losses on
the ring, while the
drop in pressure
(P1
P2) is provoked by exit
losses. The model analyzes each Figure A.1O: Principal parameters that Influence
pison as i~i were th. calculation model for hydraulic efficiency of
independent, that the rope pump.
is, they all demonstrate the same loss. It also does not take into account entrance and exit effects. Thus, (P0
P2) corresponds to the
pressure on the water column between two pistons(14):
—
—
(P0 — P2)
=
(P0
—
P1)
+
(P1
—
P2)
g Hpis
(N/m2)
(4)
Now that we have defined the pressure that is exercised on different parts (Note that the value of P1 is unknown), we can give
the formulas to calculate the two flows Qdrag and Opres (without entering into flow study theory):
(14)
—
Not taken into account are the dynamic effect of water flow
such as the acceleration of water and the friction between the
water and the tube. This is acceptable because it represents
less than 1% in our conditions.
212
Appendix
4
2rt(p0-p1)ø~(1
~ v L
Q
pres
~
4
-
_f ~
0cirag
(øtutr
—
~
(ma’s)
(5)
(m3Is)
(6)
The remaining component is that of the exit losses. For this we
define the exit loss factor Kw:
2
-
Ø~2,Ø2
(7)
~tub~pis
(P
1 P2) -
2g
-
2
~
tub
~2
(N/m2)
(8)
pis
We have now defined a system of 4 equations (equations (3),
(4), (5) and (8) with 4 unknowns: (P0 P1), (P1
P2), Qloss
and Qpres. This system can be resolved manually (although it
demands perserverance) or numerically with a microcomputer.
Some results are reflected in the figures 7.1 7.3
—
—
—
Discussion of the model’s validity.
The model presented here starts with the following premises:
The tube has a constant interior diameter. All the pistons are of equal form and diameter and are equidistant.
—
F: Calculating hydraulic efficiency
—
—
—
213
There are neither entrance nor exit effects.
The flow through the ring between the piston and the
tube wall is laminated (Reynolds number less than
2,300). This limits the applicability of the model to cases
where neither the speed nor the motion are very great~
For example, the following combinations: Vpis~2rn/s ~
o.65 mm., or Vpis ~i.4 rn/s and ~1 .1 mm. We have not
discarded the model for other cases, but neither has it
been proved. Ukely the real losses would be greater
than those calculated in the model.
Also neglected are the dynamic effects of the water flow
such as the acceleration of water and the friction between the water and the tube. This is acceptable because it is less than 1% in our conditions.
The losses between the rope and the piston are not taken into account.
The model was verified in 53 field tests at 4 different depths.
The standard deviation of the relative difference between the
theoretical results and the field tests ~hyd,model /i~hyd,real)
was somewhat high (10%) due to mea~unnglimitations. Nonetheless, the average relative difference was only 1 .3%, so we
accept the model as valid.
The only similar study that we have found in the literature is that
cdragied out by Faulkner and Lambert, 1990, which did tests using a high discharge rope pump withub = 71 mm,~is= 69
mm (flat pistons), and 2.4 mm Hhead 5.5 mm. The ?esults coincide with those of Heuthorst in that efficiency increases with
piston speed and (of less importance) with the quantity of pis-
tons. There are two differences: Heuthorst found an optimum
speed of around 2 m/s, while Faulkner found it to be around 0.7
rn/s. This difference is explained by the water acceleration effects and entrance and exit losses that are relatively muchlarger
214
Appendix
at lesser depths. Faulkner and Lambert also found a slight drop
in efficiency at greater depths, a phenomenon that Heuthorst
did not encounter in his tests. We do not have an explanation
for this discrepancy. What does stand out is the great difference in pumping heads (5.5 m versus 32 m). Moreover, the
quantity of pistons that is found simultaneously inside the raising main in Heuthorst varies from 5 to 30, while the variation
found by Faulkner and Lambert is only 1 to 5.
Appendix
215
Appendix H:
Materials for the wheel on the post.
Part No.
Matenai
1
2
3
4
GIl 1/4” Tube 150
GI 1 1/2” Tube 6,000
Iron”
430
Anchor
Post
Ladder
Raising main
securing
5 Discharge tube
securing
7 Strut
6 Strut securing
8 Spoke
9 Pulley wheel support
10 Pulley wheel
11 Support
12 Axle
13 Bearing conjunction
Material
11/2” Tube
11/4” Tube
1,2” Tube
1,2” iron
3/8 Iron
114” Iron
#12 Wire
15” Old tire
Bearing conjunction
MM
Iron 1/4”
Iron 1/4”
#12 Wire
Iron 1/4”
Iron 1/4”
Iron 1/4”
15” Tire
Iron 1/2”
1/2” Tube
Quant.
1
1
9
400
3
100
12,000
40
190
3
3
80
800
400
3
16
16
1
2
1
2
Matenals total:
MM
Unit
6,000
150
400
1,600
3,870
5,940
36,000
1
2
216
Appendix
Appendix
217
List of symbols
f
Fhandle
s—i
Frequency of axle revolutions
N
Real force on wheel handle
(=
0.5
1
—
Fhandle, teor
*
ropa)
Fhandle, teor
g
Hhead
Hpis
-handle
-rope
-pis
-pul
-tub
Pin
Psal
Qdrag
Qioss
G~res
Qreal
Qteor
Vpis
VOLrev
N
Force on pulley wheel handle without friction.
rn/s2 Gravity acceleration
9.81
m
Pumping head
m Distance between pistons
mm Diameter
2
mm Pulley wheel handle diameter
mm Rope diameter
500
5
mm Piston diameter
mm Pulley wheel diameter
mm Raising main diameter
W Input power,developed by user
30— 150
W Exit power, resulting In pumped water
ma’s Component of loss flow due to draggIng of piston
ma’s Loss flow (= Qpres Q drag)
Component of loss flow due to pressure
ma’s Real flow
ma’s Theoretical flow
ma’s Piston speed
Ltr Theoretical volume per revolution
mm Play between piston and tube (= -tub -pis)0.2
1
Pump total efficiency ( = hyd rope)
Hydraulic efficiency (= Qreai I Qteor)
80—95%
Mechanical efficiency, defined as lossfactor due to friction (= Fhandle, teor I Fhandle)
80—90%
—
—
—
*
hyd
rope
P1
3.1416
kg/m3 Specific weight of water
m2/3 Kinematic viscosity of water
1,000
1 1C—6
*
218
Appendix
List of abbreviations
VLOM
COOPINIC
CEPAD
DAR
Village Level Operation and Management
Appropriate Technology Research Center
Nicaraguan Agrarian Reform Institute
Nicaraguan Innovators’ Cooperative
Ecumenical Pro—Development Committee
Rural Water Institute
INAA
Nicaraguan Water Utility
PAHO
PE
PP
UNI
Panamencan Health Organization
Puiyethylene
Pulypropylene
National Engineering University
CITA-INRA
—
Consulted bibliography
Ariosoroff, S., et al., Community water supply: The option of
manual pumps. The World Bank, Washington, DC, 1988.
Ballesteros Perez, Miguel Angel, Proyecto de mejoramlento
de Ia bomba de mecate. UNI—Tecnologia de Ia industria, Managua, Nicaragua, 1991.
Bargmann, Done, Presupuesto para bombas de mecate de
madera. Informe no publicadao, Puente de Paz, Managua, Nicaragua, 1991.
Besseiink, J. e.a., Behaviour of deepwell handpumps with
PVC raising mains. IADHPP9O.02, Ellecom, Holanda, 1990.
Burlandt, U., Ergonomie fGr design und entwlcklung. KoIn,
1978.
Appendix
219
Faulkner, R.D. and Lambert, R.A., The use of the rope—
washer pump In micro—scale Irrigation, in: Proc. Instn. Civ.
Engrs, part 1, 1990, 88, February, pp. 81—90.
Heuthorst, Nicolaas, informe do los ostudlos sobre el rendimlento hidraullco de Ia bomba do mecate. Informe no publicado, DAR—Region V, Juigalpa, Nicaragua, 1991.
IRC, Handpumps, Issues and concepts in rural water supply programmes. Technical paper No 25, La Haya, Holanda,
1988.
Lambert, R.A., How to make a rope—and—washer pump. IT
publication, Londres, Inglaterra, 1990, ISBN 1 85339 0224
Mulvani, P., et al., Tools for agriculture. IT publication, Londres, lnglaterra, ISBN 0 946688 36 2.
Orozco, Eduardo, La bomba do mecate. CITA—INRA, Managua, 1984.
Solis Orozco, Osmundo, e.a., Informe do evaluacion tecnIca
do las bombas do mecate Instaiadas en Bluefleids. lnforme
no publicado, DAR—Region V, Juigalpa, Nicaragua, 1990.
Teijen, Reinder van, Manufacture and engineering. Rope
pumps, a review of ten years experience. Dieren, Holanda,
1986.
Watt, S., 21 Chain and washer pumps. IT publications, Londres, Ingiaterra, 1976.
Appendix
220
Addresses in Nicaragua
Name:
Description:
Contact:
Address:
Tel:
Fax:
Name:
Description:
CEPAD, Department of Appropriate
Technology
Ecumenical development organizatIon,
works in latrine (traditional and compost),
water tank and rope pump construction.
Cristy Stickney, adviser.
Del cementerlo occidental, 2 c. al forte.
Apartaclo Postal 3091, Managua
Offices: 505—2--664507 / 666102 /
664212
Workshop: 5052—50389
505—2—664326
CICUTEC
Non—profit popular communications association.
Edits, among other things, the ENLACE
magazine.
Counts among its collaborators several
worked with rope pumps for many years.
Edited and distributed this book.
=
Contact:
Address:
Tel:
Antonio Belli, coordinator; Eduardo OrozCo and Boris Engeihart, collaborators.
De Ia CST, 1 c. abajo, 1/2 c. al sur.
Apartado Postal A—136, Managua
505—2—662643
1~~-ri
221
Appendix
Name:
-
Description:
CQOPINIC (Nicaraguan Innovators’
Cooperative)
Cooperative that produces various products based on appropriate technology, including hydraulic ram pumps and rope
pumps. The adviser, Jan Haemhouts, Is
co—author of this book and has been involved in the development of rope pumps
in Nicaragua since 1983, serving prior to
Contact:
Address:
Tel:
Fax:
Name:
Description:
Contact:
Address:
Tel:
Fax:
that as an adviser in Haiti.
Jan Haemhouts, adviser.
Del cine Salinas, 1 c. al sur, 1/2 c. abajo,
Mga.
505—2—23947 (CEDIN)
505—2—661366 (Jan Hamehouts)
505—2—23947
OAR—Region V
The regional representation of the NicaraguanRural Aqueduct Directive of the national water utility (INAA) in Region V.
With its 60 employees, it is dedicated to
rural water supply and sanitation programs and education. It began using the
rope pump in 1988, and has worked in its
development, particularly in terms of the
design of the wheel and in rope pumps
used with drilled wells. It took the initiative to make thlspublicatlon a reality.
~mundo Soils Orozco, head of community participation.
Contlguo aJ BND, Julgalpa.
Apartado Postal 24, Juigalpa.
505—81—351 /740
505—81—369 / 505—2—763205
222
Appendix
Name:
Description:
Contact:
Address:
Tel:
Name:
Description:
Contact:
Address:
Name:
Description:
Contact:
“Guadalupe Came~’Cooperative
Women’s cooperative producing, among
other things,molded glazed ceramic
guides.
Ervin Torrez, manager; Ron Rivera. adviser.
De Ia Normal, 200 m aJ Norte, Esteli.
(Ron Rivera: 505—2—73807)
HUTECNIC
Rubber, PP, PE, PVC, etc., injection
workshop. Has worked making pistons
since 1985.
Ceilmo Morales Novoa, owner—manager.
Puente Larreynaga, 2 c. abajo, 25 v al
forte, Managua.
Ignacio Lopez Workshop
Private metallurgic workshop that has
produced wheels for different models
since 1990. WorkIng on developing a
motorized rope pump as well as a rope
pump that works with a windmill.
Ignaclo Lopez and Reynaldo Erlach,
partners.
Address:
Tel:
Henk Holtslag, windmill development.
Do los semaforos Repuestos La 15, 100
v. al stir. Managua.
(Henk Holtslag, 505—2—74952).
Append~
Name:
Description:
Address:
Name:
Description:
Contact:
Address:
Tel:
Fax:
223
Jose Eva,leto Talavera
Mcro-workshopof PE and PP InJected
pistons.
Frente al antlguo Mercado Perifenco,
Managua
“Palo do Hub”
Foundation of social projects in the town
of Nueva Guinea, founded In 1990. CarrIes out minisodal projects, and own a
shop of sanitation and other materials to
Improve wells, Including rope pumps.
Donald Rios.
Frente a Ia alcaldia municipal, Nueva
Guinea.
(via DAR—Region V: 505-81-351 / 740)
(via DAR—Reglon V: 505-81-369/5052—763205)
Name:
Puente do Paz.
Description:
US solidarity organization. Finances and
executes small development projects.
Works with rope pumps at the level of lo-
Address:
cal construction.
William Torrez, promoter; Done Bargmann, adviser.
Colonla Centroamerica, #441, Managua
Tel:
Fax:
505—2--7--350
(via CEPAD; 505-2-664236)
Contact:
224
Appendix
Name:
Description
Address:
Name:
Description:
Contact:
Address:
Tel:
Rafael Castilla Castro
Metallurgic workshop with 3 workers who
have been involved in the development
of appropriate technology projects since
1984. Produce wheels for rope pumps
of different types.
Del INAA, 1/2 c. al sur, 1/2 c. dragiba,
Juigaipa.
Society for the sellIng and installation
of rope pumps.
Founded in mid—i 990, this society sells
and installs rope pumps throughout Nicaragua, particularly in the country’s Pacific
region.
The society sells between 5 and 10 rope
pumps weekly. Moreover, the society is
dedicated to thetechnolog ical develop.
mont of the pump, and In particular, improving of the pistons and the glazed ceramic guide, the pump for a raised tank
and a motorized pump.
Rene Mesa, coordinator; Henk Alberts,
adviser.
Reparto Los Cedros, Cdragetera Vieja a
Leon, Km.29, 100 v. dragiba, ala orilla
do Ia cdragetera.
505—2—51236
225
Appendix
Name:
Description:
Contact:
Alan Gallegos
Ceramic workshop that produces glazed
ceramic guides molded with extruder.
Alan Gallegos, coordinator; Ron Rivera,
adviser.
Address:
Tel:
Del Hotel Estrella, 2 c. al lago, 3 c. arriba, casa no. 21, Managua
(Ron Rivera: 505—2—73807.)
Addresses outside of Nicaragua
Name:
Description:
Bernard van Hemert
Principal author of this book. Has
worked with appropriate water technologies and pumps since 1982, and with
rope pumps since 1 ~87.
Contact:
Oude Velperweg 5qG824 HE Amhem,
Tel:
Fax:
31—85—644909
Name:
Description:
Address:
The Netherlands /
31—85—617817
MennonIte Central Committee—
Technology for Health
(CCM—Tecnologla para Ia salud)
This NGO works in conjunction with ECOTEC in the development of the rope
pump in Guatemala. Although It has little
experience to date, its emphasis on
transference of technology is interesting.
Contact:
Edgard Cacores, director;
Raymundo Helmuth, technical adviser
Apartado Postal 1779
Ciudad do Guatemala 01901
Tel: 030—4308
226
Appendix
Name:
Description:
ECOTEC
This organization works together with the
Mennonite Central Committee in the development of the rope pump in Guatemala. Although it has little experience to
date, its emphasis on transference of
technology is interesting.
Contact:
Address:
Bayron Rosales Amado
7a. avenida 8—90, zona 2, Ciudad do
Tel:
Guatemala.
22471/24871
Name:
Description:
Tel:
DEMOTECH
A small Dutch NGO that is dedicated to
development and the transfer of appropriate technology. It has worked for
more than 10 years with user-built rope
pumps in many places, including Indonesia and Peru. It emphasizes technology
transfer and user participation.
Reinder van Tijen, coordinator
A.P. 303
6950 AH Dieren, Holanda
31—8330—15777
Name:
Center for technological advice on
Contact:
Address:
Description:
water pumps (Centro de asesorla
para bombeo de agua)
This center has Introduced the large flow
rope pump for low depths with technical
and financial (GTZ—Germany) assis-
tance.
Rope Pump
1
Annex 1:
During a technical evaluation of the 60 ropepumps,
installed 2 or 3 years ago by the proyect of
INAA-SNV in Nueva Guinea, Nicaragua, some weak
points were found.
The problems found are:
1. THE AXLE (p. 92)
In Nueva Guinea we have the experience that the axle regurarly
breaks where it is bended.
Reasons:
• Small radius.
• Bad quality of the bendings. (see photo 23)
Suggestions:
• Make the bends
with bigger radius.
• Make the bends
of 120 instead of 90 degrees
(this is easier if pulley wheel
is mounted between supports).
• Bend the pipe with adequate
tools (for instance a tool like
in the illustration). Pumps made
like this 3 years ago and bend
with this tool had no problems.
2
ri
m
Diameter of
pipe
length of half
~,,~~~pipediameter
Plate of +/— 1/8”
+ 1
+
mm.
2mm.
Plate of +1— 3/16”
with radius of +7... 60 nun.
2. THE BEARINGS (p.147-i 49)
Of the mayority of the pumps of this design, the bearings are
getting loose (for example like on page 1 49) or the bearings got
lost, causing worn out and breaking axles.
Reasons:
• Some pumps were installed with a pin instead of a safety bolt.
• The safety bolt got lost or got removed and a small pin was
placed. In this way the upper-bearing gets loose and after that
the lower-bearing.
*
Rope Pump
3
• Incorrectly installed bearings (seep. 149).
• Lack of knowledge, maintenance and back-up of the water
committees and the users.
Suggestions:
• If design of page 147 is used, weld the lower-bearings with
some points If it is felt neccesary that axle and pulley wheel
should be removable. (the experience is that the bearings and
the axle hardly wear out when they are lubricated). When the
bearings have to be changed, the lower-bearing can be
removed with a hammer.
• Oil
is better than grease because it “cleans” the bearings.
• Lubrificate the bearings with regular oil every 4 weeks.
• Use axles and bearings of galvanizad pipe if possible. (The
galvanizing works as a lubrication.)
Construction when
Fixed bearings.
An other possibility
you want the
Installed in some
is to use bearings
possibility to
remove the pulley,
1500 pumps; no
big problems.
of wood. (pulley
and bearings
(pulley not
removable)
removable)
Annex 1
1±
3. SPOKES AND DIAGONALS
In the several pump designs, sometimes there are problems
with broken diagonals or spokes.
Reasons:
• Welding is of bad quality and/or material is “burned”, there is
corosion, especially on the welds.
• The diameter of the spokes is to small. (5 mm.)
• Diagonals are not welded “triangular”. (if pump structure can
move, parts and especially welds can break.)
Suggestions:
• Use spokes of minimal 1/4’ (6 mm), but even better a larger
diameter, for example 3/8’. (8 mm)
4. THE BLOCKING-SYSTEM (fig. A3, page 193)
several pumps the mounting/welding (as on photo 15) is
broken. Almost all alternative systems (see photo 1 6) are
broken.
Reasons:
• The welding in this way don’t resist the big forces.
Of
Rope Puma
on the blocking systems.
the blocking-system
is close(r) to the axle,
the forces become big(ger).
• If
Suggestions:
• Use the system shown here.
(used since 2 years
and has not given problems).
• Strengthen the pumpstructure (legs) where it recei~~’es
the
forces. (see illustration)
• Eventually use bars of 1/2’ instead of 3/8’ (in case 4f
community pumps/deep wells).
5. PISTONS AND ROPE
The pumps installed 2 3 years ago often have origi ial pistons,
mounted every 1 .5 2 m. The efficiency has decre~sed.
-
-
Reasons:
• In practice people change the rope, when it is won out/starts
breaking, and leave the worn pistons. This causes l~we r
efficiency. The pumping-time is longer to get the sat .e amount
of water. This causes extra wear out of pistons and ope.
Suggestions:
• Put the pistons with less distance. (0,5 1 m) Thou ;h the
investment at the beginning is higher, in the long rur it is
cheaper, because the pump is more efficient and th rope and
-
pistons last longer. Fastening the pistons with knots seems the
easiest.
6
Annex 1
• The wear-out of the PVC-tube appears to be “little”. Of all
pumps installed in Nicaragua (about 2000)in the last 3 years
only some 20 are known, where it was neccesary to change the
tubes. (about 70% is installed on private wells)
6. THE GUIDE (page 201-203)
The guides as demostrated have several problems like breaking
(especially the hollow type), defects in the glazing or breaking
during instalation or maintenance. Also these types of guides
are relatively complicated in production and distribution.
Suggestions:
‘Use an insulator (like the ones used in high-power electrical
systems) installed in concrete (or wood). Right now almost all
guides in Nicaragua are made with an insulator installed in
concrete.
• For drilled wells up to 3” the guide can be made in a round
form.
-
i~vc
LJ1w
_____
Lc~J~J
nr
vor~1.
irc~ropQ
(.prct
0~
rc~Q)
-
Rope Pump
7. CORROSION
On all types of pumps there are problems with corrosion at the
base and the wheel-spokes.
Reasons:
• Quality of handling, cleaning and painting in gene r~lis low.
• In general users don’t maintain the painting of the pumps.
Suggestions:
• Mount a piece of galvanizad pipe 3/8” or 1/2” to pr?tect the
lower parts of the pump-structure.
I
• Use as much as possible galvanized materials anc~treat the
welc~edparts. Clean thouroughly, especlaly the welc~lngs,and
paint with anti-rust and “oil” painting.
• Use non-corrosive materials e.j. wood, plastic, cast iron,
others?
8. NOISE
The pumps make a noise in the blocking-system an Ithe
handle.
Reasons:
• The materials mounted as brake absorption (plasti ~tube or
rubber) get loose.
• In the case of the handle: in general it is not lubric ted. (dirtens
the hands)
Suggestions:
• Give an option to remove the brake lever (children~haveto
take more care!), making a “stop”. (see illustr.)
Annex 1
8
• Mount a PVC tube
instead of a steel tube.
(if cut lengthwise
it can be changed)
PVC.
P P6
9~.MOUNTING OF THE PUMP TUBE (rising main)
In many pumps installed in Nueva Guinea, the PVC-tubes are
not mounted straight in the cover of the well, causing wearing
out of rope and tubes. (e.j. photo 22). The mounting
demonstrated on page 109 and 136 functions well if made in
this way, but many of the pumps are installed with other
materia Is.
Reasons:
• Lack of adequate materials and knowledge/techniccal control
during installation.
Suggestions:
• Line out correctly the discharge and return tube, using a
plummet, and use the materials as indicated.
• Assemble a support in the structure of pump so that the pump
tube is centralized automatically (see illustration, at number 5).
Rope Pump
9
5
Tube 2 is 2x diam. of tube 1 e.g. 1=1” and 2=2”.
Tube 3 is of same size as tube 2.
Tube 4 is 1 size bigger as tube 1, e.g. 1=1”, 4=1, 25” (mm).
In drilled wells it is better to use a return tube (in handmade well
less necesary).
It is likely that a small booklet will be made by
COSUDE/Bombas de Mecate S.A. about production/instalation
and maintainance of the (recent) Rope and Washer pump.
Appendix
Address:
Name:
Description:
Contact:
Address:
227
We wrote it several
times, but received no response.
Jiron Bolognesl 165
Puno, Peru.
Loughborough UnIversIty of Technol-
ogy, Dep. of CIvIl EngIneerIng
The contact people have developed and
researched a low depth rope pump for Irrigation use in Zimbabwe and Tanzania;
they have published various articles, as
well as a construction manual.
Robert Lambert and Richard Faulkner.
Leicestershire LE1 1 3TU, England
ii
ii
II
‘I
“The success of the rope pump relles on the manner
in which it is introduced into a marginalized
community, with the only resource being the
community’s desire to participate within a group
project, because the process must involve a program
based on the community’s social organization and
self—management. The only methodology that results
in the successful transfer of technology is that which
takes into account the subjects of development,
providing for their collective participation and
unlimited creativity.”
Nemesio Porras Mendieta
“It is popular because in the firstplace, it is made from
our own materials. It isn’t necessary to bring in parts
from somewhere else, and its cost is within reach of
people with few economic resources. It is democratic
because practically everyone has the right to
participate in the installation and reparation, including
the women and children. There is nothing difficult as I
see it.
ConcepciOn Mendoza Castro