1
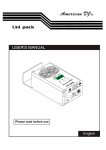
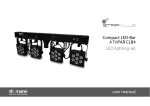
MULTI-DATA/PAK
TM
User Instructions
Elation Professional R
4295 Charter Street Los Angeles, CA 90058 USA
Tel: 323-582-3322 Fax: 323-582-3108
Web: www.elationlighting.com
24-004-1531
E-mail: [email protected]
Rev 1.0, August 2004
Elation Professional R
4295 Charter Street
Los Angeles CA. 90058
www.elationlighting.com
Chase Mode:
Introduction:
Thank you for purchasing the Multi-Data/Pak by Elation Professional.
To optimize the performance of this product, please read these operating
instructions carefully to familiarize yourself with the basic operations of this
unit. The Multi-Data/Pak is a unique DMX to Analog and MIDI to Analog
converter. This unit has been tested at the factory before being shipped to
you, there is no assembly required.
Customer Support:
Elation Professional provides a customer support line, to provide
setup help and to answer any question should you encounter
problems during your setup or initial operation. You may also visit
us on the web at www.elationlighting.com for any comments or
suggestions. Service Hours are Monday through Friday 9:00 a.m.
To 5:00 p.m. Pacific Standard Time.
Voice:
Fax:
E-mail:
To activate the unit's chase function, press the CHASE button."CHAS" will
be displayed in the LED display indicating chase mode has been activated.
The unit will run a 72 channel chase until the function is turned OFF.
Changing the output signal voltage:
The unit is capable of sending an analog output signal of +(-)10, +(-)12, +(-)15
volts. Determine the voltage your pack requires and change this setting to the
required output voltage. The unit's default output is +10 volts. To change the
output level, do the following.
1. For 10 volts, flip dip switches 1 and 4 to the ON position.
2. For 12 volts, flip dip switches 1 and 3 to the ON position.
3. For 15 volts, flip dip switches 1 and 2 to the ON position.
(323) 582-3322
(323) 582-3108
[email protected]
Warning!
To prevent or reduce the risk of electrical shock or fire, do not expose this unit
to rain or moisture.
Caution!
There are no user serviceable parts inside this unit. Do not attempt any repairs
yourself, doing so will void your manufactures warranty. In the unlikely event
your unit may require service please contact your nearest Elation dealer.
Specifications:
Power Input:
Fuse:
DMX to Analog:
Analog Output:
Dimensions:
Weight:
AC 120V~50/60Hz, 1A
F1A 250V 5x20mm
Maximum of 72 channels
+(-)10V/ +(-)12V/ +(-)15V
483x125x44mm(19"x5"x1.75")
1.3 Kg/ 2.5 Lbs
Do not discard the shipping cartoon in the trash. Please recycle when ever
possible.
Conformity:
This product complies to EN 50081-1/EN55022 pr EN55103-1 (EMC emission)
and EN 50081-1/EN 61000-4-2 pr EN 55103-2 (EMC immunity).
Multi-Data/Pak Instruction Manual Page 2
Multi-Data/Pak Instruction Manual Page 7
Speed Settings:
This setting adjusts the speed of the internal chase. The number of channels in
a chase can be adjusted between 1-72 channels. This chase can not be edited.
To change the chase speed, do the following:
1. Press and hold down the MENU button for three seconds.
2. When the LED Display begins to flash, tap the MENU button three times
to activate the SPEED settings. This will be indicated by SPXX flashing in
the LED Display.
3. Use the UP and DOWN buttons to select your desired chase speed. The
speed can be adjusted from 01 to 99. A setting of 01 is the fastest chase
speed at 1/10 of a second. A setting of 99 is the slowest chase speed at
every 10 seconds.
4. When you have made your selection, tap the MENU button twice to exit
this function and store your setting.
Features:
The Multi-Data/Pak is a universal signal converter that converts DMX and
MIDI to an Analog signal. This allows you to use your analog dimmer and
power packs with a DMX controller or MIDI sequencer. The unit can
convert up to 72 DMX channels. This unit may also be used as a 72
channel chaser. One scene can be stored into memory as an emergency
back up should your controller ever fail. This unit has built in memory in the
case that the unit's power is ever disconnected.
Functions & Controls (Front):
POWER
Signal
FUSE
8888
DMX
HOLD
MULTI-DATA/PAK
MIDI
STORE
Channel Setting:
CHASE
F1A 250V 5x20mm
MENU
This setting allows you to change the starting DMX channel. To make changes
to this setting, do the following.
1. Press and hold down the MENU button for three seconds.
2. When the LED display begins to flash, be sure the DMX LED on the left
of LED display is flashing. If it is not flashing, use the UP and DOWN
buttons to select DMX mode. (See Mode Setting on page 5).
3. When you are in DMX mode, tap the MENU button once to activate the
DMX settings. This will be indicated by AXXX flashing in the LED display.
4. Use UP and DOWN buttons to select your desired DMX address. The
address can be set between 001 to 512. NOTE: ONLY 72 TOTAL
CHANNELS WILL OUTPUT STARTING WITH THE SET ADDRESS.
5. When you have made your selection, tap the MENU Button four times to
exit this function and store your setting.
Programming a BACK-UP Scene:
This functions allows you to program one scene ino the data pack's memory.
This scene can be recalled at any time. To program a scene, do the following:
1. With any DMX controller, program a scene using any of the available 72
channels..
2. Press and hold down the SCENE button for five seconds until "GOOD"
is displayed in the LED display.
3. To recall the scene, press the SCENE button at any time. "STOR" will be
displayed in the LED display indicating that the unit is running the stored
scene.
Multi-Data/Pak Instruction Manual Page 6
1
2
3 4
6
5 7 8
MIDI IN
MIDI THRU
DMX IN
DMX OUT
9
10
11
12
DMX IN
13
DMX OUT
14
1. Power Switch - This turns the main power on and off.
2. Fuse Holder - This holds a fuse that protects the internal power supply.
3. LED Display - This is a seven segments display that indicates DMX
signal, MIDI signal, DMX Function, Hold Function, DMX channel, and
is used to activate and make changes in the menu.
4. Up Button - This button is used to advance the selected readings in
the menu.
5. Down Button - This button is used to descend through the menu
selections.
6. Menu Button - Use this button to activate the system menu.
7. Chase Button - This button selects chase mode.
8. Store Button - Pressing this button stores a scene or recalls a stored
scene.
9. MIDI In - This connector is used to receive MIDI signal from a MIDI
controller or MIDI sequencer.
10. MIDI Thru - This connector is used to send the signal coming in from
the MIDI IN JACK (9) to another MIDI device.
11. DMX In - This 3-pin XLR jack is used to receive DMX signal from a DMX
controller.
12. DMX Out - This 3-pin XLR jack is used to send a DMX signal to a DMX
power pack or dimmer.
Multi-Data/Pak Instruction Manual Page 3
13. DMX In - This 5-pin XLR jack is used to receive DMX signal from a DMX
controller.
14. DMX Out - This 5-pin XLR jack is used to send a DMX signal to a DMX
power pack or dimmer.
Functions & Controls (Rear):
1
24
25
48
Earth
49
72
Earth
OUTPUT LEVEL
Earth
Output
10V
12V
15V
OUTPUTS 1-24
1
OUTPUTS 25-48
OUTPUTS 49-72
2
3
DIP Switch
1
2
3
ANALOG OUTPUT
POLARITY
+
4
on off off on
on off on off
on on off off
POWER INPUT
CAUTION
-
RISK OF ELECTRIC SHOCK
DO NOT OPEN
N'OUVREZ PAS..RISQUE DE CHOCELECTRIQUE
THIS APPARATUS MUST BE EARTHED
WARNING:
4
5
6
1. Channel 1-24 Output - This 25 pin "D" socket connector controls the
output signal for channels 1-24.
2. Channel 25-48 Output - This 25 pin "D" socket connector controls the
output signal for channels 25-48.
3. Channel 49-72 Output - This 25 pin "D" socket connector controls the
output signal for channels 49-72.
4. Output Level - 10V/ 12V/ 15V are available using these dip-switches.
Details refer to the figure.
5. Analogue Output Polarity - The left
is for positive(+) output and the right
for negative(-) output.
6. Power Input Cord - Connect this cord to an AC 100V~50/60Hz electrical
outlet.
Set-Up:
1. With the main power off, connect either a DMX or MIDI controller.
2. Connect your output connections to the "D" sockets on the rear of the
unit. As an option, Elation makes a converter D type connector to din
plugs available as model number “Z-MDP/C”.
3. Connect the DJ Z-MDP/ C to convert the D type connectors
to din style plugs if required.
4. After you have made all your connections, turn the main power on and
follow the operating instructions on the next page.
Multi-Data/Pak Instruction Manual Page 4
Operating Instructions:
Mode Select:
To access the menu, you must hold down the MENU button for at least three
seconds. You will then have access to the MODE setting. Select the input type
being used, DMX or MIDI. If a DMX or MIDI signal is present, the
corresponding LED will begin to flash in the LED display. Press the MENU
button to store the mode.
DMX Mode :
When the unit is receiving DMX signal, the DMX LED will be flashing in
the LED display indicating that DMX signal is present. The unit will also
display the current DMX address in the LED Display. This unit can operate
between DMX channels 1-512 (A001 - A512). However, be aware that this
unit will only output a total of 72 DMX channels starting from the set address.
(See the Channel Setting section on page 6).
MIDI Mode :
When the unit is receiving a MIDI signal, the MIDI LED will be flashing in
the LED display indicating that MIDI signal is present. The unit will also display
a flashing MIDI channel number (CH01 - Ch16) in the LED display. This unit
can operate on MIDI channels 1-16. You may use the UP and DOWN buttons
to select a starting MIDI channel number.
Hold Mode :
This mode allows last DMX setting, if the DMX signal is interrupted, to hold.
For example, if the hold function is OFF and you have channels 1 & 4 on and
your DMX controller is turned OFF, DMX channels 1 & 4 will also turn OFF. If you
turn the HOLD function ON and disconnect DMX signal, channels 1 & 4 will remain ON until you disconnect the Multi-Data/Pak 's power or reconnect a DMX
controller. To turn this function ON or OFF, do the following:
1. Press and hold down the MENU Button for three seconds.
2. When the LED begins to flash, tap the MENU button twice to enter
HOLD mode. This will be indicated by a flashing LED next to "HOLD" in
the LED Display.
3. Use the UP and DOWN Buttons to select the ON or OFF settings.
4. When you have made your selection, tap the MENU button three times to
exit this function and store your setting.
Multi-Data/Pak Instruction Manual Page 5