1
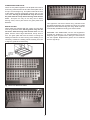
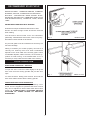
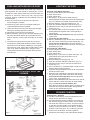
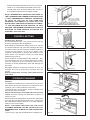
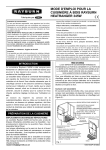
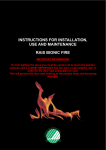
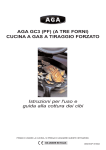
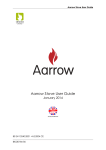
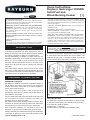
Users Instructions.
Rayburn Heatranger 355SFW
Solid Fuel and
Wood Burning Cooker
Consumer Protection Act 1987
As responsible manufacturers, we take care to make sure that our
products are designed and constructed to meet the required safety
standards when properly installed and used.
personal protective clothing is worn when handling, where
applicable, the pertinent parts that contain any of the listed materials
that could be interpreted as being injurious to health and safety, see
below for information.
IMPORTANT NOTICE: PLEASE READ THE ACCOMPANYING
WARRANTY: Any alteration that is not approved by AGA, could
invalidate the approval of the appliance, operation of the warranty
and could also affect your statutory rights. Use only authorised
replacement parts.
Firebricks, Fuel beds, Artificial Fuels - when handling use
disposable gloves.
All local regulations including those referring to national and
European standards need to be complied with when installing
the appliance.
Glass Yarn, Mineral Wool, Insulation Pads, Ceramic Fibre,
Kerosene Oil - may be harmful if inhaled, may be irritating to skin,
eyes, nose and throat. When handling avoid inhaling and contact
with skin or eyes. Use disposable gloves, face-masks and eye
protection. After handling wash hands and other exposed parts.
When disposing of the product, reduce dust with water spray,
ensure that parts are securely wrapped.
Fire Cement - when handling use disposable gloves.
Glues and Sealants - exercise caution - if these are still in liquid
form use face mask and disposable gloves.
Control of Substances - Health and Safety
Important
This appliance may contain some of the materials that are indicated.
It is the Users/Installers responsibility to ensure that the necessary
WARNING
INTRODUCTION
THE ASHPIT AND FIREBOX DOORS MUST BE LOCKED
CLOSED AT ALL TIMES DURING NORMAL USE, EXCEPT
WHEN LIGHTING OR RE-FUELLING.
The Rayburn 355SFW has been designed to burn a
variety of solid fuels and thereby provide heating facilities
for cooking, domestic hot water and central heating.
The thermostatically controlled hot water boiler can be
operated independently of the cooker and will provide hot
water for central heating and domestic use, whilst
manually operated spinwheel control on the front of the
ashpit door will provide heat for cooking and domestic
hot water.
The cooker/boiler flueway damper knob on the centre
front of the cooker below the top plate requires to be set
in conjunction with the flue chamber damper to obtain the
appropriate service required from the appliance.
to the oven and increase heat to water. Placing it on one
or more boiler side will reduce the heat to water. The
firebricks can be used in separate sections as required
and do not have to be fully fitted or removed.
PREPARING COOKER FOR USE
FIREBRICK POSITIONS
The Rayburn 355SFW is delivered complete including a
set of boiler removable firebricks where positional
location determines the amount of hot water supplied in
winter and summer seasons.
The oven side and firebox front firebricks are
permanently fixed with fire cement and should remain in
their positions at all times.
The two boiler face side bricks and boiler face rear brick
are so located for summer use when hot water, for
domestic use only, will be provided.
For winter use or central heating facilities the boiler face
rear brick is removed and the two boiler face side bricks
are transferred to locate on/over the oven side bricks.
The removable firebricks can be fitted or not at the
discretion of the user in the position that gives the most
benefit. Generally the firebrick will change the distribution
of the heat, so placing it on the oven side will reduce heat
[email protected]
Fig. 1
Secondary Air Slide.
On opening the firedoor the secondary air slide is seen
on the base of the opening and should be set according
to the fuel being used as follows:Air Slide Open - wood logs
Air Slide Closed - manufactured smokeless fuels
1
10/09 EOPI 515579
FLUE RESTRICTOR PLATE
There are two plates supplied. The flat plate with holes is
for burning solid mineral fuels and the similar plate with a
scoop is for wood logs only. This plate is fitted at the rear
of the firebox covering the flueway opening and is to be
used when burning a specified fuel only. Do not use
the plate with the scoop when burning solid mineral
fuels. This part can only fit one way round. When
burning wood, fit this part before the grate plates and
firebricks.
Fig. 5 Solid Mineral Fuel Set-up
This appliance has been tested using manufactured
briquetted smokeless fuel (Taybrite and Ancit) for closed
appliances sized between 20g and 140g. Other fuels are
commercially available and may give similar results.
GRATE PLATES
Three plates are supplied with the cooker and are fitted
over the grate bars when burning wood only. Do not
use these when burning solid mineral fuels. Fit the
plates, with the return edge downwards, evenly front to
rear. The grate plate will have the effect of locking the
riddling mechanism so when burning wood riddling is not
necessary. Position the riddling handle centrally in its slot
to align the grate bars before fitting.
WARNING: HOT SURFACES, use the tool supplied to
operate this appliance. It is recommended to use the
heatproof glove supplied when raising the dome lids to
use the hotplate. Replacement gloves can be obtained
from the Aga Shop.
Fig. 2
Fig. 3 Both Flue Restrictor Plates
Fig. 4 Wood Setup
2
RECOMMENDED SOLID FUELS
MANUFACTURED - SUNBRITE SINGLES, SUNBRITE
DOUBLES, COALITE, PHURNACITE and SUPACITE.
NATURAL - ANTHRACITE LARGE & SMALL NUTS,
SELECTED HOUSECOAL (TREBLES/LARGE NUTS
AND DOUBLES/NUTS), TAYBRITE, COKE, WOOD
LOGS
PETROLEUM COKE MUST NOT BE USED.
Oversize fuel lumps should be broken down to size.
Stones and other foreign bodies should be removed
when fuelling.
Fuel should be stored under cover and ventilated,
particularly manufactured fuels which must be kept dry.
Wet kitchen refuse should not be burned.
Fig. 6
DESN 512979
Fig. 7
DESN 514177
Any air inlet grilles must be maintained so that they are
free from blockage.
Failing to maintain your cooker properly can lead to a
chimney fire. Chimney fires occur when combustible
deposits on the inner walls of the chimney ignite. These
combustible deposits, called “creosote”, are a natural byproduct of wood burning. A fire hazard exists if 1/4” of
creosote (or more) coats the inner walls of the chimney.
DOOR OPERATION
OVEN DOOR OPERATION - SEE FIG. 6
To open the doors. Twist the handle slightly to lift up the
door catch from the locking spindle and pull the door
open.
To close the doors. Gently push the door shut until the
door catch makes contact with the locking spindle.
FIREDOOR/ASHPIT DOOR OPERATION
The firedoor and ashpit door are kept closed by a turn
screw. A tool is supplied to operate these when hot and
they can be adjusted to ensure both these doors close
tightly. IT IS IMPORTANT TO ENSURE PROPER
CLOSURE OF THESE DOORS TO PREVENT
OVERFIRING.
3
FUELLING WITH WOOD OR PEAT
LIGHTING THE FIRE
The cooker will satisfactorily burn wood logs, blocks or
peat briquettes, but logs should be perfectly dry in order
to obtain the best cooker performance and minimise the
deposits of creosote. Wood logs may also provide
overnight banking problems and the following hints are
recommended:a) Burn dry soft wood in the day time and dry hard
wood overnight if possible.
b) Avoid using ‘green’ wood on overnight banking as
creosote deposits will be increased.
c) Using hard wood in the day time will give prolonged
burning but heating response is slower.
d) Wet kitchen refuse should not be burned.
e) Before refuelling, open the flue chamber damper to its
full extent and fill the firebox up to the bottom of the
firedoor opening, ensuring the secondary air is at fully
open.
f) To obtain the optimum burning rate when burning
wood logs the grate plates should be fitted to the top
of the fire bars in the firebox. Riddling is not required
when burning wood, poking will normally suffice. Take
care not to upset the plates when using the poker.
These plates must be removed when burning solid
mineral fuels.
All Fuels using Wood and Paper
a) Check the flue pipe is free of blockage.
b) Open firebox door.
c) Open ashpit door.
d) De-ash (Fig. 12) and remove dead fuel from
bottomgrate (lift off clinker door above the bottomgrate
(Fig. 14), rake fuel into ashpan replace clinker door).
e) Remove ashpan, empty and replace (Fig. 13).
f) Open flue chamber damper to maximum (Fig. 11).
g) Flue dilution lever fully to ‘left’ (flue chamber door
closed, Fig. 11).
h) Lay a liberal supply of wood and paper on top of the
bottomgrate bars together with a small quantity of
fuel and light.
i) Close and lock the ashpit door with the spinwheel
control open.
j) Close and lock the firedoor.
k) With fire established, open firebox door and fill firebox
with fuel. Check secondary air slide setting (Fig. 10).
Close and lock firebox door. Push flue chamber
damper back to position which has been found to give
desired burning rate.
All fuels Using a Gas Poker
a) Check flue pipe is free of blockage.
b) Open firebox door.
c) Open ashpit door.
d) De-ash (Fig. 12) and remove clinker door (Fig. 14).
Insert flat bayonet type gas poker on top of
bottomgrate bars.
e) Remove ashpan and empty (Fig. 13).
f) Open flue chamber damper to maximum (Fig. 11).
g) Flue dilution lever fully to ‘left’ (flue chamber door
closed, Fig. 11).
h) Lay a 75-100mm 3”-4”) shallow depth of fuel onto the
bottomgrate and light gas poker.
i) Close the ashpit and firebox doors as far as possiblespinwheel control open.
j) When the fuel is well alight, extinguish and remove
the gas poker, replace the clinker door and ashpan,
close and lock the ashpit door with the spinwheel
control open. close the firedoor.
k) With the fire established open the firebox door and fill
firebox with fuel. Check secondary air slide setting
(Fig. 6). Close and lock the firebox door.
Push the flue chamber damper back to position which
has been found to give best results. Set spinwheel
control to give desired burning rate.
Fig. 8
FAMILIARISE YOURSELF WITH THE
COOKER
COOKER CONTROL
Cooking Only - All Fuels
a) The fire is controlled by using the spinwheel on the
ashpit door to govern the air supply.
b) The adjustable flue chamber damper is for reducing
the chimney draught, and the more it can be closed,
the easier the cooker is to control. The line markings
on the flue chamber enable you to repeat the best
settings to suit your chimney, from No.1 in a closed
position to No.6 fully open. Try a mid-way point first.
c) Control over the direction of the flue gases is
obtained by the setting of the cooker/boiler damper.
Fig. 9
4
Set the cooker/boiler damper knob on the front of the
cooker to ‘C’ and the boiler thermostat knob on the
rear left hand corner of the top plate to No. 2 or No. 3.
If more heat is required set to a higher number.
NOTE: INTERMEDIATE SELECTIVE SETTINGS OF
THE COOKER/BOILER DAMPER KNOB AWAY FROM
‘C’ WILL PROGRESSIVELY RESTRICT THE AMOUNT
OF HEAT TO THE TOP OF THE OVEN AND
INCREASE THE AMOUNT OF HEAT INTO THE
BOILER UNTIL THE KNOB IS POINTING TO SYMBOL
‘H’ FOR MAXIMUM WATER HEATING. IN THIS
POSITION, THE MINIMUM PROPORTION OF HEAT IS
DIRECTED TO OVEN HEATING. ALTHOUGH THE
OVEN WILL STILL GET HOT.
Fig. 10
CONTROL SETTING
Cooking Only - All Fuels
Set the spinwheel open. The precise amount will be
shown by experience with the appliance.
After setting the cooker/boiler damper knob to ‘C’, set the
flue chamber damper fully open after refuelling and reset
to position which has been found by practical experience
to give the best results. Do not try to obtain a fast
increase in temperature by opening flue chamber to its
fullest extent. This results in most of the heat being
wasted up the chimney.
Avoid excessive fire temperatures with solid fuel - they
are unnecessary and may do serious harm to the cooker.
The first symptoms of an overheated cooker is the
formation of clinker (melted ash) which will damage the
fire bricks.
Damaged firebricks should be replaced as soon as
possible but may be temporarily repaired with fire
cement.
Keep the ashpit door securely closed with the front
plate catch.
Fig. 11
Fig. 12
OVERNIGHT BANKING
Solid fuel
The appliance is designed for continuous burning and the
best results will only be obtained if it is allowed to burn
overnight. It is no more expensive in fuel costs.
Last thing at night, de-ash the fire, empty the ashpan and
fully refuel but do not overload.
Ensure that the firebox and ashpit doors are securely
closed, and after closing the spinwheel, re-open it a
quarter of a turn.
Set the boiler thermostat knob to its minimum setting and
close the flue chamber damper plate to No. 1 setting. Set
the cooker/boiler chamber knob to ‘C’ to obtain optimum
heat into oven and hot plate.
NOTE: THE BEST POSITION FOR THE FLUE
CHAMBER DAMPER CAN BE FOUND ONLY BY
EXPERIMENT BUT ALWAYS TRY THE LOW SETTING
FIRST.
In the morning, open the spinwheel three complete turns,
Fig. 13
Fig. 14
5
open the flue chamber damper to maximum and riddle
the fire. When it is burning brightly, close the flue
chamber damper, but do not refuel before use if the
hotplate is required immediately, unless there is a risk of
the fire going out.
Ensure that the firebox and ashpit door are securely
closed, close the spinwheel tight and the flue chamber
damper is set to No.1.
Set the boiler thermostat knob to its minimum setting
and the front damper knob to ‘c’.
Turn the flue dilution lever (See Fig. 11) from left to right
hand so that the flue chamber door opens at the bottom
and minimise burning rates.
NOTE: THE PRECISE AMOUNT OF OPENING
DEPENDS ON THE CHIMNEY DRAUGHT, THE
TYPE/CONDITION OF WOOD TO BE BURNT AND
THIS MAY TAKE 2 OR 3 DAYS TO ASCERTAIN.
1. If the fuel in the firebox is exhausted prematurely, the
overnight chimney draught must be reduced by
increasing the opening setting of the flue chamber
door, using the flue dilution lever.
2. If the fuel does not burn but ‘dies out, the draught
should be increased by reducing the opening setting.
of the flue chamber door, using the flue dilution lever.
It maybe necessary to set the thermostat to a higher
number to allow more air.
Following overnight banking, the flue chamber door must
be closed, the spinwheel and flue chamber damper
opened and the fire refuelled.
Immediately the new fuel has caught alight, close the flue
chamber damper.
NOTE: BUILD-UP OF CREOSOTE DEPOSITS IN THE
FLUE AND CHIMNEY CAN IN TIME, LEAD TO
CHIMNEY FIRE.
THESE DEPOSITS CAN BE PREVENTED BY THE
REGULAR USE OF A PROPRIETARY BRAND OF
CHIMNEY CLEANER, WHICH REUDCES THE
STRENGTH OF THE CREOSOTE DEPOSITS.
BOILER CENTRAL HEATING
THERMOSTAT SETTING
All Fuels.
Set the cooker/boiler damper knob ‘H’.
Close spinwheel.
To regulate burning, set the boiler thermostat knob to ‘8’
(high) or minimum rate ‘1’ (low).
Adjust as required to suit desired water heating.
Overnight banking and daytime slow burning should be
obtained with the boiler thermostat knob set at ‘1’ to give
extended burning.
Wood burning
Some woods are more difficult to burn therefore it may
be necessary to open the spinwheel in addition to the
thermostat to obtain the desired results. The spinwheel
must be closed as appropriate. Do not leave the cooker
for extended periods with the spinwheel open as the
cooker may overheat and cause damage.
In some circumstances it may be possible to overheat
the appliance and the water inside will boil. This will be
evident by the sound of a knocking noise coming from
the appliance and pipes around the house. If this occurs
close off all air controls and manually start the central
heating pump if fitted. Opening the oven doors and
hotplate covers will help to release heat from the
appliance. Be aware that steam and boiling water will be
expended from any open vent from the heating system
probably in the roof space at the expansion tank.
In the unlikely event that the appliance is not operating in
freezing conditions the water must be drained from the
boiler to prevent frost damage.
IMPORTANT: CHEMICAL CLEANERS MUST NOT BE
CONSIDERED AS AN ALTERNATIVE TO CHIMNEY
SWEEPING, ONLY AS SUPPLEMENTARY.
OVERNIGHT CENTRAL HEATING
TYPICAL WATER TEMPERATURES
Solid Fuel
The appliance may be operated overnight for the
purpose of selected central heating when inclement
weather conditions occur.
Set the cooker/boiler damper knob to ‘H’ after refuelling
etc. and the boiler thermostat knob to No. 2 with the flue
chamber damper set at minimum. The spinwheel should
be closed and about four radiators can be run overnight
under these conditions.
NOTE: THE HOTPLATE AND OVEN TEMPERATURE
WILL BE CONSIDERABLY LOWER AND EXTENDED
TIME WILL BE NEEDED TO HEAT UP THESE
FEATURES. DO NOT FORGET TO RE-SET THE
COOKER/BOILER KNOB TO ‘C’ FOR COOKING
AFTER OVERNIGHT USE.
Against Thermostat knob settings with Cooker/Boiler
Damper at ‘H’ and Spinwheel closed.
Thermostat Setting No.
Water Temperature
(APPROXIMATE)
1
46ºC (115ºF)
3
54.5ºC (130ºF)
5
65.5ºC (150ºF)
8
80ºC (176ºF)
a) Using the cooker boiler to provide heat for domestic
hot water and radiators in the winter, a boiler thermostat
setting at No.8 is recommended.
b) Using the cooker boiler for the provision of domestic
hot water only, in the summer, a boiler thermostat setting
of No. 5 is recommended.
NOTE: TO CONSERVE FUEL, ENSURE THE HOT
WATER CYLINDER AND PIPES ARE LAGGED WITH
INSULATION.
OVERNIGHT BANKING
Wood
The appliance is designed for continuous slumbering
overnight for up to a maximum of 10 hours depending on
the type of dry wood being used. Last thing at night, open
the flue chamber damper. de-ash the fire, empty the
ashpan and fully refuel.
6
Lift off the clinker door (See Fig. 10) and insert a hooked
poker to draw out any offending accumulation. Replace
clinker door after use.
The amount of clinker formation is dependent on the
heating load or burning rate and should be checked
weekly for any build-up. Excessive build-up will lead to a
fall in heating output requiring bottomgrate clean-out and
reduction in life of the bottomgrate.
REFUELLING
The firebox should be filled to the recommended level of
the bottom firebox door opening and the firebox door
closed.
A correctly fuelled fire will last a minimum of 3 hours
when burning solid fuel and 1 1/2 hours burning wood
when maintaining the maximum rated output of the boiler
with intermittent cooking periods included.
NOTE: When burning any wood fuels and Sunbrite
Coke, the secondary air slide should be set in a fully
open position.
A deep bed of newly charged fuel on a low fire will
take time before heat reaches the ovens, hotplate
and boiler. When burning Coal, Phurnacite and
Anthracite, allow several minutes for the new charge
to ignite before changing the flue chamber damper
setting.
ONCE REFUELLING HAS BEEN COMPLETED,
CLOSE THE FIREBOX DOOR IMMEDIATELY AND
OPEN ONLY FOR REFUELLING CHARGES.
USE OF THE HOT PLATE
The best results can be obtained by using machined
base utensils. The hottest part of the hot plate is
immediately above the fire, the other end being for
simmering.
The circular plug in the hotplate (near the flue chamber
end) is for flue cleaning and must not be removed for
cooking.
Keep the hotplate clean with a wire brush.
NOTE: TO OBTAIN OPTIMUM HOTPLATE
PERFORMANCE FOR FAST BOILING OR HOT PLATE
COOKING, FUEL THE FIREBOX TO THE BOTTOM
EDGE OF THE FIREBOX APERTURE
TO A
HORIZONTAL LEVEL.
WARNING: THE COOKER TOP PLATE SURFACE
AROUND THE HOTPLATE WILL BECOME HOT
UNDER USE AND CARE MUST BE OBSERVED.
PLEASE REFER TO THE INSTALLATION
INSTRUCTIONS
REGARDING
MINIMUM
CLEARANCES TO COMBUSTIBLE SURFACES AND
MATERIALS.
DE-ASHING
When burning wood, de-ashing and riddling is required
less frequently. Usually once or twice a day is sufficient
even when in continuous use. Always de-ash before
refuelling when burning solid mineral fuels. In winter, this
may be as much as three times daily depending upon
weather severity and cooker usage.
To de-ash, riddle the grate by agitating the riddling
handle in an up and down manner 10-20 times to free the
grate of ash. See Fig. 12.
ALWAYS DE-ASH BEFORE REFUELLING (SEE
‘EXCEPTIONS’ BELOW) AT THE FOLLOWING
INTERVALS:SUMMER USE:
Two times daily at least.
WINTER USE:
Three times daily at least and more often if required.
NOTE: SHOULD THE BOTTOMGRATE DE-ASHING
FAIL TO CLEAR AN ACCUMULATION OF STONES,
SHALE OR CLINKER, IT MAY BE REMOVED AS
DESCRIBED IN SECTION ON REMOVAL OF
CLINKER.
Open the ashpit door to give access to the ashpan which
must be emptied regularly (See Fig. 13).
NOTE: DO NOT ALLOW ASH TO ACCUMULATE IN
THE ASHPAN UNTIL IT TOUCHES THE UNDERSIDE
OF THE BOTTOMGRATE BARS OR THEY WILL
QUICKLY BURN OUT.
Ensure the ashpan is fully home otherwise the ashpit
door may not close and lock completely.
EXCEPTIONS:
WHEN BURNING ANTHRACITE OR PHURNACITE,
ALWAYS REFUEL BEFORE EMPTYING ASHPAN AND
RIDDLING.
USE OF THE TOP ROASTING OVEN
The correct adjustment of the spinwheel and flue
chamber damper to obtain the oven temperature required
varies with the chimney draught, and can be found only
by experiment. The following is a suggested method
only, and may need modification to suit local conditions.
Suppose an oven temperature for roasting is desired,
and that the cooker is idling.
Thoroughly de-ash the fire as described in the respective
paragraph, and refuel. Set the flue chamber damper to
No.3 setting and open the spinwheel as described under
‘CONTROL SETTING’.
As soon as the fire has become red all through, close the
flue chamber damper. Do not allow the fire to become
white hot.
The temperature of the oven should now rise steadily.
When it reaches a point about 30ºC (50ºF) below that
required, close the spinwheel to approximately one turn
open. Thereafter control the temperature of the oven by
adjusting the spinwheel.
NOTE: THE METHOD SHOULD PROVE SUCCESSFUL
IN ALMOST ALL CASES, BUT IF CLOSING THE FLUE
CHAMBER DAMPER CAUSES THE FIRE TO SMOKE,
IT SHOULD BE OPENED GRADUALLY UNTIL THE
SMOKING STOPS.
To reduce top heat in the oven adjust the cooker/boiler
damper knob gradually away from symbol ‘C’. The oven
may be cleaned with a stiff wire brush, when it is very
hot.
REMOVAL OF CLINKER FROM
BOTTOMGRATE
Due to an accumulation of pieces of stone, clinker and
shale etc. it may not be possible to pass them through
the grate when riddling, and may even cause jamming.
Allow the fire to burn out and then open the ashpit door.
7
OVEN TEMPERATURES:HOT
220º-260ºC (400º-500ºF)
MODERATE
150º-200ºC (300º-400ºF)
SLOW
90º-150ºC (200º-300ºF)
Check with pointer
reading on oven
door thermometer.
USE OF THE BOTTOM
COOKING OVEN
It is not possible to control this oven, but during the
course of roasting, sufficient heat input permits
simmering of dishes that have been taken from the
roasting oven.
OVEN TEMPERATURES:Idling 95ºC min.
During cooking - 135ºC max.
During the cooker idling periods, the oven is ideal for
heating plates and keeping food warm.
Fig.15
FLUEWAY CLEANING
WARNING: HOT SURFACES, use the tool supplied to
operate this appliance. It is recommended to use the
heatproof glove supplied when raising the dome lids to
use the hotplate. Replacement gloves can be obtained
from the Aga Shop.
Following a prolonged shutdown of the appliance,
perhaps after the summer break, ensure the flueway is
free from obstruction prior to re-lighting.
When burning coke, anthracite, other smokeless fuels,
logs or peat, the appliance flueways should be cleaned
on a regular four weekly basis.
When burning bituminous coal, cleaning should be done
at weekly intervals.
Prolonged soot formation may result in flueways
becoming blocked and could give rise to the release of
carbon monoxide, a poisonous gas into the room.
Failure to ensure clean flueways, flue pipes and bends
may lead to emission of dangerous gases and an inferior
performance from your appliance.
Cooker Flueway - Allow the fire to burn out, open the
flue chamber damper to its maximum and remove the
flue chamber door.
Turn the cooker/boiler knob to ‘C’.
Brush the soot or fly ash from the flue pipe allowing it to
fall onto the top of the oven. Fig. 15.
Remove the hotplate plug and rake the deposits forward,
pushing them into the firebox. Figs. 16 & 17.
Boiler Flueway - Set the cooker/boiler damper knob to
‘H’ and remove boiler cleaning cover in top plate adjacent
to boiler thermostat control knob.
Lift out exposed boiler cleaning plate and brush near
boiler flueways up and down allowing debris to fall into
the firebox. Fig. 18.
The flue restrictor plate may need to be removed to
enable deposits to be swept out of the bottom of the
boiler flueway. If necessary remove side bricks and grate
baffles to ease access.
Clean boiler flue outlet by inserting brush horizontal at
right hand of boiler aperture below top plate.
Fig.16
Fig.17
Fig.18
8
Push brush above and below the boiler damper so that
flash etc. is pushed onto oven top. Insert rake through
hotplate plug aperture and pull deposits into firebox (after
resetting cooker/boiler damper knob to ‘C’).
Replace flue chamber door and hotplate plug and riddle
the bottomgrate thoroughly to clear the bottomgrate
ready for relighting.
NOTE: THE APPLIANCE IS DESIGNED AND
INTENDED TO BE UNDER CONTINUOUS FIRING BUT
IF IT IS NOT IN USE ASHPIT AND FLUE CHAMBER
DOORS SHOULD BE LEFT OPEN TO ENSURE FREE
PASSAGE OF AIR THROUGH THE APPLIANCE AND
AVOID CONDENSATION PROBLEMS.
CLEANING
Surface blemishes caused by spillage on the gloss
enamel are easier to remove when the cooker is cool,
and a damp cloth is usually all that is necessary.
This should not be done whilst the cooker is hot.
DO NOT USE ABRASIVE PADS, OVEN CLEANER, OR
CLEANERS CONTAINING CITRIC ACID ON
ENAMELLED SURFACES.
IMPORTANT NOTE: Aga recommend Vitreous Enamel
Association approved cleaners for cleaning the vitreous
enamelled surfaces of this product.
CHIMNEY SWEEPING
But they are unsuitable for use on: chrome and stainless
steel components, including the hand-rails and their
brackets.
The insulating covers should be cleaned regularly with a
NON-ABRASIVE mild detergent, applied with a soft
(coarse free) cloth and lightly polished up afterwards with
a soft (coarse free) duster or tissue to bring it back to its
original lustre.
Sweep annually and inspect soot box at 3 monthly
intervals and remove any deposits.
NOTE: SWEEPS BRUSHES MUST BE OF THE TYPE
WITH WIRE CENTRES AND GUIDE WHEELS.
CHIMNEY FIRES
TO REPLACE BOTTOMGRATE BARS
Prevention: Chimney fires do not occur in clean, intact,
properly installed chimneys. Have a professional
chimney sweep clean and inspect your appliance at least
once a year. More frequent cleanings may be required,
based on the type of fuel burned, the type of appliance,
and the frequency of use. In general, an older appliance
or one that is used frequently, will require more than one
clean per year.
Allow fire to burn out first then open the ashpit door and
lift off the clinker door. Remove dead fuel with hooked
poker into ashpan and then lift up each individual bar,
pulling forward to remove.
NOTE: THERE ARE TWO TYPES OF BARS
ASSEMBLED AND THE REPLACEMENT BARS
SHOULD BE CHECKED AGAINST ‘REPLACED’ BAR
BEFORE REPLACEMENT.
Detection: The first indication of a chimney fire is usually
the noise - a roaring sound grows louder as the fire’s
intensity increases. Clouds of black smoke and sparks
will be seen exiting the top of the chimney; in severe
fires, flames can extend several feet about the chimney.
FIREBRICK REPLACEMENT
The firebricks fitted to the Rayburn 355SFW are of first
quality manufacture, and providing the cooker has been
installed and used correctly will have a reasonable life.
They are, however, expendable items and in time will
require renewal.
Replacement bricks either in sets or singly can be
obtained from your Rayburn distributor. Always quote the
manufacturing number.
The manufacturing number, which will be found fixed to
the appliance, should be quoted if any question arises in
connection with the Rayburn 355SFW Cooker.
Action: In case of a chimney fire follow these steps but
do not put yourself or others in peril:
1. Call the fire brigade immediately.
2. Get everyone out of the property.
3. Close down the air supply to the appliance i.e. the
primary air spinner and the flue damper. Limiting the
fires air supply will reduce its intensity. If there is a
damper in the chimney connector, plug or close the
opening.
4. If a fire extinguisher is available, open the appliance
door just enough to insert the nozzle of a 10lb, dry
chemical fire extinguisher rated for Class ABC fires.
Discharge the entire content of the fire extinguisher
into the appliance and shut the door.
5. If possible, wet down the roof and other outside
combustibles to prevent fires ignited by shooting
sparks and flames.
6. Closely monitor all combustible surfaces near the
chimney. During severe chimney fires, these surfaces
can become hot enough to ignite.
GRATE PLATE REPLACEMENT
Three grate plates are supplied for WOOD BURNING
ONLY. These plates are designed to sit on top of the
reciprocating firebars with the return edge downwards.
They provide a solid flat surface for the wood to burn on
and are NOT TO BE USED when burning solid mineral
fuels. These plates may distort but will only need
replacing if they are damaged or missing.
After a chimney fire, have the chimney inspected by a
professional chimney sweep or cooker installer.
9
SMOKE/SMELL EMITTED DURING INITIAL USAGE
HOT WATER SERVICE
Some parts of the cooker have been coated with a light
covering of protective oil. During initial operation of the
cooker, this may cause smoke/smell to be emitted and is
normal and not a fault with the appliance, it is therefore
advisable to open doors and or windows to allow for
ventilation.
Lift the insulating lids to prevent staining the linings.
The cooker has been designed to provide a satisfactory
supply of domestic hot water with or without a limited
amount of heating with a normal day’s cooking providing
the cooker is kept alight overnight and the system
complete with lagged cylinder conforms to the installation
instructions.
SERVICING
Always use a qualified service/heating engineer when
servicing is required. Use only authorised replacement
parts. Do not make unauthorised modifications.
FUME EMISSION WARNING
Properly installed and operated, this cooker will not emit
fumes.
Occasional fumes from de-ashing and re-fuelling may occur
but persistent fume emission must not be tolerated.
If fume emission does persist, then the following immediate
action should be taken:a) Open doors and windows to ventilate room.
b) Let the fire out or remove lit fuel from cooker.
c) Check for flue or chimney blockage, and clean if
required.
d) Do not attempt to relight fire until cause of fume has
been identified, and if necessary, seek professional
advice.
SPARES LIST
Part Number
QWX
1/16182 T
1/16182 B
3/16272
4/16273
3/16271
3/16274
3/16275
3/18172
RS2M301369
RS1M301368
Description
Boiler Thermostat
Bottomgrate bars top
Bottomgrate bars bottom
Oven side firebricks
Firebox side top firebricks
Front firebrick
Removable boiler face
rear firebrick
Removable boiler face
side firebrick
Grate Baffle Plate
Flue Restrictor Plate
Flue Restrictor Assy
No Reqd
1
6
5
2
1
1
1
2
3
1
1
Replacement parts if required are always available exworks. Write to us should any difficulty be encountered in
obtaining them from your usual supplier.
10
11
For further advice or information contact
your local distributor/stockist
With AGA’s policy of continuous product
improvement, the Company reserves the right to
change specifications and make modifications to
the appliance described at any time.
Manufactured by
AGA
Station Road
Ketley Telford
Shropshire TF1 5AQ
England
www.rayburn-web.co.uk
www.agacookshop.co.uk
www.agalinks.com
12