1
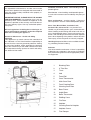
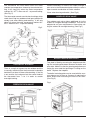
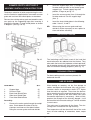
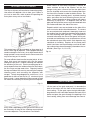
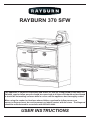
RAYBURN 370 SFW
This appliance is hot while in operation and retains its heat for a long period of time after use.
Children, aged or infirm persons should be supervised at all times and should not be allowed
to touch the hot working surfaces while in use or until the appliance has thoroughly cooled.
When using the cooker in situations where children, aged and/or infirm persons are
present a fireguard must be used to prevent accidental contact with the stove. The fireguard
should be manufactured in accordance with BS 8423:2002.
USER INSTRUCTIONS
TABLE OF CONTENTS
Page No.
1.
2.
Schematic ........................................................................................................................................ 3
Summer Operation.............................................................................................................................4
3.
Recommended Fuels .........................................................................................................................4
4.
Operation ...........................................................................................................................................4
5.
Lighting The Fire ................................................................................................................................4
6.
Fuelling...............................................................................................................................................4
7.
Condensation .....................................................................................................................................4
8.
External Riddling ................................................................................................................................5
9.
Ash Removal......................................................................................................................................5
10.
Ashpan ...............................................................................................................................................5
11.
Thermostat With Override ..................................................................................................................5
12.
Overnight Burning ..............................................................................................................................6
13.
Firedoor Spin Valve............................................................................................................................6
14.
Ashdoor Spin Valve............................................................................................................................6
15.
Boiler Insulating Plate ........................................................................................................................6
16.
Summer Grate & Heatshield Assy......................................................................................................7
17.
Hotplate Covers .................................................................................................................................7
18.
Cooking Utensils ................................................................................................................................7
19.
Use of Ovens .....................................................................................................................................7
20.
Internal Flue Cleaning ........................................................................................................................8
21.
Grate Removal ...................................................................................................................................8
22.
Cleaning .............................................................................................................................................9
23.
Opening Cooker Door ........................................................................................................................9
24.
Air Supply...........................................................................................................................................9
25.
Cooker Clearance ............................................................................................................................10
26.
Chimney Fires ..................................................................................................................................10
27.
CO Alarms........................................................................................................................................10
28.
Fault Findings...................................................................................................................................11
2
Consumer Protection Act 1987
As responsible manufacturers, we take care to make
sure that our products are designed and constructed to
meet the required safety standards when properly installed and used.
Firebricks, Fuel beds, Fuels - when handling use disposable gloves.
Fire Cement - when handling use disposable gloves.
In case of skin contact wash immediately with plenty of
water.
IMPORTANT NOTICE: PLEASE READ THE ACCOMPANYING WARRANTY: Any alteration that is not approved by AGA, could invalidate the approval of the
appliance, operation of the warranty and could also affect your statutory rights. Use only authorised replacement parts.
Glues and Sealants - exercise caution - if these are
still in liquid form use face mask and disposable gloves.
Glass Yarn, Mineral Wool, Insulation Pads,
Ceramic Fibre, Kerosene Oil - may be harmful if
inhaled, may be irritating to skin, eyes, nose and throat.
When handling avoid inhaling and contact with skin or
eyes. Use disposable gloves, face-masks and eye protection. After handling wash hands and other exposed
parts. When disposing of the product, reduce dust with
water spray, ensure that parts are securely wrapped.
All local regulations including those referring to national and European standards need to be complied
with when installing the appliance.
Control of Substances - Health and Safety
Important
This appliance may contain some of the materials that
are indicated. It is the Users/Installers responsibility to
ensure that the necessary personal protective clothing
is worn when handling, where applicable, the pertinent
parts that contain any of the listed materials that could
be interpreted as being injurious to health and safety,
see below for information.
Hanlding Adequate facilities must be available for loading, unloading and site handling.
Asbestos
This stove contains no asbestos. If there is a possibility
of disturbing any asbestos in the course of installation
then please seek guidance and use appropriate protective equipment.
SCHEMATIC
3
1.
Blanking Plate
2.
6” Flue Box
3.
Trivet
4.
Hob
5.
Towel Rail
6.
Oven Thermometer
7.
Main Oven Door
8.
Front Cleaning Door
9.
Warming Oven Door
10.
Base Frame
11.
Ashpit Door
12.
Boiler Thermostat
13.
Riddling Cover
14.
Fire Door
15.
Hotplate
16.
Cleaning Panel to Hotplate
17.
Hotplate Covers
18.
Flue Damper
Fig.1
SUMMER OPERATION
(i.e. when Central heating is not in use).
The fire-box of this cooker can not be modified to
reduce the boiler output while cooking. Therefore if
cooking is carried out during the summer months then
adequate dissipation of the heat produced be allowed
for in your central heating circuit to ensure that the hot
water within the circuit does not boil.
By-pass
Position
RECOMMENDED FUELS
All fuels should be stored under cover and kept
as dry as possible prior to use. This appliance has
been tested using manufactured briquetted smokeless fuel (Ancit) for closed appliances, sized between
20g and 140g and wood logs. Other fuels are
commercially available and may give similar results.
Wood logs up to 380mm long are suitable. All fuels
should be stored under cover and kept as dry as
possible prior to use.
Cooker
Position
LIGHTING THE FIRE
Do not use fuels with a Petro-coke ingredient as this
may cause the grate to overheat, causing damage.
Reduced outputs will result when fuels of lower
calorific values are used. Never use gasoline or
gasoline type lantern fuel, kerosene, charcoal lighter
fluid or similar liquids to start or freshen up a fire in
this heater. Keep all such liquid well away from the
heater at all times. Operate the stove only with the
fuelling door closed except for re-fuelling.
Fully open the thermostat and set the flue damper to
by-pass, kindle with paper and sticks in the usual way
and ignite by using a taper or rolled wad of paper inserted into the ashpit. Under no circumstances should
any inflammable liquid i.e. petrol, paraffin etc. be used
to light the fire. When the fire is well established close
the direct damper fully and keep it closed. Add fuel to
the firebox as required and adjust the thermostat to
suit the current requirements. The cooker should not
be used as an incinerator.
OPERATION
FUELLING
Before lighting the fire move the flue damper position
to ‘by-pass’ this will allow flue gases to the chimney
unobstructed, when the fire is established the damper
position can be moved to cooker. See Fig.1
When fuelling set the flue damper to by-pass as this
will help to eliminate smoking. Afterwards be sure to
reset the flue damper to the required setting. Never
pack fuel tightly or fill the firebox to capacity. A lower
level fire is more effective particularly in regard to
water heating efficiency. The maximum fuel level is
up to the bottom of the firebox door and rising upwards at a 30o angle towards the back of the firebox.
CONDENSATION
If the appliance is run for extended periods on a low
fire, especially when burning wood or peat the fire can
cool down to such an extent that vapour in the flue
gases may condense. This will make the inside of the
flue damp so that the soot sticks to the flue and the
tarry mixture formed may drip down into the appliance. It is always a good idea to run at a high rate
4
whenever possible, because it is so easy to light, a
lot of people, especially in the Summer, run the appliance for just a few hours with a strong roaring fire.
The appliance is then allowed to die until the hot
water is used up and then is relit. From the appliance
and flue point of view, this is a better technique than
running a low fire continually. (Fig. 1 & 2)
ASH REMOVAL
Some attention should be paid to the amount of ash
that is allowed to build up in the firebox. Wood has
better burning characteristics if a bed of ash is allowed to build up, riddling only being necessary to
level up the fire (for cooking, for example). Coal or
smokeless fuels, on the other hand, burn better if they
are well riddled to allow a good airflow to the fire. For
slow combustion it is better to have a thicker ash bed
for all fuels. Therefore, do not riddle the fire before
slowing it down for overnight burning, but riddle it if
required in the morning or before cooking.
Fig.2
When using anthracite or coal avoid excessive firing
conditions. High temperatures are unnecessary and
can do serious harm to the cooker. The first indication
that overheating is taking place will be the formation
of clinker (melted ash) in the firebox and this should
be removed immediately otherwise damage will occur
to the firebars and cooker components and any damage here should be repaired without delay.
ASHPAN
The ashpan must be emptied as required otherwise
ash will build up to a point where it interferes with the
natural flow of cool air through firebars and as a consequence these will be damaged.
Fig.3
Fig.4
Riddling
Cover
Control
Knob
EXTERNAL RIDDLING
THERMOSTAT WITH MANUAL OVERRIDE
Lift the riddling cover on the ash door and insert the
operating tool into the hole until it engages with the
spigot on the grate and move vigorously. In addition
it is also recommended that the firebed itself be thoroughly raked at intervals thus loosening up such debris as clinker, stones, etc. which are then easily
removed. (Fig.3).
The air supply to the fire is controlled by the thermostat probe inserted into the boiler and the control knob
attached to the ash door.
The automatic thermostat has 6 settings which control
the heat to which the boiler water will rise for central
heating purposes. Setting 0 will close the thermostat,,
setting 3 will give a nominal burning rate of 21/2 to 3kg
per hour of house coal. Setting 5 will give maximum
water heating and high oven temperatures.
5
The thermostat will close down when the water
reaches the temperature chosen by the selected setting, it will close fully when the water temperature
reaches 90 - 95o C when set at 5 - to prevent boiling.
Heated secondary air enters the firebox through a
spin valve in the firedoor back plate while the valve is
open to assist combustion of smoke volatiles.
Close when burning anthracite. (See Fig.6)
(See Fig. 5)
ASHDOOR SPIN VALVE
The thermostat manual override has 4 settings which
retain the air flap in a predetermined open position for
steady heat when baking and cooking. It will only
close fully when the water temperature reaches 90 95o C when set at 5 - to prevent boiling.
The ashdoor spin valve allows additional air to the
firebox for marginal draught conditions. This can be
adjusted to suit your requirements. Close when setting the cooker for overnight burning. (See Fig.7)
Fig.5
Fig.7
Spin Valve
BOILER INSULATING PLATE
This plate is fitted by removing the hotplate and sliding the insulating plate down between the boiler and
oven side. Make sure that the spacing projections are
facing the oven and the top flange is resting on the
boiler. Replace the hotplate.
OVERNIGHT BURNING
There is a small air bypass into the ashdoor and this
is normally sufficient when the thermostat is closed to
hold the fire at least 10 hours after banking. If the fire
is out and the fuel unburned set the control knob of
the thermostat from 1/2 to 1 in order to sustain
overnight burning.
The boiler insulating plate may be used with the summer plates or on its own as a means of reducing the
boiler output and increasing the heat to the oven.
(See Fig. 8)
Fig.8
FIREDOOR SPIN VALVE
Fig.6
6
2.
Insert the support legs (item 1) through the
fire door and rest them on the shaker grate
support lugs. To lock support legs into
position, fit legs as per fig. 15.
To obtain a reduction in boiler output during the summer the Cooker is supplied with a removable summer
grate and cast iron heat shield plates as standard.
3.
Remove the existing rocker grate and stand the summer grate on the supporting legs after inserting it
through the firedoor. Fit heat shield plates as shown
in diagram. (See fig. 9 & 10)
Insert the summer grate (item 2) through the
fire door and rest it on the support legs
(item 1).
4.
Insert the heat shield plates in the following
order - items 3, 4 and 5.
NB.
When using the summer grate and heat
shields it will be necessary to use a poker to
clear ash before refuelling.
SUMMER GRATE & HEAT SHIELD
ASSEMBLY INSTALLATION INSTRUCTIONS
Fig.9
HOTPLATE COVERS
Fig.11
The insulating covers retain most of the heat that
would otherwise be radiated into the kitchen. They
also retain the heat in the hotplates so that rapid heating of cooking utensils will result when one or both of
them are lifted for cooking purposes. (See Fig. 11)
Fig.10
COOKING UTENSILS
For best cooking results use heavy based, flat
bottomed utensils.
USE OF OVENS
CONTENTS
1.
2.
3.
4.
5.
Support legs
Summer Grate
Back Heat Shield Plate
Side Heat Shield Plate
Front Heat Shield Plate
When baking or roasting, set the flue damper to
cooker and open the thermostat fully until the thermometer shows a temperature about 50oF higher
than that which is required. Then close the thermostat to a point where the required temperature is sustained (a little practice will soon show how much
thermostat adjustment is necessary). Much will depend on the strength of the chimney draught. It will
be found that a thermostat setting of 3 will be suitable
in most cases.
QTY
(2)
(1)
(1)
(2)
(1)
Assembly:
1.
Remove the rocker grate through the ashpit
door. Brush down the sides of the fire
chamber and clean out the debris before
fitting the summer grate and heat shields.
The main oven is heated on all four faces. The simmering oven is heated on the top face only.
The temperature will be about half that of the main
oven, for slow cooking, of casseroles, stews, soups
etc.
7
Allow cooker to cool down completely, remove all
loose sections on top of the Cooker, set the flue
damper to by-pass, remove the flue box plate from
the flue chamber and remove the cleaning door from
the front of the Cooker in order to obtain access. Remove the hotplate cleaning panel and hob cleaning
plate, and clean the heat collecting fins on the hotplate. Carbon deposits on these surfaces will reduce
efficiency by up to 20%. All deposits from the flue
pipe and the top of the oven may be brushed both into
the firebox and down the side of the oven.
INTERNAL/FLUE CLEANING
The flue or chimney will need to be cleaned regularly.
How often will depend a lot on how your Cooker is
run, but, to start with, make a point of inspecting the
flue system every one or two weeks
Fig.12
Deposits which have accumulated on the side of the
oven must also be brushed downwards. To remove
the accumulated ash and soot, thoroughly clean out
the residue from the side flues and base plate through
the front cleaning door opening — this operation is
essential otherwise the flow of hot gases will be obstructed and satisfactory oven temperatures will not
be maintained, apart from which such deposits may
contribute to smoking. Replace all the loose parts
which have been removed making sure that all cooking surfaces have been thoroughly cleaned on the underside. (See Figs. 12, 13 & 14).
This period may well be extended as time goes by if
there is little sign of deposits. Some people find they
need to sweep the flue every six to eight weeks but a
longer period is more normal and in some cases this
may be as long as 12 months.
Fig.14
For most efficient heat transfer to water jacket, all surfaces that come into contact with the flue gases
should be kept clean. Regular cleaning will maintain
the efficiency of the unit. Use the scraping tool to remove deposits from the inside surfaces of the firebox,
the flue ways and top water tube. Regularly look at
the top and side of the oven by removing the hotplate
cleaning panel and removing the deposits with
scraper. To help keep deposits to a minimum, it is a
good idea to have a fast fire for 15 minutes at least
once a week. Loose deposits will be scoured off and
will make the necessity of cleaning out less frequent.
GRATE REMOVAL
Fig.13
Lift the back of the grate and push it in towards the
back of the boiler until the front of the bars pass the
front casting. Tilt the grate up on the right hand side,
drop down the left hand side towards the back of the
boiler and pass the grate through the opening in the
front casting, taking care not to damage the enamel.
Every week, depending on the type of fuel used, it will
be necessary to take off the cleaning access plates
to remove deposits. The procedure is as follows:
8
CLEANING
OPENING COOKER DOOR
IMPORTANT: BE CAREFUL OF THE HOT APPLIANCE.
1. To Open Door Lift handle and pull door open. See
Fig. 15.
General cleaning must be carried out when the
cooker is cool.
Fig.15
Stanley cookers are finished in a high gloss vitreous
enamel. To keep the enamel in the best condition observe the following tips:
1. Wipe over daily with a soapy damp cloth, followed
by a polish with a clean dry duster.
2. If milk, fruit juice or anything containing acid is
spilt on the hob or down the cooker, be sure to
wipe it immediately or the vitreous enamel may
be permanently discoloured. Jam and preservatives containing sugar can permanently damage
the vitreous enamel.
2. To Close Door - Lift handle, push door closed,
press down to engage latch and release. See
Fig.16.
3. Keep a damp cloth to hand while cooking, to wipe
up any spills as they occur, so they do not harden
and become more difficult to remove later.
Fig.16
4. If spills do become baked on, a cream cleanser
can be used. For stubborn deposits a soap impregnated pad can be carefully used on the vitreous enamel.
5. Use only products recommended by the Vitreous
Enamel Association, these products carry the Vitramel label.
6. In the oven, spills and fat splashes are carbonised at high temperatures: occasionally brush
out with a stiff brush. The shelves can be soaked
and cleaned with a cream cleanser.
NOTE - DO NOT SLAM SHUT THE DOORS
AS THIS WILL LEAD TO DAMAGE TO THE
DOOR HANDLES.
7. Both insulating covers should be raised and allowed to cool before cleaning the enamel with a
soapy damp cloth. Use a wire brush to keep the
cast iron hotplate clean.
AIR SUPPLY
A permanent unobstructed air vent communicated
directly to outside air or an adjacent room which itself
has a permanent air vent to outside is required.
DO NOT USE ABRASIVE PADS OR OVEN CLEANERS CONTAINING CITRIC ACID ON ENAMELLED SURFACES. ENSURE THAT THE CLEANSER MANUFACTURERS INSTRUCTIONS ARE ADHERED TO.
Any air inlet grilles must be positioned so that they are
not liable to blockage.
It is not permissible to use an air extraction device in
the same room as the appliance, unless additional
ventilation is provided to prevent any adverse effect
on the flue.
9
Effect of Extractor Fan
Avoid if possible the installation of an extractor fan in
the same room as the cooker. Compensating air inlets
must be introduced equivalent to the capacity of the
fan when fitted.
5. If possible, wet down the roof and other outside
combustibles to prevent fires ignited by shooting
sparks and flames.
6. Closely monitor all combustible surfaces near the
chimney. During severe chimney fires, these
surfaces can become hot enough to ignite.
COOKER CLEARANCE
After a chimney fire, have the chimney inspected by
a professional chimney sweep or cooker installer.
The Cooker should not be installed at zero clearance
to combustible materials. The sides should have a
minimum clearance of at least 7.5 cm (3”) from combustible materials unless otherwise fully insulated.
CO ALARMS
Building Regulations require that whenever a new or
replacement fixed solid fuel or wood/biomass appliance is installed in a dwelling a carbon monoxide
alarm must be fitted in the same room as the appliance. Further guidance on the installation of the carbon monoxide alarm is available in BS EN
50292:2002 and from the alarm manufacturer’s instructions.
This cooker is supplied with a back filler piece which
should be used with fitting the cooker between kitchen
units. This filler piece is mounted to the wall behind
the cooker using the appropriate screws and rawl
plugs (not supplied) and allows adequate clearance
from the front of the cooker to the front of the kitchen
units for door opening (see Fig.5 & 5a)
Provision of an alarm must not be considered a
substitute for either installing the appliance correctly or ensuring regular servicing and maintenance of the appliance and chimney system.
CHIMNEY FIRES
Prevention: Chimney fires do not occur in clean, intact, properly installed chimneys. Have a professional
chimney sweep clean and inspect your appliance at
least once a year. More frequent cleaning may be required, based on the type of fuel burned and the frequency of use. In general, an older appliance or one
that is used frequently, will require more than one
clean per year.
Your installer should have fitted a CO alarm in the
same room as the appliance. If the alarm sounds
unexpectedly, follow the instructions given under
“Warning Note” below.
WARNING:If the CO Alarm sounds unexpectedly:-
Detection: The first indication of a chimney fire is
usually the noise - a roaring sound grows louder as
the fire’s intensity increases. Clouds of black smoke
and sparks will be seen exiting the top of the chimney;
in severe fires, flames can extend several feet about
the chimney.
1. Open Doors and windows to ventilate the
room and then leave the premises.
2. Let the fire go out.
Action: In case of a chimney fire follow these steps
but do not put yourself or others in peril:
1. Call the fire brigade immediately.
2. Get everyone out of the property.
3. Close down the air supply to the appliance i.e. the
primary air spinner and the flue damper. Limiting
the fires air supply will reduce its intensity. If there
is a damper in the chimney connector, plug or
close the opening.
4. If a fire extinguisher is available, open the
appliance door just enough to insert the nozzle of
a 10lb, dry chemical fire extinguisher rated for
Class ABC fires. Discharge the entire content of
the fire extinguisher into the appliance and shut the
door.
10
FAULT FINDINGS
1.
Poor Chimney Draught
(a)
(b)
(c)
(d)
(e)
2.
Excessive Chimney Draught
(a) High Chimney
(a) Open Flue Cover of fit Draught Stabiliser
3.
Down Draught
(a) High Trees
(b) High Buildings
(c) Negative Pressure Zone
(a) Raise Chimney Height
(b) Raise Chimney Height
(c) Fit Cowl
4.
Cooker Smoking
(a)
(b)
(c)
(d)
(a)
(b)
(c)
(d)
5.
Hot Plate Not Heating
(a) Soot Under Hot Plate
(b) Fire too Low
(c) Utensils not Flat
(a) Remove and Clean
(b) Build better Fire
(c) Use machined based Utensils
6.
Oven Not Heating
(a)
(b)
(c)
(d)
Poor Chimney Draught
Flueways blocked with soot
Damper open to Chimney
Faulty Thermostat
(a)
(b)
(c)
(d)
Raise Height or Fit Cowl
Clean Out
Close Damper
Check and replace if necessary
7.
Radiators Not Heating
(a)
(b)
(c)
(d)
(e)
Pump not Working
Air in Radiators
Pipe System Faulty
Excessive Number of Radiators
Radiator Valves not adjusted
(a)
(b)
(c)
(d)
(e)
Check and replace if defective
Vent Radiators
Check Pipe Sizes and Circuit
Turn off un-needed Radiators
Adjust Valves to give even flow
8.
Domestic Hot Water Cylinder
not heating
(a)
(b)
(c)
(d)
(e)
Cylinder too Large
Flow Pipe too small
Flow Pipe crossed
Cylinder too far away
Hot water from boiler not
reaching cylinder
(a)
(b)
(c)
(d)
(e)
Use 135 - 180 L Cylinder
Use 25mm Bore Pipe
Reverse Flow Pipe
Not more than 7.8m fully lagged.
Adjust Flow Control Valves or
fit injector tee.
9.
Intermittent Performance
(a) Cooker starved of Primary Air
(b) Extraction Fan in room
(c) Cooker subjected to wind
change
(d) Dirty Flueways
(e) Poor Fire
(f) Uncontrolled Burning
(d) Clean Flueways Frequently.
(e) Burn more Fuel
(f) Repair or Replace Thermostat
(a) Leak in Indirect Cylinder Coil
(b) Incorrect Cylinder Fitted
(a) Replace Cylinder
(b) Check with installer
10.
Domestic Hot Water Rusty
Obstruction
Too Low
Too Wide
Crack in Wall
Shared by another unit
Insufficient Primary Air
Chimney Choked
Side Flueways Choked
Down Draught
(a)
(b)
(c)
(d)
(e)
Clear and Clean
Raise Height above Ridge
Fit Flue Liner 15 to 23 c.m.
Repair Cracks
Cut of other Unit.
Provide Room Air Inlet
Clean Chimney
Clean Flueways
Raise Chimney Height
(a) Provided Air Inlet in Room.
(b) Provide additional Air Inlet in room
(c) Raise Chimney of Fit Cowl
It is of the utmost importance to keep the flue pipe and chimney clear of deposits by regular sweeping of the
chimney irrespective of whether the fuel used is classed as smokeless or not. All fuels give rise to soot or ash
deposits and regular cleaning is essential for safe operation.
Blocked or partially obstructed flueways and chimneys will cause dangerous fumes to be emitted into the room,
these may well be invisible if a smokeless fuel is burned.
11
With AGA Rangemaster’s policy of continuous
product improvement, the Company reserves the
right to change specifications and make modifications to the appliance described at any time.
Manufactured by
AGA Rangemaster
Station Road
Ketley Telford
Shropshire TF1 5AQ
England
www.rayburn-web.co.uk
www.agacookshop.co.uk
12