1
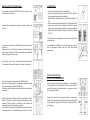
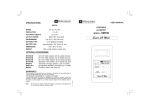
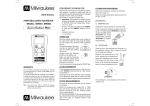
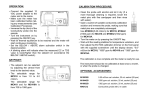
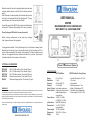
Mount the bracket in the wall in upright position above the water
container (which contains a solution of pH reducing acid and
water).
Place the pump in vertical position (with the tubes below) on the
wall, above and centered with the “Mounting bracket“. Then go
down the pump until it is joined with the bracket.
USER MANUAL
MC720
Connect the pump to the MC122 pH controller (on the black and
white outlet). The pump will discharge 0,08 cL every 2 seconds.
MILWAUKEE MC122 PH CONTROLLER
WITH MP810 1,5 L/H DOSING PUMP
Place the plug and B/W outlet far away from water!
Before servicing (maintenance) on the pump (e.g. changing
tube), please disconnect the equipment.
It is suggested to dissolve 10 cL of pH reducing acid in a 5L container of mineral water.
Depending on the volume of your tank and the brand of you pH reducing acid (if it is
more or less concentrated), this quantity will be balanced. It is better to dissolve more
than less. It is suggested to use an airstone on the bottom of your tank. The pump can
be attached directly to the container of the solution.
OPTIONAL ACCESSORIES:
M10004B
M10007B
M10010B
M10000B
MA9015
pH 4.01 buffer solution, 20 ml sachet (25 pcs)
pH 7.01 buffer solution, 20 ml sachet (25 pcs)
pH 10.01 buffer solution, 20 ml sachet (25 pcs)
Electrode rinse solution, 20 ml sachet (25 pcs)
Electrode storage solution, 20 ml sachet (25 pcs)
WARRANTY:
These instruments are warranted from all defects in materials and manufacturing for a period of two years
from the date of purchase. The electrode is warranted for a period of 6 months.
If during this period, the repair or replacement of parts is required, where the damage is not due to negligence or erroneous operation by the user, please return the parts to either dealer or our office and the repair
will be effected free of charge.
Note: We reserve the right to modify the design, construction and appearance of our products without advance notice.
www.milwaukeeinst.com
Smart Monitoring System
SPECIFICATIONS
MC122 pH Meter
Range
Resolution
Accuracy
Setpoint
Alarm / Output
Power Socket
Power drivers
pH electrode
Environment
Power supply
Dimensions
Weight
0.0 to 14.0 pH
0.1 pH
±0.2 pH (@25°C)
5.5 to 9.5 pH
active when measure is
higher/lower than selected
setpoint depending on
user selection
115VAC, 2A, 60Hz
or 230VAC, 1A, 50Hz
MA911B/2 (included)
0 to 50°C, 95% RH
not condensing
12 VDC (included)
148.5 x 82.5 x 32 mm
180 g
MP810 Peristaltic Dosing Pump
• Constant Dosing flow of 1,5 l/h
(25 cc/min)
• No regulation
• Maximum pressure: 1 bar
• Made of Polipropilene (PP)
• Peristaltic tube in Santoprene
• Power supply: 230 VAC ± 10%
INSTALLATION OF CONTROLLER:
CALIBRATION:
Connect the supplied 240VAC/12VDC power adapter to the
meter and to the main line.
• Remove the protective cap from the electrode.
• Immerse the electrode tip into a new sachet of pH 7 calibration
solution and allow the reading to stabilize.
• Adjust the pH7 calibration trimmer (on the front) to display “7.0
pH”.
• Rinse the electrode with tap water and dry it with paper tissue.
• Open a new sachet of pH 4 calibration solution, immerse the
electrode tip into the sachet and allow the reading to stabilize.
• Adjust the pH4/10 calibration trimmer (on the front) to display
“4.0 pH”.
Connect the connection base (black and white outlet) to the
main line.
The calibration is now complete and the meter is ready to take
measurements.
Connect the pH-electrode to the BNC socket on the bottom of
the meter.
Always remove the electrode protective cap before taking any
measurement. Make sure that the meter has been calibrated
before taking any measurements
It is suggested to recalibrate the meter at least once a month,
after a prolonged stocking time and after pH-electrode
replacement.
Immerse the tip (2.5 cm) of the pH-electrode into the sample.
(for example it can float with the help of a piece of polystyrol).
Turn the instrument on by pressing the ON/OFF button.
The nature of the setpoint can be selected by setting the switch
to the desired position (ABOVE or BELOW).
Allow the reading to stabilize and the meter will start continuous
monitoring.
A blinking alarm will indicate when the measured pH value is
higher or lower than selected setpoint, depending on user
selection. When the alarm is activated, it also activates the
connection base and the auxiliary equipment.
The setpoint can be selected by adjusting the central front knob
to the desired value. The selectable range is from 5.5 to 9.5 pH.
INSTALLATION OF THE
MP810 1,5 L/H DOSING PUMP
Connect the rigid tube to the pump (aspiration – arrow upwards).
Fix the white filter on the other end of the tube, where the dissolved pH reducing acid will be drawn in – to prevent small objects entering the pump.
Connect the soft tube to the pump (impulsion – arrow downwards). The injection fitting will be placed at the end of this tube
only to inject into a piping. (This fitting has a thread that links it
to the piping.)