1
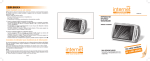
Edited by Foxit PDF Editor
Copyright (c) by Foxit Software Company, 2004
For Evaluation Only.
User Manual
Double Din Car Navigation & Entertainment System
English
Before operating the unit, please read this manual carefully and keep it properly for future reference.
Edited by Foxit PDF Editor
Copyright (c) by Foxit Software Company, 2004
For Evaluation Only.
[ CONTENT]
1. FEATURE INSTRUCTION - - - - - - - - - - - - - - - - - - - - - - - - - - - - - 2
2. USAGE CAUTIONS - - - - - - - - - - - - - - - - - - - - - - - - - - - - - - - - - - 3
3. SAFETY ATTENTION - - - - - - - - - - - - - - - - - - - - - - - - - - - - - - - - - 4
[ STEERING WHEEL CONTROL]
* Voltage value of the buttons on steering wheel:
4. PANEL FUNCTION DEFINITION - - - - - - - - - - - - - - - - - - - - - - - - 5
( Volage range)
5. RE-SETTING UNIT - - - - - - - - - - - - - - - - - - - - - - - - - - - - - - - - - - 5
6. BASIC OPERATION- - - - - - - - - - - - - - - - - - - - - - - - - - - - - - - - - - 6
7. OPERATION INSTRUCTION- - - - - - - - - - - - - - - - - - - - - - - - - - - 8
7.1
MAIN INTERFACE OPERATIONS - - - - - - - - - - - - - - - - - - - - - - 8
7.2
RADIO INTERFACE OPERATION- - - - - - - - - - - - - - - - - - - - - - 9
7.3
DVD INTERFACE OPERATION- - - - - - - - - - - - - - - - - - - - - - - 10
7.4
TV INTERFACE OPERATION - - - - - - - - - - - - - - - - - - - - - - - - 14
7.5
IPOD INTERFACE OPERATION- - - - - - - - - - - - - - - - - - - - - - 15
7.6 EXTERNAL CONNECTION VEDIO INTERFACE OPERATION --16
7.7
BLUETOOTH INTERFACE OPERATION - - - - - - - - - - - - - - - 17
7.8
SYSTEM PARAMETER INTERFACE SET - - - - - - - - - - - - - - - 19
8 .
REAR VIEW OPERATION - - - - - - - - - - - - - - - - - - - - - - - - - - - 21
9.
CLOSE SCREEN OPERATION - - - - - - - - - - - - - - - - - - - - - - - - 21
10.
GPS OPERATION - - - - - - - - - - - - - - - - - - - - - - - - - - - - - - - - - 21
11.
GPS PARAMETER - - - - - - - - - - - - - - - - - - - - - - - - - - - - - - - - 52
12.
REMOTE CONTROL - - - - - - - - - - - - - - - - - - - - - - - - - - - - - - - 53
* Typical circuit graphic
Connect the control
wire to the steering
13. AUDIO KNOWLEDGE - - - - - - - - - - - - - - - - - - - - - - - - - - - - - - 55
14.
TROUBLESHOOTING SOLUTION - - - - - - - - - - - - - - - - - - - - 58
15.
MAIN FUNCTION- - - - - - - - - - - - - - - - - - - - - - - - - - - - - - - - - - 60
16.
CIRCUIT CONNECTION- - - - - - - - - - - - - - - - - - - - - - - - - - - - 61
17.
STEERING WHEEL CONTROL- - - - - - - - - - - - - - - - - - - - - - - 62
ATTENTION:
When installation, take off the two
screws for anti- shock of deck at first.
62
Edited by Foxit PDF Editor
Copyright (c) by Foxit Software Company, 2004
For Evaluation Only.
[ CIRCUIT CONNECTION]
[ FEATURE INSTRUCTION]
GPS antenna jack
TV antenna jack
IPOD connection
GPS connection
Radio antenna jack
3
2
1
Fuse box (15A)
C YELLOW
3
B GREEN
It has internal Bluetooth function, which can answer and dial the phone
conveniently to make your driving safe. At another hand, if mobile phone has
A2DP function, it can play music when Bluetooth is on.
1
1 3 5 7
2 4 6 8
It supports external IPOD playing.
WIRE WIRE-TERMINAL FUNCTION WIRE WIRE-TERMINAL
3
A1
A2
A3
A4
A5
A6
A7
A8
B1
B2
Grey-White
Brown-White
Black-White
/
Black-Yellow
Grey-Red
Brown-Red
Black-Red
Black-Yellow
Grey-Yellow
FL
RL
LIN
GND
CAM
FR
RR
RIN
Vout 1
Vout 2
1
2
WIRE COLOR
FUNCTION
1
Brown Manual brake close screen testing line
Back draft radar testing line
2
Pink
3
4
5
6
7
8
61
Red
Blue
Orange
Yellow
Black
FUNCTION
B3
/
GND
/
B4
/
B5 Brown-Yellow
Vin1
B6 Black-Yellow
Vin2
C1
/
/
C2
/
/
Steering-GND
C3
Black
Blue
C4
IR IN
Steering-key1
C5
Green
Steering-key2
Grey
C6
ACC power
AMP control
Illumination
Battery 12V
Ground
WIRE
1
2
3
4
5
6
7
8
COLOR
Purple
Purple/black
Grey
Grey/black
White
White/black
Green
Green/black
FUNCTION
Right Rear speaker
Right Rear speaker
Right Front speaker
Right Front speaker
Left Front speaker
Left Front speaker
Left Rear speaker
Left Rear speaker
It adopts 16: 9 HDTFT that is drove with the advanced microprocessor, and
possesses flow eri ness col or, l ow er pow er dissi pation and rel iabl e
performance.
It has an automatic detection backup function to make your backup safe.
It has two video output lines , four audio output lines; two video input lines, one
audio input line, so it can connect with external device conveniently;
It' operation system is intelligent and humanistic. It has graphic OSD, not only
be operated on panel function buttons but also on TFT touching icons, even
using TX to control.
It supports external steering-wheel control without damaging the original car's
function to make driver more convenient.
It has manual brake close screen function. When the manual brake close
screen line connect to ground, the unit may turn on TFT, otherwise to turn off
TFT.
In order to install and use correctly, please read the manual carefully.
PRODUCT INTRODUCTION
1 3 5 7
2 4 6 8
Its internal DVD player adopts the high quality DVD deck, which can play
DVD、DVD-9、VCD、DVCD、CD、MP3、CD-R/RW formats etc.
The radio can memorize the AM 12 stations and FM 18 stations.
A BLUE
321
21
21
43 54
43
876
65
65
2
The AV unit provides DVD, RADIO , GPS(optional), external IPOD,
AV(output/input), BLUETOOTH, HD TFT , BACKUP VIEW and the standard
POWER OUTPUT(50wx4 ) of function integrated.
Edited by Foxit PDF Editor
Copyright (c) by Foxit Software Company, 2004
For Evaluation Only.
[USAGE CAUTIONS]
1. The unit only support the format of MP3/WMA/JPEG/MPEG which recorded in
DVD-R, CD-R, CD-RW, SD and USB .
2. When you want to format the media device to delete the file, you should use
common format, not use fast format, avoiding damage the devices such as USB
and SD etc.
3. The setting for MP3/WMA/JPEG/MPEG encoder and CD/DVD recorder.
Using MP3/WMA encoder to compress the audio data into MP3/WMA format ,
please set the parameters as following:
The Bit Rate of transmitting is: MP3:32-320KBPS
WMA:48-192KBPS
The frequency of sampling is: MP3:32,441.48KHZ
WMA:32,441.48KHZ
Using JPEG/MPEG encoder to compress the AV data into JPEG/MPEG format ,
please set the parameters as following:
JPEG/MPEG :
JPEG display zone dimension:
Baseline format: 1024(W) X768(H) pixel (MAX)
Continuous format: 1024(W) X768(H) pixel (MAX)
MPEG
Video format: MPEG1, MPEG2
Display zone dimension:
MPEG1: 320X240,352X240(NISC),352X2889(PAL)
MPEG2: 40X480,740X480(NTSC),704X576(PAL)
Audio format: MPEG1, MPEG2
The Bit Rate of transmitting is:2-384KBPSCBR
The frequency of sampling is:32441.48 KHZ
WMA:32441.48 KHZ
4.When you use disc recorder to record the multimedia file of
MP3/WMA/JPGE/MPEG, if the quantity of the multimedia file is too large, you can't
record in one disc fully, please add a disc.
5.If you use part of function of Windows Media player 9.0 edition above, may not
be able to play the detailed information of compatible format normally at some
time.
Main Function :
w o r k v o l t a g e : DC 12V
W o r k v o l t a g e Range : 10.8V – 16V
M A X W o r k C u r r ent : 10A
B u i l d - i n A n g le ; Front & Back angle ≤30°
DVD/CD PLAYER
S u p p o r t e d F i le Formats: DVD-R, DVD-RW, DVD+R, DVD+RW, CD-R, CD-RW, CDD A , M P 3 , W M A , H DCD, SVCD, VCD, MPGE, JPEG
IMPORTANT INFORMATION
IMPORTANT INFORMATION
MP3/WMA:
[ MAIN FUNCTION]
A U D I O S / N - - - ---------85dBA
A C T B O U N D - - - --------95Db
F r e q u e n c y R a n ge --------20Hz -20kHz
D i g i t a l A u d i o Sample-------24bit
ESP:
- - - - - - - - - - - ---DVD 2-3s
- - - - - - - - - - - ---CD-DA 10s
- - - - - - - - - - - - --MP3 100s
- - - - - - - - - - - ---WMA 200s
M S P : - - - - - - - --------10-200Hz,X/Y/Z : 1.0G
P o w e r O u t p u t : ---------------50W×4 Impedance:4Ω
S / N R a t i o : - --------------70dBu
F r e q u e n c y R a nge : -------------20Hz -20kHz
Video
S y s t e m : - - - ---------NTSC, PAL (Auto identify)
O u t p u t : - - - - --------1Vp-p(75Ω)
I n p u t : - - - - --------1Vp-p(75Ω)
FM
F r e q u e n c y : ------------ 87.5 MHz – 108.0MHz
S e n s i t i v i t y (-30dB):-----------15dB
S / N R a t i o : (-50dB):-----------60dB
F r e q u e n c y R a nge : -------------30Hz -15kHz(3dB)
AM
F r e q u e n c y R a nge : -------------522kHz -1620kHz
S e n s i t i v i t y ( SN=20dB):-----------20dBu
I m a g e r e j e c t i on:------------60dB
F r e q u e n c y : - ------------50Hz-2kHz
60
Enter the system setting,tune the TV parter audio to a
relevant value
At present,our nation’s TV system is PAL-D or
PAL-K,it is PAL-I in Shenzhen and Zhuhai,their
partner frequency are not alike.
PAL-D is 6.5M PAL-I is 6M
TV has only images but not
has novoice
Close the PCB function
The function of the PCB is in circulating
There are no repeat and search
function when play VCD
SD card can read on computer, Because of the compatible reason of SD brand, Replace another SD card
not all of the SD cards can read in this system
but can not read on the unit
The grade is exceed the locked function set
The exetent code is not compatible
CD put on the contrary
CD can not up to snuff
Tune the set grades’ clock function
Use the CD compatible with the unit
]Keep the side with label when enter the CD
There is no CD in the unit
CD can not enter
Exit the CD in the unit then enter a new one
Nonlice operation
Wrong or no motion
Press the JECT for 5seconds to reset the read CD device
Information is more than the contents that
can be display
Display wrong play
information
Information is more than the contents that
can be display
CD was pollued or damaged
File or notes damaged
Clean or replale the CD Instead the CD or choice a new storage file
6.The order of playing MP3/WMA/JPEG/MPEG
Appear stop page in playing
progress
cause
Problems
[TROUBLE SHOOTING]
59
If the size of the picture exceed the limit, part of the picture will not display.
When you record the MPEG2 data using DVD media, you must set the Recording
Format to one time using only.
The unit seeks the multimedia files or folder in natural number. So it play in natural
number from small to big. If your multimedia file is recorded, and its file name is not
named as per Arabic numbers (eg: 1.XXX, 2.XXX), the unit will not seek and play in
order, and it will enter the status of seeking and playing random automatically.
[ SAFETY ATTENTION]
Before installation, please read all the instruction, and suggest you‘d better let the
AV professional install the unit.
The unit adopts 12V car power system which must connect to ground.
Please don't install it on truck or bus with 24V directly, or will be damaged.
You'd better use legal disc, rather than nonstandard disc or bad quality
disc; otherwise, it may cause trouble-shoot and reduce using life of the
unit.
Without professional guidance, you mustn't exchange the power fuse or
use some unsuitible fuse, otherwise, it will cause the unit damaged even
fired.
Avoiding violate the traffic rule, the driver can't enjoy program and operate
the unit when driving.
For safety and the normal using of the unit, please ask the professional to
install and repair it, at the same time to avoid damaging unit and the
accident at the same time. Needing detailed information to consult the
local professional retailer of AV products.
Don't place the unit in the wet environment or water, avoiding electric
shock as the result of short circuit, or other unnecessary damage and fired.
Cozy Hint:
In order not to avoid short circuit, please cut off car and the
connection of ACC and B+ before installing.
PRODUCT INTRODUCTION
IMPORTANT INFORMATION
Solution
Edited by Foxit PDF Editor
Copyright (c) by Foxit Software Company, 2004
For Evaluation Only.
OPERATION INSTRUCTION
BAND
Band Button
2
Eject Button
12
LOUD
Loud Button
9
VOL+/-
10
RST
3
MENU
Menu Button
13
AS/PS
Automatically Search And Mamory Button
4
MODE
Mode Conversion
14
AUDIO
Audio Adjustments Button
5
MUTE
Mute/Close
Screen Button
15 SMART DIAL/ENT Smart Dial/enter
6
Up Choice
16
9
7
Down Choice
17 USB/SD USB/ SD Card Operation
8
Select Button
18
IR Lens
Volume + /- Button
19 MIC/
Microphone Bluetooth
Reset Button
[RESET THE UNIT]
1.Must reset the unit before you use it at the first time or you Change the car battery.
2.Must reset the unit when he unit is confused.
3.Press RST button to reset the unit using a tip.
Remark: Pressing RST button will loss clock and memory.
Use real disc
Replace correct speaker
Check speaker line
Check and connect line correctly
Check brake line and connect correctly
Stop car in safe state and keep in brake state
Tune system Video setting
Check and connect correctly
Don’t use bad disc
Speaker and the unit not
have the same power impedanceSpeaker turnoff
Wrong line correct between ACC&B+
Wrong connect thrum with brake line
Not in brake state
Current DVD system set is correspondThe Video
line from main unit is connected properly
Low tone, distortion severity
Automatic reset when the
unit close
No picture
The picture not normal
FM signal faintness
Connect automatic antenna correctly
Close LOCK function
check and correct line
Increase the voice Replace speaker
Tune the balance set to middle place Speaker line keep insulative
Wrong line connect Too low voice Speaker
fault
Voice balance setting warp too large
Speaker has a ground line connect part
Novoice output or voice
output small
Automatic antenna not shoot out completely
Look is in open state
R eplace new battery, Reset battery
Battery has done,
Wrong battery set
Unable to use the remote
IMPORTANT INFORMATION
Radio
Replace correct fuse, Tune voltage, Press the Reset key to reset
the system
The unit power or auto battery fuse is blown.
Power voltage is over the rating rang, system
automatism protect Caused by nonlicet operation
Press the Reset key to
No power
Replace correct fuse Tune voltage
reset the system
ST/ MO Stereo /mono-channel Button
The unit power or auto battery fuse is blown.
Power voltage is over the rating range, system
Automatiion protect caused by nonlicet operation
[ PANEL FUNCTION DEFINITION]
General
Solution
11
cause
Power Button
Problems
1
[ TROUBLE SHOOTING]
Edited by Foxit PDF Editor
Copyright (c) by Foxit Software Company, 2004
For Evaluation Only.
58
Edited by Foxit PDF Editor
Copyright (c) by Foxit Software Company, 2004
For Evaluation Only.
[ BASIC OPERATION]
1. POWER BUTTON
CAN NOT USE DISC
The disk will circumrotate at a high speed in the unit. If you find
the disc break, disrepair, crinkle or with other damages, please
don’t run a risk to use in the unit, which may damage the unit.
The unit can only play natural disc. Don’t play the anomalistic disc. The effect
by playing the anomalistic disc, we don’t bear any responsibility.
When the unit is connected to the power source, you can press any button to turn
on it. At turn on status, you can press this button shortly to shift the main interface
to GPS mode. At this state, audio playing is continuous, and the speaker outputs
the playing sound, external AV maintain output.When GPS has voice hint, the
output of speaker will shift to GPS voice, but the external video output won't shift.
Press this button shortly again, the unit will shift to the current video. Press this
button longer to turn off the unit .
Remark: Note: When GPS is off on the Parameter Interface , press any
button can turn the DVD on after the electricity connected well , press
IMPORTANT INFORMATION
shortly or long this button can turn the DVD off .
2. EJECT BUTTON
ABOUT CD
When input or takeout the disc, don’t left fingerprint, dust or tom
tag. Please hand the inside edge of the disc.
Dirty or disfiguring disc will cause jumping-sound when in
playing. Also to pay attention not scrape the side with label,
however, this side not much easy to damage as the REC side, but
it also can lead it not to use.
If there are fingerprints or dust on the disc surface, clean the
discs with soft dry cloth, follow the picture, wipe from the center
out.
Gently clean as beeline from the center. Don’t clean the disc
surface along circle track. If possible, downright clean the disc
use cloth dipping with alcohol or cleaner which are sold in market
for CD/DVD. Don’t use alcohol, thinner, or other leaner, include
the products designed or clean ethane disc.
3. VOL+/VOL -
BUTTON
In normal playing state, press (VOL+/VOL-) button to adjust current volume. Press
SEL button or touch slightly left end of volume bar of TFT, press VOL+/VOL- again,
it can adjust circularly VOL, BAS, TRE, BAL, FAD, BRI, CON, COL.
4.BAND BUTTON
In the radio mode, press this button to search band circlely as shown: FM1-FM2FM3-AM1-AM2-FM1
In normal playing state, press this button to change mode.
5. MENU BUTTON
Playing DVD, press this button to display song list(number)and playing as per
selected song number(need disc supporting)
6.MUTE BUTTON
Press it shortly to turn off the mute function, press it shortly again or press
VOL+/VOL- button to turn on the mute function . Press it long to turn off the
screen , press any button or touch anywhere turn on the screen.
7. MODE SHIFT BUTTON
Press this button shortly to shift system mode. Press this button long to enter into
external GPS video interface, At this state, external audio output is continuous, and
the speaker outputs the playing sound, only external GPS video shift to TFT
interface. If operating any function on panel, the unit shift to current video
interface. If having not any operations for 5 seconds, the unit will shift to GPS
57
OPERATION INSTRUCTION
Press this button to eject disc automatically, the disc will insert automatically but
not play if isn' t taken away in 10seconds.
Edited by Foxit PDF Editor
Copyright (c) by Foxit Software Company, 2004
For Evaluation Only.
interface automatically. Press mode long, the unit turn off GPS interface and
return to current state.
8. RESET BUTTON
Press it to return to the default setting and memory information will be cancelled.
This player reads the disc deck to use is the inspiration type, puts in gently the
disc the disc eject, the disc by the automatic, the system can read the disc
automatically; In puts the disc before, please deck in the core does not have the
disc piece,only then inserts the disc piece.
Notice:
*Asks you to use the standard original disc,and maintains the disc to be
clean,forms the good use habit, safeguards this system the normal service
life.
*This aircraft accepts the diameter is only the 12 CM disc, please do not
have to put in 8CM as well as the shape irregular disc, if inserts
forcefully can create the card disc and deck the core structure damage.
*On the disc has the character disc on.
10.SEL BUTTON
The sign disc playing zone code
Area1: Usa, Canada, Island On Pacific Ocean East
Area2: Japan, Western Europe, North Europe, Egypt, Southern
Africa, Middle East Nation
Area3: Taywan, Hongkong, South Korea, Thailand
Area4: Australia, New Zealand, South Asia,
Island On Pacific Ocean South, Oceania
Area5: Russia, India, Mongolia, East Europe, Central Asia,
North Korea, North Africa,
Area6: China
IMPORTANT INFORMATION
OPERATION INSTRUCTION
9. DISC WINDOW
Show the selected image scene ratio. “LB” letter box “PB” camera
leans scan. The left picture mean can transfer form the 16:9 image
mail box
STORAGE OF DISC
Touching SETUP INFORMATION can adjust volume. In the state, touch VOL to
adjust volume and effect.
11.
BUTTON
* At radio mode:
When disc is not in using, put it back stand in disc box. Please keep
The Disc away from too cold, wet or heat sources.(including sunshine
sources). Don’t stick paper on tape to the disk, or use disc with
pencil, ball pen or other write tool with tip, Which may hurt the disc.
Pressing it long is manual seeking frequency downwards. When it activated,
pressing it slightly is seeking frequency downwards step by step, pressing it long
is seeking frequency downwards continuously, pressing it shortly is seeking
frequency downwards automatically.
When selected effective frequency, the unit will stop seeking and start to radio.
Don’t let your disc in sunshine or in too hot environment.
* At TV mode
Pressing"<< "button is seek frequency upward.
* At DVD model
Pressing button is seek song or chapter upward.
12.
BUTTON
Don’t use Alcohol, thinner or cleaner which are sold in market, or
water used in gramophone disc more maintenance of disc, please
see the disc explain.
* At radio mode:
Pressing it long is manual seeking frequency upwards. When it activated,
pressing it slightly is seeking frequency upwards step by step, pressing it long is
seeking frequency upwards continuously,pressing it shortly is seeking frequency
Don’t enter many disc in the unit once!
56
Edited by Foxit PDF Editor
Copyright (c) by Foxit Software Company, 2004
For Evaluation Only.
upwards automatically.When seeked effective frequency , the unit will stop
seeking and start to radio.
SUBTITLE
Press it to cut gradually the captions language
* At TV mode
PRG
After press program key, press the digital to input the order of the title/ Songs. Then press
the key
To play.
Pressing " >>" button is seek frequency upward.
* At DVD model
Pressing button is seek song or chapter upward.
13. AUDIO BUTTON
Press this button to adjust mono left/right
[AUDIO KNOWLEDGE]
14.SMART DIAL/ENT BUTTON
Roll right or left to select function, then press for a short time to confirm.
15. LOUD BUTTON
sign knowledge of dvd
12cm diameter Feature
longest time to play
Double-decked(dvd-9)
monolayer (dvd-10)
Double-decked(dvd-18)
242 Minute
266 Minute
484Minute
bosseyed, monolayer (dvd)
mpge2
bosseyed, monolayer
cdda
74 Minute
Press it can open or close loud button,if the loud control is opened,"LOUD"will
display on the screen.
16. TOUCH SCREEN FUNCTION
The used TFT of Unit is touching style. In corresponding OSD interface, touch OSD
icon, you can play or operate corresponding function.
74 Minute
[ FUNCTION OPERATIONS]
SIGN KNOWLEDGE OF DVD DISC
Sign
signification
Show the sound orbit number of disc record, at most eight sound
orbit in one disc
Show the disc can offer with multiple subtitle display.
Show the view angle number of shooting image(at most nine angles)
55
MAIN INTERFACE OPERATIONS
OPERATION INSTRUCTION
IMPORTANT INFORMATION
DVD BASIC KNOWLEDGES
Edited by Foxit PDF Editor
Copyright (c) by Foxit Software Company, 2004
For Evaluation Only.
In main interface, touch any function icon can come into corresponding mode. Press
top right corner
, or COME BACK BUTTON can come back current playing state
.If having not any operations within about 10 seconds, system will automatically
come back to current playing state .
20. PANEL GLIDE DOWNWARD
2. MUTE
21. POWER
3. SELECT STATION/SONG BUTTON
22. GOTO (JUMPS PLAY)
4. ZOOM
23. SETUP
5. NAVIGATIO N
24. NAVIGATION
6. NAVIGATIO N
25. VOLUM STEP UP
7. VOLUM DOWN
26. FREQUENCY STEP UP /NEXT SONG
8. NAVIGATIO N
27. FREQUENCY DEGRESSION
9. MICRO-TUNE DOWNWARD
28. LONG PLAYING
10. MICRO-TUNE UPWARD
29. TITLE DISPLAY
11. STOP
30. CAPTION TRANSFER
12. PLAY/PAUSE
31. TRANSFER LONG DISTANCE TO SHORT
1. MUTE BUTTON
13. PLAYBACK BROADCAST MENU
Press it shortly to turn off the mute function, press it shortly again or press
VOL+/VOL- button to turn on the mute function. Press it long to turn off the
screen. Press any button or touch anywhere on TFT to turn on the screen.
14. SCREEN MENU
2. BAND SELECTION BUTTON
16. RECEIVER AUTO SEARCH/ REPLAY 33. AUDIO
Press it to shift among FM1, FM2, FM3, AM1 AND AM2
17. SEL(AUDIO FREQUENCY CONTROL) 34. ANGLE TRANSFER
3. APS BUTTON
18. MODE(TRANSFER)
35. BLUETOOTH INCEPT
19. GPS
36. PANEL GLIDE DOWNWARD
Press it shortly to browse and play memorized stations which will last 5 seconds.
Press it long for 2 seconds, the unit seeks automatically frequency in full scope,
and memorize automatically found stations from M1 to M6,then return M1 to play.
Remark: when the unit is in seeking station, it is in sleep state. Every band stores
6 channels, FM1, FM2, FM3 can store 18 channel totally;AM1,AM2 can store 12
AM channels totally .
4.
BUTTON
Pressing it shortly is seeking station downward automatically. When selected
effective channel, the unit stop and play. When running, press any button of
M1,M2,M3,M4,M5,M6 long to memorize the current channel in corresponding
button.Pressing it long is seeking station downward manually. When the
operation is activated, pressing it shortly is seeking station downward step by
step and pressing it long is seeking station downward continuously.
15. BAND/SYSTEM TRANSFER
IMPORTANT INFORMATION
OPERATION INSTRUCTION
RADIO INTERFACE OPERATION
1. EJECT
RANGE/ PLAY RANDOM
32. SINGLE CHANNEL/STEREO TRANSFER/
PROGRAM PLAY
REMOTE CONTROL’S BASIC OPERATION:
AUDIO
Press it to cut the movie dubbing language gradually. It has the functions such as 5.1-track
output, stereo output and L/R track output
ANGLE
Some DVD disc may be taken views from different angle at the same time. Press the key to
enjoy the same view from different angle
54
Edited by Foxit PDF Editor
Copyright (c) by Foxit Software Company, 2004
For Evaluation Only.
[REMOTE CONTROL]
5.
BUTTON
Pressing it shortly is seeking station upward automatically. When selected
effective channel, the unit stop playing. When running, press any button of
M1,M2,M3,M4,M5,M6 long to memorize the current channel in corresponding
button.
Pressing it long is seeking station upward manually. When the operation is
activated, pressing it shortly is seeking station upward step by step and pressing it
long is seeking station upward continuously.
6. LOC BUTTON
Press it to perform shortly/long-distance control.
Press it shortly to switch LOUD control, at the same time to display hint in TFT.
8.ST/MO BUTTON
In FM band, touch it to shift stereo or mono-channel. When signal is
selecting mono-channel can reduce noise.
9. M1-M6 BUTTON
Touch any one of M1 TO M6 shortly can sort the memory station.
Pressing it long to preserve the running station.
DVD OPERATION INTERFACE
53
weak,
OPERATION INSTRUCTION
IMPORTANT INFORMATION
7.LOUD BUTTON
Edited by Foxit PDF Editor
Copyright (c) by Foxit Software Company, 2004
For Evaluation Only.
1.
BUTTON
Touch it shortly to turn off mute, touch it shortly again or touch VOL+/VOL- button
to turn on mute. Touch it long to turn off the screen. Press any buttons or touch
screen to turn on.
2.
SYSTEM PARAMETER
BUTTON
During DVD playing disc, press it to stop playing, press again will resume playing.
3.
OPERATION INSTRUCTION
Memory
When displaying the button, press it to come out more touch buttons.
Navigation software
memory
SD card or built-in NAND FLASH
Operation system
5.0 CORE
IMPORTANT INFORMATION
BUTTON
Firstly press
Main CMOS chip
Storage
BUTTON
In DVD playing disc state, touch it shortly to select songs downwardly. Touch it
long circularly to select the speed (2*4*8*20*time speed) playing. In fast playing
state; touch the play button to resume normal playing mode.
5.
Main frequency
BUTTON
In DVD playing disc state, touch it shortly to select songs upwardly. Touch it long
circularly to select the fastback (2*4*8*20*time speed) playing. In fast playing
state, touch the button to resume normal playing mode.
4.
[ GPS PARAMETER]
Software translate
and edit type
button, it will display below interface:
GPS HARD PARAMETER
CMOS chip group
Frequency
C/A CODE
Channel Number
20
Channel
Tracking sensitive
degree
RPT
RDM N/P
L/R
Orientation precision
data updated
frequency
Velocity
52
Edited by Foxit PDF Editor
Copyright (c) by Foxit Software Company, 2004
For Evaluation Only.
6. RPT BUTTON
As the following picture:
Touch it slightly to select repeating playing chapter, repeating playing name,
repeating playing, and close repeating playing.
7. RDM BUTTON
Touch it slightly to open or close RDM play. When being RDM play mode, playing
order is out of order.
8. N/P BUTTON
Touch it to shift between audio and video.
9. L/R BUTTON
to exit.
When playing VCD, touch it to shift between left and right channel.
When playing DVD, if the disc has multi-tracks or multi languages, touch it slightly
to shift among multi-tracks and multi languages, if the disc just has mono-track,
touching it slightly is useless.
8.SYSTEM
Firstly press
button, it will display below interface:
At main interface state:
1.Chick " system " to come into
system set interface.
As the following picture:
10. MENU BUTTON
Playing DVD disc, press the button to display song list (number), and playing as
per selected song number (need disc supporting)
11.
BUTTON
Touch it to select upward in current level menu. When needed item selected, touch
OK to run.
12.
To resume default set.When system file is confused,
click it to repair them.
51
2.Exit
BUTTON
Touch it to select downward in current level menu. When needed item selected,
touch OK to run.
OPERATION INSTRUCTION
IMPORTANT INFORMATION
Click ">""<" to adjust effect,click
Edited by Foxit PDF Editor
Copyright (c) by Foxit Software Company, 2004
For Evaluation Only.
Return to screen set interface:
13.
BUTTON
Touch it to return to last level menu. When needed item selected, touch OK to run.
14.
BUTTON
Touch it to return to next level menu. When needed item selected, touch OK to
run.
15.
BUTTON
5.Click "adjust position" to come
into position set interface.
When needed item selected, touch OK to confirm.
16.
BUTTON
As the following picture:
17.
BUTTON
OPERATION INSTRUCTION
OPERATION INSTRUCTION
Touch it to stop playing.
When playing DVD disc, if DVD disc has several captions, press it to shift among
captions. If DVD disc has mono-caption, pressing it is useless.
18.
BUTTON
In playing disc state, press it to select circularly the time display of mono-song
playing, residual time of mono-song playing , full disc playing , residual time of full
disc playing and close playing.
>
Click ">""<" " " " " to adjust parameter,the click "OK" to confirm.
>
Note: Operations for USB/SD is similar to DVD.
6.TIME
TV INTERFACE OPERATION
Refer to P31
7.SKIN
At main interface state:
1.Click "skin" button to come
into skin interface.
13
50
Edited by Foxit PDF Editor
Copyright (c) by Foxit Software Company, 2004
For Evaluation Only.
As following picture:
1.
BUTTON
Touch it shortly to turn off mute, touch it shortly again or touch VOL+/VOL- button
to turn on mute. Touch it long to turn off the screen. Press any buttons or touch
anywhere in screen to turn on.
2.
resume default button
BUTTON
Touching it slightly to select upward the stored TV channel.
3.
Touching it slightly can select downward the stored TV channel.
Chick "right-left" seroll button to adjust parameter!
4.
AS
BUTTON
Touching it long, the unit will seek channel in full scope and memorize
automatically.
Return to screen interface:
5.
F+
BUTTON
When searched channel is hazy or signal is weak, touch it to adjust upward to
calibrate frequency.
6.
4.click "adjust size " into
Size adjustment interface
F-
BUTTON
When searched channel is hazy or signal is weak, touch it to adjust downward to
calibrate frequency.
IPOD INTERFACE OPERATION
As following picture:
IPOD
IPOD:UNKNOWN
MUSIC:001
TIME:00:00:00
Click ">""<" to adjust vertical,horizon parameter, then click "OK" to confirm.
49
11:20
OPERATION INSTRUCTION
OPERATION INSTRUCTION
BUTTON
Edited by Foxit PDF Editor
Copyright (c) by Foxit Software Company, 2004
For Evaluation Only.
1.
Button
4.TOUCH SCREEN
Press it shortly to turn off the mute function, press it shortly again or press
VOL+/VOL- button to turn on the mute function. Press it long to turn off the screen.
Press any button or touch mainframe screen to turn on the screen.
2.
Refer to P22
Button
In IPOD playing disc state, touch it shortly to select songs upwardly. Touch it long
to choose the fastback mode. In fast play state, touch the button to return natural
playing mode.
3.
5.SCREEN
At main console state
Button
In IPOD playing disc state, touch it shortly to select songs downwardly. Touch it
long to choose the speed mode. In fast play state; touch the button to return natural
playing mode.
Button
OPERATION INSTRUCTION
OPERATION INSTRUCTION
4.
In IPOD play disc state, press it to stop play, press it again to renew play.
1.Chilk “
>
EXTERNAL VIDEO FREQUENCY INTERFACE
OPERATION
" scroll downward
As following picture:
1.Chilk this icon to come into screen interface.
As following picture:
1.
Button
Press it shortly to turn off the mute function, press it shortly again or press
VOL+/VOL- button to turn on the mute function. Press it long to turn off the screen.
Press any button or touch mainframe screen to turn on the screen.
2.
SYS
1.Chilk this icon to come brightness set interface
Button
Press it to choose external input video color .
15
48
Edited by Foxit PDF Editor
Copyright (c) by Foxit Software Company, 2004
For Evaluation Only.
BLUETOOTH INTERFACE OPERATION
4.Click here to come into sattellite
Data Stream interface
5.Click this icon to come into Longitude
Latitude and time set interface.
After click,as the following picture:
The system provide Bluetooth freehand communication function, if you phone has
Bluetooth and A2DP function, it can set up joint dot vs. dot with the system, in the
scene, it can achieve the phoning, telephone answer etc function and play
telephone music.
* Partnership
6.Click this icon exit
In the system main interface, press the freehand module, enter
Bluetooth
freehand interface, and open phone function of search new equipment, When
system contact with signal, it will cue phone whether connect equipment, phone
choice YES and import password 0000 and ensure it, after system contact with
phone ,system scène display: it had connect, whether try it again, until it's OK.
As following picture:
1. CONNECT/CUT
After system connect with phone, press “cut” button to cut connection, then press
the connect button to renew connection.
2. DIAL PHONE
When system connect with phone, it can import phone number by scene number
button, it can directly dial phone number by phone or press televox dial to televox
dial number, press take phone button with green.
47
OPERATION INSTRUCTION
OPERATION INSTRUCTION
After click,as the following picture:
Edited by Foxit PDF Editor
Copyright (c) by Foxit Software Company, 2004
For Evaluation Only.
Come into the following picture:
*Answer phone
When sb. calls you, in any model, system will automatically change Bluetooth
freehand function interface and playing voice is mute of current mode change to
ring of incoming telegram, if Bluetooth set up automatism answer, system will
automatism answer phone, if Bluetooth don't set up automatism answer, press
interface answer
or
press choice answer or refuse answer. During answer
phone, press picture of phone, it can change talk sound to phone, ensure safety
which talk information, press picture of Bluetooth, it can change talk sound to
loudhailer of car. Incoming telegram number will be display information rim.
3. BACKSPACE BUTTON
Waiting a moment..., as following picture:
Bluetooth playing music operation
In system main interface, you press
(freehand mode), enter Bluetooth freehand
interface and open phone function of search new equipment, when system contact
with signal of phone, it will cue phone whether connect with equipment, phone
choice Yes and import code 0000 and ensure it, system will connect with phone,
system scene display it had connect. After connect , in system main interface
press Bluetooth music freehand mode, enter Bluetooth music interface. Open your
phone music play machine, it will play mode set up to AV/earphone, it can play MP3
music which deposited in your phone by car loudhailer.
OPERATION INSTRUCTION
OPERATION INSTRUCTION
In dial number state, When input wrong, press the button to cancel character
(Above picture is sentensit of sattellite data and signal)
1. Play/pause button
Press it to play/pause MP3 music of phone deposited.
2.Click " ? " icon to come into
menu Introduction interface
2. Stop button
Press it to stop play MP3 music, press the play button to renew memory play.
3. Choice song along button
In play MP3 state, press choice song along button to play ahead song.
After click, as the following interface:
4. Choice song backward button
In play MP3 state, press choice song backward button to play backward song.
Click "GPS reset" to reset
GPS Automatically
46
Edited by Foxit PDF Editor
Copyright (c) by Foxit Software Company, 2004
For Evaluation Only.
SYSTEM PARAMETER INTERFACE
OPERATION
Come into normal set interface,as the following picture:
Tick click to turn off mute, cance " " to open mute.
Click " < " to decrease
volume
Click " > " to Increase volume
Scroll left
Scroll right
Exit
Click "< " " > " to select 3 mode circularly:
mute
Weak
Strong
DIRECTION BUTTON
Language
Left face button
Click " < " " > " to select 3 mode circularly:
Right face button
Simply Chinese
Engliah
Classic Chinese
: Press it to adjust operate item parameter descending.
: Press it to adjust operate item parameter increase
by degrees.
Upward button
: Press it to upward choice operation item.
Downward button
: Press it to downward choice operation item.
BASIC SETUP
3.GPS monitor
1.Radio
Upward/downward button or direct press choice item, press the item or left/right
circulate choice radio area setup.
2. TV
Upward/downward button or direct press choice item, press the item or left/right
circulate choice TV setup.
1.Click "GPS monitor" button
45
3. Time
Upward/downward button or direct press choice item, press the item or left/right
button to adjust time.
OPERATION INSTRUCTION
OPERATION INSTRUCTION
Button Voice
Edited by Foxit PDF Editor
Copyright (c) by Foxit Software Company, 2004
For Evaluation Only.
4. CLK
Upward/downward button or direct press choice item, press the item or left/right
button to change 12H,24H.
SYSTEM MAIN INTERFACE SET
At main console stale:
5. CLK SW
Upward/downward button or direct press choice item, press the item or left/right
button to choose open or close time display.
6. BEEP
1.Click "SET” button
Upward/downward button or direct press choice item, press the item or left/right
button to choose open or close beep.
Press up/down button or direction key choose the GPS, Press up/ down button or
direction key choose the item chooses turn on or turn off to the GPS. In the GPS
off mode, GPS off, can' t enter the GPS. Press main page can' t use the “GPS”
icon.
Come into set interface:
OPERATION INSTRUCTION
OPERATION INSTRUCTION
7. GPS ON/OFF
AUDIO SETUP
1. BAS
Upward/downward button or direct press choice item, press the item or left/right
button to step up or depress bas.
2. TRE
Upward/downward button or direct press choice item, press the item or left/right
button to step up or depress tre.
3. BAL
Upward/downward button or direct press choice item, press the item or left/right
button to adjust bal.
4. FAD
1.NAVIGATION SET
Refer to page 27
2.NORMAL SET
Upward/downward button or direct press choice item, press the item or left/right
button to adjust fad.
LOUD
After you use the direction key of up and down or click once to select the option
directly, click it once or use the direction key of left and right to circle selecting the
loud control of opening or closing .
1.Click " USUAL SETUP " to
set normal parametes
44
Edited by Foxit PDF Editor
Copyright (c) by Foxit Software Company, 2004
For Evaluation Only.
EQ
Operation interation as following picture:
Open
Last file
Del
Full screen
Up scroll
After you use the direction key of up and down or click once to select the option
directly, click it once or use the direction key of left and right to circle selecting the
audio mode.
VIDEO SET
Play/ pause
next file
FIle list and
screen shift
Down scroll
Exit
BRIGHT
After you use the direction key of up and down or click once to select the option
directly, click it once or use the direction key of left and right to adjust the
brightness.
COLOR
After you use the direction key of up and down or click once to select the option
directly, click it once or use the direction key of left and right to adjust the color.
CONT
After you use the direction key of up and down or click once to select the option
directly, click it once or use the direction key of left and right to adjust the contrast.
MODE
After you use the direction key of up and down or click once to select the option
directly, click it once or use the direction key of left and right to circle selecting the
USER mode、STD mode(the standard mode ) 、SOFT mode 、BRIGHT mode.
PARK ON/OFF
Click anywhere of screen to exit:
Press up/down button or direction key choose the PARK. Press up/down button or
direction key choose the item chooses turn on/off to the PARK.
In the PARK ON mode, the PARK (cathode) to be able to watch on the lcd screen ;
In the PARK OFF mode , the PARK(cathode) to be possible to watch on the LCD
screen .
According to your requirement to operate,as the handlook is
limited, we just descrike the basic operation.
43
OPERATION INSTRUCTION
OPERATION INSTRUCTION
Click “
" to full screen,or click anyewhere in screen to play full screen,
as the following picture:
Edited by Foxit PDF Editor
Copyright (c) by Foxit Software Company, 2004
For Evaluation Only.
After click "Down scroll",as the following interface:
[ REARVIEW]
If the car install the rearview, when it move back, the system will switch rearview
condition automatically, and display what it took on the screen, make sure the
safety of moving back car. During the driving, if you want to know the condition at
the back, you can press the icon CCD on the home page to enter to the rearview
interface. When the system enter to the rearview video interface, while the current
condition is play, then the loudspeaker output the sound of the current play
condition, and the external audio and video output are all in the current condition.
2.click "FILM" button.
[CLOSE PICTURE FUNCTION]
For the sake of your driving safely, the unit has the close picture function when
driving,(connect manual brake close screen testing wire to the car's brake power
switch. If you want to cancer this function, you can ground the manual brake close
screen testing wire),you can't watch the graph until your park.
OPERATION INSTRUCTION
OPERATION INSTRUCTION
Come into FILM interface :
3.Click here to open film file.
Close mode
When driving in the night, in order to protect the sight of driver, secure safety of
driving, on any mode of playing, long press "MUTE" key, system will close display
screen, but will maintain playing. Click any key on touch screen or press any on
the panel to exit close mode.
After clicked,come into the following interface:
5.Click "OK" again
[ GPS OPERATION]
[NAVIGATION SOFTWARE REQUEST]
4.Select the file .
After click,as the following interface:
Operation system:windows5.0 core
Navigation software edit format: ARMV4I
I/O:COM2,bite rate:9600
6.Click " " to play film
42
Edited by Foxit PDF Editor
Copyright (c) by Foxit Software Company, 2004
For Evaluation Only.
Come into the following interface:
[set before use]
3.Choose File
4.Click "OK" button
Before using GPS,must set it as following method,then to operate the GPS.
1.TOUCH SCREEN CALIBRATION.
Detailed operation as following:
At main consol interface:
1.Touch "set" icon
5.Film
At main console interface
1.ClicK " Down scroll ".
41
Come into set interface
In above interface, According to your requirement to rotate ,full
screen,zoom+,zoom-,slide play,up scroll,down scroll or give up operation and
OPERATION INSTRUCTION
OPERATION INSTRUCTION
After finished above operations,as the following interface:
Edited by Foxit PDF Editor
Copyright (c) by Foxit Software Company, 2004
For Evaluation Only.
After touch"touch screen" icon,as following picture:
After touched above operations,come into the following interface:
5.Click "
" to play
2.Touch "touch screen ion”
After touch"touch screen icon",come into the following interface,as following
picture:
4.Picture
OPERATION INSTRUCTION
OPERATION INSTRUCTION
At main console interface:
1.Click "Picture" button
Touch "
" icon for 1 second at least,as following picture:
Come into main interface:
Open
Touch "touch screen ion”
Rotale clockwisely
Sliede
Full creen
3.Touching "
“ icon
Up scroll
Zoom +
Zoom _
Down scroll
Exit
After loosed,"+"move to top left coner,as following picture:
2. Open picture file
40
Edited by Foxit PDF Editor
Copyright (c) by Foxit Software Company, 2004
For Evaluation Only.
Come into music inferface,as following:
Touching "
"again,as following picture:
Volome
Open
Del
Last song
4.Touching “
Up scroll
Circular/RDM play
Play/Pause
" icon again
Down scroll
Exit
Next song
Song list
Progress bar
Mute ON/OFF
After loosed,"
picture.
"move to button-left coner automaticlly,as following
2.Click here
As the following interface:
Touch "
"again,as following picture:
3.All file
OK
5.Touching “
" icon again
4.Click OK
After loosed, “
39
"come to button-right coner,as following picture:
OPERATION INSTRUCTION
OPERATION INSTRUCTION
Open Adio file
Edited by Foxit PDF Editor
Copyright (c) by Foxit Software Company, 2004
For Evaluation Only.
Display No12 page,as following picture:
Touching “
”,as following picture:
Status: Page 12 of 18
6.Touching “
After loosed,“
OPERATION INSTRUCTION
OPERATION INSTRUCTION
If want to give up read,click exit,the operation as following:
“ icon again
”move to top-right coner,as following picture:
5.Click "Exit" button
Remark:Electonic book file is with".txt",other format can not support.
3.Music
At console interface status
Touch“
” again,as following picture:
7.Touching “
“ icon again
1.Click "Music”
38
Edited by Foxit PDF Editor
Copyright (c) by Foxit Software Company, 2004
For Evaluation Only.
After touched,as following picture:
After loosed, “
”will be disppeared automatically,then display "OK",as
following picture:
Up scroll
Down scroll
Page search
Exit
If you want to read page 12,touch"Page search”:
4.Touch"Page search"
8.Touching "OK“ finaly.
After touched,as following picture:
Delete key,Delete
Backspace
Enter
Finshed above operations,system return to main console inferface:
Exit
Number button
Click Number button 12 to input 12.
4.Click "Enter”
37
If not displaying "OK" indicate calibration is failure.the cause is touching
"+" is too short,please repeat above opertions until the "OK" is displayed.
OPERATION INSTRUCTION
OPERATION INSTRUCTION
Touch "OK" finally,as following picture:
Edited by Foxit PDF Editor
Copyright (c) by Foxit Software Company, 2004
For Evaluation Only.
After touch,come into the following interface:
2.SET DIRECTION FOR NAVIGATION SOFTWARE.
8.Touch "Start navigation" ,
operation completed
Before using the GPS,must set direction for navigation software, detailed
operations as following:
Insert SD with map to SD socket,then connect the GPS to car AV system
correctly, turn on the AV unit, come into AV main interface, then touch
"GPS" icon to come into GPS interface, as following Picture:
When car move forward,the screen cross move as car to perform site navigation.
OPERATION INSTRUCTION
2.ELECTRONIC BOOK
OPERATION INSTRUCTION
At console state
1.Touch "Electronic book" button
Come into "Electronic book" interface:
Touch "set" icon at first,as following picture:
2.Touch "File package"button
1.Touching “ SET " icon
After touch,come into following interface:
3.Touch "XXX.txt"file, to read it!
27
36
Edited by Foxit PDF Editor
Copyright (c) by Foxit Software Company, 2004
For Evaluation Only.
After finished above operation to come into set interface,as following picture:
After touched,come into the following interface:
5.Touch"Name index“ button
When coming out above interface,touch"navigation set" to set,as following
picture:
After touched,come into the following interface:
OPERATION INSTRUCTION
2.Touch "navigation set" long button
The zone is for
manual input
desination address
Input method,Writ
Touch it to come into set interface,as following picture:
For Example:Input Guangzhou railway station.
Display content
6.Touch "enter" button
Touch "open file" icon again,as following picture:
After touch,come into the following interface:
3.Touch "open file"icon
7.Touch here
35
28
OPERATION INSTRUCTION
When input error,click the button
delect the false antents
Edited by Foxit PDF Editor
Copyright (c) by Foxit Software Company, 2004
For Evaluation Only.
Come into "Rtnavi" Interface,as following picture:
Touch"open file" icon to come into the following interface:
Wating for a moment,...will come out the following picture:
OPERATION INSTRUCTION
OPERATION INSTRUCTION
Then double touch "StorageCard" quickly or touch "OK" directly,
as following picture:
4.double touch "StorageCard”
Or touch "OK" directly
ACC
NO REJ
2.Thouch "ACC" button
After touched,display the following interface:
After touched,come into the following interface:
Come into “desination ADD”interface,
as the following page
3.Touch "Menu" button
Double touch "RtNavi" quickly or select "Rtnavi",then touch "OK" as
following picture:
5.Double touch "RtNavi”Or select the file,
then touch "OK"
29
After touched,come into the following interface:
4.Touch "Real Navigation"button
34
Edited by Foxit PDF Editor
Copyright (c) by Foxit Software Company, 2004
For Evaluation Only.
[OPERATION INTRUCTION]
After touched,display the following interface:
After finished set before use,the following will describle the specific operation
for all interface,Pls read carefully to avoiding non-proper operation!
CONSOLE INTERFACE INTRODUTION:
Double touch "Rtnavi.exe" or select "Rtnavi.exe",then touch "OK".After
these operations,system retuan to navigation set interface,as following
picture:
Console
last page
Or select the file,
6.Double touch "RtNavi”
then touch "OK"
Set
Time
OPERATION INSTRUCTION
OPERATION INSTRUCTION
Display current ststus
next page
Remark:The console interface is default.
Return to navigation interface set:
1.Navigation
The navigation fuction will run just when the SD card has been storeed
navigation map,or is invalid,the following will intruct the fuction according
to Rtnavi software ,the use of the other map refer to its instrution.
Then tick select "Auto run navigation when imtiating",then touch "exit"
button,or exit the set interface:
1.Thouch "Navigation" button
6.Touch here exit
7.Touch here
33
30
Edited by Foxit PDF Editor
Copyright (c) by Foxit Software Company, 2004
For Evaluation Only.
Come into next interface:
Return to set interface:
3.Touch "time" button
Come into the following interface.
OPERATION INSTRUCTION
OPERATION INSTRUCTION
After above opertions,seting direction is sucessful !
3. TIME SET
At main console
Introduction for the buttons of the interface:
Up adjust
1.Touch "set" icon
come into set interface
Exit
Left adjust
Down adjust
Right adjust
Introduction for the zone of the interface:
Date set,
format:Mon.Da
te.Year
Time
set.Format:
H/M
0:56
Country/Kegio
2.Touch next page button
According to above introduction comtent,set country and region date and time.
31
32