1
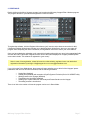
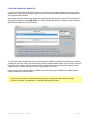
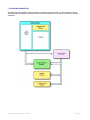
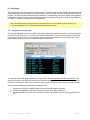
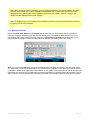
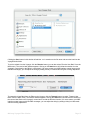
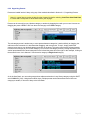
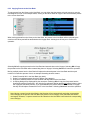
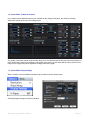
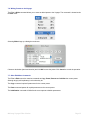
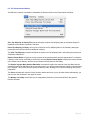
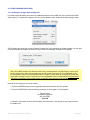
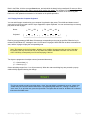
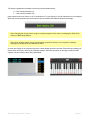
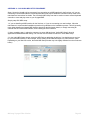
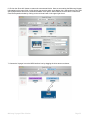
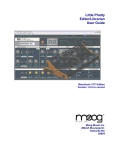
Minimoog Voyager
Editor/Librarian
User Guide
Macintosh Edition V 3.5
Moog Music Inc.
2004-E Riverside Dr.
Asheville NC
28804
Minimoog Voyager Editor Librarian
Page 2
TABLE OF CONTENTS
1 INTRODUCTION ...................................................................................................................................................4
1.1 Credits ..........................................................................................................................................................4
1.2 Support ........................................................................................................................................................4
1.3 Program Features.........................................................................................................................................5
2 INSTALLATION/REQUIREMENTS .......................................................................................................................6
2.1 Before you begin ..........................................................................................................................................6
3 STARTING UP .......................................................................................................................................................7
4 GETTING CONNECTED - MIDI SETUP ...............................................................................................................8
5 PROGRAM ORGANIZATION................................................................................................................................9
www.apple.com6 PROGRAM WINDOWS - THE VOYAGER EDITOR WINDOW ...............................................10
6.1 USER BANK ..............................................................................................................................................11
6.1.1 Navigation in the User Bank .............................................................................................................11
6.1.2 Working with Banks...........................................................................................................................13
6.1.3 Other User Bank Functions...............................................................................................................16
6.1.4 The Bank Menu ................................................................................................................................18
6.1.5 Organizing Presets ...........................................................................................................................21
6.2 VOYAGER PANEL .....................................................................................................................................23
6.3 LIBRARIAN ................................................................................................................................................24
6.3.1 Working with Libraries.......................................................................................................................25
6.3.2 Organizing Presets ...........................................................................................................................26
6.3.3 Copying Presets to the User Bank....................................................................................................27
6.3.4 The Librarian Menu ..........................................................................................................................28
7 PROGRAM WINDOWS - THE EDITOR WINDOW .............................................................................................29
7.1 2 Editing Modes - Classic and Expert ........................................................................................................29
7.2 Classic Mode - Additional Controls.............................................................................................................31
7.3 Classic Mode Display Settings ...................................................................................................................31
7.4 Parameter Resolution in the Editor ............................................................................................................33
7.5 Editing Preset Parameters..........................................................................................................................33
7.6 Writing Presets to the Voyager...................................................................................................................35
7.7 Other Edit Menu Commands......................................................................................................................35
7.8 Show Voyager Panel .................................................................................................................................36
7.9 Exiting the Editor ........................................................................................................................................37
8 PROGRAM WINDOWS - THE NANOM WINDOW .............................................................................................38
9 PROGRAM WINDOWS - THE PRESET GENETICS WINDOW.........................................................................40
9.1 Single Parameter Adjustment ....................................................................................................................42
9.2 Moving Genetics Presets ...........................................................................................................................43
9.3 The Preset Genetics Menus.......................................................................................................................44
10 OTHER PROGRAM FUNCTIONS ....................................................................................................................45
10.1 Updating the Voyager Operating System ................................................................................................45
10.2 Playing from the Computer Keyboard ...............................................................................................46
11 SHORTCUTS & KEY COMMANDS ..................................................................................................................48
APPENDIX A – OSX AUDIO MIDI SETUP PROCEDURE .....................................................................................49
APPENDIX B – VOYAGER CATEGORY DESCRIPTIONS ....................................................................................54
Minimoog Voyager Editor Librarian
Page 3
1 INTRODUCTION
Thank you for choosing the Minimoog Voyager Editor/Librarian! The Editor/Librarian is designed to be the ultimate
tool for organizing and creating presets for the Minimoog Voyager or RME. Through a MIDI connection, this
program can receive single presets or an entire bank of presets from the Voyager or RME - as well as replace
individual presets or an entire bank. Once the presets are transmitted to the Editor/Librarian, all preset
parameters can be displayed in a graphical user interface, including edit functions like Pot Mapping, Touch
Surface Destinations and Filter Poles. The settings of the front panel controls can be displayed with high
resolution (16-bit), to allow super-precise sound editing. The program can also be used to learn the inner details
of the factory presets. Using the Librarian, presets can be organized to create custom preset banks – a terrific
feature for musicians preparing for their next gig! In addition, a Preset Genetics function is available to create new
presets by morphing or mutating two presets together. You can also play the Voyager remotely from the
Macintosh keyboard, an especially handy feature for owners of the RME. A Voyager OS update function is
incorporated, too, simplifying Voyager OS updates.
The Editor/Librarian software will operate with or without the Voyager V3 upgrade hardware (expanded memory
option).
We hope you enjoy using the Minimoog Voyager Editor Librarian!
- The Voyager Editor Librarian development team
1.1 Credits
Software Development: Soundtower Software, Windsor, Ontario, Canada.
MIDI Implementation: Lintronics, Wilhermsdorf, Germany
User Guide: GregAE, Larry Thompson
1.2 Support
Support for this product is available at: www.soundtower.com/moog/help.
Additional support is provided online in the Moog Voyager forums at: www.moogmusic.com.
Minimoog Voyager Editor Librarian
Page 4
1.3 Program Features
Features of the Minimoog Voyager Editor/Librarian includes:
• Support for seven sound banks of 128 presets
• Editing all Voyager parameters from a single interface window
• Panel change sensing
• Random patch generation - morphing, mixing and mutating from one sound to another
• Preset Bank Management and Librarian functions, with support for the Voyager’s ‘Sound Category’
feature.
• User selectable 16-bit or 8-bit parameter editing resolution
• Auditioning Voyager sounds remotely from the Macintosh keyboard
• All six Voyager preset factory banks (SE, AE, RME, EB, TWolf and Zon Vern Pyles)
File Options:
• Unlimited Voyager bank data load and save
• Support for Voyager Operating System update installation
Edit Functions:
• Full editing functions available (Copy, Paste, Rename, Initialize and Write presets or banks)
MIDI Functions:
• MIDI Setup on channels 1-16
• Transmit/Receive Voyager Preset Banks
• Receive individual Voyager Presets
Bank Functions:
• Permits loading/saving complete Voyager banks
• Presets can easily moved between banks for quick organization
• A new Single Parameter Adjustment feature permits adjustment of a single parameter for one preset, a
group of presets, or entire an entire bank
• Presets can be copied from the Bank to any Librarian category (32 available) and vice versa. Libraries
can hold an unlimited numbers of Voyager presets.
• Enhanced User Bank and Librarian selection options allow presets to be easily moved/manipulated.
Genetics Function:
• Offers four ways of generating a new bank of presets from two "parent" presets selected from any bank:
o Mix - randomly mix parent parameters
o Morph - blend from one preset to the next
o Mutate - randomly mix from range between parent parameters
o Random - random preset generation
• Different preset parameters can be excluded, for more predictable results
• Auto Audition feature allows instant audition of selected "Offspring" presets
• Single Parameter Adjustment feature allows one preset parameter to be changed for an entire bank of
presets
NanoM Wizard:
• A morphing tool for selected parameter groups (LFO, Mod Busses, Oscillators, Mixer, Filters, Envelopes
• A set of "Morpher" controls permits morphing from one preset into another
Minimoog Voyager Editor Librarian
Page 5
2 INSTALLATION/REQUIREMENTS
No special software installation is required. The Minimoog Voyager Editor Librarian is a standalone program
designed to run on Macintosh computers under OSX only (an OS9 version is not available).
The software requires a 1024 x 768 minimum screen resolution.
The Minimoog Voyager Operating System must be V3.2 or higher (updates available at www.moogmusic.com)
A MIDI interface is required for the software to work with the Minimoog Voyager.
A wheeled, two-button mouse is recommended for additional control of the program.
2.1 Before you begin
To get the most out of this program you should be familiar with the operation of the Minimoog Voyager. The
Voyager User’s Manual is an excellent resource to aid in the understanding of the inner workings of your Voyager.
It is recommended reading for all Voyager owners. Although this software program can be an invaluable resource
to aid in the understanding the Voyager, it is not a substitute for reading the Voyager User’s Manual.
Minimoog Voyager Editor Librarian
Page 6
3 STARTING UP
Double clicking on the Moog Voyager program icon launches the Minimoog Voyager Editor Librarian program.
The program will ask for your name and registration number as shown.
To register the software, click the Register Online button (you’ll need an active Internet connection for this).
Clicking the Register Online button will take you to the Moog Music Online Store, where you can order the
program. After completing the online transaction, the Registration code will be sent to your email address.
Once you have obtained a registration code, enter this information along with your name in the appropriate fields
and click the Enter Code button. Registered users will see their name displayed on a slightly modified splash
screen that includes ”This software is registered to (your name)”.
Note: In case of lost registration, a hard drive crash or other calamity, registered users can obtain their
registration information by writing to [email protected] or [email protected].
If you click on the Demo Mode button, the program will open and allow you to edit all of the Voyagers’ preset
parameters and use most of Editor's functions, with the following limitations:
•
•
•
•
•
•
Saving files (disabled)
Loading files (disabled) with exception of SysEx (System Exclusive) files in OS UPDATE utility.
Writing presets to the Voyager (disabled)
Transmitting the User Bank (disabled)
Sending up to 5 panel edits from the Library and Preset Genetics to the Voyager
The editing session is time-limited.
There is no limit to the number of times the program can be run in Demo Mode.
Minimoog Voyager Editor Librarian
Page 7
4 GETTING CONNECTED - MIDI SETUP
In order for the Editor/Librarian program to be fully functional with the Voyager hardware, the software must be
registered (not in Demo Mode) and the Voyager must be connected to the MIDI In and MIDI Out connections of
your computer's MIDI interface.
After making the proper connections between the Voyager and the MIDI interface, launch the Editor/Librarian. In
the program’s MIDI menu, select MIDI Setup. You’ll see the following window (your window may show different
MIDI IN Port and MIDI OUT Port information):
You will need to select the MIDI interface where your Voyager or RME is connected. Choose the correct MIDI In
and MIDI Out ports from the list, and set the MIDI channel to match the MIDI channel on your Voyager. Adjust the
Piano Note Velocity slider control if desired (this sets the MIDI Note Velocity value that the program will use to
audition presets. The default setting is 100, but you can adjust it from 0-127).
On the Voyager, make sure that MIDI In and MIDI Out is turned ON, SysEx is ENABLED, and MIDI Program
Change is turned ON (“Select Presets”).
Note: You may also need to make additional configurations using Apple’s Audio MIDI Setup Utility.
For more information, see Appendix A – OSX Audio MIDI Setup Procedure.
Minimoog Voyager Editor Librarian
Page 8
5 PROGRAM ORGANIZATION
The Minimoog Voyager Editor Librarian program is organized as shown below. The main window is always
displayed when the program is launched and becomes the starting point for all preset modifications and bank
operations.
Minimoog Voyager Editor Librarian
Page 9
www.apple.com6 PROGRAM WINDOWS - THE VOYAGER EDITOR WINDOW
The Voyager Editor is the main program window, and is always displayed when the program is launched. This
window contains three program components: the User Bank (1), the Voyager Panel (2), and the Librarian (3). The
three program components interact and are always active. A detailed description of each program component
follows.
Note: When the program is run for the first time, the User Bank defaults to the Default Program for all of
the program’s presets in all banks. When you quit the program, the state of all banks is stored with the
program. These banks appear when the program is run again.
Minimoog Voyager Editor Librarian
Page 10
6.1 USER BANK
The User Bank is where you load, save, transmit, receive, and edit Voyager presets. Preset banks are loaded into
the program either from the Voyager, from a stored bank, or from one of the six preset factory banks built into the
program. The Editor/Librarian has seven banks, labeled A-G, corresponding to the seven preset memory banks in
an expanded Voyager. Presets in the User Bank be selected individually, as a group, or randomly (non-adjacent),
to allow for convenient rearrangement and reorganization.
Note: The Editor/Librarian program can also be used with a stock (unmodified) Voyager, allowing you
to access 896 presets at one time even without the expanded memory!
6.1.1 Navigation in the User Bank
The User Bank preset list has room to display only about a third of the presets at one time, so a scrolling window
is used to view all 128 presets. If you have a mouse with a scroll wheel, you can use the wheel to scroll through
the preset list. Simply move the cursor anywhere onto the list and use the wheel to scroll up and down. If your
mouse doesn’t have a scroll wheel, use the scroll bar or scroll arrows.
You can also use the Macintosh keyboard to navigate the list, but you must select a preset in the list first. The
reason is that there are actually two preset lists on the Editor window; one for the User Bank (as shown above)
and one for the Librarian. Without your input the program has no idea which of the two lists you wish to control.
You can use the following keyboard keys to navigate the list:
•
•
•
Pressing the PAGE UP or PAGE DOWN keys scrolls the list in blocks of presets.
The UP and DOWN keys will scroll one preset at a time, up or down respectively.
Pressing the END key moves to the end of the list, while the HOME key returns to the beginning of the
list.
Minimoog Voyager Editor Librarian
Page 11
You can change the way the presets in the User Bank are displayed. By default, presets are displayed from 1 to
128, but you can change the order by clicking in the ‘No.’ column in the User Preset Bank list. This will reverse the
sorting order, placing preset 128 at the top of the list:
A second click in the ‘No.’ column toggles the sort order back to its original state.
You can also sort by preset name or preset category. Clicking in the Preset column causes the User Preset Bank
to be sorted alphabetically:
Clicking again in the Preset column reverses the sort order.
Clicking in the Category column causes the User Preset Bank to be sorted alphabetically by category:
Clicking again in the Category column reverses the sort order.
Minimoog Voyager Editor Librarian
Page 12
Note: When sorting by Preset or Category, you’ll see a directional arrow in the column heading. This arrow
indicates the sort order (an ‘up’ arrow indicates an alphabetical sort, a ‘down’ arrow indicates a reverse
alphabetical sort). Selecting any preset, regardless of the sort order (number, name or category), will
always send the displayed Preset to the Voyager.
Note: Preset Bank Lists in the Librarian or Preset Genetics windows can also be sorted forward or reverse
by clicking in their column headers.
6.1.2 Working with Banks
Buttons for Load, Save, Receive, and Transmit appear above the User Preset Bank display to provide for
frequently used bank operations (we’ll discuss other buttons later). The Load and Save buttons allow you to
conveniently load or save banks from/to the computer. The Receive and Transmit buttons allow banks to be
moved to/from the Voyager. These four button functions duplicate commands found in the menus.
When you click on the Load button you will be presented with a load dialog box similar to the one shown below.
The actual view you see will be dependant on your Macintosh View settings, but the idea here is that you’ll have
to navigate to where the Voyager bank files are stored on your system. Since these files can reside anywhere you
chose when you save them, it’s a good idea to create a special folder or a specific location to store them. This will
make it easier to find your stored banks (and library files) when you’re ready to load them back into the program.
Minimoog Voyager Editor Librarian
Page 13
In the figure above we created a folder called Voyager Banks located on the Macintosh Desktop, and used it to
store some example bank files. Note that program bank files have the extension ‘.mvr’. When loading a bank file,
the Editor Librarian program will allow you to see all file types, but only those files with an ‘.mvr’ extension can be
loaded as a bank. All others will be ignored.
The Save button allows you to save the current bank. Upon clicking Save, you’ll be presented with a dialog box
similar to this one:
Enter a suitable file name for your preset bank in the “Save As:” name field. Clicking on the Save button here will
save the file to the location you specify and append ‘.mvr’ to the file name.
You can select a different storage location by clicking on the blue down arrow button to the right of the “Save As:”
name field. This will result in an enlarged window that will allow you to navigate to any location for storage. In the
example below, we’ve navigated to the ‘Voyager Banks’ folder on the Macintosh Desktop (depending on your
Macintosh systems settings, your view may look somewhat different):
Minimoog Voyager Editor Librarian
Page 14
Clicking the Save button in this window will add the ‘.mvr’ extension to the file name and store the bank into the
Voyager Banks folder.
To receive a bank from the Voyager, click the Receive button (you can also select "Receive User Bank” from the
MIDI menu). The receive bank window appears. Clicking on the Start button will initiate the transfer from the
Voyager’s current bank to the Editor’s current bank. If for some reason your MIDI interface cannot keep up with
fast MIDI messages, you can adjust the timing by adding a delay in milliseconds using the scrolling adjustment:
To transmit the User Bank from the Editor to the Voyager, click the Transmit button (or select "Transmit User
Bank" from the MIDI menu). The transmit window appears. Clicking the Start button will transmit the contents of
the current User Bank to the Voyager’s current bank. As with the Receive function, if for some reason your MIDI
interface cannot keep up with fast MIDI messages, you can adjust the timing by adding a delay in milliseconds
with the scrolling adjustment:
Minimoog Voyager Editor Librarian
Page 15
The transmitted data will be written into the current Voyager bank, overriding the existing presets.
Note: Although the Editor supports all seven Voyager banks, only one bank (the current bank) can be
transmitted or received at a time.
6.1.3 Other User Bank Functions
Now let’s look at the other User Bank button functions that haven’t been covered.
The Edit button takes you to the Editor window, where you can edit the currently selected preset. A complete
explanation of the Editor window is saved for later in this guide (see page 28).
The Use loaded data checkbox is a feature that changes the way the program works with the Voyager. When the
box is unchecked (disabled), selecting a preset from the User Bank switches the Voyager to the corresponding
preset. The Voyager sends the preset to the User Bank. This guaranties synchronization between the Voyager
and the program. When the checkbox is checked (enabled), the selected preset data from the User Bank is sent
to Voyager's edit buffer for editing and audition. This feature helps you to browse through presets in the User
Bank without the need for dumping the entire bank to the Voyager.
The Auto Dump checkbox works for the Librarian. When checked (enabled), a selected preset from the Librarian
preset list is automatically sent to the Voyager's edit buffer for editing/audition. When unchecked, no data is sent
to the Voyager.
Minimoog Voyager Editor Librarian
Page 16
The Drag and Drop and Multi Select radio buttons control the way the cursor operates:
•
Drag and Drop mode is conventional cursor operation, allowing you to freely drag and drop presets
between the current User Bank and the Librarian. You can add the SHIFT and COMMAND () modifier
keys to make multiple preset selections. These can be groups of presets, non-adjacent selections, or a
combination of both.
•
Multi Select mode locks the cursor into ‘Select’ mode, allowing you to select groups of presets. This
mode can be useful for large amounts of group moves because it restricts the operation of the cursor to
just making selections, preventing accidental dragging of presets out of the User Bank or Librarian. In
Multi Select mode, presets are moved between the User Bank and Librarian using the large Move
arrows (see 6.1.5 – Organizing Presets).
Finally, User Bank buttons A-G allow you to switch amongst the seven program banks. Keep in mind that the
bank buttons interact with the ‘Use loaded data’ checkbox, meaning that the Editor will either switch to the
Voyager bank/location and acquire the preset data from the Voyager (when ‘Use loaded data’ is unchecked), or
send the selected preset data to the Voyager’s current preset (when ‘Use loaded data’ is checked).
Minimoog Voyager Editor Librarian
Page 17
6.1.4 The Bank Menu
The Bank menu shown below includes the Load User Bank Data and Save User Bank Data As commands that
duplicate the functions of the Load and Save buttons. It also includes commands to generate a New Bank
(creates a bank of 128 default presets), load one of the Voyager factory banks (Moog Banks) and commands to
Copy, Paste, Rename and Initialize selected presets in the User Bank. A Single Parameter Adjustment
command is also available here, allowing you to adjust a single parameter without opening the Editor. These
commands work on the currently selected User Bank.
Selecting Moog Banks opens a side menu, displaying the six factory banks: Anniversary Edition, Signature
Edition, Twolf25 (Thomas Wolf bank), Zon25 (Zon Vern Piles bank), Electric Blue and RME. To load any one of
these, simply select the desired factory bank. The selected bank will overwrite the presets in the current User
Preset Bank (A-G).
Note: You may want to save your current preset bank prior to loading a new preset bank into the same
bank location. Failure to do this will cause you to lose all of the Voyager presets in that bank.
Minimoog Voyager Editor Librarian
Page 18
Selecting Rename from the menu will display a message drawer as shown:
The Rename drawer allows you to change the preset name or the sound category. Clicking in the preset name
field allows you to change (or completely replace) the preset name up to a maximum of 24 characters (12 per
line). Additional characters beyond 12 per line will be ignored. The TAB key toggles the cursor between the upper
and lower text lines.
Note: Besides selecting Rename from the Bank menu, you can also bring up the Rename drawer by
double-clicking on a preset name in the User Bank (or the Editor).
Clicking on the category label in the Rename drawer produces a drop-down menu of assignable categories.
Thirty-two categories are available here, including various leads, basses, and instruments. These categories
match the default Librarian categories. To assign a category, simply select one from the list.
Clicking OK will store the changes and close the dialog box. Clicking Cancel will close the dialog box without any
changes.
The Single Parameter Adjustment command allows you to alter a single parameter for any preset, group of
presets or entire bank. To use this command, first select the preset, group of presets or bank that you wish to
affect, then select the Single Parameter Adjustment command. A drawer will appear below the main Window
title bar:
Minimoog Voyager Editor Librarian
Page 19
Select the desired parameter from the Parameter pull-down menu and use the slider control to set the value.
The Parameter menu contains more than one hundred different parameters to choose from, including all 24
characters in the preset name:
After choosing the desired parameter and value, click on Change to apply the change, OK to quit and close the
drawer, or Cancel to cancel the function without changes. You can repeat this process multiple times by selecting
a new parameter and value, then clicking the Change button. This is especially handy for making several ‘global’
changes to groups of presets. Click OK when done.
Note: You must select Change in order for the change to be applied. Simply clicking OK after selecting a
parameter and value will not apply the change to the selected preset(s).
When a change is made using the Single Parameter Adjustment feature, the change is only applied to the
selected presets in the Editor User Bank – they are not automatically written to the Voyager. For this reason, you
should transfer your modified bank to the Voyager after making any parameter changes, or the changes may be
lost.
Note: Numerical values in the Single Parameter Adjustment drawer are displayed as 8-bit values (0-255)
when the Editor’s Parameter Resolution is set to 8-bit resolution. Values are displayed as 16-bit values
(0-65535) when the Editor Parameter Resolution is set to 16-bit resolution.
Minimoog Voyager Editor Librarian
Page 20
6.1.5 Organizing Presets
Voyager presets can be sorted, reorganized and categorized by moving them from the User Bank to the Librarian.
There are several ways of moving presets:
•
By dragging a single preset to any Library category. Here we’ve selected a single preset (B-014 ‘Outer
Limits Clav) and are dragging it into the CLAV category:
•
By selecting a several presets (using the Command key) and dragging the group to any Librarian
category. Here we selected three lead sounds and are dragging them into the BRIGHT LEAD category:
•
By selecting a group of presets and clicking on the Move arrow button. First we selected our Library
category (‘Evolution’), then selected a group of presets in the User Bank. Clicking on the Move arrow
copies the selected presets into the ‘Evolution’ Library category:
•
By copying a preset from the User Bank and pasting to the Library. You can use the Bank menu or the
shortcut Copy and Paste commands. The preset will be pasted into the selected Library category:
Minimoog Voyager Editor Librarian
Page 21
•
By copying the entire User Bank (all 128 presets) using the Load From User Bank Data command in the
Librarian menu:
When you copy a bank this way, you will be asked if you wish to sort the presets according to category
before the bank is copied:
If you select OK, the presets will be placed in their corresponding categories in the Librarian. If you select
NO, all presets will be placed into the currently selected (i.e. boldface) category. Selecting CANCEL will
cancel the command.
Note: Because the User Bank and the Librarian are two different functions in the same window, each has
its own separate copy & paste commands. For this reason, if you wish to move presets using copy/paste,
you should choose COPY from the Bank menu, and then choose PASTE from the Librarian menu. You
can simplify this process using the shortcut commands (refer to the Bank and Librarian menus, or see the
shortcut command list at the end of this Guide). Note that when pasting a preset to the Librarian, the preset
will be pasted into the currently selected category. That said, the easiest way to move presets between the
User Bank and Librarian is either to drag and drop the selected presets or to use the Move arrows.
Tip: If you need to change the order of the presets in the User Bank (for an upcoming gig, for example),
simply copy the entire bank into the Library (use the Librarian’s ‘Load From User Bank Data’ command,
but don’t sort the bank into categories). You can then drag and drop selected presets back into the
User Bank as desired.
Minimoog Voyager Editor Librarian
Page 22
6.2 VOYAGER PANEL
The Voyager Panel is the second component in the Editor window. The Voyager Panel displays the settings of the
Voyager’s knobs and switches for the current preset. This is handy to give a visual reference as to how the
selected preset is setup on the Voyager. While most of the knobs on the panel have a red dot to indicate their
settings, pointer knobs and switches on the display indicate their actual positions. The yellow LCD displays the
name of the selected preset:
The Voyager Panel is interactive, meaning it will not only respond to parameter changes made from the Voyager,
it will send information to the Voyager when a control is changed. Except for the Fine Tune knob, all controls are
active and movable. Rocker and rotary switches will change position when clicked, and knobs will respond using
a rotary motion with the cursor. When the cursor is placed over a knob with a red dot, the corresponding
parameter information is superimposed in the Touch Surface area. The parameters are displayed in both 8-bit and
16-bit versions:
Note: Any edits made using the Voyager Panel must be written to the Voyager in order to be saved.
Minimoog Voyager Editor Librarian
Page 23
6.3 LIBRARIAN
The Librarian is the third component in the Editor window. The Librarian lets you store an unlimited number of
Voyager presets. You can also have as many library files on your computer as you wish. The Librarian provides
32 sound categories to organize your Voyager sounds and have them available for immediate use. These
categories correspond to the 32 sound categories in the Voyager (OS3.2), but any category can be renamed
should you need to.
A view of the Librarian function is shown below. Sound categories are displayed on the left along with two large
Move buttons, a list of the Voyager presets is on the right, and buttons for library file functions are at the top.
The currently selected (active) sound category is indicated by boldface type and a triangle to the left of the name.
In the figure above, ‘Bright Lead’ is the active category, and it contains 8 presets. The presets in the Bright Lead
category is displayed on the right.
Note: When the number of presets exceeds what can be displayed in the list window, the program will
add a scroll bar to access to all presets in the list. When a scroll bar is displayed, you can navigate the
list using the scroll bar/scroll arrows, mouse wheel, or the HOME, END and ARROW keys on the Mac
keyboard.
Minimoog Voyager Editor Librarian
Page 24
You can change to a different category simply by clicking on the desired category name. In the figure below we
selected the Piano category, which only contains one preset:
6.3.1 Working with Libraries
The Librarian has four buttons dedicated to Library file functions:
The Librarian’s Add Current Panel button adds the current preset from the User Bank to the active sound
category. Note that new entries are always added to the end of the list, so if you have a lot of presets in a
particular category, you may have to scroll down to see the new entry.
The New button allows you to create a new Library. After clicking New, you’ll see a message dialog asking if you
wish to save the existing library:
Clicking the OK button will present you with a save dialog box that will allow you to name and save the current
library to the location you specify. After saving, you will have an empty (new) Library. Clicking the NO button will
clear the contents of the existing library (all 32 categories), leaving an empty library. Clicking the Cancel button
will cancel the operation and return you back to the library unchanged.
The Load button allows you to load a library file into the program. Loading a library file is just like loading a bank
file, but with a difference – library file names have the extension .mvl.
Note: All library files are loaded or saved as .mvl (Minimoog Voyager Library) files. As with bank files,
Library files may be stored anywhere on your hard drive or removable media. When loading a library file,
all files will be displayed, but only those with an .mvl extension will load. All other files will be ignored.
Tip: You can load a new library into an existing library to combine the presets of each. You can also
combine presets from different banks using the ‘Load from User Bank Data’ command.
The Save button allows you to save the library file, displaying a dialog box that will allow you to name and save
the current library to the location you specify.
Minimoog Voyager Editor Librarian
Page 25
6.3.2 Organizing Presets
Presets are loaded into the Library using any of the methods described in Section 6.1.5, Organizing Presets.
Note: It’s a good idea to receive all data from the Voyager first before selecting Load From User Bank Data
to insure that it corresponds to all the bank data in your Voyager.
Presets can be moved from one Librarian category to another by dragging them with your mouse. Here we are
dragging the preset ‘HERBY’S D6’ from the active category to the Piano category:
The red category arrow is another way to move presets between categories. It works similarly to dragging, but
with less mouse movement. It’s also faster than dragging, and more precise. To use it, simply position the
category arrow next to your desired category and click on the arrow. This action will move the selected presets
from the active category to your chosen category. You move the red category arrow by clicking anywhere in the
vertical space between the sound categories on the left and the preset list on the right. In this example, clicking on
the arrow will move ‘Jan’s Hammer” from the active category to Bright Lead category:
As in the User Bank, you can make group and non-adjacent selections in any Library category using the SHIFT
and COMMAND () keys. Using these modifier keys, multiple presets can be selected and moved from one
category to another, or from the Library to the User Bank.
Minimoog Voyager Editor Librarian
Page 26
6.3.3 Copying Presets to the User Bank
To copy presets from the Library to the User Bank, you can either drag the presets using the mouse, or use the
left-facing Move arrow. In the example below, clicking on the Move arrow will copy the four selected Bass presets
to the current User Bank:
When moving presets from the Library to the User Bank, the presets in the User Bank will be replaced by the
ones from the Library and will be transmitted to the Voyager bank. A dialog box will ask you to confirm this
operation:
Selecting OK will copy the presets into the User Bank and transmit them to the Voyager. Selecting NO will copy
the presets into the User Bank without transmitting them to Voyager. Selecting Cancel will cancel the operation.
Moving multiple presets into the User Bank will replace the selected preset in the User Bank and the equal
number of consecutive presets. Here is an example illustrating what this means:
1.
2.
3.
4.
Select Preset No 003 in the User Bank (any bank).
Select 5 non-adjacent presets from the Librarian (any category).
Drag the 5 selected Presets from the Librarian and drop them into the User Bank.
A warning dialog will be displayed like the one above. Selecting OK will copy the five presets into the
User Bank replacing Presets 003 - 007 with the five selected Librarian presets and transmit them to the to
the Voyager at the same locations. If you select NO then the presets will not be transmitted to Voyager
but they will still replace Presets 003 to 007 in the User Bank. Selecting Cancel will cancel the operation.
Note: Moving a preset from the User Bank to the Librarian will not automatically assign the corresponding
sound category to the preset in the User Bank (the preset’s sound category in the User Bank will remain
unchanged). However, if a preset moved from the Librarian to the User Bank it will include the corresponding
sound category.
Minimoog Voyager Editor Librarian
Page 27
6.3.4 The Librarian Menu
128
and
The Librarian menu (shown on the left) includes
commands that duplicate the functions of the New, Load
and Save buttons mentioned above. It also includes
commands to Load From User Bank Data (copies all
presets from the User Bank), Add From Top Offspring
(copies all presets from the Preset Genetics ‘Top
Offspring’ list into the current category) as well as
commands to Copy, Paste, Cut, Delete, Select All and
Rename selected presets, and commands to Rename
Clear categories, and restore the Default Category
Names.
Selecting Rename Category (or double clicking on the triangle to the left of the category name) will create a text
window allowing you to change the existing category name or enter a new one:
Clicking outside of the name field will enter the new name and close the text window.
Note: Default category names match the categories built into the Voyager. While you can rename a
Librarian category for your own convenience, doing so WILL NOT change the category name in the
Voyager - the hardware will always use the built-in categories.
Selecting Default Category Names will restore all category names to their default designation.
Selecting Clear Category will clear the contents of the selected category, leaving all other categories unaffected.
Minimoog Voyager Editor Librarian
Page 28
7 PROGRAM WINDOWS - THE EDITOR WINDOW
There are two visual tools that significantly aid the the programming and editing of the Voyager - Classic and
Expert mode. Selecting one of the other of these two modes is available in the Options Menu - Editing View as
shown below.
7.1 2 Editing Modes - Classic and Expert
The two available editing screens are shown here
CLASSIC MODE
Minimoog Voyager Editor Librarian
Page 29
EXPERT MODE
Clicking the Edit button on the main screen brings up the Editor window in the mode you have selected as
described above. Here you have access to every Voyager programming parameter, including those parameters
that can only be accessed through the Voyager’s screen menus (Filter Poles, Pot Mapping, Touch Surface control
assignments, Keyboard and Trigger Modes, and Pitch Bend Amount). The Editor’s real-time controls allow you to
tweak and audition the sound of your presets right from your Macintosh.
Slider controls are used in the Expert window and more realistic rotary controls are used in the Classic window to
display the functional equivalent of the Voyager knobs.
Adjusting any on-screen control transmits that control change to the Voyager, instantly updating the Voyager’s
sound.
Note: In addition to having any on-screen control update the Voyager, adjusting any Voyager control
updates the onscreen display, so you can actually use the Voyager’s controls AND the Editor parameters
simultaneously for the ultimate in Voyager preset development!
Minimoog Voyager Editor Librarian
Page 30
7.2 Classic Mode - Additional Controls
In the Classic mode, additional controls, not available on the Voyager front panel are found by selecting
Advanced Features at the top of the editing screen.
The graphs on the lower portion of this window allow you to visualize and edit the filter and volume envelopes in a
more intuitive way. Simply click and drag on the points of the graph. You will notice that the rotary controls on the
image of the Voyager front panel respond to changes made in the graph.
7.3 Classic Mode Display Settings
When in Classic mode, an additional selection can be made in the the Options menu
Selecting Display Settings will open this window
Minimoog Voyager Editor Librarian
Page 31
The various sliders and check boxes allow you to customize the look of the Classic control panel on the computer
screen.
Brightness and Contrast adjust the overall look of the screen
Has Center - When selected, the image of the Voyager LCD and touch panel are in view. When deselected, they
are removed, decreasing the screen real estate required to view the editor.
Display Knob Values displays the numeric value over the rotary knobs
Full Screen causes the other windows on your desktop to be covered by the Classic edit window
Zoom drop down box allows various pre set and custom zoom levels. When Custom is selected the slider to the
right of the the drop down box determines the zoom level.
Knob CC Sensing will cause the knobs and switches on the editing window to follow and display the position and
values of the corresponding knobs and switches on the front panel of the Voyager.
Click the Apply button to confirm your settings, Cancel to not apply changes and OK to close the window.
Minimoog Voyager Editor Librarian
Page 32
7.4 Parameter Resolution in the Editor
The Editor window can display the Voyager’s parameters in either 8-bit or 16-bit resolution. You select the bit
value from the Editor’s Options menu:
When 8 BIT is selected, the Editor will display all parameters values in 8-bit resolution (value range 0 – 255).
When 16 BIT is selected, the Editor will display all parameter values in 16-bit resolution (value range 0 – 65535).
7.5 Editing Preset Parameters
Preset parameters are adjusted in the Editor window in several ways:
•
Switches – Clicking on a switch toggles it ON or OFF.
•
Sliders/Knobs– Move a slider (Expert) or rotating a knob (Classic) by clicking and dragging it in the
desired direction. You can get finer control by placing the mouse cursor in the slider channel and clicking.
This will increase or decrease the parameter value by 1 for each click. When 16-bit data values are
displayed, it will take many clicks to register a change. When 8-bit data values are displayed, each click
will change the value by 1.
•
Slider data values can also be adjusted by clicking on the value and manually entering a new value:
Note: For 8-bit resolution, valid data values are 0-255. For 16-bit resolution, valid data values are 0-65535.
If you type in a value outside of these ranges, it will be ignored.
•
Pull-down menus – Click to pull down a menu in the Editor window. Menu selections are made by doubleclicking on a menu item. This action will select that item and close the menu.
•
Parameter groups – You can copy a complete parameter group from one preset to another. Click on a
parameter group label (LFO, Mod Busses, Oscillators, Mixer, Filters, Envelopes, Pot Map or Touch
Surface) to get a pop-up menu. Select COPY to copy the parameters, and PASTE to paste the
parameters. The example shown below is the result of clicking the Envelope parameter group bar:
Minimoog Voyager Editor Librarian
Page 33
Presets can be auditioned in the Editor window by clicking on the piano keyboard at the bottom of the window. To
the right of the right of the piano keyboard are the Pitch and Mod wheels. You’ll find that the Editor’s on-screen
Pitch Bend and Mod wheels work just like the real thing; the Pitch Bend wheel springs back to its center position
when released, but the Mod wheel stays put when you adjust it.
Above the Editor keyboard, and to the left of the Preset Name field is an Auto Dump LED button:
Auto Dump is a feature that resynchronizes the Editor with the Voyager if the MIDI connection between the
Voyager and the Editor is interrupted, either accidentally or intentionally. When enabled, the Editor periodically
requests the edited preset from the Voyager (you will see the Voyager’s MIDI LED will flash periodically when
Auto Dump is selected). A complete preset update is sent with each request.
You can safely keep Auto Dump disabled and enable it if you ever lose the connection between the Voyager and
the Editor during an editing session.
Minimoog Voyager Editor Librarian
Page 34
7.6 Writing Presets to the Voyager
The Editor’s Write command allows you to save an edited preset to the Voyager. The command is located under
the Edit menu:
Selecting Write brings up a dialog box as shown:
Choose a destination (bank and location) and click OK to store the preset. Click Cancel to cancel the operation.
7.7 Other Edit Menu Commands
The Editor’s Edit menu also contains commands to Copy, Paste, Rename and Initialize the current preset.
Although largely self-explanatory, here’s what they do:
The Copy command copies all parameters for the current preset.
The Paste command pastes all copied parameters to the current preset.
The Initialization command will initialize the current preset to default parameters.
Minimoog Voyager Editor Librarian
Page 35
The Rename command allows you to change or rename the current preset. When Rename is selected, you will
be presented with a message dialog window as shown:
Clicking in the name field allows you to change the preset name up to a maximum of 24 characters (12 per line).
Additional characters will be ignored. Clicking OK will store the change and close the dialog box. Clicking Cancel
will close the dialog box without changes.
Note: You can also bring up the Rename window by double-clicking in the preset name window in the Editor.
Clicking on the category field in the preset name window brings up a menu of sound categories, allowing you to
assign a category from one of the 32 available:
All edits made in the Editor window (parameters, name and categories) affect the preset in the Voyager’s EDIT
buffer. Since the EDIT buffer is temporary, the preset will have to be stored using the WRITE command if you wish
to keep it.
7.8 Show Voyager Panel
The Editor’s Options menu contains a command to display the Voyager’s panel settings:
Minimoog Voyager Editor Librarian
Page 36
When Show Moog is selected, the Voyager Panel is displayed as a moveable window. The panel automatically
updates to show all of the Editor settings. As you make changes in the Editor window, you will see these changes
reflected on the Voyager Panel. To close the Voyager panel window, click on the button in the upper left corner of
the panel. The panel will also close automatically when you leave the Editor.
7.9 Exiting the Editor
To exit the Editor, click the red ‘X” button in the upper left corner of the Editor window, or use the Close command
in the File menu. Upon exiting the Editor window, you will return to the main window.
Note: You must exit the Editor window before you can quit the Voyager Editor program.
Minimoog Voyager Editor Librarian
Page 37
8 PROGRAM WINDOWS - THE NANOM WINDOW
The NanoM window is selected from the Generator menu in the Editor window. NanoM allows you to adjust the
amounts of selected parameter groups using random values. There is also a function that allows you to morph the
current sound into the selected Editor preset.
The selected parameter groups are LFO, Modulation Busses, Oscillators, Mixer, Filter and Envelopes. Adjusting
the slider for any of these parameter groups generates random values for those parameters. The results of these
parameter group changes are sent to the Voyager for audition and displayed automatically in the Editor. If you
wish to keep the newly created preset sound, press the Keep button. This will place the newly created preset in
the Editor.
The Morpher function allows you to morph between the current preset and a selected preset. This function is
similar to the Morph function found in the Preset Genetics window. To select a preset, use the bank button to
select a bank:
Minimoog Voyager Editor Librarian
Page 38
then use the pulldown menu to select a preset from that bank:
With a preset selected, the Morpher slider will allow you to morph between the selected preset and the current
preset in the Editor, and audition the sound at any point. The current Editor preset is positioned at 0% (slider at far
left) and the selected preset at 100% (slider at far right). The ‘smoothness’ of the transition from 0% to 100% is
highly dependant on the choice of presets. Compatible sounds tend to transition smoother than contrasting
sounds, but possibilities for new sound combinations exist at every point. Experimentation is encouraged.
Note: As you morph between the two presets with the Morpher slider, you will notice that the preset name
in the Editor (and the Voyager’s LCD) changes. This is normal, as the program is morphing the names of
the presets along with the parameters. The current preset name is displayed at slider position 0%(far left),
and the selected preset name is displayed at slider position 100% (far right). Values in between will scramble
the name.
The Cancel button closes the nanoM window.
Note: You must close the nanoM window to order to return to Editor program.
Minimoog Voyager Editor Librarian
Page 39
9 PROGRAM WINDOWS - THE PRESET GENETICS WINDOW
The Preset Genetics window is selected from the Options menu of the main page, or from the Editor window
under the Generator menu. Preset Genetics allows you to quickly build new sounds from two existing ones in a
similar fashion to breeding. Parameters of each of the two sources (parents) are combined using four different
functions to generate a new bank of presets (kids).
A view of the Preset Genetics window is shown below. The two source banks (parent banks, also called mommy
and daddy) are located in the upper left, along with buttons for the four different genetics functions. The generated
bank (kids) and the top offspring bank are located in the lower left. On the right is a scrollable filters window that
allows user-selected parameters to be excluded from the genetics function. Directly below the filters window is a
single parameter adjustment function that permits you to change one of the preset parameters for an entire
Voyager bank.
Both parent banks use the presets from the User Bank, and these banks will automatically load when the Preset
Genetics window is opened. Any pair of the 128 available presets can be used for the genetics functions (one
each from mother and father). The result of applying the user-selected genetics functions creates the child bank,
and any ‘keepers’ auditioned from the child bank can then be moved into the top offspring bank.
The four Preset Genetics functions are:
Mix: The parameters of each child preset are randomly chosen from either a parameter from the mother or father
source. For example, if the mother’s cutoff frequency was 10 and the father’s was 88, the child’s value would only
be 10 or 88.
Morph: The value of each parameter is linearly interpolated from one parent to the other. The first child is
identical to the mother; the last child is identical to the father. All others are weighted towards each parent
depending on their placement within the list. The middle child preset is exactly 1⁄2 mother and 1⁄2 father.
Minimoog Voyager Editor Librarian
Page 40
Mutate: The parameter values of each child preset are randomly chosen from within the range between each
parent’s parameter. For example, if the mother’s cutoff frequency was 10 and the father’s was 88, the child values
would be anywhere between 10 and 88.
Random: The value of each parameter of each child is produced by a random number from within the min/max
Voyager parameter range.
Note: Experimentation by using vastly different parents and similar parents creates the most interesting
results. You can also ‘interbreed’ the child patches, too. In addition, you can set filters to excluded
parameters that will not take a part in the generation of new offspring. Experiment and have fun!
Note: Preset names in the Kids bank also become scrambled or rearranged when you use the Genetics
functions. This is normal. You can prevent preset names from changing by checking the Name box under
‘Exclude Preset Parameters’. When the Name box is checked, all preset names in the generated Kid’s
bank will assume the selected preset name from the Mommy bank.
The Auto Audition checkbox enables automatic transfer of the selected presets from the mother, father, kids or
top offspring banks to the Voyager's edit buffer. When the Auto Audition checkbox is unchecked (disabled), no
data is transmitted to the Voyager.
The Edit button brings up the Editor window, permitting on-screen editing of the selected preset from the mother,
father, kids or top offspring banks. The Auto Audition button must be checked for the Editor to correctly display
the selected preset in the Genetics window.
The Reset button resets all selections made under the ‘Exclude Preset Parameters’ section. When the Reset
button is clicked, any checked selections become unchecked.
Minimoog Voyager Editor Librarian
Page 41
9.1 Single Parameter Adjustment
This function allows you to change one of the preset parameters for an entire Voyager bank. It works similar to the
Single Parameter Adjustment in the User Bank. Simply select the desired parameter from the pull-down menu:
and use the slider control to set the desired value:
When you click OK, a new Kids bank is generated from the Mommy bank. Every preset in the Kids bank now
contains the newly modified parameter. To save the change, select Replace Voyager Bank with the Kids Bank
from the FILE menu. Clicking OK will send the Kids bank to the Voyager. Clicking No will not update the Voyager
bank, but will update the Mommy bank with the changes, allowing you to make additional changes if desired.
Note: Numerical values for Single Parameter Adjustment are displayed as 8-bit values (0-255) when the
Editor Parameter Resolution is set to 8-bit resolution. Numerical values are displayed as 16-bit values
(0-65535) when the Editor Parameter Resolution is set to 16-bit resolution.
Minimoog Voyager Editor Librarian
Page 42
9.2 Moving Genetics Presets
Presets created in the Genetics window can be moved in several ways:
•
Selected presets can be dragged from either the Top Offspring or Kids bank directly into any
Librarian category.
•
Selected presets can be dragged from either the Top Offspring or Kids bank directly into the
User Bank. When dragging a preset to the User Bank, a message dialog will be displayed asking
if you also want to write the preset to the Voyager's bank:
Clicking OK will send the Top Offspring or Kids preset to the Voyager. Selecting No will
not update the Voyager bank, but will update the Users Bank with the change. Selecting
Cancel will cancel the operation.
Note: The Preset Genetics module does not support the same multiple selection options as the Librarian
and User Banks (i.e. the SHIFT and COMMAND keys have no function).
Minimoog Voyager Editor Librarian
Page 43
9.3 The Preset Genetics Menus
The File menu contains commands to manipulate the banks and files in the Preset Genetics window:
Save Top Offspring As Library File permits saving the complete Top Offspring bank as a separate library file,
regardless of the number of presets in the bank.
Paste Top Offspring To Library will copy the contents of the Top Offspring bank to the Librarian, pasting the
presets into the end of the Library (unassigned) category.
The Clear Top Offspring command will delete all entries in the Top Offspring bank, while leaving the parent and
child banks undisturbed.
Refresh Parent Banks will copy the current contents of each selected bank into each parent bank. For example,
if Mommy is the A bank, and Daddy is the B bank, selecting Refresh Parent Banks will place the current contents
of the A bank into the Mommy, and the current contents of the B bank into the Daddy.
The Replace Voyager Bank with the Kids Bank command will replace the contents of the User Bank with the
modified presets in the Kids Bank. When using this function you will be presented with an option to send this bank
to the Voyager. This function will also replace the Mommy bank, allowing you to continue modifying other preset
parameters.
The Close command will close the Preset Genetics window and return you to the main window. Alternatively, you
can also click the red button in the upper left corner.
The Mommy and Daddy menus allow you to independently select any of the seven banks for the genetics
function as shown:
Minimoog Voyager Editor Librarian
Page 44
10 OTHER PROGRAM FUNCTIONS
10.1 Updating the Voyager Operating System
First make certain that MIDI connections are established and the correct MIDI Out port is selected (See MIDI
Setup, page 6). To update the Voyager’s OS, you use the update function located in the Moog Voyager menu:
The file dialog will prompt you to open a System Exclusive file (.syx) containing the software update. You will need
to locate and select the update file. When you open the file, the following message box will appear:
Note: Some MIDI interfaces use different buffer sizes (normally between 128-65535 bytes), which could
result in buffer errors when large messages like the OS update are transferred. To compensate for this,
the transmitted packet size can be adjusted here to a higher or lower value. By changing the packet size,
large SysEx messages can be converted into more manageable pieces for data transfer. The packet size
should be only adjusted if the Voyager reports a checksum error after the SysEx transfer is completed.
Now set up the Voyager to receive the update:
1. Press the MASTER button on the Voyager and scroll down to select "Receive Update"
2. Press the ENTER button and the following message on the Voyager’s LCD will appear:
This will delete
the Operating System!
Are you SURE?
YES / NO
3. Use the Cursor button to select YES and press the Enter button. The Voyager is now ready to receive
the update files.
Minimoog Voyager Editor Librarian
Page 45
Back in the Editor, click the onscreen Start button, and wait while the data is being transferred. Do not turn off the
power and do not use any other Editor controls while sending the update. The Voyager OS update usually
contains three SysEx bank files. After the first file is transferred, repeat the procedure for the remaining files.
Refer to the OS update documentation for full details on the update procedure.
10.2 Playing from the Computer Keyboard
You can audit Voyager sounds using your computer's keyboard to play notes. The middle and bottom rows of
computer keys act as a single octave of keys mapped like a piano keyboard. You can use these keys to remotely
play notes on the Voyager:
Notes:
Keyboard:
C
C#
D
D#
E
F
F#
G
G#
A
A#
B
|
s
d
g
h
j
|
|
z |
x |
c |
v |
b |
n |
m
-----------------------------------------------------------------------------
|
Each key press generates a MIDI Note ON message corresponding to the note as specified. When the key is
released, a MIDI Note OFF message is sent. You will see the Voyager’s MIDI LED blink as these commands are
sent, and the Voyager will play the corresponding note.
Note: This feature works in all windows, allowing you to audition Voyager sounds at any time. Note that
the CAPS LOCK key must not be ON, as only lower case letters send MIDI note data. You can use the
CAPS LOCK key to temporarily turn off remote playing if desired.
Two keys are programmed to adjust octaves (increment/decrement):
“o” – Octave down (-1)
“p” – Octave up (+1)
Octave switching ranges from –2 to +8 (ten octaves). When the octave switching keys are pressed, a pop-up
window briefly appears showing the change:
Tip: You can sustain a note by pressing down a “note” key and while it is depressed, press an “octave” key.
A MIDI Note ON command will be sent without a corresponding MIDI Note OFF, causing a sustained, or
‘stuck’ note. To un-stick the note, press the Space Bar. The Space Bar will send an ‘All Notes Off’ command
that shuts off all MIDI notes.
Minimoog Voyager Editor Librarian
Page 46
Two keys are programmed to adjust note velocity (increment/decrement):
“u” – Note velocity decrease (-5)
“i” – Note velocity increases (+5)
Note velocities can be set from 0 to 125 in increments of 5. A note velocity of 0 is the equivalent of no note played.
When the velocity switching keys are pressed, a pop-up window briefly appears showing the change:
Note: Changing the velocity values using the computer keyboard is the same as changing the ‘Piano Note
Velocity’ in MIDI Setup Window.
Note: Some Voyager presets are not programmed to respond to Velocity. If such a preset is selected,
changing the velocity value here will have no effect.
As notes are playing on the computer keyboard, a status display located in the lower Preset Genetics window (as
shown below on the left), and over the keyboard display in the Editor (as shown on the right) reveals the MIDI
channel, note and velocity values being transmitted:
Minimoog Voyager Editor Librarian
Page 47
11 SHORTCUTS & KEY COMMANDS
Most of the menus in the Minimoog Voyager Editor Librarian have key command shortcuts for certain items on the
menus. A key command shortcut is a combination of one or more modifier keys and an alphanumeric key. Modifier
keys used in this program are the OPTION key () and COMMAND key ().
Note: The COMMAND key is also known as the Cloverleaf key, or Apple key.
Here is the list of shortcut commands found in the menus:
MAIN WINDOW
Moog Voyager menu:
H Hide Moog Voyager
H Hide Others
Q Quit
Bank menu:
L
Load User Bank Data
S
Save User Bank Data
C Copy
V
Paste
N Rename
I
Initialize
Librarian menu:
L
Load Voyager File
S
Save Voyage File As
C Copy
V
Paste
X
Cut
D Delete
A
Select All
N Rename Panel
MIDI menu:
M Midi Setup
R Receive User Bank
T
Transmit User Bank
U Receive Preset Sound
Options menu:
G Preset Genetics
Minimoog Voyager Editor Librarian
EDIT WINDOW
GENETICS WINDOW
Moog Voyager menu:
Moog Voyager menu:
H
Hide Moog Voyager
H
Hide Moog Voyager
H
Hide Others
H
Hide Others
Q
Quit
Q
Quit
File menu:
File menu:
E
Close
S
Save Top Offspring
Edit menu:
V
Paste Top Offspring
C
Copy
W
Close
V
Paste
R
Rename
W
Write
I
Initialize
MIDI menu:
U
Receive Current Panel
M
MIDI Setup
Generator menu:
G
Preset Genetics
Page 48
APPENDIX A – OSX AUDIO MIDI SETUP PROCEDURE
Steps 1 through 4 should only be necessary if you are setting up a MIDI interface for the first time, or if you are
connecting to a new MIDI interface. Some MIDI interfaces may require additional connection setup. Refer to the
manufacturers instructions for details. The OSX Audio MIDI setup can also be used to connect external keyboard
controller to route and play notes on your Voyager/RME.
Step by step OSX MIDI setup:
1. If you are installing a MIDI interface for the first time, or if you are connecting to a new interface, follow the
manufacturer’s recommended installation procedure for guidelines on the installation process. This will generally
mean either installing an internal MIDI interface board into the Macintosh chassis, or simply connecting an
external USB or Firewire MIDI interface, then installing the driver software.
2. Upon completing step 1, reboot the computer (or power ON) and open “Audio MIDI Setup” (found in
Applications/Utilities/Audio MIDI Setup). You can also use the Finder to search for “Audio MIDI Setup”.
3. In the Audio MIDI Setup window, select the MIDI Devices tab below the title bar. You should now see an icon
for your new MIDI interface. In this example, we are adding an M-Audio MIDI Sport 1x1 USB interface. (Note:
Depending on your Mac OS version, the Audio MIDI Setup window may look slightly different from the one shown
below)
Minimoog Voyager Editor Librarian
Page 49
4. Click on the ‘Show Info’ icon to reveal the Properties window for the new interface. In the Properties window,
click on the ‘More Information’ arrow to expand the window. Enter the desired Name, Port and MIDI information in
the proper fields (this will depend on your setup) and click the APPLY button.
5. Click on the ‘ADD DEVICES’ icon You will see a ‘new external device’ icon added to the MIDI Setup window:
Minimoog Voyager Editor Librarian
Page 50
Minimoog Voyager Editor Librarian
Page 51
6. Click on the ‘Show Info’ button to rename the new external device. Here we are entering the Minimoog Voyager
information into the name fields. In this window you can also select a new display icon, change the icon color, and
specify MIDI transmit and receive channels and MIDI clock options. When finished, click the APPLY button and
close the Properties window by clicking on the red close button in the upper right corner:
7. Connect the Voyager icon to the MIDI interface icon by dragging the in/out arrows as shown:
Minimoog Voyager Editor Librarian
Page 52
8. Close the Audio MIDI Setup window, launch the Voyager Editor software, then open MIDI Setup and follow the
instructions as described in Section 4 – Getting Connected – MIDI Setup:
Minimoog Voyager Editor Librarian
Page 53
APPENDIX B – VOYAGER CATEGORY DESCRIPTIONS
Here are the official Voyager sound category descriptions from Moog Music:
1. Not assigned
Category not assigned.
2. Piano
A sound like a piano (acoustic or electric), generally percussive in nature
3. Organs
A sustained tone with an organ-like timbre
4. Strings
A sustained tone with a string-like timbre
5. Clav
A decaying tone with a timbre like a clavinet or harpsichord
6. Pads
A sustained tone with a mellow timbre
7. Soft Lead
A mellow lead sound
8. Bright Lead
A bright lead sound
9. Res Lead
A lead sound with a strong resonant character
10. Sync
Sounds featuring oscillator synchronization
11. Brass
An ensemble of horns, i.e. a brass section
12. Horn
A sustained tone with a horn-like timbre
13. Instruments
Sounds that imitate traditional instruments
14. Evolution
A sound that evolves over the duration of the note
15. Motion
A sound having an animated quality
16. Interval
Sounds that feature 2 or 3 note intervals (4ths, 5ths, chords, etc.)
17. Synth
A sound best described as typical of that produced by a synthesizer
18. Vox
A sound like the human voice, or one emulating vowel sounds
19. Bells
A sound with a bell-like timbre
20. Sequence
A short percussive sound appropriate for sequences
21. Percussion
Any type of drum or percussion sound as found in a drum kit or percussion
instrument
22. Model D
A sound emulative of a Minimoog Model D
23. Classic
A sound emulative of a Modular System, PolyMoog, Taurus bass pedals, or other
vintage synth. Also, any sound having an enduring or revered quality.
24. Generic
A basic sound, often used as a starting point for sound development
Voyager Sound Categories (con’t)
Minimoog Voyager Editor Librarian
Page 54
25. Harmonics
Sounds with a strong resonant character
26. Ring
A sound with a strong ring modulation character
27. Noise
An un-pitched sound (like white noise), or an extremely distorted or
clangorous sound
28. Soft Bass
A mellow bass sound
29. Bright Bass
A bright bass sound
30. Res Bass
A bass sound with a strong resonant character
31. Sub Bass
A very low bass
32. Sound FX
Sound effects
Minimoog Voyager Editor Librarian
Page 55