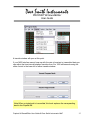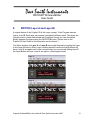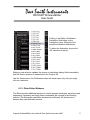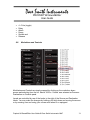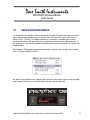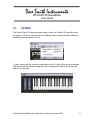
1
PROPHET’08 SoundEditor User Guide THIS PAGE LEFT BLANK INTENTIONALLY Prophet ’08 SoundEditor User Guide © Dave Smith Instruments 2007 2 PROPHET’08 SoundEditor User Guide Table of Contents 1. INTRODUCTION ................................................................................................................ 6 1.1. Credits ...................................................................................................................................... 6 1.2. Support..................................................................................................................................... 6 2. INSTALLATION / REQUIREMENTS.............................................................................. 7 2.1. Before You Begin .................................................................................................................... 7 3. OVERVIEW.......................................................................................................................... 8 4. STARTING UP ..................................................................................................................... 8 5. GETTING CONNECTED ................................................................................................. 12 6. SOUNDEDITOR Quick Start ........................................................................................... 14 6.1. Software Menus ..................................................................................................................... 15 6.1.1. FILE Menu: ................................................................................................................... 15 6.1.2. EDIT Menu: .................................................................................................................. 16 6.1.3. MIDI Menu: .................................................................................................................. 16 6.1.4. OPTIONS Menu:........................................................................................................... 17 6.1.5. SNAPSHOTS Menu:..................................................................................................... 17 6.1.6. HELP Menu: ................................................................................................................. 18 6.2. Alternative Controls............................................................................................................... 18 6.3. Scrollable Lists....................................................................................................................... 19 6.4. Toolbar................................................................................................................................... 20 6.5. Naming Programs .................................................................................................................. 22 6.6. Receiving and Transmitting ................................................................................................... 24 6.7. Loading and Saving Files....................................................................................................... 26 7. GLOBAL SETTINGS ........................................................................................................ 27 7.1. Global Setting Parameters...................................................................................................... 27 8. EDITOR (Layer A and Layer B)....................................................................................... 29 8.1. Editor Controls....................................................................................................................... 31 8.1.1. Buttons .......................................................................................................................... 31 8.1.2. Knobs ............................................................................................................................ 31 8.1.3. Parameter menus ........................................................................................................... 32 8.1.4. Source and Destination menus ...................................................................................... 32 8.1.5. Other Editor Windows................................................................................................... 33 8.2. Program Envelopes ................................................................................................................ 34 8.3. LFO ........................................................................................................................................ 36 8.4. Oscillators .............................................................................................................................. 36 Prophet ’08 SoundEditor User Guide © Dave Smith Instruments 2007 3 PROPHET’08 SoundEditor User Guide 8.5. Low Pass Filter....................................................................................................................... 37 8.6. Modulators and Controls........................................................................................................ 38 8.7. Editor Menus.......................................................................................................................... 39 8.7.1. FILE Menu: ................................................................................................................... 39 8.7.2. EDIT Menu: .................................................................................................................. 39 8.7.3. OPTIONS Menu:........................................................................................................... 40 8.8. Saving Programs .................................................................................................................... 40 9. SEQUENCER WINDOW .................................................................................................. 42 9.1. Sequencer Buttons.................................................................................................................. 44 9.2. Display Mode......................................................................................................................... 45 9.3. Sequence Destination............................................................................................................. 46 9.4. Reset Button........................................................................................................................... 47 9.5. Function Button...................................................................................................................... 48 • Copy/Paste ............................................................................................................................. 49 • Reverse................................................................................................................................... 49 • Invert ...................................................................................................................................... 49 • Randomize ............................................................................................................................. 49 • Randomize Q ......................................................................................................................... 49 • Step Up................................................................................................................................... 49 • Step Q..................................................................................................................................... 49 • Control Adjust........................................................................................................................ 49 9.6. Tempo and Clock Divide ....................................................................................................... 50 9.7. Sequence Templates............................................................................................................... 50 10. USER PROGRAM BANKS............................................................................................... 52 10.1. Renaming Programs in a bank ........................................................................................... 53 10.2. Copying, pasting and renaming by popup menu ............................................................... 55 10.3. Saving and Loading Single Programs................................................................................ 56 10.4. Program Banks Menus....................................................................................................... 56 10.4.1. FILE Menu .................................................................................................................... 56 10.4.2. EDIT Menu ................................................................................................................... 57 10.4.3. MIDI Menu ................................................................................................................... 57 10.5. Program Menu ................................................................................................................... 59 11. PROPHET ’08 BANK MANAGER/LIBRARIAN .......................................................... 62 11.1. Buttons and Checkboxes.................................................................................................... 63 11.2. Librarian Functions............................................................................................................ 64 11.3. Organizing Presets ............................................................................................................. 65 11.3.1. Librarian Menu:............................................................................................................. 69 11.3.2. File Menu: ..................................................................................................................... 69 Prophet ’08 SoundEditor User Guide © Dave Smith Instruments 2007 4 PROPHET’08 SoundEditor User Guide 11.3.3. 11.3.4. 11.3.5. Bank Menu: ................................................................................................................... 70 Librarian Menu:............................................................................................................. 70 MIDI Menu: .................................................................................................................. 71 12. PROGRAM GENETICS and MORPHER ...................................................................... 72 12.1. Loading Banks ................................................................................................................... 75 12.2. Creating New Sounds ........................................................................................................ 75 12.3. Moving Programs .............................................................................................................. 76 12.4. Program Genetics Menus................................................................................................... 76 12.5. Morpher ............................................................................................................................. 77 13. SNAPSHOTS....................................................................................................................... 79 14. PHANTOM PROGRAM BANKS..................................................................................... 81 15. V-PIANO ............................................................................................................................. 84 15.1. Playing Notes From Keyboard .......................................................................................... 85 16. HELP PROGRAM FUNCTIONS..................................................................................... 88 16.1. About ................................................................................................................................. 88 16.2. Help ON Line .................................................................................................................... 88 16.3. Updating the Firmware ...................................................................................................... 88 17. PROPHET ’08 STACK and SPLIT LAYERS................................................................. 92 18. KEY COMMAND SHORTCUTS..................................................................................... 93 18.1. MAIN WINDOW .............................................................................................................. 93 18.2. PROPHET ’08 BANK MANAGER/LIBRARIAN WINDOW ........................................ 94 18.3. PROPHET ’08 PROGRAM BANKS WINDOW ............................................................. 95 18.4. PROPHET ’08 PROGRAM GENETICS WINDOW........................................................ 96 19. APENDIXICES................................................................................................................... 97 19.1. APPENDIX A. FILE EXTENSIONS................................................................................ 97 19.2. APPENDIX B. SEQUENCER NOTE VALUES .............................................................. 98 19.3. APPENDIX C. SEQUENCER CHORDS ......................................................................... 99 Prophet ’08 SoundEditor User Guide © Dave Smith Instruments 2007 5 PROPHET’08 SoundEditor User Guide 1. INTRODUCTION Congratulations and thank you for downloading/purchasing our Prophet ’08 SoundEditor for the Dave Smith Instruments (DSI) Prophet ‘08! This Prophet ’08 SoundEditor is designed to be the ultimate tool for organizing and creating presets for your Prophet ’08. Through a MIDI connection, this program can receive single presets or an entire bank of presets from the hardware - as well as replace individual presets or an entire bank. Once the presets are transmitted to the computer from the Prophet’08, all preset parameters can be displayed and edited in a friendly graphical user interface. The program can also be used to learn the inner details of the factory presets. Patches can be added to the program library in user-named categories for creating custom preset banks – a terrific feature for musicians looking to organize programs for easy retrieval later! In addition, a genetics function is available to create new presets simply by morphing or mutating two presets together into a whole new bank. The software allows for each of the Layers A and B to be edited singly or in combined mode. Lastly, a hardware OS update function is available to simplify updating the Prophet ’08 firmware. This manual, both a user guide and handy reference, is designed to get you up and running quickly. We hope you enjoy using Prophet ’08 SoundEditor for your Prophet ‘08! - The Software Development Team 1.1. Credits Software Development: SoundTower Software, Windsor, Ontario, Canada. User Guide Development: Derek Prowse 1.2. Support Support for this product is available at: www.soundtower.com/prophet/ Prophet ’08 SoundEditor User Guide © Dave Smith Instruments 2007 6 PROPHET’08 SoundEditor User Guide 2. INSTALLATION / REQUIREMENTS No special software installation is required. SoundEditor is a stand-alone program designed to run on Windows 95, 98, 2000, ME, XP; Min Pentium 133. The SoundEditor application requires: • 15MB Hard Drive space • 256 MB RAM (min.) • 1024 x 768 minimum screen resolution. • A MIDI interface Updates are available at: www.davesmithinstruments.com. The Prophet ’08 already has the correct firmware. A wheeled, two–button mouse is recommended for additional control of the program. 2.1. Before You Begin To get the most out of the Prophet ’08 SoundEditor program you should first be familiar with the operation of your Prophet ’08 instrument The Prophet ’08 instrument offers an abundance of programmable features, and the accompanying Operation Manual is the key resource for a complete explanation of the features and workings of the instrument. Although this software program can be an invaluable resource to aid in understanding your Prophet ’08, it is not a substitute for reading and understanding the Operation Manual. Prophet ’08 SoundEditor User Guide © Dave Smith Instruments 2007 7 PROPHET’08 SoundEditor User Guide 3. OVERVIEW This User Guide will walk you through the steps to setup the SoundEditor with your Prophet ’08 instrument. The STARTING UP and GETTING CONNECTED sections should be followed first to get the hardware properly connected and running with the SoundEditor software. From there you can freely explore SoundEditor, edit and audition sounds, create new ones and have some fun! The Prophet ’08 is a deep and complex instrument with many programming options. With this in mind, SoundEditor has been designed to be as simple and easy to use as possible while retaining all of the functional control needed to adjust every single Prophet ’08 parameter. 4. STARTING UP After installing Prophet ’08 and launching the application for the first time by double clicking on the program icon: . You will initially be shown a splash screen with version number and the name of registered owner. In the image shown below this is version 1.1.2 and the program is currently an unregistered copy: Prophet ’08 SoundEditor User Guide © Dave Smith Instruments 2007 8 PROPHET’08 SoundEditor User Guide The first window you will see upon startup will be the following message window overlaying the splash screen: Note: Registration is free for Special Edition model owners. Prophet ’08 SoundEditor User Guide © Dave Smith Instruments 2007 9 PROPHET’08 SoundEditor User Guide Selecting DEMO will put the program in demo mode, limiting file and SysEx operations, but still allowing you to check out the program. The unregistered program lets you freely edit all of the Prophet ’08s preset parameters and use most of the Editor's functions with the following limitations: • • • • Saving files (disabled) Loading files (disabled) with exception of SYSEX files in OS UPDATE utility. Writing presets to the Prophet ’08 (disabled) Transmitting the User Bank (disabled) When you re-run the program, you’ll need to select demo mode again. This will continue until the program has a valid registration. There is no limit to the number of times the program can be run in demo mode. To register the software, select REGISTER ON LINE. The program will launch your default web browser and connect you to the DSI site, where you can purchase/register your copy of Prophet ’08 SoundEditor. Note: You will need an active Internet connection in order to register the program. If you have a valid registration code, enter this information in the appropriate fields and select ENTER CODE you will be presented with a small thank you message box. Prophet ’08 SoundEditor User Guide © Dave Smith Instruments 2007 10 PROPHET’08 SoundEditor User Guide Registered users will see their name displayed on the program splash screen. Prophet ’08 SoundEditor User Guide © Dave Smith Instruments 2007 11 PROPHET’08 SoundEditor User Guide 5. GETTING CONNECTED In order for the Prophet ’08 SoundEditor software to communicate with the Prophet ’08, the hardware must be connected to both the MIDI In and MIDI Out connections of your computer's MIDI interface. To open MIDI Setup, click on Midi menu and select MIDI Setup or use Ctrl-M. In MIDI Setup, select both MIDI In and MIDI Out ports where Prophet ‘08 is connected. If MIDI communication is working correctly then Prophet ‘08’s ROM software version will be displayed in on top of the MIDI Setup window. You will need to select the MIDI I/O ports where your Prophet ’08 is connected. Prophet ’08 SoundEditor User Guide © Dave Smith Instruments 2007 12 PROPHET’08 SoundEditor User Guide MIDI IN combo box selects the midi interface port to which your Prophet ’08’s Midi Out is connected. This interface processes midi data sent to Prophet ’08 Sound Editor from the Prophet ’08. MIDI IN recognizes and filters out incoming midi data in two ways: 1) The SysEx dump byte size must match expected byte count for the message type 2) The SysEx dump message signature must be set for the Prophet ’08 (the byte that specifies the kind of SysEx message) If either of these two conditions is not met, Prophet ’08 Sound Editor will ignore the invalid message and the data will not be processed. MIDI OUT combo box selects the midi interface port to which your Prophet ’08’s Midi In is connected. All data sent from Prophet ’08 Sound Editor (parameters, commands, continuous controllers, and notes played by mouse piano or assigned computer keys) goes to this port. Poll button looks for and activates the midi ports if available. Note: To reset (jump start) the connection between your midi interface and Prophet ’08 Sound Editor click Poll. This should reset the drivers, empty buffer contents, and reset the interface. After making your configuration selections, click the POLL PROPHET ’08 button. If MIDI communication is working correctly, the program will display the Prophet ’08 ROM Software Version at the top of the window. Click the OK button to store the settings and close the dialog box. You are now ready to explore Prophet ’08 SoundEditor! Prophet ’08 SoundEditor User Guide © Dave Smith Instruments 2007 13 PROPHET’08 SoundEditor User Guide 6. SOUNDEDITOR Quick Start When you launch SoundEditor you will see the window below. We will be referring to this as the Main window throughout this manual. The Main window contains menus, a toolbar and, initially, the Layer A parameter editing control panel: Note: The first time you launch SoundEditor, the two program banks, though not initially displayed, are filled with the Prophet ’08 factory sounds banks. The content of the program banks, including all edits and changes, are stored when you quit SoundEditor. They will reappear when SoundEditor is launched again. Prophet ’08 SoundEditor User Guide © Dave Smith Instruments 2007 14 PROPHET’08 SoundEditor User Guide 6.1. Software Menus Here’s a quick tour of the menus in the Main window: 6.1.1. FILE Menu: The File menu contains commands to load and save Prophet ’08 data, load Factory Presets and access the Prophet ’08 Bank Manager and Phantom Program Banks windows. • • • • See Loading and Saving Files, Section 6.7 Loads the Prophet ’08 or factory programs. Sec. 10 See Prophet ’08 Bank Manager/Librarian, Sec. 11 Phantom Program Banks, Section 14 Prophet ’08 SoundEditor User Guide © Dave Smith Instruments 2007 15 PROPHET’08 SoundEditor User Guide 6.1.2. EDIT Menu: The Edit menu contains commands for accessing Controls, Sequencer, copying, pasting, renaming, writing and initializing programs. You have the capability to Copy, Paste and Initializing the currently active Layer as well. Renaming the currently active program can be done through this menu. 6.1.3. MIDI Menu: The MIDI menu provides access to the MIDI Setup and Global Settings windows, as well as transfer commands of all Prophet ’08 data (transmit/receive). • • • See Receiving and Transmitting, Section 6.6 See Getting Connected for more on Midi Setup, Section 5 See Global settings sec. 7 Prophet ’08 SoundEditor User Guide © Dave Smith Instruments 2007 16 PROPHET’08 SoundEditor User Guide 6.1.4. OPTIONS Menu: The Options menu contains the commands for switching between Prophet ’08 Layer A and Layer B, as well as accessing the Program Genetics and V-Piano windows. This is also where you would select off-line editing. • • • See Program Genetics and Morpher, Sec. 12 Screen resolution control See V-Piano, Sec. 15 6.1.5. SNAPSHOTS Menu: The Snapshots menu contains just two commands for the Snapshots window, Add and View. The purpose of Snapshots is to allow you to quickly capture “Snapshots” of all parameters currently set in an edited program, giving you multiple points of ‘undo’ and allowing you to check your editing at various stages. See Snapshots, Section 13. Prophet ’08 SoundEditor User Guide © Dave Smith Instruments 2007 17 PROPHET’08 SoundEditor User Guide 6.1.6. HELP Menu: Prophet ’08 Help command will automatically access the SoundTower Prophet ’08 help webpage when selected. An active Internet connection will be required to access Prophet ’08 Help. + The Prophet 08 OS Update feature allows for OS update from provided files or from files saved to HD. This is explained in section xxx of this guide. 6.2. Alternative Controls If you are using a two-button mouse, you’ll find that right-clicking in various lists and menus in some windows will bring up a contextual menu of useful functions: When in Program Banks Right-clicking on program number or assigned name results in the contextual menu shown. This menu allows you to easily Copy, Paste, Rename, Save, Load, and Initialize programs. These commands are duplicated in the menus, but are placed here for convenience. Prophet ’08 SoundEditor User Guide © Dave Smith Instruments 2007 18 PROPHET’08 SoundEditor User Guide Similarly, when in Program Banks, Right-clicking on program Category column results in the contextual menu shown to the right. This menu allows you to assign a category to your program. It should be noted that these Categories are only accessible through the SoundEditor and not the Prophet ‘08. The Categories are stored in the Prophet ‘08’s memory for future recall. 6.3. Scrollable Lists You’ve already seen the two program bank lists that the Program Bank window offers. These lists, as well as program lists in other SoundEditor windows, can be navigated using the list scroll bars, the scrollable mouse wheel, or the keyboard. The following keys can be used to navigate SoundEditor’s scrollable lists: • • The UP and DOWN cursor keys will scroll one preset at a time, up or down respectively. Left click on the selection. Prophet ’08 SoundEditor User Guide © Dave Smith Instruments 2007 19 PROPHET’08 SoundEditor User Guide 6.4. Toolbar The Toolbar contains buttons for frequently used functions. A description of each button follows: The Receive button receives the current program from the Prophet ’08, allowing you to refresh after making changes. This button resynchronizes SoundEditor with the Prophet ’08 if you have been editing a program offline using the Prophet ’08 controls. The Send button sends the current edited SoundEditor program to the Prophet ’08, allowing you to refresh after making edits. This button resynchronizes the Prophet ’08 with SoundEditor if you have been editing a program offline using SoundEditor. These buttons control the Prophet ’08 Sequencer and Snapshots functions: copies the current program to the Snapshots window. This The Snap button button duplicates the action of selecting ‘Add Snapshot’ from the Snapshots menu (above). The Start/Stop Sequencer button is below the Snap button on the left. This button duplicates the action of pressing the Prophet ’08 Sequence Start/Stop button. The Sequencer Reset button is on the right. This button duplicates the action of pressing the Reset button on the Prophet ’08. It resets the sequence currently playing. It also acts as an emergency MIDI ‘All Notes Off’ command. Prophet ’08 SoundEditor User Guide © Dave Smith Instruments 2007 20 PROPHET’08 SoundEditor User Guide Popup labels identifying the Start/Stop Sequencer and Sequencer Reset buttons are displayed when the cursor is placed on them. To the right of the Snap button is a MIDI status display. It shows the current MIDI status, and will display hexadecimal transmissions of MIDI data. With normal MIDI communication between SoundEditor and the Prophet ’08 instrument, the MIDI status displays ‘ON-LINE PROPHET ’08’. The Write button brings up the Write Program window, allowing you to write the current program to the Prophet ’08 at the location you specify. The Write button duplicates the action of selecting ‘Write’ from the Editor’s Edit menu. The Layer B (Layer A when active in Layer B) button brings up the Layer B (or Layer A) Settings window. The Sequen (Sequencer) button opens the sequencer control window A or B corresponding to the Layer editor window currently active. Full control of all 4 sequencers is accomplished from this window. The Global button duplicates the action of selecting ‘Global Settings’ from the MIDI menu. Prophet ’08 SoundEditor User Guide © Dave Smith Instruments 2007 21 PROPHET’08 SoundEditor User Guide The Piano button brings up the V-Piano (Virtual Piano) window. The Piano button duplicates the action of selecting ‘V-Piano’ from the Options menu. To the right of the Piano button is a group of three smaller buttons and a MIDI status display. 6.5. Naming Programs SoundEditor gives you the ability to name your own programs or change existing program names that then can be stored and recalled in the Prophet ’08. Here’s how: In the Program Banks window, activated by clicking , select the program you wish to rename, right-click the mouse and select Rename: Here we’ve right clicked on Program A008 – Soft Triangles - and selected the ‘Rename’ function from the contextual menu. Click into the text field and make the desired name changes. When done, press enter. The new name will be stored automatically at location A008 and the Prophet ’08 will be updated. Prophet ’08 SoundEditor User Guide © Dave Smith Instruments 2007 22 PROPHET’08 SoundEditor User Guide Another option for ease of changing the name of the current program being edited is to click on the main program assignment panel which brings up the rename window immediately. Note: There is a 16-character limit on program names. Names may include upper and lower case characters as well as numbers and most punctuation marks. You can also change the program name using the Write button in the toolbar. Select the program you wish to change in Program Banks menu then click the Write button in the toolbar. This brings up the Write Program window: Prophet ’08 SoundEditor User Guide © Dave Smith Instruments 2007 23 PROPHET’08 SoundEditor User Guide Here you can change the name or enter a new name in the ‘New Name’ field. When done, clicking the OK button will save the new name to the existing (default) location. Write P also gives you the option of saving the program to another location if desired. Select the new bank using the Destination bank pull-down menu (shown), and scroll to the desired program location. Clicking OK will save the program to this new location. 6.6. Receiving and Transmitting Receiving and transmitting functions are located in the Midi and Program menus. Here you can receive or transmit all data at once, or limit the data to any selected Program Bank or Single Program. Prophet ’08 SoundEditor User Guide © Dave Smith Instruments 2007 24 PROPHET’08 SoundEditor User Guide A transfer window will open at this point. If your MIDI interface cannot keep up with the rate of received or transmitted data you can adjust the time interval between transfers from 0 to 1000 milliseconds using the slider control in the lower left of either transfer window: Note: When a single bank is transmitted, this bank replaces the corresponding bank in the Prophet ’08. Prophet ’08 SoundEditor User Guide © Dave Smith Instruments 2007 25 PROPHET’08 SoundEditor User Guide 6.7. Loading and Saving Files Loading and saving functions are located in the File and Program menus in the Main window. You can load or save all Prophet ’08 data at once, or limit the data to a selected Program Bank or Single Program. Note: SoundEditor also has features for loading/saving Sequences, Phantom (virtual) Program Banks and Library files. Refer to those sections elsewhere in the User Guide for details. Prophet ’08 SoundEditor User Guide © Dave Smith Instruments 2007 26 PROPHET’08 SoundEditor User Guide 7. GLOBAL SETTINGS The SoundEditor’s Global Settings window is displayed by clicking the Global button in the toolbar or by selecting “Global Settings” from the MIDI menu (shortcut: Ctrl + G). The data is automatically polled from the Prophet ’08 but not if SoundEditor is set to “OFF-LINE EDITING”. The Global Settings window displays the Prophet ’08 global settings including, but not restricted to, transposition control, tuning, clock, MIDI parameters and parameter send and receive. Whenever the Global Settings window is opened the associated data is requested from the Prophet ’08 hardware and displayed. 7.1. Global Setting Parameters The Global Setting window allows control of: • • • • • Master Transpose (-12 to 12) Master Fine Tune (0 to 100) Midi Channel (All or 1 to 16) Poly Chain (No Chaining, Poly Chain Out, Poly Chain In) Midi Clock Select (Internal, Internal with Send, External and External with Send) Prophet ’08 SoundEditor User Guide © Dave Smith Instruments 2007 27 PROPHET’08 SoundEditor User Guide • • • • • • • • • • Midi Program Send/Receive On/Off Midi Pressure Send/Receive On/Off Midi Controller Send/Receive On/Off SySex Send/Receive On/Off Parameter Send (NRPN, CC, OFF) Parameter Receive (All, NRPN Only, CC Only, OFF) Pedal Destination (Foot Control, Breath Control, Expression, Volume, Filter Frequency, Filter Frequency / 2) Damper Polarity (Normally Open, Normally Closed) Velocity Curve (Curve 1 through 4) Pressure Curve (Curve 1 through 4) See image below for layout of described controls. Prophet ’08 SoundEditor User Guide © Dave Smith Instruments 2007 28 PROPHET’08 SoundEditor User Guide 8. EDITOR (Layer A and Layer B) A unique feature of the Prophet ’08 is the Layer concept. Each Program has two layers, A and B. Each layer can contain a completely different patch. The layers are typically used to create stacked and split Programs, though you can also switch quickly between the layers using the LAYER A/B button. (Please refer to the Prophet’08 User Guide for full information on this feature.) The Editor windows for Layer A or Layer B are brought forward by toggling the Layer A and Layer B buttons. When Layer A editing window is active the Layer button will have ‘Layer B’ as caption and in the converse when you are actively editing Layer B the Layer Button will have 'Layer A’ as caption. (See images below): Prophet ’08 SoundEditor User Guide © Dave Smith Instruments 2007 29 PROPHET’08 SoundEditor User Guide We will deal with the combined Layer A/Layer B Mode in section 17. For the Layer editing window you have access to every Prophet ’08 programming parameters, including sequences. The Editor’s real-time controls allow you to tweak, test and audition the sound of your presets right from your PC. Edits are automatically sent. Custom knob controls are used in the Editor window to display the functional equivalent of the Prophet ’08 knobs. Adjusting any on-screen control transmits that control change to the Prophet ’08, instantly updating the sound. (See image below) Note: In addition to the on-screen controls updating the Prophet ’08, adjusting the Prophet ’08 controls will update the Editor display. This is because MIDI control messages are transmitted bi-directionally, allowing you to use the Prophet ’08 controls AND the Editor parameter controls simultaneously! Prophet ’08 SoundEditor User Guide © Dave Smith Instruments 2007 30 PROPHET’08 SoundEditor User Guide 8.1. Editor Controls The Editor window has several types of controls for program editing. Each is discussed in more detail in the following sections. 8.1.1. Buttons Clicking on a button toggles it ‘ON’ or ‘OFF’. When ON, the button has the appearance of an LED that is lit. When OFF, the button appears dimmed. In this example, the Stack A/B button is ON and the Split A/B is off: 8.1.2. Knobs Move a knob by clicking and dragging cursor in a rotational manner will change the parameter value. You can get finer control by placing the mouse cursor in/near the knob and moving the mouse wheel (clicking is unnecessary). This will increase or decrease the parameter value by 1 for each mouse wheel increment or decrement. (You can also use the computers up/down arrow keys to increment or decrement the values.) Prophet ’08 SoundEditor User Guide © Dave Smith Instruments 2007 31 PROPHET’08 SoundEditor User Guide 8.1.3. Parameter menus Click to select a parameter menu. Clicking on the label produces a drop-down menu that will display all possible options for the particular parameter. Clicking on a selection in the drop-down will select that item and close the menu: 8.1.4. Source and Destination menus Clicking in a Source or Destination field brings up a movable menu of Source or Destination parameters: In this example, clicking in the Editor’s Layer A Modulation first Source field brings up the Source menu, listing all possible modulation sources. Here we’re selecting ‘Sequence Track 4’ from the available list. To select no source, choose the ‘Off’ selection at the top of the Source menu. The Source menu will remain open until you make a single click selection. Prophet ’08 SoundEditor User Guide © Dave Smith Instruments 2007 32 PROPHET’08 SoundEditor User Guide Clicking in the Editor’s Modulation Destination field brings up the Destination menu, listing all of the possible modulation destinations. To select no destination, choose the ‘Off’ selection at the top. Making a new selection updates the source or destination display fields immediately, and the chosen selection is transmitted to the Prophet ’08. Like the Source menu, the Destination menu will remain open only until you single click on a selection. 8.1.5. Other Editor Windows The Editor provides additional windows to control program envelopes, waveforms and sequencing. Accessing and using these components are covered in the following sections. The Sequencer and Banks windows are sufficiently full featured as to deserve their own dedicated sections. Prophet ’08 SoundEditor User Guide © Dave Smith Instruments 2007 33 PROPHET’08 SoundEditor User Guide 8.2. Program Envelopes SoundEditor provides two panels dedicated windows to adjust program envelopes. The adjustments are viewed graphically as the knob value changes are reflected by direct envelope changes in the display. Click on and adjust the knobs to change the envelope forms. In addition to the ADSR control sliders, the Filter Envelope Window contains slider controls to adjust the Filter Frequency, Envelope Amount and Keyboard Amount. Prophet ’08 SoundEditor User Guide © Dave Smith Instruments 2007 34 PROPHET’08 SoundEditor User Guide The AMP Envelope window contains the familiar ADSR, VCR and Amount controls as well as controls for Level and Velocity. The Envelope 3 window also contains the ADSR, Amount controls, and a Velocity control like the AMP envelope, but adds a programmable destination field. Clicking in this field brings up the Destination Menu, where you can select the destination of Envelope 3. When you’re finished adjusting envelope parameters, click the DONE button to return to the Editor. Prophet ’08 SoundEditor User Guide © Dave Smith Instruments 2007 35 PROPHET’08 SoundEditor User Guide 8.3. LFO All four LFO control are grouped at the bottom left of the main Layer window. The organization of each of the LFO is the same: Shape and destination are selected through drop down lists accessed by clicking on label or arrow. The Frequency and Amount values are modified by knobs controls. Each LFO can be synced individually by clicking on/off the LEDs. 8.4. Oscillators Osc 1 and Osc 2 are controlled by controls in the Oscillators sub-panel found to the top right of the main screen. As can be noted in image above all Prophet ’08 Osc 1 and 2 parameters can be modified in real time through this panel including: Prophet ’08 SoundEditor User Guide © Dave Smith Instruments 2007 36 PROPHET’08 SoundEditor User Guide • • • • • • • • Freq Fine Shape/PW Glide Noise Glide Mode Osc Stop and Toggling Sync and Keyboard On/Off Note that Glide Mode is changed through contextual menu not knob. Click on the list box to open the list. 8.5. Low Pass Filter Low Pass Filter parameters are controlled by controls in the Low Pass Filter sub-panel found to the middle right of the main screen. As can be noted in image above all Prophet ’08 Low Pass parameters can be modified in real time through this panel including: • • • • • • Frequency Resonance Env Amount Velocity Key Amount Audio Mod Prophet ’08 SoundEditor User Guide © Dave Smith Instruments 2007 37 PROPHET’08 SoundEditor User Guide • • • • • • 4 – Pole (toggle) Delay Attack Decay Sustain and Release 8.6. Modulators and Controls Modulators and Controls are simply mapped by clicking on the combobox down arrows and selecting from the list. Above ’28 Env 1 Attack’ was selected as Pressure Destination on Controls panel. Levels are controlled by use of the knobs to the right of the Source and Destination labels. You may make the changes by holding a left click down and moving the mouse or by mousing over and using your mouse scroll wheel if so equipped. Prophet ’08 SoundEditor User Guide © Dave Smith Instruments 2007 38 PROPHET’08 SoundEditor User Guide 8.7. Editor Menus Here are descriptions of the menus in the Editor window: 8.7.1. FILE Menu: The File menu contains commands to access the Load and Save Single Programs, Program Banks, Librarian, Phantom Program Banks and Exit commands. 8.7.2. EDIT Menu: The Edit menu contains commands for copying, pasting, initializing and writing programs. The Copy Program command copies all parameters of the current defined program and the Paste command pastes the copied parameters into the current program Copy, Paste and initialize layer deals with the currently active layer of the program being edited. Prophet ’08 SoundEditor User Guide © Dave Smith Instruments 2007 39 PROPHET’08 SoundEditor User Guide The Write command brings up the Write Program window, allowing you to change the name and select the location where The program will be saved. Initialize resets all parameters to default values. 8.7.3. OPTIONS Menu: The Options menu gives access to many controls and functions unique to Sound Tower editors. • • • Access to Program Genetics and Morpher windows Screen Resolution choice of 1024x768 and 1152x864+ V-Piano 8.8. Saving Programs All program edits you make in the Editor are automatically applied to the edit buffer of the Prophet ’08, but they must be saved to make them permanent. To save an edited program, use the Editor’s Write option. This is accessed by clicking on the write button on tool bar (in red circle) Prophet ’08 SoundEditor User Guide © Dave Smith Instruments 2007 40 PROPHET’08 SoundEditor User Guide Selecting Write produces the Write Program dialog box: Select a destination bank, location and click OK to store the program. You can also change the program name here (limited to 16 characters). Click Cancel to cancel the operation. Prophet ’08 SoundEditor User Guide © Dave Smith Instruments 2007 41 PROPHET’08 SoundEditor User Guide 9. SEQUENCER WINDOW From the Sequencer window all four of the Prophet ’08 sequences can be graphically controlled. The Sequencer Window is selected from the Editor’s Program menu (shortcut: F6), or by clicking on Tool Bar button (below) A quick adjustment option is offered through the controls on the right side of the editor screen. Prophet ’08 SoundEditor User Guide © Dave Smith Instruments 2007 42 PROPHET’08 SoundEditor User Guide When the Sequencer is selected, it opens a new window (below). The Sequencer window contains parameters to program the four Prophet ’08 sequences, controls to adjust the tempo and clock divide functions, and buttons to start/stop and reset the sequencer. Additionally, a Sequence Templates function allows you to copy sequences from other programs and apply them to any one or all four sequences: A closer look of the upper right corner of the Sequencer Window reveals the buttons for Sequencer Start/Stop and Reset (see section 9.1 below), knob control to adjust the Prophet ’08 SoundEditor User Guide © Dave Smith Instruments 2007 43 PROPHET’08 SoundEditor User Guide Tempo and a drop down list box to control Clock Divider parameters (see section 9.6 below). 9.1. Sequencer Buttons The sequencer buttons provide a convenient way to start/stop and reset the Prophet ’08’s sequencer remotely. Like the sequence buttons in the main window, placing the cursor over the Sequencer buttons causes a pop-up label to appear. Prophet ’08 SoundEditor User Guide © Dave Smith Instruments 2007 44 PROPHET’08 SoundEditor User Guide 9.2. Display Mode The Display Mode control affects the way the cursor works when adjusting each of the 16 sequence control bars. There are two modes, Sliders and Pen: Sliders are just that, individual sliders. Each bar is adjusted individually by clicking and dragging on the ‘fader’. Slider mode is the best choice for sequences that will control oscillator pitch, or anytime precision adjustment is required. Pen makes the cursor function like a magnet so as you drag the cursor over the graphic bars the height or each bar and so the shape of the sequence is adjusted as if drawing a line or curve. With the mouse button held down, placing the cursor over a fader causes the fader to follow the cursor position. Pen mode allows you to draw envelope-like sequences by dragging the cursor across the control bars. Pen mode is not as precise as slider mode, but is a good choice for sequences that are programmed to provide ‘evolving’ changes over time. Once set, the Display Mode control setting remains ‘as is’ until you change it again. Prophet ’08 SoundEditor User Guide © Dave Smith Instruments 2007 45 PROPHET’08 SoundEditor User Guide 9.3. Sequence Destination Just below each of the four Sequence labels is a display field that that expands into a list box when clicked showing the sequence’s destination (shown as OSC ALL in the figure below). You can change the destination by clicking in this display field, which will bring up a destination menu as shown. In the example given here, Sequence 1 is set to control Resonance. Each of the Sequences (1 through 4) must be selected individually. You need to set each Destination for each of the four sequences separately. Simply click in the destination display field for each sequence, and select the new destination. Prophet ’08 SoundEditor User Guide © Dave Smith Instruments 2007 46 PROPHET’08 SoundEditor User Guide 9.4. Reset Button The Reset button resets all 16 sequencer control bars to zero values. This is a quick way to zero the parameters: Prophet ’08 SoundEditor User Guide © Dave Smith Instruments 2007 47 PROPHET’08 SoundEditor User Guide 9.5. Function Button Just below the Reset button is the Function button. Selecting the Function button opens a window that gives you access to additional sequencer functions, including adjusting the length of each sequence, options to create pitched sequences from preloaded sequence data, and functions to alter the sequence data. Also notice that we’ve selected Major from the Chords column, creating a sequence of pitch values based on a major chord. This sequence will be simultaneously applied to all four Prophet ’08 oscillators because ‘OSC ALL’ is the selected destination: Preloaded chord data is available for major and minor chords, and several major and minor sevenths to get you started. Refer to Appendix B for a list of sequencer note values and Appendix C for details on SoundEditor chord structures. To the right of the Chords column is a Functions column containing commands to copy, paste and modify the selected sequence. These functions include: Prophet ’08 SoundEditor User Guide © Dave Smith Instruments 2007 48 PROPHET’08 SoundEditor User Guide • • • • • • • • Copy/Paste: Copies the selected sequence/pastes to any selected sequence. Reverse: Reverses the sequence order within the specified step range. Invert: Inverts all values within the specified step range. Zero values become Resets and vice versa. Randomize: Randomizes all values within the specified step range. Repeated selecting of the Randomize function creates a new series of random sequence values. Randomize Q: Works like Randomize, but automatically adjusts step values up or down to real note values. Step Up: Creates a sequence of incremental positive values based on the first value in the range. For example, if the first step value is 0, Step Up will create a series of values where the second step value will be 1, the third 2, etc. If the first step value is 45, then the second will be 46, the third 47, etc. Step Q: Works like Step Up, but increases the step values by 2. If the first step value is 10, Step Q will create a series of values where the second step value will be 12, the third 14, etc. Control Adjust arrows act to raise or lower the selected sequence value by 1 for each click of the control. Holding the control button instead of clicking provides for rapid adjustment of the sequence values. The Undo button offers multiple levels of undo. You can undo any chord or function selection back to the point at which you started. The Done button closes the Function drop-down window. Note: the Sequence selection buttons on the left side isolate the sequence to apply these settings to. As each sequence is selected the colour of the bars of the selected sequence change from the light blue-green to mauve to help remind which sequence is actively being edited. Prophet ’08 SoundEditor User Guide © Dave Smith Instruments 2007 49 PROPHET’08 SoundEditor User Guide 9.6. Tempo and Clock Divide At the top right of the Sequencer Window are the Tempo and Clock Divide function controls. To adjust, simply click and rotate control for Tempo and click on the label for activation of contextual menu for clock divide. Tempo is continually adjustable from 30 to 250 BPM. Clock Divide is adjustable in increments from Half Note through 64th N T. 9.7. Sequence Templates Sequence Templates are a way to copy and paste sequences from other programs into your current sequence, as well as loading and saving sequences to your computer. The Add button adds the current sequence to the list. The Load From…… button produces a dropdown menu that allows you to load sequences from bank A or B or from a File saved to your HD. There is also a selection here to clear the list. Selecting Load File… brings up an Open File window that allows you to navigate to where the file is located. Prophet ’08 SoundEditor User Guide © Dave Smith Instruments 2007 50 PROPHET’08 SoundEditor User Guide The window will display all the files on your computer, but only those files having an ‘.p_s’ extension are valid template files that can be loaded. All other file types will be ignored. Use the Add button to save the current sequence as a template. You can display all sequencer settings from all programs in Program Banks. To select and apply sequencer settings from a template, use your mouse to click on the small arrow in the right most column in sequencer Template list. The Sequencer Template settings will be applied to the current program and sent to the Prophet ’08’s program buffer for auditioning. Click on step value labels to toggle values: 0 -> RST -> OFF -> 0 The Save button allows you to save all sequences that appear in the list of programs. Clicking the Save button brings up the Save Sequence Templates window: Enter a name for the file and select a location. Click SAVE when done. Sequence templates are saved with a ‘.p_s’ extension. The layout of the Sequencer window corresponds to the Prophet ’08’s 16x4 sequencer. You can adjust step parameter values using sliders. Reset buttons set all 16 sequence step parameters to “0” and if clicked again to “OFF” Prophet ’08 SoundEditor User Guide © Dave Smith Instruments 2007 51 PROPHET’08 SoundEditor User Guide 10. USER PROGRAM BANKS To streamline functionality of this software the Prophet ‘08 user banks are set in their own powerful sub-window easily accessed from the main GUI, from main menu or short cut key. (Ctrl+B). The Banks window is, in essence, a smaller main control window that can be left open and use in conjunction with the main editing window. If the program is to be heavily edited the Banks window can be minimize or closed until needed again. The Prophet ’08 program banks are accessed in several ways. In main menu select File -> Program Banks (Ctrl+B). As well the SoundEditor has a Bank button set just to the right of the current program name panel. Click this once and the Bank window will be activated. Prophet ’08 SoundEditor User Guide © Dave Smith Instruments 2007 52 PROPHET’08 SoundEditor User Guide The program banks display both Bank A and Bank B for editing. 10.1. Renaming Programs in a bank There are two options to rename a program from the program bank Edit menu select Rename (Ctrl+N) and open the rename box. (see below) Prophet ’08 SoundEditor User Guide © Dave Smith Instruments 2007 53 PROPHET’08 SoundEditor User Guide The other option is to left click select a program in one of the bank windows and then click the Edit button to set this program to be the active program in main edit window. This will also cause the program name to be placed in the current program name label (in the example below A001 ‘Wagnerian’ was select and set by Edit. A single click on the program name in green label brings up a small rename box: Type the new name, press ENTER, and the Prophet ’08 will automatically be updated. Prophet ’08 SoundEditor User Guide © Dave Smith Instruments 2007 54 PROPHET’08 SoundEditor User Guide 10.2. Copying, pasting and renaming by popup menu To copy selected program, click right mouse button to show pop-up menu and select “Copy Program”. You can use “Copy Program” from the “Edit” menu. If you have edited/changed any parameters, they will be included in the copied program. To paste the copied program to a different location in any of the banks, select the destination location, click the right mouse button to show pop-up menu and select “Paste Program”. Prophet ’08 SoundEditor User Guide © Dave Smith Instruments 2007 55 PROPHET’08 SoundEditor User Guide Note: The Paste function from the pop-up menu described above is different than Pasting from the “Edit” menu: • • ·Pasting from a pop-up menu automatically writes Program to the Prophet ’08. Pasting from the “Edit” menu sends the program to the Prophet ’08’s buffer for editing or auditioning. 10.3. Saving and Loading Single Programs Use the right mouse button pop-up menu to save the selected single program to a file or place it into a bank. 10.4. Program Banks Menus Here’s a description of the menus in the Program Banks window: 10.4.1. FILE Menu The File menu contains commands to Load and Save phantom banks, and Close the window. The Load All Prophet 08 Data command loads a saved bank file into the selected bank. Valid Bank files contain the ‘.p08’ suffix, and are the only file type that will load here. All other data files will be ignored. The Save All Prophet 08 Data command allows you to save the currently selected phantom bank. Selecting it brings up a save window where the Bank file can be named and saved to the location of your choice: Prophet ’08 SoundEditor User Guide © Dave Smith Instruments 2007 56 PROPHET’08 SoundEditor User Guide The Load Factory Presets command has a fly-out menu of program banks to choose from. The current OS has only the one choice. You can also open the Librarian and/or Phantom Program Banks from this menu as well. 10.4.2. EDIT Menu The Edit menu contains commands to Copy, Paste, and Rename, Initialize and Clear a program bank. The Copy Program and Paste/Write Program commands operate on the selected program, and are used to copy and paste programs between Banks. The Rename command opens a rename window; the selected program name can be changed or replaced. The Initialize command initializes the selected program, returning all parameters to their default values. 10.4.3. MIDI Menu The MIDI menu contains commands to transmit the selected bank to the Prophet ’08 Bank A or B. Prophet ’08 SoundEditor User Guide © Dave Smith Instruments 2007 57 PROPHET’08 SoundEditor User Guide Selecting any of the MIDI Dump Banks commands brings up the Transmit Program Banks window. The contents of the selected Program Bank will be transmitted to the chosen Prophet ’08 Bank when you click on the Transmit window Start button. Prophet ’08 SoundEditor User Guide © Dave Smith Instruments 2007 58 PROPHET’08 SoundEditor User Guide 10.5. Program Menu The program menu selection is very important to the functioning of Banks management. It contains the core list of functions for loading and sending/writing programs to and from the Prophet ’08. When you have selected a program of interested that is to be edited the first option of the Program menu, Edit Program Ctrl+E, sends the entire program to the SoundEditor’s buffer and is represented on the editing surface by updating all parameter groups. When satisfied with the edit the Write Program option (Ctrl+W) can be selected to send the modified program to be auditioned on the hardware. Receive and Transmit Bank will pull or send all of a selected Bank, or both banks, from or to the Prophet ’08 hardware when selected. A small receive/transmit window will be activated that always for adjustment to pause intervals between individual program upload/download to account for system data receive/send limitations in different setups. Prophet ’08 SoundEditor User Guide © Dave Smith Instruments 2007 59 PROPHET’08 SoundEditor User Guide Load Program Bank To and Save Program Bank will pull or send all of a selected Bank from or to file on memory media when selected. Your OS system dependent save/open dialogue window will guide you through this process. Load Single Program and Save Single Program will open and load or save a selected program from or to file on memory media when selected. Your OS system dependent save/open dialogue window will guide you through this process. Prophet ’08 SoundEditor User Guide © Dave Smith Instruments 2007 60 PROPHET’08 SoundEditor User Guide The last function available for use in the Program menu is the Initialize function. Selecting this option resets all program parameters back to initial factory presets. Prophet ’08 SoundEditor User Guide © Dave Smith Instruments 2007 61 PROPHET’08 SoundEditor User Guide 11. PROPHET ’08 BANK MANAGER/LIBRARIAN The Prophet ’08 Bank Manager is accessed through the Main window by clicking on the Bank button just to the right of the main program label. The Prophet ’08 Bank Manager’s Librarian lets you organize and store an unlimited number of Prophet ’08 programs. You can also have as many Library files on your computer as you wish. The Librarian provides 24 sound categories to organize your Prophet ’08 sounds and have them available for immediate use. For convenience, these sound categories have already been defined, but all categories can easily be renamed according to your needs. A view of the Prophet ’08 Bank Manager window is shown below. The User Program Bank is shown on the left (1), Librarian sound categories are displayed in the middle (2), and a list of the programs contained in the current Librarian sound category is on the right (3). Buttons for Bank Manager and Library functions are at the top. Prophet ’08 SoundEditor User Guide © Dave Smith Instruments 2007 62 PROPHET’08 SoundEditor User Guide 11.1. Buttons and Checkboxes A detailed view of the buttons and checkboxes in the Prophet ’08 Bank Manager is shown below. Here’s how the buttons and checkboxes function: The Use Bank Data checkbox is part of the User Program Bank functions. When Use Bank Data is unchecked (disabled), selecting a preset from the User Program Bank switches the Prophet ’08 to the corresponding preset. This guaranties synchronization between the hardware and SoundEditor. When Use Bank Data is checked (enabled), the selected preset data from the User Program Bank is sent to the Prophet ’08 edit buffer for editing and audition. This feature helps to browse through presets in the User Program Bank without the need for dumping the entire bank to the hardware. Note: When Use Bank Data is enabled, Tempo and Clock Divide data is not sent with the program data. If a sequence is playing when you select a new program, you will hear the new program’s sound, but it will be played at the tempo of the original program. This can be used to quickly audition new sounds/sequences at pre-determined tempos. Despite its location in the window, the Auto Dump checkbox is part of the Librarian. When the Auto Dump checkbox is checked (enabled), a selected preset from the Librarian Program list is automatically sent to the Prophet ’08 edit buffer for editing/audition. When Auto Dump is unchecked (disabled), no data is sent. The Add Current Program button copies the selected program in the User Program Bank to the current Librarian category. Prophet ’08 SoundEditor User Guide © Dave Smith Instruments 2007 63 PROPHET’08 SoundEditor User Guide 11.2. Librarian Functions The Librarian function contains 24 sound categories and a program list which display the contents of each category: The selected sound category is indicated by boldface type and a triangle to the left of the name. Prophet ’08 SoundEditor User Guide © Dave Smith Instruments 2007 64 PROPHET’08 SoundEditor User Guide Note: When the number of presets exceeds what can be displayed in the list window, the program will add a scroll bar to provide access to the complete list of presets. You can change to a different category simply by clicking on the small arrow to the left of the desired sound category name. For example, in the figure below we selected the Strings category, which currently contains no presets: Navigating the Librarian’s program listing is exactly like navigating the User Program Bank listing, using either the mouse or the keyboard. Options for changing the sort order of these programs is done in the same way as described for the Users Program Bank list. 11.3. Organizing Presets The Librarian’s Add Current Program button adds the current preset from the User Program Bank to the selected sound category. Note that new entries are always added to the end of the list, so if you have a lot of presets in a particular category, you may have to scroll down to see the new entry. Prophet ’08 SoundEditor User Guide © Dave Smith Instruments 2007 65 PROPHET’08 SoundEditor User Guide You can import all 128 programs from the User Program Bank into the Library using the Load From User Bank Data command in the Librarian menu You can also import the sounds from the Program Genetics Top Offspring bank using the Add From Top Offspring command. It’s important to understand that when using the Load From User Bank Data or Add From Top Offspring commands, programs will load into the currently selected Librarian category. Should you accidentally load a bank into the wrong category, you can use the Librarian’s Clear Category command to delete the bank, but realize that doing so will clear ALL presets in that category, including any presets you intentionally placed there. You can use the Delete command to selectively delete programs in categories, one program at a time. Right click on library list box and select cut or delete. Prophet ’08 SoundEditor User Guide © Dave Smith Instruments 2007 66 PROPHET’08 SoundEditor User Guide Programs can be moved from one category to another by dragging them with the mouse. Here we are dragging program 013 ‘Tarkus (F1 seq)’ into the Res Bass category: And here is the result. Note that after the move the number of programs in the Strings Library category is now 99 (down from 100 as seen in image above), and 1 program is now in the Res Bass category: You can also drag programs from the User Bank to the Library and from the Library to the User Bank. When dragging from the Library to the User Bank, the Library program will replace the currently selected program in the User Bank, and be written to the Prophet ’08 at that program location. Prophet ’08 SoundEditor User Guide © Dave Smith Instruments 2007 67 PROPHET’08 SoundEditor User Guide Found under Librarian menu the New Library command allows you to create a new Library. After selecting New Library, you’ll see a message dialog asking if you wish to save the existing library: Clicking the OK button will present you with a ‘Save Program Library’ dialog box that will allow you to name and save the current library to the location you specify. Clicking the NO button will clear the existing library including all 24 categories, leaving an empty library. Clicking the Cancel button will cancel the operation and return you back to the library unchanged. The Load command allows you to load a library file into the program. Library file names have the extension ‘.p_l’. When loading a library file, all file types will be displayed, but only those with a ‘.p_l’’ extension will load. All other files will be ignored. The Save command allows you to save the library file, displaying a dialog box that will allow you to name and save the current library to the location you specify. Prophet ’08 SoundEditor User Guide © Dave Smith Instruments 2007 68 PROPHET’08 SoundEditor User Guide 11.3.1. Librarian Menu: The Librarian menu is found at the top left corner of the Librarian window. 11.3.2. File Menu: File Menu contains links to the Load and Save Prophet ’08 Data, Load Factory Presets, Program Banks, Phantom Program Banks and Quit options. Prophet ’08 SoundEditor User Guide © Dave Smith Instruments 2007 69 PROPHET’08 SoundEditor User Guide 11.3.3. Bank Menu: Bank menu contains the command to handle Librarian edit operations, including Copy, Paste, Rename, Initialize, Edit Program From Bank, New Bank, Load to A and Save A options. 11.3.4. Librarian Menu: Librarian menu contains the usual Copy, Paste, Cut, Delete and Rename Program functions. In addition there are: • • • • • • • • • Edit Program From Lib Write New Library Rename Category Clear Category Load Prophet 08 File Save Prophet 08 File As Load From User Bank Data and Add From Top Offspring. Prophet ’08 SoundEditor User Guide © Dave Smith Instruments 2007 70 PROPHET’08 SoundEditor User Guide 11.3.5. MIDI Menu: The MIDI menu contains a quick link to the Midi Setup window that contains all the MIDI setup linkages and information as well as Receive A (or B), Transmit A (or B) and Global Settings link. Prophet ’08 SoundEditor User Guide © Dave Smith Instruments 2007 71 PROPHET’08 SoundEditor User Guide 12. PROGRAM GENETICS and MORPHER The Program Genetics window is selected from the Options menu of the main page (Morpher is a subset function of Genetics and will be discussed at the end of this section): Program Genetics can also be accessed from the Bank Manager/Librarian Options menu selection as well: Genetics allows you to quickly build new sounds from two existing ones in a similar fashion to breeding. Parameters of each of the two sources (Parents) are combined using four different functions to generate a new bank of presets (Kids). A view of the Preset Genetics window is shown below. The two source banks (Parent banks called Mommy and Daddy) are located in the upper left, along with buttons for the four different genetics functions. The generated bank (Kids) and the Top Offspring bank are located in the lower left. On the right are filters to exclude selected parameters from the genetics function, and three buttons at the top for editing functions and resetting excluded parameters. Prophet ’08 SoundEditor User Guide © Dave Smith Instruments 2007 72 PROPHET’08 SoundEditor User Guide Any pair of programs can be used for the genetics functions (one program each from mother and father). The result of applying the user-selected genetics functions creates a child bank of 128 new programs, and any ‘keepers’ auditioned from the child bank can then be moved into the Top Offspring bank. The four Program Genetics functions are selected by using the buttons at the top of the window. Here’s what the four functions do: • Mix button: The parameters of each child program are randomly chosen using parameters from either the mother or father source. For example, if the mother’s cutoff frequency was 10 and the father’s was 88, the child’s value would either be 10 or 88. • Morph button: The value of each parameter is linearly interpolated from one parent to the other. The first child is identical to the mother; the last child is identical to the father. All others are weighted towards each parent depending Prophet ’08 SoundEditor User Guide © Dave Smith Instruments 2007 73 PROPHET’08 SoundEditor User Guide on their placement within the list. The middle child program is exactly 1⁄2 of the mother and 1⁄2 of the father. • Mutate button: The parameter values of each child preset are randomly chosen from within the range between each parent’s parameter. For example, if the mother’s cutoff frequency was 10 and the father’s was 88, the child values would be anywhere between 10 and 88. • Random button: A random value from within the min/max parameter range produces the value of each parameter for the child. Notes: Experimentation by using vastly different parents and similar parents creates the most interesting results. You can also ‘interbreed’ the child patches, too. In addition, you can set filters to excluded parameters that will not take a part in the generation of new offspring. Experiment and have fun! The Auto Audition checkbox enables automatic transfer of the selected presets from the mother, father, kids or top offspring banks to the Prophet ’08's edit buffer. When the Auto Audition checkbox is unchecked (disabled), no data is transmitted to the Prophet ’08. Other buttons at the top of the window include Edit, Write and Reset. The Edit button brings up the Editor window, permitting on-screen editing of the selected preset from the Parents, Kids or Top Offspring banks. Note: The Auto Audition button must be checked for the Editor to correctly display the selected preset in the Genetics window. The Write button brings up the Write Program dialog box. The Write function works on the currently selected program, which can be from the Mommy or Daddy Bank, the Child Bank or the Top Offspring Bank: The Reset button resets all selections made under the ‘Exclude Preset Parameters’ section. When the Reset button is clicked, all checked parameter selections become unchecked. Prophet ’08 SoundEditor User Guide © Dave Smith Instruments 2007 74 PROPHET’08 SoundEditor User Guide 12.1. Loading Banks Both Parent banks use the programs from the ‘A’ bank by default, but any bank can be loaded into either parent by clicking on the list box masthead and selecting Bank A or B as shown below: 12.2. Creating New Sounds To create a bank of sounds based on a Program Genetics function (Mix, Morph, Mutate, or Random) you must select a pair of ‘seed’ programs, one each from the Mommy bank and Daddy bank. Use the scroll bars to scroll through the Parent bank lists and select the desired programs. If you have a mouse with a scroll wheel you can quickly scroll through either bank list by placing the mouse cursor onto the list and scrolling up/down. With a pair of programs chosen, selecting any one of the four Program Genetics functions will create a bank of 128 programs in the Kids bank. Selecting the Program Genetics function a second time will create a new bank of 128 programs, replacing the previously generated Kids bank. Notes: Program names in the ‘Kids’ bank become scrambled or rearranged when you use the Genetics functions. This is normal. Prophet ’08 SoundEditor User Guide © Dave Smith Instruments 2007 75 PROPHET’08 SoundEditor User Guide If Auto Audition is enabled, the newly generated programs can be auditioned by selecting a program from the Kids bank. With Auto Audition enabled, the program data is automatically sent to the Prophet ’08 edit buffer. Programs can be auditioned using SoundEditor’s V-Piano function, or by using the computer keyboard. Note: Be sure to turn down the volume before trying out “Kids” programs because the resulting levels can be unpredictable! 12.3. Moving Programs Programs created in the Program Genetics window can be moved in several ways: Selected programs in the Kids bank are moved into the Top Offspring bank by clicking on the thin copy bar that separates the banks. Selected programs can be dragged from either the Top Offspring or Kids bank directly into any Librarian category in the Prophet ’08 Bank Manager. Programs can also be dragged from either the Top Offspring or Kids bank directly into the User Program Bank in the Prophet ’08 Bank Manager where they are automatically written to the Prophet ’08 at the currently selected program location. 12.4. Program Genetics Menus Program Genetics has just one menu, shown below. The File menu contains commands to open Bank Manager/Librarian and Phantom Program Banks. Prophet ’08 SoundEditor User Guide © Dave Smith Instruments 2007 76 PROPHET’08 SoundEditor User Guide 12.5. Morpher The Morpher function is accessed through the main menu Option selection: The resulting window is a reduced view of the Morpher: This window contains a slider that allows for real time Morphing (the same Morph algorithm as used in the Program Genetics function) between any two programs from either or the same bank. Checking the Live Scroll option sends each incremental blending of the two programs being morphed to the editor buffer and window GUI as well it will be auditioned so that you can hear the actual result as you scroll. Please keep your speaker volume down using this function. There can be some very strange an extreme results that have high gain characteristics. The expanded view of the Morpher window (found by clicking the More button) offers a few editing/filtering options for the Morpher. Prophet ’08 SoundEditor User Guide © Dave Smith Instruments 2007 77 PROPHET’08 SoundEditor User Guide Options include preserving certain parameter groups as presented in the original programs (options for preservation are): • Base Sequencer • Freq/Tune • Base Mod Sources • Base Mod Destination • Base Analogue Oscillators • Base Controls There is also the option to Morph the Analog Oscillators only and to use Controller by number. Prophet ’08 SoundEditor User Guide © Dave Smith Instruments 2007 78 PROPHET’08 SoundEditor User Guide 13. SNAPSHOTS Program Snapshots add extra functionality to quickly capture UNDO points or “Snapshots” of edited programs. To add the current program to Snapshots click on the Snap button on Layer Tool Bar (seen below) Use SnapShot menu option and select Add Snapshot Press Ctrl+A to display SnapShot window. Prophet ’08 SoundEditor User Guide © Dave Smith Instruments 2007 79 PROPHET’08 SoundEditor User Guide To rename a program in Snapshot collection, double-click on the program name. To send the Snapshot to the Prophet ’08’s edit buffer, click the Send button as seen above. As you build a list of snapshots you may want to go back to one of interest and re-edit it or audition. This is simply done by clicking on one of the SnapShot selections and clicking the Edit button. The parameter settings on main window will automatically reset. Snapshots allows you to quickly capture “Snapshots” of edited programs, giving you multiple points of ‘undo’ and allowing you to check your editing at various stages. The Snapshots Window is accessed from the Snapshots menu in the Main window. Prophet ’08 SoundEditor User Guide © Dave Smith Instruments 2007 80 PROPHET’08 SoundEditor User Guide 14. PHANTOM PROGRAM BANKS The Phantom Program Banks function allows you to add virtual banks of programs (phantoms) to your Prophet ’08. Phantom Program Banks allows you to load up to 16 banks of programs into SoundEditor, and have any program in any bank immediately available for auditioning. This means you can have as many as 2048 programs (16 x 128) at your disposal (2560 program when you include the four Prophet ’08 instrument banks!). Banks of programs can be loaded from SoundEditor’s Program Banks (A and B), or from the Top Offspring list in the Program Genetics window, or from any saved bank files. Banks can also be assembled by pasting or dragging single programs to this window. The Phantom Program Banks window is selected from the File menu in the Main window (shortcut: Ctrl-H): Note: You can expand the Phantom Program Bank window both horizontally and vertically to accommodate long path names and long program lists. Prophet ’08 SoundEditor User Guide © Dave Smith Instruments 2007 81 PROPHET’08 SoundEditor User Guide Phantom Banks serve as a librarian for your Prophet ’08 programs. You can load 16 different Program Banks into Prophet ’08 Sound Edit at a time. The banks can be loaded from the Prophet ’08’s Program Banks, from Genetics’ Top Offspring or from saved Prophet ’08 Bank and SysEx Files. Loading functions are located in the File menu. By double clicking on the Category column members a Category rename dialogue box will be activated and you may re-label the Category the phantom programs belong to. In the example below we double clicked on the S002 (the second of the modified Rare Peace programs) and see that it is Not Assigned. Prophet ’08 SoundEditor User Guide © Dave Smith Instruments 2007 82 PROPHET’08 SoundEditor User Guide One click on the – Not Assigned label will bring up the contextual menu filled with the available categories. These are changed in Librarian. Prophet ’08 SoundEditor User Guide © Dave Smith Instruments 2007 83 PROPHET’08 SoundEditor User Guide 15. V-PIANO The Virtual Piano (V-Piano) provides a way to ‘play’ the Prophet ’08 remotely using the mouse. V-Piano is selected from the Options menu in either the Main window or the Editor window (shortcut: ctrl-P) To play, simply use the mouse to press keys on the V-Piano. When a key is pressed with the mouse, the corresponding note will be displayed in Red on the bottom left side of the keyboard: Prophet ’08 SoundEditor User Guide © Dave Smith Instruments 2007 84 PROPHET’08 SoundEditor User Guide The vertical slider on the far right of the keyboard adjusts the velocity of notes played from 0 to 127. The Midi channel is changed by clicking on the label just above the Velocity label (‘Vel. 127’ below) and choosing from the popup menu. 15.1. Playing Notes From Keyboard You can also play notes on the Prophet ’08 using your computer's keyboard. The middle and bottom rows of computer keys act as a single octave of keys mapped like a piano keyboard. You can use these keys to remotely play notes on the Prophet ’08: Mouse Piano and Computer Key assignment are as follows: Sliders adjust Midi Channel change and velocity of notes played. 3-4 notes can be played at the same time. Octave Shifting: Letters Q W E R T Y U I O P select the octave (transpose computer keys) Note Velocity: - and + decrease and increase note velocity Key Notes: X =C D =C# C =D F =D# Prophet ’08 SoundEditor User Guide © Dave Smith Instruments 2007 85 PROPHET’08 SoundEditor User Guide V =E B =F H =F# N =G J =G# M =A K = A# ,=B . = C (one octave above "X" key) All Notes Off - Space Bar key Additional functions: + and - = change Note velocity +/- 5 * and / = change Play channel +/- 1 Visually this is roughly represented by the following schematic of the keyboard: Hint: You can “hang” a note by pressing down a “note” key and while it is depressed, press “octave” key. When computer keys are played, a value of note played is displayed together with a midi channel and velocity on main window’s status bar. Each key press generates a MIDI Note ON message corresponding to the note as specified. When the key is released, a MIDI Note OFF message is sent. You will see the Voyager’s MIDI LED blink as these commands are sent, and the Voyager will play the corresponding note. Prophet ’08 SoundEditor User Guide © Dave Smith Instruments 2007 86 PROPHET’08 SoundEditor User Guide Note: This feature works in all windows, allowing you to audition sounds at any time. Note that the CAPS LOCK key must not be ON, as only lower case letters send MIDI note data. You can use the CAPS LOCK key to temporarily turn off remote playing if desired. Prophet ’08 SoundEditor User Guide © Dave Smith Instruments 2007 87 PROPHET’08 SoundEditor User Guide 16. HELP PROGRAM FUNCTIONS 16.1. About This menu item simply opens a splash screen that gives the registered owner and version details of the software. 16.2. Help ON Line The Help On Line menu item opens your default web browser with a direct link to SoundTower.com/prophet online help page. This help page is a replication of the help file included with this software’s installer package for use in case the original file is lost or for the user to get access to inclusions that may occur from time to time. 16.3. Updating the Firmware IMPORTANT: Refer to the documentation supplied with your OS update for full details on the update procedure BEFORE updating the firmware with SoundEditor. Begin by confirming that MIDI connections are established and the correct MIDI Out port is selected. Prophet ’08 SoundEditor User Guide © Dave Smith Instruments 2007 88 PROPHET’08 SoundEditor User Guide There are several options to update the Prophet ’08 OS using the ‘Prophet ‘08 OS Update’ function located under Prophet ’08 in Help in main menu: Selecting this command will initiate the update. You will be presented with a dialogue box offering update options. There are two different methods to update the operating system. The first is broken down into a two part procedure involving update of MainOS and then VoiceOS. Clicking MAIN first invokes a dialogue window as follows: Prophet ’08 SoundEditor User Guide © Dave Smith Instruments 2007 89 PROPHET’08 SoundEditor User Guide When this part of the update is finished the Prophet’08 will close and then restart. Please do not turn off your Prophet’08 during this procedure. When the software restarts, go back to the Help menu and open the OS update dialogue again and click the VoiceOS update button. This will invoke the following dialogue window: Please note that the software will close and then restart again automatically when update is completed. Please do not turn off your Prophet’08 during this procedure. Clicking OS Udate From File will present you with a load window. You must navigate to where the SysEx Update file is located that you downloaded from the DSI site and select the file: Prophet ’08 SoundEditor User Guide © Dave Smith Instruments 2007 90 PROPHET’08 SoundEditor User Guide Clicking the OPEN button will load the file into SoundEditor. You will be presented with a dialog box. Clicking the START button will initiate the transfer of SysEx data to the Prophet ’08. You must NOT interrupt, turn off or other wise disrupt the update while it is in progress as this may have sever consequences with regard to your Prophet’08’s OS integrity that may require reinstallation of the OS. Prophet ’08 SoundEditor User Guide © Dave Smith Instruments 2007 91 PROPHET’08 SoundEditor User Guide 17. PROPHET ’08 STACK and SPLIT LAYERS Prophet’08 Stack and Split functions are easily and simply engaged by the editor by toggling between two LEDs at the top of the editor screen. In the upper of the two images above the Stack function is engaged and the lower of the images demonstrates the Split function view. The Split point is set by clicking on the label to the right of the LEDs and clicking on the popup keyboard (see below): Here we clicked on the C3 key (grayed out above) and set the split point at this key. The label changes it’s text to reflect the currently selected key. Prophet ’08 SoundEditor User Guide © Dave Smith Instruments 2007 92 PROPHET’08 SoundEditor User Guide 18. KEY COMMAND SHORTCUTS Most of the menus in the SoundEditor have key command shortcuts for frequently used items on the menus. Many users find these key command shortcuts quicker and easier then using the mouse for most operations. Key command shortcuts are found in the program menus. Here is a list of the complete key command shortcuts for SoundEditor. 18.1. MAIN WINDOW File menu: Ctrl + O Ctrl + S Ctrl + L Ctrl + B Ctrl + H Ctrl + Q Load All Prophet ’08 Data Save All Prophet ’08 Data Prophet ’08 Bank Manager/Librarian Program Banks Phantom Program Banks Quit Edit menu: Alt + C Alt + S Controls Sequencer Ctrl + C Ctrl + V Ctrl + W Copy Program Paste Program Write Program Crtl + Shift + C Ctrl + Shift + V Ctrl + I Copy Layer Past Layer Initialize Layer Ctrl – N Ctrl – I Rename Program Initialize Program Prophet ’08 SoundEditor User Guide © Dave Smith Instruments 2007 93 PROPHET’08 SoundEditor User Guide MIDI menu: Ctrl + R Ctrl + T Ctrl + G Ctrl + M Receive Current Program Transmit Current Program Global Settings Midi Setup Options menu: Crtl + Shift + G Crtl + Shift + M Ctrl + P Program Genetics Morpher V-Piano Snap Shots menu: Crtl + A Crtl + Shift + A Add Snapshot View Snapshots 18.2. PROPHET ’08 BANK MANAGER/LIBRARIAN WINDOW File menu: Ctrl + O Ctrl + S Ctrl + B Load All Prophet ’08 Data Save All Prophet ’08 Data Program Banks Bank menu: Ctrl + C Ctrl + V Ctrl + N Ctrl + I Ctrl + E Crtl + Shift + O Crtl + Shift + S Copy Paste Rename Initialize Program Edit Program From Bank Load to BankB Save BankB Librarian: Crtl + Shift + C Crtl + Shift + V Crtl + Shift + X Copy Paste Cut Prophet ’08 SoundEditor User Guide © Dave Smith Instruments 2007 94 PROPHET’08 SoundEditor User Guide Crtl + Shift + D Crtl + Shift + E Crtl + Shift + N Delete Edit Program From Lib Rename Program MIDI menu: Crtl + R Crtl + T Crtl + M Crtl + G Receive BankB Transmit BankB Midi Setup Global Settings Options menu: Crtl + Shift + G Crtl + P Program Genetics V - Piano 18.3. PROPHET ’08 PROGRAM BANKS WINDOW File menu: Ctrl + O Ctrl + S Ctrl + L Ctrl + H Ctrl + Q Load All Prophet ’08 Data Save All Prophet ’08 Data Prophet ’08 Bank Manager/Librarian Phantom Program Banks Close Edit menu: Ctrl + C Ctrl + V Ctrl + N Copy Program Paste/Write Program Rename Program Midi menu: Crtl + R Crtl + T Crtl + G Crtl + M Receive BankB Transmit BankB Global Settings Midi Setup Program menu: Ctrl + E Ctrl + W Edit Program Write Program Prophet ’08 SoundEditor User Guide © Dave Smith Instruments 2007 95 PROPHET’08 SoundEditor User Guide Options menu: Ctrl + G Ctrl + P Program Genetics V-Piano Snap Shots menu: Crtl + A Crtl + Shift + A Add Snapshot View Snapshots 18.4. PROPHET ’08 PROGRAM GENETICS WINDOW File menu: Ctr l+ L Prophet’08 Bank Manager/Librarian Ctr l+ ALt + option L Phantom Program Banks Ctr l+ W Close Prophet ’08 SoundEditor User Guide © Dave Smith Instruments 2007 96 PROPHET’08 SoundEditor User Guide 19. APENDIXICES 19.1. APPENDIX A. FILE EXTENSIONS Here is the complete list of file extensions used in the DSI Prophet’08 SoundEditor: Save/Load Prophet 08 Program Bank .p_b Save/Load All Prophet 08 Data .p08 Save/Load Single Prophet 08 Program .p_p Save/Load Prophet 08 Main Settings .p_m Save/Load Sequence Templates .p_s Program Library .p_l, .p_b OS Update from File .syx Prophet ’08 SoundEditor User Guide © Dave Smith Instruments 2007 97 PROPHET’08 SoundEditor User Guide 19.2. APPENDIX B. SEQUENCER NOTE VALUES The following chart of note values is provided to assist in adjusting sequence pitches in SoundEditor. The step values shown produce musical half-steps and are based on an oscillator pitch setting of C0 with no transposition: Prophet ’08 SoundEditor User Guide © Dave Smith Instruments 2007 98 PROPHET’08 SoundEditor User Guide 19.3. APPENDIX C. SEQUENCER CHORDS The Function section in SoundEditor’s Sequencer window contains a number of preset ‘chords’ which are programmed as arpeggiated patterns of notes. These preset chord patterns are shown here for your convenience. The patterns are based on a starting step value of 48 (C4, although the step value is completely programmable), and visually grouped to shown the chord played. All 16 steps are shown: Basic (alternating major third): (Continued next page) Prophet ’08 SoundEditor User Guide © Dave Smith Instruments 2007 99 PROPHET’08 SoundEditor User Guide Sequencer window preset ‘chords’ continued: . Prophet ’08 SoundEditor User Guide © Dave Smith Instruments 2007 100