1
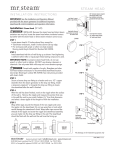
Tempo® Controls
Installation, Operation & Maintenance Manual
Installation Instructions for Tempo® & Tempo/Plus™
Step 4
Firmly connect the connector near the "CONTROL END"
marking to the back of the control. Turn on power to the
steam generator and test the control to verify correct connections. Test per the instructions on page 21. Proceed with
installation and verification of proper control function.
IMPORTANT: Turn power to the steam generator
OFF before installing the control. Failure to turn the
power off will result in an inoperable control.
Diagram 3
Step 5
Remove & discard peel-off paper to expose
adhesive liner as shown in Diagram 3.
Step 6
Run a bead of silicone (provided) as shown to the
C shaped groove as shown in Diagram 4.
IMPORTANT: Do not apply excessive amounts of silicone. Do not apply silicone to any other parts of the
control including the adhesive gasket.
Step 7
Insure the mounting surface is clean and dry as required
for good adhesion. Apply silicone into the hole in the
wall as required to create a moisture seal.
SIL
ICO
NE
Diagram 4
Hold the control with the LED display in the 12 o'clock
position and press the control against the wall until the
adhesive sticks and holds firmly as shown in Diagram 5.
IMPORTANT: Two registration marks are provided
to facilitate level installation. The marks are located at
the 3 o'clock and 6 o'clock positions on the back side of
the control. Use a level as required.
Diagram 5
22