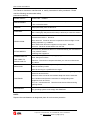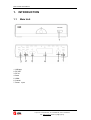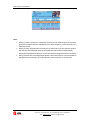
1
ReDi 210 MP User Manual
Table of Contents
1.
INTRODUCTION . ....................................................................5
2.
SYSTEM CONNECTION . ........................................................8
3.
GETTING STARTED. ...............................................................9
4.
OPERATION . ......................................................................... 11
5.
EDIT CHANNEL......................................................................12
6.
SYSTEM SETUP ....................................................................13
7.
TOOLS ....................................................................................17
8.
GAME......................................................................................20
9.
REC.........................................................................................21
10.
TIMESHIFT/ RECORD .........................................................23
11.
TROUBLESHOOTING ..........................................................26
12.
TECHNICALSPECIFICATIONS............................................27
2
V. Ipirou 45, 15125 Marousi, Τel: 210-8098700, Fax: 210-6122512
Site: www.crypto.gr, Email: [email protected]
ReDi 210 MP User Manual
SAFETY INFORMATION
This sheet lists important safety information that will help to assure proper use of the product.
Please read them carefully before operation of your product.
TO REDUCE THE RISK OF FIRE AND ELECTRIC SHOCK, DO NOT EXPOSE THIS UNIT
TO RAIN OR MOISTURE.
1. To prevent electric shock do not attempt opening or removing the covers of the device. The
device uses AC220~240V and you may be expose to dangerous voltage.
2. To clean the device always unplug the product from the wall outlet. Do not use liquid
cleaners or aerosol cleaners. Use a dry cloth for cleaning.
3. You will notice that the product has slots and openings. These are used for ventilation to
ensure reliable operation and to protect it from overheating. The openings should never be
blocked by other devices. This product should not be placed in an installation, unless proper
ventilation is provided. Do not put anything above the product because you will block the
ventilation openings causing the device to overheat.
4.The product should be situated away from heat sources such as radiators, heat registers,
stoves, or other products (including amplifiers) that produce heat.
Service
Do not attempt to service this product yourself, as opening or removing covers may expose
you to dangerous voltage or other hazards. Refer all servicing to qualified service personnel.
3
V. Ipirou 45, 15125 Marousi, Τel: 210-8098700, Fax: 210-6122512
Site: www.crypto.gr, Email: [email protected]
ReDi 210 MP User Manual
This Receiver has been manufactured to satisfy international safety standards. Please
read the following recommended safety
precautions carefully.
MAINS SUPPLY:
OVERLOADING:
LIQUIDS:
CLEANING:
AC100-240V ~ 50/60Hz
Do not overload wall outlets, extension cords or adapters as this can result
in fire or electrical shock.
Keep liquids away from the Receiver.
Before cleaning, disconnect the Receiver from the wall socket.
Use a cloth lightly dampened with water(no solvents) to clean the exterior.
Do not block the Receiver ventilation holes. Ensure that free airflow is
maintained around the
VENTILATION:
Never store the
Receiver.
Receiver where it is exposed to direct sunlight or near
heating euipment e.g. a radiator.
Never stack other electronic equipment on top of the Receiver.
Place the
Receiver at least 30mm from the wall.
Do not use any attachment that is not recommended by the manufacturer;
ATTACHMENTS:
it may cause a hazard
or damage the equipment.
CONNECTION TO
THE CABLE TV
SIGNAL AND TV:
Connect all components before plugging any power cords into the wall
outlet. Always turn off the
Receiver, TV and other components before you connect or disconnect
any cables.
Do not attempt to service this product yourself. Any attempt to do so will
SERVICING:
make the warranty invalid.
Refer all servicing to a qualified service agent.
If the
Receiver is installed in an area subject to intense lightning activity,
protection devices for the
Receiver mains connector and modem telephone line are essential.
LIGHTNING:
The individual manufacturer's instruction for safeguarding other
equipment, such as TV set,
Hi-Fi, etc., connected to the
Receiver must also be followed during
lightning storms.
GROUNDING:
CATV cable MUST BE EARTHED.
The grounding system must comply with SABS 061.
NOTE:
Dispose the used batteries at designated place for environment protection
4
V. Ipirou 45, 15125 Marousi, Τel: 210-8098700, Fax: 210-6122512
Site: www.crypto.gr, Email: [email protected]
ReDi 210 MP User Manual
1. INTRODUCTION
1.1
Main Unit
1. USB port
2. RF OUT
3. RF IN
4. Scart
5. HDMI
6. Coaxial
7. Power Input
5
V. Ipirou 45, 15125 Marousi, Τel: 210-8098700, Fax: 210-6122512
Site: www.crypto.gr, Email: [email protected]
ReDi 210 MP User Manual
1.2
Remote control
1. NUMERIC ENTRY
2. MENU
3. CH+
4. VOL - /LEFT
5. OK
6. PAGE UP
7. CH8. TV/RADIO
9. INFO
10. AUDIO
11. SUB-T
12. PLAY
13. PAUSE
14. RED BUTTON/FB
15. GREEN BUTTON/FF
16. POWER
17. MUTE
18. RECALL
19. EXIT
20. VOL +/RIGHT
21. PAGE DN
22. FAV
23. EPG
24. TTX
25. RECORD
26. STOP
27. BLUE BUTTON/PVR
28. YELLOW BUTTON
6
V. Ipirou 45, 15125 Marousi, Τel: 210-8098700, Fax: 210-6122512
Site: www.crypto.gr, Email: [email protected]
ReDi 210 MP User Manual
1.3
Loading batteries to the remote control
1. Pull the battery compartment stock.
2. Load one button battery into the battery compartment.
3. Make sure that the battery have been inserted in the correct polarities matching to the
symbols +, - marked in the battery compartment. Close the battery compartment cover.
4. Remove the batteries if the unit will not be used for a prolonged period of time.
BE ENVIRONMENTALLY FRIENDLY
Do not dispose batteries as normal rubbish. Be environmentally friendly,
dispose batteries following the Government's regulation.
CAUTION
LITHIUM BATTERY
Danger of explosion if battery is
incorrectly replaced. Replace only
with the same or equivalent type.
The remote control transmits a directional infrared beam. Be sure to aim the remote
control directly at the infrared sensor of the unit during operation.
If the sensor has been covered or there is a large object between the remote control and
the sensor, the sensor will not respond.
The sensor may not able to receive the remote signal when it is exposed to direct sunlight
or a strong artificial light (fluorescent or strobe light). In this case, change the direction of
the light or reposition the unit to avoid direct lighting.
7
V. Ipirou 45, 15125 Marousi, Τel: 210-8098700, Fax: 210-6122512
Site: www.crypto.gr, Email: [email protected]
ReDi 210 MP User Manual
1. Remote sensor
2. Within approximately 6 meter (20 feet)
2. SYSTEM CONNECTION
8
V. Ipirou 45, 15125 Marousi, Τel: 210-8098700, Fax: 210-6122512
Site: www.crypto.gr, Email: [email protected]
ReDi 210 MP User Manual
3. GETTING STARTED
3.1
Welcome Srceen
If you use ReDi 210 MP for the first time, the "Welcome" menu appears.
Press cursor button to setup the Region, Language, Display Mode and Aspect Mode.
Highlight "OK" and press the "OK" button to start channel search.
3.2
Installation
1. Press the "MENU" button to enter main menu.
2. Press "UP"or " DOWN " button to highlight "Installation", press "RIGHT" button to enter to
the Installation menu.
3. Press "UP" or "DOWN" cursor button to highlight the desired item and press "OK" button to
enter the sub-menu .
4. Press "EXIT" button to exit.
3.2.1
Channel Auto Scan
1. Select the "Auto Scan", press "OK" button to enter the Auto Scan menu.
2. Press the cursor button to set "FTA Only", select NO for free to air and pay per view
channels and YES for all free to air channels only), then press "Search" and press the "OK"
button to start auto scan.
9
V. Ipirou 45, 15125 Marousi, Τel: 210-8098700, Fax: 210-6122512
Site: www.crypto.gr, Email: [email protected]
ReDi 210 MP User Manual
3.2.2
Channel Scan
1. Select "Channel Scan", press the "OK" button to enter the Channel Scan menu.
2. Press cursor button to set Scan mode, Scan Band, Channel No., Frequency and Bandwidth,
then highlight "Search", press "OK" button to start channel scan .
Channel Scan mode:
-By channel
-By frequency
3.2.3
Aerial Adjustment
1. Select the "Tuner Power", press"OK" to enter the Aerial Adjustment.
2. Press the cursor button to set the desired setting. When "Tuner Power" is selected "On", the
STB will provide 5V power to the antenna. It will not provide anything
when"Off" is
selected.
3.2.4
LCN
If LCN(Logical Channel Number) Select function is activated, you can't change the original
number of TV channels by scanning .
You can activate/deactivate the LCN function by setting the "LCN Mode" to on/off.
10
V. Ipirou 45, 15125 Marousi, Τel: 210-8098700, Fax: 210-6122512
Site: www.crypto.gr, Email: [email protected]
ReDi 210 MP User Manual
4. OPERATION
4.1
Changing Channels
There are three ways of channel selection - stepping through the channel list, selection by
number and from the on-screen channel list.
1. Stepping through the channel list:
To move through the channel list, press the upward arrow or downward arrow key on the
remote control.
2. Selected by number:
Enter the channel number directly by pressing numeric buttons, and press the "OK" button to
select desired channel.
3. Selected by on-screen channels list:
You can also select the required channel directly from on-screen channel list. This is displayed
using the device main menu. See "Edit Channel" in this manual for operation details.
4.2
Accessing the Electronic Program Guide (EPG)
With the DVB-T you can have access to program information any time you want. This feature
is displayed on-screen with functions allowing a viewer to navigate, select, and see content by
time, title, channel etc. Also you can have access to TV guide of any digital channel. To use
this function simply follow the following:
1. Press "EPG" button to enter EPG menu.
2. Press cursor button to switch between channel list, events schedule of the selected channel.
3. Press "Green" button to start Timer settings.
With this option you can set the device to open or close whenever you want, set a channel as
wake up channel and schedule to record any future broadcast.
4. Press "Red" button to enter the "Step time" menu.
With this option you can find information about a program of each channel, based on hours or
days. Eg you can see the
program guide of a channel for 2 or 3 days later, etc.
5. If you want to go back on viewing the channel press the "EPG" button again.
11
V. Ipirou 45, 15125 Marousi, Τel: 210-8098700, Fax: 210-6122512
Site: www.crypto.gr, Email: [email protected]
ReDi 210 MP User Manual
5. EDIT CHANNEL
5.1
Edit Channel menu
1. Press the "MENU" button to enter main menu.
2. Press "UP" or "DOWN " button to highlight "Edit Channel", press "RIGHT" button to enter
the Edit Channel menu.
3. Press "UP" or "DOWN" cursor button to highlight the desired item and press "OK" button to
enter the sub-menu .
4. Press "EXIT" button to exit.
5.2
TV Channel list
1. In the Edit Channel menu, select "TV Channel List", press "OK" button to enter TV channel
list menu.
2. Press "UP" or "DOWN» button to highlight a channel, press the "OK" button to preview the
desired TV channel.
- Use this menu to favor, lock, skip, move, sort, delete and rename a channel.
(1) Press "FAV" button, then press "OK" button to edit the FAV function.
(2) Press "color" button, then press "OK" button to edit the corresponding function.
5.3
Radio Channel list
1. In the Edit Channel menu, select "Radio Channel List", press "OK" button to enter the Radio
Channel list menu.
2. Press "UP" or "DOWN" button to highlight channel press the "OK" button to listen the
desired TV channel.
12
V. Ipirou 45, 15125 Marousi, Τel: 210-8098700, Fax: 210-6122512
Site: www.crypto.gr, Email: [email protected]
ReDi 210 MP User Manual
NOTE: Basically, the operation of "Radio Channel List" is the same as "TV Channel List", but
there is one point different: In "Radio Channel List" mode, there is no video information, so it
will always display Radio's logo in the right side preview window.
5.4
Delete All
1. In the Edit Channel menu, select "Delete All", press "OK" button.
2. A warning window appears.
Select "Yes", press "OK" button to delete all channels.
Select "No", Press "OK" button to cancel deleting.
6. SYSTEM SETUP
6.1
System setup menu
System setup menu allows us to set Language, TV System, Local Time Setting, Timer Setting,
Parental Lock, OSD Setting, Favorite and Auto Standby.
1. Press the "MENU" button to enter main menu.
2. Press "UP" or "DOWN" button to highlight "System Setup", press "RIGHT" button to enter
the System Setup menu.
3. Press "UP" or "DOWN" cursor button to highlight the desired item and press "OK" button to
enter the sub-menu.
4. Press "EXIT" button to exit
13
V. Ipirou 45, 15125 Marousi, Τel: 210-8098700, Fax: 210-6122512
Site: www.crypto.gr, Email: [email protected]
ReDi 210 MP User Manual
6.2
Language
This menu allows you to set Language.
6.3
TV System
This menu allows us to set Display Mode, Aspect Mode, Video Output and Digital Audio
Output.
Display Mode:
480i/480p/576i/576p/720p/1080i/1080p
Aspect Mode:
Auto/4:3PS/4:3LB/16:9
Video Output::
CVBS/RGB
Audio Output:
LPCM OUT / BS OUT
6.4
Local Time Setting
This menu allows you to set the region and time.
Region:
This menu is used for changing the region setting.
GMT Usage:
This menu is used for opening the usage of GMT. The options are: Off / On
GMT Offset:
This menu is valid only when selected "Uesr Define" in GMT Usage menu.
The GMT offset range is "-11:30 ~ +12:00", increasing half hour progressively.
Date:
"Date" and "Time" menus are valid only when selected "Off" in GMT Usage menu.
Time:
Press "OK" then numeric button to input the time.
14
V. Ipirou 45, 15125 Marousi, Τel: 210-8098700, Fax: 210-6122512
Site: www.crypto.gr, Email: [email protected]
ReDi 210 MP User Manual
6.5
Timer Setting
1. Program Timer: This menu allows us to set the program timer for a scheduled recording or
channel setting.
Timer Mode:
Off/Once/Daily
Timer Service:
Channel/Record (schedule a video recording)
Wakeup Channel: You can select a desired channel as the wakeup channel.
Wakeup Date:
Press "OK" then numeric button to input date.
Wakeup Time:
Press "OK" then numeric button to input the time.
Duration:
Press "OK" then press numeric button to input the duration time.
6.6
Parental Lock
This menu allows you to protect the installation menu and channel, and change the Password.
1. In "System Setup" menu, select "Parental Lock" and press "OK" button, you are asked to
input a password (the default password is"0000").
2. After the input of the correct password by pressing numeric buttons, the parental lock menu
appears.
Menu Lock:
To lock the installation menu and Edit menu. When you want to enter Auto
Scan/Channel Scan menu, you must input the password. You can set menu lock to on/off.
Channel Lock:
Off/ AGE 10/AGE 12/AGE 16/AGE 18
New Password:
Confirm Password:
To change the password.
To confirm the new password.
15
V. Ipirou 45, 15125 Marousi, Τel: 210-8098700, Fax: 210-6122512
Site: www.crypto.gr, Email: [email protected]
ReDi 210 MP User Manual
6.7
OSD Setting
This menu allows you to set OSD Timeout, OSD Transparency and load default OSD setting.
OSD Timeout: 1-10
OSD Transparency: To set the OSD transparency to Off/10%/20%/30%/40%.
Load Default OSD Setting: To clear all OSD setting and reset parameters as default value.
6.8
Favorite
This menu allows you to rename the favorite group.
1. In Channel menu, select "Favorite", press "OK" button to enter Favorite menu.
2. Select desired group, press "OK" button to open the screen keypad. Input a letter and a
number one by one by pressing the cursor button and press "OK" button to confirm. After
finishing, highlight "OK" on screen keypad to confirm, then you have you change Favorite
group name successfully.
3. Press "EXIT" button to quit the group rename menu.
16
V. Ipirou 45, 15125 Marousi, Τel: 210-8098700, Fax: 210-6122512
Site: www.crypto.gr, Email: [email protected]
ReDi 210 MP User Manual
6.9
Auto Standby
No command to receiver on front panel or Remoter in 3 hours and no timer event, the receiver
will enter standby mode automatically.
7. TOOLS
7.1
Tools main menu
1. Press the "MENU" button to enter main menu.
2. Press " UP" or " DOWN " button to highlight "Tools", press "RIGHT" button to enter the Tools
menu.
3. Press "UP" or "DOWN" cursor button to highlight the desired item and press "OK" button to
enter the sub-menu.
4. Press "EXIT" button to exit.
7.2
Receiver Information
This menu can display some parameters of bootloader, maincode, radioback, countryband
and userdb information.
1. In "Tools" menu, select "Receiver Information", press "OK" button to open receiver
information window.
2. Press "EXIT" button to exit.
17
V. Ipirou 45, 15125 Marousi, Τel: 210-8098700, Fax: 210-6122512
Site: www.crypto.gr, Email: [email protected]
ReDi 210 MP User Manual
7.3
Load Factory Default
This menu allows you to re-set the device back to factory settings and clear all existed
channels.
1. In the "Tools" menu, select "Load Factory Default" and press "OK" button.
2. A confirmation window will be displayed. Select "Yes" to activate a reset back to the factory
settings and clear all channels.
3. Select "No" to cancel. Press "EXIT" button to exit.
7.4
Software Upgrade
We offer the functions for user to upgrade software version by OTA or by USB.
1. Enter "Tools" menu, select "S/W Upgrade by OTA" or "Upgrade by USB", press "OK" button
and the Software Upgrade menu will be shown.
2. Press cursor button to select the desired item, then highlight "Start" and press "OK" button
to start the upgrade.
3. Press "EXIT" button to exit.
18
V. Ipirou 45, 15125 Marousi, Τel: 210-8098700, Fax: 210-6122512
Site: www.crypto.gr, Email: [email protected]
ReDi 210 MP User Manual
7.5
USB Device
This function allows you to play files from USB port.
1. In "Tools" menu, select "USB device", press "OK" button to enter Media Player menu.
2. Press "UP" or "DOWN" cursor button to select a desired item, and press "OK" button to play
the desired files.
3. Press "EXIT" button to exit.
Key operations:
·
FAV : Put the selected file to play list .
·
0 : All the MP3 files in current directory will be added into MP3 play list .
·
1 : All the Image files in current directory will be added into Image play list.
·
2 :There are four kinds of sorting approaches.
·
-
Name (A-Z): Sorting in Alphabetical descending Order.
-
Name (Z-A): Sorting in Alphabetical ascending Order.
-
Lock: Collecting all locked channels and list in the bottom of TV
Channel List.
-
Default: Return to original setting order.
Yellow Key: The “Please select play list type” operation window will be shown by
pressing Yellow key. After that, the user can play the image or music by choosing the
files. If here is no file in the directory, an operation window “This type of play list
doesnot exist” will be shown.
·
INFO: Set up slide show of images.
·
Blue : To rotate among the 3 repeat modes provided as below:
Repeat Folder
The entire Random Folder
Repeat Single
19
V. Ipirou 45, 15125 Marousi, Τel: 210-8098700, Fax: 210-6122512
Site: www.crypto.gr, Email: [email protected]
ReDi 210 MP User Manual
7.6
Remove USB device safely
In "Tools" menu, select "Remove USB device safely", Press "OK" button to confirm. Then a
window is displayed. Press "OK" button again.
8. GAME
8.1
Game
This menu allows you to play games.
1. Press the "MENU" button to enter main menu.
2. Press "UP" or "DOWN" button to highlight "Game", press "RIGHT" button to enter the Game
menu.
3. Press "UP" or "DOWN" cursor button to highlight the desired item and press "OK" button to
enter the game.
4. Press "EXIT" button to exit.
20
V. Ipirou 45, 15125 Marousi, Τel: 210-8098700, Fax: 210-6122512
Site: www.crypto.gr, Email: [email protected]
ReDi 210 MP User Manual
9. REC
9.1
REC
1. Press the "MENU" button to enter main menu.
2. Press "UP" or "DOWN" button to highlight "REC", press "RIGHT" button to enter the REC &
Media menu.
3. Press "UP" or "DOWN" cursor button to highlight the desired item and press "OK" button to
enter the sub-menu.
4. Press "EXIT" button to exit.
9.2
Record Manager
This menu allows you to play the recorded files.
1. In "REC" menu, select "Record Manager" and press "OK" button to enter Record Manage
menu.
2. Press "UP" or "DOWN" cursor button to select a desired item, and press "OK" button to play
the desired files.
3. Press "EXIT" button to exit.
21
V. Ipirou 45, 15125 Marousi, Τel: 210-8098700, Fax: 210-6122512
Site: www.crypto.gr, Email: [email protected]
ReDi 210 MP User Manual
9.3
DVR HDD Information
This menu can display some parameters of the Removable Disk.
1. In "REC" menu, select "DVR HDD Information", press "OK" button to open DVR HDD
information window.
2. Press "EXIT" button to exit.
9.4 HDD Format
This menu allows you to format the disk.
1. In "REC" menu, select "HDD Format", press "OK" button to open HDD Format menu.
2. Highlight "Storage Partition", press "LEFT" or "RIGHT" cursor button to change Partition.
3. Highlight "Format", press "OK" button, a window appears.
Select FAT/NTFS, press "OK" button to format.
Select "Cancel", Press "OK" button to cancel.
9.5
DVR Configuration
This menu allows us to set the DVR Configuration.
Press "UP" or "DOWN" cursor button to select desired item, press "LEFT" or "RIGHT" cursor
button to change the setting.
TimeShift time(min): On/Off
TimeShift to record: On/Off
Record Type:
TS/PS
TS: Transportation stream which includes information like teletext, subtitle, etc.
PS: Program stream which will be packeted with the file format of *.mpg and
be also playbacked by PC or other devices.
Record Selection:
You can press "LEFT"or "RIGHT" cursor button to
change Selection.
Standby after record: On/Off
22
V. Ipirou 45, 15125 Marousi, Τel: 210-8098700, Fax: 210-6122512
Site: www.crypto.gr, Email: [email protected]
ReDi 210 MP User Manual
10. TIMESHIFT/ RECORD
10.1
Time shift
The digital receiver ReDi 210 MP gives you the ability to record and watch one program
interfacing with the viewing time. All you have to do is to connect an external hard drive or a
USB stick in the usb port of the device.
With this function you can:
Pause the program and continue to see if another time.
NOTE: For proper operation of TIME SHIFT it is recommend using a storage device that
supports USB 2.0 and has high speed read /write. Also if it is possible it is recommended to
use a USB stick or HDD with high storage space. The product can support up to 2TB disks
The TIME SHIFT is a feature where you can simultaneously track, pause or to go back and
forth when you are watching a program. For example, while watching your favorite show
someone rings the door bell. No problem. Just activate the function bt pressing “Pause” button
to freeze the image. The device then start to record the program and when you return you can
resume viewing from where you left.
• Enable TIME SHIFT
- To use TIME SHIFT press <PAUSE> and a bar with the time when the recording is started
(right) will appear. From this moment and forth the channel program will be recorded.
Each time you wish to pause or rewind the program a new bar will appear.
Notice that now the bar has 2 times. The right is the normal time showing the on going time
from the beginning when started Time Shift and the left is the play backed time according to
the time you choose to watch of the recorded program.
During TIME SHIFT, it is possible to do the following.
- Press "PAUSE" to pause the program and <PLAY> to continue watching later.
- Press "STEP FORWARD" or "FORWARD" to fast forward the recorded program at specified
time steps at 2χ, 4x, speed etc respectively.
- Press "STEP BACKWARD" or "BACKWARD" to quickly rewind the recording at specified
time steps or at 2χ, 4X, speed etc, respectively.
This choices affect only the recorded program, and not the function of TIME SHIFT.
To return to the normal playing time press the "STOP" and then the <EXIT>. The TIME SHIFT
will continue to record but you will watch the normal time of the program
23
V. Ipirou 45, 15125 Marousi, Τel: 210-8098700, Fax: 210-6122512
Site: www.crypto.gr, Email: [email protected]
ReDi 210 MP User Manual
• Stop TIME SHIFT
The TIME SHIFT is switch off when you change the channel or if you enter the main menu
NOTE:
• The TIME SHIFT is disabled when you activate it for a specific channel and
you have
scheduled a recording (PVR) to another channel. When that recording starts the device will
take you to that channel automatically and it will deactivate Time Shift to the other
• The TIME SHIFT can be activated while recording a program, but only for that channel you
are recording.
10.2
·
Personal Video Recording (PVR)
Instant Recording
With this feature, with a touch of a button you can write a program you are watching.
- Press <RECORD> button on your remote
to immediately start recording the program you
are watching
- Pressing the button again <RECORD>, you can adjust the duration of the recording.
-
Press <STOP> button to stop recording. A window will appear.
- Select YES to stop recording. Select NO to resume recording.
·
Scheduled Recording
Apart from the operation of direct recording, the device can be scheduled to write a program in
the future.
-Press the <Menu> button and select <settings>, <Timer Settings>.
This menu lets you set the timer for a recording.
Time Mode:
Off/Once/Daily
Time service:
Record
Wakeup Channel: Set the channel you want to record.
Wakeup Date:
Press OK and then the numbers to enter the date of recording.
Wakeup Time:
Press OK and then the numbers to enter time you want the device to
start writing.
Duration:
Press OK and then the numbers to enter the duration of the recording
To see all the programs you have recorded press :
1. Menu <Rec> select “Record Manager” press OK.
2. Press the Up and Down arrow keys to select the desired entry and press the OK to play the
file.
3. Press <EXIT> on the remote to exit the menu.
24
V. Ipirou 45, 15125 Marousi, Τel: 210-8098700, Fax: 210-6122512
Site: www.crypto.gr, Email: [email protected]
ReDi 210 MP User Manual
Note :
·
When you write a program in a particular channel you can watch another of the same
group of four digital channels, that belong in the same frequency, at the same time you
make the record.
·
When you have programmed a recording for a channel and you are watching another
with the time shift activated when the recording will start the device automatically
deactivate Time Shift and takes you to the channel that is programmed to be recorded.
·
During the time that a recording takes place the Time Shift function can be activated in
parallel with the recording only for that specific channel and not for anyone else.
25
V. Ipirou 45, 15125 Marousi, Τel: 210-8098700, Fax: 210-6122512
Site: www.crypto.gr, Email: [email protected]
ReDi 210 MP User Manual
11. TROUBLESHOOTING
In some region, the digital terrestrial signal may be weak. So you'd better use an antenna with
builtin signal booster.
Problem
Possible cause
What to do
Check mains lead.
Mains lead unplugged.
Check fuse.
Mains fuse blown.
Remote sensor not connected
correctly
Ensure remote sensor plug
is fully inserted into the
remote sensor socket on
the main unit.
Aerial is disconnected.
Check aerial lead.
Aerial is damaged.
Check aerial.
Out of digital signal area.
Check with signal provider
No picture or sound
Tuned to digital teletext
channel
Change to another channel
Scrambled channel
message
Channel is scrambled.
Select alternative channel
Standby light not lit
No signal found
Plug in and turn on plug.
Aim handset at front panel.
Receiver off.
code
Check for
obstructions/reposition
remote sensor.
Replace remote battery.
Ensure remote sensor plug
is fully inserted into the
remote sensor socket on
the main unit.
Re-install channels to cancel
channel lock.
Forgotten menu lock code
Contact help line.
Handset not aimed correctly.
No response to remote
control
Remote sensor obstructed.
Remote battery exhausted.
Remote sensor not connected
correctly.
Forgotten channel lock
After moving receiver to
another room, it is no
no longer able to receive
digital signal
The signal through the aerial
may not be strong enough to
receive digital reception due
to distribution problems
Try a direct feed from the
antenna.
26
V. Ipirou 45, 15125 Marousi, Τel: 210-8098700, Fax: 210-6122512
Site: www.crypto.gr, Email: [email protected]
ReDi 210 MP User Manual
12. TECHNICALSPECIFICATIONS
Power Voltage
AC 220V / 240V 50-60Hz
Power Consumption
<8W
Video decoder
MPEG-2 MP@HL, AVC/H.264 HP @L4.1 MPEG-4 ASP SUPPORTED
Audio decoder
MPEG-1 Layer 1,2/PCM/HE-AAC V1.0 ICE958 SPDIF/ AC3
Video output ratio
Auto/4:3PS/4:3LB/16:9
Video resolution
480i/480p/576i/576p/720p/1080i/1080p
Recording Format
Video: ts, mpg
Audio
mp3
Image
jpg, bmp
File type: *.ts /*.tp/*.trp
TS
Video Codec: MPEG2 MP@HL H.264 MP/HP
Max Resolution:
Audio:
1920 x 1080p
MPEG layer 1/2/ AC3/ AAC
File type: *.mpg
MPG
Video Codec: H.264 BP/MP/HP MPEG4 SP/ASP,Xvid
Max Resolution:
Audio:
1920 x 1080p
MPEG layer 1/2/ AC3
File type: *.mp4
Video Codec: MPEG2 MP@HL, H.264 MP/HP MPEG4
MP4
Media Player Format
SP/ASP,H.263/Xvid
Max Resolution:
Video
Audio:
1920 x 1080p
MPEG layer 1/2/ AC3/ AAC
File type: *avi
Video Codec: MPEG2 MP@HL, H.264 MP/HP MPEG4
AVI
SP/ASP,H.263/Xvid
Max Resolution:
Audio:
1920 x 1080p
MPEG layer 1/2/ AC3/ AAC
File type: *mkv
Video Codec: H.264 BP/MP/HP
MKV
MPEG4 SP/ASP,Xvid, MPEG2 MP@HL,
Max Resolution:
Audio:
OSD Menu
Multilingual
Teletext
Multilingual
H.264 MP/HP,
MPEG4 SP/ASP,H.263/Xvid
1920 x 1080p
MPEG layer 1/2/ AC3/ AAC
Tuner
RF Input Connector
IEC FEMALE
Loop Through
IEC Male
Receiving Channel Range
174~230MHz, 470~862MHz
27
V. Ipirou 45, 15125 Marousi, Τel: 210-8098700, Fax: 210-6122512
Site: www.crypto.gr, Email: [email protected]
ReDi 210 MP User Manual
Modulation
QPSK/16QAM/64QAM
Band Width
6 / 7/ 8 MHz
1 x HDMI
1 x Scart
1 x USB 2.0 (Host)
1 x Coaxial
Outputs
Dimensions
W xD xH
Weight
155 x 107 x
40 mm
221 gr
Technical specifications are subject to change without prior notice.
For technical information and support please contact us:
Web Site: www.crypto.gr
E-mail: [email protected]
Disposal of old electrical and electronic equipment
If you see this symbol on the product or on its packaging, you should hand the product over to the
applicable collection point for the recycling of electrical and electronic equipment. Do not throw it
away with household wastes.
The improper disposal of these products may have negative consequences for the environment and
human health.
For more information about the recycling of this product, please contact your local city office,
your household waste disposal service or the shop where you purchased it.
28
V. Ipirou 45, 15125 Marousi, Τel: 210-8098700, Fax: 210-6122512
Site: www.crypto.gr, Email: [email protected]