1
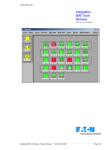
www.eaton.com
C.A. Unicenter
Integration
User’s Manual
Computer Associates Unicenter Integration – User’s Guide – 34 003 757 XU / AF
Page 1/9
www.eaton.com
Table of Contents
1
2
Introduction .......................................................................................................................................3
Installation and configuration procedure...........................................................................................3
2.1
Installation procedure ................................................................................................................3
2.2
Configure Unicenter security .....................................................................................................3
2.3
Configure EATON SNMP cards/agents.....................................................................................4
3 Uninstalling the agent .......................................................................................................................4
4 Use....................................................................................................................................................5
4.1
EATON Automatic discovery (Auto-Discovery) .........................................................................5
4.2
Receive and view UPS alarms ..................................................................................................7
4.3
Launching UPS properties from Unicenter ................................................................................8
4.4
EATON equipment and Unicenter compatibility list:..................................................................9
Computer Associates Unicenter Integration – User’s Guide – 34 003 757 XU / AF
Page 2/9
www.eaton.com
1
Introduction
This document describes the stages to integrate and use an EATON UPS with the Computer
Associates Unicenter Network and Systems Management platform. This document is applicable for
Unicenter version 3.0.
To use any EATON UPS with this platform, you must have completed the installation and configuration
procedures first.
2 Installation and configuration procedure
2.1 Installation procedure
1. Execute the "ca_unicenter_integration_vxx.exe" InstallShield package. The following actions will
be automatically performed:
Copy both MIB and Icon files.
Compile and load the MIB.
Install the UPS class (you have to select the appropriate repository).
Load Message Management for Events and Actions.
Modify Unicenter configuration files (nodes.dat, ip.atp and gwclass.dat). Original files will be saved
with xxx.yyy.eaton extension.
Reset the Unicenter DSM after user confirmation. This operation takes several minutes because
all Unicenter services need to be restarted. This step is necessary to finalize the package
integration.
2. Configure Unicenter security for managing events and actions (described in the following section
§2.2).
3. Configure SNMP cards/agents (described in the following section §2.3).
4. Perform auto-discovery to detect UPS SNMP cards/agents.
5. Start the Unicenter Explorer and the Event Management console to detect UPS status changes.
2.2 Configure Unicenter security
To manage the UPS icon status, a few commands must be executed from the EM console with the
relevant administration rights. EM default settings only authorize the "caunint" user to perform
commands.
Follow the instructions below to enable the proper settings:
1. From the command line DOS, execute "caugui settings".
2. Click on the "Event management" major tab and then on the "Client Preferences" minor tab.
3. Change the "Users authorized to issue commands" field to "*@*".
4. Save the settings.
5. From the command line DOS, run "unicntrl stop opr" then "unicntrl start opr".
Computer Associates Unicenter Integration – User’s Guide – 34 003 757 XU / AF
Page 3/9
www.eaton.com
2.3 Configure SNMP cards/agents
Each SNMP card or agent must be configured so that the SNMP alarms (Traps) are sent to the
Unicenter platform. To do this, the Unicenter host must be declared in the managers’ table of each
SNMP card and agent. For this configuration, you can use the cards web interface.
For legacy cards (66074, …), run the Set SNMP Manager.bat script file in <Unicenter home path>\bin
directory and follow the instructions. During the procedure, you will be asked for:
The IP address of your SNMP card or agent,
The IP address of the Unicenter host,
The read/write community name for the agent (by default "public" if not specified),
The trap receiver community name (by default "public" if not specified).
Repeat these steps for each SNMP card or agent.
NOTE: You also have other possibilities:
1. For SNMP cards, you can use telnet configuration menu. You can also use the HTML settings
page for the "Manager Table" settings.
2. Use a MIB browser to configure the SNMP cards and agents.
However, we strongly suggest using the script file as these operations require an in-depth knowledge
of the SNMP protocol and also a good understanding of our products.
Configuration example for manager number X:
OID number
Designation / Value
1.3.6.1.4.1.705.1.2.2.1.1.X
Manager number = X.
1.3.6.1.4.1.705.1.2.2.1.2.X
Device number = 0.
Manager type = 9 (other).
1.3.6.1.4.1.705.1.2.2.1.3.X
1.3.6.1.4.1.705.1.2.2.1.4.X
Protocol level = 4 (snmpv1).
1.3.6.1.4.1.705.1.2.2.1.5.X
Manager description = "Unicenter" for example.
Manager IP address = YYY.YYY.YYY.YYY format.
1.3.6.1.4.1.705.1.2.2.1.6.X
1.3.6.1.4.1.705.1.2.2.1.7.X
Community name = "public" for example.
1.3.6.1.4.1.705.1.2.2.1.8.X
Severity level = 2 for example.
1.3.6.1.4.1.705.1.2.2.1.9.X
Acknoledgement type = 2 (mgnoack).
3
Uninstalling the agent
From the "Add/Remove programs" item of the control panel, execute "Unicenter UPS Device
Integration Package". This script will perform the following actions:
Stop services.
Unload the MIB.
Remove both icon and MIB files.
Remove the class and objects from World View CORE (select the appropriate repository).
Remove the Event Message records and actions.
Restore Unicenter configuration files (nodes.dat, ip.atp and gwclass.dat).
Reset the Unicenter DSM after user confirmation. This operation takes several minutes because
all Unicenter services need to be restarted. This step is necessary to terminate uninstallation.
Important Notes:
During restoration of the Unicenter configuration files, a backup copy of the current files will be made
in their respective directories with the xxx.eaton extension. It is recommended to compare each
configuration file with its copy and merge modifications after uninstallation. Restoring a file from its
saved copy could erase modifications.
Computer Associates Unicenter Integration – User’s Guide – 34 003 757 XU / AF
Page 4/9
www.eaton.com
4
Use
4.1 UPS Automatic discovery (Auto-Discovery)
Any EATON Pulsar UPS with a compatible SNMP card or SNMP proxy agent is automatically
discovered by Unicenter. Each detected UPS is identified by its IP address. Several maps are
available:
“Unicenter Explorer: Topology" or "Unicenter 2-D map": View any equipment from a network
segment.
“Unicenter Explorer: Class specification": View all the UPS detected on the network.
Network segment map containing a UPS.
Computer Associates Unicenter Integration – User’s Guide – 34 003 757 XU / AF
Page 5/9
www.eaton.com
View the EATON UPS equipment detected on the network (MGE_UPS Class).
Note: MGE_UPS belong to the UPS Class.
With "Unicenter 2-D map", each UPS is associated with a specific icon for easy network identification.
UPS through "Unicenter 2-D map"view.
Computer Associates Unicenter Integration – User’s Guide – 34 003 757 XU / AF
Page 6/9
www.eaton.com
4.2 Receive and view UPS alarms
The icon is associated with the UPS status (depending on the alarms received)
UPS Status
Unicenter 2-D map
Unicenter Explorer
Normal
Warning
Critical
Using EM Console, you can view the traps received from any equipment. A text message is
associated with each trap (alarm or acknowledgement) sent by a UPS. The color depends on the
alarm severity:
Green:
Normal status (Alarm Acknowledged)
Orange:
Warning
Red:
Critical
Traps in
EM Console view
Computer Associates Unicenter Integration – User’s Guide – 34 003 757 XU / AF
Page 7/9
www.eaton.com
UPS Alarm list:
Severity
Warning
Critical
Alarm message
UPS on Battery
UPS utility power failed
UPS communication failed
UPS Battery entering Fault status
UPS battery need to be replaced
UPS battery reached low condition
UPS battery is unavailable
UPS has overload condition
4.3 Launching UPS properties from Unicenter
For each UPS in all Unicenter views, you are able to access a certain amount of information
depending on the type of equipment you have. For cards with an on-board web server, you are able to
access the UPS properties Web Page. Select your UPS and "UPS Properties" item with one click.
Running the “UPS properties" from Unicenter.
Computer Associates Unicenter Integration – User’s Guide – 34 003 757 XU / AF
Page 8/9
www.eaton.com
4.4 EATON equipment and Unicenter compatibility list:
EATON equipment
designation
Card/
proxy
Protocol
Autodiscovery
Receiving
alarms
(Traps)
Network Management
card Minislot SNMP /
Web – 66102
Industrial Network
Management card
Minislot SNMP / Web –
66103
Network Management
Proxy / XML-@gent
(Windows)
Transverse card
SNMP/Web – 66074
Minislot card
SNMP/Web – 66244
XML-Web card – 66073
SP WAN- UM Agent
SNMP card – 66245
SNMP card – 66062
Card
SNMP/HTTP
OK
OK
Accessing UPS
properties
using a browser
(HTTP)
OK
Card
SNMP/HTTP
OK
OK
OK
Proxy
HTTP
OK (**)
Na
NOK (*)
Card
SNMP/HTTP
OK
OK
OK
Card
SNMP/HTTP
OK
OK
OK
Card
Proxy
Card
Card
HTTP
SNMP
SNMP
SNMP
OK (**)
OK (**)
OK
OK
Na
OK
OK
OK
OK
na
na
na
(*): Unsupported option. With Network Management Proxy / XML-Agent, the address "http://<IP Address
proxy>/eaton/default.htm" giving access to the UPS property page cannot be configured automatically with Unicenter.
(**): Not recognised as EATON UPS equipment. Must be added manually. Select your equipment in the console and click on
"Reclassify". Select the UPS class under UPS class. Modify the pollset_name properties of the snmp class: change host to
UPS. (From the Unicenter 2D Map, select the UPS Icon and through right click select Viewer then Class Editor)
na: not applicable.
Computer Associates Unicenter Integration – User’s Guide – 34 003 757 XU / AF
Page 9/9