1
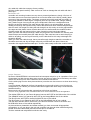
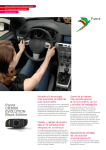
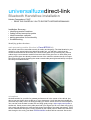
universalfuzedirect-link
Bluetooth Handsfree installation
Holden Commodore VY/VZ
– READ THIS CAREFULLY IN IT'S ENTIRETY BEFORE BEGINNING!
Installation Summary...
• identifying product locations
• finding correct connection points
• ideal connection methods
• pairing procedure for functionality
• troubleshooting
identifying product locations..
main processing module (blue box in Parrot BTE600 kit)
this unit will need to be mounted securely for safety and longevity. The ideal location in your
vehicle is a free space behind and below the audio unit, you will find a cavity that the
module and harness will tuck neatly into. Remove the glove box by lowering fully (remove
rubber hinge over extension retainers from the inside of the glove box on both sides) and
gently pull the glove box directly toward the rear of the vehicle to release the clip in hinges.
Now remove the screws fastening the center console side panel (pictured below) to expose
the cavity and interface loom.
microphone
the best location for your Mic for greatest performance is in the center of the vehicle, just
above your rear vision mirror at the top of your windscreen. You'll find that the included mic
mount will clip neatly to the roof lining providing you with a swivel mount for the microphone.
You can then tuck the lead in under the roof lining gently using a right angle panel puller or
similar tool. Gently remove the A pillar panel with your fingers (so as not to mark it by prying
with a tool) and tape the mic cable securely down the A pillar to the dash (see above). Feed
the mic cable down through the cavity exposed by the A pillar panel to behind the Glove box
and through to the cavity your Main BTE600/CK3000 module will be mounted. Secure the
mic cable with cable ties or tape to factory cabling.
Refit the A pillar panel carefully. Take care not to crush or damage the mic cable with the A
pillar clips.
controller unit
controller unit mounting location can vary due to personal preference, though I find one of
the neater and more convenient locations is next to the shifter on the Silver (usually) dress
surround of the automatic shifter. The larger surround around this panel will pop neatly up
using panel paddles or bare fingers. Pull gently from the cup holder area, using a feeding
tool ( plastic tongue from tongue and groove chipboard is the best, a straightened coat
hanger can also be used but can mark things easily and is not recommended), push the
feeding tool through the exposed cavity around the shifter and down towards the passenger
side foot well. Your target is to bring the tool through from this cavity out to the gap between
the carpet and the plastic center console above the foot well towards the module location.
Carefully probe with the feed tool till you have found this route (see picture below)
When you have the feed tool through, attach the plug end of the controller to it securely with
electrical tape and carefully draw the cable through. Take care here not to catch the plug or
cable on anything, and not to pull forcefully on the cable itself as It is easy to damage with
excessive tension.
When you have the cable through, leave yourself enough length to attach the controller to
the shifter surround and clip the larger surround you lifted back into place. Mount the
controller with supplied double sided tape. Tuck the cable neatly toward the module location.
power harness
the Parrot CK300/BTE600 is universal and has interceptor relays for up to 4 speakers. Since your
Commodore is a little cleverer than some cars we are going to make use of the factory auto mute
feature and audio input to save a little time and excessive connections.
Cut the white plug from the loom pictured above (one wire at a time so as not to short wires during
cutting).
If you purchased a Bluetooth kit from Universalfuze.com as well as being your kit being pre
configured for your vehicle you will have also been supplied with both crimp connectors and
heatshrink tubing.
Bare one wire at a time and make connections to this loom as follows..
*note, this is only applicable to the Universalfuze kits as we custom make this loom for this application
The thicker RED wire of your Parrot kit parrot harness will FUZE to the Yellow wire of the vehicle
The ORANGE wire of you parrot kit will FUZE to the Orange/Black wire of the vehicle
The BLACK wire will FUZE to the BLACK/WHITE wire of the vehicle
The BLUE wire of your Parrot kit will FUZE to the Yellow/Black wire of your vehicle
The thin RED and thin WHITE wires from you Parrot kit will each FUZE to the BLUE and
BLUE/BLACK wires of the vehicle respectively
As pictured above (heatshrink and solder method) you have now made all appropriate
connections, so you can plug in the mic and controller into the main blue module and gently
bundle all excess cable neatly and secure with tape or a cable tie.
Tuck the module and relay/cable bundle into the cavity.
You are now ready for a power up test!
Turn your vehicle accessories on with the key. Your Bluetooth kit should power up and the
lights on the controller illuminate. Select the appropriate language as per the Parrot
instruction manual, you should hear the menu voice clearly through the vehicle speaker
system and the audio display will read 'TEL' or 'PHONE'.
Pairing procedure
in any phone that is bluetooth enabled, you will find a 'Bluetooth' section of the menu, usually
under 'Connectivity' (consult you phone user manual for details)
Once you have found this menu, with the vehicles accessories switched on, search for
bluetooth devices from you phone.
Your phone will list Parrot bluetooth or BTE600 or Parrot V 5.###, select this device to
connect.
The phone will then ask you to input a PIN, this is factory preset to 1234 by Parrot and will
remain so unless you change it in the Parrot settings menu.
After the device has indicated 'pairing successful', you will need to select 'options' and set the
Parrot kit to make connections automatically with your phone ( consult phone user manual
for details)
Congratulations! You have now completed your first professional
Bluetooth kit installation!
troubleshooting
no power up or no audio
make sure the vehicles key is in the ACC position. Check and recheck all connections as
pictured, make sure there is no tension on any plugs or connections and that no cables have
been crushed during panel re-installation.
cannot 'find' Parrot kit with the phones bluetooth menu
make sure the vehicles key is in the ACC position. Check and recheck all connections as
pictured and confirm kit has complete power up with audio by setting the language menu
phone pairs and connects but has audio conflicts or limited connectivity
seek a software update from your telephone manufacturer, this is a common requirement and
can usually be done online at home easily. See you phones user manual for details
Any further questions or troubleshooting can be directed to
[email protected]