1
Q-Station
User Manual
4535 616 40761 Rev A
June 2012
© 2012 Koninklijke Philips Electronics N.V. All rights reserved. Published in USA.
Manufactured by Philips Ultrasound
22100 Bothell-Everett Highway
Bothell, WA 98021-8431
USA
Telephone: +1 425-487-7000 or 800-426-2670
Fax: +1 425-485-6080
www.healthcare.philips.com/ultrasound
This Medical Device meets the provisions of the transposition of the Medical
Device Directive 93/42/EEC within the country of origin of the Notified Body
concerned with the device.
European Union Representative
Philips Medical Systems Nederland B.V.
Quality & Regulatory Affairs
Veenpluis 4-6
5684PC Best
The Netherlands
WARNING
United States federal law restricts this device to sale by or on the order of a
physician.
This document and the information contained in it is proprietary and confidential information of Philips Healthcare
("Philips") and may not be reproduced, copied in whole or in part, adapted, modified, disclosed to others, or disseminated
without the prior written permission of the Philips Legal Department. This document is intended to be used by customers
and is licensed to them as part of their Philips equipment purchase. Use of this document by unauthorized persons is
strictly prohibited.
Philips provides this document without warranty of any kind, implied or expressed, including, but not limited to, the
implied warranties of merchantability and fitness for a particular purpose.
Philips has taken care to ensure the accuracy of this document. However, Philips assumes no liability for errors or
omissions and reserves the right to make changes without further notice to any products herein to improve reliability,
function, or design. Philips may make improvements or changes in the products or programs described in this document
at any time.
Unauthorized copying of this document, in addition to infringing copyright, might reduce the ability of Philips to provide
accurate and current information to users.
This product may contain remanufactured parts equivalent to new in performance, or parts that have had incidental use.
Philips Ultrasound products may be manufactured under or operate in accordance with one or more of the following
United States patents and corresponding patents in other countries: U.S. Patent Numbers 5,533,510; 5,800,356; 6,447,453;
6,447,454; 6,582,367; 6,676,606; 6,692,438. Other patent applications are pending in various countries.
"QLAB" is a trademark of Koninklijke Philips Electronics N.V.
Non-Philips product names may be trademarks of their respective owners.
2
Q-Station User Manual
4535 616 40761
Contents
1
2
Read This First............................................................................................7
Intended Audience...............................................................................................................7
Intended Use.........................................................................................................................7
User Information Components........................................................................................8
User Information Conventions.........................................................................................8
Upgrades and Updates.....................................................................................................10
Customer Comments.......................................................................................................10
Customer Service..............................................................................................................10
Q-Station Installation..............................................................................11
Computer Requirements.................................................................................................12
Removing MSXML 6 SP2............................................................................................13
Network Requirements...................................................................................................14
Network Requirements for Q-Station Installation..............................................14
Network Requirements for Configuring the Q-Station Computer.................15
Computer Security Policy Option.................................................................................21
Computer Security Policy Settings and Default Values.......................................21
Changing the OS Policy Settings...............................................................................22
Installing the Software......................................................................................................22
Software Registration.......................................................................................................25
Automatically Registering the Software..................................................................25
Manually Registering the Software...........................................................................27
User Accounts....................................................................................................................29
Creating a New User Account.................................................................................30
Adding a User to the PMW Clinical User Group................................................30
Managing User Accounts............................................................................................31
Verifying the Software Installation..................................................................................31
Administrator Account Removal...................................................................................32
Q-Station User Manual
4535 616 40761
3
Contents
3
4
5
4
Remote Services.........................................................................................33
Configuring Remote Services Connection Settings......................................................33
Enabling Remote Access......................................................................................................34
Requesting Online Support.................................................................................................35
Viewing Support-Request History.....................................................................................36
Q-Station Basics..........................................................................................37
Security....................................................................................................................................38
Logging On........................................................................................................................39
Locking the Q-Station Software...................................................................................39
Logging Off........................................................................................................................40
Common Elements...............................................................................................................40
Data Type Icons.....................................................................................................................41
Messages and Notifications.................................................................................................42
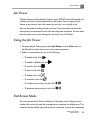
Job Viewer...............................................................................................................................43
Using the Job Viewer............................................................................................................43
Full-Screen Mode...................................................................................................................43
Q-Assistant.............................................................................................................................44
Q-Station Options................................................................................................................45
Viewing Installed Q-Station Options................................................................................46
Q-Station Compatibility.......................................................................................................46
Working with the Q-Station Software......................................................49
Studies......................................................................................................................................49
Data Panel.........................................................................................................................49
Retrieving Study Data from PACS/Archive................................................................50
Transferring Studies Data to Your Workstation.......................................................51
Archiving Data to a DICOM Archive..........................................................................52
Setting CD/DVD Write Preferences...........................................................................52
Writing a Disc Using Preferred Settings....................................................................52
Viewing....................................................................................................................................53
Displaying the Image Toolbar........................................................................................53
Q-Station User Manual
4535 616 40761
Contents
6
7
Image Toolbar Controls.................................................................................................53
Performing Wall Motion Scoring.................................................................................55
Making Measurements....................................................................................................56
Annotating an Image.......................................................................................................58
Capturing an Image.........................................................................................................58
Analyzing Images in QLAB..................................................................................................59
Reports....................................................................................................................................60
Viewing an Approved Report.......................................................................................61
Editing a Report...............................................................................................................61
Setting Electronic Signatures on Reports...................................................................62
Approving a Report........................................................................................................63
Printing a Report.............................................................................................................63
Custom Report Templates............................................................................................63
Export......................................................................................................................................64
Export Toolbar Controls...............................................................................................64
Patient Data Export........................................................................................................65
Exporting Data in DICOM Format.............................................................................66
Saving Images....................................................................................................................67
Saving a Loop as a Movie...............................................................................................68
System Management..................................................................................69
Specifying System Information............................................................................................69
Q-Station Data Locations....................................................................................................69
Configuring a Windows 7 Network Share................................................................70
Configuring a Windows XP Network Share.............................................................71
Configuring a Local File Repository or NTFS USB Drive......................................73
Specifying Storage Locations for Q-Station Data.....................................................74
Backing Up Configuration Settings....................................................................................75
Restoring Configuration Settings.......................................................................................76
Network and DICOM Settings..................................................................77
Checking Network Settings................................................................................................78
Q-Station User Manual
4535 616 40761
5
Contents
Adding DICOM Devices......................................................................................................78
Editing DICOM Devices......................................................................................................80
Deleting DICOM Devices...................................................................................................80
Testing DICOM Devices......................................................................................................80
ECG Configuration...............................................................................................................81
Activating the ECGServiceUser Account..................................................................82
Configuring Access to ECG Reports..........................................................................83
Configuring Access to ECG Raw Data.......................................................................84
Specifying the Date Format for StressVue XML.......................................................84
ECG Data Flow Troubleshooting.................................................................................84
Index.............................................................................................................87
6
Q-Station User Manual
4535 616 40761
1 Read This First
The Q-Station Help and Q-Station User Manual are intended to assist you with
the safe and effective operation of your product. Before attempting to use the
product, read the user information and strictly observe all warnings and
cautions.
The user information for your Philips product describes the most extensive
configuration of the product, with the maximum number of options and
accessories. Some functions described may be unavailable on your product's
configuration.
Intended Audience
Before you use your Q-Station, you need to be familiar with diagnostic
techniques. Sonography training and clinical procedures are not included here.
This document is intended for sonographers, physicians, IT personnel, and
biomedical engineers who operate and maintain your Philips product.
Intended Use
This product is intended to be installed, used, and operated only in accordance
with the safety procedures and operating instructions given in the product
user information, and only for the purposes for which it was designed. However,
nothing stated in the user information reduces your responsibility for sound
clinical judgment and best clinical procedure.
Installation, use, and operation of this product is subject to the law in the
jurisdictions in which the product is used. Install, use, and operate the product
only in such ways that do not conflict with applicable laws or regulations, which
have the force of law.
Use of the product for purposes other than those intended and expressly
stated by Philips, as well as incorrect use or operation, may relieve Philips or
Q-Station User Manual
4535 616 40761
7
1
Read This First
its agents from all or some responsibility for resultant noncompliance, damage,
or injury.
WARNING
System users are responsible for image quality and diagnosis.
User Information Components
The user information provided with your product includes the following
components:
•
Q-Station User Manual: Introduces you to features and concepts and
helps you set up and configure your software.
•
Q-Station Help: Available on the product in some languages, the Q-Station
Help contains comprehensive instructions for use. It also provides
descriptions of all controls and display elements. To display the Help, click
Help.
•
Q-Station Operating Notes: Contains information that clarifies certain
product responses that might be misunderstood or cause user difficulty.
•
Shared Roles for System and Data Security: Contains guidelines to help
you understand how the security of your Philips product could be
compromised and information on Philips' efforts to help you prevent security
breaches.
User Information Conventions
The user information for your product uses the following typographical
conventions to assist you in finding and understanding information:
•
All procedures are numbered, and all subprocedures are lettered. You must
complete steps in the sequence they are presented to ensure success.
•
Bulleted lists indicate general information about a particular function or
procedure. They do not imply a sequential procedure.
•
Control names and menu items or titles are spelled as they are on the
system, and they appear in bold text.
8
Q-Station User Manual
4535 616 40761
Read This First
•
•
•
•
•
•
•
•
1
The pointer is the cursor used to select elements on the display.
Point means to position the tip of the pointer or cursor on an item on the
display.
Click or select means to move the pointer to an object and press the primary
mouse button.
Double-click means to quickly click twice to select an object or text.
Right-click means to point at an item and then press the right mouse button,
without moving the mouse.
Shift+click means to press and hold the Shift key while clicking an item on
the display.
Ctrl+click means to press and hold the Ctrl key while clicking an item on
the display.
Drag means to place the cursor over an object and then press and hold the
mouse button while moving the mouse.
Information that is essential for the safe and effective use of your product appears
throughout your user information as follows:
WARNING
Warnings highlight information vital to the safety of you, the operator, and the
patient.
CAUTION
Cautions highlight ways that you could damage the product and consequently
void your warranty or service contract or ways that you could lose patient or
system data.
NOTE
Notes bring your attention to important information that will help you operate
the product more effectively.
Q-Station User Manual
4535 616 40761
9
1
Read This First
Upgrades and Updates
We are committed to innovation and continued improvement. Upgrades may
be announced that consist of software improvements. Updated user information
will accompany those upgrades.
Customer Comments
If you have questions about the user information, or you discover an error in
the user information, in the USA, please call Philips at 800-722-9377; outside
the USA, please call your local customer service representative.
Customer Service
Customer service representatives are available worldwide to answer questions
and to provide maintenance and service. Please contact your local Philips
representative for assistance. You can also contact the following office for referral
to a customer service representative, or visit the Philips Healthcare "Contact
Us" website:
www.healthcare.philips.com/main/about/officelocator/index.wpd
Philips Ultrasound Headquarters
22100 Bothell-Everett Highway, Bothell, WA 98021-8431, USA
800-722-9377
10
Q-Station User Manual
4535 616 40761
2 Q-Station Installation
To ensure that the Q-Station software installs successfully and operates
correctly, it is critical that you perform the installation procedure exactly and
in the order written. Also, because Philips provides remote support for the
Q-Station software, Philips requires that the Q-Station computer have internet
access.
Some procedures require using the computer's operating system (OS) software
and not the Q-Station software. Detailed instructions for performing those
OS procedures are not included here, because the procedures could vary
depending on the OS type and version. See the OS Help for detailed
instructions. This user manual provides suggested phrases to search for in the
OS Help.
The installation procedure comprises the following tasks:
1. Verify that the computer meets or exceeds the minimum requirements (see
"Computer Requirements" on page 12).
2. Confirm or collect the network information (see "Network Requirements"
on page 14).
CAUTION
If the Q-Station PC is part of a wireless network, use only secured wireless
technologies. For more information about network security, see Shared
Roles for System and Data Security, which is included with your Q-Station
software.
3. Decide whether to enable OS Hardening (see "Computer Security Policy
Option" on page 21).
4. Install the software (see "Installing the Software" on page 22).
5. Register the software and obtain the license file (see "Software Registration"
on page 25).
6. Restart the computer.
Q-Station User Manual
4535 616 40761
11
2
Q-Station Installation
7. Manage user accounts (see "User Accounts" on page 29).
8. Verify the software installation (see "Verifying the Software Installation" on
page 31).
9. Remove the administrator account from the PMWClinicalUserGrp group
(see "Administrator Account Removal" on page 32).
10. Establish the remote connection (see the "Remote Services" section).
Computer Requirements
Before the software can be used on your computer, your computer must meet
or exceed the following minimum requirements. For more information, search
the Windows Help for get information about your computer.
•
Windows XP Professional (32 bit, with Service Pack 3) or Windows 7 (32 bit
and 64 bit) (Windows Vista is unsupported)
•
Intel Core 2 Duo or greater processor or AMD Athlon 64 X2 or greater
processor
•
2 GB RAM
•
64 MB or greater video card with Open Graphics Library (OpenGL) and
Pixel Shader 3.0 support
•
7,200 RPM hard drive with a minimum of 40 GB of available space
•
CD-ROM/DVD RW drive
•
USB port
•
LAN port
•
Microsoft Word 2007 or Microsoft Word 2010
•
Mouse with a scroll wheel
•
Standard Microsoft (or equivalent) keyboard
•
Monitor with 1600x1024 or greater resolution
NOTES
•
12
If you are installing on Windows XP, you must remove MSXML 6 Service
Pack (SP) 2 from the destination computer before installing the Q-Station
Q-Station User Manual
4535 616 40761
Q-Station Installation
•
•
•
•
2
software. If MSXML 6 SP2 is present, the system configuration check fails.
See "Removing MSXML 6 SP2" on page 13.
You cannot install the Q-Station software on a computer if the DPI (text
size) setting is set to Large Size. The DPI setting must be Normal Size.
To determine your computer's hardware specifications, see the computer's
hardware documentation, contact the manufacturer, or search the Internet.
If you are unsure that your computer meets the minimum requirements,
continue the installation. The System Configuration Check will alert you to
any discrepancy.
If your computer meets only the minimum requirements, the software
installation could require more time to complete than it would on a
computer that exceeds the requirements.
Removing MSXML 6 SP2
The Q-Station SQL database does not install correctly if the Microsoft MSXML 6
SP2 is installed on the destination computer. Before installing the Q-Station
software, remove the MSXML 6 SP2.
1. On the destination computer, open Add/Remove Programs (Windows XP)
or Programs and Features (Windows 7).
2. If the Microsoft MSXML 6 SP2 is listed as an installed program, select it and
click Remove.
3. Do one of the following:
• If the removal is successful, you can ignore the remaining steps of this
procedure and install the Q-Station software.
• If the removal fails, go to step 4.
• If the removal is successful, but Q-Station installation still fails, go to step 4.
4. In the Tools directory of the Q-Station Installation DVD, double-click
msicuu2.exe.
5. Install the Clean Up utility by following the prompts in the Windows
Installer Clean Up Setup wizard.
Q-Station User Manual
4535 616 40761
13
2
Q-Station Installation
6. Click Start and All Programs, and then select Windows Install Clean
Up.
7. In the list of programs, select MSXML 6 Service Pack 2 (KB954459)
[6.20.1099.0].
8. Click Remove.
Network Requirements
CAUTION
If the Q-Station PC is part of a wireless network, use only secured wireless
technologies. For more information about network security, see Shared Roles
for System and Data Security, which is included with your Q-Station software.
Before installing the Q-Station software and to ensure a complete and successful
installation, Philips recommends that you confirm or collect specific network
information. The network information is required for these purposes:
•
To allow installation of the Q-Station software
•
To enable the Q-Station computer to operate in your network environment,
exchange data with DICOM devices (PACS and ultrasound systems), and
accept remote support from Philips
If your facility has an information-technology (IT) department, confer with the
IT network administrator as necessary.
Network Requirements for Q-Station Installation
The following network requirements are for installing the Q-Station software
onto your computer.
•
•
•
•
14
Access to the Internet
Port 443 (outbound only) open in the firewall
Port 80 (to enable automatic registration) open in the firewall
If a proxy server is used, you need the proxy server address, the user name,
and the password.
Q-Station User Manual
4535 616 40761
Q-Station Installation
2
NOTE
Port 443 is used for secure Web sites (URLs that begin with "https://"), and port
80 is used for regular Web sites. Most facilities that have Internet access have
those ports open in the firewall.
Network Requirements for Configuring the Q-Station Computer
The items listed in the "Setting Name" column of the following tables are the
network requirements for configuring the Q-Station computer to operate in
your network environment and accept remote support from Philips. Some of
these items may not apply to your network. Write the settings that apply to
your network in the spaces provided.
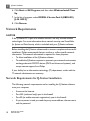
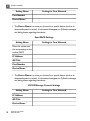
Q-Station Computer Settings
Setting Name
Setting for Your Network
Automatic IP Address
Fixed IP Address
Subnet Mask
Default Gateway
DNS Server
AE Title
Port Number
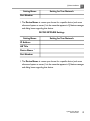
Ultrasound System 1 Settings
Setting Name
Setting for Your Network
IP Address
AE Title
Port Number
Q-Station User Manual
4535 616 40761
15
2
Q-Station Installation
Setting Name
Device Name
Setting for Your Network
1
1. The Device Name is a name you choose for a specific device (such as an
ultrasound system or server). It is the name that appears in Q-Station messages
and dialog boxes regarding that device.
Ultrasound System 2 Settings
Setting Name
Setting for Your Network
IP Address
AE Title
Port Number
Device Name
1
1. The Device Name is a name you choose for a specific device (such as an
ultrasound system or server). It is the name that appears in Q-Station messages
and dialog boxes regarding that device.
Ultrasound System 3 Settings
Setting Name
Setting for Your Network
IP Address
AE Title
Port Number
Device Name
1
1. The Device Name is a name you choose for a specific device (such as an
ultrasound system or server). It is the name that appears in Q-Station messages
and dialog boxes regarding that device.
16
Q-Station User Manual
4535 616 40761
Q-Station Installation
2
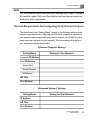
Archive PACS Settings
Setting Name
Setting for Your Network
IP Address
AE Title
Port Number
Does the system
support Native Data?
Does the system
support ECG Data?
Does the system
support Structured
Report?
Device Name
1
1. The Device Name is a name you choose for a specific device (such as an
ultrasound system or server). It is the name that appears in Q-Station messages
and dialog boxes regarding that device.
Query/Retrieve PACS Settings
Setting Name
Setting for Your Network
Does this system use
the same settings as the
archive PACS?
IP Address
AE Title
Q-Station User Manual
4535 616 40761
17
2
Q-Station Installation
Setting Name
Setting for Your Network
Port Number
Device Name
1
1. The Device Name is a name you choose for a specific device (such as an
ultrasound system or server). It is the name that appears in Q-Station messages
and dialog boxes regarding that device.
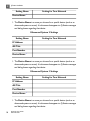
Send PACS Settings
Setting Name
Setting for Your Network
Does this system use
the same settings as the
archive PACS?
IP Address
AE Title
Port Number
Device Name
1
1. The Device Name is a name you choose for a specific device (such as an
ultrasound system or server). It is the name that appears in Q-Station messages
and dialog boxes regarding that device.
DICOM Storage Commit Settings
Setting Name
IP Address
AE Title
Device Name
18
Q-Station User Manual
4535 616 40761
1
Setting for Your Network
Q-Station Installation
Setting Name
2
Setting for Your Network
Port Number
1. The Device Name is a name you choose for a specific device (such as an
ultrasound system or server). It is the name that appears in Q-Station messages
and dialog boxes regarding that device.
DICOM MPPS:RIS Settings
Setting Name
Setting for Your Network
IP Address
AE Title
Device Name
1
Port Number
1. The Device Name is a name you choose for a specific device (such as an
ultrasound system or server). It is the name that appears in Q-Station messages
and dialog boxes regarding that device.
Q-Station User Manual
4535 616 40761
19
2
Q-Station Installation
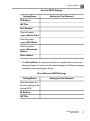
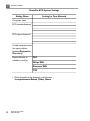
StressVue ECG System Settings
Setting Name
Setting for Your Network
Computer name
ECG raw data locations1
ECG report locations1
If used, computer name
for report archive
location(Destination
Directory)1
Report formats to
transfer to archive
PDF
Philips XML
Alternate XML
TIFF
1. Write the path to the directory in this format:
\\computername\Shared_Folder_Name.
20
Q-Station User Manual
4535 616 40761
Q-Station Installation
2
Audit Server Settings
Setting Name
Setting for Your Network
IP Address
Host Name
Network Protocol
TCP
UDP
Port Number
Computer Security Policy Option
The computer security policy option offered during the software installation is
designed to increase the security of patient data by changing some of the
Windows OS settings. It is intended for use in office environments that do not
have an information technology (IT) department. If your office has an IT
department, your office probably has a security policy. Ask your IT department
if you should select this option during installation. After the Computer Security
Policy option is enabled, no "undo" function is available, and the system
administrator must manually restore the OS settings.
Computer Security Policy Settings and Default Values
If you select the Computer Security Policy option during installation, it
changes the Administrator account name, changes the policies for passwords
and the locking and disabling of accounts, and sets default values for those policies.
The policies and their default values are as follows:
The Computer Security Policy option changes the Administrator account
name for these reasons:
•
Administrator is an easy access point for hackers, because it has a known
name.
•
Changing the name increases system security.
Q-Station User Manual
4535 616 40761
21
2
Q-Station Installation
An account is locked for 5 minutes, if 10 invalid log-on attempts occur within
5 minutes.
The password policy is enforced as follows:
•
Logging on requires a user name and password.
•
Strong passwords are required.
•
A password-protected screen saver appears after 15 minutes of inactivity.
•
The 12 previous passwords are not allowed.
A strong password has the following properties:
•
A minimum length of eight characters
•
Three of four character types (uppercase, lowercase, number, and a special
character)
•
Must be changed every 90 days
•
Cannot contain the associated user name
•
Cannot contain words that can be found in a dictionary
•
Cannot contain repeated or sequential letters or numbers (for example:
abcd, aaa, 5432, 1111)
Changing the OS Policy Settings
You must have administrator privileges and use the Windows OS interface and
tools to change the policy settings. For details, search the Windows Help for
local security settings.
Installing the Software
To install the software, you must be logged on with local administrator privileges.
Philips recommends that you create a unique local administrator account named
QAdmin to install the Q-Station software. Using the QAdmin account increases
the security of the Q-Station software installation and data. You can use that
account after the installation to verify Q-Station operation.
22
Q-Station User Manual
4535 616 40761
Q-Station Installation
2
CAUTION
If you are upgrading the Q-Station software from version 1.x, do not uninstall
the previous version. Uninstalling the previous version before upgrading to the
current version may result in an inability to reattach an existing patient database.
NOTES
•
•
Installing Q-Station software automatically upgrades any previous version.
During installation, some anti-virus applications or other software programs
designed to protect the PC may display warning messages that alert you
that unknown software is being installed. Ignore or close those messages,
and allow the Q-Station installation to proceed.
The Installation Wizard performs the software installation and prompts you at
various times during the installation as it proceeds through the installation
sections.
1. Before you begin the installation:
• Ensure that the target computer meets the minimum requirements (see
"Computer Requirements" on page 12 ).
• If the target computer is on a network, ensure that the network meets
the minimum requirements (see "Network Requirements for Q-Station
Installation" on page 14).
• Ensure that you have the original Q-Station DVD case available. It has the
Q-Station serial number, which is required for the registration process.
2. Create the QAdmin account. For details, search the Windows Help for add
a new user to the computer.
3. Use the QAdmin account to log on to the computer.
4. Place the installation DVD in the DVD drive and wait a few moments for the
Installation Wizard to start.
5. If the Installation Wizard does not start automatically, use Windows Explorer
to navigate to Setup.exe on the DVD, and then double-click Setup.exe to
start the installation.
6. On the Welcome display, select the installation language and click Next.
Q-Station User Manual
4535 616 40761
23
2
Q-Station Installation
7. Read and accept the license agreement. (If you do not accept the license
agreement, the Installation Wizard prompts you to exit the installation.)
8. Click Next.
9. In the System Configuration Check dialog box, do one of the following:
• If the system passed the System Configuration Check, click Next.
• If any item has a warning, review it carefully. You may choose to correct
the item before proceeding with the software installation, or you may
choose to continue the software installation without correcting it. If you
choose to continue the software installation, click Next.
• If any item failed, the software installation stops. Exit the software
installation and resolve the item before restarting the software installation.
10. In the Configure Patient Database dialog box, select a destination drive
and set the amount of disk space for the patient database.
11. Click Next.
12. The Installation Wizard prompts you to select whether to apply the
Computer Security Policy option. For details about this feature, see
"Computer Security Policy Option" on page 21. If you do not want to apply
the Computer Security Policy option, select Maintain existing
computer security policies.
NOTE
After the Computer Security Policy option is enabled, no "undo" function
is available, and the system administrator must manually restore the OS
settings.
13. Click Install.
14. The Installation Wizard checks for Microsoft .NET Framework. If the computer
has Microsoft .NET Framework installed, the Q-Station software installation
continues. If the computer does not have Microsoft .NET Framework installed,
the Installation Wizard installs it and restarts the computer to complete the
.NET Framework installation; this requires you to log on to continue the
Q-Station software installation.
24
Q-Station User Manual
4535 616 40761
Q-Station Installation
2
15. The main part of the software installation continues, which requires
approximately 30 minutes to complete. Meanwhile, the main progress indicator
may seem to be inactive for several minutes, but other dialog boxes in the
background show activity. This is normal. Allow the dialog boxes to process;
do not click them or press any key.
16. In the Installation Succeeded dialog box, click Register to launch the
Registration Wizard and obtain the license file.
NOTE
If the Installation Failed dialog box appears, follow its instructions to restart
the computer and restart the software installation.
Software Registration
Before you can use the Q-Station software, you must register it to obtain the
license file. There are two methods for registering the software and obtaining
the license file:
•
Automatic registration, which occurs when the Q-Station computer is
connected to the Internet.
•
Manual registration, which is required when the Q-Station computer is not
connected to the Internet. This method requires using another computer
that is connected to the Internet.
Automatically Registering the Software
If the Q-Station computer is connected to the Internet, complete the following
steps. If the Q-Station computer is not connected to the Internet, see "Manually
Registering the Software" on page 27.
1. Ensure that you have the following items available:
• A registration name (your name)
• Your valid e-mail address
• The Q-Station software serial number from the Q-Station DVD case
Q-Station User Manual
4535 616 40761
25
2
Q-Station Installation
2. In the Q-Station Registration Wizard, select I Am Connected to the
Internet and Would Like to Register Now, and then click Next.
3. Type the required information, and then click Next.
4. Type the Q-Station serial number (from the CD case) in the Serial Number
text box and click Next. The Registration Wizard automatically obtains the
license file and displays the Registration Complete message.
NOTE
The license file is specific to your Q-Station computer and cannot be used
with another computer.
5. In the Registration Complete dialog box, select I Would Like to Back
Up My License File, and click Finish to make a backup copy of the license
file.
6. In the Select Backup Location dialog box, select the location to which
you want to save the license file and click Save.
7. Do one of the following:
• If the Installation Succeeded dialog box appears, click Restart to restart
the computer and complete the software installation.
• If the Installation Succeeded dialog box does not appear, manually
restart the computer to complete the software installation.
• If the Installation Failed dialog box appears, follow the instructions to
restart the computer and restart the software installation.
8. Verify that the following icons are on the desktop:
• Q-Station icon, for opening the Q-Station application.
• Q-Assistant icon, for opening the Q-Assistant tool, which is for configuring
the Q-Station application
26
Q-Station User Manual
4535 616 40761
Q-Station Installation
2
Manually Registering the Software
NOTE
The license file is specific to your Q-Station computer and cannot be used with
another computer.
If the Q-Station computer is not connected to the Internet, complete the
following steps. If the Q-Station computer is connected to the Internet, see
"Automatically Registering the Software" on page 25.
1. Ensure that you have the following items available:
•
•
•
•
A registration name (your name)
Your valid e-mail address
The Q-Station software serial number from the Q-Station CD case
A USB flash memory drive
2. On the Q-Station computer, do the following:
a. Open the Windows Notepad accessory program.
b. In the Q-Station Registration Wizard, select I am not connected to the
Internet. Tell me how to register.
c. Click Next.
d. Copy the URL from the dialog box and paste it into Notepad.
e. Copy the node ID and paste it into Notepad.
f. Connect your USB flash drive.
g. Save the Notepad file, with a name of your choice, to the USB flash drive.
h. Close Notepad and disconnect the USB flash drive.
3. On the computer that is connected the Internet, do the following:
a. Open an Internet browser window.
b. Connect the USB flash drive that contains the Notepad file with the
registration URL and node ID.
c. Open the Notepad file.
d. Copy the registration URL from Notepad, paste it into the browser's
address field, and go to that URL.
Q-Station User Manual
4535 616 40761
27
2
Q-Station Installation
e. Copy the node ID from Notepad, and paste it into the Node ID field of
the registration Web site.
f. Enter the remaining required information (name, e-mail address, and
Q-Station serial number) and click OK. The registration Web site sends
the license file to your e-mail address.
g. Access your e-mail account and retrieve the license file.
h. Save the license file to the USB flash drive.
i. Disconnect the USB flash drive, and take it to the Q-Station computer .
4. On the Q-Station computer, if the Registration Wizard displays the Welcome
to the Registration Wizard, select I already have a license file and
click Next.
5. If the Registration Wizard is not displayed, do the following:
a. On the Windows desktop, double-click the Q-Assistant icon to open
Q-Assistant.
b. Click Options.
c. Click Registration Wizard.
d. In the Welcome to the Registration Wizard dialog box, select I
already have a license file and click Next.
6. Connect the USB flash drive to the Q-Station computer.
7. Click . . . and navigate to the USB flash drive.
8. Right-click the license file and select Open, or double-click the license file.
9. Click Next.
10. In the Registration Complete dialog box, select I Would Like to Back
Up My License File and click Finish to make a backup copy of the license
file.
11. In the Select Backup Location dialog box, select the location to which
you want to save the license file and click Save.
12. Do one of the following:
• If the Installation Succeeded dialog box appears, click Restart to restart
the computer and complete the software installation.
• If the Installation Succeeded dialog box does not appear, manually
restart the computer to complete the software installation.
28
Q-Station User Manual
4535 616 40761
Q-Station Installation
2
• If the Installation Failed dialog box appears, follow the instructions to
restart the computer and restart the software installation.
13. Verify that the following icons are on the desktop:
• Q-Station icon, for opening the Q-Station application.
• Q-Assistant icon, for opening the Q-Assistant tool, which is for configuring
the Q-Station application
User Accounts
The Q-Station software automatically creates a local user account named
ECGServiceUser, which is the service account that runs StressVue.
ECGServiceUser must be active for you to access StressVue from your
Q-Station system. Additionally, each Q-Station user must have a unique user
account and be a member of the PMWClinicalUserGrp group.
In addition to creating the ECGServiceUser user account, the Q-Station
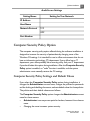
software also creates several local groups, as described in the following table.
Groups Created during Q-Station Installation
Group Name
Description
Comments
PMWClinicalUserGrp
Clinical user Each active
group
Q-Station user
must be a member
of this group.
PMWHospitalITUserGrp
Hospital IT
group
PMWInternalAccountsGrp
Group for Factory use; do not
internal
modify.
(factory) use
Each Q-Assistant
user must be a
member of this
group.
Q-Station User Manual
4535 616 40761
29
2
Q-Station Installation
Group Name
Description
Comments
SQLServer2005MSSQLServer
ADHelperUser$PHILIPS-D8327EC
Factory use; do not
modify.
SQLServer2005MSSQLUser
$PHILIPS-D8E27EC$QSTATIONDB
Factory use; do not
modify.
SQLServer2005SQLBrowserUser
$PHILIPS-D8E27EC
Factory use; do not
modify.
To create and manage the user and group accounts, you must have administrator
privileges and use the Windows operating system (OS) interface and tools. For
details, search the Windows Help for using local users and groups.
Creating a New User Account
Before being able to use the Q-Station software, each user must have a unique
ID and password in an individual account. For details, search the Windows Help
for create a new user account.
Each user account must meet the following criteria:
•
Users must be required to change their passwords the first time that they
log on.
•
Each password must meet the password policy in use.
•
The user account must be enabled.
•
Each user must be a member of the PMWClinicalUserGrp group.
Adding a User to the PMW Clinical User Group
Before being able to use the Q-Station software, each user account must be a
member of the PMWClinicalUserGrp group.
For details, search the Windows Help for add a user to a group.
30
Q-Station User Manual
4535 616 40761
Q-Station Installation
2
NOTE
The administrator account that you used for installing the Q-Station software
is automatically added to the PMWClinicalUserGrp group.
Managing User Accounts
You can change a user name or other account properties or delete an account.
For details, search the Windows Help for change a user's group or account
type or delete a user account.
Verifying the Software Installation
After you finish installing the software, use this procedure to verify that it installed
correctly and is ready for use, and to perform some administrative duties.
1. On the Windows desktop, double-click the Q-Station icon. If the application
opens, the software installed correctly.
2. If the application does not open, ensure that the user account in use is a
member of the PMWClinicalUserGrp group, and then try opening the
application again. For instructions, search the Windows Help for change a
user's group or account type.
3. If the user account in use is a member of the PMWClinicalUserGrp group,
and the application still does not open, reinstall the license file as follows, and
then trying opening the application again.
a. On the Windows desktop, double-click the Q-Assistant icon to open
Q-Assistant.
b. Click Options.
c. Click Registration Wizard.
d. In the Welcome to the Registration Wizard dialog box, select I
already have a license file and click Next.
e. Click . . . and navigate to the location of the license file.
f. Select the license file and click Open.
g. Click Next.
h. Click Finish.
Q-Station User Manual
4535 616 40761
31
2
Q-Station Installation
i. In the New License File dialog box, click Activate Now and then click
OK.
4. If reinstallation of the license file does not enable you to open the application,
do the following:
a. Uninstall Q-Station software, Q-Assistant, and the Philips Service Agent.
b. Reinstall Q-Station software, which also reinstalls Q-Assistant and the
Philips Service Agent.
c. Perform the verification procedure again.
5. Verify that the license options are correctly installed:
a. Double-click the Q-Assistant icon.
b. Click System Management.
c. Ensure that the Q-Station serial number shown matches the serial number
on the software DVD case.
d. Click Options and ensure that the plug-ins and features listed match the
plug-ins and features that you purchased.
Administrator Account Removal
Before using the Q-Station software in a clinical environment, it is a good practice
to remove the administrator account (QAdmin) that you used to install the
software from the PMWClinicalUserGrp group. Doing so prevents the
administrator from accidentally accessing patient data.
To remove the account, you must have administrator privileges and use the
Windows operating system (OS) interface. For details, search the Windows
Help for change a user's group or account type.
32
Q-Station User Manual
4535 616 40761
3 Remote Services
After installing the Q-Station software, Philips recommends that you enable
remote access in Q-Assistant. Remote access allows Philips representatives
to provide any support you may need. You have full control over remote
access. No one can access the Q-Station software remotely if you do not
enable remote access.
After remote access is enabled, the Q-Station software communicates only
with the Philips server specified in the Settings area of the Remote Services
tab.
Configuring Remote Services Connection Settings
If your site uses a firewall, ensure that port 443 (outbound only) is open before
you configure remote services connection settings.
1. In Q-Assistant, click the Remote Services tab.
2. Click Settings.
3. Under Connection Settings, ensure that the Server Address is set to
M2M Enterprise Server.
NOTES
• Selecting M2M Enterprise Server automatically selects Enterprise
URL, Tunnel URL, and RA URL.
• The M2M Enterprise Server is the standard server address. Do not
select Custom or any other setting, unless a Philips representative
instructs you to do so.
4. In the Connection Type menu, ensure that Internet is selected.
NOTE
Internet is the standard connection type. Do not select VPN, unless a
Philips representative instructs you to do so.
Q-Station User Manual
4535 616 40761
33
3
Remote Services
5. In the Proxy Settings area, if your site uses a proxy server to control
Internet access, type the proxy IP address, user name and password (if used),
and indicate whether the proxy server uses NTLM.
NOTE
You can add only an IP address and port number in the Proxy Settings area
(for example, 192.168.0.1:8080). URLs are not accepted.
6. Click Save. Q-Assistant registers with the Philips M2M server.
7. Click Test Connection and verify that OK appears. OK indicates that a
path to the server exists.
8. If Failed to Connect appears instead of OK, ensure that:
• The computer is connected to the Internet.
• Network settings are configured correctly.
• Port 443 (outbound) is open in the firewall.
Enabling Remote Access
1. In Q-Assistant, click the Remote Services tab.
2. Click Access/Status.
3. Under Remote Desktop, do one of the following:
• To enable permanent remote desktop access, select Enable
Permanently.
• To enable remote desktop access only until a date and time that you specify,
select Enable Until, select a date from the menu, and enter a time.
4. In the Remote Desktop confirmation dialog box, click OK to enable remote
access. Q-Assistant displays a yellow triangle. When the yellow triangle changes
to a green circle, Q-Assistant has successfully established contact with the
Philips remote server. (Establishing contact may require a few minutes.)
5. Under Software Download, do one of the following:
34
Q-Station User Manual
4535 616 40761
Remote Services
3
• To allow a Philips representative to download software to the Q-Station
computer, select Enable Download.
• To allow automatic installation of downloaded software, select Install
Automatically.
Q-Assistant displays a yellow triangle. When the yellow triangle changes to
a green circle, Q-Assistant has successfully established contact with the Philips
remote server. (Establishing contact may require a few minutes.)
Requesting Online Support
The ability to request online support is an optional feature, available in some
countries, that enables you to send a request to Philips for technical or clinical
assistance.
NOTE
The Request Support tab is visible only after you enable online support and
submit a support request.
1. If you are creating an online-support request for the first time, enable online
support as follows. Otherwise, go to step 2.
a. In Q-Assistant, click the Options tab.
b. Click Service Options.
c. Click Enable.
d. Enter an access code to enable online support. For an access code, contact
your Philips representative.
2. Do one of the following:
• At the top of the Q-Assistant desktop, click the Request Support tab.
• In Q-Assistant's lower left corner, click Request Support.
3. Complete the fields in the Request Support form.,
4. Click Request Service to send your support request to Philips.
Q-Station User Manual
4535 616 40761
35
3
Remote Services
Viewing Support-Request History
If Request Support is enabled, you can view a history of your online-support
requests.
1. In Q-Assistant, click the Request Support tab.
2. Click History to view the details of previous support requests.
36
Q-Station User Manual
4535 616 40761
4 Q-Station Basics
The Q-Station software-application package is designed to manage, view, and
report image data acquired by ultrasound systems and ECG data from Philips
StressVue ECG Systems. It is a DICOM viewer that provides an environment
for review and quantification of cardiovascular and general imaging ultrasound
studies. You can manage study data, review images, perform wall-motion
scoring, and make basic unlabeled measurements in the Q-Station software.
You can also create patient reports and export patient data to DICOM archives,
removable media, or network storage locations.
When you purchase QLAB plug-ins, the Q-Station software integrates QLAB
software to provide advanced quantification and includes the most clinically
relevant QLAB software analysis results in the report.
If you have purchased the StressVue ECG Connect software option, you can
also do the following:
•
Import StressVue ECG waveform data, the ECG SR, and a PDF of the
ECG report.
•
Display stress ECG ST maps and stress echo ultrasound data side-by-side
in the report and in the QLAB CMQ-Stress plug-in for analysis.
•
Display, in the QLAB CMQ-Stress plug-in, ECG waveforms with stress
echo ultrasound.
NOTES
•
•
The Q-Station software is not intended for long-term storage and should
only be used to store patient data that you are currently investigating. To
ensure data security, patient data should also be stored on a secure
storage device (a PACS).
Your ability to analyze images in the Q-Station software depends heavily
on the quality of the image data you intend to analyze. Image quality is
highly dependent on a number of factors, including the quality and grayscale
standard display function (GSDF) calibration of the reviewing monitors,
the ambient lighting in the viewing environment, and the compression
applied to the image when it is exported in DICOM format. For more
Q-Station User Manual
4535 616 40761
37
4
Q-Station Basics
•
•
information on compression options available on the ultrasound system
and other export options that affect image quality, see the documentation
that accompanies your ultrasound system.
Make sure to maintain the accurate date and time on the computer on
which the Q-Station software is installed.
If you are combining stress ECG data with stress-echo ultrasound data,
ensure that the date and time on the StressVue system and on the
ultrasound system are accurate.
The Q-Station software guides you through your workflow using task-oriented
activities. Each activity is described in detail in Help. The following activities are
available:
•
Use the Studies tab to manage patient data and select studies for processing
in other available activities.
•
Use the View tab to view patient data.
•
Use the QLAB option on the View tab to analyze images using QLAB
software plug-ins.
•
Use the Report tab to create, edit, approve, and print reports about patient
data.
•
Use the Export tab to export patient data to DICOM archives and media
(DICOM format) or to export in PC format to your local drive or media.
Security
The Q-Station software uses the following security features to protect patient
data from unauthorized access:
•
Unique user groups, names, and passwords
•
Workstation locking
•
Computer Security Policy (optional in Setup)
•
Screen blanking
•
Audit logging
•
Secure remote access
38
Q-Station User Manual
4535 616 40761
Q-Station Basics
4
For further details, contact your Hospital IT Administrator, and see the User
Manual and Shared Roles for System and Data Security, included with your software.
Logging On
If security features have been set up through the Computer Security Policy option
during installation of the Q-Station software, each user of the system is identified
with a unique user name. Each user name is assigned a password. User names
and passwords are created during installation of the Q-Station software, or by
your Hospital IT Administrator.
The Q-Station software displays the user name of the user currently logged on
in the message bar.
CAUTIONS
•
If access to the Q-Station software is not restricted to authorized persons
by your hospital’s security policy, you must not leave it unattended while
you are logged on. If you need to leave the Q-Station software unattended,
you must lock it or log off.
•
Access to the Q-Station software by users with administrative privileges,
or by users with sophisticated and malicious methods, cannot be restricted
except by restricting physical access to the workstation.
1. In the Windows Security panel, type your user name in the Name field.
2. Type your password in the Password field.
3. Click OK.
Locking the Q-Station Software
If you need to leave the Q-Station software unattended for a period of time, but
will return and continue working, you can lock it to prevent unauthorized access
to patient data while you are away.
1. Press Ctrl+Alt+Delete to display the Windows Security panel.
2. Click Lock Computer.
Q-Station User Manual
4535 616 40761
39
4
Q-Station Basics
You are not logged off, but the Q-Station software is secured. The Log On
panel is displayed. You can unlock it using your password and continue your
work where you left off.
Logging Off
1. Press Ctrl+Alt+Delete to display the Windows Security panel.
2. Click Log Off.
Your work is saved and the Windows Security panel is displayed for the next
user.
Common Elements
The following tools are available in all activities.
Menu Bar
The menu bar provides access to frequently used commands for performing
tasks. Depending on your current activity, some commands may be unavailable.
Commands are described with relevant procedures in the activity sections later
in Help.
Shortcut Menu
You can click items with the right mouse button (called ‘right-click’) to see a
shortcut menu containing commands and tools relevant to the item. The shortcut
menu is also available by holding down Shift and pressing F10.
Main Toolbar
The main toolbar provides quick access to the tools most relevant to your
current activity. Tools found on the main toolbar are described with relevant
procedures in the Help.
40
Q-Station User Manual
4535 616 40761
Q-Station Basics
4
Activity Bar
The activity bar provides access to each activity with the focus on the patient
data selected in the Studies tab. If an activity is not available in your current
situation, the tab is dimmed, and you cannot switch to that activity. You can
close an activity and return to the Studies tab by clicking Close on the File
menu.
Patient Info Panel
The Patient Info panel is visible in activities beyond the Studies tab, and
provides demographic details of the current patient.
The Series tab of the Patient Info panel provides a pictorial index display of
a thumbnail of each image or report contained in the study.
You use the pictorial index to select images and reports for processing in available
activities. In the pictorial index, images and reports are grouped by study. Studies
are separated by a divider. Studies are grouped chronologically, with the most
recent first.
Each image or report in the pictorial index is identified by a pictorial, which
provides information about the image or report.
NOTE
Information may not always be available.
A status mark indicates that an image has been opened in the View tab during
the current viewing activity. Status marks are only available in the View tab.
To open an image or report, double-click the pictorial. Double-clicking an image
pictorial opens the image on the View tab. Double-clicking a report pictorial
opens the report on the Report tab.
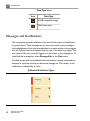
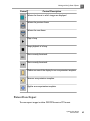
Data Type Icons
Icons on thumbnails indicate the data type of the image.
Q-Station User Manual
4535 616 40761
41
4
Q-Station Basics
Data Type Icons
Icon
Data Type
QLAB-compatible image
Multi-frame loop
Messages and Notifications
The message bar provides feedback of the state of the system and notification
of system events. These messages are for your information only, providing an
acknowledgement of jobs you have submitted or a status update on the progress
of a job. System events are displayed with an icon of the event in progress. The
user name of the user currently logged on is also shown in the message bar. To
show/hide the message bar, select Message Bar on the View menu.
Notifications provide more detailed information about a system event and are
displayed in a pop-up window just above the message bar. The severity of the
notification is indicated by its color.
Q-Station Notification Types
42
Q-Station User Manual
4535 616 40761
Q-Station Basics
4
Job Viewer
The Job Viewer provides details of export, print, DICOM, removable media, and
network jobs that you have submitted to the system. You can open the Job
Viewer at any time to check the status of your jobs, or to modify a job.
Jobs are executed according to their priority. Concurrent jobs that have the
same priority are executed in the order that they were submitted. You can make
jobs execute sooner by increasing their priority in the Job Viewer.
Using the Job Viewer
1. To open the Job Viewer panel, select Job Viewer on the View menu, or
double-click a system-event icon in the system-event area.
2. Select a command and do any of the following:
• To disable a job, click
.
• To enable a disabled job, click
• To cancel a job, click
• To abort a job, click
• To delete a job, click
• To resubmit a job, click
.
.
.
.
.
• To increase the priority of a job, click
• To decrease the priority of a job, click
.
.
Full-Screen Mode
You can operate the Q-Station software in full-screen mode, hiding the main
toolbar, the activity bar, and the message bar to maximize the display area. The
menu bar remains visible to provide access to commands. In particular, commands
Q-Station User Manual
4535 616 40761
43
4
Q-Station Basics
for switching between the activities are available on the Navigation menu,
allowing you to continue with your workflow in full-screen mode.
To switch to full-screen mode, select Full Screen on the View menu or press
F11. To exit full-screen mode, press F11.
Q-Assistant
Q-Assistant is the configuration application for the Q-Station software. This
separate application is installed when you install the Q-Station software.
NOTE
To run Q-Assistant, you must be a member of the local administrators group
and the PMWHospitalITUserGrp.
Use Q-Assistant to do the following:
•
Back up and restore configuration settings and your license file (see "Backing
Up Configuration Settings" on page 75 and "Restoring Configuration
Settings" on page 76)
•
Establish a remote connection (see "Configuring Remote Services
Connection Settings" on page 33) and enable Remote Desktop and
Request Support
•
Configure network settings (see "Checking Network Settings" on page 78)
•
Configure DICOM settings for connections to ultrasound systems, PACS
servers, and a StressVue ECG system (see "Adding DICOM Devices" on
page 78 and "Editing DICOM Devices" on page 80)
•
Update the license file by using the Registration Wizard (see "Manually
Registering the Software" on page 27)
•
Select a storage location for Q-Station reports (see "Specifying Storage
Locations for Q-Station Data" on page 74)
To start Q-Assistant, double-click the Q-Assistant icon on the desktop.
44
Q-Station User Manual
4535 616 40761
Q-Station Basics
4
Q-Station Options
Besides the DICOM viewer features available in the Q-Station software, the
QLAB Cardiovascular 3D viewer and the QLAB General Imaging 3D viewer are
standard with all configurations. Other features are available as purchasable
options. The types of options available include connectivity capabilities, ECG
capabilities, and QLAB Advanced Quantification Software plug-ins.
NOTE
Purchasable options can be used only on a single Q-Station installation.
NOTE
Some QLAB plug-ins may be unavailable in some countries.
The following licensed options are available for Q-Station software:
•
Q-Station Base (required for all configurations)
•
DICOM Export
•
DICOM Query/Retrieve
•
StressVue ECG Connect
•
Cardiac 2D Quantification plug-in
•
Cardiac Motion Quantification plug-in
•
Cardiac Motion Quantification-Stress plug-in
•
Cardiac 3D Quantification plug-in
•
Cardiac 3D Quantification Advanced plug-in
•
Mitral Valve Quantification plug-in
•
Strain Quantification plug-in
•
Region of Interest Quantification plug-in
•
Intima Media Thickness plug-in
•
Parametric Quantification plug-in
•
MicroVascular Imaging plug-in
Q-Station User Manual
4535 616 40761
45
4
Q-Station Basics
•
•
•
•
•
•
General Imaging 3D Quantification plug-in
General Imaging Parametric Quantification plug-in (This plug-in is unavailable
in the United States.)
Elastography Analysis (This plug-in is only available in the United States.)
Elastography Quantification (This plug-in is unavailable in the United States.)
Vascular Plaque Quantification plug-in (This plug-in requires FDA 510(k)
clearance and is not yet available in the United States.)
Fetal Heart Navigator plug-in (This plug-in requires FDA 510(k) clearance
and is not yet available in the United States.)
Viewing Installed Q-Station Options
1. On the Windows desktop, double-click the Q-Assistant icon to open
Q-Assistant.
2. Click Options to see a list of the plug-ins and optional features installed on
your system.
Q-Station Compatibility
Philips Ultrasound systems produce clinical image data in a variety of file formats,
such as DICOM, DSR, and ResearchLink. Some image file formats created on
Philips Ultrasound systems are incompatible with Q-Station software.
In addition to clinical image data, Q-Station software also recognizes some ECG
data and communicates with PACS from various manufacturers.
File Compatibility
Q-Station software can open files from any of the following ultrasound systems:
•
CX50
•
HD11 XE
•
HD15
46
Q-Station User Manual
4535 616 40761
Q-Station Basics
•
•
•
•
4
iE33
iU22
Sparq
ClearVue
Additional analysis capabilities are available when the images from those systems
contain Philips native data. (Native data is raw image data saved with an ultrasound
image that enables post-acquisition adjustments to the image.) Q-Station software
also can open files from any ultrasound system that can export patient studies
in DICOM format.
ECG Data Compatibility
This release of Q-Station software can accept ECG data only from the Philips
StressVue Diagnostic Stress Test system.
PACS Compatibility
Q-Station software can query and retrieve patient lists and studies from any
PACS that supports standard DICOM Query/Retrieve capability. This is a
purchasable Q-Station option.
Q-Station User Manual
4535 616 40761
47
4
48
Q-Station Basics
Q-Station User Manual
4535 616 40761
5 Working with the Q-Station Software
This section guides you through procedures commonly used in working with
patient study data on the Q-Station software. These procedures include
importing and exporting patient study data, reviewing images, and performing
advanced quantification.
For detailed information on the controls, features, and tasks mentioned here,
as well as information on additional tasks, see the Q-Station Help. To display
the Help, click Help and then click Q-Station Help. For instructions on using
QLAB plug-ins, click
while you are using a plug-in.
Studies
The Studies tab provides an overview of patient study data on your
workstation, and allows you to access additional data sources.
To open patient study data for processing, the data must reside in the local
Studies database. This usually means your first task is to import patient study
data from another source (for example, DICOM archive, ultrasound system,
or removable media). You use the Studies tab to do this. After importing
patient study data to your workstation, you can open the data for processing.
After processing, you should export the data to a DICOM archive.
NOTE
You can sort the studies list by clicking the heading of the selected column.
You can reorganize columns by dragging them to the preferred position.
Data Panel
The Data panel displays data locations that are available to you. The panel is
divided into two sections: Local Data and Remote Data.
•
Local Data provides access to the Studies data location, the database
where patient study information is stored on your workstation. The Local
Q-Station User Manual
4535 616 40761
49
5
Working with the Q-Station Software
•
Data section also provides access to studies stored on CD/DVD drives,
USB storage devices, and one or more User Selectable Repository
locations on local or network disk drives.
Remote Data provides access to data locations stored on workstations
or PACS connected to your network. You can copy data from remote data
locations to your workstation for viewing, printing, or export. You can copy
data to remote data locations for archiving.
For convenience in working with more than one local data location, you
can right-click the location you want to view and add it to the display as a
new tab. Once added, you can right-click the tab to close it or choose other
options.
•
NOTES
•
•
•
If you want additional display space, you can close the Data panel by clicking
the X in the upper-right corner, or by clicking Data on the View menu.
To reopen the Data panel, click Data on the View menu again.
For information about configuring network shares for use as Q-Station data
storage locations, see "Configuring a Windows 7 Network Share" on page
70 or "Configuring a Windows XP Network Share" on page 71.
For information about configuring local file repositories or NTFS-formatted
USB drives for use as Q-Station data storage locations, see "Configuring a
Local File Repository or NTFS USB Drive" on page 73.
The Free Space indicator at the bottom of the Data panel compares the
amount of unallocated database space with the amount of free space on
the hard drive and displays the lesser of those values as an indicator of the
amount of space available for storing data in the Studies database.
Retrieving Study Data from PACS/Archive
Study lists stored on a PACS/archive are retrieved by query.
CAUTION
When retrieving patient data from a connected PACS/archive, you must formulate
a specific query to ensure that all relevant data is retrieved.
50
Q-Station User Manual
4535 616 40761
Working with the Q-Station Software
5
1. In the Data panel, click a Remote Data location.
2. Type or select search terms in the available query fields. Additional fields can
be accessed by clicking the query panel expander.
NOTE
Available query fields and the format in which you must enter data in the
query fields depend on the configuration of the selected PACS/archive. For
example, many PACS require patient names to be entered in uppercase text.
For more information, contact the administrator of the PACS/archive.
3. To reset the query form, click Clear.
4. To submit your query, click OK.
NOTE
You cannot perform processing tasks on study data displayed in a remote
study list. To perform further actions on the study data, import the data to
the studies data location. Also, pictorial representations of the images are
marked "archive," do not contain any imaging data, and may not accurately
represent the number of images in the series.
Transferring Studies Data to Your Workstation
1. In the Data panel, select the data location you want to transfer patient data
from.
2. Select the data you want to transfer. You can select:
• One or more images or reports from a single study
• One or more studies from the Studies list
3. Drag the selected data to the Studies data location.
NOTES
• If the selected data belongs to a patient that already exists in the destination
location, the data is automatically merged with the existing patient.
• You can also transfer data using the Copy and Paste tools.
Q-Station User Manual
4535 616 40761
51
5
Working with the Q-Station Software
Archiving Data to a DICOM Archive
1. Select the data you want to archive. You can select:
• One or more images or reports from a single study
• One or more studies from a single patient
• One or more patients from a Patients list (all data for each patient is
archived)
2. Drag the selected data to the destination DICOM archive in the Remote
Data section of the Data panel. If the selected data belongs to a patient that
already exists in the destination DICOM archive, the data is automatically
merged with the existing patient. You can also transfer data using the Copy
and Paste tools.
Setting CD/DVD Write Preferences
Before writing a disc for the first time, set the CD/DVD write preferences. You
can then write patient data using the same settings each time.
1. On the Tools menu, click Customize CD/DVD Write Preferences.
2. Configure the settings and then click Save.
Writing a Disc Using Preferred Settings
Before writing a disc for the first time, set the CD/DVD write preferences. See
"Setting CD/DVD Write Preferences" on page 52.
1. Insert a blank disc in CD/DVD writer.
2. Select studies data to write to disc.
3. On the toolbar, click
52
Q-Station User Manual
4535 616 40761
.
Working with the Q-Station Software
5
Viewing
Use the View tab to view and measure images, play loops from stress echo and
non-stress echo studies, select subloops, and perform wall-motion scoring on
stress echo studies. You can view both single-frame images and loops (a sequence
of images) in Q-Station.
The View tab incorporates the pictorial index, which you use to select images
for viewing. Images that are currently open for viewing are highlighted in blue in
the pictorial index. To delete one or more images from a study, right-click the
selected pictorial or group of pictorials, and then click Delete.
NOTE
The image Delete operation does not have an "undo" feature.
You can make adjustments to the displayed images using tools provided in the
View tab. Menu commands and tools on the main toolbar affect all images. Tools
on the image toolbar affect only the image with which you are working.
Displaying the Image Toolbar
The image toolbar contains tools that let you adjust the view of an image, select
subloops, make basic unlabeled measurements, and annotate the image. You can
see the image toolbar only if you choose to display it.
Click
on the upper-right corner of the image.
Image Toolbar Controls
Control
Control Description
Selects the image.
Scrolls the image.
Q-Station User Manual
4535 616 40761
53
5
Working with the Q-Station Software
Control
Control Description
Adjusts contrast and brightness.
Zooms the image.
Pans the image.
Displays subloops (stress echo images only).
Displays the next subloop (stress echo images only).
Displays the previous subloop (stress echo images only).
Sets a subloop as the preferred loop (stress echo images only).
Displays the measurement tools.
Enables you to draw a line.
Enables you to draw an angle.
Enables you to draw an open contour.
Enables you to draw a smoothed polygon.
54
Q-Station User Manual
4535 616 40761
Working with the Q-Station Software
Control
5
Control Description
Enables you to draw a closed contour.
Enables you to draw an arrow with an annotation.
Resets the image viewing settings.
Marks the image for inclusion in the report.
Captures the image and appends it to the study. (This control is
available when a loop is playing; however, it only captures and appends
the frame that was active at the time of the mouse click.)
Displays image information.
Plays a loop. Available only when Sync Mode is set to Free Run.
Pauses a loop. Available only when Sync Mode is set to Free Run.
Performing Wall Motion Scoring
NOTE
Wall motion scoring is allowed only on protocols with eight or fewer stages.
1. On the toolbar, click
.
2. Drag the slider at the top of the window to indicate the stage you are scoring.
If Display Stages is selected on the Display Mode menu, Q-Station displays
the corresponding stage in the image viewer.
Q-Station User Manual
4535 616 40761
55
5
Working with the Q-Station Software
3. Click the view icons to see the wall segments from different perspectives. If
Display Views is selected on the Display Mode menu, Q-Station displays
the corresponding view in the image viewer.
4. Do one of the following:
• If all wall segments are normal, click All Normal.
• Click the wall segment in the left-ventricle graphic or in the bull's eye, and
click the wall score for the segment (scores are synchronized between the
graphic and the bull's eye).
5. Before scoring the next stage, click Save to store your input for the current
stage.
6. Repeat step 2 through step 5 for each stage. To apply the scores from the
previous stage to the current stage, click Carry Over.
Making Measurements
Results of unlabeled measurements appear on the image but are not saved in
the report. You can, however, capture the image to save the measurement and
result on the image.
WARNING
Do not make measurements in the Q-Station software across the scrolling bar
boundary between new and old M-mode or Doppler data. Such measurements
are inaccurate.
56
Q-Station User Manual
4535 616 40761
Working with the Q-Station Software
5
Scrolling Bar Boundary
NOTES
•
•
To view a captured image in the viewer, Display Mode must be set to
Display Sequence.
Measurements can be made only on single frame images or frames within
a loop.
1. If necessary, click
to display the image toolbar.
2. Click
to display the Measurements menu.
3. Do any of the following:
• To make a line measurement, click
and click two points. To constrain
the line vertically or horizontally, press and hold down Shift while placing
and clicking the second point.
• To make an angle measurement: click
; position the cursor where you
want the first point, and then click to select the position; position the
cursor where you want the vertex of the angle and click; position the
cursor where you want the third point and click.
Q-Station User Manual
4535 616 40761
57
5
Working with the Q-Station Software
• To create an open contour, click
and click two points.
• To create a closed contour, click
, click an initial point, and drag it to
trace the contour. Click again to complete the contour.
• To create a smoothed polygon, click
, click an initial point, and drag,
clicking additional points on the contour as you drag. Double-click to
complete the measurement.
Annotating an Image
You can add an arrow with a text box to an image. Annotation can be added
only to single frame images or frames with within a loop.
1. If necessary, click
2.
3.
4.
5.
to display the image toolbar.
Click
.
Click on the image to place the arrow, and click again to display the text box.
Type the annotation in the text box and click to complete the annotation.
To edit the annotation, put the cursor on the text box and type changes.
Capturing an Image
When you capture an image, Q-Station appends it to the study as a
JPEG-compressed DICOM image. Q-Station displays
the pictorial index.
1. If necessary, click
2. Click
58
.
Q-Station User Manual
4535 616 40761
to display the image toolbar.
on captured images in
Working with the Q-Station Software
5
Analyzing Images in QLAB
As an option, Q-Station can include QLAB Advanced Quantification Software,
a built-in analysis tool that enables you to perform advanced quantification using
one of several plug-ins. Some analysis results from the QLAB software are
included in the report, and some are not. For example, discreet numbers are
exported from the CMQ and CMQ-Stress plug-ins as measurements; in addition,
these plug-ins produce bulls-eye diagrams as pictures in the Advanced Analysis
section of the report. However, no results of any kind from the ROI and PQ
plug-ins are included in the Q-Station report.
WARNING
The heart rate (HR) in the Q-Station report and the HR that is included with
the QLAB CMQ and CMQ-Stress exported bulls-eye diagrams have different
clinical meanings. The HR in the exported bulls-eye diagrams is an averaged HR
from three views, and the individual HR for each view is not from DICOM.
For instructions on using the QLAB software, click
QLAB plug-in.
while you are using a
1. To start the QLAB software and display a list of the available plug-ins, do one
of the following:
• On the View tab, right-click any image in the viewing area (one-up or
four-up), and then click QLAB.
• On the View tab, click
on any image in the viewing area.
• On the Studies tab, right-click any image thumbnail in the patient folder
Series tab, and then click QLAB.
• If you want to use the CMQ plug-in, on the View tab, click the check box
for one or more images in the viewing area (one-up or four-up), and then
click
on the toolbar.
• If you want to use the CMQ-Stress plug-in, in the View tab's pictorial
index, right-click any stress echo thumbnail image and select QLAB.
Q-Station User Manual
4535 616 40761
59
5
Working with the Q-Station Software
NOTE
Only the CMQ and CMQ-Stress plug-in supports review of more than
one image.
2. On the left side of the display, click the icon of the plug-in that you want to
use. The available plug-ins depend on the type of file that you open and which
plug-ins have been purchased.
3. To save an image from QLAB software into the sequence of images for the
study:
a. Display the frame that you want to export, or click
to export an AVI
file.
b. Customize the image content by using the Show/Hide options for the
border and waveforms.
c. Click
. The image from QLAB software is saved as a secondary
capture. Moving images are saved as multi-frame DICOM loops. Still frames
are saved as still DICOM images.
d. To export discreet results to the report, click , click Export to PACS,
and then click Save. Or, if you want to save the results to a spreadsheet,
click
, click Save to File, and then click Save.
Reports
Patient reports contain the measurements and quantification results that were
completed in the patient study as well as images that you specifically add. If you
have purchased the option to do so, the report also can contain associated ECG
information.
A patient report generates automatically while you conduct a study that includes
both labeled measurements and image acquisitions. To access the report, click
the Report tab.
60
Q-Station User Manual
4535 616 40761
Working with the Q-Station Software
5
Viewing an Approved Report
Reports that have not been approved can be viewed in the Report tab.
NOTE
As an alternative to the following procedure, you can view an approved report
by double-clicking the report thumbnail on the View tab's pictorial index.
1. In the Studies tab, select an examination that has an approved report.
2. Click the Report tab.
3. Click
. All approved reports for the selected patient are displayed in the
Approved Reports table in the control panel.
4. Select one or several reports in the Approved Reports table. Each selected
report is displayed as a PDF in a dedicated tab in the main display area.
Editing a Report
The department name and institution name that appear in the report are specified
when you configure Q-Station using the System Management tools in
Q-Assistant. For more information, see "Specifying System Information" on page
69.
WARNING
Edits to measurements in the report do not update derived calculations.
1. In the Studies tab, select an examination.
2. Click the Report tab.
3. If the report data includes both stress echo stages and ECG events, select
the ECG stages that correspond to the echo stages listed in the Associate
Stress Echo Stages to ECG Events dialog box, and click OK.
4. Click .
5. Enter a title for the report in the Title field in the control panel.
Q-Station User Manual
4535 616 40761
61
5
Working with the Q-Station Software
6. Under Advanced Analysis, select one or more of the following image types
to include in the report, as appropriate:
•
•
•
•
CMQ-Stress Bulls Eye
WMS Bulls Eye
WMS Anatomic
ECG ST Maps
NOTE
If you select CMQ-Stress Bulls Eye and ECG ST Maps, only the WMS
Bulls Eye can be included in the report. (WMS Anatomic is unavailable.)
7. Under Advanced Analysis, select one or more of the stages to include in
the report. The report supports stress studies with up to eight stages. The
stages are named as they were during the exam acquisition.
8. Under Findings, select any applicable codes to include findings statements
in the report. A Findings section is added to the report and the statements
associated with the selected codes are entered.
9. Enter text in the draft report using the standard word-processing tools
(Microsoft Word) in the main display area.
10. Click
to save the draft report as work in progress.
Setting Electronic Signatures on Reports
The user name (electronic signature) that appears in the footer of the report is
set or edited by changing the user name that defines the active user account.
1. Open the Windows User Accounts dialog box. For more information,
search the Windows Help for user accounts overview.
2. Select the user account that you want to edit.
3. Edit the User Name that appears in the account.
4. Restart the computer to reset the account information. All new reports will
display the new user name as the report's electronic signature. Existing reports
will continue to display the original electronic signature name.
62
Q-Station User Manual
4535 616 40761
Working with the Q-Station Software
5
Approving a Report
1. Open the draft report that you want to approve.
2. Click
. The report is converted to a DICOM Encapsulated PDF and is
moved from the Edit workstep to the table of approved reports in the View
workstep.
Printing a Report
1. Select the report that you want to print in the Approved Reports table,
or if the report is already displayed, ensure its tab is selected.
2. Click
. The report is printed to the workstation's default paper printer.
Custom Report Templates
You can create report templates to customize the sections of your Q-Station
reports.
The following lookup fields are available for adding to your custom report
templates:
•
Patient Name
•
Patient ID
•
Accession Number
•
Date of Birth
•
Patient's Age
•
Gender
•
Study Data
•
Referring Physician's Name
•
Institution Name
•
Institution Address
•
Department Name
•
Patient's Size
Q-Station User Manual
4535 616 40761
63
5
Working with the Q-Station Software
•
•
•
Patient's Weight
Study Description
Operator's Name
NOTE
For guidelines and detailed instructions on creating and editing custom report
templates, see the Q-Station Help.
Export
The Export tab displays images from the selected study in the image viewer.
Also displayed is the Export Settings panel, which you use to configure and
send the export job.
To collapse or expand the Export Settings panel, click its title bar.
Export Toolbar Controls
Control
Control Description
Selects the image
Scrolls the image
Adjusts contrast and brightness
Zooms the image
Pans the image
64
Q-Station User Manual
4535 616 40761
Working with the Q-Station Software
Control
5
Control Description
Selects the format in which images are displayed
Selects the previous frame
Selects the next frame
Plays a loop.
Stops playback of a loop.
Not currently functional.
Not currently functional.
Defines an area of the display for an anonymization template.
Saves an anonymization template.
Applies an anonymization template.
Patient Data Export
You can export images in either DICOM format or PC format.
Q-Station User Manual
4535 616 40761
65
5
Working with the Q-Station Software
If you use anonymization when exporting patient data to a CD/DVD or Windows
folder, certain patient attributes are replaced with anonymized values.
WARNING
When exporting data, the presentation state of images at the time of export is
preserved in the exported data. You should be aware that important diagnostic
information, for example annotations, may not be visible when viewing the
exported images.
CAUTION
Exported data is not anonymized by default. If data is exported to a system or
storage device that is not protected by password or other method, it is accessible
by all clinical users. It is your responsibility to ensure that patient privacy is not
compromised at the export location.
Exporting Data in DICOM Format
CAUTIONS
•
To prevent unauthorized persons taking the disc when an export task
finishes, you must not leave the system unattended while an export task is
in progress. Alternatively, the system must be accessible by authorized
persons only.
•
Exporting to CD or DVD should be considered as temporary storage only,
and should not be considered a long-term backup solution.
•
Objects that are not supported by a DICOM PACS or archive may be
skipped during export to that PACS. Objects that may be unsupported
include DICOM Encapsulated PDF, DICOM General ECG Waveforms, and
with older PACS, DICOM Structured Report. To alleviate this issue, deselect
the ECG and SR options in the advanced settings area for the PACS DICOM
device in the DICOM settings tab of the Q-Assistant configuration utility.
•
Although exported DICOM information can be anonymized, there is no
mask applied to images to obscure the patient data that may be visible in
the images.
66
Q-Station User Manual
4535 616 40761
Working with the Q-Station Software
5
NOTE
You cannot remove native data from an image to reduce file size prior to export.
1. Select one or more loops or single frame images from a single study.
NOTE
Clicking Select All exports the complete study.
2. In the Export Settings panel, click the DICOM tab.
3. Do one of the following:
• To export patient data in DICOM format to a DICOM archive, a CD, a
DVD, or a USB drive, select a destination on the Destination menu.
• To export patient data in DICOM format to a Windows folder, click
and select a folder on the workstation, CD, DVD, or USB drive.
4. To export the stand-alone DICOM Viewer application with the patient data,
select Include DICOM Viewer.
5. To make patient data anonymous, select Anonymize. If you want to change
the default anonymization name after selecting Anonymize, click
6. Click Export.
.
Saving Images
1. In the image viewer, select the images that you want to save. You can select
one or more images at a time.
2. On the File menu, click Save Image As.
3. Select a quality setting.
4. To change the file name, type a new name in the File Name field. By default,
the patient name is used as the file name and images are saved as JPEG files
(.jpg). However, you can select other formats from the Image Format menu.
5. To change the destination, do one of the following:
• Select a previously used destination on the Destination menu.
Q-Station User Manual
4535 616 40761
67
5
Working with the Q-Station Software
• Click
and select an available destination (Windows folder on the
workstation or USB drive).
NOTE
When saving data in PC format, you can save only to Windows destinations
and not to DICOM nodes.
6. Click OK.
Saving a Loop as a Movie
1.
2.
3.
4.
Open a loop and select its tab on the image viewer.
On the File menu, click Save Movie As.
Select a quality setting.
To change the default file name, type a new file name in the File Name field.
By default, the patient name is used as the file name. Movies are saved as AVI
files (.avi).
5. To change the destination, do one of the following:
• Select a previously used destination on the Destination menu.
• Click
and select an available destination (Windows folder on the
workstation or USB drive).
NOTE
When saving data in PC format, you can save only to Windows destinations
and not to DICOM nodes.
6. Click OK. The movie is saved as it appears in the image viewer.
68
Q-Station User Manual
4535 616 40761
6 System Management
The System Management tab in Q-Assistant lets you specify system
information such as audit server and language settings, specify locations in
which to store Q-Station data, and back up and restore the Q-Station license
file and configuration settings.
Specifying System Information
The Q-Assistant software displays your Q-Station serial number, which it reads
from the license file, in the System Information area of the System
Management tab.
1. In Q-Assistant, click the System Management tab.
2. Click System Information.
3. Do any of the following:
• Type information in Institution Name and Department.
• Select the language in which you want to run the Q-Station software and
the Q-Assistant software from the Language menu.
• If your site uses an audit server, enter its IP Address, Host Name,
and Port Number, and select the appropriate Network Protocol.
4. Click Save.
Q-Station Data Locations
In the Media/Store section of the Q-Assistant System Management tab,
you can specify local folders, network shares, and local storage devices as
Q-Station data locations.
Q-Station User Manual
4535 616 40761
69
6
System Management
Configuring a Windows 7 Network Share
On a Windows 7 computer, you can create a folder and then configure it as a
network share for use as a Q-Station data location.
NOTE
The computer where the network share resides must be in the same domain as
the Q-Station computer.
1. If the folder you want to share does not already exist, using Windows
Explorer, create a folder in the location where you want the network share
to reside.
2. Right-click the folder and then click Properties.
3. In the Properties dialog box, click the Security tab.
4. Do one of the following:
• If Everyone appears in the Group or user names list, go to step 13.
• If Everyone does not appear in the Group or user names list, go to
step 5.
5.
6.
7.
8.
Click Edit.
Click Add.
In the Select Users or Groups dialog box, click Object Types.
In the Object Types dialog box, select Built-in security principals and
then click OK.
9. In the Select Users or Groups dialog box, click Locations.
10. In the Locations dialog box, select the name of the local computer and then
click OK.
11. In the Select Users or Groups dialog box, type Everyone in the text entry
field and then click Check Names. When the name is underlined, the system
has verified its availability.
12. Click OK. Everyone now appears in the Security tab Group or user
names list.
70
Q-Station User Manual
4535 616 40761
System Management
6
13. Click Everyone, and then select Modify in the Allow column of the
Permissions list. Selecting Modify automatically selects the Read &
Execute, List Folder Contents, Read, and Write permissions.
14. Click OK.
15. In the Properties dialog box, click the Sharing tab.
16. Click Share.
17. In the File Sharing dialog box, type Everyone in the text entry field, and
then click Add.
18. In the Name list, click Everyone, and then select Read/Write on the
Permission Level menu.
19. Click Share.
The folder is now shared and can be accessed directly from the User Selectable
Repository option of the Q-Station Data panel (see "Data Panel" on page 49).
Alternatively, you can select the network share as a storage location on the
Q-Assistant System Management tab (see "Specifying Storage Locations for
Q-Station Data" on page 74).
Configuring a Windows XP Network Share
On a Windows XP computer, you can create a folder and then configure it as
a network share for use as a Q-Station data location.
NOTE
The computer where the network share resides must be in the same domain as
the Q-Station computer.
1. If the folder you want to share does not already exist, using Windows
Explorer, create a folder in the location where you want the network share
to reside.
2. Right-click the folder and then click Properties.
3. In the Properties dialog box, click the Security tab.
4. Do one of the following:
• If Everyone appears in the Group or user names list, go to step 12.
Q-Station User Manual
4535 616 40761
71
6
System Management
• If Everyone does not appear in the Group or user names list, go to
step 5.
5. Click Add.
6. In the Select Users, Computers, or Groups dialog box, click Object
Types.
7. In the Object Types dialog box, select Built-in security principals and
then click OK.
8. In the Select Users, Computers, or Groups dialog box, click Locations.
9. In the Locations dialog box, select the name of the local computer and then
click OK.
10. In the Select Users, Computers, or Groups dialog box, type Everyone
in the text entry field and then click Check Names. When the name is
underlined, the system has verified its availability.
11. Click OK.
12. In the Group or user names list, click Everyone.
13. In the Allow column of the Permissions list, select Modify. Selecting Modify
automatically selects the Read & Execute, List Folder Contents, Read,
and Write permissions.
14. Click Apply.
15. In the Properties dialog box, click the Sharing tab.
16. Select Share this Folder.
17. Click Permissions.
18. In the Group or user names list, click Everyone.
19. In the Allow column of the Permissions list, select Full Control. When
you select Full Control, the Change, and Read permissions are
automatically selected.
20. Click OK.
21. In the Properties dialog box, click OK.
The folder is now shared and can be accessed directly from the User Selectable
Repository option on the Q-Station Data panel (see "Data Panel" on page 49).
Alternatively, you can select the network share as a storage location on the
72
Q-Station User Manual
4535 616 40761
System Management
6
Media/Store page of the Q-Assistant System Management tab see "Specifying
Storage Locations for Q-Station Data" on page 74.
Configuring a Local File Repository or NTFS USB Drive
On a Windows 7 or a Windows XP computer, you can configure local file
repositories and NTFS-formatted USB drives for use as Q-Station data storage
locations.
NOTES
•
•
•
•
The Windows system groups Everyone and Authenticated Users both
have Network Service as a member.
Q-Station Export, Import, and Delete operations on local file repositories
and NTFS-formatted USB drives are possible only if Network Service
has Read, Write, and Delete permissions on the local file repository or
NTFS-formatted USB drive.
If Network Service does not have Read access, an error message is
generated when you try to open the folder contents using the Q-Station
User Selectable Repository feature. In Q-Assistant, an error message
is generated if you try to add such a location.
If Network Service does not have Write and Delete access on a folder,
when you open the repository for the first time, a warning message indicates
that Export and Delete operations are not allowed.
To grant the necessary permissions to Network Service, perform the following
procedure.
1. In Windows Explorer, right-click the NTFS-formatted USB drive or the
folder you want to configure as a local file repository, and then and click
Properties.
2. In the Properties dialog box, click the Security tab.
3. Do one of the following:
• If the Group or user names list includes Everyone, Authenticated
Users, or Network Service, go to step 10.
Q-Station User Manual
4535 616 40761
73
6
System Management
• If the Group or user names list does not include Everyone,
Authenticated Users, or Network Service, go to step 4.
4. On the Security tab of the Properties dialog box, click Add.
5. In the Select Users, Computers, or Groups dialog box, click Object
Types.
6. In the Object Types dialog box, select Built-in security principals, and
then click OK.
7. Click Locations, select the name of the local computer, and them click OK.
8. In the Select Users, Computers, or Groups dialog box, type Everyone
in the text entry field and then click Check Names. When the name is
underlined, the system has verified its availability.
9. Click OK.
10. In the Group or user names list, click any one of the following names:
Everyone, Authenticated Users, or Network Service.
11. In the Allow column of the Permissions list, select Modify. Selecting
Modify automatically selects the Read & Execute, List Folder Contents,
Read, and Write permissions.
12. Click OK.
Specifying Storage Locations for Q-Station Data
The storage directories that you specify in Q-Station Data Locations appear
in the Local Data area of the Q-Station Studies tab. The directories you specify
there are different from the local patient database, the location of which you
select when you install the Q-Station software.
1. In Q-Assistant, click the System Management tab.
2. Click Media/Store.
3. In the Q-Station Data Locations area, click Add, and browse to a local
directory or network share that you want to use for exporting and importing
DICOM data.
4. Click Activate Now to activate the new directory immediately, or click
Activate Later to specify additional data locations and activate the new
74
Q-Station User Manual
4535 616 40761
System Management
6
directories later, when prompted by Q-Assistant. When you activate new
directories, Q-Assistant restarts.
NOTE
If the Q-Station software is open when the Q-Assistant software restarts,
the Q-Station software closes, and you must manually restart it.
5. If you want to add a USB drive as a local storage device, connect the USB
drive.
NOTE
FAT-formatted and NTFS-formatted USB drives are supported for Q-Station
data locations. FAT-formatted USB drives do not have special configuration
requirements. For information about configuration requirements for
NTFS-formatted USB drives, see "Configuring a Local File Repository or NTFS
USB Drive" on page 73.
6. In the Q-Station Local Devices area, select the drive letters that
correspond to the CD/DVD and USB drives on the Q-Station computer.
7. If the selected CD/DVD drive is read/write, select R/W.
8. Click Save.
Backing Up Configuration Settings
You can back up the Q-Station configuration settings and license file in
Q-Assistant.
1.
2.
3.
4.
5.
In Q-Assistant, click the System Management tab.
Click Backup/Restore.
Select Backup To.
Click Browse and select a location to which you want to back up the data.
To start the backup, click Backup. When the backup is complete, a
notification message appears.
Q-Station User Manual
4535 616 40761
75
6
System Management
Restoring Configuration Settings
In the Q-Assistant software, you can restore the Q-Station configuration settings
and license file from a backup location.
CAUTION
The Q-Station software does not support transferring configuration settings
from one Q-Station computer to another. Restore configuration settings only
on the Q-Station computer from which they were backed up.
1.
2.
3.
4.
In the Q-Assistant software, click the System Management tab.
Click Backup/Restore.
Select Restore From.
Click Browse and select the location from which you want to restore the
data.
5. Select the data that you want to restore. You can select Configuration
Repository, License File, or both.
6. Click Restore. When the restoration is complete, a notification message
appears, and Q-Assistant restarts.
76
Q-Station User Manual
4535 616 40761
7 Network and DICOM Settings
You can use the Q-Assistant software to connect the Q-Station software to
ultrasound systems, PACS, and one StressVue ECG system. (You can enter
up to five report and archive locations for a StressVue ECG system or an
archive computer.) For a list of settings required for configuring Q-Station
network and DICOM settings, see "Network Requirements for Configuring
the Q-Station Computer" on page 15.
NOTE
Q-Station software supports the DICOM Storage Commit service, which is
used to confirm that a study has been committed to permanent storage on a
PACS. This confirmation ensures that it is safe to delete the local copy of the
study. When the Q-Station software receives this confirmation, it flags the
local copy of the study for deletion by the Q-Station Automatic Cleanup service.
The Q-Station software supports any of the following connected workflows:
•
If you do not archive studies to a PACS, you can connect directly to an
ultrasound system, obtain data from the ultrasound system for analysis
in the Q-Station software, and then generate a report.
•
If your PACS does not support storage of native data from the ultrasound
system, you can connect directly to an ultrasound system, obtain native
data from the ultrasound system for analysis in the Q-Station software,
and then archive the data to a PACS without including native data. (Native
data is raw image data saved with an ultrasound image that enables
post-acquisition adjustments to the image.) You can configure this
workflow in the Q-Assistant software by clearing the Native check box
for Archive in the Advanced Settings area of the PACS Device in
DICOM Settings dialog box.
•
If the ultrasound systems at your institution are configured to send data
to a PACS, you can query the PACS to obtain a list of patients and studies,
request that the PACS send the Q-Station computer a study for analysis,
and then archive the data back to the PACS.
Q-Station User Manual
4535 616 40761
77
7
Network and DICOM Settings
Checking Network Settings
You can view the Windows network settings for the computer on which the
Q-Station software is installed in the Network Settings area of the
Network/DICOM tab in the Q-Assistant software.
CAUTION
If the Q-Station PC is part of a wireless network, use only secured wireless
technologies. For more information about network security, see Shared Roles
for System and Data Security, which is included with your Q-Station software.
1. In Q-Assistant, click the Network/DICOM tab.
2. Click Network Settings.
3. If your computer has more than one network card, select the appropriate
card from the Select Network Card menu.
4. Click Network Connections to open the Windows Network
Connections control panel and view settings for your network connection.
5. Do either of the following:
• To see detailed information about the network settings, click IPConfig/All.
• To release and then renew the network connection, click IP
Config/Release and then IPConfig/Renew.
6. To check the connection status of a server on the network, type the IP address
of the computer in the IP Address field and click Ping.
Adding DICOM Devices
1. In Q-Assistant, click the Network/DICOM tab.
2. Click DICOM Settings.
3. Enter the Q-Station AE title and port number in the AE Title and Port
Number fields, and then click Save.
4. Click Add.
78
Q-Station User Manual
4535 616 40761
Network and DICOM Settings
7
5. In the Add DICOM Device dialog box, select a device type from the Device
Type menu.
6. Enter a device name, AE title, IP address, and port number for the device to
which you want to connect.
NOTES
• If you are connecting to an ultrasound system that has a dynamic IP address,
the IP address you enter is used only when you test the connection to the
ultrasound system. The ultrasound system can still send studies to the
Q-Station software, even if the IP address changes.
• An Ultrasound system that uses DICOM Query/Retrieve or DICOM
Storage Commit must have a static IP address.
• If the Q-Station computer sends data to any DICOM destination, the
destination and the Q-Station computer both require a static IP address.
7. If you are adding a PACS, click Advanced Settings and do the following:
a. Select the functions supported by the PACS: Archive, Query/Retrieve,
or Send. Some PACS use the same AE title and port number for all three
functions. If the PACS to which you are connecting uses a different AE
title or port number for different functions, use the Add DICOM Device
dialog box to add a separate device connection for each function.
b. If you selected the Archive function, select the optional data types to be
sent (still images and loops are always archived): Native, ECG, and SR.
You can ask your network or PACS administrator to determine if your
PACS supports native or ECG data.
c. Only if your network or PACS administrator requests it, change the
Association (Artim) Timeout and a Storage Commit Max. Reply
Waiting Time. The default settings are suitable for most PACS.
d. Click OK.
e. For each Storage Commit Device you are connecting to, select the
following in the Storage Commit Association section of the DICOM
Settings dialog box:
• Click PACS Device, and then select the PACS name.
Q-Station User Manual
4535 616 40761
79
7
Network and DICOM Settings
• Click Storage Commit Device, and then select the name of the device
that performs the storage commit function..
8. Click Save.
9. Click Activate Now to restart the Q-Assistant software and activate the
devices that you added, or click Activate Later if you want to perform
additional Q-Assistant tasks before activating the devices.
Editing DICOM Devices
1.
2.
3.
4.
5.
In Q-Assistant, click the Network/DICOM tab.
Click DICOM Settings.
Select the DICOM device that you want to edit, and click Edit.
Make changes in the Edit DICOM Device dialog box, and click Save.
If you are editing a PACS, click Advanced Settings to make changes in the
Advanced Settings dialog box.
6. Click Activate Now to apply the changes and restart the Q-Assistant
software, or click Activate Later if you want to perform additional
Q-Assistant tasks before activating the changes.
Deleting DICOM Devices
1.
2.
3.
4.
5.
In the Q-Assistant software, click the Network/DICOM tab.
Click DICOM Settings.
Select the DICOM device that you want to delete and click Delete.
In the Delete DICOM Device dialog box, click Yes.
Click Activate Now to complete the deletion and restart the Q-Assistant
software.
Testing DICOM Devices
1. In the Q-Assistant software, click the Network/DICOM tab.
80
Q-Station User Manual
4535 616 40761
Network and DICOM Settings
7
2. Click DICOM Settings.
3. Select the DICOM device that you want to test, and click Verify. Verification
may require up to one minute. The Q-Assistant software displays the results
of a DICOM test (DICOM Verify and TCP/IP Ping) in the Verify column and
in the Verification Results area of the DICOM Services Configuration
dialog box.
ECG Configuration
If you have purchased the option to do so, you can configure the Q-Assistant
software to access ECG raw data and ECG reports from shared directories on
a StressVue ECG system. Q-Assistant software can connect to only one StressVue
ECG system.
When you export an ECG report on the StressVue system, the report is stored
in designated export folders.
Before the Q-Assistant software can access the ECG reports and raw data, the
StressVue administrator must:
•
Create the ECGServiceUser account on the StressVue ECG system (if
the account does not already exist).
•
Assign the same password to this account as the ECGServiceUser account
on the Q-Station system.
•
Share the folders that contain the ECG reports and raw data, and give
permission to the ECGServiceUser account to access the folders.
For more information, see the StressVue Instructions for Use.
After you have configured the Q-Assistant software to access the ECG reports
and raw data, it monitors the export folders on the StressVue system, converts
the ECG data to DICOM, and provides it to the Q-Station software. The
Q-Station software can then combine the stress ECG data with the appropriate
stress echocardiogram in a report.
NOTE
ECG reports can be reviewed in the Q-Station software only when they have
been matched with a stress echo file.
Q-Station User Manual
4535 616 40761
81
7
Network and DICOM Settings
Activating the ECGServiceUser Account
When you install the Q-Station software, the installer automatically creates an
inactive local user account, ECGServiceUser, that corresponds to the
ECGServiceUser account on the StressVue system. You must activate the
account to receive the ECG data from a StressVue system.
Optionally, you can modify the password for the ECGServiceUser user account
and the SVGService service. If you want to change the password, it must be
the same for both the user account and the service. The default password for
the ECGServiceUser account is PasswordPMW2007.
NOTES
•
•
If you change the password for the ECGServiceUser account on the
system on which the Q-Station software is installed, ensure that it is the
same password used for the StressVue system's ECGServiceUser account.
Be sure to stop the SVGService service before changing its password.
1. Activate the ECGServiceUser account. For instructions on activating user
accounts, search the Windows operating system Help for activate a user
account.
2. If you want to change the password for both the ECGServiceUser user
account and the SVGService service, see the Windows operating system
Help:
• For instructions on changing the password for a user account, search the
Windows operating system Help for change user password.
• For instructions on changing the password for a service, search the
Microsoft Management Console Help for configure how a service
is started. (To access the Microsoft Management Console, right-click
My Computer and select Manage.)
82
Q-Station User Manual
4535 616 40761
Network and DICOM Settings
7
Configuring Access to ECG Reports
When you configure access to StressVue ECG reports, you can also specify that
the reports be sent to an archive destination, such as a TraceMasterVue ECG
Management System or another StressVue directory. If you specify an archive
destination, the administrator of the archive destination must:
•
Create an ECGServiceUser account on the archive computer
•
Assign the same password to this account as the ECGServiceUser account
on the Q-Station system
•
Share the archive folder and give permission to the ECGServiceUser
account to access the folder
1. In the Q-Assistant software, click the Network/DICOM tab.
2. Click ECG Configuration.
3. In the ECG Reports (StressVue Export Directories) area, type the path
to the StressVue ECG reports directory.
4. Click Add.
5. Make sure that Enable Q-Station access to reports is selected. If this
option is not selected, ECG report data will not be available in the Q-Station
software.
6. To specify an archive computer for StressVue reports (for example, a
TraceMasterVue ECG Management System), type the destination path in the
Destination Directory field and select the file formats (Philips XML,
Alternate XML, PDF, or TIFF) to be copied to the archive computer.
7. Click Save.
8. Verify that studies with ECG data appear in the Q-Station Studies list. See
"ECG Data Flow Troubleshooting" on page 84.
9. If you have configured the Q-Station software to send ECG reports to an
archive computer, such as a TraceMasterVue ECG Management System, verify
that reports appear on the archive computer. See "ECG Data Flow
Troubleshooting" on page 84.
Q-Station User Manual
4535 616 40761
83
7
Network and DICOM Settings
Configuring Access to ECG Raw Data
1. In the Q-Assistant software, click the Network/DICOM tab.
2. Click ECG Configuration.
3. In the ECG Raw Data (StressVue Archive Locations) area, type the
path to the StressVue ECG archive directory.
4. Click Add.
5. Click Save.
6. Verify that patients with ECG data appear in the Q-Station Studies list. See
"ECG Data Flow Troubleshooting" on page 84.
7. If you have configured the Q-Station software to send ECG reports to an
archive computer, such as a TraceMasterVue ECG Management System, verify
that reports appear on the archive computer. See "ECG Data Flow
Troubleshooting" on page 84.
Specifying the Date Format for StressVue XML
The StressVue XML date format setting on the Q-Station computer must match
the corresponding date format setting on the StressVue system.
1. In the Q-Assistant software, click the Network/DICOM tab.
2. Click ECG Configuration.
3. In the StressVue XML Date Format area, select the date format that you
want to use for StressVue XML data.
4. Click Save.
ECG Data Flow Troubleshooting
After you have configured the Q-Station software to receive ECG reports and
raw data from the StressVue ECG system, verify that patients with ECG data
appear in the Q-Station Patients list.
84
Q-Station User Manual
4535 616 40761
Network and DICOM Settings
7
If you have configured the Q-Station software to send ECG reports to an archive
computer, such as a TraceMasterVue ECG Management System, verify that
reports appear on the archive computer.
ECG Data Does Not Appear in the Q-Station Studies List
If patients with ECG data do not appear in the Q-Station Studies list, review
the folder that contains the ECG reports on the StressVue system. As the
Q-Station software pulls the reports, they should disappear from the folder on
the StressVue system. If that does not happen, verify the following:
•
The ECGServiceUser account is activated on the Q-Station system.
•
The ECGServiceUser account is activated on the StressVue system.
•
The ECGServiceUser account name and password are the same on the
StressVue system and on the Q-Station system.
•
On the StressVue system, the folders that contain the ECG reports and
raw data are shared, and full control of those folders has been granted to
the ECGServiceUser account on the StressVue system.
•
On the Q-Station system, the SVGService service has the same password
as the ECGServiceUser account, and the SVGService service has been
started on the Q-Station system.
•
If patients with ECG data do not appear in the Q-Station Studies list, but
they have been pulled from the folder that contains the ECG reports on
the StressVue system, verify that the StressVue file name includes the last
name and patient ID (PID), which are required fields.
Q-Station User Manual
4535 616 40761
85
7
Network and DICOM Settings
ECG Data Does Not Appear on an Archive Computer
If ECG reports do not appear on an archive computer after you have configured
the Q-Station software to send ECG reports to the archive computer, verify
the following:
•
The archive computer is available on the network: In Q-Assistant, ping the
archive computer by entering its IP address in the Network Settings area
of the Network/DICOM tab, and then clicking Ping.
•
The ECGServiceUser account is activated on the archive computer.
•
The ECGServiceUser account name and password are the same on the
Q-Station system and on the archive computer.
•
The archive folder on the archive computer is shared, and full control of
that folder has been granted to the ECGServiceUser account on the
archive computer.
86
Q-Station User Manual
4535 616 40761
Index
A
Administrator account, removing, 32
Analysis in QLAB, 59
Annotations, 58
Anonymization
during export, 66
Approving reports, 63
Assistance, 10
Audience, intended, 7
Audit server, configuring, 69
Configuration settings
backing up, 75
restoring, 76
Configuring Q-Station, 44
Controls
export toolbar, 64
image toolbar, 53
Conventions
user information, 8
Customer comments, 10
Customer service, 10
D
B
Backing up settings and license, 75
C
Capturing images, 58
Caution notifications, 42
CD/DVD write preferences, 52
Closed contour measurements, 56
Comments
customer, 10
Computer requirements, 12
Computer security policy, 21, 22
changing settings, 22
Computer security policy option
settings, default values, 21
Data locations, 69
Data panel, 49
Data storage locations, 74
Data types, 41
Date format for StressVue XML, 84
DICOM
archival, patient data, 52
exporting data, 66
DICOM devices
adding, 78
deleting, 80
editing, 80
testing, 80
DICOM settings, 77
Drives, assigning, 74
Q-Station User Manual
4535 616 40761
87
Index
E
ECG configuration, 81
ECG data
accessing, 84
compatibility, 46
troubleshooting, 84
ECG reports, accessing, 83
ECGServiceUser account, activating, 82
Editing reports, 61
Electronic signatures, 62
Export settings
DICOM format, 66
panel, 64
Export tab, 64
Export toolbar, 64
Exporting
patient data, 65
Exporting DICOM, 66
F
Feedback area, 42
File compatibility, 46
Full-screen mode, 43
H
Help, 8
Hiding patient data
during export, 66
History, support, 36
88
Q-Station User Manual
4535 616 40761
I
Image quality, 37
Image toolbar, 53
Images
annotating, 58
capturing, 58
saving, 67
viewing, 53
Installation
overview, 11
procedure, 22
verifying, 31
Institution name, 69
Intended audience, 7
Intended use, 7
J
Job Viewer
about, 43
using, 43
L
Language settings, 69
License file
backing up, 75
restoring, 76
Line measurements, 56
Locking Q-Station, 39
Logging off, 40
Logging on, 39
Index
Loops
saving as movie, 68
M
Managing user accounts
changing account properties, 31
deleting accounts, 31
Measurements, 56
Menus, 40
Message bar, 42
MSXML 6 SP2, 13
N
Network requirements, 14, 15
configuration settings, 15
installation, 14
Network settings, 77
Network settings, checking, 78
Network shares
configuring on Windows 7, 70, 73
configuring on Windows XP, 71
Note notifications, 42
Notifications, 42
O
Open contour measurements, 56
Operating notes, 8
Options, 45, 46
viewing, 46
Overview, Q-Station, 37
P
PACS compatibility, 46
Patient data
DICOM archival, 52
exporting, 65
local, 49
remote, 49
securing, 38
Philips contact information, 10
Pictorial index
about, 40
data types, 41
Pinging servers, 78
Printing
reports, 63
Procedures, 49
Purchasable options, 45
Q
Q-Assistant, 44
Q-Station
data locations, 69
Q-Station basics, 37
QLAB
analysis, 59
saving images, 59
R
Registration, 25
Q-Station User Manual
4535 616 40761
89
Index
Remote access
configuring, 33
enabling, 33
Remote service
configuring, 33
enabling, 34
Removable media, 52
settings, 52
Removing administrator accounts, 32
Reports
about, 60
advanced analysis, 61
approving, 63
editing, 61
electronic signatures, 62
printing, 63
storage location, 60
viewing, 61
Requirements
computer, 12
network, 14
Restoring settings and license, 76
Settings
network and DICOM, 77
system, 69
Smoothed polygon measurements, 56
Software registration, 25, 27
automatic, 25
manual, 27
Storage locations, 74
Studies data
transferring, 51
writing to removable media, 52
Studies database, 49
Studies tab, 49
Study data
retrieving remote, 50
Support history, 36
Support, requesting, 35
System event area, 42
System management, 69
System upgrades, 10
T
S
Saving
images, 67
images in QLAB, 59
loops, 68
Security, 38
Security policy, 21
Serial number, 69
Service, customer, 10
Service, requesting, 35
90
Q-Station User Manual
4535 616 40761
Toolbars, 40, 53, 64
export, 64
image, 53
U
Upgrades, system, 10
User accounts, 29, 30, 31
adding, 30
changing, 31
deleting, 31
Index
User accounts (continued)
new, 30
User groups, 29
User information
about, 7
components, 8
conventions, 8
V
View tab, 53
Viewing
images, 53
reports, 61
W
Wall motion scoring, 55
Warning notifications, 42
Website, Philips, 10
Verifying software installation, 31
Q-Station User Manual
4535 616 40761
91
Index
92
Q-Station User Manual
4535 616 40761