1
Guide
Intel® Centrino® with
vPro™ Technology
Intel® Core™2 Processor
with vPro™ Technology
Getting to Pro: An
Enterprise Approach to
Deploying Intel® Active
Management Technology
Prepared by EDS for Intel® Corporation
December 2007
.
Quick Reference Guide Maximizing the Benefits of Intel® Active Management Technology: A Solution Guide
Table of Contents
Introduction ............................................................................................................................................................................. 5
Architecture and Design Considerations .......................................................................................................................... 5
Architectural Overview ............................................................................................................................................................................................................................................... 5
Intel® AMT 2.1 Device Provisioning Overview ............................................................................................................................................................................................... 6
Intel® AMT 2.1 Device Management Infrastructure Installation Overview ................................................................................................................................... 8
Component Overview ............................................................................................................................................................................................................................................... 10
Windows Server 2003 Active Directory (AD) ............................................................................................................................................................................................. 11
Domain Name Server (DNS) ................................................................................................................................................................................................................................... 11
Dynamic Host Configuration Protocol (DHCP) Server ............................................................................................................................................................................. 11
Microsoft Certificate Authority (CA) ................................................................................................................................................................................................................. 11
Intel® AMT Setup & Configuration Server (SCS) 3.0 or later ............................................................................................................................................................... 12
SCS Console 3.x ............................................................................................................................................................................................................................................................ 13
Microsoft SQL Server 2005................................................................................................................................................................................................................................... 13
Microsoft Systems Management Server 2003 (SMS) with Intel® AMT Add-on 3.x ............................................................................................................... 13
Intel® AMT 2.1 Host .................................................................................................................................................................................................................................................... 14
Internet Explorer Web Client ................................................................................................................................................................................................................................ 15
Requirements and Dependencies .................................................................................................................................... 15
Windows Server 2003 Standard R2 SP2 ...................................................................................................................................................................................................... 15
Windows Server 2003 Active Directory (AD) Forest ............................................................................................................................................................................. 16
Active Directory Schema Extensions ............................................................................................................................................................................................................... 16
Mutual Transport Layer Security (MTLS) ....................................................................................................................................................................................................... 16
Microsoft Certificate Authority (CA) in standalone mode .................................................................................................................................................................... 17
Microsoft SQL Server 2005 Standard Edition SP2 .................................................................................................................................................................................. 17
Microsoft Internet Information Server 6.0 (IIS).......................................................................................................................................................................................... 17
Microsoft Domain Name Server .......................................................................................................................................................................................................................... 17
Microsoft DHCP Server ............................................................................................................................................................................................................................................. 17
Microsoft SMS 2003 SP3 ........................................................................................................................................................................................................................................ 17
Intel® Setup and Configuration Server 3.0 or later .................................................................................................................................................................................. 17
Intel® AMT Add-on for SMS version 3.0 or later......................................................................................................................................................................................... 18
2
Quick Reference Guide Getting to Pro: An Enterprise Approach to Deploying Intel® AMT
Intel® AMT 2.1 Managed Devices ........................................................................................................................................................................................................................ 18
Required vs. Optional Infrastructure Components Checklist .............................................................................................................................................................. 18
Minimum and Recommended Software .......................................................................................................................................................................................................... 19
Network Requirements Checklist....................................................................................................................................................................................................................... 20
Lab Bill of Materials (BOM) ..................................................................................................................................................................................................................................... 20
Intel® AMT BIOS Provisioning Overview ......................................................................................................................................................................................................... 22
Manual................................................................................................................................................................................................................................................................................ 23
USB Key ............................................................................................................................................................................................................................................................................ 24
OEM...................................................................................................................................................................................................................................................................................... 25
Setup and Configuration .................................................................................................................................................... 26
Verifying Existing Network Infrastructure ................................................................................................................................................................................................... 26
Installing a Certificate Authority ........................................................................................................................................................................................................................ 37
Active Directory Modification, Schema Extension and User/Groups ............................................................................................................................................. 63
Installing the Intel® AMT Setup and Configuration Server (SCS) ...................................................................................................................................................... 66
Intel® AMT Add-On for Microsoft SMS 2003 ................................................................................................................................................................................................ 74
SCS Console Configuration ..................................................................................................................................................................................................................................... 89
Firewall/Ports ............................................................................................................................................................................................................................................................. 103
Provisioning Intel® AMT Systems .................................................................................................................................................................................................................... 103
Testing and Validation..................................................................................................................................................... 113
Discovery....................................................................................................................................................................................................................................................................... 113
Asset Inventory ......................................................................................................................................................................................................................................................... 114
Power Control Operations ................................................................................................................................................................................................................................... 115
Wake Up on Advertisement................................................................................................................................................................................................................................ 118
SOL/IDE Redirection Operations ...................................................................................................................................................................................................................... 120
System Defense ........................................................................................................................................................................................................................................................ 124
Maintenance Activities .................................................................................................................................................... 127
SMS Add-on .................................................................................................................................................................................................................................................................. 127
Glossary ............................................................................................................................................................................... 129
Troubleshooting / Best Practices.................................................................................................................................. 132
3
Quick Reference Guide Maximizing the Benefits of Intel® Active Management Technology: A Solution Guide
Appendix A ......................................................................................................................................................................... 134
Deploying and Configuring Active Directory ............................................................................................................................................................................................. 134
Installing and Configuring DNS.......................................................................................................................................................................................................................... 134
Installing and Configuring DHCP ....................................................................................................................................................................................................................... 134
Installing and Configuring Certificate Services ........................................................................................................................................................................................ 135
Installing and Configuring Systems Management Server 2003 .................................................................................................................................................... 135
Installing and Configuring SQL Server 2005............................................................................................................................................................................................. 136
Appendix B ......................................................................................................................................................................... 137
Installing an Enterprise Subordinate CA ...................................................................................................................................................................................................... 137
Create Client Certificate Template for the Enterprise Subordinate CA .................................................................................................................................... 141
Add Client Certificate Template to the Enterprise Subordinate CA ............................................................................................................................................ 149
4
Quick Reference Guide Getting to Pro: An Enterprise Approach to Deploying Intel® AMT
Introduction
servers, with one server in each pair more transparent than the other. This is
presented in this manner to help the reader understand the minimum
requirement for a single server in the pair, and also to show that an enterprise
This document will explain the approach to organizing and executing a successful
deployment requires a second server (at a minimum) for availability purposes.
Intel® Active Management Technology (Intel® AMT) 2.1 implementation project. It
The Intel® AMT 2.1 devices specific to this document are hosts that require wired
is written from the perspective of deploying and supporting a full life-cycle of
enterprise Intel® AMT 2.1 technology. This document will help the reader
construct such an environment from the ground up and it will reference
instruction and guidance from Intel on the detail of Intel technology.
The intended audience of this document is systems integrators and those
intending to perform full lifecycle support for any Enterprise deployment of Intel®
AMT 2.1 technology. The reader will gain a comprehensive understanding of the
mechanics and support of the Intel technologies, and be instructed on the
complete infrastructure setup required for this environment.
network connectivity. This document will only address hosts that are connected
to the network via a physical network connection. Intel® AMT devices that provide
support for wired and wireless network connections are out of this document
scope, and will be addressed in later documentation.
Generally speaking, an enterprise wishing to deploy Intel® AMT 2.1 will require at
minimum three (3) servers in addition to their existing management framework
for the Intel® AMT 2.1 devices (hosts). It is highly recommended that for a fully
functional enterprise these servers be redundant as appropriate for their service
to provide for high availability. Most, if not all enterprises require the robustness
This document is not intended to replace Intel® AMT 2.1 vendor documentation,
of service that can only be attained via high availability configurations. The
but rather relies upon it and strives to provide the integrated feel across the
minimum three (3) additional servers are as follows:
required Intel and Microsoft technologies from a support and deployment
perspective.
Architecture and Design Considerations
Architectural Overview
The architecture depicted here provides the reader with the guidance needed to
understand the Intel® AMT 2.1 support and deployment infrastructure. This
guidance has taken into account changes in later versions of Intel® AMT and
although not detailed here only minor changes will be needed to support the later
versions. This is communicated as the best practice for medium to large
enterprises and is intended to provide the background and instruction needed to
plan, design, and deploy a successful Intel® AMT 2.1 implementation for the
enterprise.
This document contains recommendations for enterprise setup and qualifies
those recommendations with the minimum requirements for deployment.
Depicted in the diagram in the Component Overview section are three pairs of
5
1.
One to host the Microsoft Certificate Authority*
2.
One to host the Intel® AMT Setup and Configuration Server
3.
One to host the Microsoft SQL Server* database
If an enterprise already has a SQL Server database or database farm in place, it
could possibly be utilized eliminating the need to standup a separate service.
Similarly, if an enterprise has an existing PKI in place, it could possibly be utilized
for the Intel® AMT 2.1 deployment. However, in this case it is likely that a
successful startup of a pilot within an enterprise would be bolstered by
implementing the PKI in standalone mode and then migrating to the existing PKI.
Quick Reference Guide Maximizing the Benefits of Intel® Active Management Technology: A Solution Guide
Another option for the enterprise that has a fully supported virtualization
The Intel® AMT 2.1 device then connects to the Intel® Setup and Configuration
environment is to place the Microsoft Certificate Authority and the Intel® AMT
Server (SCS) where security information and configuration information are
Setup and Configuration Server within that environment. The caveat is that the
delivered and stored on the Intel® AMT 2.1 device.
environment must be supported just like standard physical server environment.
Process and procedures should account for standard server support in the virtual
environment. Note: Virtualization of the SQL Server database cluster is not
recommended.
It is assumed that a fully functional Windows networking infrastructure (as
depicted below in the Component Overview section) is in place prior to the
deployment of Intel® AMT 2.1 management capabilities. These assumptions
include the highly available configurations most common to enterprise
deployments of Windows Active Directory, Domain Name Servers, DHCP servers,
and a Microsoft Systems Management Server* (SMS) hierarchy. The integration
points for these Windows networking services are discussed later in the
document. However, this document will not provide guidance on how to plan,
design, or deploy these components (except for where configuration
Normal day-to-day operations occur in this step and general operation is
performed by the SCS and the Intel® SMS Add-on initiating management activities
on the Intel® AMT 2.1 device.
The last step is performed when the Intel® AMT 2.1 device is being redeployed or
decommissioned. In each case either the SCS or the Intel® AMT Add-on for SMS is
used to partially un-provision the Intel® AMT 2.1 device in the case of a
redeployment scenario internal to the same enterprise or fully un-provisioned in
the case of a decommission or redeployment outside of the enterprise. The fully
un-provisioned device is in the state prior to Step 1 in this process and the
partially un-provisioned device returns it to the state produced in Step 1.
However, each un-provision activity does not reset the administrator password
for Intel® AMT.
modifications or considerations must be made to integrate the Intel® AMT 2.1
Consideration for provisioning the Intel® AMT 2.1 devices is the coordination of
management services into the existing enterprise Windows networking
the fully qualified domain name (FQDN) as defined in the operating system and
infrastructure). These exceptions will be described as appropriate in the
the Intel® AMT system. This is best performed after the operating system is
remainder of the document.
provisioned and joined to the Active Directory. After the operating system is
Intel® AMT 2.1 Device Provisioning Overview
At this point, the reader will need to gain an understanding of the device preprovisioning and provisioning process. Later in the document a more detailed
explanation of what is required to prepare an Intel® AMT 2.1 device for
joined to the domain scripted actions are performed to complete step 3 above.
This activity is critical to enable proper management behavior of Intel® AMT
device management with the Intel® SMS Add-on in coordination with SMS. Failure
to properly coordinate the FQDN between the Intel® AMT device and the
operating system will not interfere with normal operating system management
management capabilities within the enterprise will be provided. The Intel® AMT
activities but will greatly degrade Intel® AMT device management.
2.1 device is setup and managed in the following order:
The SCS needs identification information for each Intel® AMT device to know its
The Intel® AMT 2.1 device is prepared in a pre-provisioning step either in house or
FQDN, which profile to use and where to put the Intel® AMT object in Active
by the OEM (Original Equipment Manufacturer). This step places specific
configuration information on the device in order to prepare it for full automatic
Directory. The identifying parameter for a device and the platform that it is on is
the platform UUID. Entering the information manually in an enterprise
provisioning with the infrastructure depicted in the architecture below.
environment is not practical on a large scale. Also, the FQDN will change as a
The Intel® AMT 2.1 device is then placed on the network in its final production
The SCS supports multiple methods for loading configuration information, each
environment and connected to power and the network.
6
machine is moved around in the enterprise and assigned to different individuals.
with its uses, advantages and disadvantages.
Quick Reference Guide Getting to Pro: An Enterprise Approach to Deploying Intel® AMT
Source of Configuration Information: Database or Script
information containing at a minimum 2 pieces of information: the Intel® AMT UUID
The SCS can be configured to locate Intel® AMT device configuration information
and the device FQDN. This script can be executed in the following ways:
in one of two ways: either from within the SCS database or via a script. When the
SCS receives a ―Hello‖ message from a device it will look in the SCS database for a
configuration entry matching the UUID in the ―Hello‖ message. If there is no
match, and there is no script, the SCS will revisit the queued ―Hello‖ message
update the interim database
Executed as part of the Active Directory logon script with the appropriate
user account given the ability to update the interim database
periodically to see if an entry was added to the database. If the script option was
selected, the SCS will activate a script to find the necessary information, given
Manually executed with the appropriate user account given the ability to
Delivered as part of the standard software delivery mechanism, Microsoft
the UUID and the source IP in the ―Hello‖ message. When the SCS receives the
Systems Management Server, the account used to execute this software
configuration from the script, it stores the information in the database.
package has the ability to update the interim database
Adding device information to the SCS database manually
This is the simplest approach but it is the most difficult for IT personnel. They
have to manually enter the UUID along with the other parameters into the New
Intel® AMT Configuration parameters. The SCS Console has a page that supports
this method. See ―Configuration Parameters per Device‖ in the Intel® AMT SCS
Installation and User Manual.
Adding device information to the SCS database using the SOAP API
The SOAP API has a method called AddServiceNewAMTProperties that adds an
entry to SCS database table. An external management console can acquire the
platform information using scripts, its own database, or a local agent, and pass
the information to the SCS either before or after the Intel® AMT device starts
sending ―Hello‖ messages.
Scripting Option
This option acquires the configuration information using a script if the required
parameters are not in the New Intel® AMT database table. The SCS runs a script
that retrieves the parameters from an external source.
The scripting option is the recommended enterprise Intel® AMT provisioning
solution. This requires that a script run on the Intel® AMT device after the system
has joined the appropriate Active Directory domain. Once this occurs the script
can be executed to fill in an interim database with the appropriate provisioning
7
Quick Reference Guide Maximizing the Benefits of Intel® Active Management Technology: A Solution Guide
NOTE: Future versions of Intel® AMT, 2.2, 3.x and beyond, support a
provisioning mechanism called remote configuration. This eliminates the
need to ―touch‖ the Intel® AMT device once it is delivered to its final
Intel® AMT 2.1 Device Management
Infrastructure Installation Overview
resting place (e.g., the end-user‘s desk) or the enterprise premises. The
The following list describes the management infrastructure installation order at a
design enables a piece of software, the RemoteConfigurationTool, to be
high level. Each component will be described in more detail in the next few
delivered with the existing software delivery mechanism (e.g., Microsoft
sections, and then fully detailed installation instructions follow. This overview
Systems Management Server – SMS) for the enterprise to initiate
will give the preparatory understanding needed to follow the rest of the
provisioning activities on the Intel® AMT 2.2 (or greater version) device
documentation as it provides increasingly detailed information on each
at whatever interval is deemed appropriate for enterprise activation of
component. The list below is in priority order as some dependencies do exist:
the systems.
1.
This activity has at its very least requirements of the infrastructure in
These servers may already exist in the enterprise and capacity permitting
the document to be installed and working properly. Also, an appropriate
may host the database required for the Intel® AMT Setup & Configuration
root certificate hash should be installed on the Intel® AMT device that is
Server 3.0 or later. Detailed account requirements are described in the
delivered. At a minimum, the Intel® AMT device is delivered by default
appropriate sections below. This document will not provide instruction for
with several well known root certificates like Verisign and GoDaddy.
installing the Microsoft SQL database server and/or cluster. It is assumed
There are others delivered on the device and it is appropriate to check
the enterprise SQL database administrators will be engaged to provision
with the OEM of your systems to determine if the appropriate well
known root certificates are pre-installed on the Intel® AMT devices
delivered to your organization. If you choose to use the preinstalled
the appropriate database.
2.
Microsoft Certificate Authority (CA)
root certificates in your enterprise, then it is required that you purchase
Setup for the CA is rather straight forward and instructions listed below
a certificate from your chosen well known provider that enables your
describe how to setup an offline root in addition to a subordinate CA. This
enterprise certificate authority to issue certificates against. Otherwise,
document will focus on setting up the Microsoft Certificate Authority in
you will need to work with your OEM to pre-install the appropriate root
stand-alone mode. These may be virtual servers as described elsewhere in
certificate of the enterprise certificate authority you have installed for
the document.
your enterprise before the Intel® AMT devices are manufactured and
delivered to the end-user.
This is the only location within this document that describes remote
configuration as the remainder of what is covered here focuses on
deployment of pre-Intel® AMT v2.2 devices. It is, however, the
recommendation that enterprises move to implement remote
configuration as a matter of best practice at this point in time.
8
SQL Database (Cluster)
3.
Active Directory® Accounts and Groups
Appropriate service accounts and management groups will be created in
the proper domains required by the following components in this list. SQL
DB login configuration will also be performed using the service account(s)
instructions in this step.
Quick Reference Guide Getting to Pro: An Enterprise Approach to Deploying Intel® AMT
4.
Active Directory Schema Extensions & Supporting Scripts
Scripts run from the root domain in the forest by the enterprise
administrator to create appropriate schema extensions and create OU‘s,
accounts, and groups in each subordinate domain.
5.
Intel® AMT Setup & Configuration Server 3.0 or later
These may be virtual servers (quantity determined by implementation
design) as described elsewhere in the document.
6.
Intel® AMT Add-on for SMS* 3.x
This will install an SMS add-on and system service to each central site and
primary site server in the management hierarchy used.
Intel® AMT Setup & Configuration Server 3.x Configuration
This activity appropriately configures the SCS to operate in the
management infrastructure.
7.
Intel® AMT 2.1 Host Provisioning
This is the final activity to prepare and complete operations on the Intel®
AMT 2.1 devices that enables them for full manageability with the
management infrastructure.
The reader will also find detailed guidance on the minimum requirements
for implementation of the Intel® AMT 2.1 management components listed
above, along with enterprise level recommendations. The goal here is to
provide for a successful deployment Intel® AMT 2.1 management
capabilities throughout the enterprise.
9
Quick Reference Guide Maximizing the Benefits of Intel® Active Management Technology: A Solution Guide
Component Overview
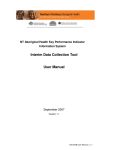
Architectural Component Diagram
The connections depicted in the diagram above are intended to describe those activities that are not usual and customary in a normal Windows network. For example,
connections for domain name server name resolution is not included, as well as a complete depiction of authentication connections is missing too. The purpose of this
diagram is to explain the interaction of systems as it pertains specifically to adding Intel® AMT 2.1 management infrastructure.
10
Quick Reference Guide Getting to Pro: An Enterprise Approach to Deploying Intel® AMT
Windows Server 2003 Active Directory (AD)
Microsoft Active Directory is assumed to be part of the overall network
Dynamic Host Configuration Protocol (DHCP)
Server
infrastructure supporting the existing Windows network environment. This
DHCP services must be in place to properly register Intel® AMT 2.1 hosts within
architecture requires AD as the authentication mechanism allowing the Intel®
Setup & Configuration Server, Intel® AMT Add-on for SMS, and potential web
clients to logon to Intel® AMT 2.1 hosts. AD should inherently be designed in a
high availability configuration as prescribed by the existing environment and
geographic requirements as well as best practices for AD in general.
the enterprise. The hosts require that the DHCP server register their fully
qualified domain name (FQDN) with the DNS. If the Microsoft DHCP server is
employed it should be configured to automatically register the hosts in the DNS.
Standard DHCP option 81 should be used to accomplish the task of registering
the Intel® AMT 2.1 hosts in the DNS as the FQDN is required as part of the PKI
Domain Name Server (DNS)
certificate generated for the device. The DNS is queried by the configuration
A domain name server is used to supply the name to IP resolution for the Intel®
accept the TLS encryption with the Intel® AMT 2.1 host.
AMT 2.1 hosts as well as resolving the Setup & Configuration server IP address
server or add-on to compare against the certificate received in order to properly
for provisioning purposes. The name and IP address of each Intel® AMT 2.1 host
Microsoft Certificate Authority (CA)
will be automatically registered in the DNS by the DHCP server.
It is recommended that at a minimum a stand-alone PKI certificate authority be in
Each Intel® AMT 2.1 host will try to resolve the static name ―ProvisionServer‖
place to enable encrypted and secure communication with the Intel® AMT 2.1
during the initial activation process explained later. ProvisionServer will be
hosts. The picture above in the Component Overview section depicts a desired
manually registered in the DNS and assigned to the Setup & Configuration Server
high availability scenario by showing the off-line root as a transparent server.
IP address.
The Microsoft certificate authority (CA) is required to properly interoperate with
―ProvisionServerDB‖ will also be utilized during the Intel® AMT provisioning
process by scripts executing on the client operating system. These scripts are
used to link the Intel® AMT unique identifier with the client operating system‘s
host name and fully-qualified domain name. ―ProvisionServerDB‖ will be manually
registered in the DNS and assigned to the Microsoft SQL Server mentioned here
hosting the Setup & Configuration Server database.
DNS is expected to be integral to the existing Windows network infrastructure.
DNS should inherently be designed in a high availability configuration as
prescribed by the existing environment and geographic requirements as well as
the Intel® Setup & Configuration Server. The CA is required to issue certificates
to the Intel® AMT 2.1 hosts, the Setup & Configuration Server, and in the case of
Mutual Transport Layer Security (MTLS) the Intel® AMT Add-on for SMS 2003.
These certificates allow for SSL encryption and Transport Layer Security (TLS)
and MTLS.
A certificate can be purchased from an outside vendor such as Verisign*. This
enables easier provisioning (remote configuration) of the Intel® AMT 3.x hosts as
the Verisign root certificate hash is already defined in the host. This will be
covered in later documentation focused on Intel® AMT 3.x devices.
best practices for DNS in general. Also DNS forward and reverse lookup zones
These servers may be considered for virtual hosting environments. It is a
should be configured to accept secure and non secure updates.
requirement that the virtual hosting environment be fully supported within the
environment through standard operating procedures. It is expected that if these
servers are virtually hosted they will receive equivalent operational support as if
they were hosted in a physical environment.
11
Quick Reference Guide Maximizing the Benefits of Intel® Active Management Technology: A Solution Guide
Intel® AMT Setup & Configuration Server (SCS)
3.0 or later
This server is required for enterprise provisioning / activation of Intel® AMT 2.1
hosts. SCS runs as a service on this Windows server. This is the one of the
primary management points for the complete lifecycle management of the Intel®
AMT 2.1 hosts. The integral nature of this system dictates a recommendation for
high availability scenarios. This is depicted above as requiring a single server but
showing a transparent server next to it indicating a recommendation to provide
The major elements of the SCS are:
Windows Service (the SCS Main Service)
Secure Database
SOAP API
Console Application (the Intel SCS Console)
The SCS needs a manual DNS registration entry referencing it as
―ProvisionServer‖ within the appropriate DNS hierarchy. It should also be
high availability in an enterprise deployment scenario and is expanded upon later
registered by machine in DNS. The reason for the manual registration is due to
in this document.
the fact that the Intel® AMT 2.1 host utilizes this name to locate the SCS upon the
Once the Intel® SCS has been installed and its database has been loaded with
initial activation process.
initial data, setup and configuration starts when an Intel® AMT 2.1 host sends a
The SCS keeps profiles, keys, and passwords securely within the SQL Server
message called a ―Hello‖ message to the SCS. The SCS and the Intel® AMT 2.1
database. Requests for activation by the Intel® AMT 2.1 hosts are made to the
device communicate securely as the SCS generates and sends the device:
SCS which performs the process of applying policy to the hosts and delivering
certificates from the certificate authority and/or passwords as well as full
Certificates from a public key infrastructure (PKI)
Access control lists (ACLs)
Other setup parameters, as defined in a profile of setup and configuration
appropriate policy information in the form of ACLs, passwords (if not integrated
information specific to the platform or to a family of platforms
with Active Directory), and appropriate meta-data to describing the target Intel®
The SCS also registers the Intel® AMT 2.1 device in Active Directory and in its own
provisioning of the host Intel® AMT 2.1 capabilities. The SCS also accepts
commands from the Intel® Add-on on the Microsoft SMS server. The SCS provides
AMT 2.1 host to the Add-on enabling the host to be managed.
secure database as depicted in the architecture. The SCS is used for various
These servers may be considered for virtual hosting environments. It is a
maintenance functions, such as updating passwords (when Kerberos
requirement that the virtual hosting environment be fully supported within the
authentication is not activated) and ACLs, and keeping logs of all performed
environment through standard operating procedures. It is expected that if these
transactions.
servers are virtually hosted they will receive equivalent operational support as if
It is recommended to have multiple instances of the SCS installed across an
enterprise, but there is only one SCS database for the enterprise.
they were hosted in a physical environment.
Full documentation describing the setup and details of what the SCS provides can
be located in the document ―Intel® Active Management Technology Setup and
Configuration Service – Installation and User Manual‖.
12
Quick Reference Guide Getting to Pro: An Enterprise Approach to Deploying Intel® AMT
SCS Console 3.x
The add-on has two main components:
The console is depicted separately here to indicate that it does not have to run
Service that runs exclusively on the SMS server
on the SCS. However, the console may also be run on the same server as the SCS
SMS console snap-in that extends the SMS console menus to include the
service. The SCS can be managed remotely with a console installed on another
Intel® AMT 2.1 functionality. It can be installed on an SMS server or on an
client communicating back to the SCS just like the SMS Add-on, via a SOAP
SMS console.
interface over HTTS (SSL port 443). It is a requirement to run the console on a
physical computer when used to deploy provisioning keys via the USB memory
stick. This is due to the fact that existing virtual hosting software does not
provide robust support for USB ports within hosted virtual operating systems.
VMWare Workstation 6.0 or higher supports the USB export capability.
Microsoft SQL Server 2005
The Intel® AMT Add-on installed on SMS is used to provide operational control of
the Intel® AMT 2.1 host. It makes API calls to the Intel® SCS in order to gain
proper credentials via policy to control and manage the Intel® AMT 2.1 host.
Documentation fully describing the Add-on is referenced below. The Intel® AMT
Add-on for SMS in conjunction with the Intel SCS is what provides the operational
team with the capabilities to manage the Intel® AMT 2.1 hosts.
This system is best described by following best practices for high availability and
The add-on extension to SMS provides secure access to the capabilities enabling
performance for access by the Intel® SCS. It is not required to be configured for
discovery of Intel® AMT 2.1 -supported systems and managing those systems
high availability, however if the database or connectivity to this database is lost,
remotely. These capabilities include:
the management of the Intel® AMT 2.1 hosts is effectively rendered useless. The
Asset Discovery & Identification
that it is preferred that this system be configured in a cluster, but it is not
System(s) Wake-up
required. Assuming performance and network connectivity are not an issue this
System(s) Remote Control
transparent server in the picture in the Component Overview section indicates
system could reside on an existing hosted SQL Server database cluster. Best
o
practices and organizational architecture will dictate whether this system should
be a stand-alone cluster or hosted on a shared database cluster system.
Microsoft Systems Management Server 2003
(SMS) with Intel® AMT Add-on 3.x
It is assumed that best practices for an existing fully-functional SMS hierarchy are
already in place. The architecture above does not intend to describe how the
SMS hierarchy should be designed and deployed, but expects a proper instance
exists. The architecture above does describe its interaction with Intel® AMT 2.1.
This document will go into the usage of SMS insofar as it relates to the Intel® AMT
Add-on. General SMS usage for typical software distribution and configuration is
not a topic covered here.
Serial Over LAN (SOL; text based/non-GUI remote control)
System(s) Redirection Operations
o
Integrated Drive Electronics redirection (IDE-R; remote boot
capability when internal drive not working)
System(s) Un-provisioning
Collection Wake-up on Advertisement
System Defense on Advertisement
Add-on Configuration
The add-on supports the SMS model of support for both single systems and
system collections. Therefore, most operations can be done for a collection of
systems as well as for a single system.
13
Quick Reference Guide Maximizing the Benefits of Intel® Active Management Technology: A Solution Guide
The add-on can be installed at any Primary Site in an SMS hierarchy, including the
The full suffix of DNS branches must be added to the network controller
Central Site. It cannot be installed at a Secondary Site. However, if it is installed at
properties when:
the parent of the Secondary Site, all the add-on functionality is available for all of
the systems managed by the Secondary Site.
It is recommended that the Intel® AMT Add-on be installed on all Primary Site
Using an Active Directory domain hierarchy
The add-on is intended to work with systems in different domain branches
servers and the Central Site server throughout the organization. This requires
The Intel® AMT Add-on is fully discussed in the ―Intel® Active Management
other considerations pertaining to domain account, site specific, and collection
Technology Add-On for Microsoft SMS 2003 User Guide‖
dependencies that are described in detail later in the section 0 Intel® AMT Add-on
Intel® AMT 2.1 Host
for SMS version 3.x.
Since it is recommended to setup TLS for enterprise Intel® AMT 2.1
implementations, the certificate files enabling TLS need to be installed locally on
every SMS site in the hierarchy that host the Intel® AMT Add-on. This effectively
means every Primary and Central Site server due to enterprise recommendations.
If this is not done, those sites without certificates are not able to communicate
with the Intel® AMT 2.1 machines in their collections, and do not identify them as
Intel® AMT 2.1 machines.
At any site where the add-on is installed, all the add-on functionality is available
for all the systems and collections included in it. However, since the add-on
conducts its operations from the site where the operations are initiated, directly
to the systems in the collection, it is strongly recommended to always choose a
site as low in the SMS hierarchy as possible to do the operation. This prevents a
These devices are delivered from the OEM with Intel® AMT 2.1 technology inside.
The functions available are provided via access through a standard web interface
(the Intel® AMT 2.1 device acts as a web server and is why we call this a host)
over standard clear text HTTP or SSL / standard HTTPS conversations
(recommended). Further, the communication of control of this device via the Addon or SCS occurs over TLS or MTLS (recommended). The complete set of
functions that the Intel® AMT 2.1 technology provides is best described in the
―Intel® Active Management Technology Deployment and Reference Guide‖
When an Intel® AMT 2.1 enabled platform is delivered, the Intel® AMT 2.1 device is
present but disabled. The Intel® AMT 2.1 device must undergo setup and
configuration before it is operational. In Enterprise environments, the setup and
configuration must be done over the network interface.
heavy load on both the network and the SMS site. In particular, it is recommended
The process of preparing the host for activation as delivered from the OEM is
to avoid initiating operations on collections, except on SMS sites which directly
described later. However, each device must be prepared with a pre-shared key
manage systems.
(PSK) that is shared with the SCS in order to properly activate the device in
In an SMS hierarchy, there can be situations in which an Intel® AMT 2.1 machine is
not accessible at a higher level in the hierarchy due to domain boundaries,
network issues, security constraints, or other reasons. This can occur even
though it was discovered and identified as an Intel® AMT 2.1 machine at a lower
level in the hierarchy. In that case, the machine is not recognized as an Intel® AMT
2.1 machine when viewed from that higher level site and the add-on functionality
cannot be executed on the machine from that site.
14
practice. It is recommended that this preparation be negotiated and delivered by
the OEM delivering the hardware. It is also acceptable to prepare each system in
a staging area. Although possible, it is unlikely that the end-user receiving the
Intel® AMT 2.1 host will be the one preparing the device with the PSK. This has a
high coordination requirement operationally speaking, and could potentially pose
a security risk depending on the process used to manage the PSK.
Quick Reference Guide Getting to Pro: An Enterprise Approach to Deploying Intel® AMT
Internet Explorer Web Client
Microsoft Internet Information Server (IIS) 6.0
This client is depicted for completeness. Depending upon the configuration of the
Microsoft Domain Name Server
environment it will communicate in clear text via standard HTTP or encrypted via
Microsoft DHCP Server
Microsoft SMS 2003 SP3
Intel Setup and Configuration Server 3.x
Intel® AMT Add-on for Microsoft SMS 3.x
Intel® AMT 2.1 Managed Devices
SSL/HTTPS. When using SSL to the Intel® AMT 2.1 hosts it must be noted that
the trusted root-certificate of the assigning CA must be loaded on this client in
order to eliminate the message indicating it does not recognize the certificate
presented for SSL communication. Further, the user must have the appropriate
credentials and access control profile to logon to each individual Intel® AMT 2.1
host as defined in the SCS profile for each host. The preference is that these
hosts be integrated into Active Directory and therefore the client would use his
AD credentials for access. Otherwise, the client would need the proper username
Windows Server 2003 Standard R2 SP2
and password credentials maintained by the SCS and stored in the SCS SQL
Microsoft Windows Server 2003® Standard R2 SP2 is the recommended level of
Server database.
operating system for all services in the enterprise Intel® AMT 2.1 deployment.
Requirements and Dependencies
This is not the minimally accepted level of the operating system; however it is
recommended that the production software be kept at the highest level. It is not
a requirement to update the existing infrastructure to this level of OS, although
The following table lists the software recommendations required for a successful
recommended to stay consistent and to provide for better enterprise OS
deployment of Intel® AMT 2.1 management technology configured in enterprise
maintenance. The minimum level of operating system required is Windows
mode. These are not the minimum requirements that could be found for each
Server 2003 SP1. The latest MSI installer is needed if the recommended OS is not
individual component in the enterprise infrastructure supporting management of
used.
the Intel® AMT 2.1 host devices. These recommendations provide guidance for
enterprises wishing to employee a successful management infrastructure
throughout its network.
This list is followed by a detailed description of each item with explanations to
rationalize each recommendation.
Windows Server 2003 Standard R2
Windows Server 2003 Active Directory (AD) Forest
Active Directory Schema Extensions
Mutual Transport Layer Security (MTLS)
Microsoft Certificate Authority – standalone configuration at a minimum
Microsoft SQL Server 2005 Standard Edition SP2
15
Quick Reference Guide Maximizing the Benefits of Intel® Active Management Technology: A Solution Guide
This recommendation is the minimum for standing up new servers hosting the
Microsoft Certificate Authority and the Intel® Setup and Configuration Server.
Following are the recommended configurations:
Recommendation for Setup and Configuration Server and
Microsoft Certificate Authority Server
Intel® Pentium 4 processor – 1.5 GHZ
PC Processor
Memory
Operating System
Hard Disk
Platform
Networking
Active Directory Schema Extensions
Allows Kerberos Authentication with the Intel® AMT 2.1 management engine –
this is optional as you may keep the Intel® AMT 2.1 device accounts in the Setup
& Configuration Server database. However, this is a highly recommended
addition to the security of the enterprise. Implementing the extensions will
provide for Kerberos authentication for the Intel® AMT 2.1 devices and eliminate
minimum
the need to maintain another account database.
2.4 GHz or faster is recommended
Extensions to the Active Directory schema are not reversible (a full directory
512 MB minimum
restoration is required to back it out but this activity is typically not performed)
1 GB or more is recommended
Windows Server 2003 R2
Minimum: Windows Server 2003 SP1
525 MB
.NET 2.0
Internet Information Server (IIS) 6.0
Minimum Ethernet 10BASE-T
and must be taken into consideration. Detail of this extension can be found in
section 0 Active Directory Schema Extensions.
When considering the implementation of the schema extensions it must be
understood that the Intel® AMT devices are added as computer accounts within
the AD forest enabling full authentication of management accounts in the AD
against the Intel® AMT device. Without the AD schema extensions, Intel® AMT
devices must maintain their own user accounts and access control lists. This is
generally un-acceptable in the enterprise.
Mutual Transport Layer Security (MTLS)
Windows Server 2003 Active Directory (AD)
Forest
Requires a Microsoft Certificate Authority (CA) at a minimum it is recommended
This document will not provide guidance on how to design, plan, or implement the
Directory integrated). This is NOT required for environments where the user does
enterprise AD. The assumption is that the AD is already in a high availability
not need encryption over the wire for management communication to the Intel®
configuration inherent to its design and deployment footprint. This is simply an
AMT 2.1 device. The caveats are that user accounts and passwords along with all
AD requirement for authentication purposes for the Intel® Setup and
session traffic will pass in the clear across the network without TLS.
Configuration Server, Microsoft SQL Server, Microsoft SMS 2003 Server, and if
integrated the Intel® AMT 2.1 hosts. It is also recommended that the AD in place
authorized the Microsoft DHCP server and is integrated with the Microsoft DNS
server. Microsoft Windows 2000 Active Directory is not supported in this
infrastructure.
16
that you use the Microsoft CA in standalone mode. This will eliminate the need to
integrate into or standup a complete CA in enterprise mode (example, Active
Quick Reference Guide Getting to Pro: An Enterprise Approach to Deploying Intel® AMT
Microsoft Certificate Authority (CA) in standalone
mode
Microsoft Domain Name Server
(Minimum if implemented)
implemented and in most cases is part of the existing Windows network
Not required for Intel® AMT 2.1 for the reason MTLS is not required. Recommend
integrates with Microsoft Active Directory. It is however a requirement that the
high availability considerations be addressed as typical in common and
recommended 2-tier CA designs. The Microsoft Certificate Authority provides the
Public Key Infrastructure (PKI) for the enterprise and loss of the trusted root or
root server represents a complete breach or loss of control throughout the
enterprise PKI. Thus, it is recommended that the 2-tier CA design is implemented
to include an offline root CA. Proper care and guidance should be taken into
consideration when deploying a PKI. This document does not provide complete
guidance on the design and operations of a PKI. It is recommended that the
reader seek the proper guidance for its implementation. Full implementation of
certificate services may be found on the Microsoft website at: Certificate
Services.
It is highly recommended that the Microsoft Domain Name Server (DNS) is
infrastructure. The DNS comes as part of Windows 2003 Server and easily
DNS implemented for the Intel® AMT 2.1 management infrastructure be a
dynamic DNS supporting RFC 2136 allowing for dynamic registration of fully
qualified domain names (FQDN). DNS service supporting these requirements is
expected to be in place prior to installing the Intel® AMT 2.1 management
infrastructure and implemented in a high availability design.
Microsoft DHCP Server
It is highly recommended that the Microsoft DHCP Server is implemented and in
many cases is part of the existing Windows network infrastructure. The DHCP
server comes as part of Windows 2003 Server and easily integrates with
Microsoft Active Directory and Microsoft DNS. It is however a requirement that
Microsoft SQL Server 2005 Standard Edition SP2
the DHCP server implemented for the Intel® AMT 2.1 management infrastructure
(Minimum recommendation)
Intel® AMT 2.1 devices. DHCP server service supporting these requirements is
support and enable DHCP option 81 allowing it to register FQDNs on behalf of the
It is recommended that this database be in a cluster configuration for high
expected to be in place prior to installing the Intel® AMT 2.1 management
availability (either Standard Edition or Enterprise Edition cluster is sufficient – this
infrastructure and implemented in a high availability design.
will require Windows Server 2003 Enterprise R2)
Microsoft SMS 2003 SP3
Microsoft Internet Information Server 6.0 (IIS)
The minimum required software level is Microsoft SMS 2003 SP1. It is highly
This is stated for completeness as it is required for the Intel Setup and
recommended to implement SMS 2003 SP3 in the enterprise to provide the latest
Configuration Server. This is the web server that supports the management
supported software and fixes to SMS 2003. It is expected that a fully functional
SOAP/HTTS calls to the SCS. IIS 6.0 is standard and included with Windows
Microsoft SMS 2003 hierarchy be in place in the enterprise prior to installing the
Server 2003.
Intel® AMT 2.1 management infrastructure and implemented in a high availability
design.
Intel® Setup and Configuration Server 3.0 or later
This is the recommended version for implementing the Intel® AMT 2.1
management infrastructure.
17
Quick Reference Guide Maximizing the Benefits of Intel® Active Management Technology: A Solution Guide
Intel® AMT Add-on for SMS version 3.0 or later
This is the recommended version for implementing the Intel® AMT 2.1
Required vs. Optional Infrastructure Components
Checklist
management infrastructure.
This checklist includes columns for options that are Required (Req.), Preferred
Intel® AMT 2.1 Managed Devices
(Pref.), and finally a checklist column to note if implemented (Impl.).
This is the minimum required for implementing the Intel® AMT 2.1 management
infrastructure. Intel® AMT 2.1 provides the needed capability of USB provisioning
to support the enterprise level of management processes.
Setting
Req
Active Directory
Schema Extensions
X
Impl
Detail
Recommend schema extensions to
provide Kerberos authentication to
Intel® AMT 2.1 host
Domain Name
Server
X
Microsoft DNS recommended but the
minimum requirement is DNS that
allows for integration with Microsoft
AD (allows dynamic updates)
DHCP Server
X
If not AD authorized requires Option
81 to enable FQDN registration of
Intel® AMT 2.1 host in the DNS
MS SMS 2003
Hierarchy
X
Requires SP1 recommend SP3
MS Certificate
Authority (CA)
X
Highly recommended to provide OOB
management traffic encryption over
the wire (TLS/MTLS) – recommend
separate server
2-Tier PKI (offline
root)
X
Highly recommended for CA to
ensure business continuance of PKI –
separate server
SQL Server
X
SQL Server Cluster
Intel® AMT SCS
Intel® AMT SCS
Redundant Server
18
Pref
Recommend separate server
X
X
Recommended to provided high
availability for critical Intel® AMT 2.1
management information
Recommend separate server
X
Recommend separate server for
high availability scenarios and
additional servers across diverse
geographical locations as needed. All
front-ended by appropriate load
balancing technology
Quick Reference Guide Getting to Pro: An Enterprise Approach to Deploying Intel® AMT
Minimum and Recommended Software
This checklist includes columns for options that are Required (Req.), Preferred (Pref.), and finally a checklist column to note if implemented (Impl.).
Software
Windows Server 2003 SP1
Req
X
Windows Server 2003 Standard R2 SP2
Windows Server 2003 Active Directory (AD)
Forest
Active Directory Schema Extensions
Mutual Transport Layer Security (MTLS)
X
X
X
X
Microsoft Certificate Authority – standalone
configuration at a minimum
X
Microsoft SQL Server 2005 Standard Edition
SP2
Microsoft Internet Information Server (IIS) 6.0
X
Domain Name Server (DNS)
X
X
Microsoft Domain Name Server (DNS)
DHCP Server
Microsoft DHCP Server
Microsoft SMS 2003 SP3
Intel® AMT SCS 3.x
Intel® SMS Add-on 3.0x
Intel® AMT 2.1 Managed Devices
19
Pref
X
X
X
X
X
X
X
Impl
Detail
Minimum OS Level
This is preferred instead of the Windows Server 2003 SP1 server mentioned
above
Windows 2000 Active Directory is unsupported in this infrastructure
configuration
Recommended to eliminate need for account database managed in SCS
If PKI is implement for security purposes TLS is the minimum requirement
PKI is not required for Intel® AMT 2.1 management, however it is highly
recommended for the enterprise to provide secure encrypted management
communication – minimally required is the Microsoft Certificate Authority Server
Minimum is Microsoft SQL Server 2000 SP4
Included in Windows 2003 Operating System
Minimum is Dynamic DNS supporting RFC 2136 supporting dynamic FQDN
registrations
This is preferred instead of the standard DNS server mentioned above
Minimum is DHCP support for Option 81 allowing for dynamic FQDN registration in
the DNS
This is preferred instead of the DCHP server mentioned above
Minimum is SMS 2003 SP1
Must install all patches
2.1 provides support for USB provisioning
Quick Reference Guide Maximizing the Benefits of Intel® Active Management Technology: A Solution Guide
Network Requirements Checklist
To simplify the networking components, four hardware switches and one router
General Port Requirements Checklist includes columns for options that are
the Intel® AMT systems to specific network segments. This enables ease of
Required (Req.), Preferred (Pref.), and finally a checklist column to note if
implemented (Impl.).
Port
16992
Req
X
16993
16994
Pref
X
X
16995
X
9971
X
56666
443
80
X
X
X
Impl
Detail
SOAP commands using HTTP (non-encrypted)
SOAP commands with Enterprise/TLS mode
(HTTPS - encrypted) – this port used when PKI
infrastructure is utilized in lieu of port 16992
IDE-Redirection (non-encrypted)
IDE-Redirection Enterprise/TLS mode – this
port used when PKI infrastructure is utilized in
lieu of port 16992
port used for configuration, but can be
reconfigured
Serial Over LAN Redirection (SOL)
Standard SSL port
Standard HTTP port
The bill of materials for the lab setup includes 2 servers running Windows Server
2003 R2 SP3 hosting VMWare Server with all 11 virtual machines listed in the
diagram below. The following diagram lists the hardware specifics but not
detailed OEM and model numbers.
Operating System
Hard Disk
Platform
Networking
20
connecting multiple Intel® AMT systems to the virtual management infrastructure
and easily simulates geographic separation as described below.
Lab Bill of Materials (BOM)
Processor
Memory
were used to host the network supporting the VM infrastructure and connecting
4 x Intel® Pentium 4 processor – 2.7 GHz
4 GB
Windows Server 2003 R2 Standard Edition
VMWare Server 1.0.3
135 GB
.NET 2.0
Internet Information Server (IIS) 6.0
4 physical ports (2x 10/100 / 2x1GB)
The specifications above may be increased as necessary to increase performance
of the supported virtual machines. However, the above hardware supported the
lab environment with very little issues.
One of the VMWare server hosts supported the following virtual servers: VS1,
VS2, VS3, VS4, and VS9. The other VMWare server host supported the remaining
virtual servers listed in the diagram in the next section: Node1, Node2, VS7, VS8,
VS10, and VPRO-CAR.
Quick Reference Guide Getting to Pro: An Enterprise Approach to Deploying Intel® AMT
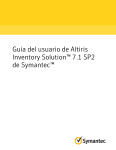
The following diagram depicts the environment used for model office testing of the enterprise management infrastructure. As described in the section above this entire
enterprise simulation environment is running on two physical servers hosting these virtual servers with VMWare Server.
The methodology behind this lab setup is to mimic an enterprise implementation where the AD forest below contains two sub-domains: EAST & WEST. The intent on
splitting up the AD forest is to simulate geographic separation of the management infrastructure and of the Intel® AMT systems themselves.
This setup contains an SMS hierarchy of a central site and two primaries (one in each domain). The simulation provided with this setup enables better understanding of
deploying the Intel® Setup & Configuration server (SCS) in a different network and domain than its supporting SQL Server database. It provides for the testing of the Intel®
SMS Add-on communicating with the SCS while in different SMS hierarchies and AD domains while Intel® AMT systems are provisioned while sitting in different domains and
geographical locations.
Intel® Management Engine Provisioning Models
21
Quick Reference Guide Maximizing the Benefits of Intel® Active Management Technology: A Solution Guide
Intel® AMT BIOS Provisioning Overview
provisioning on the network. This model requires an arrangement be made with
There are three models which can be used to enable provisioning of the Intel®
specific management policies and most importantly the provisioning pass phrase
AMT 2.1 hosts into Enterprise Mode: Manual, USB Key, and OEM. These models
provide the enterprise the flexibility to deploy Intel® AMT 2.1 hosts in whatever
method is necessary. It is highly unlikely that the manual model will be used
except in extreme circumstances where volume of deployments are low or the
greater automation of USB Key and/or OEM models are unavailable.
It is highly likely that an enterprise will choose a hybrid of the USB Key model and
OEM model while primarily dependent on the OEM model.
The USB Key model will typically be used by enterprise deployments that require
or utilize a staging area where OEM equipment is delivered to one or more
centralized location where other activities to stage the equipment is required
(example, operating system and application installation). This centralized staging
location is sometimes used as a means to ensure high security provisioning of
equipment where relying on OEM and transit security is an unacceptable risk –
found in high security sectors like government and financial. Also, the USB Key
model may be used in situations that require field personnel to attend to
provisioning Intel® AMT 2.1 systems that are either new or in a break-fix scenario
directly deployed in its final production environment (example, user‘s desktop).
This flexibility provides a mechanism by which in-place replacement of failed
motherboards in an Intel® AMT 2.1 system do not require a touch at the OEM
before being delivered onsite, thus allowing for third-party warehousing of
common parts. Logging onto the Intel® AMT BIOS from the system POST prior to
the OEM to pre-configure the Intel® Management Engine dependent BIOS with
and provisioning ID of the system. This information along with other pertinent
identifying information about the individual system is then delivered back to the
enterprise to be uploaded to the Intel® Setup and Configuration server to enable
automated provisioning in the enterprise.
Detailed information can be found in the provisioning model discussions below
and in the additional documentation, ―Intel® Active Management Technology
Deployment and Reference Guide‖.
The following provisioning model discussions provide setup procedures for Intel®
AMT 2.1 in different environments, automatically and manually. These procedures
assume that the default BIOS and MEBx parameters are set as described in the
table below.
BIOS or MEBx setting
Intel® Management Engine
Sleep-state power policies for
Intel® Management Engine
Intel® AMT 2.1
Provisioning mode
TLS
DHCP
1 The
Typical default
Disabled
Value after setup
Enabled1
Off for S1 – S5
On for S1 – S52
Disabled
Enterprise
Enabled
Enabled
Enabled1
Enterprise
Enabled
Enabled
Intel® Management Engine and Intel® AMT 2.1 must be enabled in order for
you to set up, configure, and use Intel® AMT 2.1.
provisioning the Intel® AMT system will disable the system‘s ability to USB key
2 Setting
provision.
2.1 to initiate configuration in any power state, as soon as the PC is connected to
Finally, the USB Key model is recommended in situations where the enterprise is
just beginning its deployment. This model lends itself well to pilot and ramp-up
scenarios where a quick start of provisioning configuration prior to working out a
complete delivery system of the OEM model.
The OEM model is the preferred model in most deployment scenarios and
becomes critical when large orders and ongoing consistent delivery of systems is
a requirement. In other words, the OEM model scales to the need of the large
enterprise delivering Intel® AMT 2.1 hosts that are ready for automatic
22
power policies for the management engine to S1 - S5 allows Intel® AMT
power and plugged into the network.
Quick Reference Guide Getting to Pro: An Enterprise Approach to Deploying Intel® AMT
Sleep states describe the possible power states for a computer, as described in
4.
the following table:
Sleep State
S0
S1
S2
S3 - Standby
S4 Hibernate
S5 - Off
Description
The computer is on and fully functional.
The computer appears to be off with the CPU stopped. RAM is
refreshed, and the computer is running in a low power mode.
The computer appears to be off with the CPU stopped. RAM is
refreshed, and the computer is running in a lower power mode than
S1.
The computer appears to be off with no power to the CPU. RAM is in
slow refresh.
The computer appears to be off with no power to the hardware.
System memory has been saved as a temporary file on the hard
disk.
The computer is off with no power to the hardware, and the
operating system has been shut down without saving system
memory to disk.
Using the appropriate keyboard function key (as defined by the PC
manufacturer), display the MEBx configuration screen.
5.
Depending on the BIOS, you should be prompted to log into MEBx when you
access the MEBx configuration screen. Typically you will press <Ctrl>+‘P‘ to
access the MEBx logon screen.
6.
Log into the MEBx using the factory-default admin username and
password. The default username and password are provided in the manual
or shipping box for the PC.
7.
Because this is the first login to the device, the system will require that
you change the default administrator password.
8.
Change the administrator password to a secure password.
9.
Using MEBx features make sure the manageability mode is set to Intel®
AMT 2.1.
10. Using the MEBx power-control feature, verify that the Intel® AMT 2.1
Manual
This procedure explains how to set up Intel® AMT 2.1 by manually entering
security credentials. Credentials are specified through the MEBx (management
engine BIOS extension) screens. This procedure assumes that BIOS and MEBx
parameters are set to the typical default values described in Table above, earlier
in this section.
1.
Using the Intel® AMT Setup and Configuration Service (SCS) request that
the SCS generate a provisioning pass phrase (PPS) and a provisioning ID
(PID). The SCS should generate a TLS premaster secret and store the
13. Exit the MEBx screen. The BIOS will then continue to load.
Caution: Do not power down the PC during this process. The BIOS must be
allowed to finish loading in order to activate the settings and complete the setup
process.
14. Once the BIOS is fully loaded it is safe to power down the PC.
mode, TLS setting, and so on). The SCS then provides you with a copy of
initiated, automated configuration.
Remove the PC from its box, connect the PC to a power source, and power
In BIOS, make sure the Intel® Management Engine is enabled throughout
the BIOS.
23
12. Enter the PPS and PID for the system.
The system is now ready to be installed at the user desk and perform its self-
up the system.
3.
11. In the MEBx screen, now select the PID and PPS option.
secret in a database, along with other information (such as operational
the PPS and PID.
2.
power policies for sleep states are set to your operational preference.
Quick Reference Guide Maximizing the Benefits of Intel® Active Management Technology: A Solution Guide
USB Key
In this procedure, a USB storage device is used to automatically install the
Caution: Do not power down the PC during this process. The BIOS must be
allowed to finish loading in order to activate the settings and complete the
setup process.
administrator password, PPS, and PID for the Intel® AMT 2.1 capabilities. The USB
Caution: Do not power down or otherwise interrupt the PC during the setup
device interprets and parses changes of the default password, PPS, and PID. The
process. Each PC‘s unique ID is associated with the specific USB key used to
procedure described here assumes that BIOS and MEBx parameters are set to the
provision that PC. If the setup process is interrupted, you may have to manually
typical default values described in the table above. Logging onto the Intel® AMT
reset that PPS and PID. At worst, the interruption might have voided a PPS-PID
BIOS from the system POST prior to provisioning the Intel® AMT system will
pair in the PSK repository, and may prevent the PC associated with that PPS-PID
disable the system‘s ability to USB key provision.
pair from authenticating the configuration service (as well as any remote
Follow these steps to enter setup information automatically in each PC via a USB
management server) that attempts to communicate with the system.
storage device:
As the BIOS loads, it loads BIOS and MEBx settings, including enabling the Intel®
1.
Using the Intel® AMT Setup and Configuration Service (SCS), request that
the SCS generate a provisioning pass phrase (PPS) and a provisioning ID
(PID).
2.
The SCS should then generate a TLS premaster secret and store the
premaster secret in a database, along with other setup and configuration
information (such as operational mode, TLS setting, and so on).
3.
4.
and enabling Intel® AMT 2.1. The BIOS then reads the new BIOS administrator
password, PPS, and PID, as well as other required information from the USB
storage device.
When BIOS has finished reading the settings from the USB device, the BIOS will
display the prompt below.
The SCS also stores the PPS, PID, new administrator password, and other
Intel® AMT Provisioning complete
configuration data in your USB storage device.
Please power down the system for settings to take effect
Remove the PC from its box and connect the PC to a power source using
Or press any key to continue with system boot…
the power cable.
5.
Plug the USB storage device into the PC.
6.
Power up the PC and press ‗Y‘ when the prompt shown is displayed.
Intel® Management Engine BIOS Extension v2.1.4.0000
Copyright© 2003-06 Intel Corporation. All Rights Reserved.
Found USB Key for provisioning Intel ® AMT
Continue with Auto Provisioning (Y/N)
24
Management Engine, setting power policies for management-engine sleep states,
1.
Power down the PC and remove the power cable from the device.
2.
Remove the USB storage device.
The PC is now ready to be sent to the user and go through the self-initiated
automated Intel® AMT 2.1 configuration, as described later in this guide.
Quick Reference Guide Getting to Pro: An Enterprise Approach to Deploying Intel® AMT
OEM
PCs whose Intel® AMT 2.1 capabilities are already set up, the systems can be
In environments in which security is a high-priority concern, Intel recommends
source and plugs the system into the network, Intel® AMT 2.1 will initiate and
that initial security credentials for Intel® AMT 2.1 be established in-house.
However, your OEM may choose to set up the default administrator password,
PPS, and PID for you, as part of their service. The procedure described here
assumes that BIOS and MEBx parameters are set to the typical default values
described in the table above.
The hardware vendor will typically use a factory firmware image tool or an ICT
(in-circuit test) tool to generate and configure PID and PPS values into a flash
device. The tool keeps a database of values (UUID, MACs, PID, and PPS) that are
burned into the flash device.
Factory-automated setup, which loads the initial security credentials into Intel®
AMT 2.1 for networking and TLS, follows several general steps:
The OEM enables the Intel® Management Engine throughout BIOS, sets the power
policies for the management engine, and enables Intel® AMT 2.1 in MEBx.
1.
A factory firmware image tool (or ICT tool) generates and configures PID
and PPS values into the Intel® AMT 2.1 nonvolatile memory.
2.
The OEM loads the PC‘s universal unique identifier (UUID) and MAC(s) into
the Intel® AMT 2.1 nonvolatile memory. The OEM may also choose to
customize other setup parameters during this procedure.
3.
At the end of a production run (or at appropriate intervals), the tool
uploads its database of values onto a CD/DVD-ROM.
4.
The factory ships the CD/DVD-ROM to the enterprise IT department.
5.
The IT department loads the database from the CD/DVDROM into the the
Intel® Setup and Configuration Service (SCS) being used to configure Intel®
AMT 2.1. This provides the ability to eliminate the single touch provisioning
described in the Manual and USB key provisioning models. This touch was
moved into the OEM factory (in this case) and the keys are generated by
the OEM instead of the Intel® AMT enterprise management team.
Because the system has now been set up with the appropriate keys and
certificates, the system is ready to go through its automatic configuration. For
25
delivered directly to the user desk. Once the user connects the PC to a power
complete its own configuration process.
Quick Reference Guide Maximizing the Benefits of Intel® Active Management Technology: A Solution Guide
Intel-Management-Engine-Version (received in the ―Hello‖ message from
Setup and Configuration
Verifying Existing Network Infrastructure
Active Directory
Intel-Management-Engine-Platform-UUID (received in the ―Hello‖ message)
While Active Directory is not a mandate for Intel® AMT 2.1 technology to function,
Intel-Management-Engine-Host-Computer-BL (added to the computer
the Intel® AMT device)
object created when the host joins the domain)
object class as a back link to an Intel® AMT object)
it is highly recommended for ease of administration and security. Active Directory
will be necessary for configuring Certificate Authority to secure the environment
and by extending the Active Directory schema, the SCS console can group
machines and provide security rights to Active Directory groups for ease of
administration. For planning and deploying Active Directory and extending the
schema, refer to Appendix A.
Active Directory Schema Extensions
Active Directory schema extensions are needed to allow for Intel® AMT devices to
be members of the directory. This enables KERBEROS authentication with Intel®
AMT devices manage with user account authenticated in the Active Directory
forest. The size of the Intel® Management Engine object in the Active Directory
database (NTDS.DIT) is approximately 20k or about 20MB per 1,000 Intel® AMT
system objects. This schema extension was jointly designed by Microsoft and
Intel®.
When the SCS performs setup for an Intel® AMT device, the SCS service:
Creates an Intel® AMT Object with the first three attributes listed below
Creates a link between the attribute ―Intel-Management-Engine-HostComputer‖ in the Intel® AMT Object and the Intel® AMT Host object
Creates a link between the attribute ―Intel-Management-Engine-HostComputer-BL‖ found on the Intel® AMT Host and the Intel® AMT Object.
Active Directory will display the Intel® AMT Object as the representation of
the Intel® AMT device itself and show it as having the type IntelManagement-Engine.
26
Intel-Management-Engine-Host-Computer (a link to the platform computer
―Intel-Management-Engine-Host-computer-BL‖ (added to the top computer
object class)
The following is a sample script (Buildschema.vbs) that adds the object class and
attributes to Active Directory:
''''''''''''''''''''''''''''''''''''''
' BuiildSchema.VBS
' Builds the Schema
''''''''''''''''''''''''''''''''''''''
On Error Resume Next
''''''''''''''''''''''''''''''''''''''
' Bind to the rootDSE
''''''''''''''''''''''''''''''''''''''
sPrefix = "LDAP://"
Set root= GetObject(sPrefix & "rootDSE")
If (Err.Number <> 0) Then
BailOnFailure Err.Number, "on GetObject method"
End If
''''''''''''''''''''''''''''''''''''''
' Get the DN for the Schema
''''''''''''''''''''''''''''''''''''''
sSchema = root.Get("schemaNamingContext")
If (Err.Number <> 0) Then
BailOnFailure Err.Number, "on Get method"
End If
''''''''''''''''''''''''''''''''''''''
' Bind to the Schema container
''''''''''''''''''''''''''''''''''''''
Set Schema= GetObject(sPrefix & sSchema )
If (Err.Number <> 0) Then
BailOnFailure Err.Number, "on GetObject method to bind to
Schema"
End If
''''''''''''''''''''''''''''''''''''''''''''''''''''''''''''''''
'''''''
Quick Reference Guide Getting to Pro: An Enterprise Approach to Deploying Intel® AMT
' Read the fsmoRoleOwner attribute to see which server is the
schema master.
''''''''''''''''''''''''''''''''''''''''''''''''''''''''''''''''
'''''''
sMaster = Schema.Get("fsmoRoleOwner")
If (Err.Number <> 0) Then
BailOnFailure Err.Number, "on IADs::Get method for
fsmoRoleOwner"
End If
'''''''''''''''''''''''''''''''''''''''''''''''''''''
' fsmoRoleOwner attribute returns the nTDSDSA object.
' The parent is the server object.
' Bind to NTDSDSA object and get parent
'''''''''''''''''''''''''''''''''''''''''''''''''''''
Set NTDS = GetObject(sPrefix & sMaster)
If (Err.Number <> 0) Then
BailOnFailure Err.Number, "on GetObject method for NTDS"
End If
sServer = NTDS.Parent
If (Err.Number <> 0) Then
BailOnFailure Err.Number, "on IADs::get_Parent method"
End If
'''''''''''''''''''''''''''''''''''''''''''''''
' Bind to server object
' and get the reference to the computer object.
'''''''''''''''''''''''''''''''''''''''''''''''
Set Server = GetObject(sServer)
If (Err.Number <> 0) Then
BailOnFailure Err.Number, "on GetObject method for " &
sServer
End If
sComputer = Server.Get("serverReference")
WScript.echo strText
''''''''''''''''''''''''''''''''''''''
' Get Optinal Command line
''''''''''''''''''''''''''''''''''''''
sFile = "IntelAMT.LDF"
If Wscript.Arguments.Count > 0 Then
sFile = Wscript.Arguments.Item(0)
End If
sFromDN = "CN=Schema,CN=Configuration,DC=x"
sToDN = sSchema
' Add flag replace fromDN with ToDN.
sCommand = "ldifde -i -k -c " & sFromDN & " " & sToDN
' Add flag schema master.
sCommand = sCommand & " -s " & sComputerDNSName
'Add flag filename.
sCommand = sCommand & " -f " & sFile
' Add flag for logging.
sCommand = sCommand & " -j ."
WScript.echo "Executing '" & sCommand & "'"
Set WshShell = Wscript.CreateObject("Wscript.Shell")
ReturnCode = -1
ReturnCode = WshShell.Run(sCommand, 1, true)
If (ReturnCode <> 0) Then
BailOnFailure ReturnCode, "on ldifde"
End If
WScript.echo vbCrLf & "Script executed successfully. See
'ldif.log' for more information"
WScript.Quit 0
'''''''''''''''''''''''''''''''''''''''''
' Ask for confirmation.
'''''''''''''''''''''''''''''''''''''''''
strText = "This script extends the Active Directory Schema to
support the Intel Management Engine class and attributes." &
vbCrLf
strText = strText & "Are you sure you want to continue?" &
vbCrLf
strText = strText & "Warning: selecting Yes will apply
irreversible changes to the Schema."
intAnswer = Msgbox(strText, vbYesNo, "Make AD Schema Changes")
If intAnswer = vbNo Then
WScript.Quit 0
End If
'''''''''''''''''''''''''''''''''''''''''
' Display the DN for the computer object.
'''''''''''''''''''''''''''''''''''''''''
sComputerDNSName = Server.Get("DNSHostName")
' strText = "Schema Master has the following DN: "& sComputer
strText = "Schema Master has the following DNS Name: "&
sComputerDNSName
27
'''''''''''''''''''''''''''''''''''''''
' Display subroutines
'''''''''''''''''''''''''''''''''''''''
Sub BailOnFailure(ErrNum, ErrText)
strText = "Error 0x" &
Hex(ErrNum) & " " & ErrText
WScript.echo vbCrLf & strText, vbInformation, "ADSI Error"
WScript.Quit ErrNum
End Sub
Quick Reference Guide Maximizing the Benefits of Intel® Active Management Technology: A Solution Guide
The LDF file (IntelAMT.ldf) that supply the input parameters to the above script is
also shown below:
dn: CN=Intel-Management-EngineVersion,CN=Schema,CN=Configuration,DC=x
changetype: add
adminDisplayName: Intel-Management-Engine-Version
attributeID: 1.2.840.113741.1.8.1.2
attributeSyntax: 2.5.5.12
cn: Intel-Management-Engine-Version
description: Intel Management Engine Version
adminDescription: Intel Management Engine Version
isMemberOfPartialAttributeSet: FALSE
isSingleValued: TRUE
lDAPDisplayName: intelManagementEngineVersion
distinguishedName: CN=Intel-Management-EngineVersion,CN=Schema,CN=Configuration,DC=x
objectCategory: CN=AttributeSchema,CN=Schema,CN=Configuration,DC=x
objectClass: attributeSchema
oMSyntax: 64
rangeLower: 0
rangeUpper: 257
name: Intel-Management-Engine-Version
schemaIDGUID:: vAtloG5TV02BGOlMbaH6ww==
searchFlags: 0
dn: CN=Intel-Management-Engine-HostComputer,CN=Schema,CN=Configuration,DC=x
changetype: add
adminDisplayName: Intel-Management-Engine-Host-Computer
attributeID: 1.2.840.113741.1.8.1.3
attributeSyntax: 2.5.5.1
cn: Intel-Management-Engine-Host-Computer
description: Provides a mapping between Intel-Management-Engine
and one or more Operating Systems (computer objects) running on
the same host
adminDescription: Provides a mapping between Intel-ManagementEngine and one or more Operating Systems (computer objects)
running on the same host
isMemberOfPartialAttributeSet: FALSE
isSingleValued: TRUE
lDAPDisplayName: intelManagementEngineHostComputer
linkID: 14910
distinguishedName: CN=Intel-Management-Engine-HostComputer,CN=Schema,CN=Configuration,DC=x
objectCategory: CN=AttributeSchema,CN=Schema,CN=Configuration,DC=x
objectClass: attributeSchema
oMObjectClass:: KwwCh3McAIVK
oMSyntax: 127
rangeLower: 0
rangeUpper: 257
name: Intel-Management-Engine-Host-Computer
28
schemaIDGUID:: 0lzr2qNpe029m2qlZrAZoA==
searchFlags: 0
dn: CN=Intel-Management-Engine-PlatformUUID,CN=Schema,CN=Configuration,DC=x
changetype: add
adminDisplayName: Intel-Management-Engine-Platform-UUID
attributeID: 1.2.840.113741.1.8.1.5
attributeSyntax: 2.5.5.10
cn: Intel-Management-Engine-Platform-UUID
description: Intel-Management-Engine-Platform-UUID is the
platform GUID
adminDescription: Intel-Management-Engine-Platform-UUID is the
platform GUID
isMemberOfPartialAttributeSet: FALSE
isSingleValued: TRUE
lDAPDisplayName: intelManagementEnginePlatformUUID
distinguishedName: CN=Intel-Management-Engine-PlatformUUID,CN=Schema,CN=Configuration,DC=x
objectCategory: CN=AttributeSchema,CN=Schema,CN=Configuration,DC=x
objectClass: attributeSchema
oMSyntax: 4
rangeLower: 0
rangeUpper: 257
name: Intel-Management-Engine-Platform-UUID
schemaIDGUID:: 0MbxeNb08E+fqFK5Oz9eOw==
searchFlags: 0
dn: CN=Intel-Management-Engine-Host-ComputerBL,CN=Schema,CN=Configuration,DC=x
changetype: add
adminDisplayName: Intel-Management-Engine-Host-Computer-BL
attributeID: 1.2.840.113741.1.8.1.4
attributeSyntax: 2.5.5.1
cn: Intel-Management-Engine-Host-Computer-BL
description: Backward link from host OS (computer object) to
Intel-Management-Engine
adminDescription: Backward link from host OS (computer object)
to Intel-Management-Engine
isMemberOfPartialAttributeSet: FALSE
isSingleValued: TRUE
lDAPDisplayName: intelManagementEngineHostComputerBL
linkID: 14911
distinguishedName: CN=Intel-Management-Engine-Host-ComputerBL,CN=Schema,CN=Configuration,DC=x
objectCategory: CN=AttributeSchema,CN=Schema,CN=Configuration,DC=x
objectClass: attributeSchema
oMObjectClass:: KwwCh3McAIVK
oMSyntax: 127
rangeLower: 0
rangeUpper: 257
name: Intel-Management-Engine-Host-Computer-BL
schemaIDGUID:: fRefPrsG/UawnlPI/3LArg==
Quick Reference Guide Getting to Pro: An Enterprise Approach to Deploying Intel® AMT
searchFlags: 0
Another sample script (ChechSchemaExist.vbs) that verifies the schema
DN:
changetype: modify
add: schemaUpdateNow
schemaUpdateNow: 1
-
extension is shown below:
dn: CN=Intel-Management-Engine,CN=Schema,CN=Configuration,DC=x
changetype: add
adminDisplayName: Intel-Management-Engine
defaultHidingValue: FALSE
defaultObjectCategory:
CN=Computer,CN=Schema,CN=Configuration,DC=x
defaultSecurityDescriptor:
D:(A;;RPWPCRCCDCLCLOLORCWOWDSDDTDTSW;;;DA)(A;;RPWPCRCCDCLCLORCWO
WDSDDTSW;;;SY)(A;;RPLCLORC;;;AU)
description: Intel Management Engine
admindescription: Intel Management Engine
objectCategory: CN=Class-Schema,CN=Schema,CN=Configuration,DC=x
objectClass: classSchema
lDAPDisplayName: intelManagementEngine
governsID: 1.2.840.113741.1.8.1.1
mayContain: intelManagementEngineVersion
mayContain: intelManagementEnginePlatformUUID
mayContain: intelManagementEngineHostComputer
instanceType: 4
objectClassCategory: 1
schemaIDGUID:: mmsxdsXb0hGL0AAA+HW2YA==
subClassOf: Computer
On Error Resume Next
DN:
changetype: modify
add: schemaUpdateNow
schemaUpdateNow: 1
dn: CN=Top,CN=Schema,CN=Configuration,DC=x
changetype: modify
add: mayContain
mayContain: intelManagementEngineHostComputerBL
-
''''''''''''''''''''''''''''''''''''''
' CheckSchemaExists.VBS
' Check if the Schema exists
''''''''''''''''''''''''''''''''''''''
''''''''''''''''''''''''''''''''''''''
' Bind to the rootDSE
''''''''''''''''''''''''''''''''''''''
sPrefix = "LDAP://"
Set root= GetObject(sPrefix & "rootDSE")
If (Err.Number <> 0) Then
BailOnFailure Err.Number, "on GetObject method"
End If
''''''''''''''''''''''''''''''''''''''
' Get the DN for the Schema
''''''''''''''''''''''''''''''''''''''
sSchema = root.Get("schemaNamingContext")
If (Err.Number <> 0) Then
BailOnFailure Err.Number, "on Get method"
End If
''''''''''''''''''''''''''''''''''''''
' Check that the Intel-Management-Engine Class exists
''''''''''''''''''''''''''''''''''''''
Set Schema= GetObject("LDAP://CN=Intel-Management-EngineVersion," & sSchema)
If (Err.Number <> 0) Then
WScript.echo "Schema Does not Exists for " & sSchema
BailOnFailure Err.Number, "on Get method"
End If
WScript.echo "Schema Exists for " & sSchema
WScript.Quit 0
'''''''''''''''''''''''''''''''''''''''
' Display subroutines
'''''''''''''''''''''''''''''''''''''''
Sub BailOnFailure(ErrNum, ErrText)
strText = "Error 0x" &
Hex(ErrNum) & " " & ErrText
WScript.echo vbCrLf & strText, vbInformation, "ADSI Error"
WScript.Quit ErrNum
End Sub
Included as a support file to this document is Microsoft‘s endorsement for these
schema extensions (MicrosoftSupportStatement.pdf).
29
Quick Reference Guide Maximizing the Benefits of Intel® Active Management Technology: A Solution Guide
Active Directory Root Domain Requirements
There are no root domain requirements needed for the Intel Setup & Configuration Service. However, there is one potential scenario that would require objects to be
placed in the Active Directory root domain. This requirement depends on the need to manage Intel® AMT objects that may reside in the root domain. In this event, then the
appropriate OU and Intel computer objects and management accounts used to manage Intel® AMT devices are required in the root domain. This is not perceived as need
but could be required as Intel® AMT managed devices may proliferate into the root domain as well.
Active Directory Domain Requirements
There are certain groups, accounts, Intel computer objects (based on schema extension), group rights, and an OU that needs to be created in each of the AD domains where
Intel® AMT managed devices exist. The following table lists the objects created in the domain and included is the script used to modify rights on the appropriate groups as
described below.
Object Name
Name
Configurable
IntelAMTOU
X
Enterprise IntelME Setup
and Configuration Servers
X
IntelAMT SCServers
Object Type
OU
(all domains with
managed AMT devices)
Universal
(*recommended) / Global Group
Domain Local Group
X
Intel(R) AMT Collections
Managers
Intel(R) AMT Redirection
Managers
Intel(R) AMT System
Defense Managers
SCSServiceAccount
SMSAMTUser_NNN
(NNN is the SMS site code)
Account used to install the
Intel® Setup &
Configuration Service
X
Universal (*recommended) /
Global Group
Universal (*recommended) /
Global Group
Universal (*recommended) /
Global Group
Domain Account (password
does not expire)
Domain Account
(password does not
expire)
Domain Account / or
Local Admin Account
Members
SMS Server(s)
SCS Server(s)
SQL
Local Administrators
Logon as a Service
R / W on IntelAMT
database
Local
Administrators
Local Administrators
Sysadmin
Or use SA account
during installation
SCSServiceAccount
Enterprise IntelME Setup
and Configuration
Servers
SMSAMTUser_NNN
SMS Admins
SMSAMTUser_NNN
SMS Admins
SMSAMTUser_NNN
SMS Admins
Local
Administrators
Logon as a Service
NOTE: The Intel® AMT Collections, Redirection & System Defense Managers global groups must include the registered trade mark symbol (R) in the names. It must look as
shown above.
30
Quick Reference Guide Getting to Pro: An Enterprise Approach to Deploying Intel® AMT
Description of Objects:
A sample Visual Basic script, ADScript.vbs, is provided and shown below. You can
use this script to prepare Active Directory for the installation. Before you use the
IntelAMTOU (name is configurable)
This OU may have any name. This is an OU created per domain to hold the Intel®
AMT computer accounts and associated groups and accounts listed below. It is
understood that certain policies may require that groups, user accounts, and
computer objects reside in different OUs. This OU is used to help manage these
objects as these objects may exist in any OU as predicated by Active Directory
implementation and policy. It is recommended to keep the Intel® AMT computer
objects and associated management groups and accounts in a separate OU. At a
minimum this OU should exist to contain the Intel® AMT computer accounts.
Enterprise IntelME Setup and Configuration Servers (name is configurable)
This group will contain the Intel® AMT Setup & Configuration Server (SCS) service
account(s). This will typically be only one account but may be more if it is deemed
necessary to create a single services account for each SCS. This group is
recommended to be a Universal security group as its membership may include
accounts in different domains. This group is also a member of each domain local
security group, ―IntelAMT SCServers‖, to provide its members the rights needed in
each domain.
IntelAMT SCServers (name is configurable)
This is a domain local security group created in each Active Directory domain
which contains managed Intel® AMT devices. This group is given rights to create
Intel® AMT computer objects (intelManagementEngine) in the associated OU
within its domain. This account requires Full Control rights to the OU where the
intelManagementEngine objects are place in order to set the Service Principal
Name‘s (SPN‘s) on the object.
Intel(R) AMT Groups
If you have an Active Directory forest, make sure the Active Directory groups
have Universal scope (and not Global scope) so that users and groups from other
domains in the forest can be added to the group.
31
script, you need to edit it according to the comments inside the script, to add
system-specific information (domain name, SMS site code, password). After you
have edited the script, you then run it from the first SMS server in your SMS
hierarchy.
'
' this section creates the 3 AD groups used for the add-on
permissions
'
Const ADS_PROPERTY_APPEND = 3
Set objRootDSE = GetObject("LDAP://rootDSE")
Set objContainer = GetObject("LDAP://cn=Users," & _
objRootDSE.Get("defaultNamingContext"))
Set objGroup = objContainer.Create("Group", "cn=Intel(R)
AMT Collections Managers")
objGroup.Put "sAMAccountName","Intel(R) AMT Collections
Managers"
objGroup.SetInfo
WScript.Echo "Group Intel(R) AMT Collections Managers
created."
Set objGroup = objContainer.Create("Group", "cn=Intel(R)
AMT Redirection Managers")
objGroup.Put "sAMAccountName","Intel(R) AMT Redirection
Managers"
objGroup.SetInfo
WScript.Echo "Group Intel(R) AMT Redirection Managers
created."
Set objGroup = objContainer.Create("Group", "cn=Intel(R)
AMT System Defense Managers")
objGroup.Put "sAMAccountName","Intel(R) AMT System Defense
Managers"
objGroup.SetInfo
WScript.Echo "Group Intel(R) AMT System Defense Managers
created."
'
' this section creates the dedicated user account used for
the add-on service
' and adds it to the local Administrators group
' change 'domain.name' to your domain name
' change 'NNN' in the rest of this script to your site code
' change 'yyy' to the password for the SMSAMTUser_VPW
account
'
Set user = objContainer.Create("User", "cn=SMSAMTUser_NNN")
user.Put "sAMAccountName","SMSAMTUser_NNN"
user.Put "userPrincipalName","[email protected]"
Quick Reference Guide Maximizing the Benefits of Intel® Active Management Technology: A Solution Guide
user.SetInfo
User.SetPassword "yyy"
user.AccountDisabled = False
user.SetInfo
WScript.Echo "User SMSAMTUser_NNN created."
(operations on single systems or collections)
c.
Intel(R) AMT System Defense Managers
Users who need to perform these operations...
Set objGroup = GetObject("WinNT://./Administrators,group")
Set objUser = GetObject("WinNT://SMSAMTUser_NNN")
objGroup.Add(objUser.ADsPath)
WScript.Echo "SMSAMTUser_NNN added to local Administrators
group"
I.
System Defense
II.
Unprovision
III.
Reprovision
(operations on single systems or collections)
In addition, the IT administrator should create a new AD user account called
SMSAMTUser_NNN (mentioned below) if not added to the script above for
creation. This is the user under which the add-on service will run. (NNN is the SMS
site‘s 3-letter site-code. This account should be a domain user and a member of
the Administrators group on the local machine. The account must have the Log on
as a service user right on the local machine. (This right is added automatically
during installation.)
After installing the Add-on, the IT administrator should ensure that the following
types of users are added to the relevant groups (these are the groups that must
SCSServiceAccount (name is configurable)
This account is used as the account that runs the Intel® AMT Setup &
Configuration Server (SCS) service (service is named AMTConfig). It is required to
be in the local administrators group of the server on which it runs as well as
having the ―Run As A Service‖ right on the same server.
a.
Certificate Authority on behalf of the Intel® AMT devices managed by SCS.
be created and named exactly as they appear):
a.
Intel(R) AMT Collections Managers
b.
System Defense
ii.
Unprovision
iii.
Power Control
iv.
Event Registration
v.
IDER
(Operations on collections)
b.
Intel(R) AMT Redirection Managers
Users who need to perform these operations...
32
I.
SOL Redirection
II.
IDER
It is responsible for creating Active Directory Intel® AMT computer objects
in the domain and OU configured to manage these computers. It receives
Users who need to perform these operations...
i.
It is responsible for obtaining and renewing certificates from the Microsoft
these rights by being a member of the ―Enterprise IntelME Setup and
Configuration Servers‖ universal group which is then a member of the local
domain security group (with associated rights to create the AD computer
objects) ―IntelAMT SCServers‖ listed below. The universal group,
―Enterprise IntelME Setup and Configuration Servers‖, will be a member of
each domain local group, ―IntelAMT SCServers‖, for domains which contain
Intel® AMT managed devices.
c.
It must have an Active Directory integrated login account in the Microsoft
SQL Server given rights to the SCS database for reading and writing.
Quick Reference Guide Getting to Pro: An Enterprise Approach to Deploying Intel® AMT
d.
As of this writing, this account must be located in the same domain as the
Account used to install the Intel® Setup & Configuration Service (SCS)
Microsoft Certificate Authority (when the certificate authority is configured
This domain account requires sysadmin privileges to create/drop a database and
in standalone mode) and you wish to automatically configure items in the
Intel® Setup & Configuration Server (SCS). If this is not configured in this
manner, the user is still able to configure SCS manually by typing in the
appropriate certificate authority information.
create security accounts for its database in the SQL server provided to host the
Setup & Configuration Service database. Another option for SQL server
installation purposes is to provide the SA account during the installation,
eliminating the need for sysadmin privileges for this domain account. It is used to
install the Setup & Configuration Service on the appropriate server. For the
SMSAMTUser_NNN (NNN is the SMS site code)
purposes of installation of the SCS this account can also be a local administrator
The Intel® SMS Add-on service runs under a dedicated user account. The name of
account on the system on which the SCS is installed but will still an appropriate
the user account is SMSAMTUser_NNN (where NNN is the 3-letter site code of
account for the SQL server as described above.
the SMS site) and is displayed by the wizard during installation. The setup
application prompts the user for this account‘s password during the installation
DNS
procedure. Once the Add-on has been installed, the add-on service updates the
Microsoft® Windows® Server 2003 Domain Name System (DNS) provides efficient
password every 28 days and whenever the service restarts, requiring no
intervention by the IT administrator. If the IT administrator ever changes the
password for this account, they should enter the new password into the add-on,
using the Security tab of the Add-on Settings dialog box. This allows the add-on
to continue to change the password automatically.
If the Intel® AMT systems are configured to use KERBEROS authentication, the IT
name resolution and interoperability with standards-based technologies.
Deploying DNS in your client/server infrastructure enables resources on a TCP/IP
network to locate other resources on the network by using host name-to-IP
address resolution and IP address-to-host name resolution. The Active Directory®
service requires DNS for locating network resources. For installing and
configuring DNS refer to Appendix A.
administrator needs to ensure that this user account is added to the relevant
Active Directory groups that allow Intel® AMT access.
DHCP
If the add-on is configured to work in the Integrated Setup and Configuration
Dynamic Host Configuration Protocol (DHCP) in the Microsoft® Windows® Server
Service mode, this user account must be added as an administrator to the list of
2003 family of operating systems enables centralized automatic management of
users in the Intel SCS.
IP addresses and other TCP/IP settings for network clients. You can reduce
The user account must have access to the protected network path selected for
the IDER image repository and the local protected path for TLS certificates.
administrative overhead in your organization by designing and implementing a
reliable and scalable DHCP solution. For installing and configuring DHCP refer to
Appendix A. Configuring a DHCP server other than Microsoft‘s requires that
If the SQL server supporting the SMS site server is installed on a machine other
option 81 is set enabling DNS registration of the AMT DHCP clients by the DHCP
than the SMS server machine, the SMSAMTUser_NNN user account must be
server.
added to the Administrators group on the SQL server machine.
Caution: The account under which the service runs must never be changed. This
prevents a scenario in which it is changed to a critical account (e.g.,
Administrator), permanently locking out the account owner when the password is
changed automatically by the service.
33
Quick Reference Guide Maximizing the Benefits of Intel® Active Management Technology: A Solution Guide
CA
For deploying and configuring SMS refer to Appendix A.
Certificate Services provides customizable services for issuing and managing
certificates that are used in software security systems that employ public key
Internet Information Services (IIS)
technology. A public key certificate, usually just called a certificate, is a digitally-
Internet Information Services (IIS) must be installed and enabled as part of the
signed statement that binds the value of a public key to the identity of the
person, device, or service that holds the corresponding private key. Most
certificates in common use are based on the X.509v3 certificate standard.
Windows Server installation for certain SMS site system roles.
requires IIS to be installed and enabled on the site system and the
Certificates can be issued for a variety of functions such as Web user
distribution point. IIS is not required if the distribution point will not be
authentication, Web server authentication, secure e-mail (using
BITS-enabled. Enable WebDAV extensions for IIS on Windows Server 2003.
Secure/Multipurpose Internet Mail Extensions, also called S/MIME), Internet
Protocol security (IPSec), Transport Layer Security (TLS), and code signing.
Distribution Points using BITS (Background Intelligent Transfer Service)
Management Points requires the site system to have IIS installed and
Certificates are also issued from one certification authority (CA) to another in
enabled and requires BITS server extensions installed. The Distributed
order to establish a certification hierarchy. For installing and configuring DNS
Transaction Coordinator (DTC) service and the Task Scheduler are required
refer to Appendix A.
and must be enabled. SQL Server named pipes must be enabled also.
Microsoft SMS
SMS 2003 is designed to make it easier for an organization to manage, support,
and maintain a distributed network of computer resources. SMS 2003 addresses
the following key issues that IT administrators face in managing distributed
computing environments:
Manage computers that roam from one location to another and connect to
the network from different geographical locations
Provides Asset Intelligence reports to enable comparison of Microsoft
applications installed with licenses purchased as well as how those titles
were obtained in order to better optimize software use across the
organization.
Active Server Pages must be installed and enabled also.
Server Locator Point requires the site system to have IIS installed and
enabled
SQL Server 2005
SQL Server is a pre-requisite to installing Systems Management Server 2003. For
installing and configuring SQL Server 2005 refer to Appendix A.
Once SQL Server is installed the interim provisioning database and associated
table should be created utilizing the following script. This script must be modified
before execution and is fully documented. This is the database used for mapping
the client operating system fully qualified domain name, Active Directory (AD)
domain name, and profile ID to the Intel® AMT universally unique identifier (UUID).
SMS
The SQL code in the attached file may be executed in the SQL Server query
Provide scalable hardware and software management to the growing
analyzer and performed by the database administrator.
Manage security on computers running Windows operating systems while
expending a minimum level of administrative overhead
34
Reporting Point requires the site system to have IIS installed and enabled.
Provide IT administrators and management access to data accumulated by
population of computers running Windows operating systems
Quick Reference Guide Getting to Pro: An Enterprise Approach to Deploying Intel® AMT
-----------
This is a sample script that is intended to demonstrate
how to create an auxiliary database in SQL Server 2005.
This database is purposed to hold the information about
Intel® AMT systems for future configuration.
User should perform the following changes to adapt this
script to its own environment:
Line 21: Change location of NewAMTProperties.mdf file
Line 23: Change location of NewAMTProperties_log.ldf file
USE [master]
GO
-- Create Database [NewAMTProperties]
CREATE DATABASE [NewAMTProperties] ON PRIMARY
( NAME = N'NewAMTProperties', FILENAME = N'c:\Program
Files\Microsoft SQL
Server\MSSQL.1\MSSQL\DATA\NewAMTProperties.mdf' , SIZE = 3072KB
, MAXSIZE = UNLIMITED, FILEGROWTH = 1024KB )
LOG ON
( NAME = N'NewAMTProperties_log', FILENAME = N'c:\Program
Files\Microsoft SQL
Server\MSSQL.1\MSSQL\DATA\NewAMTProperties_log.ldf' , SIZE =
1024KB , MAXSIZE = 2048GB , FILEGROWTH = 10%)
COLLATE SQL_Latin1_General_CP1_CI_AS
GO
EXEC dbo.sp_dbcmptlevel @dbname=N'NewAMTProperties',
@new_cmptlevel=90
GO
IF (1 = FULLTEXTSERVICEPROPERTY('IsFullTextInstalled'))
begin
EXEC [NewAMTProperties].[dbo].[sp_fulltext_database] @action =
'enable'
end
GO
ALTER DATABASE [NewAMTProperties] SET ANSI_NULL_DEFAULT OFF
GO
ALTER DATABASE [NewAMTProperties] SET ANSI_NULLS OFF
GO
ALTER DATABASE [NewAMTProperties] SET ANSI_PADDING OFF
GO
ALTER DATABASE [NewAMTProperties] SET ANSI_WARNINGS OFF
GO
ALTER DATABASE [NewAMTProperties] SET ARITHABORT OFF
GO
ALTER DATABASE [NewAMTProperties] SET AUTO_CLOSE OFF
GO
ALTER DATABASE [NewAMTProperties] SET AUTO_CREATE_STATISTICS ON
GO
ALTER DATABASE [NewAMTProperties] SET AUTO_SHRINK OFF
GO
ALTER DATABASE [NewAMTProperties] SET AUTO_UPDATE_STATISTICS ON
GO
ALTER DATABASE [NewAMTProperties] SET CURSOR_CLOSE_ON_COMMIT OFF
GO
35
ALTER DATABASE [NewAMTProperties]
GO
ALTER DATABASE [NewAMTProperties]
OFF
GO
ALTER DATABASE [NewAMTProperties]
GO
ALTER DATABASE [NewAMTProperties]
GO
ALTER DATABASE [NewAMTProperties]
GO
ALTER DATABASE [NewAMTProperties]
GO
ALTER DATABASE [NewAMTProperties]
AUTO_UPDATE_STATISTICS_ASYNC OFF
GO
ALTER DATABASE [NewAMTProperties]
DATE_CORRELATION_OPTIMIZATION OFF
GO
ALTER DATABASE [NewAMTProperties]
GO
ALTER DATABASE [NewAMTProperties]
OFF
GO
ALTER DATABASE [NewAMTProperties]
GO
ALTER DATABASE [NewAMTProperties]
GO
ALTER DATABASE [NewAMTProperties]
GO
ALTER DATABASE [NewAMTProperties]
GO
ALTER DATABASE [NewAMTProperties]
GO
ALTER DATABASE [NewAMTProperties]
SET CURSOR_DEFAULT
GLOBAL
SET CONCAT_NULL_YIELDS_NULL
SET NUMERIC_ROUNDABORT OFF
SET QUOTED_IDENTIFIER OFF
SET RECURSIVE_TRIGGERS OFF
SET
ENABLE_BROKER
SET
SET
SET TRUSTWORTHY OFF
SET ALLOW_SNAPSHOT_ISOLATION
SET PARAMETERIZATION SIMPLE
SET
READ_WRITE
SET RECOVERY SIMPLE
SET
MULTI_USER
SET PAGE_VERIFY CHECKSUM
SET DB_CHAINING OFF
USE [NewAMTProperties]
GO
-- Create Table [dbo].[AmtProperties]
SET ANSI_NULLS ON
GO
SET QUOTED_IDENTIFIER ON
GO
CREATE TABLE [dbo].[AmtProperties](
[UUID] [nchar](32) COLLATE SQL_Latin1_General_CP1_CI_AS NOT
NULL,
[FQDN] [nvarchar](256) COLLATE SQL_Latin1_General_CP1_CI_AS
NOT NULL,
[OU] [nvarchar](256) COLLATE SQL_Latin1_General_CP1_CI_AS
NOT NULL,
[ProfileID] [int] NOT NULL,
CONSTRAINT [PK_AmtProperties] PRIMARY KEY CLUSTERED
(
[UUID] ASC
Quick Reference Guide Maximizing the Benefits of Intel® Active Management Technology: A Solution Guide
)WITH (IGNORE_DUP_KEY = OFF) ON [PRIMARY]
) ON [PRIMARY]
GO
The script above performs the following activities:
1.
The database is created – the appropriate information in the SQL code
must be changed to match the installation requirements of SQL Server
implementation.
2.
The associated table used for storing information is created
Detailed configuration instructions for implementation of this database are not
provided in this document as final implementation of this database is highly
configurable dependent upon full enterprise deployment considerations. The
scripts found in this document can be successfully deployed to provide the
needed Intel® AMT provisioning steps and give the framework the infrastructure
implementation team may use to customize per enterprise deployment.
The domain service account used by the SCS server must be allowed read & write
access to the Interim Provisioning database created by the SQL code in the
attached file in this section.
36
Quick Reference Guide Getting to Pro: An Enterprise Approach to Deploying Intel® AMT
Installing a Certificate Authority
Certificate Authority
A Certificate Authority is an entity in a network that issues and manages digital
certificates and public keys for data encryption and decryption. As part of a public
key infrastructure (PKI), a CA checks with a registration authority to verify
information provided by the requestor of a digital certificate. If the registration
authority verifies the requestor‘s information, the CA then issues a certificate.
Installing Stand-alone Root CA
To configure a secured communication between the Intel® AMT devices and the
SCS server using TLS or MTLS, a Microsoft Certificate Authority must be installed.
The CA can be configured as an Enterprise CA, or a Stand-alone CA. This
document describes the installation and configuration of a Stand-alone CA,
however if a CA is already installed and configured in your network, proceed to
the Exporting and Importing CA Certificate‖ section below.
1.
Using a Domain Admin account, logon to the server that will become the
Standalone Root CA
2.
Verify that Internet Information Services (IIS) is installed, and Active Server
Pages is configured on the CA server
3.
From the Control Panel, double-click Add/Remove Programs
4.
Click Add/Remove Windows Components
5.
In the Windows Components dialog box, click the checkbox to select
Certificate Services.
37
Quick Reference Guide Maximizing the Benefits of Intel® Active Management Technology: A Solution Guide
6.
A dialog box is displayed indicating that the machine name or domain
9.
Click Next. The CA type screen is displayed.
membership of the machine cannot be changed while it acts as a certificate
server.
7.
Click Yes, and then click Details.
10. Select Stand-alone root CA option on the CA Type screen and click Next
8.
Verify that both the Certificate Services CA and the Certificates Services
Web Enrollment Support checkboxes are selected and click OK.
38
Quick Reference Guide Getting to Pro: An Enterprise Approach to Deploying Intel® AMT
11. Complete the CA Identifying Information as follows:
You may accept the default location for the Certificate Database Settings or
a.
In the Common name for this CA field, type in the NETBIOS name of
the CA. The Distinguished name suffix field is auto filled for you. (This
is the domain suffix of the host).
b.
The default Validity Period of the CA‘s self-signed certificate is 5
years. Accept this value or modify according to your company policy.
modify as prescribed by your company policy. The configuration information will
be stored in Active Directory, so leave the ―Store configuration information in a
shared folder ― option unchecked. Click Next.
12. Click Yes on the dialog message informing you that IIS must be stopped
temporarily.
Click Next.
13. Click Finish, and then close the Add or Remove Programs window.
14. Configure the CA to issue certificates as follows:
1.
39
Click Start > Administrative Tools > Certification Authority
Quick Reference Guide Maximizing the Benefits of Intel® Active Management Technology: A Solution Guide
2.
From the right pane, right-click CA server name, click Properties and
click the Policy Module tab
3.
Click Properties and select Follow the settings in the certificate
template, if applicable. Otherwise, automatically issue the certificate.
40
Quick Reference Guide Getting to Pro: An Enterprise Approach to Deploying Intel® AMT
7.
Right-click on the CA server name again, select All Tasks > Start
Service. You should notice the CA icon turn green, indicating that the
service is started.
Installing a Stand-alone Subordinate CA
NOTE: To install an ―Enterprise Subordinate CA‖, proceed to Appendix B.
Install and configure a Stand-alone Subordinate CA as follows:
1.
Logon to the server that will become the stand-alone subordinate CA
2.
Verify that Internet Information Services (IIS) is installed, and Active Server
Pages is configured on the server
3.
From the Control Panel, double-click Add/Remove Programs
4.
Click Add/Remove Windows Components
5.
In the Windows Components dialog box, click the checkbox to select Certificate
Services.
4.
Click OK, and a dialog box is displayed indicating that the ―Certificate
services must be restarted for these changes to take effect‖, click OK
5.
Click OK.
6.
From the right pane, right-click on the CA server name, select All Tasks
> Stop Service. You should notice the server CA icon turning red, to
indicate that the service is stopped.
41
Quick Reference Guide Maximizing the Benefits of Intel® Active Management Technology: A Solution Guide
6.
A dialog box is displayed indicating that the machine name or domain
membership of the machine cannot be changed while it acts as a certificate
server.
7.
Click Yes, and then click Details.
10. Select Stand-alone subordinate CA option on the CA Type screen and click Next
11. Complete the CA Identifying Information screen, and click Next
8.
Verify that both the Certificate Services CA and the Certificates Services Web
Enrollment Support checkboxes are selected and click OK.
9.
Click Next. The CA type screen is displayed.
42
Quick Reference Guide Getting to Pro: An Enterprise Approach to Deploying Intel® AMT
12. Accept the default ―Certificate Database Settings‖ window settings, and click
13. Complete the CA Certificate Request as follows:
Next.
a.
In the Computer name field, type in the FQDN name of the
Stand-alone Root (Parent) CA.
You may accept the default location for the Certificate Database Settings
or modify as prescribed by your company policy. The configuration
information will be stored in Active Directory, so leave the ―Store
configuration information in a shared folder― option unchecked. Click Next.
b.
The Parent CA field is auto filled for you if you click the
Browse button.
c.
Click Next.
14. Click Yes on the dialog message informing you that IIS must be
stopped temporarily.
15. Click Finish, and then close the Add or Remove Programs window.
43
Quick Reference Guide Maximizing the Benefits of Intel® Active Management Technology: A Solution Guide
16. Click OK when presented with
17. Configure the CA to issue certificates as follows: Click Start >
Administrative Tools > Certification Authority
18. From the right pane, right-click CA server name
44
19. Click Properties and click the Policy Module tab
Quick Reference Guide Getting to Pro: An Enterprise Approach to Deploying Intel® AMT
20. Click Properties and select Follow the settings in the certificate
c.
template, if applicable. Otherwise, automatically issue the certificate.
From the right pane, right-click on the CA server name, select All Tasks
> Stop Service. You should notice the server CA icon turning red, to
indicate that the service is stopped.
d.
Right-click on the CA server name again, select All Tasks > Start
Service. You should notice the CA icon turn green, indicating that the
service is started.
a.
Click OK, and a dialog box is displayed indicating that the ―Certificate
services must be restarted for these changes to take effect‖, click OK
b.
45
Click OK.
Quick Reference Guide Maximizing the Benefits of Intel® Active Management Technology: A Solution Guide
Exporting and Importing CA Certificate
1.
administrative account.
The stand-alone CA‘s self-signed certificate is not automatically added to the
requester‘s Trusted Root Certification Authorities certificate store. Therefore,
the CA certificates must be manually stored locally on the SCS Console, SMS
servers running the SMS Add-On application, and the SCS servers. Before storage
however, the certificate must be saved as a file, and then installed as a trusted
root certificate. This involves exporting and importing the certificate on the CA
server. The table below represents a summary of certificates required for SCS
configuration.
Cert Type
Installed On
Location
Run As
Install Method
Trusted
Root
CA server
Trusted Root
Store
Admin
Certificate
Import Wizard
Trusted
Root
SCS server
Local
Computer
Admin
Certificate
Import Wizard
Trusted
Root
SMS Server
Local
Computer
Admin
Certificate
Import Wizard
IIS Server
Auth
SCS Server
Local
Computer
Admin
Internet
Explorer
Client Cert
SCS Server
SCSServiceAcc
ount
Internet
Explorer
Client Cert
SMS Server
SMSAMTUser_
NNN
Internet
Explorer
IIS Auth
SCS Console
Personal
Certificate
Store
Personal
Certificate
Store
Local
Computer
Console User
Internet
Explorer
.pem files
SMS Server
Local
Computer
Admin
Notepad,
OpenSSL and
Convert.bat
46
Log on to the Stand-alone Subordinate CA server with an
2.
Export the CA certificate, using the following procedure:
3.
Click Start > Administrative Tools > Certification Authority.
4.
From the right pane, right-click on the CA server name, and select
Properties.
Quick Reference Guide Getting to Pro: An Enterprise Approach to Deploying Intel® AMT
5.
47
From the General tab, select the certificate and click View Certificate.
6.
Click the Details tab and then, click Copy to file.
Quick Reference Guide Maximizing the Benefits of Intel® Active Management Technology: A Solution Guide
7.
Click Next at the Welcome screen
9.
In the File to Export window, type a name for the certificate, and click
Next.
8.
Click Next to accept the default format ―DER encoded binary X.509
(.CER)‖, and click Next.
10. Click Finish.
11. A message indicates that the export was successful.
NOTE: This is the Root certificate that will be installed on the SCS and SMS
servers later on in this document.
12. Click OK. The Details tab returns to focus.
13. Click OK > OK.
14. Install the CA certificate in the certificate store as a trusted root
certificate on the CA server.
15. Locate the certificate exported above.
48
Quick Reference Guide Getting to Pro: An Enterprise Approach to Deploying Intel® AMT
16. Right-click the certificate and select Install Certificate, and Click Next.
18. Select Trusted Root Certification Authorities and click OK.
19. Click Next > Finish. A message should display indicating you are about
to install certificates, click Yes
20. Click OK, a message should display indicating a successful import.
Configure IIS on the Subordinate CA.
1.
Click Start > Programs > Administrative Tools > Internet Information Server
(IIS) Manager.
2.
Expand <Computer Name>(local computer)
3.
Click Web Sites
4.
Right-click the Default Web Site and click Properties.
5.
Click the Directory Security tab
6.
Click Edit in Authentication and access control section.
7.
Verify that there is a checkmark next to the ―Enable Anonymous Access‖
and the ―Integrated Authentication‖ checkboxes.
17. Select Place all certificates in the following store and click Browse. The
Select Certificate Store window opens.
8.
Remove all other checkmarks.
9.
Click OK
10. Click the Select All button, and then click OK
11. Close IIS Manager
12. Install the CA certificate in the certificate store as a trusted root certificate
on the SCS server.
49
a.
Login to the SCS server.
b.
Open Internet Explorer*.
Quick Reference Guide Maximizing the Benefits of Intel® Active Management Technology: A Solution Guide
c.
Enter the address of the Subordinate CA server web interface. In the
j.
following example, ca_machine is the host name of the CA server:
Select Place all certificates in the following store and click Browse. The
Select Certificate Store window opens.
http://ca_machine/certsrv
k.
Place a checkmark next to the Show physical stores box, and expand
Trusted Root Certification Authorities
d.
Click Download a CA certificate, certificate chain or CRL.
l.
Click Local Computer, and click OK.
e.
Click Download CA certificate.
m.
Click Next > Finish. A message should display indicating a successful
f.
Click Save and type a name for the certificate (.cer) file. (Note where
you saved the file).
g.
Click Save and then click Close.
h.
Close Internet Explorer window.
i.
Locate the certificate, right-click and select Install Certificate, and Click
Next.
50
import.
n.
Click OK.
13. Install the CA certificate in the certificate store as a trusted root certificate
on the SMS server.
a.
Login to the SMS server.
b.
Open Internet Explorer
Quick Reference Guide Getting to Pro: An Enterprise Approach to Deploying Intel® AMT
c.
Enter the address of the Subordinate CA server web interface. In the
j.
following example, ca_machine is the host name of the CA server:
Select Place all certificates in the following store and click Browse. The
Select Certificate Store window opens.
http://ca_machine/certsrv
k.
Place a checkmark next to the Show physical stores box, and expand
Trusted Root Certification Authorities
d.
Click Download a CA certificate, certificate chain or CRL.
l.
Click Local Computer, and click OK.
e.
Click Download CA certificate.
m.
Click Next > Finish. A message should display indicating a successful
f.
Click Save and type a name for the certificate (.cer) file. (Note where
you saved the file).
import.
n.
Click OK.
g.
Click Save and then click Close.
h.
Close Internet Explorer window.
i.
Locate the certificate, right-click and select Install Certificate, and Click
on IIS, communications between client and server is secured through SSL
Next.
encryption. Section 4.2.2.1 shows the tasks needed to install and configure IIS if
Configure Secure (SSL) Connection to IIS
Connection to IIS requires a digital certificate. When SSL certificates are installed
you have not done so. Section 4.2.2.2 shows the tasks needed to request and
install an SSL certificate from a Standalone CA, while section 4.2.2.3 shows the
steps needed from an Enterprise CA.
51
Quick Reference Guide Maximizing the Benefits of Intel® Active Management Technology: A Solution Guide
Install and configure IIS on the SCS server
8.
Click Finish to continue.
9.
When completed, make sure all of the following components are installed.
1.
Login as a user with Administrative rights to the SCS server
2.
From the Manage Your Server wizard, click Add or Remove a Role. If you
To do that:
closed the Manage Your Server wizard, it will be available from the Start
a.
Open the Control Panel.
b.
Open Add Remove Programs
c.
Select Add Remove Windows Components.
d.
Highlight Application Server and click Details to see the sub
Menu.
3.
On the Configure your Server Wizard Preliminary Information and click Next
to begin.
4.
On the Server Role screen, click on Application Server (IIS, ASP.Net) to
components. If any one of the following components is not selected,
highlight it and click Next.
5.
then select the component and install it now:
On the Application Server Options screen, click Enable ASP.Net. Click Next
to continue.
NOTE: DO NOT check the box to install Front Page Server Extensions.
e.
Application Server Console
ASP.NET
Enable network COM+ access
Enable network DTC access
Internet Information Services (IIS)
Highlight Internet Information Services (IIS) and click Details to see the
sub components. If any one of the following components is not
selected, then select the component and install it now:
Background Intelligent Transfer Service (BITS) Server Extensions
Common files
Internet Information Services Manager
World Wide Web Service (details)
o
World Wide Web Service
o
Active Server Pages
o
WebDAV Publishing
6.
On the Summary of Selections Screen, click Next to continue.
10. Click OK > OK > OK > Next > Finish.
7.
The server will finish loading the IIS services and a screen will pop up
11. Click on Start, All Programs, Administrative Tools and open Internet
indicating the server is an application server.
52
Information Services (IIS) Manager
Quick Reference Guide Getting to Pro: An Enterprise Approach to Deploying Intel® AMT
12. Click the plus sign next to the server name then click on Web Service
Extensions
13. Verify that BITS Server Extensions and ASP.NET are set to ―Allowed‖
14. Right click on WebDAV and select Allow
Request and Install an SSL Certificate from a Standalone CA
Create the Certificate Request
1.
From the SCS server, open Internet Explorer
2.
Enter the address of the Subordinate CA Server web interface. In the following
example, ca_machine is the host name of the CA Server:
http://ca_machine/certsrv
3.
Type in Login credentials
4.
Click Request a certificate.
5.
Click Advanced Certificate Request.
6.
Click Create and submit a request to this CA.
7.
Complete the request form as follows:
a.
In the Name field, type the Fully Qualified Domain Name (FQDN) of the SCS
server. For example: vpro-vs9.vproprod.local
b.
In the Type of Certificate Needed field, click the drop down arrow and
select Server Authentication Certificate
c.
53
In the Key Options area, select the Mark keys as exportable checkbox
Quick Reference Guide Maximizing the Benefits of Intel® Active Management Technology: A Solution Guide
d.
Select the Request Format PKCS10
6.
Select My user account and click Finish
7.
Click Close > OK
8.
From the left pane, expand the Certificates-Current User branch.
9.
Expand the Personal branch.
10. Click Certificates.
11. In the right pane, right click on the certificate, and select Open.
12. Click the Details tab.
e.
Click Submit. A dialog indicating a new certificate request is displayed. Click
Yes.
f.
13. Click Copy to File. The Welcome screen of the Certificate Export Wizard is
displayed.
Click Install this Certificate. Click Yes when the confirmation message is
displayed.
g.
A successful certificate installation is displayed, close Internet Explorer.
Create Personal (pfx) certificate on the SCS Server
1.
From the SCS server, Click Start, and then click Run
2.
Enter MMC and click OK. The Microsoft Management Console* (MMC) is
displayed.
3.
From the File Menu, click Add/Remove snap-in
4.
Click Add.
5.
Select Certificates and click Add.
54
14. Click Next. The Export Private Key screen is displayed.
Quick Reference Guide Getting to Pro: An Enterprise Approach to Deploying Intel® AMT
NOTE: The password must contain an upper-case letter, a lower-case letter,
numbers, and one of the @#$%^&* symbols at a minimum.
15. Select Yes, export the private key and click Next. The Export File Format
screen is displayed.
18. Enter a name for the file (This is saved as a .pfx file) and click Next > Finish.
19. Click OK at the successful completion message.
20. Click OK.
21. Close MMC
Install the SSL Certificate in IIS from pfx
1.
Click Start > Programs > Administrative Tools > Internet Information Server
(IIS) Manager.
16. Select Enable strong protection and click Next.
17. Enter and confirm the password which protects the private key and click
Next.
55
2.
Expand <Computer Name>(local computer)
3.
Click Web Sites
4.
Right-click the Default Web Site and click Properties.
5.
Click the Directory Security tab
Quick Reference Guide Maximizing the Benefits of Intel® Active Management Technology: A Solution Guide
6.
From the Secure Communications box, click Server Certificate. The Web
Server Certificate wizard is displayed. Click Next.
7.
Select Import Certificate from .pfx file and click Next.
8.
Click Browse, and select the .pfx file created previously, and click Next
9.
Enter the password setup previously, and click Next
10. Accept the default SSL port 443 and click Next
56
Quick Reference Guide Getting to Pro: An Enterprise Approach to Deploying Intel® AMT
a.
Click Next
b.
Click Finish, and then click OK
c.
Restart Default Web Site
d.
Click OK to close Default Web Site Properties window.
e.
Close IIS Manager.
8.
Click Next
9.
Select Create a new certificate
Request and Install an SSL certificate from an Enterprise CA
Create Certificate Request (CSR)
1.
Login as a user with Administrative rights to the SCS server
2.
Click on Start > Programs > Administrative Tools > Internet Information
Server (IIS) Manager
3.
Expand <Computer Name>(local computer)
4.
Click Web Sites
5.
Right-click the Default Web Site and click Properties
6.
Click the Directory Security tab
10. Click Next
11. Select Prepare the request now, but send it later
12. Click Next
7.
57
Click Server Certificate…
Quick Reference Guide Maximizing the Benefits of Intel® Active Management Technology: A Solution Guide
13. Type the name for the new certificate OR accept the defaults, and click
Next
14. Complete the Organization and Organization Unit information and click
Next
58
15. In the Common name window, type the FQDN of the SCS server, and click
Next
16. Complete the Geographical information window and click Next
Quick Reference Guide Getting to Pro: An Enterprise Approach to Deploying Intel® AMT
Submit Certificate Request (CSR) to Enterprise CA
1.
Open Internet Explorer on the SCS server
2.
Type in the CA URL. For example: http://vpro-vs4/certsrv
3.
Click Request a certificate
4.
Click Advanced certificate request
17. Enter a file name for the certificate hash, and click Next
18. Review the summary page, and click Next
19. Click Finish.
59
Quick Reference Guide Maximizing the Benefits of Intel® Active Management Technology: A Solution Guide
5.
7.
Open the text file
8.
Copy and paste the contents of the text file into the ―Saved Request‖
Click Submit a certificate request by using a base-64-encoded CMC or PKCS
#10 file, or submit a renewal request by using a base-64-encoded PKCS #7
file.
window of the ―Submit a Certificate Request or Renewal Request‖ page
6.
60
Locate the certificate hash (text file) created previously
Quick Reference Guide Getting to Pro: An Enterprise Approach to Deploying Intel® AMT
12. Click Save
13. Type a name for the certificate file, and click Save
14. Click Close
15. Close Internet Explorer and Notepad.
Install the Certificate in IIS
9.
1.
Return to the IIS Manager on the SCS server
2.
Click Server Certificate….
3.
Click Next
From the Certificate Template drop down box, select Web Server
10. Click Submit
11. Click Download certificate
61
Quick Reference Guide Maximizing the Benefits of Intel® Active Management Technology: A Solution Guide
4.
Select Process the pending request and install the certificate
5.
Click Next
6.
62
Click Browse to select the certificate file created previously
7.
Click Next
8.
Click Next to accept the default SSL port 443
9.
Review the Certificate Summary and click Next
10. Click Finish
Quick Reference Guide Getting to Pro: An Enterprise Approach to Deploying Intel® AMT
11. Click OK to close the Default Web Site properties page
6.
saved the certificate)
12. Close IIS.
Installing a Trusted Root on the SCS Console
The SCS console requires a certificate of the CA in order to authenticate to the
IIS, therefore you must install a certificate on all PC or server systems that will run
the SCS console. Install a client (issuer) certificate in the SCS console‘s trusted root
certificate store using the following procedure:
Click Save and type in a name for the certificate (.cer) file. (Note where you
7.
Click Save, and then click Close.
8.
Close Internet Explorer window.
9.
Locate the certificate, right click and select Install Certificate.
10. Click Next > Next > Finish > OK.
Active Directory Modification, Schema Extension
and User/Groups
1.
Log on to the SCS Console with an administrative account.
2.
Open a web browser.
Important: Only the Active Directory Security Administration Team can make
3.
Enter the address of the CA Server web interface. In the following
changes to the Active Directory environment.
example, ca_machine is the host name of the CA Server:
The Active Directory Scripts are located on the SCS server in the ―<SCS
http://ca_machine/certsrv
servername>:C:\Program Files\Intel\AMTConfServer\AdminScripts‖ directory.
Login to the SCS server
Copy the contents of the C:\Program Files\Intel\AMTConfServer\AdminScripts
directory into a location on the domain controller.
Extend Active Directory Schema
The Active Directory Schema scripts are located in the‖\AdminScripts\Active
Directory Schema‖ directory.
1.
Logon to the ―Root‖ domain controller with an administrative account with
schema access.
2.
Double-click the BuildSchema.vbs file located in the AdminScripts\Active
Directory Schema directory. This script and supporting files are located in
the section above describing Active Directory requirements in section 0
Error! Reference source not found.Active Directory Schema Extensions.
3.
4.
Click Download a CA certificate, certificate chain or CRL.
5.
Click Download CA certificate.
63
Click Yes at the schema change message.
Quick Reference Guide Maximizing the Benefits of Intel® Active Management Technology: A Solution Guide
4.
Click OK > OK. The script window will be displayed.
2.
From the Active Directory users and Computers console, create the
following Group objects, as stated in the table below:
5.
Click OK at the script executed successfully message.
6.
To verify the schema extension, double-click the CheckSchemaExists.vbs
located in AdminScripts\Active Directory Schema directory.
7.
A schema exists message should be displayed. Click OK.
Create SCS Service User Account and Group Accounts
The Active Directory User and Group objects for SCS should be created as follows
(described in section 0 Active Directory Domain Requirements):
1.
Login to a Domain Controller in the domain where the SCS server will be
installed.
64
Domain where
Created:
Where SCS
server will be
installed
Where SCS
server will be
installed
Container
Object Type
Object Name
Domain
OU
IntelAMTOU
IntelAMTOU
Security
Group Universal
All Domains,
except Root
IntelAMTOU
Security Group
– Domain Local
Enterprise IntelME
Setup and
Configuration
Servers
IntelAMT
SCServers
3.
Member Of
IntelAMT
SCServers
Login to a Domain Controller in the domain where the issuing Certificate
Authority (CA) is installed.
4.
From the Active Directory users and Computers console, create the
following User object, as stated in the table below:
Domain where
Created:
Where CA is
installed
Where CA is
installed
Container
Object Name
Domain
Object
Type
OU
IntelAMTOU
User
SCSServiceAccount
Member Of
IntelAMTOU
Enterprise
IntelME Setup
and
Configuration
Servers
Quick Reference Guide Getting to Pro: An Enterprise Approach to Deploying Intel® AMT
5.
Verify that the following OU, User & Groups are created in AD:
Domain
where
Created:
Where SCS
server and
CA is
installed
Issuing CA
Server
domain
SCS Server
domain
Container
Object
Type
Object Name
Domain
OU
IntelAMTOU
All
domains,
except
Root
Membership
5.
Double-click the CreateACL.vbs.
6.
Click OK when the script response messages are displayed.
7.
Open Active Directory Users and Computers.
8.
Right click the OU created in step 1 above, select Properties, and click the
Security tab.
IntelAMTOU
User
SCSserviceAccount
IntelAMTOU
Security
Group Universal
IntelAMTOU
Security
Group –
Domain
Local
Enterprise IntelME
Setup and
Configuration
Servers
IntelAMT SCServers
9.
If Security tab is not visible, then click Cancel. From the Top Menu, Click
View > Advanced Features.
SCSserviceAccount
Enterprise IntelME
Setup and
Configuration
Servers
Note: The ―IntelAMT SCServers‖ group will be created in every domain (except
the root) of the forest, while the ―Enterprise IntelME Setup and Configuration
Servers‖ group will only be created in the SCS server domain. Also, the
―SCSserviceAccount‖ User will only be created in the domain that contains the CA.
Create User and Group Security ACL
The Active Directory Security ACL scripts are located in the \AdminScripts\Active
Directory ACL‖ directory (scripts also found and described in section 0 Active
Directory Domain Requirements). The script creates the ACL for the OU created
for the Intel® AMT systems.
1.
In AD, create an OU for provisioned Intel® AMT systems data. For example:
IntelAMTOU. The OU can be created in multiple domains.
2.
Edit the CreateACL.vbs located in ……AdminScripts\Active Directory ACL
directory.
3.
Locate line : strOU = ―OU=AMTOU‖
4.
Change the string to the OU created above, and save the file.
65
10. In the Group or user names: box, select IntelAMT SCServers, and click
Advanced.
Quick Reference Guide Maximizing the Benefits of Intel® Active Management Technology: A Solution Guide
2.
Click the Windows Start > Programs > Administrative Tools > Local Security
Policy.
3.
Expand Local Policies.
4.
Click User Rights Assignment.
5.
From the right pane, double-click Log on as a service.
devices. From a high availability perspective, it is recommended that you install
6.
Click Add User or Group.
more than one SCS server in your environment.
7.
Verify that Locations box displays the domain name
NOTE: All SCS servers in an Active Directory forest share a single SQL database.
8.
Enter the SCS Service Account User name and click Check Name, the SCS
11. In the Permission entries box, you should now see the special permissions
assigned to the SCS Servers group for the OU.
12. Close Active Directory Users and Computers.
13. Run the CreateACL.vbs script in every domain where the OU is created.
Installing the Intel® AMT Setup and Configuration
Server (SCS)
The SCS server service (AMTConfig) is the configuration tool for Intel® AMT
Service User will be recognized.
Prerequisites
Configure the SCS Service Account as a Service ID
1.
66
Login to the SCS Server as an Administrator
9.
Click OK > OK.
Quick Reference Guide Getting to Pro: An Enterprise Approach to Deploying Intel® AMT
SQL Server Configuration
Since the SCS servers share the same database. Make sure that the SQL server is
available to all the SCS servers installed in your network. Configure the SQL
server that contains the shared database as follows:
SQL Server Service Verification
1.
From the computer running SQL server, Click Start > All Programs
2.
From the Microsoft SQL Server 2005 program group, select Configuration
Tools > SQL Server Configuration Manager.
a.
From the left pane, select SQL Server 2005 Services.
e.
Verify that Shared Memory, Named Pipes, and TCP/IP are enabled.
f.
If they are not, select each, right-click, and select Enable, and click OK
at the message.
g.
b.
In the right pane, check the State column and ensure that SQL Server
(MSSQLSERVER) and SQL Server Browser are both running. If they are
not running, select each service, right click, and select Start. Verify
that the start mode is set to Automatic.
67
c.
Expand the SQL Server 2005 Network Configuration.
d.
Select Protocols for MSSQLSERVER.
Right click on Protocols for MSSQLSERVER and select Properties.
Quick Reference Guide Maximizing the Benefits of Intel® Active Management Technology: A Solution Guide
m.
Close the SQL Server Configuration Manager window.
Enable SQL Server and Windows Authentication Mode
1.
Logon to the server running SQL server 2005
2.
Click Start > All Programs
3.
From the Microsoft SQL Server 2005 program group, select SQL Server
Management Studio.
4.
Enter the server name, select Windows Authentication, and click Connect
Right-click on the root node. A popup menu is displayed
h.
a.
Select Properties, and then select Security.
b.
In the Server authentication section, verify that SQL Server and
In the Force Encryption drop down box, select Yes, to enable secured
database communication using the internal SQL Server encryption
option.
i.
Click OK, and then click OK at the message.
j.
Expand the SQL Native Client Configuration branch.
k.
Select the Client Protocols branch.
Windows Authentication mode is selected.
l.
Make sure that Shared Memory, Named Pipes, and TCP/IP are enabled.
If they are not, select each, right-click, and select Enable.
68
c.
Click OK.
Quick Reference Guide Getting to Pro: An Enterprise Approach to Deploying Intel® AMT
Grant SQL DB Access to the SCS Service Account
NOTE: This may not be needed in the case that SCS is installed using a database
administrator (DBA) provided account with the system administration (sysadmin)
role.
1.
From the left pane, expand Security.
2.
Right-click Logins, and create a new Login.
3.
Select the SCS Service Account user name.
4.
Click OK
5.
Right-click the SCS Service User name, select Properties, select Server Roles,
and check the sysadmin role.
6.
Click OK.
Install SCS Server Components
1.
Logon to the SCS server, using the Administrator ID .
2.
Verify that the SCS Service account is configured with the following access
5.
Click Next at the welcome screen.
6.
Accept the license agreement and click Next.
7.
From the Setup Type screen, select Complete and click Next.
8.
In the User name field, enter the service account user name in the
rights:
a.
The service ID is created in the domain that the issuing CA is installed.
b.
Member of Local Administrators on the SCS Server.
c.
Log on as a Service on the SCS server
d.
If using Windows Authentication on the SQL server, the SCS Service
account must have the ―sysadmin‖ role on the database server.
Otherwise, if SQL Authentication, you‘ll need the ―SA‖ credentials.
3.
Log on to the SCS server, using the SCS Service account.
4.
Double-click AMTConfserver.exe
This file is obtained by downloading the software distribution from Intel
(http://softwarecommunity.intel.com/articles/eng/1025.htm).
AMTConfserver.exe is found within the distribution file.
―Domain\Username‖ format. For example, ―VPROPOV\SCSserviceAccount‖.
9.
Enter the Password, and click Next. The ―Select IIS Web Server Virtual
Directory, Application Pool and Web Site‖ is displayed
69
Quick Reference Guide Maximizing the Benefits of Intel® Active Management Technology: A Solution Guide
13. In the Web Site Name field, the Default Web Site is selected, but if you
have created a dedicated web site for SCS, click the drop down arrow to
select it now.
14. In the Virtual Directory Name field, the default is AMTSCS_RCFG is selected.
Click Next.
10. In the Web Site Name field, the Default Web Site is selected, but if you
have created a dedicated web site for SCS, click the drop down arrow to
select it now.
11. In the Virtual Directory Name field, the default AMTSCS is selected. Click
Next.
12. The ―Select Remote Configuration IIS Web Server Virtual Directory,
application pool and Web Site‖ screen is displayed.
15. In the Database Server field, click the drop down arrow to select the
NETBIOS name of the database server (or a clustered database instance).
16. Select Windows Authentication and click Next
70
Quick Reference Guide Getting to Pro: An Enterprise Approach to Deploying Intel® AMT
21. Remove the checkmark next to the Start Intel® AMT Config Service
checkbox and click Finish.
AMTConfig Service Verification
Verify that the AMTConfig Windows service is running as follows:
17. In the Database Name field, enter the name for the SCS database, the
default is IntelAMT.
18. Leave the Console User Name field as the default and click Next.
19. Click Install.
20. The installer may prompt to add the ―Run As A Service‖ permission to the
User, click OK to accept.
71
1.
From the SCS Server
2.
Click the Windows Start > Run.
3.
In the Open field, type services.msc and click OK
4.
In the status column, check the status of AMTConfig.
5.
Select AMTConfig, and click Start.
6.
When completed, the word ―Started‖ appears in the Status column.
7.
Close the Services window, and Logoff.
Quick Reference Guide Maximizing the Benefits of Intel® Active Management Technology: A Solution Guide
Install Intel® AMT Management (SCS) Console
Verify that .NET Framework 2.0 is installed on the SCS Console. If not, refer to
Microsoft web site for installation download and instructions.
1.
Log on to the SCS console using the SCS Service account.
2.
Locate and double-click AMTConsole.exe
This file is obtained by downloading the software distribution from Intel
(http://softwarecommunity.intel.com/articles/eng/1025.htm).
AMTConsole.exe is found within the distribution file.
7.
Click Install and click Finish.
DNS and AMTConfig Verification
DNS Configuration – ProvisionServer / ProvisionServerDB
The SCS server must be registered in the DNS for each domain. The host record
must be replicated to other DNS servers in the domain. You can have more than
one SCS server in an Active Directory forest, but all SCS servers share the same
database. Create the DNS entry as follows:
3.
Click Next at the Welcome screen.
4.
Click Next at the License Agreement screen.
5.
Accept the license agreement and click Next.
6.
Click Next to accept the default ―C:\Program Files\Intel\AMTConsole‖
directory, or select a location of your choice.
72
1.
Logon to the domain controller (DNS server) with an administrative
account.
2.
Click Start > Administrative Tools > DNS.
Quick Reference Guide Getting to Pro: An Enterprise Approach to Deploying Intel® AMT
7.
Place a checkmark next to the Create associated pointer (PTR) record
checkbox.
8.
Click Add Host
9.
Click OK at the completion message
10. Click Done.
11. Repeat this procedure at Step 3
12. Replace the name in Step 5 with ProvisionServerDB
13. Replace the IP address in Step 6 with the IP address of the Microsoft SQL
Server supporting the SCS server
3.
Expand the DNS server name, and expand the Forward Lookup zone
4.
Right-click the zone name and click New Host (A)…
5.
In the Name field, type ProvisionServer
6.
Type in the IP address of the SCS server
73
14. Close the DNS MMC console.
Quick Reference Guide Maximizing the Benefits of Intel® Active Management Technology: A Solution Guide
Intel® AMT Add-On for Microsoft SMS 2003
Before installing the add-on for SMS, there must be an SMS 2003 environment
installed, configured and working properly.
Installation of SMS Add-On
Pre-Install Activities
The SMSAMTAdd-onInstaller.exe must be extracted to produce all the files
needed for the installation. Follow the instructions below to extract the files:
1.
Double click the SMSAMTAdd-onInstaller.exe.
2.
On the license agreement select I accept and click on Next.
3.
Select the location for the files to be extracted or accept the default
location. Click Next.
4.
Click Finish
This file is obtained by downloading the software distribution from Intel
(http://softwarecommunity.intel.com/articles/eng/1356.htm). There are three
folders extracted from the distribution. Open the iAMT addon for SMS folder to
view the iAMTAddonSetup.exe for the installation and the ADScript.vbs script
that will need to be edited.
Active Directory User and Groups
A script file (adscript.vbs) is provided for the creation of SMS Add-on users and
'
' this section creates the 3 AD groups used for the
add-on permissions
'
Const ADS_PROPERTY_APPEND = 3
Set objRootDSE = GetObject("LDAP://rootDSE")
Set objContainer = GetObject("LDAP://cn=Users," & _
objRootDSE.Get("defaultNamingContext"))
Set objGroup = objContainer.Create("Group",
"cn=Intel(R) AMT Collections
Managers")
objGroup.Put "sAMAccountName","Intel(R) AMT
Collections Managers"
objGroup.SetInfo
WScript.Echo "Group Intel(R) AMT Collections Managers
created."
Set objGroup = objContainer.Create("Group",
"cn=Intel(R) AMT Redirection
Managers")
objGroup.Put "sAMAccountName","Intel(R) AMT
Redirection Managers"
objGroup.SetInfo
WScript.Echo "Group Intel(R) AMT Redirection Managers
created."
Set objGroup = objContainer.Create("Group",
"cn=Intel(R) AMT System
Defense Managers")
objGroup.Put "sAMAccountName","Intel(R) AMT System
Defense Managers"
objGroup.SetInfo
WScript.Echo "Group Intel(R) AMT System Defense
Managers created."
groups in Active Directory. The script must be edited prior to running in order to
add specific information relating to the environment. These edits include the
domain name, SMS Site Code, the SMSAMTUser_NNN User ID and password. The
script will also add the ―Log on as a service‖ right for the SMSAMTUser_NNN
account on the local machine. Below is the VB script (scripts found and described
in section 0 Active Directory Domain Requirements):
NOTE: This activity may have been completed at the time of Active Directory
preparation as described in the Active Directory Domain Requirements section
above. This is included here for completeness.
74
'
' this section creates the dedicated user account
used for the add-on
service
' and adds it to the local Administrators group
' change 'domain.name' to your domain name
' change 'NNN' in the rest of this script to your
site code
' change 'yyy' to the password for the SMSAMTUser_NNN
account
'
Quick Reference Guide Getting to Pro: An Enterprise Approach to Deploying Intel® AMT
Set user = objContainer.Create("User",
"cn=SMSAMTUser_NNN")
user.Put "sAMAccountName","SMSAMTUser_NNN"
user.Put "userPrincipalName","SMSAMTUser_NNN@Domain"
user.SetInfo
User.SetPassword "yyy"
user.AccountDisabled = False
user.SetInfo
WScript.Echo "User SMSAMTUser_NNN created."
Set objGroup =
GetObject("WinNT://./Administrators,group")
Set objUser = GetObject("WinNT://SMSAMTUser_NNN")
objGroup.Add(objUser.ADsPath)
WScript.Echo "SMSAMTUser_NNN added to local
Administrators group"
The ADScript.vbs script will create the following groups and users:
Groups:
Verify that the SMSAMTUser_NNN is added to the Administrators group on
the SMS server.
5.
Verify that the three (3) groups are created on the domain controller.
NOTE: Once the SMSAMTUser_NNN service account is created, the add-on service
updates the password every 28 days and whenever the service restarts,
requiring no intervention by the IT administrator. If the password for this account
needs to be changed, enter the new password into the add-on using the Security
tab of the General Settings Dialog. This will allow the add-on to continue the
automatic changing of the password.
NOTE: This service account should never be changed. This prevents a scenario in
which it is changed to a critical account (example, administrator), permanently
locking out the account owner when the password is changed automatically by
perform Unprovision, RCO, System Defense, or Redirection operations on
NOTE: If the SQL server used by SMS is not installed on the SMS server machine,
Intel(R) AMT Redirection Managers (Users in this group are allowed to
collections)
Intel(R) AMT System Defense Managers - (Users in this group are allowed
to perform Intel® AMT System Defense operations either on single systems
or SMS collections)
Users:
SMSAMTUser_NNN (where NNN is SMS Site Code) The SMS add-on service runs
under this account and must have the ―Log on as a service‖ right. A service
account must be created for each SMS Primary server that will have the Intel®
SMS add-on feature installed.
Run ADScript.vbs - Active Directory User and Groups
1.
Logon to the SMS server as an SMS Administrator
2.
Locate and edit the adscript.vbs as explained previously.
75
4.
the service.
perform Intel® AMT redirection operations either on single systems or SMS
Double click the adscript.vbs file.
Intel(R) AMT Collections Managers (User in this group are allowed to
SMS collections)
3.
the SMSAMTUser_NNN user account must be added to the Administrators group
on the SQL server machine.
Quick Reference Guide Maximizing the Benefits of Intel® Active Management Technology: A Solution Guide
Additional Hot fixes
NOTE: If you have configured an Enterprise CA, see Appendix B for the
If the Intel® AMT systems are configured to use Kerberos authentication and
procedures to create and add a template using 2.16.840.1.113741.1.2.1 OID. For
Windows Server 2003 SP1 or R2 is being used, Microsoft hot fixes KB899900
and KB908209 must be installed to allow the add-on to work correctly. Note:
These hot fixes are included in Windows Server 2003 SP2. These hot fixes can
be obtained by clicking on the following links:
http://support.microsoft.com/kb/899900
http://support.microsoft.com/kb/908209
step, you will select a ―template‖, and skip step 11.
11. In the OID field, complete the certificate OID to read:
1.3.6.1.5.5.7.3.2,2.16.840.1.113741.1.2.1
12. Select 1024, 1536, or 2048 as a key size depending on your company‘s
encryption algorithm.
13. Select the Mark keys as exportable checkbox.
Install Client Certificate for SMSAMTUser_NNN
For mutual authentication between Intel® AMT devices and the SCS server, a
client certificate must be issued and stored in the personal certificate store of
the SMSAMTUser_NNN on the SMS server(s). The following procedure shows
how to acquire a certificate from a stand-alone subordinate server.
1.
Verify settings for ―log on locally‖ for the SMSAMTUser_NNN & add
account as local administrator on the server
2.
Logon to the SMS Server(s) as SMSUserAMT_NNN.
3.
Click Start > Programs > Internet Explorer.
4.
Enter the URL of the Subordinate CA:
http://ca_machine/certsrv.
5.
Logon to the certificate server with the SMSUserAMT_NNN credentials.
6.
Click Request a certificate.
7.
Click Advanced certificate request.
8.
Click Create and submit a request to this CA.
NOTE: If you have configured an Enterprise CA, a template must be created with
the identical OID described below. Requesting the certificate and developing the
template is detailed in appendix B describing the Enterprise CA activities.
9.
In the Name field, type the FQDN of the SMS server.
10. In the Type of Certificate Needed field, select Other
76
14. Click Submit.
Quick Reference Guide Getting to Pro: An Enterprise Approach to Deploying Intel® AMT
15. Click Yes.
16. Click Install this certificate.
Create the “CA root certificate Path” PEM file
17. Click Yes.
Creating Pem Files
Creating a pem file is a process of concatenating certificates paths in reverse
order. For example, in the diagram below, the VPRO-CAR certificate will be
concainated (appended) to the VPRO-VS1 certificate. Two (2) pem files (―CA
Certificate‖ pem and the ―Client Certificate‖ pem) will be created for the SCS
configuration.
77
1.
Log on to the SMS Server as the SMSAMTUser_NNN.
2.
Click Start > Programs > Internet Explorer.
3.
Click Tools > Internet Options.
Quick Reference Guide Maximizing the Benefits of Intel® Active Management Technology: A Solution Guide
4.
78
5.
Click the ―Trusted Root Certification Authorities‖ tab.
6.
Scroll down and select the Root CA certificate
7.
Click Export, and click Next.
8.
Select Base-64 encoded X.509 (.CER)
Click the Content tab, and then click Certificates.
Quick Reference Guide Getting to Pro: An Enterprise Approach to Deploying Intel® AMT
a.
Select the Issuing CA‘s certificate (In the example below, the
Subordinate CA‘s certificate).
9.
Click Next.
10. Enter the file name for the certificate. For example: C:\Certificates\RootCert, and click Next
b.
Click Export, and click Next.
c.
Select Base-64 encoded X.509 (.CER)
d.
Click Next.
e.
Enter the file name for the certificate. For example:
C:\Certificates\Intermediate-CA-Cert, and click Next
f.
Click Finish, and then click OK for a successful export.
g.
Repeat steps a thru f for each additional intermediate CA (for
example, if there is a Policy CA that precedes an Issuing CA)
11. Click Finish, and then click OK for a successful export.
12. Select the ―Intermediate Certification Authorities‖ tab.
79
h.
Click Close > OK
i.
Close Internet Explorer.
j.
Open separate windows of the Notepad application for each
certificate previously exported.
Quick Reference Guide Maximizing the Benefits of Intel® Active Management Technology: A Solution Guide
k.
Locate the Intermediate-CA-Cert file created above and drag it
inside the first notepad window.
l.
Repeat for each Intermediate CA as exported previously.
m.
Locate the Root-Cert file created above and drag into the second
notepad window.
n.
Next, copy the contents of the Root notepad window and append
to the bottom of the intermediate window.
o.
Save the combined file as a .pem file, for example ―CA-CertificatePath.pem‖.
80
Quick Reference Guide Getting to Pro: An Enterprise Approach to Deploying Intel® AMT
NOTE: The certificate order for the pem file creation is shown below:
CA Certificate Path
Intermediate cert
Root CA cert
Client Certificate Path
Client Personal cert
Intermediate cert
Root CA cert
Create the “Client Certificate” PEM file
The creation of the Client Certificate pem file requires the use of the OpenSSL
tool. It is an openssl tool that converts a pfx file to a .cer file that can be edited
with a text editor. The tool must be downloaded (www.stunnel.org/download openssl.zip) before completing this section of the document. In our example, the
Client Certificate pem, will consist of three certificates (Personal, Intermediate,
and Root) as shown below:
1.
While logged on to the SMS Server as the SMSAMTUser_NNN.
2.
Click Start > Programs > Internet Explorer.
3.
Click Tools > Internet Options.
81
4.
Click the Content tab, and then click Certificates.
5.
Click the ―Personal‖ tab.
6.
Select the Personal certificate for the SMSAMTUser_NNN user.
7.
Click Export, and click Next
Quick Reference Guide Maximizing the Benefits of Intel® Active Management Technology: A Solution Guide
8.
Select Yes, export the private key, and click Next
11. Enter the file name. For example; C:\Certificates\Client-Auth; and the file is
saved with a .pfx extension.
12. Click Next, then click Finish, and click OK.
13. Click Close, and then click OK.
14. Locate the OpenSSL tool directory (as mentioned above can be found at
www.stunnel.org/download - openssl.zip) .
15. Copy the pfx file created above into the OpenSSL directory.
16. Locate the .pfx file created above.
17. Create the convert.bat file as follows:
9.
Verify that Enable strong protection (requires IE 5.0, NT 4.0 SP4 or above) is
selected, and then click Next.
10. Enter and confirm a password, and click Next. (This password is kept in the file
a.
Replace the input.pfx file with the name of the pfx file.
b.
Replace the output.pem file with what you intend to name your pem file
c.
Save the edited convert.bat file.
d.
Double-click the convert.bat file
e.
Enter the private key password (This is the password specified during the
pfx file creation), and press Enter.
and does not change.)
f.
82
The preliminary Personal Certificate PEM file is now created.
Quick Reference Guide Getting to Pro: An Enterprise Approach to Deploying Intel® AMT
g.
Using Notepad, open the personal certificate pem file.
h.
Open another two instances of Notepad (these are the second & third
Notepad windows)
i.
Copy the contents of the CA-Certificate-Path.pem file and append to the
personal certificate pem file.
j.
Save the combined file as a pem file. For example, Client-CertificatePath.pem.
k.
The path to this .pem file will be used as the input to the ―CA Client Path‖
field in the Security tab of the Intel® AMT Add-on settings dialog.
18. Logoff.
NOTE: The certificate order for the pem file creation is shown below:
CA Certificate Path
Intermediate cert
Root CA cert
Client Certificate Path
Client Personal cert
Intermediate cert
Root CA cert
3.
The files will extract. Click Next.
4.
At the License Agreement screen select I Accept and click Next.
Intel® AMT Add-on for SMS Installation
The SMS add-on can be installed on a Windows Server 2003 or Windows XP
Workstation where the SMS 2003 console is installed. It must also be installed on
each SMS Primary Site Server in the environment. The user account performing
the installation requires the following rights:
A member of the Administrators group on the local machine
Administer rights for Collections, Site and Advertisements in the SMS
Hierarchy
Follow the steps below to install the SMS Add-on:
1.
Logon to the SMS server as an SMS Administrator
2.
Double click iAMTAddonSetup.exe
This file is obtained by downloading the software distribution from Intel
(http://softwarecommunity.intel.com/articles/eng/1025.htm).
iAMTAddonSetup.exe is found within the distribution file.
83
Quick Reference Guide Maximizing the Benefits of Intel® Active Management Technology: A Solution Guide
6.
At the Setup Type screen determine which setup will be installed. The full
installation must be installed on each SMS Primary Site Server including the
Central Site Server that will manage Intel® AMT capable systems. The full
installation includes the Intel® AMT Add-on for SMS Service and the Console
plug-in. The Console Add-on will install the add-on for the remote console and
can be installed on any machine that will connect to the SMS database.
5.
Select the Destination Folder. By default it is %SystemDrive%\Program
Files\Intel\Intel® AMT Add-on for SMS. Click Next.
7.
Select the Full Installation for the SMS Primary Site Server and click Next.
If the Full Installation is selected go to Step 8. If just the Console Add-on was
selected skip to step 9 to begin the installation.
84
Quick Reference Guide Getting to Pro: An Enterprise Approach to Deploying Intel® AMT
8.
Enter the password for the Intel® AMT Service account and Click Next.
10. The status bar will indicate the install progress
9.
Select Install to begin the install.
11. When the install finishes click on Finish.
Configure SMS Add-on Settings
SMS is in itself a full solution to managing servers and desktops in an
environment. Intel® AMT SMS Add-on adds value to the SMS solution with
85
Quick Reference Guide Maximizing the Benefits of Intel® Active Management Technology: A Solution Guide
features such as discovering systems that do not have the SMS Client agent
installed, tracking its assets, performing wake-up and power down functions as
well as resetting systems. Below is a description of these features and how they
should be configured.
1.
Logon to the SMS server as the SMS Administrator
2.
Open the SMS Administrator console
3.
Expand the SMS Hierarchies
4.
Right-click Collections > select All Tasks > Intel® AMT Tasks > Add-On Settings.
About Tab
The About tab contains information about the versions of the product, add-on
service, and add-on console components. It also provides a hyperlink to Intel® AMT
add-on support.
Setup and Configuration Tab
The Setup and Configuration tab is configured in ―SMS Add-on Setup and
Configuration tab‖ section of this document. This is described in section 0, SMS
Add-on ―Setup and Configuration‖ Tab.
Security Tab
The Security tab is configured in ―SMS Add-on Security Tab‖ section of this
document. This is described in section 0, Error! Reference source not found.SMS
dd-on ―Security‖ Tab.
86
Quick Reference Guide Getting to Pro: An Enterprise Approach to Deploying Intel® AMT
Performance Tab
Advertisement Tab
The Performance tab allows the performance behavior of the add-on to be
The Advertisement tab contains settings that define the global behavior of the
configured by specifying:
Wake up on Advertisement feature. This behavior can be overridden on specific
The number of concurrent network connections allowed to be open at once
per collection operation – Higher system performance requires more
system resources.
The number of concurrent operations permitted – When the maximum
number of concurrent collection operations has been reached, any new
collection operation is not accepted until one of the currently running
operations has completed.
The timeout for an operation retry on a locked system during a mass
operation (the time elapsed is measured from the time of locking) – The
operation is terminated when this limit is reached.
The timeout for a client system to respond to an Intel® AMT request. In
networks with high latency this needs to be a large value, while on LANs
this can be a small value. The operation is terminated if the system fails to
respond within this timeout. Smaller values will significantly shorten the
total time taken by large collection operations to complete.
advertisements to behave differently from this global setting.
Wake up on Advertisement feature
Wake up systems on mandatory advertisements – If this box is checked then any
advertisement with mandatory settings associated with a collection wakes up the
systems in that collection when the mandatory advertisement is set to occur.
Non-mandatory advertisements have to be set manually in order to wake up.
Reset all advertisement wake up manual settings to automatic – After the
default behavior of this feature is changed, all current mandatory advertisements
are reset to the new setting (recommended). It is only necessary to reset
advertisements if they have been manually changed from the default settings.
Advertisements which accept the default settings change to the new settings
automatically, even if the reset option is not selected. Any non-mandatory
advertisement is reset to not wake up.
BIOS Password Bypass on advertisement - The BIOS bypass can also be used for
those systems where BIOS is locked via a password.
NOTE: If the BIOS bypass option is checked but is not supported by the system,
the wake-up on the system will not be executed.
87
Quick Reference Guide Maximizing the Benefits of Intel® Active Management Technology: A Solution Guide
To select the repository from which IDER boot images can be selected:
1.
Open Windows Explorer
2.
Create a directory. For example, IDER
3.
Share the directory.
NOTE: This is the directory where IDE-Redirect boot images will be stored.
4.
Return to the SMS Add-on Settings Redirection tab.
5.
Click the Browse button.
6.
Navigate to and select the directory created above, and click OK.
7.
Click Apply.
Redirection
The Redirection tab allows several redirection parameters to be configured. The
parameters that can be configured are:
SOL redirection port – The IT administrator must ensure that the port value
is not in use by some other application.
IDE Redirection timeout – Determines when an IDER session is terminated
automatically.
Maximum number of IDER concurrent sessions – Limits concurrent access
to the network image file. The highest number that can be entered is the
maximum number of network connections entered in the Performance tab.
Boot Images Base Path - The repository from which IDER boot images can
be selected. The path must be a network path that is accessible to
System Defense
authorized users only. The IT administrator must ensure that the dedicated
The System Defense tab is configured in ―SMS Add-on System Defense Tab‖
add-on user account is authorized to access this path. If this path is not set,
section of this document.
users cannot select a boot image in the Redirection operations dialog.
88
Quick Reference Guide Getting to Pro: An Enterprise Approach to Deploying Intel® AMT
SCS Console Configuration
Console Login
Login to the SCS Console using the UserID that installed the SCS Server &
Console:
1.
Click Start > Intel® AMT Configuration > Intel® AMT SCS Console.
6
General Parameters
The General settings define the configuration of the Intel® AMT Main Service; the
AMT 1.0 Provisioning and the Integration with Active Directory options. All the
2.
Enter the SOAP web service URL path including the virtual directory. The
entry format is:
https://FQDN/<Virtual Directory>
For example: https://vpro-vs2.vpropov.local/AMTSCS
In this example, vpro-vs2.vpropov.local is the FQDN of the SCS server, and
AMTSCS is the virtual directory of SOAP web service in IIS. If the web
service is hosted on a port number other than port 80, include the port
number in the URL path. For example, https://vprovvs2.vpropov.local:123/AMTSCS
3.
89
Click Login. The Intel® AMT SCS Console opens.
other parameters in this pane will not take effect until the SCS service is stopped
and restarted. Configure General settings as follows:
1.
Open the Intel® AMT Setup and Configuration Console.
2.
Expand the Configuration Service Settings branch.
3.
Select General. The General Settings screen is displayed.
Quick Reference Guide Maximizing the Benefits of Intel® Active Management Technology: A Solution Guide
NOTE: For enterprise deployments the following option ―From Script‖ should be
chosen.
From Script: Select this option if you have written a script or plan to utilize the
scripts included below. The SCS determines the properties of the Intel® AMT
system by invoking the script specified in the script location. This is the option
that will be used for enterprise deployments. The VB script located below is
executed by the OS shell initiated through the following attached batch file. You
should take the following files and store them in the location on the SCS from
which they will run. The following option description provides an example where
these scripts should execute.
Script Location: This is the full path and file name of the batch file included in the
ZIP file below. This is not the full path and file name of the VB script. The batch
file should be modified as necessary to point to the location of the VB script listed
below. The batch file (runscript.bat) contents are listed below:
4.
Define the General parameters:
TCP Listen Port: Each instance of Intel® SCS listens for ―Hello‖ messages from the
Intel® AMT devices on a defined TCP port. Accept the default port 9971.
Intel® AMT 1.0 Provisioning: This selection is for backward compatibility purposes
only. Release 1.0 devices do not support TLS encryption. If there are no Release
1.0 devices on your network, leave the box blank.
Place a checkmark next to the Integrate with Active Directory checkbox to
enable SCS server to add Intel® AMT objects into Active Directory database. This
also enables the use of Kerberos authentication and the AD user list.
Log Level: Select Warning. Selecting the most detailed log level requires more
resources and bandwidth.
Get New Intel® AMT Properties: This option determines how SCS acquires the
necessary information defining the Intel® AMT device properties.
From DB: Select this option to populate Intel® AMT properties from the Intel® AMT
table stored in the SCS database. This is the default option. This default option
typically requires that pertinent provisioning information be entered manually
through the SCS and a per system basis.
90
REM -------------------------------------------------------------------------REM Copyright (C) Intel Corporation, 2002 - 2007.
REM
REM runscript.bat
REM
REM This batch script is needed to ensure that the VBScript is
run from the
REM cscript engine.
REM The VBScript output is redirected to a file for logging and
debugging
REM purposes. In a production environment redirection should be
either removed,
REM or another mechanism added to prevent the log from filling
the host drive.
REM
REM Note that a full path to the script is provided to SCS, for
example:
REM X:\aaa\bbb\ccc\script.bat
REM The path is decomposed to the directory part and to the
script part, as in
REM X:\aaa\bbb\ccc
REM
- and REM script.bat.
REM SCS then runs script.bat in
REM X:\aaa\bbb\ccc
REM -------------------------------------------------------------------------@echo off
Quick Reference Guide Getting to Pro: An Enterprise Approach to Deploying Intel® AMT
cscript.exe //Nologo "C:\Program
Files\Intel\AMTConfServer\AdminScripts\InterimDB\InterimDBScript.vbs"
The contents of the InterimDB-Script.vbs file is shown below; modify
as needed:
'------------------------------------------------------------------------------------------------'
' Copyright (C) Intel Corporation, 2002 - 2007.
'
' script.vbs
'
' The script uses uses WMI to connect to a system and resolves
FQDN, profile
' and Active Directory OU for Intel® AMT. In addition, the
target system UUID is
' matched with a given UUID to ensure a match. The FQDN is
discovered, but
' Profile and Active Directory OU must be determined arbitrarily
or
' additional logic implemented.
' SCS accepts profile="profileName" and profile_id="NNNN" in
this order of precedence.
'
' The script is best used when Intel® AMT platforms host a
version of
' windows that supports WMI, and a single profile is used. The
Active Directory
' OU can be constant, or be derived from the target system's
computer object OU
' (derivation not shown in the script)
'
' The script reads environment variables CS_AMT_UUID,
CS_AMT_ADDRESS and CS_OUT_FILE_NAME for input
' and outputs an XML file for SCS to the designated output file.
' -----------------------------------------------------------------------------------------------'
Option Explicit
Const adOpenStatic = 3
Const adLockOptimistic = 3
Const LOG_FILE_NAME = "InterimDB-Script.log"
Dim server, dataSource, dbName, tableName, sqlServerName, sql
Dim inputUUID, inputFilename, inputIP
Dim profileName, profileId, fqdn, ou, uuid
Dim objConnection, objRecordSet, objWMIService, colItems,
objItem, oShell
Dim logfilesystem, logfile, logts, DateInfo
DateInfo = Now
'''''''''''''''''''''''''''''''''''''''''
' The following values should be changed by user!!!
' NOTE: If you do not have SQLEXPRESS edition of SQL Server delete '\SQLEXPRESS' string from the server name
'sqlServerName = "ProvisionServerDB"
dataSource = "Server01.acme.com\VPSM01,9007"
DBName = "NewAMTProperties"
tableName = "AmtProperties"
ou = "OU=IntelAMTOU,DC=west,DC=vproprod,DC=local"
profileId = 2
profileName = DEFAULT_PROFILE_NAME
'Wscript.Echo "==============Create Log
File====================="
Set logfilesystem = CreateObject("Scripting.FileSystemObject")
if logfilesystem.FileExists(LOG_FILE_NAME) = False Then
logfilesystem.CreateTextFile(LOG_FILE_NAME)
End If
Set logfile = logfilesystem.GetFile(LOG_FILE_NAME)
Set logts = logfile.OpenAsTextStream(ForAppending,
TristateUseDefault)
logts.Write VbCrLf & "============== " & Now & " =============="
& VbCrLf
'There must be way for the script to return error
WScript.Timeout = 30
'Wscript.Echo "==============Starting Script============"
'Determine if profile is selected by id or by name
Const USE_PROFILE_ID = True
'Const USE_PROFILE_ID = False
Set oShell = WScript.CreateObject("WScript.Shell")
inputIP = oShell.ExpandEnvironmentStrings("%CS_AMT_ADDRESS%")
inputUUID = oShell.ExpandEnvironmentStrings("%CS_AMT_UUID%")
If inputUUID = "%CS_AMT_UUID%" Then
logts.Write "target UUID is a mandatory parameter" & VbCrLf
logts.Close
Wscript.Quit(1)
End If
Const DEFAULT_PROFILE_NAME = "MTLS"
Const DEFAULT_PROFILE_ID = 2
Const DEFAULT_AD_OU =
"OU=IntelAMTOU,DC=west,DC=vproprod,DC=local"
Const ForReading = 1, ForWriting = 2, ForAppending = 8
Const TristateUseDefault = -2, TristateTrue = -1, TristateFalse
= 0
inputFilename =
oShell.ExpandEnvironmentStrings("%CS_OUT_FILE_NAME%")
If inputFilename = "%CS_OUT_FILE_NAME%" Then
logts.Write "output filename is a mandatory parameter" & VbCrLf
logts.Close
Wscript.Quit(3)
End If
91
Quick Reference Guide Maximizing the Benefits of Intel® Active Management Technology: A Solution Guide
logts.Write "inputIP=" & inputIP & VbCrLf
logts.Write "inputUUID=" & inputUUID & VbCrLf
logts.Write "inputFilename=" & inputFilename & VbCrLf
Set objConnection = CreateObject("ADODB.Connection")
Set objRecordSet = CreateObject("ADODB.Recordset")
'Wscript.Echo "==============Create XML
File====================="
'Wscript.Echo "filename to output: " & inputFilename
'Wscript.Echo conf
logts.Write "filename to output: " & inputFilename
& VbCrLf
logts.Write conf & VbCrLf
' Open connection to the DB
objConnection.Open "Provider=SQLOLEDB.1;" & ";Data Source=" &
dataSource & ";DataBase=" & dbName & ";Trusted_Connection=yes"
sql = "select * from " _
& tableName & " where UUID = '" & inputUUID & "'"
logts.Write "Running SQL: " & sql
& VbCrLf
objRecordSet.Open sql,objConnection, adOpenStatic,
adLockOptimistic
If objRecordSet.RecordCount <> 0 Then
ou = objRecordSet.Fields("OU").Value
profileId = objRecordSet.Fields("ProfileId").Value
fqdn = objRecordSet.Fields("FQDN").Value
Else
logts.Write "The AMT with UUID '" & inputUUID & "' has not
been found" & VbCrLf
End If
'Replace
Dim profileAttr
If USE_PROFILE_ID Then
profileAttr = "profile_id=""" & profileId & """"
Else
profileAttr = "profile=""" & profileName & """"
End If
Dim conf, filesystem, file, ts
conf = "<amtConfiguration " _
& "fqdn=""" & fqdn & """ " _
& "addn=""" & ou & """ " _
& profileAttr _
& " />" _
& VBNewLine
sql = "delete from " _
& tableName & " where UUID = '" & inputUUID & "'"
objRecordSet =
objConnection.Execute (sql)
'objRecordSet.Close
objConnection.Close
Set filesystem = CreateObject("Scripting.FileSystemObject")
filesystem.CreateTextFile inputFilename
Set file = filesystem.GetFile(inputFilename)
Set ts = file.OpenAsTextStream(ForWriting, TristateUseDefault)
ts.Write conf
ts.Close
logts.Close
WSCript.Quit(0)
NOTE: The SCS Service account must have a login associated with it in the SQL
Server database that contains the table accessed by this script (default DB:
―NewAMTProperties‖ Table: ―AMTProperties‖). This login must have rights to
read and delete records from this table.
The ―InterimDB-Script.vbs‖ script provides a logging feature to enhance
debugging provisioning problems. The log created is a simple text file that is
perpetually amended to include time and date stamps as well as detailed
information for each provisioning request. It is located in the same directory as
specified in the ―runscript.bat‖ file.
The VB script may also be modified to include business logic selecting which SCS
profile to assign to Intel® AMT systems (SCS profiles are described later in this
document) or simply hard coded to ignore the information in the interim DB.
Other modifications may be made to this script to properly identify the OU in
which to place each Intel® AMT system to complete the provisioning process.
This activity underscores the flexibility of the scripting methodology to enable
automated provisioning of Intel® AMT systems. The decision made to modify
these scripts is guided by the enterprise deployment requirements.
Service Maintenance Settings: These are the parameters used to tune the
performance of the SCS.
Queue Polling Period: This parameter determines how frequently (in milliseconds)
the Intel® SCS checks the queue in the database for new tasks.
92
Quick Reference Guide Getting to Pro: An Enterprise Approach to Deploying Intel® AMT
Max Queue Size: Sets the maximum permitted length of the database queue. If
the queue is full when the server API attempts to add an additional entry, the
entry will be lost.
No. of Worker Threads: This parameter limits the number of Worker Threads
permitted simultaneously.
No. of Slow Worker Threads: This parameter limits the number of Slow Worker
Threads permitted simultaneously.
Delayer Polling Time: When a process fails, it is sent to the Delayer. A process
may fail because information is missing. For example, an Intel® AMT device sends
a ―Hello‖ message before the device has an entry in the New Intel® AMT devices
list, so there is no profile associated with the device and configuration cannot
complete. The Delayer is a thread that manages rerunning delayed processes.
This parameter determines how frequently the Delayer attempts to rerun a
process.
Keep Log Time: This parameter determines how long log entries are saved.
want a new certificate requested from the CA and updated on each
Intel® AMT device before the current one expires.
Keep Security Audit Time: This parameter determines how long security status
entries are saved.
Reissue Intel® AMT Digital Certificates: Place a checkmark here if you
Change Intel® AMT Active Directory Password: Enable this option if
you want to automatically change the password for each Intel® AMT
object in AD. SCS will then update the associated Intel® AMT device
Maintenance Policies
with the new password.
Periodically, SCS can perform some maintenance tasks on all configured Intel®
AMT devices. The majority of these maintenance tasks are security (Password)
Re-provision Intel® AMT: With this option selected, SCS will re-apply
related, and communication between the Intel® AMT devices and SCS server are
the settings in the profile associated with each Intel® AMT device
sent in clear text unless TLS or MTLS is enabled. It is therefore recommended
according to your defined interval.
that the password related task be configured in a TLS or MTLS environment only.
In non-TLS environments, configure the Intel® AMT objects password to
Change Intel® AMT Administrator password: When this option is
selected, the administrator password is changed periodically to either
―Password Never Expires‖ in Active Directory.
a randomly-generated password or to a fixed password (The option is
defined on the profile associated with each Intel® AMT device, under
the Profiles > General tab).
Renew Pseudo Random Generator: With the selection of this option,
SCS generates a new random number generator seed to each Intel®
AMT device.
93
Quick Reference Guide Maximizing the Benefits of Intel® Active Management Technology: A Solution Guide
Synchronize Intel® AMT Clock: This option synchronizes the clock in
6.
each Intel® AMT device to the clock on the SCS server. This makes sure
that the clocks on each Intel® AMT device do not differ by more than
the Kerberos Max Clock Tolerance that is defined the profile settings.
Profiles
Password:
7.
8.
To Add a Profile, select Profiles, and click Add.
an admin/password information in SMS Add-on, enter the same information
here.
9.
2.
Profile Configuration: General Tab
3.
Click the General tab.
4.
In the Profile Name box, enter a descriptive name of the profile.
5.
For the Profile Description, enter a description of the profile.
94
Click the Advanced button and enter the number of minutes allowed by
your company policy in the Kerberos Max Clock Tolerance. The default of 5
minutes is typically sufficient.
NOTE: Profile configuration changes require a confirmation prior to moving to the
next tab. Click Apply to confirm on each tab.
Select Manual if you want an Administrator or a third-party Management
console to have access to the Intel® AMT devices. If you already configured
These parameters include features that are enabled on the device, authentication
1.
Select Random Creation if you want only the SCS to manage the Intel® AMT
devices.
The configuration parameters for Intel® AMT devices are contained in the profiles.
mechanism, and which users have access to device features.
In the Administration Credentials: User Name, the default name is ―admin‖.
10. Click Apply.
Profile Configuration: Network Tab (TLS Mutual Authentication Settings)
1.
Click the Network tab.
2.
Click the Enable ping response in the General box to allow the Intel® AMT
devices to respond to ping
Quick Reference Guide Getting to Pro: An Enterprise Approach to Deploying Intel® AMT
3.
If a VLAN is configured in your environment, click the Use VLAN, and enter
the integer value of the VLAN Tag. If not, leave blank. (Must be the correct
number!!)
4.
In the Enabled Interfaces box, click to place a checkmark next to Web UI to
allow a browser based management of Intel® AMT devices
5.
Click to place a checkmark next to Serial Over LAN, to manage Intel® AMT
devices remotely by encapsulating keystrokes and character display data in
a TCP/IP stream.
6.
Click to place a checkmark next to IDE Redirection, to remotely
enable/disable, format or configure individual floppy or IDE CD drives and to
reload operating systems and software from remote locations.
7.
In the TLS PSK box, click Encrypted
8.
In the TLS Settings box, place a checkmark next to Use TLS.
9.
Select TLS Mutual Authentication for both Local and Network Interface.
12. Click the ellipsis (browse) icon by the CA Host Name.
10. Click the Ellipsis (browse) icon next to the TLS Server Certificate Details:
window
13. Select the Subordinate CA and click OK.
14. Click OK.
11. Click Add.
95
Quick Reference Guide Maximizing the Benefits of Intel® Active Management Technology: A Solution Guide
15. Click OK.
16. Click the Mutual Authentication button
17. Click Add
96
18. If the Active Directory schema is extended:
a.
Click Get from CA…
b.
Select the Offline Standalone Root CA or Root CA, and click OK (CA
with more than one year validity required)
Quick Reference Guide Getting to Pro: An Enterprise Approach to Deploying Intel® AMT
19. If the Active Directory Schema is NOT extended:
a.
Click Import
b.
Browse to the Root CA certificate (.crt) created from the Offline Root
23. Click OK
CA
c.
Click Open
20. Click OK
21. Click the Add button next to the FQDN Suffixes window
22. Type in the domain suffix for the CA server, and click OK
97
24. Click Apply.
Quick Reference Guide Maximizing the Benefits of Intel® Active Management Technology: A Solution Guide
Profile Configuration: ACL Tab
1.
8.
Remote Control Realm, PTAdministration Realm and Hardware Asset
Realm. Add additional realms as needed.
Click the ACL tab.
9.
2.
Click Add
3.
Select Kerberos User
4.
Click the browse (ellipsis) button, the Select User or Group dialog box is
displayed
5.
Select the User or Groups that will have access to SCS and click Check
Names. This should include the SMSAMTUser_NNN accounts for those
Intel® AMT boxes that will be managed by the SMS Add-on and associated
to this profile.
6.
Click OK.
7.
In the Access Permission drop down box, select Any
98
In the Realms drop down list, hold down the ―Ctrl‖ key, and then select/click
Click the top double-arrow
10. Click OK, and then click Apply.
icon to add the realms
Quick Reference Guide Getting to Pro: An Enterprise Approach to Deploying Intel® AMT
Profile Configuration: Power Policy Tab
1.
Click the Power Policy tab.
Users
The Users configured here will have access to the SCS console based on the
defined permissions for each user or group. With AD integration, these users or
groups can be domain based. Add Users as follows:
2.
1.
From the SCS Console, select Users.
2.
Click Add, and then click Select User
3.
Enter the User or Group name, and then click Check Names.
In the Intel® AMT is ON in the following host sleep states: drop down
window, select Intel® AMT is always ON (S0-S5).
3.
In the Idle Timeout window, type the number minutes that you want the
Intel® AMT device remain operable without any activity and click Apply.
4.
Click OK to complete profile creation.
Security Keys
Security key generation is covered in the ―Provisioning Intel® AMT Systems‖
section of this document.
99
Quick Reference Guide Maximizing the Benefits of Intel® Active Management Technology: A Solution Guide
4.
Click OK
Configuration Parameters
5.
From the Role drop down window, select a role:
―Configuration parameters‖ is covered in ―Provisioning Intel® AMT Systems‖
section of this document.
Installing Client Certificates for TLS Mutual Authentication
For mutual authentication between Intel® AMT devices and the SCS server, a
client certificate must be issued and stored in the personal certificate store of
the SCS Service Account on the SCS server. ―SCS Service Account‖ refers to the
SCS User Account that runs the ―AMTConfig‖ service).
Install Client Certificate for SCS Service Account
1.
Logon to the SCS Server as the SCS Service Account (you may need to
configure the ―log on locally‖ settings for the SCS User).
2.
Click Start > Programs > Internet Explorer.
3.
Enter the following URL: http://ca_machine/certsrv
4.
Click Request a certificate.
functions.
5.
Click advanced certificate request.
Operator: Access to Security Keys, Logs, Security Audit and New Intel®
6.
Click Create and submit a request to this CA.
7.
In the Name field, type the FQDN of the SCS server.
8.
In the Type of Certificate Needed field, select Other
a.
Enterprise Administrator: Full access to SCS Console
b.
Administrator: Same as Enterprise Administrator, but cannot create or
edit Profiles, or access to the Users, General and Maintenance
c.
AMT Systems
d.
6.
Log Viewer: View standard Log and Security Audit.
Click OK.
Intel® AMT Systems
Intel® AMT Systems is covered in ―Provisioning Intel® AMT Systems‖ section of
NOTE: If you have configured an Enterprise CA, select ―template‖, and skip step 9.
9.
In the OID field, complete the certificate OID to read:
1.3.6.1.5.5.7.3.2,2.16.840.1.113741.1.2.1
this document.
10. Select 1024, 1536, or 2048 as a key size depending on your company‘s
Logs
11. Select the Mark keys as exportable checkbox.
Intel® AMT Systems is covered in ―Provisioning Intel® AMT Systems‖ section of
this document.
100
encryption algorithm.
Quick Reference Guide Getting to Pro: An Enterprise Approach to Deploying Intel® AMT
.
15. Click Yes.
16. Close Internet Explorer window, and Logoff.
SMS Add-on “Security” Tab
Configure TLS security settings for communications between the SMS Add-on
Service and the Intel® AMT systems.
12. Click Submit.
1.
Logon to the SMS server as the SMS Administrator.
2.
Open the SMS Administrator Console
3.
Right-click Collections > All Tasks > Intel® AMT Tasks > Add-on Settings, and
select the Security tab.
13. Click Yes.
4.
Place a checkmark next to the Enable Intel® AMT secure connection (TLS)
checkbox
5.
In the CA Certificate Path field, type the path to the ―CA Certificate Path‖
pem file previously created in the ―Creating Pem Files‖ section of this
document.
14. Click Install this certificate.
6.
101
Place a checkmark next to the Enable Mutual Certificate checkbox
Quick Reference Guide Maximizing the Benefits of Intel® Active Management Technology: A Solution Guide
7.
In the Client Certificate Path field, enter the path to the ―Client Certificate
Path‖ pem file created above.
8.
In the Client Certificate Password field, enter the password of the Client
certificate.
9.
It is not necessary to modify the Service Account Password field.
10. Click Apply.
NOTE: All certificate paths specified above must be local to the SMS server(s)
where the Add-on is installed.
6.
A list of available SCS profiles configured to work with SMS Add-on is
displayed. Select the profile(s) needed, and click OK.
SMS Add-on “Setup and Configuration” Tab
Configure Setup and Configuration tab to determine the authentication
credentials sent to the Intel® AMT systems.
1.
Click the Setup and Configuration tab
7.
Since Integrated Setup and Configuration is enabled, the ―External Setup
and Configuration Authentication Method‖ is disabled.
8.
2.
Place a checkmark into the Integrated Setup and Configuration checkbox.
3.
In the Server Hostname field, type the name of the SCS server.
4.
In the Server Port Number field, type 443.
5.
In the Supported Profiles box, click Set Profiles.
102
Click Save and Close.
Quick Reference Guide Getting to Pro: An Enterprise Approach to Deploying Intel® AMT
Firewall/Ports
Generate Keys Using the SCS Console
Locate a formatted (FAT) USB key to complete the Security Keys export settings.
Port Listings
This table is listed for completeness. It is almost identical to the network
1.
From the SCS Console, click Security Keys.
2.
Click MEBx Settings
requirements checklist earlier in the documentation and the previous list should
be used when determining if the network is configured properly.
Port Number
56666
16992
16993
16994
16995
9971
443
1
Description
Default SOL Redirection Port
SOAP commands in Small Business mode
SOAP command in Enterprise/TLS mode
IDE-Redirection in Small Business mode
IDE-Redirection in Enterprise Business mode
Default TCP listen port for SCS, configurable1
SSL port in Enterprise/TLS mode
By default, port 9971 is used to establish connection between Intel® AMT
systems and SCS. This default port may be changed by an OEM. The port number
must match the TCP Listen Port field on the General tab of the SCS Console.
Provisioning Intel® AMT Systems
Provisioning Using USB Key
Security keys can be generated using either the SCS console, Command line, or by
the OEM.
103
Quick Reference Guide Maximizing the Benefits of Intel® Active Management Technology: A Solution Guide
3.
In the Number of security keys in a USB key: box, type the number of
security keys that will be created when the Create Pre-Provision Data
button is selected. Default is 50.
4.
In the Factory Default MEBx Password (This is the factory-assigned OEM
password, default value is admin) drop down box, select admin.
5.
In the New MEBx Password box, select Manual creation, type the same
password specified in the Profile Configuration: General Tab section.
a.
6.
Click OK.
Click Create Pre-Provision Data. A list of security keys are generated based
3.
prompt:
on the number configured in MEBx settings above.
7.
To verify the security keys creation, type the following at the command
USBFile –view setup.bin
Insert the USB key in a USB port, and click Export. This USB key will be used
for provisioning Intel® AMT systems.
Generate Keys Using the Command line (“CreateUSB” Tool)
Another method of generating security keys is to use the CreateUSB tool located
in the ……Software\CreateUSBKey directory. A formatted (FAT) USB key is
required to complete the Security Key generation.
1.
From a command prompt, change the directory to
….Software\CreateUSBKey.
2.
Type the following:
USBFile –create setup.bin setup.xml admin Password 20
Replace ―Password‖ with the ―ME password‖ of your choice, and the ―20‖
with the number of keys you want to generate.
4.
You should now see a list of PID/PPS security keys.
5.
Copy the setup.bin file to the USB key, for use in provisioning Intel® AMT
systems.
104
6.
From the SCS Console, click Security Keys.
7.
Click Import.
Quick Reference Guide Getting to Pro: An Enterprise Approach to Deploying Intel® AMT
8.
Select the setup.bin file (copied to the USB key), and click Open.
9.
Click OK
8.
To view the details of a security key, highlight a key, and click View.
10. Click Refresh
11. To view the details of a security key, highlight a key, and click View.
Install Keys into Intel® AMT systems
Generating the security keys from the SCS console; and by the command line
methods requires that the keys be manually copied to each Intel® AMT System.
Generate Keys Using the Command line (“CreateUSB” Tool)
The third method of generating security keys is for the OEM to install the
PID/PPS keys on the Intel® AMT Systems in the factory, and then provide the
1.
Locate the USB key that contains the security keys
2.
Insert USB key into the Intel® AMT system‘s USB port
3.
Power On the Intel® AMT system, and it should read the keys from the USB
Admin team a list of these keys to be imported into the SCS database.
drive
1.
Obtain the setup.bin file from the OEM.
4.
Press ―Y‖ to accept the key installation; do not press any additional keys.
2.
Logon to the SCS console
5.
When completed, there should be a message instructing you to power off
3.
From the SCS Console, click Security Keys.
4.
Click Import.
5.
Select the setup.bin file (copied to the USB key), and click Open.
6.
Click OK
7.
Click Refresh
105
the Intel® AMT system
6.
Power off the Intel® AMT system and remove the USB thumb drive.
Quick Reference Guide Maximizing the Benefits of Intel® Active Management Technology: A Solution Guide
Move Intel® AMT systems to User location
and may be changed to match the enterprise deployment requirements. These
scripts are provided as fully functioning scripts that require minor modification to
When the Intel® AMT systems are provisioned using the USB key, they can now
implement quickly. The following script contains documentation describing the
be moved to their respective user desktop location:
two values that must be modified per deployment. Those two values are:
1.
Remove power and network cables from the Intel® AMT system
2.
Prepare for shipping to the End-User location
3.
Upon arrival, restore power plug and network cable
4.
Power on the Intel® AMT systems.
Final Provisioning Step to Configure New Intel® AMT Systems
The final step to fully provisioning the Intel® AMT systems in the enterprise is to
assign the Intel® AMT system to the following:
1.
OU – the value here is the name of the AD domain to which Intel® AMT
system accounts are added. This is configurable per enterprise deployment
and may be changed per requirements. This name should be the same
across all domains within a single AD forest. The current default as
described in this document is: ―OU=IntelAMTOU‖. The ―OU=‖ portion of this
value should remain unchanged as it becomes part of a proper LDAP string.
2.
profileID – this value is used to correspond to the profile identifier number
assigned in the SCS. This profile is the one to which the Intel® AMT
systems are assigned and configured in previous sections within this
document.
1.
AD domain and associated OU
2.
Fully Qualified Domain Name – determined by completely installed and
finalize automated provisioning they could potentially be ignored in this script and
configured AD joined client operating system
further modification to the server side script (run by the SCS – listed in the
3.
Intel® AMT Setup and Configuration profile configured in previous sections
This information is captured either programmatically or manually and may be
entered as such in the following two sections. The manual configuration is
provided here for a full understanding of how to perform this specifically for
testing and troubleshooting purposes. It is not expected that an enterprise
deployment would utilize the manual method for full scale deployment efforts.
Previous sections in this document describing the installation of the SQL server
and configuration of the SCS on the general configuration page prepare the
management infrastructure for the scripting method described in the section
below.
From Interim DB Provisioning Script
The script provided here works with the configuration of the infrastructure in
previous sections to accept the information it captures from the client operating
system running on the Intel® AMT systems. These scripts are highly configurable
106
While the previous two values are used to populate the Intel® AMT interim DB for
section describing the configuration on the SCS General page of the SCS console)
could implement business logic to assign these. Further, the server side script
could be modified to hard code these values to what is needed.
It should be noted that the scripting mechanism is very flexible and
documentation describing exact implementation of these scripts is not possible.
Quick Reference Guide Getting to Pro: An Enterprise Approach to Deploying Intel® AMT
The interim DB provisioning script shown below must be executed from a fully configured Intel® AMT system with a running operating system that has been joined to the
Active Directory domain.
Option Explicit
Const adOpenStatic = 3
Const adLockOptimistic = 3
Dim
Dim
Dim
Dim
Dim
Dim
Dim
dataSource, dbName, tableName, sqlServerName
uuid, fqdn, ou, profileId, host, domain
shell, env, strComputer, moniker, sql
objConnection, objRecordSet, objWMIService, colItems, objItem
errObject
connectionString
dlen, currpos, ldapstr
'''''''''''''''''''''''''''''''''''''''''
' The following values should be changed by user!!!
' NOTE: If you do not have SQLEXPRESS edition of SQL Server - delete '\SQLEXPRESS' string from the server name
sqlServerName = "10.1.2.3"
'dataSource = "mydb.corp.com\MBDBINSTANCE,9876"
dataSource = "mydb.corp.com"
DBName = "NewAMTProperties"
tableName = "AmtProperties"
ou = "OU=IntelAMTOU,OU=PC Services"
profileId = 3
Set objConnection = CreateObject("ADODB.Connection")
Set objRecordSet = CreateObject("ADODB.Recordset")
Set errObject = CreateObject("ADODB.Error")
' Local computer
strComputer = "."
' Path to the wmi on local machine
moniker = "winmgmts:" _
& "{" _
& "impersonationLevel=impersonate," _
& "authenticationLevel=PktPrivacy"_
& "}" _
& "!\\" _
& strComputer _
& "\root\cimv2"
Set objWMIService = GetObject(moniker)
' Enumerate wmi objects
Set colItems = objWMIService.ExecQuery("Select * from Win32_ComputerSystemProduct")
' Extract UUID
For Each objItem in colItems
uuid = objItem.UUID
Next
107
Quick Reference Guide Maximizing the Benefits of Intel® Active Management Technology: A Solution Guide
If Err.number <> vbEmpty Then
Wscript.Echo "Error: cannot extract UUID"
End If
' Extract FQDN
Set colItems = objWMIService.ExecQuery("Select * from Win32_ComputerSystem")
For Each objItem in colItems
fqdn = objItem.Name & "." & objItem.Domain
Next
dlen=1
currpos=1
While dlen < len(fqdn)
currpos = InStr(dlen, fqdn, ".")
dlen = InStr(currpos + 1, fqdn, ".") - 1
If dlen <= 0 then
dlen = len(fqdn)
End If
ldapstr = ldapstr & ",DC=" & Mid(fqdn, currpos + 1, dlen - currpos)
dlen = dlen + 1
Wend
ou = ou & ldapstr
' Remove dashes from UUID
Dim re, uuidWithoutDashes
Set re = new RegExp
re.Pattern = "-"
re.Global = true
uuidWithoutDashes = re.Replace(uuid,"")
sql = "insert into " _
& tableName _
& "(UUID, FQDN, ProfileID, OU)" _
& " values('" _
& uuidWithoutDashes _
& "','" _
& fqdn _
& "'," _
& profileId _
& ",'" _
& ou _
& "')"
Wscript.Echo sql
' Open connection to the DB
'objConnection.Open "Provider=SQLOLEDB.1;" & "Server=" & sqlServerName & ";Data Sourse=" & dataSource & ";DataBase=" & dbName &
";Trusted_Connection=yes"
108
Quick Reference Guide Getting to Pro: An Enterprise Approach to Deploying Intel® AMT
objConnection.Open "Provider=SQLOLEDB.1;" & "Data Source=" & dataSource & ";DataBase=" & dbName & ";User
Id=amtInterimUpdate;Password=amtInterimPassword"
' Insert new record into DB
objRecordSet.Open sql, objConnection, adOpenStatic, adLockOptimistic
' The error handling should be improved!
If Err.number = vbEmpty Then
Wscript.Echo "New AMT properties have been inserted successfully"
End If
objConnection.Close
The script performs WMI queries to obtain the Intel® AMT UUID and operating system fully qualified domain name (FQDN). The FQDN must be the final FQDN of the
operating system as managed by the SMS agent on the operating system. This enables the SCS to properly assign the operating system FQDN to the Intel® AMT system on
the same machine eliminating the confusion of having a system with two separate FQDNs.
This script executes with the proper domain account given rights to update the ProvisionServerDB with information that it captures. There are three main routes through
which this script can be executed listed below. The method of execution of this script is again dependent upon the enterprise deployment requirements.
a.
Manually executed by the appropriate domain account assigned rights to the interim DB logged onto the Intel® AMT system‘s client operating system
b.
Deployed via AD logon script
c.
Deployed via SMS advertisement – additional modification to the script is needed to create a proper SMS package ready for distribution. This would include better
error handling and reporting as necessary.
The choice here is dependent upon deployment practices and requirements in the enterprise. It may be that the enterprise chooses all three methods depending upon local
deployment requirements. The most secure method is deployment through an SMS advertisement as consideration for interim DB update access is decided. If the interim
DB is fed with incorrect information the most damage that could be done is that the Intel® AMT system is not configured correctly and another automated re-provisioning
process is needed. Incorrect or malformed data fed into the interim DB will only prevent an Intel® AMT system from being fully provisioned for out-of-band management.
109
Quick Reference Guide Maximizing the Benefits of Intel® Active Management Technology: A Solution Guide
From the SCS Console
When the Intel® AMT systems arrive at the End-User location, and power is
restored, the systems will now send a ―Hello Message‖ to the SCS server. From
the SCS console, we can now complete the provisioning.
1.
From the SCS Console, click Intel® AMT Systems.
2.
Click Refresh, and highlight one of the newly added Intel® AMT system
4.
In the Active Directory Organizational Unit (OU) box, type the OU where the
Intel® AMT objects will be created. For example:
OU=IntelAMTOU,DC=west,DC=vproprod,DC=local.
3.
Click Set Props…, and then in the FQDN box, type the FQDN of the Intel® AMT
system. For example: hp-10.vpropov.local.
110
Quick Reference Guide Getting to Pro: An Enterprise Approach to Deploying Intel® AMT
5.
In the Profile box, click the dropdown arrow to select the profile defined for this
10. From the left pane of the SCS console, click Intel® AMT Systems, you should now
Intel® AMT system.
6.
Click OK.
7.
From the left pane of the SCS console, click Actions Status
see the Intel® AMT device status as ―Provisioned‖
Discover “New Intel® AMT Systems using SCS” from SMS Console
The Intel® AMT systems are now fully provisioned, and using the SMS Add-on, we
8.
You should now see ―Waiting‖ in the status column.
9.
Click Refresh, the status should now change to ―Succeeded.
can now retrieve any Intel® AMT systems that have been provisioned using SCS.
1.
Logon to the SMS server as an SMS Admin equivalent.
2.
From the SMS Administrator Console, expand Collections, and right-click All
Systems.
3.
Select All Tasks > Intel® AMT Tasks > Discover Intel® AMT Systems using SCS.
4.
An SCS Discovery running in the background message is displayed. Click OK.
5.
Expand System Status, and click Status Message Queries.
6.
In the right hand pane, right-click All Status message, and select Show
Messages.
111
Quick Reference Guide Maximizing the Benefits of Intel® Active Management Technology: A Solution Guide
7.
Click OK to accept the default one (1) hour range. The status message viewer
window is displayed.
8.
Review the Description column and notice that <AMT System name>: Intel® AMT
Automatic Discover: System located message.
9.
Close the System Status window.
10. From the left pane, right-click All Systems.
11. Select All Tasks > Update Collection Membership, and click OK.
12. Click the Refresh icon or right-click All Systems and select Refresh.
13. The newly provisioned Intel® AMT system will now be displayed in the SMS
console.
14. From the right pane, right click the new Intel® AMT system.
15. Select All Tasks > Intel® AMT Tasks > Retrieve Asset Identification Information.
16. The asset information screen similar to the one below will be displayed.
112
Quick Reference Guide Getting to Pro: An Enterprise Approach to Deploying Intel® AMT
Testing and Validation
4.
Click the Start IP Scan button.
5.
The results are written to the SMS log and can be viewed in the SMS
Console under Status Message Queries.
Discovery
Discovery by IP scanning can be performed on a collection of systems.
The Intel® Systems must be discovered and located before performing any tasks
related to Intel® AMT. There are three methods for discovering Intel® AMT
SMS Discovery Process
systems:
Using IP Address Range Scan
Single System Discovery
Using the SMS Discovery process
To check a single system for Intel® AMT support:
Discovering systems provisioned by Intel® SCS
1.
Right click on the Intel® AMT system.
2.
Select All Tasks > Intel® AMT Tasks > Check for Intel® AMT Support.
IP Address Range Scan
Immediate discovery of Intel® AMT systems can be performed by running a scan
Collection Discovery
for IP addresses using the Intel® AMT tools in the SMS Console. This discovery
To discover Intel® AMT support for all systems in a specific collection:
method does not require the system to have the SMS Client installed and active.
To discover Intel® AMT supported systems using IP address scan follow the steps
below:
1.
Right click on the collections container.
2.
Select All Tasks > Intel® AMT Tasks > Discover Intel® AMT via IP Scan
3.
In the Scan IP Addresses for Intel® AMT systems dialog enter the Start and
End addresses of the range to scan.
113
1.
Right click on the collection.
2.
Select All Tasks > Intel® AMT Tasks > Discover Systems.
3.
Select the Include subcollections checkbox if this action is also required to
be performed on sub-collections.
4.
Click OK.
Quick Reference Guide Maximizing the Benefits of Intel® Active Management Technology: A Solution Guide
The discovery result for each system in the collection is logged to the SMS log
and can be viewed in the SMS Console under Status Message Queries.
Systems that have been provisioned by the Intel® AMT SCS can also be
discovered. The add-on retrieves from the SCS all the systems that have been
provisioned since the previous check was made. Systems retrieved from the SCS
that do not already exist as SMS resources (example, were not discovered by
SMS methods) are added to the SMS repository by the add-on.
Active Directory Discovery methods via the SMS process works sufficiently for
most cases unless immediate results are required.
Discovering Systems provisioned by Intel SCS
The SMS Add-on can also retrieve from the System Configuration Service (SCS) all
systems that have been provisioned since the previous check was performed.
To discover Intel® AMT systems provisioned by SCS, follow the steps below:
1.
Right click on the collections container.
2.
Select All Tasks > Intel® AMT Tasks > Discover Intel® AMT via SCS.
3.
The Add-on retrieves the systems provisioned by SCS and adds them to
the SMS database.
Asset Inventory
Asset Inventory for systems discovered by Intel® AMT subsystem is stored in the
SMS database. To view an Intel® AMT system‘s asset information:
1.
Select and right click an Intel® AMT system.
2.
Select All Tasks > Intel® AMT Tasks > Asset Identification Information.
3.
The asset identification information will be displayed as shown below.
114
4.
Compare the displayed information with the physical asset information on
the system. They should match.
5.
If the device did not report the hardware inventory, re-discover the iAMT
capabilities by: right-click the iAMT device, and select All Tasks > Intel® iAMT
Tasks > Discover System.
Quick Reference Guide Getting to Pro: An Enterprise Approach to Deploying Intel® AMT
Power Control Operations
There are several reasons that a machine may need to be powered on, powered
off or reset. The Power Control feature allows management of systems when the
Operating System is not functioning properly or in cases where remote services
have been turned off and SMS Remote Control or RDP cannot be used. This saves
money and time by reducing the need for hands on assistance. Below is a
description of these features and configurations for an enterprise environment.
This feature enables remote power state control of Intel® AMT-supported
systems. The power control features can be performed on a single system or on a
set of machines that belong to a collection. The available functions are power up,
power down, power cycle, and reset. Different boot options are also available,
depending on the specific system implementation.
The steps to perform Power control options for both single systems and a
collection of systems are listed below.
4.
Select the required power command from the list available.
Single Systems Power Operations
The remote operation is performed immediately with a notification at the end of
the operation and the completion status. To perform this function for a single
System, follow these instructions:
1.
Right click an Intel® AMT system.
2.
Select All Tasks > Intel® AMT Tasks > Power Control Operations
3.
The Power Control Operations window appears as shown below.
Power Up
Reset
Power Cycle
Power Down
Note: Only commands available for the current power state of the system
are enabled in the dialog. For example, if the system is powered down, only
the power up command is enabled.
Caution: Reset, Power Cycle, and Power Down commands can cause loss of
data to users logged on to the system.
5.
115
Select a boot option from the drop-down menu of available boot options:
NOP (Normal Operations - standard boot)
Force PXE Boot
Force Hard Drive Safe Mode Boot
Force Hard Drive Boot
Quick Reference Guide Maximizing the Benefits of Intel® Active Management Technology: A Solution Guide
6.
Force Diagnostics Boot
Force CD or DVD Boot.
Under the boot options menu are additional items that can be selected and
configured:
Lock System during Operation – Selecting this checkbox prevents user
The following table explains the fields in the Power Control Operations dialog box
for single systems:
Name
Host Name
IP address
intervention on the system during any of the power operations except
for Power Down. (This checkbox is only enabled if the system supports
all options: locking the keyboard, reset button, and power button
during a reboot.)
BIOS Password Bypass – Selecting this checkbox bypasses the BIOS
password during a reboot. (This checkbox is only enabled if the system
supports bypassing the BIOS password during a boot.)
Resource ID
Current Power State
Power Up
Reset
Power Cycle
Power Down
Boot options
BIOS Password
Bypass
Lock System during
Operation
Send Command
Refresh Power State
116
Description
The host name of the system as it is stored in the SMS
object
The IP address of the system as it is stored in the SMS
object. The IP address may not be available on some
occasions
The SMS object resource ID
The current power state as retrieved from Intel® AMT
Power up the system from any Sx state
Power Up Power up the system from any Sx state.
Reset command, reboots the system. This is a warm
reset. Not available when system is in an Sx state
Perform a power down, power up action. Not available
when system is in an S4 (hibernate) or S5 (soft off)
state
Power down system. This is a cold power down. Not
available when system is in an S4 (hibernate) or S5 (soft
off) state
Drop-down menu of available boot options supported by
this BIOS
Check box that enables bypassing the BIOS password
upon booting
Check box that enables locking of keyboard, reset, sleep
and power buttons during the boot
Perform operation on this system
Manually refresh the power state - verifies power state
with Intel® AMT
Quick Reference Guide Getting to Pro: An Enterprise Approach to Deploying Intel® AMT
Multiple Systems (Collections) Power Operations
NOP (Normal Operations - standard boot)
The remote operation is performed in the background and the results for each
Force PXE Boot
Force Hard Drive Safe Mode Boot
Force Hard Drive Boot
Force Diagnostics Boot
Force CD or DVD Boot.
system are logged to the SMS log along with a summary of the operation. Below
are the steps and settings available for Collections:
1.
Right click a collection of Intel® AMT Systems.
2.
Select All Tasks > Intel® AMT Tasks > Power Control Operations
3.
The Power Control Operations for Collection window appears as shown
below.
6.
Under the boot options menu are additional items that can be selected and
configured:
Lock System during Operation – Selecting this checkbox prevents user
intervention on the system during any of the power operations except
for Power Down. (This checkbox is only enabled if the system supports
all options: locking the keyboard, reset button, and power button
during a reboot.)
BIOS Password Bypass – Selecting this checkbox bypasses the BIOS
password during a reboot. (This checkbox is only enabled if the system
supports bypassing the BIOS password during a boot.)
4.
Select the power control command from the list available.
were in when the operation was initiated. (This option is only enabled
Power Up
Reset
Note: The system's BIOS support determines which boot options are available so
Power Cycle
systems with different hardware vendors may have different boot options.
Power Down
Note: The operation is only performed by those systems in the collection that
Intel® AMT and are in a relevant state. For example, a power down command is
not performed on a system that is already powered down.
Caution: Reset, Power Cycle, and Power Down commands can cause loss of data
to users logged on to the system.
117
systems in the collection are powered up, regardless of the state they
Note: This action is performed on all systems in that collection which support
5.
Force Power Up – Selecting this checkbox guarantees that all the
Select a boot option from the drop-down menu of available boot options:
if the Power Cycle remote control command was selected.)
support all of the selected boot options. All other systems do not get the
command and stay in their current state. (NOP = Normal Operation)
Caution: Ensure that the systems in the specified collection do not run key
network operations or server applications as these configurations will apply to
every system in the collection.
The following table explains the fields in the Power Control Operations dialog box
for a collection
Quick Reference Guide Maximizing the Benefits of Intel® Active Management Technology: A Solution Guide
Name
Collection Name
Power Up
Reset
Power Cycle
Power Down
Boot options
BIOS Password Bypass
Force Power Up
Send Command
Close
Description
Name of the collection on which the operation is
performed
Powers up the system from any Sx state
Reset command, reboots the system. This is a warm
reset. Does not work on systems in an Sx state
Perform as power down, power up action. Does not work
on systems in an S4 (hibernate) or S5 (soft off) state
unless the Force Power Up option is selected
Power down system. This is a cold power down. Does not
work on systems in an S4 (hibernate) or S5 (soft off)
state
Drop-down menu of available boot options supported by
this BIOS
Checkbox that enables bypassing the BIOS password
upon booting
Only enabled when the Power Cycle power control
command is selected. It ensures that the system is
powered up, even if it is currently in an S4 (hibernate) or
S5 (soft off) state that would ignore a Power Cycle
command
Performs the command on this collection
Closes the dialog
Wake Up on Advertisement
The Wake-up upon advertisement feature integrates the Intel® AMT wake-up
feature with SMS advertisements. This is especially useful for delivery of patches
and software during off hours when machines are powered off. If the
advertisement is set for a collection, this feature wakes up the collection's
powered down Intel® AMT-supported machines when the advertisement becomes
active. When the clients wake up, they can contact SMS and apply the program
being advertised. The advertisement must be a mandatory assignment for the
global settings to take effect automatically. This global setting has no effect on
non-mandatory advertisements.
Note: The Wake up is conducted on Intel® AMT supported systems belonging to
the collection that meet the following criteria:
Systems are already discovered in the SMS Hierarchy
Systems have the SMS Advanced Client agent installed and active
Systems are reporting to the Primary SMS site where the wake up is
conducted
Note: If the advertisement is a non-recurring advertisement that has already run,
Wake Up on Advertisement will not wake up the collection to run it again even if
the advertisement is scheduled to re-run.
118
Quick Reference Guide Getting to Pro: An Enterprise Approach to Deploying Intel® AMT
Wake-Up Global Setting
Advertisements which accept the default settings change to the new
Follow these steps to configure the Wake up on advertisement global setting:
settings automatically, even if the reset option is not selected. Any
1.
Right click on Collections.
2.
Select All Tasks > Intel® AMT Tasks > Add-on Settings.
3.
The settings dialog box is displayed.
4.
Click the Advertisement tab.
5.
Place a checkmark next to ―Wake up systems on mandatory
advertisements‖.
non-mandatory advertisements are reset to not wake up.
BIOS Password Bypass on advertisement - The BIOS bypass can also
be used for those systems where BIOS is locked via a password.
Note: If the BIOS bypass option is checked but is not supported by
the system, the wake-up on the system will not be executed.
There are four control buttons at the bottom of the Advertisement Tab:
Reload Settings: Refreshes the dialog box with the current setting
information.
6.
Click Apply.
7.
The following are additional options available for the global Wake up
settings:
Wake up systems on mandatory advertisements - Any mandatory
advertisements associated with a collection wakes up the systems in
that collection when the mandatory advertisement is set to occur,
unless the setting is overridden for a specific advertisement.
Reset all advertisement wake up manual settings to automatic –
After the default behavior of this feature is changed, all current
mandatory advertisements are reset to the new setting
(recommended). It is only necessary to reset advertisements if they
have been manually changed from the default settings.
119
Save and Close: Saves the current settings and closes the dialog box.
Close: Closes the dialog box without saving the settings.
Apply: Saves the current settings without closing the dialog box.
Quick Reference Guide Maximizing the Benefits of Intel® Active Management Technology: A Solution Guide
Override the Global Wake up systems on mandatory advertisements
To override the wake-up setting for a specific advertisement and prevent it from
waking up systems, perform the steps below:
1.
Right Click the advertisement.
2.
Select All Tasks > Intel® AMT Tasks > Wake Up Options. The following dialog
box opens:
SOL/IDE Redirection Operations
This feature enables remote Serial Over LAN (SOL) Redirection and IDE
Redirection (IDER) operations for Intel® AMT-supported systems.
SOL Redirection – Allows for the remote selection of boot options.
IDE Redirection – Allows for rebooting from another image
SOL Redirection functionality is available for single systems only. The boot screen
is displayed to the user, allowing remote selection of boot options. The BIOS can
also be redirected, forcing entry to the BIOS during the boot and allowing remote
changes to the BIOS before the operating system loads (optional).
IDE-Redirection functionality is available for both single systems and collections:
Note: An IDER boot image repository must be set in the Intel® AMT Add-on
Settings dialog (See ―SMS Add-on Configuration section‖ of this document), or a
warning message appears and all the IDER options are disabled.
3.
Click Override default settings. Ensure the Wake up systems box is not
checked and click OK
Note: Non-mandatory advertisements have to be set manually in order to wake
up.
Checking if Advertisement is set to Wake up
To check if an advertisement is set to wake up a collection follow the steps
below:
1.
From the SMS Console right click on the advertisement and select All Tasks
- Intel® AMT Tasks - Wake Up Options
2.
If Use Default Settings is selected, the advertisement‘s Wake Up behavior
is determined by the global settings in the Advertisement tab of the Addon Settings dialog box.
3.
If Override Default Settings is selected, the advertisement‘s Wake Up
behavior is determined by the settings in the Intel® AMT Settings for
Advertisement window
120
Redirection Operation for a single system
Follow these steps to test a redirection operation for a single system:
1.
Right click on an Intel® AMT system.
2.
Select All Tasks > Intel® AMT Tasks > Redirection Operations.
3.
For BIOS operation, place a checkmark to both Serial Redirection Terminal
and Enter BIOS Setup.
Quick Reference Guide Getting to Pro: An Enterprise Approach to Deploying Intel® AMT
11. Click Set Boot Image button.
12. Select your image of choice, and click OK
13. Click Redirection Boot
14. The Intel® AMT system will now boot from the image file selected.
SOL redirection
Serial Redirection Terminal – Selecting this box will redirect the serial output
during the boot.
Enter BIOS Setup – Selecting this box will stop the boot operation at the
BIOS entry screen.
IDER redirection
Boot from Image located at – This box will allow for booting from an image.
Click on the Set Boot Image button to select an image that is located in the
repository set by the Boot Images Base Path option in the Intel® AMT Addon settings dialog.
Session Close After - The value can be overwritten for the IDER session
timeout defined in the Redirection tab of the Intel® AMT Add-on settings
dialog, by entering a different value in the Session Close After field
(optional).
4.
You also have option to Lock the System during Operation and bypass the
BIOS Password.
Note: Redirection operations that are not supported by a given system BIOS are
grayed out.
5.
Click the Redirection Boot button.
6.
A telnet (DOS) window will now be displayed to replicate what is also
Boot Options:
displayed on the Intel® AMT system.
7.
Navigate through the BIOS settings and Save/Ignore your changes and Exit.
8.
The Intel® AMT system will now reboot itself into a NOP state.
9.
For IDER (Boot from Image) operation, remove the previous checkmarks.
10. Place a checkmark in the Boot from Image located at checkbox.
121
Lock System during Operation - Select this box to lock the keyboard, reset
button, sleep button, and power button during a reboot in order to prevent
user intervention on the system during the operation (optional). (This
checkbox is only enabled if the system supports locking all of these options
during a reboot.)
Quick Reference Guide Maximizing the Benefits of Intel® Active Management Technology: A Solution Guide
BIOS Password Bypass – Select this box to bypass the BIOS password during
a reboot (optional). (This checkbox is only enabled if the system supports
bypassing the BIOS password during a reboot.)
1.
Right click any collection.
Current Sessions - Click the Current Sessions button to open the Current
2.
Select All Tasks > Intel® AMT Tasks > Redirection Operations.
3.
The Redirection Operations dialog appears
Sessions dialog. This displays any sessions currently running. (A new session
cannot be started if there are currently open sessions.)
To perform an IDE Redirection operation on a collection:
Stop Session - Click the Stop Session button next to each running session
and then click the Close button.
Note: Clicking the Refresh button checks again for any running sessions.
Set Boot Image – Click Set Boot Image to select an image within the size
limits of the CD or medium designed to store it that is located in the
repository set by the Boot Images Base Path option in the Intel® AMT Addon settings dialog referenced in section 0 Redirection or the section below
Redirection Boot – Click this button to perform the boot with the selected
0 To perform a Global Redirection operation:.
options.
Note: If no IDER boot image repository has been set in the Intel® AMT Add-
Caution: Redirection Boot can cause loss of data to users logged on to the
on settings dialog, a warning message is displayed, and all the options in
system.
the Redirection Operations dialog are disabled.
Note: Ensure that the system targeted by the Redirection Boot is not the system
Lock System during Operation - Select this box to lock the keyboard, reset
running the SMS console, SMS server, or any other key network system.
button, sleep button, and power button during a reboot in order to prevent
Note: Once a redirection session is opened for a system, no other redirection
session can be opened for that system until the first session is closed. To open
both SOL and IDER sessions, it is required to choose both in the same boot
user intervention on the system during the operation (optional). (This
checkbox is only enabled if the system supports locking all of these options
during a reboot.)
operation. It is also not possible to run any other operation (example re-discover,
BIOS Password Bypass – Select this box to bypass the BIOS password
Remote Control) on a system which has an open redirection session (the system
during a reboot (optional). (This checkbox is only enabled if the system
is locked).
supports bypassing the BIOS password during a reboot.)
Advanced IDER Settings – click this button and a dialog appears in which
you can set:
122
Quick Reference Guide Getting to Pro: An Enterprise Approach to Deploying Intel® AMT
The maximum concurrent number of IDER sessions
The session timeout.
Note: Ensure that the system targeted by the Redirection Boot is not the system
running the SMS console, SMS server, or any other key network system.
Note: SOL Redirection cannot be carried out on a collection.
To perform a Global Redirection operation:
Right click any system and choose All Tasks - Intel® AMT Tasks – Add-on Settings.
The Intel® AMT Add-on Settings dialog box is displayed. Click the Redirection Tab:
Note: The values set in the Advanced IDER Settings dialog override the
values set in the Intel® AMT Add-on settings Redirection Operations dialog,
for the next redirection operation only.
Perform Boot - Click the Perform Boot button in the Redirection Operations
dialog.
Caution: The Perform Boot command can cause loss of data to users logged
on to the system.
1.
Select the Include subcollections checkbox when the Boot
verification message appears (optional); if selected this action is
also performed on sub-collections. Click OK to boot the selected
collections.
The following parameters can be configured:
SOL Redirection Port: Ensure that the port entered is not in use by another
application
IDE Redirection Timeout: Specifies when an IDER session should be automatically
terminated.
Max IDER Concurrent Sessions: Maximum number of IDER redirection
sessions that can be open concurrently using the network boot image file
used for redirection.
Note: The highest number that can be entered is the maximum number of
network connections specified in the Add-on Settings dialog box Performance
tab. (See example below – in this example the max number is set to 10)
The result of the redirection operation for each system is logged to the SMS log.
A summary log entry is written to the SMS log when the operation ends.
123
Quick Reference Guide Maximizing the Benefits of Intel® Active Management Technology: A Solution Guide
applied to an advertisement, to move all systems belonging to a collection with a
scheduled advertisement to a remediation network until each system is installed
with the advertised package. This is done by using the Intel® AMT System
Defense feature. The SMS client agent is responsible for the software delivery
itself. Systems will only be returned to normal network settings after the
software has been successfully delivered.
If you apply a System Defense Policy or Heuristics Policy to a system that is
unreachable for any reason, the Add-on will apply the policy to the system when
it becomes reachable.
A System Defense Policy can be created and enabled using the Advertisement
Boot Image Base Path – Click on Browse to select an image that is located
tab in the Intel® AMT Add-on Settings dialog.
in the repository set by the Boot Images Base Path option in the Intel® AMT
Once a policy has been loaded and enabled, it can be applied to an advertisement,
Add-on settings dialog or within the size limits of the CD or medium
which will immediately apply the policy to Intel® AMT systems in the target
designed to store it.
collection. The SDP is applied to Intel® AMT supported systems belonging to the
Note: If no IDER boot image repository has been set in the Intel® AMT Add-on
settings dialog, a warning message is displayed, and all the options in the
Redirection Operations dialog are disabled.
System Defense
collection. These systems must have been discovered, have an SMS Advanced
Client installed and active, and are reporting to the local Primary site server
where the System Defense settings have been applied.
The policy will be automatically removed from each system in turn when the SMS
site is notified that the advertisement status for the system shows ―Program
Intel® AMT delivers a new category of capabilities called system defense,
Success‖.
including agent presence and network outbreak containment which allows you to
Note: If the system is not accessible, because of networking, Intel® AMT
define multiple system defense and heuristics policies and apply them individually
permissions, or other issues, the SDP will not be removed, and a message will be
to each collection or system in an SMS site. These capabilities provide hardware-
logged to the SMS log. The policy can then be manually cleared.
based timers for checking the presence of security agents, hardware-based
filters for inbound and outbound network traffic, and isolation circuitry.
The add-on creates several new fields in the ―System Resource‖ schema of SMS
system objects to store information about the SDP-state of systems. These are
The System Defense feature allows you to apply a System Defense Policy (SDP)
shown below and can be used as attributes in any SMS query on System
or Heuristics Policy (HP) to an SMS collection or to a single system. You can
Resources.
define multiple policies for different systems and different circumstances. You
create policies by specifying them in script files, and apply the relevant policies to
the collections or systems that you want to protect.
The System Defense for advertisement feature integrates the Intel® AMT System
Defense feature with SMS advertisements. A System Defense Policy (SDP) can be
124
Below is a list of Intel® AMT System Resource Fields:
Field name
IAMTSDPCount
IAMTActivePolicyId
Field description
The number of times the SDP has been applied to the
system. If the value is 0, the system is not protected.
The Id of the SDP currently active and protecting the
system
Quick Reference Guide Getting to Pro: An Enterprise Approach to Deploying Intel® AMT
IAMTOldPolicyId
The Id of the SDP which was disabled in order to apply the
current active SDP. This SDP will be restored when the
current active SDP is removed
Apply System Defense Policy to Advertisement
Follow the steps below to apply a System Defense Policy to an advertisement:
1.
Right click on the advertisement in the SMS Advertisements window.
2.
Select All Tasks > Intel® AMT Tasks > Apply SD PolicySystem Defense
Operations. The Apply SD Policy menu option is disabled if no policy has been
loaded and enabled.
Reapplying an SDP to an advertisement has no effect on the systems in the
collection which are still protected from the previous application of the SDP. This
can be verified from the SMS logs. Reapplying the SDP will apply the SDP only to
the systems which have not yet applied the advertisement (i.e. systems which
failed to apply the advertisement, or new systems in the collection, added after
the SDP was applied). Once a system has successfully installed the
advertisement, reapplying an SDP to the advertisement will not have any effect
on it.
Applying an SDP policy to a system will fail, and an appropriate message will be
logged to the SMS log, if the system already has the maximum number of filters
or policies already defined on it.
The result of SDP application operation for each system is logged to the SMS log.
A summary log entry is written to the SMS log when the operation ends.
Removing System Policies
From Collections:
In order to manually remove a System Defense policy from a collection Right click
on the collection targeted by the advertisement and choose All Tasks - Intel® AMT
Tasks - Clear System Defense Policy.
The SDP has a fixed priority level of 50. This means that if there is also an
enabled Agent Presence Policy (APP) on the Intel® AMT system, which has a
priority higher than 50, the SDP will not be active. If there is no APP on the Intel®
AMT system, then the SDP for advertisement will be enabled and activated, even
if there was a previous SDP set by some other application on the system. When
From Single System:
To manually remove a System Defense policy from a single system Right click on
the system and choose All Tasks - Intel® AMT Tasks - Clear System Defense
Policy.
the SDP for advertisement is removed by the add-on, either automatically due to
Note: This option is only enabled if a System Defense policy applied by the add-on
the successful installation of the advertised package, or manually via the add-on
to that system is currently active.
menus, the add-on will re-enable any previous policy that was disabled when the
SDP for advertisement was applied.
Considerations before using System Defense
If several different advertisements have an SDP applied to their target
System Defense is a powerful feature that can have serious detrimental effects
collections, and some systems are thereby multiply protected by the SDP, the
if it is not used with caution. This is because System Defense effectively isolates
protection will be removed from these systems when all of the relevant
many network systems, and in certain cases this isolation can become permanent.
advertised packages have been successfully installed.
125
Quick Reference Guide Maximizing the Benefits of Intel® Active Management Technology: A Solution Guide
This section provides the overview needed to get started using system.
path to this file is entered into the text box using the Add button. The Script is
However, detailed information on this should be found in the Intel®
checked for syntax when loaded. Any error in the script will terminate the script
documentation: Intel® Active Management Technology Add-On for Microsoft*
load, and the user will be notified of the line in which the error occurred. The
SMS 2003 Installation and User’s Guide Version 3.0.
script language has a strictly defined syntax, which closely resembles Cisco ACL
Note: Heuristics policies are only available on Intel® AMT 3.x systems and later.
If a system protected by an active SDP is deleted from SMS, no warning
Technology Add-On for Microsoft® SMS 2003 Installation and User’s
Guide Version 3.0 for syntax and detailed information for creating these
message is displayed to the user. The deleted system remains permanently
policies.
protected by the SDP.
If the Add-on is uninstalled while systems are protected by active SDPs, a
warning message is displayed to the user. If this warning is ignored and the
Add-on is uninstalled anyway, the systems remain permanently protected.
If the operating system of a protected system is reinstalled, SMS may lose
the connection between the previous entry to which it applied the SDP,
and the current entry that represents the newly-installed operating
system.
If a system protected by an SDP is disconnected from the network, the SDP
cannot be removed, and the system will remain isolated when it is
connected to a different network. For example, this may occur when a
machine is moved to a different department within the organization.
The Add-on does not allow an SDP to block a system from receiving ARP
broadcasts or responding to them; this is to prevent the system from losing
its IP address and becoming undetectable on the network.
Note: System Defense is implemented by the add-on integrated with the
advertisement functionality of SMS. It is not a generic protection for networks,
and will only protect systems which are expected to download and install a given
advertisement. IT administrators should not confuse it with other network
protection tools such as firewalls, which have a much wider scope, and are
independent of SMS advertisements.
System Defense Tab
To define a System Defense policy to be later applied to Advertisements, the
System Defense Policy (SDP) is defined as a script in a text file and the network
126
language. Refer to the Intel® documentation: Intel® Active Management
Quick Reference Guide Getting to Pro: An Enterprise Approach to Deploying Intel® AMT
Note: SDP definitions are only noted at the time of the operation of applying the
Note: In any case where an add-on reports a ―changed UUID‖, the system must be
SDP. If the SDP is changed while a system is protected by the policy, no change
rediscovered to update the entry.
will be communicated to the protected system. Likewise, if the SDP is changed
during the application of the SDP to the systems in the collection, no change will
be noted, and all of the systems will be protected using the original SDP.
SMS Repair and Scheduled Backups
The Intel® AMT service must be stopped before trying to perform SMS
Note: Changing the SDP file alone will not update the SDP definition. The UI must
maintenance tasks that must disable SMS services and WMI connections (i.e.,
be made aware of the change, either by unchecking and rechecking the Enable
running the SMS repair agent or running a scheduled backup). More information
System Defense Policy for Advertisements checkbox, or by pressing the Browse
about this can be found at
button and reselecting it.
http://www.microsoft.com/technet/prodtechnol/sms/sms2003/maintain/spmbrs
Maintenance Activities
SMS Add-on
ms03/spmbr02.mspx
Repairing the Intel® AMT Add-on for SMS
Before repairing the add-on, verify that the SMS Console is closed. The user
account repairing the add-on requires the same permissions needed for
Duplicate Entries
installation.
Due to the nature of SMS, duplicate entries may be created for the same physical
To repair the add-on, follow either of the steps below:
system. The add-on discovery mechanism can detect these types of duplicate
entries and log them. Duplicate entries in the SMS repository may be valid or
for the add-on, and follow the wizard's instructions.
invalid depending on the host setup and configuration. For example, dual boot
systems are a valid case of duplicate entries.
An example of an invalid duplicate entry is a case where a system was removed
Open the Add or Remove Programs console and select the Change option
Double click the original installation file (setup.exe) and follow the wizard's
instructions.
from SMS and a different system in SMS was given the name of the removed
Caution: The Repair option restores the installation to its default state, replacing
system. If this is the case, remove one of the entries and rediscover the system.
installed files (if they have been changed), and all registry settings, with their
default values. However, while Repair ensures the existence of the required add-
Motherboard Replacement
on service user account, it does not change its settings.
The add-on may report a UUID change when a motherboard has been replaced in
Note: Repair will fail if the dedicated service user name has been changed in
a system with an entry in SMS. If this is the case, rediscover the system to make
Active Directory, or the Active Directory settings for the dedicated service user
sure that the current information is used.
account have been changed to ―Account is disabled‖ or ―User cannot change
Note: The new UUID is not automatically detected when working with Kerberos
without an integrated Intel® Setup and Configuration Service, due to the
motherboard replacement. In any case, rediscovering the system in order to
update the entry is recommended after the motherboard is changed.
127
password‖.
Quick Reference Guide Maximizing the Benefits of Intel® Active Management Technology: A Solution Guide
Logs
All add-on operations are logged in the SMS log. Each log entry specifies the
operation type and the result of the operation. For collection operations, the addon logs the operation start, the result for each system, and a summary of the
complete operation.
A specific Status Message Query can be created on these logs by performing the
following steps:
1.
Right click on System Status - Status Message Queries and choose New Status Message Query.
2.
Click the Edit Query Statement button in the Status Message Query
Properties dialog.
3.
In the Query Statement Properties dialog select the Criteria tab.
4.
Click the button to create a new criterion.
5.
In the Criterion Properties dialog select "Simple value" from the Criterion
type drop-down list.
6.
Click the Select button.
7.
In the Select Attribute dialog select "Status Message" from the Attribute
class drop-down list.
8.
Select "Component‖ from the Attribute drop-down list.
9.
Click the OK button.
10. Click the Values button in the Criterion Properties dialog.
11. Select "Intel® AMT Add-on for SMS" from the list box in the Values dialog.
12. Click the OK button repeatedly until all dialogs are closed
Known Issues
Detailed information regarding known issues be found in the Intel®
documentation: Intel® Active Management Technology Add-On for Microsoft* SMS
2003 Installation and User‘s Guide Version 3.0.
128
Quick Reference Guide Getting to Pro: An Enterprise Approach to Deploying Intel® AMT
Glossary
Term
Access Control List (ACL)
Active Directory (AD)
AD OU Active Directory
Organizational Unit
Intel® AMT
API
Authentication
Authentication Server (AS)
Authenticator
Authorization
CRL Certificate Revocation List
Domain
DNS
DNS
FPACL
FQDN Fully Qualified Domain Name
Group
GSS-API
ISV
Term
129
Definition
A set of data associated with a file, directory or other net-work resource that defines the permissions that users, groups, processes or
devices have for accessing it. In Intel® AMT, a list of users and their access privileges.
Active Directory is an advanced, hierarchical directory ser-vice that comes with Windows 2000/2003 servers. It is LDAP (Lightweight
Directory Access Protocol—a protocol used to access a directory listing) compliant and built on the Internet's Domain Naming System (DNS).
Workgroups are given domain names, just like Web sites, and any LDAP-compliant client (Windows, Mac, Unix, etc.) can gain access to it.
Organizational Units (OUs) within an Active Directory are a way to delegate control over part of the directory to a user or group of users.
Subsets of users, groups and/or computers can be delegated to different groups, allowing a greater degree of control and granularity
without the need to run dedicated domain controllers for that group.
Intel Active Management Technology is a technology developed by Intel that enables Administrators to remotely manage and repair
networked computers even when they are powered down. Three primary features of Intel® AMT are better asset management, reduced
downtime and minimized desk-side visits, also called by Intel the ―discover, heal and protect process.‖
Application Programming Interface: A language and message format used by an application program to communicate with the operating
system or some other control program such as a database management system (DBMS) or communications protocol. APIs are implemented
by writing function calls in the program, which provide the linkage to the required subroutine for execution. Thus, an API implies that some
program module is available in the computer to perform the operation or that it must be linked into the existing program to perform the
tasks.
A security measure designed to establish the validity of a transmission, message, or originator.
A Kerberos element in a KDS that recognizes a client at log-on time based on information in its trusted database.
An authentication protocol string created each time authentication occurs and sent with the ticket to the server. It contains a time-stamp
encrypted in the session key that can reliably show that the authentication request actually came from the client identified in the ticket.
The process of determining what types of activities are per-mitted. Usually, authorization is in the context of authentication: once you have
authenticated a user, the user may be authorized for different types of access or activity.
The CRL is a list of time stamped entries which indicate which lists have been revoked.
Part of the DNS (domain naming system) name that specifies details about a host. A domain is the main subdivision of Internet addresses, the
last three letters after the final dot, and it tells you what kind of organization you are dealing with. In the context of Active Directory, every
host is a member of a domain. A user logs in to the domain of which he is a member.
A system for converting host names and domain names into IP addresses on the Internet or on local networks that use the TCP/IP protocol.
For example, when a Web site address is given to the DNS, DNS servers return the IP address of the server associated with that name.
Enterprise Access Control List
Factory Partners Access Control List
The human-readable name corresponding to the IP address of a network interface, as found on a computer, router or other networked
device. It includes both its host name and its domain name.
In Active Directory, a collection of users and objects that share properties and permissions. A group may have another group as a member.
The second group is then a sub-group of the first group.
Generic Security Services Application Programming Inter-face. The generic API for performing client-server authentication.
Independent Software Vendors that develop applications that use Intel® AMT capabilities.
Definition
Quick Reference Guide Maximizing the Benefits of Intel® Active Management Technology: A Solution Guide
Kerberos
Key
Key Distribution Center (KDC)
Mutual Authentication
Provisioning
Proxy
PSK Pre-Shared Key
RC4-HMAC
Realm
RNG Random Number Generator
Schema
Security Identifier (SID)
SOAP Simple Object Access Protocol
SOL/IDER Serial-over-LAN/IDERedirection
SPEGNO Simple and Protected GSS-API
Negotiation Mechanism
SPN
Term
Ticket Granting Server (TGS)
130
An Access Control System that was developed at MIT in the 1980s. The Kerberos concept uses a ―master ticket‖ obtained at logon, which is
used to obtain additional ―service tickets‖ when a particular resource is required. It is named after a mythological creature.
A key is a piece of information that controls the operation of a cryptography algorithm. In encryption, a key specifies the particular
transformation of plaintext into cipher text, or vice versa during decryption. Keys are also used in other crypto-graphic algorithms, such as
digital signature schemes and keyed-hash functions (also known as MACs), often used for authentication.
In the Kerberos protocol, a trusted third party that has secret information (passwords) for all clients and services under its supervision.
Mutual authentication, also known as two-way authentication, is a process whereby two parties, typically a client and a server, authenticate
each other in such a way that both parties are assured of the others' identity. In mutual authentication, the server also requests a certificate
from the client.
Provisioning deals with planning, setting up and configuring the hardware, software and networks that deliver access to data and network
resources for the users.
A firewall mechanism that replaces the IP address of a host on the internal (protected) network with its own IP address for all traffic passing
through it. A software agent that acts on behalf of a user, typical proxies accept a connection from a user, make a decision as to whether or
not the user or client IP address is permitted to use the proxy, perhaps does additional authentication, and then completes a connection on
behalf of the user to a remote destination.
The use of secret passwords or encryption keys that are entered into both sides of the message exchange ahead of time. Pre-shared keys
are typed into the clients and servers (authentication servers, access points, etc.) or entered via floppy, CD-ROM or smart card. Contrast with
―server-based keys,‖ in which one side generates a key and sends it to the other side during the authentication session.
An encryption type based on the RC4 encryption algorithm that uses an MD5 HMAC for checksum. It is included in the Windows
implementation of Kerberos.
In Kerberos, a realm is the same as an Active Directory domain. Kerberos V5 expects realms to have all capital letters. Intel® AMT
functionality is divided among different realms, for example, the Storage Realm and the Storage Administration Realm. ACLs associate a user
or an SID with one or more realms.
A computer Random Number Generator is a software routine that implements an algorithm to generate random numbers. Modern
cryptography rests on the assumption that ciphers can be constructed whose output is indistinguishable from random noise without
knowledge of a secret key used in the algorithm. See ―Key‖.
A conceptual model of the structure of a database that defines the data contents and relationships. The Microsoft Active Directory schema
contains formal definitions of every object class that can be created. One of these objects is the computer object. The Intel -ManagementEngine-Class, based on the computer object, is added to the Active Directory schema and used to define Intel® AMT objects. The SCS database
schema defines the data tables maintained in the database and the relationships of the tables.
A numeric value that identifies a logged-on user who has been authenticated by Active Directory or a user group.
A message-based protocol based on XML for accessing ser-vices on the Web. SOAP employs XML syntax to send text commands across the
Internet using HTTP.
The proprietary protocols defined for Intel® AMT for redirecting keyboard/text or floppy disk/CD transfers from a local host to a remote
workstation.
SPNEGO is a standard GSS-API pseudo-mechanism for peers to determine which GSS-API mechanisms are shared, select one and then
establish a security context with it.
A service principal name - the name by which a client uniquely identifies an instance of a service.
Definition
A Kerberos element in a KDC that creates tickets used to by clients to access servers.
Quick Reference Guide Getting to Pro: An Enterprise Approach to Deploying Intel® AMT
TLS Transport Layer Security
Token
UUID Universally Unique Identifier
VLAN Virtual Local Area Network
131
A protocol intended to secure and authenticate communications across a public network by using data encryption. TLS uses digital
certificates to authenticate the user as well as authenticate the network (in a wireless network, the user could be logging on to a rogue
access point).
The TLS client uses the public key from the server to encrypt a random number and send it back to the server. The random number,
combined with additional random numbers previously sent to each other, is used to generate a secret session key to encrypt the subsequent
message exchange.
In Kerberos, a fixed length element that contains a user's SID and includes the user's rights and group memberships.
A UUID is an identifier standard used in software construction. The intent of UUIDs is to enable distributed systems to uniquely identify
information without central coordination. Thus, anyone can create a UUID and use it to identify something. Information labelled with UUIDs
can therefore be combined into a single database without need to resolve name conflicts.
A UUID is essentially a 16-byte number and in its canonical form a UUID may look like this:
550E8400-E29B-11D4-A716-446655440000
A VLAN is a logical subgroup within a local area network that is created via software rather than manually moving cables in the wiring closet.
It combines user stations and network devices into a single unit regardless of the physical LAN seg-ment they are attached to and thereby
allows traffic to flow more efficiently within populations of mutual interest.
Quick Reference Guide Maximizing the Benefits of Intel® Active Management Technology: A Solution Guide
Troubleshooting / Best Practices
SMS Trace Logs & Status Messages
There are several troubleshooting activities that can be performed to help
[HKEY_LOCAL_MACHINE\SOFTWARE\Intel\Intel(R) AMT Add-on\LOG]
determine what issues may exist with the infrastructure. This list is not an
"LogLevel"=―5―
exhaustive list, but it will help list some of the obscure options that are available
to you.
Technical support from Intel may be obtained by using the email address:
[email protected].
SMS Logging
This creates: ―IAMTSMSService.log‖ in Add-on install directory
This option is much like the SCS Log Level option above in that it creates extra
files to help with detailed issue isolation. Also, you will use these file to
communicate issues to the Intel® technical support organization for problems you
are unable to diagnose and remedy on your own.
[HKEY_LOCAL_MACHINE\SOFTWARE\Intel\Intel(R) AMT Add-on\LOG]
Auditing Objects
"NoLogDetailFailedPerm"=dword:00000001
Best practice in auditing object in the Windows server operating system is fairly
This option prevents the SMS Add-on from creating un-needed entries in the SMS
standard for other Windows server OS issues. This is no exception as auditing
status log for systems that are not Intel® AMT systems. This helps to reduce the
object for SCS or the SMS Add-on create objects in the Windows security event
log size and eliminate entries that are not necessary for normal operations.
log helping identify many issues with the most likely issue being security access
problems and ACL issues.
SCS Log Level
[HKEY_LOCAL_MACHINE\SOFTWARE\Intel\AMTConfServer\LOG]
"LogLevel"="V―
This creates: ―c:\scs_server.log‖ and ―c:\scs_win_server.log‖
This option helps to create verbose logging used for internal troubleshooting and
these files are often needed by the Intel technical support organization (email
listed above). You may use this to determine what actions SCS is performing and
as an example determine if SCS is having trouble creating Active Directory
objects.
132
Quick Reference Guide Getting to Pro: An Enterprise Approach to Deploying Intel® AMT
Certificate Troubleshooting
4 of this document. The SPN‘s needed for AD integration to work appropriately
The basic activity for certificate troubleshooting is to open the appropriate
are listed in the following screenshot.
certificate and checking the certificate chain to make sure that the root
certificate from the issuing certificate authority is installed correctly. Other
activities vary according to the issue at hand, but it is imperative that the
certificates have the appropriate Intel OID assigned as noted earlier in the
document as well as client and server authentication purposes assigned to the
certificate used for Intel® AMT management. For example:
DNS Testing
The DNS testing is rather straightforward, but is worth mentioning. There are no
tricks to DNS testing as what should be done for this infrastructure is the same
as for other infrastructure troubleshooting. The primary tool for troubleshooting
DNS issues is ‗nslookup‘ and it should be verified the DNS configuration handed
out by your DHCP scope. It is possible that the DHCP server is handing out an
unexpected domain suffix and not registering the hardware FQDN as is expected.
When the provisioning server or SMS Add-on is unable to locate the Intel® AMT
device it is prudent to check the DNS entries, DHCP scope settings, and finally
make sure the machine is properly plugged into power and the network.
ADSI Edit
This utility will help you determine if the appropriate Service Principal Names
(SPNs) are assigned to the Intel Management Engine Object created in the
IntelAMT OU by the SCS. The service account running the AMTConfig service on
the Setup & Configuration Server should have Full Control rights to the IntelAMT
OU to properly create and manage the objects it contains. If objects have been
created in this OU prior to the SCS service account modifying them it is likely that
you will have SPN issues. This can be fixed by manually deleting objects with
another account (given appropriate access to do so) and then allowing the SCS
service account to manage the objects in the IntelAMT OU as described in section
133
Quick Reference Guide Maximizing the Benefits of Intel® Active Management Technology: A Solution Guide
Appendix A
Installing and Configuring DNS
The following sections provide links to documentation that may used to attain
Microsoft TechNet Deploying DNS
detailed instructions specific to the named products and technologies. These
http://technet2.microsoft.com/windowsserver/en/library/7f6df44c-06c3-4b92-
documents are to support full installation configurations of each product
ba32-63d895a7924b1033.mspx?mfr=true
mentioned in this document but not fully detailed here. It is intended that the
reader utilize the information in this appendix research the supporting products.
Deploying and Configuring Active Directory
Overview of DNS Deployment
Examining Your Current Environment
Designing a DNS Namespace
Deploying Active Directory
Designing a DNS Server Infrastructure
http://technet2.microsoft.com/windowsserver/en/library/56764c0c-1f60-4d53-
Designing DNS Zones
96f8-1aef3efcac021033.mspx?mfr=true
Configuring and Managing DNS Clients
Click on the links below for additional information on Active Directory.
Securing Your DNS Infrastructure
Deployment resources
Integrating DNS with Other Windows Server 2003 Services
Using the Active Directory Installation Wizard
Implementing Windows Server 2003 DNS
Creating an additional domain controller
Additional Resources for Deploying DNS
Creating a new domain tree
Installing and Configuring DHCP
Creating a new child domain
Creating a new forest
Microsoft TechNet Deploying DHCP
Upgrading from Windows NT or Windows 2000
http://technet2.microsoft.com/windowsserver/en/library/599241a4-4374-4a98af9b-c38f766fbfbe1033.mspx?mfr=true
Overview of DHCP Deployment
Extending Your Active Directory Schema in Windows Server 2003 R2
Creating Your DHCP Server Design
http://technet2.microsoft.com/windowsserver/en/library/509ada1a-9fdc-45c1-
Integrating DHCP with Other Services
8739-20085b20797b1033.mspx?mfr=true
Defining Scopes
Implementing Your DHCP Solution
Example DHCP Implementation
Additional Resources for Deploying DHCP
134
Quick Reference Guide Getting to Pro: An Enterprise Approach to Deploying Intel® AMT
Installing and Configuring Certificate Services
Operating Systems Management Server 2003
http://www.microsoft.com/technet/sms/2003/library/operate.mspx
Microsoft TechNet Certificate Services
Using SMS 2003 SQL Views to Create Custom Reports
http://technet2.microsoft.com/windowsserver/en/library/d01a80dd-479a-444b-
SMS 2003 Operations Guide
8893-68c40d61dd9c1033.mspx
Setting Up a Certification Authority
Administering a Certification Authority
SMS Technical FAQ
Scenarios and Procedures for SMS 2003: Software Distribution and Patch
Management
Deploying a Public Key Infrastructure
Deploying Windows XP SP2 with SMS 2003 or 2.0
Certificate Services overview
Using Microsoft SMS 2003 to Distribute Microsoft Office 2003
New features in Certificate Services
Deploying Exchange 2003 Offline Address Book using SMS 2003 SP1
Understanding Certificate Services
Windows Installer Source Location Manager
Using Certificate Services
SMS 2003 Software Update Management to Mobile Computers
Certificates Resources
Deploying Software Updates Using the SMS Software Distribution Feature
Installing and Configuring Systems Management
Server 2003
Planning & Deploying Systems Management Server 2003
Managing Duplicate GUIDs in SMS 2003
Scenarios and Procedures for SMS 2003: Maintenance, Backup, and Recovery
Download Tool To Define and Detect Configuration Models
http://www.microsoft.com/technet/sms/2003/library/plan-deploy.mspx
Securing Systems Management Server 2003
Scenarios and Procedures for SMS 2003: Planning and Deployment
http://www.microsoft.com/technet/sms/2003/library/secure.mspx
SMS 2003 Capacity Planner
Scenarios and Procedures for SMS 2003: Security
SMS Technical FAQ: Planning and Deployment
SMS Technical FAQ: Security
Active Directory Schema Modification and Publication
Deployment Readiness Wizard Procedures for Resolving Test Failures
SMS 2003 Configuration and Operation of Advanced Client Roaming
Configuring Microsoft SQL Server 2000 Replication for a SMS 2003 Management
Point
135
Quick Reference Guide Maximizing the Benefits of Intel® Active Management Technology: A Solution Guide
Technical Reference for Systems Management Server 2003
Database Engine
http://www.microsoft.com/technet/sms/2003/library/techref.mspx
Analysis Services
Deploying Office 2007 with SMS 2003 R2 White Paper
Integration Services
Using SMS 2003 SQL Views to Create Custom Reports
Replication
SMS 2003 SP1 Status Message Documentation
Reporting Services
Troubleshooting Flowcharts
Notification Services
Troubleshooting Management Points for SMS 2003
Service Broker
Installing and Configuring SQL Server 2005
Full-Text Search
Getting Started with SQL Server 2005
http://www.microsoft.com/technet/prodtechnol/sql/2005/library/gettingstarted.
mspx
Database Engine Overview
Database Engine Enhancements
SQL Server 2005 System Requirements
Installing SQL Server 2005
Installing the SQL Server Database Engine
SQL Server 2005 Upgrade Handbook
An Overview of SQL Server 2005 for the Database Administrator
What's New in SQL Server Agent
Installing SQL Server Service Pack 2
http://www.microsoft.com/downloads/details.aspx?FamilyId=d07219b2-1e2349c8-8f0c-63fa18f26d3a&DisplayLang=en
SQL Server 2005 Planning & Architecture
http://www.microsoft.com/technet/prodtechnol/sql/2005/library/planning.mspx
136
SQL Server Express Edition
SQL Server Mobile Edition-
Quick Reference Guide Getting to Pro: An Enterprise Approach to Deploying Intel® AMT
Appendix B
6.
A dialog box is displayed indicating that the machine name or domain
membership of the machine cannot be changed while it acts as a certificate
server.
The following sections provide links to documentation that may used to attain
detailed instructions specific to the named products and technologies. These
documents are to support full installation configurations of each product
mentioned in this document but not fully detailed here. It is intended that the
reader utilize the information in this appendix research the supporting products.
Installing an Enterprise Subordinate CA
7.
Click Yes, and then click Details.
8.
Verify that both the Certificate Services CA and the Certificates Services
Install and configure an Enterprise subordinate CA as follows:
1.
Logon to the server that will become the Enterprise Subordinate CA as an
Administrator
2.
Verify that Internet Information Services (IIS) is installed, and Active Server
Pages is configured
3.
From the Control Panel, double-click Add/Remove Programs
4.
Click Add/Remove Components
5.
In the Windows Components dialog box, click the checkbox to select
Certificate Services.
Web Enrollment Support checkboxes are selected and click OK.
9.
137
Click Next. The CA type screen is displayed.
Quick Reference Guide Maximizing the Benefits of Intel® Active Management Technology: A Solution Guide
13. Accept the default ―Certificate Database Settings‖ window settings, and
click Next.
10. Select Enterprise subordinate CA option on the CA Type screen and click
Next.
11. Complete the CA Identifying Information screen.
You may accept the default location for the Certificate Database Settings
or modify as prescribed by your company policy. The configuration
information will be stored in Active Directory, so leave the ―Store
configuration information in a shared folder‖ option unchecked. Click Next.
14. Complete the CA Certificate Request as follows:
12. Click Next
138
Quick Reference Guide Getting to Pro: An Enterprise Approach to Deploying Intel® AMT
a.
Click the Browse button next to the Computer name window.
e.
Click Next.
15. Click Yes on the dialog message informing you that IIS must be stopped
temporarily.
16. Click Finish, and then close the Add or Remove Programs window.
17. Click OK when presented with
b.
The standalone Root CA will be highlighted, click OK to select
it
c.
The Computer name and the Parent CA fields are auto filled
for you.
d.
139
Accept the default ―Save the request to a file‖ location.
18. Configure the CA to issue certificates as follows: Click Start >
Administrative Tools > Certification Authority
Quick Reference Guide Maximizing the Benefits of Intel® Active Management Technology: A Solution Guide
21. Click Properties and select Follow the settings in the certificate template, if
applicable. Otherwise, automatically issue the certificate.
19. From the right pane, right-click CA server name
20. Click Properties and click the Policy Module tab\
a.
Click OK, and a dialog box is displayed indicating that the ―Certificate
services must be restarted for these changes to take effect‖, click OK
b.
Click OK.
c.
From the right pane, right-click on the CA server name, select All Tasks
> Stop Service. You should notice the server CA icon turning red, to
indicate that the service is stopped.
140
Quick Reference Guide Getting to Pro: An Enterprise Approach to Deploying Intel® AMT
5.
Select Certificate Templates, and click Add
should notice the CA icon turn green, indicating that the service is started.
6.
Click Close, and then click OK
Create Client Certificate Template for the
Enterprise Subordinate CA
7.
From the mmc console, click Certificate Templates
8.
In the right hand pane, select User
Right-click on the CA server name again, select All Tasks > Start Service. You
During the normal SCS operations, including provisioning, the SCS request
certificates on behalf of the Intel AMY systems. In an Enterprise Certificate
hierarchy, the fields in the certificate requests are pre-defined in form of
templates. Follow the following procedures to create a template on the
Enterprise subordinate CA.
1.
Logon to the Enterprise subordinate CA server.
2.
Click Start > Run, and then type mmc and click OK
3.
From the MMC console, select File > Add/Remove Snap-in
4.
Click Add
141
Quick Reference Guide Maximizing the Benefits of Intel® Active Management Technology: A Solution Guide
9.
Right click User, and then select Duplicate Template
11. Type your preferred display name in the ―Template display name‖ field, and
then type your preferred name in the ―Template name‖ field
12. Click Apply
13. Select the Request Handling tab
10. The properties of a New template is displayed as follows:
142
Quick Reference Guide Getting to Pro: An Enterprise Approach to Deploying Intel® AMT
15. Select the Microsoft Strong Cryptographic Provider checkbox
16. Click OK, and then click Apply
17. Select the Subject Name tab
14. Click the CSPs… button
18. Select the ―Supply in the Request‖ radio button, and then click Apply.
19. Select the Security tab
143
Quick Reference Guide Maximizing the Benefits of Intel® Active Management Technology: A Solution Guide
23. Select Application Policies, and then click the Edit button
20. Add the ―Enterprise IntelME Setup and Configuration Servers‖ group.
21. Click Apply
22. Select the Extensions tab
24. Click Add
144
Quick Reference Guide Getting to Pro: An Enterprise Approach to Deploying Intel® AMT
25. Click New
29. Click OK
26. In the Name field, type intel_oid
27. In the Object identifier field, type 2.16.840.1.113741.1.2.1
28. Click OK
30. Click Add
145
Quick Reference Guide Maximizing the Benefits of Intel® Active Management Technology: A Solution Guide
31. Select Server Authentication and click OK
33. Click Apply and then click OK to save the template.
32. Click OK
146
Quick Reference Guide Getting to Pro: An Enterprise Approach to Deploying Intel® AMT
Add Client Certificate Template to the Enterprise
Subordinate CA
4.
From the list of templates, select the template created in previous steps
5.
Click OK
6.
The template is now listed in the list of templates.
7.
Close the MMC console.
Follow the following procedures to add the newly created template to the
Enterprise subordinate CA.
1.
Click Start > Programs > Administrative Tools > Certification Authority
2.
Select Certificate Templates in the navigation tree.
3.
Right click Certificate Templates, and then select New/Certificate Template
to Issue
NOTE: You can now return to task 4.2.1.3 to export the certificates.
147
Quick Reference Guide Maximizing the Benefits of Intel® Active Management Technology: A Solution Guide
*Other names and brands may be claimed as the property of others.
Intel® Active Management Technology requires the computer system to have
Copyright © 2008 Intel Corporation. All rights reserved.
an Intel® AMT-enabled chipset, network hardware and software, as well as
Intel, the Intel logo, Intel® AMT, Intel vPro, Centrino, Centrino Inside
connection with a power source and a corporate network connection.
and vPro Inside are trademarks of Intel Corporation in the U.S. and
Setup requires configuration by the purchaser and may require scripting with
other countries.
the management console or further integration into existing security
frameworks to enable certain functionality. It may also require modifications
of implementation of new business processes. With regard to notebooks, Intel
AMT may not be available or certain capabilities may be limited over a host OSbased VPN or when connecting wirelessly, on battery power, sleeping,
hibernating or powered off. For more information, see
http://www.intel.com/technology/manage/iamt/
148