1
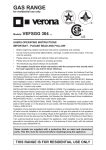
ONE DIN 7 INCH TOUCHSCREEN
CAR DVD RECEIVER
Instruction Manual
CAUTION:
C
nB
uy
N
et
.c
om
1. Please read the instruction manual carefully before using the unit, to avoid
wrong operation.
2. When you want to change other mode from GPS mode, please use mode
button on the remote control or power button on the unit to switch.
3. Please do not use any sharp things or apparatus to touch panel and that
will break the touching screen..
4. There are two modes of GPS for user selection, please carefully refer to
instruction manual on page 19.
5. To aviod the sight of TFT disturb the drivers’eyesight please long press the
PLAY/PAUSE button to turn off the screen but the voice can output
normally .
6. When the unit is out of work,pelase take off the little plug and prick the RES
button and recover it( please operate it lightly)
7. Please don’t move the display monitor when the screen Stretches out
or Shrinks,to avoid to brake the screen and the machinism!
DVD/VCD/CD/MP3/MPEG4/DIVX/JPEG
IPOD/TV/BLUETOOTH/AUX/USB/SD
FM/AM/MULTIMEDIA PLAYER
1
CATALOGUE:
1. Standard Accessory
Standard accessory..........................................................................................3
Specification.....................................................................................................4
Touching Area and Button Instruction..............................................................5
Main Menu Interface........................................................................................6
Radio Operation Instruction.............................................................................8
DVD Player instruction.....................................................................................9
TV Operation Instruction.................................................................................14
AUX Operation Instruction.................................................................. ...........15
om
USB/SD Operate Instruction ................................................................. ........15
IPOD Operate instruction………………………………………………………….16
User Normal Setup Menu...................................................................... ........17
Bluetooth Function............................................... ................................ .........18
GPS Function............................................... ........................................ .........19
Remote Control Instruction.................................................................... .........25
1pcs
Output Wire
Remote Control
1pcs
1pcs
Instruction
Manual 1pcs
Plastic Frame
1pcs
Install Bracket
Ipod Wire
2pcs
1pcs
C
nB
Trouble Shooting.............................................................................................30
uy
N
Wiring Diagram............................................... .................................. .............26
Technical Parameters......................................................................................28
ISO Power
et
.c
User General Setup Menu..................................................................... ........18
Main Unit
* GPS Antenna
1pcs
*Touch Pen
1pcs
*Remark: The GPS antenna and touch pen are only for the unit with GPS built-in model.
2
3
2. Specification:
3.Touch Screen Area and Function Button Instruction
1)
Built-in Amplifier & DVD player. 4x50W max power output.
2)
Standard one Din Size (50MM) Height, 7”inch Touch Screen
3)
Burglarproof detachable panel.
4)
Five angles adjust screen.
5)
Compatible with
DivX/DVD/DVD-RS/DVD+RS/DVD_RW,CD_R/CD_RW,MP3/MP4,WMA format. Support
6)
Front I-POD slot
7)
Front USB 2.0 slot.
8)
Front AUX input slot.
9)
Compatible with PAL/NTSC/SECAM/SECAM_L TV system. 100 stations preset.
10) Support USA/Europe/Russia Radio System.
11) Support SD card reader
uy
N
12) Preset manifold audio/video system
13) 1x audio input
14) 1x video input
15) 2x audio output
16) 2x video output
nB
17) Rear view camera input
18) Wireless remote control
19) 18FM / 12AM presets
C
20) RDS built-in.
et
.c
JPEG display.
Optional Function Instruction:
om
Main Function Instruction
1. Touch Screen Instruction:
1) A touch area is main interface for enter, or return to main interface from current mode, suitable for
radio/TV/DVD mode operation.
2) B touch area only suitable for DVD mode operation, no effect for other modes.
2. Button Function Instruction
(1). TFT_UP button:ajust screen up,there are five angles for ajust up,it turn up a angle when press one
time ,the screen can not turn up when at the end of angle. on DVD mode, short press to rearward a
chapter/track, long press to fast return. On TV/radio mode, short press to return last station, long press
for three seconds to scan previous frequency and will be stopped when successful scan the station.
(2). .TFT_DN button: ajust screen down,there are five angles for ajust down,it turn down a angle when
press one time ,the screen can not turn down when at the end of angle. on DVD mode, short press to
1)Built-in WINCE5.0 Navigation System GPS, compatible with all kind of map software all
over the world.
forward a chapter/track, long press to fast forward. On TV/radio mode, short press to forward next
station, long press for three seconds to scan next frequency and will be stopped when successful scan
2)Built-in DVB-T
the station.
(3).Auto/manual scan button,under radio mode it is station scan, long press 3 seconds
be manual scanned and stored under DVD for track switch
4
5
the station will
(4).SCREEN IN OR OUT BUTTON: the screen Stretches out or Shrinkswhen you press once .
1)
Radio mode touch button
(5).Ant-thief lock :when you need take off the plug plesse prease it
2)
DVD touch button (when disc inside then the button can be effect)
(6). - +VOL button: turn
+VOL button: increase button for volume,
3)
.USB/SD touch button (when USB/SD card insert then the button can be effect)
vertica press is to enter,long press is to setup the machine core when playing DVD, long press is to
4)
GPS touch button (when GPS connected then the button can be normal used)
make a call when bluetooth.VOL- +VOL/SEL button: ccontrarotate
5)
TV receiver touch button
6)
Power on/off touch button, touch once will power off.
7)
User general setup touch button, please do not setup inner parameter so that its will affect the
turn down the voice,clockwise
turn up the voice,press voice menu once can swicth BAS/TRE/BAL/FAD and can turn
VOL-
+ to setup the parameter you need, under GPS2 mode,long pressofe 3 secondto switch GPS icon.
(7). Microphone for bluetooth
using effect.
(8). POWER(MODE) button: press once to power on,,again press
to change the mode,long press to
power off..
(9). .BAND button:Change
FM1/FM2/FM3/AM1/AM2 under radio mode and change the TV/DVD
8)
AUX Output touch button.
9)
User normal setup touch button, which mainly used for setting image and sound effect.
om
rotation
decrease button for volume,
10) Screen slide up touch button.
system under TV and DVD mode,change GPS1 and GPS2 under GPS mode
11) Bluetooth function touch button, when Bluetooth function available for the unit then the button
(10) Out connector input..
can be normal used.
et
.c
(11).MINI-USB input connector port.
12) Screen slide down touch button.
(12).IPOD input connector port .
13) Eject touch button, insert or eject disc when DVD playing.
(13). EJECT button: eject disc.
14) IPOD mode touch button, .the function can work when ipod connect with the uint , when input
(14). IR Sensor .
uy
N
ipod it will into ipod menu
4 . Main Menu Interface Instruction
⑵
⑶
⑷
C
nB
⑴
(5)
(6)
(7)
(8)
(9)
(10)
6
(11)
(12)
(13)
(14)
7
5. Radio Operation Instruction
Press A/PS button for 1.5 seconds on the touch screen, the unit will enter to auto scan status, and will
store the effective stations to the relevant band FM1/FM2/FM3 (1-6). And the stored stations will be
1. Interface Instruction
(13)
displayed on the TFT panel preset frequency area. Then scan finished, the unit will start to play the first
⑴
station on FM1.
4. Select preset station
⑵
Press the station stored before on the touch screen, and selected station will be displayed on the
preset frequency area, the current display area will display the playing station.
5. Turn on/off stereo function
⑶
om
If the received signal is weak, you can press ST button on touch screen to turn off stereo function
and change to single receiving. Then the stereo noise will be restrained and make it more clearly.
When receive more stronger signal, then you can turn on ST, then now the “ST ON” will be
showed on the screen, and you can receive stereo station program.
et
.c
*on AM mode, this function is not effective.
6. Turn on/off stereo function
⑸
1)
Frequency display area
2)
Up screen button
3)
Down screen button
4)
Mute button
⑹
⑺
⑻
⑼
⑽
⑾
⑿
uy
N
⑷
Band button
6)
Auto/manual scan button, touch once the station will be manual scanned and stored, touch 1.5
seconds the stations will be auto scanned and stored.
7)
Rearward scan button, touch once to rearward scan, touch 1.5 seconds to auto scan and its will
be stopped when stations scanned.
Forward scan button, touch once to forward scan, touch 1.5 seconds to auto scan and its will be
C
8)
stopped when stations scanned.
9)
nB
5)
Select button, enter to user normal setup system to set sound and image effect.
10) Treble/bass control button, you can select rock/pop/classic etc sound effect
If the received signal is weak, you can press ST button on touch screen to turn off stereo function
and change to single receiving. Then the stereo noise will be restrained and make it more clearly.
When receive more stronger signal, then you can turn on ST, then now the “ST ON” will be
showed on the screen, and you can receive stereo station program.
*on AM mode, this function not effective.
6. DVD Player Operation Instruction
1. Insert/Eject disc
You can insert/eject disc whatever mode, when you want to insert disc just press the eject disc
button on touch screen, and the panel will auto slide down, insert the disc, the unit will auto slide
into the disc, at the same time DVD mode will be displayed on the screen.
If you want to eject disc from the unit, just press eject function on touch screen, the panel will be
11) Sound effect control button
auto slide down and the disc in the enter mount, if you don't take off the disc within 5-8 seconds
12) Stereo control button
then the disc will be auto slide into again.
13) Current receive frequency display area
2. Manual adjustment station
Press the forward or rearward scan button on the touch screen, you can select the station frequency
step by step up or down, long press over 1.5 seconds to auto scan status and it will be stopped until the
effective station searched and stored.
3. Auto adjustment station
8
9
Then press left/right button to move cursor, you can select title/chapter/play time, and then press
2. DVD Interface Instruction:
figures to enter your target position, then press confirm button to play the relevant chapter.
4. Forward/rearward
Press forward/rearward button on touch screen, press once its will forward/rearward by x2/x4/x8/x20
speed, long press forward/rearward button on remote control can also operate the above function.
5. Repeat playing
(8)
(9)
When disc playing, press AMS button on the remote control, the original chapter will be repeat
played, press again all of chapters will be repeat played. Then press again to cancel repeat
playing.
(1)
(2) (3)
(4)
(5)
(6)
(7)
om
6. Random playing
When disc playing, press LOC (RDM) button on the remote control, the unit will be on random
(10)
(1) Up/down cursor selection button, when playing MP3 cursor position is left/right moving, after
playing status, press again to cancel random playing.
7. Program playing
selecting and press OK button for confirmation.
et
.c
When disc playing, press ST (PROG) button on remote control, the panel will display below menu.
(2) Play/pause button
(3)Rearward button, touch once its will quick rearward by 2/4/8/16/20 speed, press play/pause button
to cancel quick rearward.
cancel quick forward.
(5) . The previous chapter/track, press this button to play previous chapter/track
uy
N
(4)Forward button, touch once its will quick forward by 2/4/8/16/20 speed, press play/pause button to
(6) Stop button, when need stope press this button and will stop playing the disc When you need play
again please press this MUTE button on the remote control or you can insert disc after the disc slide
out .
nB
(7) Slide down panel, press once to slide down panel
(8) Slide up panel, press once to slide up panel
(9) Audio/video adjustment button, press this button to enter audio/video adjustment menu
C
(10)The next chapter/track, press this button to play next chapter/track
3. Select chapter what you need
(1)When playing disc, you can press up/down chapter on the touch screen or panel for selection,
and you can also use remote control to select chapters.
Note: according to multi chapters DVD disc, its will not be effective by using remote control
. hen you can input whatever chapter you like by the relevant number, the direction key can be
adjusted up/down/left/right. When you programmed your favorite songs, press PLAY button to play
songs one by one.
8. DVD setup
On DVD mode, you can special setup DVD, the setting method as following.
Press MENU button to enter user setting main menu, then select DVD setup by up/down button and
do details setting.
Note: On DVD menu, menu up/down button is for up or down moving option, left/right button is for left
figure buttons for selection.
or right moving option, confirm button is for confirmation effective. Press MENU button to exit
(2)Press GOTO button on remote control then below menu will be displayed.
DVD setup at any time.
1).System Setup
Press “Set up” key to enter the system setup menu:
10
11
2). System function setup menu and original setup.
To setup the TV system, Video output, Display mode, Pin, Level, Default as below menu:
The system function original setup as below:
Menu
System
You can setup the Display, Sound, Language, System etc. Operations as below:
Then Press UP/DOWN key to select the wanted value and press ENTER back to item list.
Language
Setup
⑶ After setup, select Exit Setup Menu among items, or press PLAY key to exit the system setup
menu.
Video Output
INTERLACE-YUV/TV-RGB/P-SCAN YPBPR/S-VIDEO
Display mode
4:3PS/4:3LB/16:9
PIN
Default PIN is 0000
Level
KID SAFE/G/PG/PG13/PG-R/R/NC-17/ADULT
Default
Reversion
Exit setup menu
Enter this item then press ENTER key to exit setup menu.
Display
English/ German/Spanish/French/Portuguese
Audio
English/ Japanese/German/Spanish/French/Portuguese/Latin
Subtitle
English/ Japanese/German/Spanish/French/Portuguese/Off
Menu
English/Japanese/German/Spanish/French/Portuguese/Latin
DIVX LANG
WINCEN EU/WINWEST EU/ISOWEST EU/ISOCEN
EU/CYRILLIC/TURKISH
Enter this item then press ENTER key to exit setup menu.
Data output
SPDIF/OFF
Tone
#/+4/+2/0/-2/-4/b
Exit setup menu
Enter this item then press ENTER key to exit setup menu.
Brightness
0 / 2/ 4 / 6/ 8/ 10 /12
Contrast
0 / 2/ 4 / 6/ 8/ 10 /12
Video
TINT
+6/+4/+2/0/-2/-4/-6
Setup
Color
0 / 2/ 4 / 6/ 8/ 10 /12
Sharp
0 / 2/ 4 / 6/ 8
Exit setup menu
Enter this item then press ENTER key to exit setup menu.
Mix mode
LT/RT STEREO
Exit setup menu
Enter this item then press ENTER key to exit setup menu.
Output Mode
LINE OUT / RF REMOD
Dynamic Range
FULL 6/8
Left +Right
Stereo/MONO L/MONO R/ MIX MONO
Exit setup menu
Enter this item then press ENTER key to exit setup menu.
Audio
Setup
Speaker
Mode
Dolby
Data
Setup
12
NTSC/PAL/Auto
Exit setup menu
C
nB
uy
N
System setup menu as below::
TV system
et
.c
⑴ Use LEFT/RIGHT key to select function in Menu Function List, the Item list appears.
⑵ Use UP/DOWN key to select item, press ENTER key to enter the value list of the item.
Default
om
Setup
Item
SPDIF/Source Code
4/8
13
SPDIF/PCM
Dummy STEREO
2/8
OFF
(3) Now you can search your favorite channel using up/down button
7.TV Operation Instruction
3. Manual scan and store channel
1.On TV mode, TFT LCD display instruction
(1).On TV mode, press up/down channel tune button to search what channel you want
(1). Preset frequency figures button
Each figure button store the relevant frequency channel, touch relevant figure button to select your
favorite TV channel, total 100 channels available.
(2). Searched effective channel, long press figure button for 1.5 seconds then you can store the
channel what you searched to the relevant figure buttons
4. TV picture/ system switching
(1) Picture system change
If the current picture system is different from unit setting system, you can press SYS button on touch
screen or BAND (P/N/S) button on remote control to switch to relevant picture system
(2) Audio system change
If the current audio system is different from unit setting system, you can press AUO button on touch
om
screen or AUDIO button on remote control to switch to relevant picture system
8. AUX Operation Instruction
This function is for external Video and Audio input, you must make the right wire connections (Video and
et
.c
Audio line ) with the external device when use this function.
9.USB and SD card Operation Instruction
1. USB Operation Instruction
On any mode, when you insert USB device to input/output, the unit will auto play all multimedia
programs in USB device, such as MP3/MP4 all format files..
(1). Preset frequency figures button
uy
N
Each figure button store the relevant frequency channel, touch relevant figure button to select your
favorite TV channel, total 100 channels available.
(2). Current TV channel display area
(3). Return button, return to main interface
(4). Previous folder, touch once to return to previous folder
(5). Panel slide up button
nB
(6).Next folder, touch once to enter to next folder
(7).Panel slide down button
(8). Eject button
(9).Mute button
2. SD card Operation Instruction
C
(10) Auto scan and store button, press once to auto scan all relevant TV channels and store to figure
MINI USB Connecter
buttons
(11) Audio system switch button
(12/14).Channel fine tune button, you can turn up the current channel up or down fine tune
(13/15). Stored channel turn up button , press this button to increase CH1 to CH100
(16).Audio/video effect adjustment menu
(17). Confirm button, use for current option confirmation and enter to TV channel mode
(18). Picture system switch button
2. Auto scan and store channel
GPScardjack(backside upturn)
SD/MMC cardjack(backside upturn)
(1). Press TV function button on main interface to enter to TV status
(2) Press SCAN button on main interface, TV is starting to auto scan and store channel to figure
buttons, after scanning and the unit start to play CH1 program
14
1).take the Anti-theft panal down
2). Insert SD card to SD jack (Face Front on Top), the system will auto switch to SD card mode
15
3). . Now you can adjust panel to a good angle and enjoy all pictures and format files in SD card
10.Ipod Operation instruction
1. Ipod Connect
Ipod Connecter
om
If have video input,The TFT panel will display IPOD video.
Please use ipod wire connect dvd and ipod player. The system will auto change to IPOD function.
And display below menu
11.User Normal Setup Menu
uy
N
et
.c
User can random set pictures and sounds
\
1.
Function Key Button Instruction:
(1). Contrast adjust button
(2). Treble adjust button
C
nB
Please touch display,will display below menu:
(3). Acutance adjust button
(4). Present setup display
(5). Vol-/Vol+ adjust button Contrast adjust button
(6). . Bass adjust button
(7). . Luminance adjust button
(8). Front left/front right/rear left/rear right sound adjust button
You can use these key control.when you touch the MOD key,will display below menu:
(9). Color adjust button
(10). Preset AV effect adjust button
(11). . .Return button
2.
Adjust Method
If you want to adjust relevant item, just touch relevant button to adjust relevant parameter, after
finished then press return to exit.
16
17
(1)
12.User General Setup Menu
Important Instruction: When you adjusted all parameters on general setup, it will affect the normal
working mode of the unit. So we suggest user should be carefully to use inside functions. If it doesn’t
Bluetooth Pair Communication Button.
(2)
Dialed Call Browse
(3)
Received Call Browse
(4)
Missed Call Browse
to the normal setup status!
(5)
Back Up Button
(6)
Panel Angle Up Adjust button
1.
(7)
Number Dialing Area
(8)
Panel Angle Down Adjust button
work normally after adjusting, then you can press reset button on the front panel to make the unit return
General Setup Menu
. Operation Steps
(1) Bluetooth Pair Communication
Get ready one GSM cell phone with Bluetooth function, according to mobile instruction to operate,
om
find out the Bluetooth function enter button, and select Bluetooth adapter, then touch the “Pair” button
on touch screen of the unit. Now Bluetooth is starting to pair and search each one together.
During the pairing and connecting, the cell phone will prompt to request a password, you
have to enter 0000.
(according to different type of Bluetooth cell phone, maybe you need to try more times to pair the
et
.c
units, then could be successful)
When “LINK ON” displayed on the screen, then it can work normally.
(2)Make Phone Call
(1)
When successfully connected, you can dial telephone number by touching the number buttons on
Clock adjust
Select clock menu and then touch “+” or “-” to adjust clock. Then finished to press EXIT
(2)
can hear your friend’s sound from the car speader. When you finished the conversation, just touch
RDS setup
Rear camera switch setup
uy
N
Select RDS mode: then you select ON button and now you can receive RDS radio
(3)
Select CAMERA: touch LEFT or RIGHT button to switch to relevant rear camera
(4)
the screen, then touch the green color button to make call out. Now you can talk with your friend, you
Radio frequency setup
Optional Function
nB
Select RADE FREQ to setup relevant frequency according to actual region
the red color button to hang up the call..
(3)Receive Phone Call
When there is a call coming, telephone number will be displayed on the telephone area of the
screen. Now you can touch the green color button to receive call , when finished the conversation,
just touch the red color button to hang up.
(4)Dialed Call Browse
Touch the “Dialed call” button, you can browse all the phone calls you made, touch again will
Below functions normally working only when this unit with these functions.
display all the phone calls you made, total 20 pieces phone number call will be browse. And in 3
13. Bluetooth Operation Instruction
seconds, you can touch the “Call out” button in color green to make a phone call of this number
(This function should be match up one GSM cell phone with Bluetooth function)
C
1. Bluetooth Interface Instruction:
that you are browsing now.
(5)
Missed Call Browse
Touch the “Missed Call” button, you can browse all the phone calls you missed, touch again will
display all the phone calls you missed, total 20 pieces phone number call will be browse. And in 3
seconds, you can touch the “Call out” button in color green to make a phone call of this number
that you are browsing now.
3. Other Instruction.
When the unit is on the other working mode but not Bluetooth mode, at the same time if there is a
phone call coming in, then the mode interface will auto switch to the Bluetooth mode interface, after call
finished, then it will auto return back to the one that is working before Bluetooth mode.
14.GPS Operation Instruction
(Instruction: This function only can work normally when the unit is the one with GPS built-in function
18
19
at the same time the SD card with map is install correct in the SD card slot of the unit)
The installation of the SD card with Map.
Insert the SD card with Map into the SD card slot “GPS Navigation Map”. Please kindly pay
attention that the metal side of the SD card must be on the top side(Follow up the
prompt)
Touch the “Navigate setup” icon to enter below menu:
et
.c
Navigation path setup.
nB
uy
N
2.
om
GPS card slot(backside upturn)
1.
Touch the “GPS” icon to enter the GPS operation menu “Console” as below:
You will see the “Navigation software path” and a folder on the right, touch this folder to open the
SD card with the map. Touch the “up” and “down” icon to find out the navigation software, the
navigation software must be a executive file that with “.exe” as suffixal name. After find out this
file, double click it, then touch “OK” icon as below picture shows:
C
and
After you touch the “OK” icon , the navigation software path is correct and OK to use. Return back
Touch the icon as above picture shows, will appear below set up menu:
20
to “Console” menu, touch the “Navigation” icon as below picture:
21
Under this screen set up, you can adjust the brightness, contrast, display system, there are NTSC
and PAL for GPS, you could adjust the display system depends on the local system to make the correct
setup..
Now, you will enter into the map software operation interface. Different map software, different
3.
om
map interface, please follow up the user manual of the map software to operate.
Language Setup
Under GPS mode, there are 18 kinds of languages for your choice. System default is English.
C
nB
uy
N
et
.c
Setup menu as below picture:
4.
Display setup
22
23
5.
Touch the “GPS” function button on the main menu or press the “GPS” on the remote control,
to start navigation function.
15. Remote Control Function Instruction
Note: Please take off the battery plate before using the remote control.
om
1. Remote Control Buttons.
(Different map software, different navigation interface.)
*Important Instruction: In order to meet different requests from different users, there are
et
.c
two navigation mode optional--GPS1 & GPS2
1) There are a “GPS” button on the remote control to choose and switch the GPS1/GPS2 mode
funtion. When the unit are under the GPS1 mode, the GPS is a fixed working mode, GPS display
and voice prompt will only be see and hear on the GPS mode.
uy
N
2) When the unit are under the GPS2 mode, it can playing DVD music and Navigation at the same
time. When there are a navigation voice prompt, then the voice will auto switch to the GPS
navigation mode. If you want to see the GPS navigation map display, just press the “SEL” button
on the front panel(or remote) for 3 seconds, if press again this “SEL” button 3 seconds again, it will
nB
switch back to the DVD display.
Example for GPS2 mode function setup:
First, make the correct navigate software path setup to start Navigation, then press the
C
“BAND” button on the remote control(or front panel) to switch to the GPS2 mode. Insert the
2.
Function Instruction
(1)
(2)
Mute/pause button, on DVD mode this button is for pause function, but on other mode is for
mute function
DVD disc to play DVD, now the display is the DVD interface display, when there are a
(3)
navigation voice prompt, the voice will switch to the GPS navigation mode, after the prompt, it
(4)
will switch back to the DVD mode. If you want to see the GPS navigation map display, just
Power on/off button, press once to turn on/off unit
Mode switch button, press once to switch to RADIO/DVD/AUX/TV/GPS
Eject button, when disc inside then press this button to eject disc. If not press this button to
insert disc
(5)
DVD button, press this button direct to enter DVD mode
press the “SEL” button on the front panel(or remote) for 3 seconds, if press again this “SEL”
(6)
DVD stop button
button 3 seconds again, it will switch back to the DVD display.
(7)
Volume +
(8)
Loud: Treble/bass control button
(9)
GPS navigation button
6.For the GPS map function instruction, please refer to the map user manual.
(10) Rear scan button, on RADIO/TV mode to rear scan frequency, long press 1.5 seconds to
auto scan. On DVD mode to turn previous chapter, long press to quick rearward
(11) Select button, to be adjust sound mode and switch to VOL/TRE/BAS/BAL/FAD
(12) Forward scan button, on RADIO/TV mode to forward scan frequency, long press 1.5 seconds
24
25
to auto scan. On DVD mode to turn next chapter, long press to quick forward
1.
Speakers Output Wires Diagram
(13) Auto/manual scan button, on RADIO/TV mode to auto scan. On DVD mode to be repeat function
(14) Band switching button, on RADIO mode to switch to FM1/FM2/FM3/AM1/AM2
(15) Volume -
M ODEL:
(16) Open/close panel, press once to slide up panel to the top side, or slide down to be bottom side
RA DIO FR EQ.RA NGE :FM 87 .5- 1 08.0 MH z
AM 52 2-16 20 KHz
TV FR EQ.RA NGE :VH F- L 4 8 .2 5 - -- 1 70M Hz
V HF- H 1 7 0-- -450 MH z
U HF 4 5 0-- -863 .25 MH z
(17) Figure buttons, on RADIO/TV mode to select station/channel, on DVD mode to select chapter
(18) Panel slide up button
(19) Panel slide down button
CAUTION :
DC14.4V
NE GAT IVE GROUND
(20) OSD button, on DVD mode to display current chapter playing
FRO NT
(21) Select chapter button, on DVD mode to select chapter to play on disc
(22) Audio switch button, on TV mode to switch audio, on DVD to switch left/right sound
G REY
WH ITE
(23) DVD setup button to be general setup
om
WHITE/BLACK
(24) Menu up select button
(25) LOC button, on radio mode to be long/short range control, on DVD mode to be random playing
(26) PBC button, on VCD mode to be view playing, on DVD mode to be menu playing
P U RP LE
(27) Menu left select button
(29) Menu right select button
(30) ST button, on radio mode to be stereo switch, on DVD mode to be memory playing
(31) PTY button, on RDS mode to be PTY function, on DVD mode to be TITLE playing
(32) Menu Down select button
(33) TA button, on RDS mode to be TA message on/off function, on DVD mode to be picture
uy
N
zoom/reduce function
et
.c
PU R P LE/B LA CK
(28) Confirm button
(34) AF button, on RDS mode to be AF message on/off function, on DVD mode to be picture slow
function
.
A UTO A N T
B LUE
G REEN
BA C K/+1 4 .4V
YELLOW
GN D
BLA CK
GR EEN /B LAC K
RE A R
RIG HT
AC C
RE D
Important Instruction:
a. a. Brake high level have valid, please connect brake wire to car brake test wire, when the car brake ,
the TFT panel will turn off, so that the driver can drive safety. If you don’t need this function, just connect
the brake wire together with the black GND wire, then the unit can work normally.
b. Back car high level valid, the TFT panel will display back video sight when backing the car, please
connect reverse wire form to the back car test wire. So that the driver can see the obstruction.
2. Audio and video output wire diagram.
All the audio and video output wires please refer to the sticker on them for connection.
C
nB
16. Wiring Diagram
GR EY/B LAC K
BA CK _ C AR
P INK
BR AKE
OR ANGE
radio/TV Antenna Signal wires
Power Output Wire Connector Jack
GPS Navigation Antenna
26
27
17 . The Technical Parameters
GPS Specifications
DVD Technical Parameters
Pick up
Compatible disc
DVD 650nm; CD 780nm
System parameters
SHARP 600
MPEG-4(DIVX),DVD,DVD+R,DVD-R,VCD,CD,MP3,WMA,JPE
Anti-Shockproof
DVD 3 seconds; VCD/CD 10 seconds; MP3 90 seconds
Audio output level
audio:1.2V±0.2
Frequency response
20Hz-20KHz
Audio signal-noise ratio(S/N)
≥80dB
Dynamic scope
≥80dB
Video ouput level
1.0±0.2Vp-p
Brightness signal-noise
≥56dB
ratio(S/N)
≥60dB
Display system
AUTO/NTSC
Menu language
Chinese/English/Spanish/French/German/Italian
uy
N
Color signal-noise ratio(S/N)
TV Technical Parameters
Frequency Range
48.25MHz~847.25MHz
TV display system
PAL/NTSC/SECAM/SECAM_L
Audio system
DK/I/BG
87.5MHz~108.0MHz
AM frequency range
522KHz~1620KHz
FM sensitivity
≤25dB
Am sensitivity
≤45dB
Signal-noise ratio (S/N)
≥50dB
Distortion
≤0.3%
C
FM frequency range
nB
Radio Technical Parameters
TV Technical Parameters
Frequency Range
48.25MHz~847.25MHz
TV display system
PAL/NTSC/SECAM/SECAM_L
Audio system
DK/I/BG
28
400MHZ
Operation system
WINCE5.0 CORE
Support audio type
MP3/PCM/WMA
Support video type
ASF/AVI/WMV/DIVX
Audio output
Stereo CD quality
Chip set
SiRF Star III
Frequency
1.575GHZ
Channel number
20 channels
Tracking sense degree
-159dBm
Position
10m, 2D RMS
et
.c
G,CD,CD-R,CD-R/W,
Main frequency
om
Laser wave length
accuracy
Velocity
0.1m/s
Data renewal rate
1HZ
Re-catchingtime
5m, 2D RMS, WAAS enable
Average 0.1s
Hot start time
Average 1s
Warm start time
Average 38s
Cold start time
Average 42s
The biggest fixed height
18,000m
The biggest velocity
515m/s
Technical Parameters of TFT-LCD Screen
LCD Screen Size
7 inch
LCD Screen Ratio
16:9
Spot pitch
0.107(h)×0.372(V)
Resolution
480(RGB)×234
Contrast
150:1
Brightness
300cd/㎡
Response speed
R:30/F:50
Viewing angle
U:15/D:35
Original luminous lamp
LED
Lamp longevity
Over 10 thousand hours
29
L/R:55
Other Technical Parameters
DC 13.8V
Outer dimension
176mm(W)×55mm(H)×183mm(D)
2.
Check if the batteries were run out.
3.
Please point to the IR area to use the remote control.
1.
Check if the TV antenna is installed in the correct place.
2.
Maybe the signal in local is not strong enough.
3.
If the TV system is set up correct?
GPS navigation
1.
Check if the navigation software path is correct setup.
cannot work
2.
If the map software is compatible with WINCE5.0?
normally
3.
If the GPS antenna is correct installed.
No TV signal or
About 3.1KG
weak TV signal
≤10MA
18.Trouble Shooting
As the machine is controlled by micro-computer, if any functional problem happened, please press the
“RST” (reset) button on at the right hand side of the front panel to reset the unit. Wait some seconds
and turn on the unit again, if all the functions work normally, then can operate the unit again. But if the
unit doesn’t work normally yet, please try below solutions to check again the unit.
.
om
Standby Current
Check if the plastic are removed out.
remote control
Power supply
Net Weight
1.
No response from
Notes:
1. Due to continuing improvements, the features and design are subject to change without
Symptom Solution
et
.c
any notice.
2. To make sure the machine work normally, it is recommended to use the attached
accessories and optional parts..
No image
Make sure the connection is correct.
2.
Check if the key of the car is inserted and turn on.
3.
Check if the “Power” button is plug up by any hard things.
uy
N
Canot play disc
1.
4.
Check if the fuse was blown.
1.
Check if the screws on the top of the unit are removed.
2.
Make sure the disc is inserted in correct side.
3.
Check if the disc is terrible dirty and scratched.
1.
Check if the brake wire and reserve wire are in correct connection.
2.
If the disc is DVD/VCD/MP4 etc image disc?
3.
If the setup for brightness and contrast are correct?
4.
nB
No power
If under TV mode, please check if the TV image system is in
correct system (PAL/NTSC/SECAM)?
2.
If the wires for speakers and power are short circuit ? or the outer
shell are short circuit ?
No sound
3.
If the volume are turn down to the lowest ?
If it is in the MUTE mode ?
5.
If under the TV mode, the set up of the audio system are
correct ?
No response for
touch / touch
departure
_________________________________________
_________________________________________
_________________________________________
If there are some hard things withstand the panel?
2.
If the unit are under Backing or Braking mode?
3.
Press the “PLAY” button when the unit is power off. Adjust and
re-set up the touch point area to see if it will
30
_________________________________________
_________________________________________
4.
1.
_________________________________________
If the wires for speakers are connected correct ?
C
1.
NOTE:
work normally?
_________________________________________
_________________________________________
31