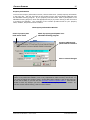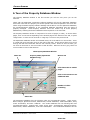
1
USER’S GUIDE
TAA Forms for Windows
TAA FORMS FOR WINDOWS - USER’S GUIDE
BLUE MOON SOFTWARE
CONTENTS
TABLE OF CONTENTS
WELCOME ........................................................................................................3
System Requirements and Recommendations...................................................4
Understanding Form Clicks.............................................................................5
Instructions for Online User’s Guide ................................................................7
Conventions Used in This Guide ......................................................................7
GETTING STARTED .............................................................................................8
Installing the Software ..................................................................................8
Initial Setup ..................................................................................................8
The Setup Windows.......................................................................................9
System Configuration and Property Information.............................................. 13
A Tour of the Property Database Window ....................................................... 16
Set up the Default Lease.............................................................................. 19
THE PROPERTY DATABASE ................................................................................. 20
Current Leases and Preleases ....................................................................... 20
Time Saving Features .................................................................................. 23
Lease Renewals .......................................................................................... 26
Other Database Commands.......................................................................... 27
PRINTING LEASE FORMS ................................................................................... 29
The Print Window........................................................................................ 29
Batch Printing............................................................................................. 30
Printer Setup.............................................................................................. 31
THE FORM WINDOW ......................................................................................... 32
A Tour of the Form Window.......................................................................... 32
REDBOOK Forms......................................................................................... 33
OTHER FEATURES AND CAPABILITIES ................................................................... 34
Importing Internet Rental Application ............................................................ 34
Administrator Setup Features ....................................................................... 35
Backup and Restore Database ...................................................................... 36
Importing Data from Property Management Software ...................................... 36
Exporting the Property Database .................................................................. 37
Automatic Software Update.......................................................................... 37
Ordering More Form Clicks ........................................................................... 38
MISCELLANEOUS TOPICS ................................................................................... 39
Low System Resources ................................................................................ 39
Installing onto a Network ............................................................................. 39
Import File Structure ................................................................................... 39
License Agreements and Upgrades ................................................................ 40
Packing the Database .................................................................................. 40
Keyboard Shortcuts..................................................................................... 40
When You Have Problems ............................................................................ 41
Some Printing Solutions............................................................................... 42
Online Help ................................................................................................ 42
TAA FORMS FOR WINDOWS - USER’S GUIDE
BLUE MOON SOFTWARE
WELCOME
3
WELCOME
TAA Forms for Windows® is an easy to use software package that is designed to let you
quickly fill out over 150 TAA Lease Forms, including REDBOOK forms, by computer and print
the completed forms on a printer using blank paper. You no longer have to fill out forms by
hand or with a typewriter or maintain an inventory of printed forms.
The software has been designed to save you time and money by speeding up the preparation
and printing of lease packages and REDBOOK forms. The software has also been designed to
improve accuracy and reduce errors by providing built in math calculations, default settings
and recurring items and charges, and automatic data transfers from the property database to
over 150 forms.
TAA Forms for Windows® software interfaces with many DOS, Windows, and web-based
property management software packages, allowing you to import data from those programs
quickly and easily.
TAA Forms for Windows® software is offered in two types of packages. Both packages include
the latest versions of the TAA Lease and REDBOOK forms and are identical in features and
functionality, except that the Small Property Package will support apartment communities of
no more than fifty units each.
The APARTMENT COMMUNITY SOFTWARE PACKAGE is designed for use in medium and large
communities, with no limitation on the number of apartment units per site. Systems are sold
on a property-by-property basis. The Apartment Community software package is limited to
use for a single site or property. The name of the specific property (or title holder) is locked
into the software and will automatically print on the forms. There is a volume discount for
multiple site purchases.
The SMALL PROPERTY SOFTWARE PACKAGE is designed for owners and property management
companies who manage single-family homes, condominiums, duplexes, or even small
apartment communities of no more than fifty units per complex. Unlike the Apartment
Community Package, the Small Property Package contains the Residential and Condominium
Lease Forms.
TAA FORMS FOR WINDOWS - USER’S GUIDE
BLUE MOON SOFTWARE
WELCOME
4
System Requirements and Recommendations
To user the Blue Moon Software you will need a personal computer with both a CD-ROM and a
3 1/2 floppy (A:) drive running Windows 95/98/NT*/2000*/XP* operating system. We
recommend a Pentium or equivalent CPU. You will need at least 64 megabytes of RAM on
your computer, and should have 10 megabytes of free hard disk space. For better
performance we recommend 128 megabytes of RAM.
The software will print on some ink jet printers and most laser printers. For fastest printing
times and sharpest output, we recommend laser printers with 300 dpi and a rated print speed
of 6 pages per minute or higher. When selecting a printer, keep the following in mind: 1) laser
printers must have at least two megabytes of RAM; and 2) ink jet printers must have a
printable area of at least 8” x 13 1/2” (some ink jet printers do not have a printable area of
this size).
Many multi-function printers are not able to handle the files sent to it by our software. You
may need to change the printer properties lower or contact your printer manufacturer for an
alternative printer driver.
As a general rule, the more expensive printers come with dual paper trays, and making the
selection is relatively straightforward. On less expensive printers, which are normally set to
print on letter paper, it can take some practice and a careful reading of your printer guide to
learn how to set the printer for legal size forms. If you are considering the purchase of a
printer, you should carefully evaluate how easy it is to print on legal paper and switch between
legal and letter size.
Recommendation: The most critical component in the operation of your TAA Forms for
Windows® is your printer, in particular the ease with which you print legal size forms and can
switch between letter and legal size paper. It is critical that you read the printer guide that
comes with your printer and take the time to learn how to change the settings on your printer
to select legal size paper.
Windows NT, 2000, or XP Users
Systems running Windows NT, 2000, or XP will need to give users full administrative
privileges to the H_KEY_LOCAL_MACHINE Software Registry. Please have your NT/2000
administrator call Blue Moon technical support at 512-322-0999 for details.
TAA FORMS FOR WINDOWS - USER’S GUIDE
BLUE MOON SOFTWARE
WELCOME
5
Understanding Form Clicks
TAA Forms for Windows® contains a built-in counter that tracks printing of TAA’s revenue
producing forms, i.e., the lease forms sold by local apartment associations. Each software
package includes an initial set of 300 form pages or “clicks” at no charge. When you install
the software for the first time, your form click counter will be set to zero. Call the Blue Moon
Software Forms Line at (512) 322-0444 for your 300 free clicks, and you can begin printing
Lease forms immediately. You can also get your 300 free clicks electronically via the Internet.
Use the Set Counter button then press the Update Counter Electronically button (note – you
are required to enter your name before pressing the button).
You are charged one click for every page of the lease forms that you print. Some forms (listed
below) are automatically printed in duplicate, and click usage is tallied accordingly.
For
example, if you were to print an Apartment Lease and an Inventory and Condition form, the
counter would be reduced by 14 clicks--12 for two copies of the 6-page lease, and 2 for one
copy of the 2-page inventory form. It does not cost any form clicks to print REDBOOK forms.
The program will automatically print two originals of the following lease documents when they
are printed for the first time:
•
•
•
•
•
•
•
•
Apartment Lease Contract
Residential Lease Contract
Condominium/Townhome Lease Contract
Animal Addendum
Submetering Addendum
Lead Hazard Addendum (last page only)
Addendum for Affordable Housing
Asbestos Addendum
After the completed original lease documents are printed, you will be charged only for the
pages you have selected to print.
Additional form clicks beyond the 300 that are provided free with the software may be
purchased through your local affiliated apartment association and installed on your system by
using an access code supplied by Blue Moon. Form clicks have been priced to be no more
expensive than purchasing pre-printed forms; discounts are available for purchasing in larger
quantities. (See the Ordering More Clicks section for instructions on purchasing clicks.)
Here’s a list of everything you wanted to know about clicks but were afraid to ask:
1. The first 300 are free; however, you will not be able to get any more until you have
paid for your software.
2. Clicks must be installed on each computer. They cannot be shared on a network.
3. “For Sale” lease forms charge clicks, REDBOOK forms do not cost clicks.
4. The software shows your remaining clicks on the bottom right side of your window.
5. If your clicks counter is less than 100, the software will nag you to reorder more
clicks.
6. If you order clicks and you have an email address on the order form, we will
automatically contact you by email.
7. Clicks cannot be copied or transferred to another pc. Only Blue Moon staff can move
clicks from one pc to another. If you are having work done on a pc or getting a new
one, call Blue Moon Software BEFORE any work is done to your pc so we can back up
your clicks.
8. You will be charged a full 12 clicks when you print a lease even if you just print one
page.
9. You can preview the forms on your monitor and will not be charged any clicks.
10. You will only be charged clicks when you submit your job to the printer.
TAA FORMS FOR WINDOWS - USER’S GUIDE
BLUE MOON SOFTWARE
WELCOME
6
11. The print window displays the number of clicks you will be charged at the bottom of
the window.
12. To download clicks electronically (using the Internet) press the Set Counter button,
enter your name in the respective field and press the Update Counter Electronically
button.
13. You will place the order for clicks through your local association and they will bill you
directly.
14. Blue Moon Software’s clicks telephone number is (512) 322-0444. Our clicks desk is
open 8 to 5 central time Monday thru Friday.
15. You will not be charged clicks when you print the order form.
16. We strongly encourage you to order clicks via email. You will receive a faster
response than by faxing in your order.
TAA FORMS FOR WINDOWS - USER’S GUIDE
BLUE MOON SOFTWARE
WELCOME
7
Instructions for Online User’s Guide
Table of Content and Bookmarks - the Table of Content appears on the right hand side. To
navigate to a desired topic simply click on the chapter or section.
Printing the Document - the User’s Guide is designed so you can easily read it on you monitor.
The guide is also designed so you can print it on letter size paper. We recommend that you
print the guide on the highest resolution setting on your printer, preferably 600 dpi or higher.
Searching for key words - you can search the User’s Guide for key words. Press CTRL+ F and
use Acrobat’s “Find” feature to search for phrases in the document.
Conventions Used in This Guide
Mouse Usage
Click: a click is a single press of one of the mouse buttons. The right mouse button is only
used in the special provisions and animal special provisions fields. Right clicking in these fields
in edit mode will pop up the comments pick list.
Double-click: a double-click is two quick presses of one mouse button in succession.
Database Terms
Field: A field is the smallest unit in the database. It contains the individual pieces of data for
the TAA leases, such as monthly rent and the list of residents.
Record: A record is the second smallest unit of the database. It is the structure containing the
fields. In the TAA software, one record is equivalent to one lease.
Edit mode: Edit mode is a state of the database. It allows you to make changes to a record
in the database.
Browse mode: Browse mode is a state of the database. You cannot make changes to a
record in the database, but you can browse through records.
TAA FORMS FOR WINDOWS - USER’S GUIDE
BLUE MOON SOFTWARE
GETTING STARTED
8
GETTING STARTED
Installing the Software
To Install the TAA Forms for Windows®
1) Insert the Blue Moon Software CD into your PC.
2) After a few seconds, the setup program will automatically launch. If your CD does not
auto-launch, click Start on the taskbar, select Run, type D:\SETUP, (where D: is the
drive with the CD), then click OK.
The setup program will show a series of windows. Each window will ask for information, or
make recommendations.
After you have read the screen and provided the required
information, you can click Next on the bottom center of the window. If you want to go back to
the previous window, click Back. To exit the installation process, click Cancel. If you cancel,
the entire process is aborted and will have to be started again later. Below is a description of
the windows, and typical responses to them:
1) Window 1: Welcome. The usual response is to click Next. If there are other
programs running, you can click Cancel, close all other programs, then begin with step
1 above.
2) Window 2: Choose Destination Location. This is the folder that WinTAA is installed in.
The default is C:\WinTAA. Most users will click Next. To view available drives and
directories, click on Browse.
The setup program will begin decompressing the WinTAA program onto your
computer. After it finishes loading files, it will set up the program folder icons and
desktop icon. Then you will come to the final setup window.
3) Window 3: Insert License Disk. After the setup program finishes installing all the files
to your hard drive, you will be prompted to insert your license disk in the A: drive.
Insert the disk and click OK to continue. If you are simply reinstalling the program
and do not need to update your license, simply click on the cancel button.
4) Window 4: Setup Complete. You are done with the installation! Click Finish to close
the Setup program.
We recommend restarting your computer before starting to use your software after an install.
The install program may prompt you to restart your computer.
To start the program running, click on the WinTAA icon in the WinTAA program folder or the
WinTAA icon on the desktop.
Store your CD and license disk in a safe place after installing.
Windows NT, 2000, or XP Users
Systems running Windows NT, 2000, or XP will need to give users some administrative
privileges. Please have your NT/2000 administrator call Blue Moon technical support at
512-322-0999 for details.
Initial Setup
TAA FORMS FOR WINDOWS - USER’S GUIDE
BLUE MOON SOFTWARE
GETTING STARTED
9
The Setup Windows
After the installation procedure is complete, you can begin the program by double-clicking on
the WinTAA icon on the desktop or selecting WinTAA from the Start Menu, under Programs. A
series of four configuration windows will appear which will allow you to configure the software
according to your specific property.
When you have completed the short series of
configuration windows, TAA Forms for Windows® will run.
The first of the setup windows offers congratulations for successfully installing the software.
At the bottom of each of the four setup windows will be a Back button (disabled on the first
window), a Next button, and a Cancel button. The Back button will take you to the previous
window. The Next button will take you to the next window. You can also press <Alt>-<N> to
move to the next window and <Alt>-<B> to move to the previous window. The Cancel button
will exit the setup window and put you directly into TAA Forms for Windows®. The information
you enter in these windows can be accessed and changed at any time from the Property
Database screen by choosing Preferences | Property Information or Preferences | System
Configuration on the menu bar.
The First Setup Window: Welcome
Click the Next button to
continue.
Click the Cancel button
to quit setup.
TAA FORMS FOR WINDOWS - USER’S GUIDE
BLUE MOON SOFTWARE
GETTING STARTED
10
The second window concerns information used to automatically calculate certain items in a
lease. The first section on this window relates to prorated rent. If your property calculates
prorated rent using the actual days in the month, click the Actual Days in Month check box. If
your property calculates prorated rent using thirty days in the month, click the 30 Days check
box.
Important Note: If you are importing the prorated rent from another property
management software like RentRoll or AMSI, then you will want to check Do Not Calculate
Prorated Rent so the Blue Moon Software doesn’t recalculate it for you.
The next box prompts you for the default length of a lease. This is a feature that will
automatically fill in the ending lease date for you when you enter the beginning lease date
while creating or editing a lease (you can easily change this value). Enter the default lease
value in months.
The next section asks whether your property ends leases on the last day of the month or on
exactly the number of months specified in the lease. Click the appropriate box. The final
section asks for the cut-off date for counting the current month as part of the lease term.
Enter the day of the month that you use for the cutoff date.
The Second Setup Window: Lease Calculation Preferences
Check the desired
method of calculating
prorated rent.
Enter the default length
of lease.
Check whether leases
end on the exact day of
the month or on the last
day of the month.
The current month will
be counted if the
beginning lease date falls
on or before this day of
the month.
TAA FORMS FOR WINDOWS - USER’S GUIDE
BLUE MOON SOFTWARE
GETTING STARTED
11
The third window concerns information specific to your management company, and property
information. The management company information shown in this window transfers to some
of the lease forms automatically. If any of this information is incorrect or missing, enter the
correct information. You will not, however, be able to change your management company
name. If you need to do so, contact Blue Moon Software. The two check boxes in the center
of the window are addendum reminders. If the property was built before 1978, then click the
first box. You will be reminded to print a Lead Hazard Addendum each time you print a lease.
If the property participates in an affordable housing program, then click the second box. The
remainder of the window is the property address as well as the phone and fax numbers.
Verify that this information is correct (or fill in the information if the fields are blank). The
software allows you to change the street address, the zip code, and the phone and fax
numbers. If you need to change the property name or city, contact Blue Moon Software.
The Third Setup Window: Management and Property Information
Verify management
company information.
Check that the property
information is correct
and check the lead
hazard box if your
property was built before
1978 and/or check the
box if you participate in
affordable housing
programs.
TAA FORMS FOR WINDOWS - USER’S GUIDE
BLUE MOON SOFTWARE
GETTING STARTED
12
The final window gives you the option of setting up the default lease or going to the Property
Database window where you can create a new lease or edit existing leases. If you choose to
set up the default lease, click the Setup Default Lease button. The setup windows will close,
and the Property Database window will open and put you in Default Lease Setup mode (see
more details about setting up the default lease). If you choose not to set up the default lease,
click the Finish button. The setup windows will close, and the Property Database window will
open in Browse mode. From there, you can create a new lease, edit existing leases, or
perform any other regular functions of the software. You can set up or edit the default lease
at any time from the Property Database window by choosing Preferences | Set up Default
Lease in the menu bar.
The Fourth Setup Window: Finish
Click here to set up the
default lease
Click here to begin TAA
Forms for Windows
without setting up the
default lease.
TAA FORMS FOR WINDOWS - USER’S GUIDE
BLUE MOON SOFTWARE
GETTING STARTED
13
Obtaining Your First 300 Clicks
If you are installing the Blue Moon software for the first time, you will be provided with 300
starter clicks needed to print TAA Lease forms. These clicks are not needed to print REDBOOK
Forms. When the Blue Moon forms software is shipped to you, the click counter is set to zero.
To obtain your free 300 starter clicks (equivalent to 300 printed pages), call the Blue Moon
Software Forms Line at (512) 322-0444, and they will assist you. When you call, you must be
at your computer with the software open. If you are upgrading from a previous version of the
Blue Moon software, the free clicks do not apply. Note: you will not be able to purchase
or receive additional clicks beyond the first 300 until you have paid for the software.
System Configuration and Property Information
If you skipped the Setup Configuration process after installation, then you need to go back
and manually configure the software to your specific property. There are two windows for this
purpose: the Modify Property Information window and the System Configuration window. It is
extremely important that you verify the accuracy of the information in these windows. Their
information will be used often as default information throughout your use of the software.
System Configuration
To access the System Configuration window, choose Preferences | System Configuration in the
menu bar. There are three main panels on this window: System Paths, Preferences for Lease
Calculations, and Management Company Information.
Standard Tab
In the Systems Path panel are two fields. The Program Path field is blue, which means it
cannot be changed. The Data Path field is the directory where TAA Forms for Windows® will
look for your data. If this data path is not correct, click on “Set Data Path” to select the
correct path.
The Preferences for Lease Calculations panel is composed of two smaller panels. The one on
the left allows you to choose to calculate prorated rent by using either actual days in the
month or thirty days per month. Select your choice by clicking on the correct field. The panel
on the right is for lease information. Set the default length of lease (used to calculate lease
ending dates), and select how you want leases to end, either on the last day of the month, or
exact numbers of months. This section also allows you to set the cut-off date for the current
month being considered as part of the lease.
Turn Off Prorated Rent Calculation
TAA Forms for Windows® automatically calculates the prorated rent when you enter or tab
through the rent field. If you are importing the lease information from another property
management software you may want to turn off the re-calculation of the prorated rent. To
set this feature go to the Preferences pull down menu and select System Configuration,
then check the Do Not Calculate Prorated Rent box.
The Management Company Information panel provides the name, address, phone and fax
numbers, and e-mail address of your property. This email is where we will contact you to
notify you of software changes and pending click orders. The Company Name field is blue, so
you cannot change this field.
The Print Clicks Log button will print a record of the user's click order history. This log does
not keep a record of forms you have printed, only a record of clicks you have received. You
TAA FORMS FOR WINDOWS - USER’S GUIDE
BLUE MOON SOFTWARE
GETTING STARTED
14
do have the option to print the activity log when you print the clicks log, which gives you more
detail about your clicks usage.
To save any information you've changed in the System Configuration window and exit the
window, click the OK button. To exit without saving, click the Cancel button.
The System Configuration Window (Standard Tab)
Method of calculating
prorated rent
Current data path
Default length of lease
Method of calculating
lease ending date
License address,
telephone and fax
number
Software serial number
Software expiration date
Print clicks log
Property email address –
where notifications will
be sent
TAA FORMS FOR WINDOWS - USER’S GUIDE
Save or Cancel changes
BLUE MOON SOFTWARE
GETTING STARTED
15
Advanced Tab
Low System Resources - Due to the size of the lease form files, some users may experience
computer memory problems when viewing or printing lease forms. If you have difficulty
viewing or printing forms, check the box labeled “Low System Resources” and then click the
“OK” button. This may cause the software to run slightly slower, but will reduce the amount
of memory required.
Automatically Select Paper Size – If you have a printer with multiple trays and can detect
paper size, then check this box. The software will not prompt you to change paper sizes and
will automatically print from the correct tray. This is very helpful if you are switching between
leases and REDBOOK forms.
The System Configuration Window – Advanced Tab
Set Low System
Resources
Automatically Select
Paper Size
Save or Cancel changes
TAA FORMS FOR WINDOWS - USER’S GUIDE
BLUE MOON SOFTWARE
GETTING STARTED
16
Property Information
To access the Property Information window, choose Preferences | Modify Property Information
in the menu bar. The first two fields in this window concern the Lead Hazard Addendum and
the affordable housing program. If your property was built before 1978 or participates in the
affordable housing program, check the appropriate box(es) by either clicking it with the mouse
or pressing the spacebar. The remainder of the window provides fields for your property
name, address, and phone and fax numbers.
The Property Information Window
Check if property was
built before 1978
Check if property participates in an
affordable housing program
Property address and
phone and fax numbers
Save or Cancel changes
Important Note: Verify this information is correct. You cannot change the property
name or city within the software, so it is very important to make sure they are correct. If
you need to change the property name, contact Blue Moon Software, and we will send you
a new set of disks, or you can use the Automatic Software Update feature. Click the OK
button to save any changes you have made and exit the Property Information screen. To
exit the screen without saving, click the Cancel button.
TAA FORMS FOR WINDOWS - USER’S GUIDE
BLUE MOON SOFTWARE
GETTING STARTED
17
A Tour of the Property Database Window
The Property Database window is the first window you will see every time you run the
software.
Those with the Apartment Community Software Package will see the apartment database.
Users with more than one property can choose specific sites under Properties in the menu bar.
Those using the Small Property Software Package will be able to view the apartment database,
the condo/townhouse database, or the residential database, depending upon the types of
property managed.
Small Property Software users can choose any of these property
databases by selecting the desired database under Properties in the menu bar.
The Property Database window is composed of a series of pages (or tabs). To access these
pages, click on the tab corresponding to the desired page at the bottom of the tab, or press
<Page Down> to move to the next tab or <Page Up> to move to the previous tab.
The Apartment Database window is illustrated below, all of the tabs fit on one window. There
is a small left arrow and right arrow to the right of the tabs. These arrows allow you to scroll
through the tabs and reach tabs that are not currently visible. When an arrow is black, you
can click on the arrow to view more tabs in that direction. When an arrow is gray, there are
no more tabs to view in that direction.
The Property Database Window
Menu bar
Property name (Apartment
database only)
Button row
Click these tabs to switch
pages
Click on the arrows to see
additional tabs
Number of clicks
remaining
Status bar
The Apartment Database has the following tabs and corresponding pages: Lease Terms,
Other Charges, Special Provisions, Attachments, Animal Addendum, Lead Hazard/Misc., Early
Lease Termination, and Misc. Addenda. The Condo Database has the following tabs and
corresponding pages: Property Info, Lease Terms, Keys... Submetering, Special Provisions,
Attachments, Animal Addendum, and Lead Hazard/Misc. The Residential Database has the
TAA FORMS FOR WINDOWS - USER’S GUIDE
BLUE MOON SOFTWARE
Status bar
GETTING STARTED
18
following tabs and corresponding pages: Property Info, Lease Terms, Special Provisions, Pay
Rent at... Move-out, Attachments, Animal Addendum, and Lead Hazard/Misc.
Menu Bar -- The menu bar across the top of the Property Database window contains the
following menus: File, Preferences, Properties, Lease Forms, REDBOOK Forms, and Help. To
access these menus and any submenus, click the menu bar. You can also press and release
the <Alt> key, then press the key corresponding to the underlined letter in the menu. The
menu bar will be discussed in greater detail later in this guide.
Button Row -- To the right of the Property Database window is a vertical row of buttons.
Following is the list of buttons and a short description of their function:
•
•
•
•
•
•
•
•
•
•
New Lease - The New Lease button allows you to enter a new lease for existing and
new units.
Renewal - The Renewal button allows you to renew an existing lease.
Print - The Print button allows you to choose from a variety of Lease forms to print for
each unit.
Find - The Find button allows you to locate any unit by number or resident's last
name. You can also sort by unit number, last name, or expiration date.
Next - The Next button moves you to the next record in the database (sorted by unit
number).
Previous - The Previous button moves you to the previous record in the database
(sorted by unit number).
Edit - The Edit button allows you to edit lease record you are currently on.
Delete - The Delete button deletes current lease record.
Order Forms - The Order Forms button allows you to order additional form clicks.
Set Counter - The Set Counter button allows you to reset the form clicks counter once
you have been notified that your forms order is ready.
Any of these buttons can also be accessed by simultaneously pressing the <Alt> key and the
underlined letter of the desired button.
Status Bar -- At the very bottom of the Database window is a status bar. This status bar will
explain how to perform certain operations and give you information about the current software
status. The message on the left side of the status bar states which record in the database you
are in and how many records exist in the current database. The message on the right side of
the status bar notifies you of the number of remaining clicks.
The status bar may be hidden behind the Windows Toolbar.
TAA FORMS FOR WINDOWS - USER’S GUIDE
BLUE MOON SOFTWARE
GETTING STARTED
19
Set up the Default Lease
Before beginning to make entries in the Lease Database, most users will want to set up a
default lease, which can be used as a model to complete actual lease contracts. The ability to
set up a default lease is one of the most powerful features of TAA Forms for Windows®. It
allows you to automatically fill in up to 85% of a lease, such as late fees, charges, reletting
charges (as a percentage of monthly rent), etc. Keep in mind that you can easily override the
values entered by the default lease.
If you have purchased the Small Property Package, you can set up a default lease in each of
its databases (i.e., the Residential Database, the Condo/Townhouse Database, and any
Apartment Databases included in your package). Begin by selecting one of the databases in
the Properties menu. Those with the Apartment Community Software Package that have only
one community will automatically go to their property database when they enter the software.
Apartment Community Software users with more than one property can select one of the
properties listed in the Properties menu.
Once in the desired database, choose Preferences | Set up Default Lease in the menu bar.
The software will switch to Default Lease mode, allowing the user to input information only in
certain fields in the Property Database windows. Default information cannot be entered in
blue fields (information in these fields will typically be different for each lease).
As a reminder, there are eight tabs in the Apartment Database and seven in the Residential
and Condo/Townhouse Databases. While in default mode, make sure to view all screens when
inputting default information. Use the <Page Up> and <Page Down> keys or the mouse to
move between screens. To move from field to field, use the <Tab> key or click on specific
fields with the mouse.
After you have gone through all the tabs and finished filling out the default lease, you can
save it by either clicking the OK button or pressing <Alt>-<O>. To exit the default lease
screen without saving, click the Cancel button, or press <Escape>.
Important Note: Data entered in the default lease will automatically be filled in on new
leases created after the default lease is saved. However, changing the default lease will
not modify any leases that have previously been entered in the property database.
TAA FORMS FOR WINDOWS - USER’S GUIDE
BLUE MOON SOFTWARE
THE PROPERTY DATABASE
20
THE PROPERTY DATABASE
Current Leases and Preleases
TAA Forms for Windows® will allow you to create and store two leases for each unit: 1) a
current lease and 2) a prelease.
Creating a New Lease
To create a new lease:
1. First click the New Lease button. The New Lease screen will open and the cursor will
be in the Unit Number field at the top of the screen.
2. Next, type in the unit number. Note: the unit number is alphanumeric and not
numeric. This is necessary to allow you to mix numbers and letters (for example, unit
10C). The disadvantage, however, is that the units are not sorted numerically (that
means that unit 10, 100, and 1000 all come before 101).
3. After entering the unit number click the OK button, or press <Enter>. The New Lease
window will close, allowing you to continue working in the lease database in Edit mode
(explained in the Edit Mode section on the next page).
The New Lease Window
Enter unit number for
new lease
Click if you want to
duplicate this unit
The unit list box will
locate the closest
match to the unit
number you typed
When you highlight a
unit in the unit list
box, the address of
that unit will appear
in the panel
Check this box if you
want to prelease the
unit
Press OK to continue
creating the lease or
cancel without saving
Notice that below the Unit Number field is a list box that contains all your existing units. If
you are using the software for the first time this box will be completely empty. As you add
units to the database, they will appear in the list box.
TAA FORMS FOR WINDOWS - USER’S GUIDE
BLUE MOON SOFTWARE
THE PROPERTY DATABASE
21
If your property has 100 units, then your lease database will eventually grow to 100 units over
time. The list box is there to help you find the units already in your database when entering a
new lease. Notice that as you type in the unit number, the software automatically finds the
nearest match in the list box. If the unit is not in the database and you need to add it, the
software will automatically create it for you. The next time you create a lease for that same
unit it will appear in the list box.
If you are entering a lease for a unit that is already in the database, and you see it on the list
box, you can simply double-click on that unit to enter the lease. Or you can click in the list
box to select that row, then click on the OK button.
The Unit list box contains several items of information for each existing unit: the unit number,
the name of the resident, and the expiration date of the lease. If the lease is a prelease, you
will see "PL" between the unit number and the resident's name. This information will quickly
let you find a unit. The address of the unit that has been selected will appear just below the
Unit list box. Below this there is a check box if you need to create a prelease. Once you have
finished entering the lease, click the OK button or press <Alt>-<O> to save it. If instead you
want to discard the lease without saving it, click the Cancel button.
Creating Preleases
To prelease a unit:
1. First, click the New Lease button, just like a regular lease.
2. Next, enter the unit number.
selected in the Unit list box.
Notice that the unit number will be automatically
3. Once the unit is selected, click the Prelease check box.
4. Click the OK button, or press <Enter>. The New Lease window will close, allowing you
to continue working in the lease database in Edit mode.
Once you have finished entering the prelease, click OK or press <Alt>-<O> to save the
information.
Important Note: You cannot create a prelease for a unit that is not in the database.
You can only prelease a unit that has a current lease.
Dealing with Duplicate Unit Numbers
In some cases you may have a property that uses the same unit number more than once. If
you have already entered that unit number and need to add another unit with the same
number but a different address, simply click the Duplicate Unit button at the bottom left of the
New Lease window.
To distinguish between identical unit numbers in the Unit list box, select the unit row in the list
box and look at the address field below the list box.
To exit the New Lease window without creating a new lease, press the Cancel button or hit
<Escape>.
Edit Mode
Once you are out of the New Lease window and back into the Database window you will be in
the database's Edit mode. Instead of the regular row of buttons on the right (New Lease,
TAA FORMS FOR WINDOWS - USER’S GUIDE
BLUE MOON SOFTWARE
THE PROPERTY DATABASE
22
Renewal, Print, etc.), there are the OK and Cancel buttons. Clicking OK (or pressing <Alt><O>) will save the current record to the database and exit Edit mode. Clicking Cancel (or
pressing <Escape>) will exit Edit mode without saving. While in Edit mode, you can change
any of the fields which are not light blue.
The keyboard shortcuts for Edit mode are:
•
•
•
•
•
•
•
<Tab> to move to the next field. <Tab> also moves to the first field of the next page
of the lease when the cursor is on the Cancel button.
<Shift>-<Tab> to move to the previous field. When you are on the first field of the
current page, <Shift>-<Tab> will switch you to the previous page and put the cursor
on the Cancel button.
<Page Down> to switch to the next page.
<Page Up> to switch to the previous page.
<Space> to toggle the value of check boxes.
<Alt>-<O> to save the data in the current lease and exit Edit mode.
<Escape> to exit Edit mode without saving.
TAA FORMS FOR WINDOWS - USER’S GUIDE
BLUE MOON SOFTWARE
THE PROPERTY DATABASE
23
Time Saving Features
There are several features in the TAA Forms for Windows® Database window to help your work
go more quickly and easily.
1) Set Up Default Lease - notice that most of the fields are pre-filled by values in your
default lease. When creating a new lease all you have to enter is information specific
to that lease, such as residents, rent amount, and beginning and ending dates.
2) Automatic Date Calculation - the program automatically fills in the ending lease date
when you enter the beginning lease date. The date it calculates is based on the
default length of lease and the method of calculating the lease ending date (ending on
exactly the number of months specified or ending on the last day of the month) from
the System Configuration window. When you exit the Begins On field, the Ends On
date will be filled in for you. You can change the ending date calculated by any one of
the following:
•
•
•
•
•
typing in the Length of Lease box to the right of the Ends On field to change the
ending date automatically as you type;
clicking the Up or Down arrows in the Length of Lease box to change the value in
the Length of Lease box and automatically change the ending lease date;
clicking the Calendar button directly to the right of the Ends On field. This will
open a Calendar window, from which you can choose the precise ending date;
bypassing the auto-fill features by going into the Ends On field and typing in the
desired date.
You can go into Preferences | System Configuration and change the default length
of lease at any time, except while in Edit mode.
3) Calendar Buttons - allow you to pick a date by looking at a calendar. Calendar buttons
can be found on the first page of the Lease tab beside Lease Begins On and Lease
Ends On and on the Renewal tab. Each Calendar button corresponds only to the date
field it is directly to the right of it. When you click on the Calendar button, a Calendar
window will open, and the selected date on the calendar will be the date in its
corresponding date field on the Database window, if there is one, or the current date if
its corresponding date field is blank. To go to the next month, click the Down arrow in
the top right of the Calendar window. To go to the previous month, click the Up arrow
in the top left of the Calendar window. When you have found the desired date, select
it by clicking on it. Then you can either double-click the selected date, click the OK
button, or press <Enter> to fill in the corresponding date field and close the Calendar
window. To close the Calendar window without filling in the corresponding date field,
click the Cancel button or press <Escape>.
The Calendar Window
TAA FORMS FOR WINDOWS - USER’S GUIDE
BLUE MOON SOFTWARE
THE PROPERTY DATABASE
Click to view the
previous month
24
Click to view the next
month
Click to select date
Double click date to
close window and
enter date into lease
Click OK to accept
date or cancel to
return to database
without selecting
date
4) Automatic Prorated Rent and Reletting Charge - the software automatically calculates
the prorated rent and reletting charge for you.
These are calculated by the
information you entered in the System Configuration window and the default lease. To
make use of these features, simply enter the monthly rent in the Monthly Rent field (if
no cents are charged in the rent, all you have to do is enter the dollar amount). When
you exit the Monthly Rent field, the decimal places will be added for you, then exit the
field either by pressing <Tab> or clicking on another field. Prorated rent, number of
days of prorated rent, and the reletting charge are all filled in for you!
TAA FORMS FOR WINDOWS - USER’S GUIDE
BLUE MOON SOFTWARE
THE PROPERTY DATABASE
25
5) Comments Pick List – save canned comments and reuse them in the Special Provisions
field.
Use the Comment Pick List as follows:
The Comments Pick List Window
List of all comments in your software – click on a
row to select a comment then press the Select
Comment button or double click to select and
close window
Add, edit or delete a
comment by pressing the
appropriate button
Add new comment or edit
selected comment in this
window
1. Create a new lease or edit an existing one to test this feature.
2. Go to the Special Provisions Tab and type in a comment in the Special Provisions field.
3. Next, right click your mouse button and select Comment Picklist… This pops up the
Comments window and places the text you typed in the bottom window.
4. Click on the Save button to add this comment to your list.
To reuse a previously saved comment go to the Special Provisions field, right click with your
mouse and either double click on the desired comment or select it by clicking in the list box
and pressing the Select Comment button.
Note: The Comments Pick List is a common repository for both the Special Provisions and
Pets Special Provisions database fields.
TAA FORMS FOR WINDOWS - USER’S GUIDE
BLUE MOON SOFTWARE
THE PROPERTY DATABASE
26
Lease Renewals
When an existing lease expires, you can create a lease renewal for the same unit without
having to retype the entire lease. All the data in the lease will be the same except for
beginning and ending lease dates, monthly rent, and reletting charge. The monthly rent and
reletting charge do not have to be changed, but you do have the option to change them.
When a lease has been renewed, a red label above the Begins On field in the Property
Database will display “Lease Renewed.”
To renew a lease:
1. Find the unit you wish to renew.
2. Click the Renewal button in the Property Database window. The Renewal window will
appear, filling in every field for you. The ending lease date will be calculated based on
the default length of lease, but you can enter a different date if this is not correct.
3. Enter the new lease terms and special provisions if any. Notice that the renewal
beginning lease date will default to one day after the active lease ending date.
However, you can easily change this value and any others except the active lease
ending date.
4. To save the renewal, click the OK button or press <Alt>-<O>. This will overwrite the
old lease with the renewal. To exit the Renewal window without saving, click the
Cancel button or press <Escape>.
The Renewal Window
Original lease expiration
date and new renewal
date will be
automatically filled in
Enter new ending lease
date, monthly rent and
reletting charge
Additional information
that prints on the
renewal form
Three rules to remember when using a Lease Renewal are:
•
•
•
You must have an active lease before you create a renewal.
The renewal will overwrite the current lease terms, thus becoming the new active
lease.
You cannot renew a lease if that unit has a prelease. If you want to renew a prelease,
first make the prelease the active lease, then renew the lease.
TAA FORMS FOR WINDOWS - USER’S GUIDE
BLUE MOON SOFTWARE
THE PROPERTY DATABASE
27
Other Database Commands
Find
To find a particular unit or resident anywhere in the database, click the Find button. The Find
window will open. This is an extremely helpful window that will allow you to view a list of
units in the current database sorted by unit number (the default setting), first resident's
name, or expiration date. To sort by unit number, resident, or expiration date, click the
corresponding buttons located in a horizontal row at the top of the list box. In the same
manner as the New Lease window, if the listed lease is a prelease, you will see "PL" displayed
between the unit number and the resident. Note: the units are sorted alphanumerically not
numerically, so unit 100 will appear after to unit 10 but before unit 20.
You can also find a lease by unit number (the default setting) or resident's name. To find by
unit number, make sure the Find by Unit Number check box is checked instead of the Find by
Resident check box. Then type the desired unit number in the Find edit box at the top of the
window. The list box in the middle of the window will select the closest match to the unit
number you typed.
To find by resident, make sure the Find by Resident check box is checked instead of the Find
by Unit Number check box. Type the desired resident's last name in the Find edit box at the
top of the window. The list box in the middle of the window will select the closest match to
the name you have typed.
To go to the selected record in the database and close the Find window, double-click on the
list box, click the OK button, or press <Enter>. To exit the Find window without going to the
selected record, click the Cancel button or press <Escape>.
The Find Window
Enter unit number or resident’s
last name, depending on the
type of search
Click to search by unit number
or resident’s last name
Press the column button to sort
by unit number, resident’s last
name or lease expiration date
Unit list box will locate the
closest match to what you have
typed
Address of selected unit will
appear in the panel
Print a list of leases in the list
box
Click OK to go to the selected
lease or cancel to return to
database
TAA FORMS FOR WINDOWS - USER’S GUIDE
BLUE MOON SOFTWARE
THE PROPERTY DATABASE
28
Next and Previous
The Next button will move you to the next record in the database. The Previous button will
move you to the previous record in the database.
When you move to a different record, if the record is a prelease and the prelease has become
effective, you will be notified and given the option to change it from a prelease to an active
lease. If you choose to do this, the old active lease will be deleted, and the prelease will
become the active lease for that unit. For example, given an active lease for Big Bird and a
prelease for Elmo which has become effective, if you choose to set the prelease for Elmo to
the active lease, Elmo will become the active lease, Big Bird's lease will be deleted, and there
will no longer be a prelease for that unit (the prelease is now the active lease). If you do not
choose to change the effective lease to the prelease, no changes will be made to the database.
Edit
The Edit button is the only way to edit a lease that is already in the database. It will allow you
to change everything you typed when you originally made the lease. You can edit an existing
lease at any time.
All the shortcut keys that were effective while creating the lease are effective here. To save
your edited changes and exit Edit mode, click the OK button or press <Alt>-<O>. To exit Edit
mode without saving changes (reverts to the values in the lease before you edited it), click the
Cancel button or press <Escape>.
Important Note: You can renew a lease by editing the existing lease, however, if you
change your default lease setting the new values will not be automatically updated. The
only way to automatically bring in the default lease values is to create a new lease.
Delete
The Delete button will delete the current lease. You will be asked if you really want to delete
that lease, but be careful with this button, nonetheless. Once you have deleted a lease, you
cannot get it back. If you delete a lease in error, you will have to re-enter the information for
that lease.
TAA FORMS FOR WINDOWS - USER’S GUIDE
BLUE MOON SOFTWARE
PRINTING LEASE FORMS
29
PRINTING LEASE FORMS
The Print Window
To print Lease forms, rental applications, and employment forms, click the Print button in the
Property Database window.
The Print window will open (see illustration below), and you will see three different pages with
tabs: Lease Forms, Spanish Forms, and Other Forms. The Other Forms page contains English
and Spanish lease application forms and the employment application forms.
To print a certain form, click on the check box to the left of the form name. If you want to
print only certain pages of that form, change the values of the To and From columns on the
right of the window as needed.
The Print Window
Click on the desired tab to print lease
forms, Spanish lease forms or other
forms
Check the forms you want to batch print
for the lease you are working on
Select the print range and
number of copies for each
form you are printing
Preview print job before
printing
Click to enter Printer Setup
dialogue box
Print selected forms
Close print window and cancel
print job
Information labels tell you
how many clicks you will be
charged and whether you
should print certain forms
A message at the bottom of the window tells you how many clicks you will be charged by
printing the chosen forms. When printing a new resident’s lease the first time, you will be
charged for the full clicks of the form, whether you print the entire form or not. For example,
the Apartment Lease form costs twelve clicks to print. Even if you print just the first page of
the form, you will still be charged twelve clicks. After the lease has been printed once, it will
be marked “Lease Printed” in the property database window. After that point, you will be
charged only for the pages you have selected to print.
TAA FORMS FOR WINDOWS - USER’S GUIDE
BLUE MOON SOFTWARE
PRINTING LEASE FORMS
30
The other two messages at the bottom of the window, if they apply to your property, are
reminders to print the Lead Hazard Addendum or Supplemental Addendum for Affordable
Housing.
To preview the forms before printing them, click the Preview button. The Form window will
open, where you can view the forms without being charged clicks. At this point you can still
make changes to the lease forms without being charged clicks.
To edit your printer setup before printing, click the Setup button. Lease forms require legal
size paper. This is where you can change your printer settings to legal or letter. You will also
be prompted to change it before it prints if you choose not to do it here. Printer setup will be
discussed in more detail in the Printer Setup section.
To print the forms without previewing them, click the Print button. At this point you will be
charged
To exit the Print window without printing anything, click the Close button.
Batch Printing
Batch printing works much the same as regular printing, except you can print forms for
multiple units at the same time. To batch print, choose File | Batch Print from the menu bar.
The Batch Print form will open, listing all the records in your current database. This listing will
look very similar to the list boxes in the Find form and the New Lease form. The only
difference here is the existence of check boxes to the left of the unit number. Check the
boxes next to the units you wish to print forms for, then click the Next button. The regular
Print window will open, and you can proceed exactly the way you would with regular printing,
except that a copy of each form selected will be printed for each record that you checked on
the Batch Print window.
The Batch Print Window
Check the units you wish to print
You can select all record or
none by pressing these
buttons
Click Next button whey you
are finished selecting the units
and continue to the forms to
print window
TAA FORMS FOR WINDOWS - USER’S GUIDE
BLUE MOON SOFTWARE
PRINTING LEASE FORMS
31
Printer Setup
You can access the Printer Setup window in several different ways:
•
•
•
by choosing File | Printer Setup from the menu bar.
by clicking the Setup button in the Print window.
after clicking the Print button in the Print window, by selecting Properties in the next
window.
This window is a common Windows dialog box, so you might have already seen it in other
programs. The box at the top left notifies you of the currently selected printer. You can
change this, if you have multiple printers, by clicking the Down arrow directly to the right of it.
The most commonly used item for TAA Forms for Windows® is the Paper Size box. Here is
where you can select legal or letter, according to the form you are printing. You will also need
to change the paper in the tray to the proper size.
The Printer Setup Window
Select your desired print driver
Choose the proper paper size
Click OK to close this window
and continue printing
Important Note: We strongly recommend that you set your printer’s resolution to
300 dots per inch (dpi). A printer set at 600 dpi uses 4 times more memory and will
result in slower print times. Most new printer resolutions are set at 600 as a default by
the manufacturers.
TAA FORMS FOR WINDOWS - USER’S GUIDE
BLUE MOON SOFTWARE
THE FORM WINDOW
32
THE FORM WINDOW
You can fill out and print any form from either Lease Forms or REDBOOK Forms in the menu
bar in the Property Database window. Lease forms are all the TAA forms pertaining to leases,
lease applications, and employment forms that cost clicks. The REDBOOK forms do not cost
any clicks. They are forms such as eviction notices and lockout notices.
To open the Form window, choose the desired form under Lease Forms or REDBOOK Forms
under the menu bar. For example, to open the employment application in the Form window,
choose Lease Forms | Employment Form in the menu bar. The Form window will open, and
you will see the employment form.
A Tour of the Form Window
At the top of the Form window is another menu bar and two rows of buttons. In the menu
bar, you can read text files into the form, save an edited form as a text file, print, change the
view of the form (zoom in and out), and access help files. The row of Function buttons are
shortcuts to the same functions in the menu bar. From left to right, the buttons are: New
File, Open File, Save File, Save As, Print, Zoom In, and Zoom Out.
Below the Function buttons is a row of Formatting buttons.
change the appearance of text in any field.
These buttons can be used to
The Form Window
The menu bar
The tool bar
Tab from field to field fill
in the form – active field
will appear in blue
Scroll up and down to see
the entire form
Locked fields will appear in
yellow
Toggle the space bar or double
click in checkboxes to check
them on and off
At the bottom of the window is a set of tabs. These tabs will allow you to move between the
pages of a form. You can also press <Ctrl>-<Page up> and <Ctrl>-<Page Down> to move
from page to page in the form.
The form is automatically filled with data from the current lease displayed in the database.
The keyboard shortcuts for this window are a lot like the keyboard shortcuts for the Property
Database window. Press <Tab> to move to the next field and <Shift>-<Tab> to move to the
previous field. <Page Up> and <Page Down> will move you up and down the forms. The
field highlighted in light blue is the active field.
TAA FORMS FOR WINDOWS - USER’S GUIDE
BLUE MOON SOFTWARE
THE FORM WINDOW
33
You cannot save data from forms into the database, but you can save it as text files under File
| Save and File | Save As in the menu bar. For example, to create a default rental application,
from the Property Database window choose Lease Forms | Rental Application. The Form
window will open with the Rental Application form. The first page of this application has no
fields to fill in, but the second page will have several fields filled in with data from the System
Configuration and Property Information windows. Here, you can fill in all the fields that are
common to all rental applications, then save it as a text file. Next time you want to print out
another rental application, you can open the one you created under File | Open in the menu
bar. Then simply fill in the fields specific to that applicant and print the application by
choosing File | Print in the menu bar or clicking the Print button.
REDBOOK Forms
REDBOOK forms are grouped by type under REDBOOK Forms in the menu bar. When you see
a small right arrow in the menu bar, it means there is another menu beneath that menu item.
For example, there is a small arrow under REDBOOK Forms | Eviction. This means there are
more choices under Eviction. This smaller menu is the menu containing the actual TAA forms.
When you click on either of these forms, that form will be loaded in Word Processing mode,
and the data from the lease you are currently in will be automatically filled into the form.
Accessing REDBOOK Forms
First select the appropriate section of the
REDBOOK
TAA FORMS FOR WINDOWS - USER’S GUIDE
Select the form you want
to print from the list of
forms that appear in
each section
BLUE MOON SOFTWARE
OTHER FEATURES AND CAPABILITIES
34
OTHER FEATURES AND CAPABILITIES
Importing Internet Rental Application
TAA Forms for Windows® software now allows you to accept online rental applications. A
prospective resident visiting your website or your property’s online advertisement on an
approved provider’s website can now fill out a rental application online and submit it to you for
your review.
Setting up the online rental application
To be able to accept online rental applications, you must:
1. Be able to receive email at your property on the computer where WinTAA is installed,
and
2. Have a property website or an online advertisement on the website of an approved
provider. If your property has its own website and you want to use the TAA Online
Rental Application on your site, you will need to:
•
sign a licensing agreement with Blue Moon Software, and
•
institute a company privacy policy or customize the sample policy provided by Blue
Moon Software.
Alternatively, you can link to the rental application hosted on the Blue Moon website. If
you prefer this option, have your webmaster contact Blue Moon tech support at (512)
322-0999 for instructions on how to properly set up the link to the Blue Moon site.
Blue Moon Software can provide your webmaster with the online rental application file and
guidelines for setting it up. Due to the sensitive nature of the personal information (credit
history, Social Security number, driver’s license number, etc.) conveyed in the rental
application, we require that the rental application file reside on a secure server. All you have
to provide your webmaster is the amount of your application fee, which credit cards you
accept and your email address. If you currently do not accept credit cards onsite, there are
third-party vendors that can provide you with this service, as well as other services like
resident screening and credit checks.
Processing online rental applications
When a prospective resident fills out an online rental application and submits it, the
information will be transmitted through secure channels to the Blue Moon server, where it will
be encrypted and emailed to you. You will receive an email message with an encrypted
attachment. The email message will tell you the applicant’s name, the type of apartment he or
she is interested in and the price range, and any comments or special notes the applicant may
wish to convey. All other information will be contained in the encrypted attachment and can
only be read with the WinTAA software. Included on the Internet rental application form is a
third page with the applicant’s credit card payment information.
To review the electronic rental application, launch WinTAA, go to the “File” pull-down menu,
and select “Import Internet Rental Application.” The first time you use this feature, the
program will look for the application file in your data folder; however, the file will more than
likely be in your email attachments folder. You will have to look for that file and folder on your
computer when prompted to “Open” the file. The file’s name will be the applicant’s name with
an “app” extension (for example, “John Doe.app”). The next time you open an online rental
application, WinTAA will automatically look for it in your email attachments folder.
When you open the application file, the TAA Rental Application form will appear on your
window with the applicant’s information filled in. Your property’s default information will be on
page two of the form. Review the information, fill out or change relevant information on page
TAA FORMS FOR WINDOWS - USER’S GUIDE
BLUE MOON SOFTWARE
OTHER FEATURES AND CAPABILITIES
35
two of the form, and print out the application. You will only be charged two clicks when you
print the form even though the form has a third page.
Administrator Setup Features
The Administrator Setup feature gives you control to lock out your on-site users from any
database field as well as giving you the ability to set which forms print with each lease
package.
Setting up the User Access Rules:
1. Go to the File pull down menu and select Administrator Setup…
2. Scroll down the list of database fields and check the ones you wish to lock out your
on-site users.
3. To prevent users from accessing the Print window check the box at the top labeled
Lock Out Users from the Print Window.
4. Press the Set Password button and enter your password to prevent users from
changing these rules and also from accessing the Setup Default Lease, the Modify
Property Information, and the System Configuration windows.
5. When you are finished with setting these rules press the Close button.
6. Next, set up the default lease for your users. Go to the Preferences pull down menu
and select Setup Default Lease. Go through and set up you default lease.
7. If you elected to lock out your users from the Print window then you will have to set
the forms you want to batch print. Press the Print button and check the forms you
want to automatically print with each lease package. Press the Preview button to save
these changes. Close the Print Preview window when you are finished setting the print
rules.
The Administrator Setup Window
Check this box if you wish to prevent users
from accessing the Print window
Check this box to set the prorated
due date equal to the beginning
lease date automatically
Check each of the fields
that you want deny
access to your users
Use the Select All or
Select None to speed up
the selection process
Press this button to set
up your Administrator
password
TAA FORMS FOR WINDOWS - USER’S GUIDE
BLUE MOON SOFTWARE
OTHER FEATURES AND CAPABILITIES
36
After this feature is activated, pressing the Print button will automatically display a window
allowing you to either Print, Preview, or Cancel the print job. Clicking on Print from within this
window will launch the batch printing of all forms that have been checked to be able to print
and clicks will be charged accordingly.
Important Note: the administrator rules will take effect after you exit the program. For
security purposes always exit the program after you enter Administrator mode.
Deploying Your Rules to Other Properties
The administrator rules are saved in a file called rules.dat and are stored in your program path
(e.g. C:\Bluemoon). You can deploy this file to other properties in the same state if you want
them to have the same rule set. Note: the Administrator password is stored in the registry
and will not copy over as part of the rules.dat file. If you deploy the rules.dat file to other
computers, you will have to set up the password on each pc in the Administrator Setup
window.
Important Note: While the Blue Moon Software works in a network environment, the
rules are set on the individual pc. You must copy the rules.dat file to each pc in your
office.
Backup and Restore Database
By choosing Backup, a new option under the File menu, you can quickly and easily create a
backup copy of your database on a floppy disk. This protects your data from loss due to hard
drive failure, power surges, or computer theft. If data loss occurs, the new Restore option will
restore previously saved data with a single mouse click. Backup and Restore also make it
simple to transfer your database from one computer to another. This will only transfer your
database; you must call Blue Moon to transfer clicks (see additional information about your
clicks)! Data can only be restored to the same version of the software that it was backed up
with.
Importing Data from Property Management Software
TAA Forms for Windows® can import lease information from both the DOS and Windows
versions of several property management software packages. The TAA Forms for Windows®
software package imports residents and occupants, lease dates, rent, and prorated rent, and
security deposit for a specific unit (basically, all the fields not set up in the default lease).
Please note that this import capability requires that your property management software be
able to generate a compatible export file. Check with your property management software
company or Blue Moon Software to confirm compatibility status.
To import a file from another software package:
1. Choose File | Import from the menu bar.
2. Choose the desired import file from the Open dialog box and click OK.
3. The New Lease window will open. The unit number that was read from the import file
will be in the Unit Number box at the top of the window. If you accept this unit
number, click the OK button. Otherwise, enter a new unit number.
After the import is complete, the import file is automatically deleted.
TAA FORMS FOR WINDOWS - USER’S GUIDE
BLUE MOON SOFTWARE
OTHER FEATURES AND CAPABILITIES
37
If your property management software does not export data in the correct format to integrate
with the Blue Moon software, ask the company who makes your property management
software to contact Blue Moon Software and ask for a Software Developer Kit.
Exporting the Property Database
You can export your property databases to a spread sheet or database program.
1. Choose File | Export from the menu bar.
2. Choose which fields you want to export. You can export all fields in the database or
mark only those fields you wish to export.
3. Click Export. You will see a dialog window that allows you to name the file and specify
the path where you want to save it.
TAA Forms for Windows® will generate a tab-delimited text file that can easily be used with
Excel or imported into another database.
Export to File Window
Check the fields you
wish to include in your
export
Press the Export button
to generate the tab
delimited file
Automatic Software Update
If you have Internet access, you can upgrade your TAA Forms for Windows® software and
receive the latest forms simply by pressing a button. When you select "Automatic Software
Update" from the File menu, the program will automatically download and install the most
current program files on your PC. Also, once you pay for your license renewal, you can even
receive your annual license update electronically, as long as your license has not expired.
Depending on the speed of your connection and how many new files you need to download,
automatic update may take up to 20 minutes for dial-up modems and about 5 minutes for dsl
connections. In most cases, there will only be a few new files to download, and it will be much
faster.
TAA FORMS FOR WINDOWS - USER’S GUIDE
BLUE MOON SOFTWARE
OTHER FEATURES AND CAPABILITIES
38
Ordering More Form Clicks
Additional form clicks can be ordered at any time. To order more form clicks, press the Order
Forms button in the Property Database window. The Order Additional Forms window will
appear. Follow the instructions at the top of the window. There are two ways to send this
information to your local apartment association:
FAX - Press “Print”, an order form will be printed, and the address and fax number of your
TAA-affiliated association will be printed on the form. Mail or fax this form to your local
apartment association.
E-mail - Press “E-mail” and the information will be sent to your association by e-mail (in order
to use this feature, you must have internet access, and your association must have an e-mail
address for this purpose).
After the local association approves the order, a representative of Blue Moon Software will
notify you by phone or e-mail. There are two ways to receive your clicks:
Telephone - If you are notified by phone, the Blue Moon representative will provide an access
code to update your forms counter. You must be at your computer running TAA Forms for
Windows® to update your counter.
Email - If you have Internet access, then you can install your clicks at any time after receiving
notification that they are ready, simply by pressing Set Counter, and then “Update Counter
Electronically.”
When ordering form clicks, remember to verify information on the printed order form for
accuracy.
Order Forms Window
Check the number of clicks
you want to order
Enter the name of the person we
should ask for when we call
Enter the phone
number we should use
to update your clicks
(for notification by
phone)
Press to print order
form
For electronic notification
that clicks are ready, enter
the email address where
we should send the
notification
Press to send order to association by email
TAA FORMS FOR WINDOWS - USER’S GUIDE
BLUE MOON SOFTWARE
MISCELLANEOUS TOPICS
39
MISCELLANEOUS TOPICS
Low System Resources
Due to the size of the lease form files, some users may experience computer memory
problems when viewing or printing lease forms. If you have difficulty viewing or printing
forms, select Preferences | System Configuration from the top menu in the Blue Moon
Software, click on the new “Advanced” tab, check the box labeled “Low System Resources”
and then click the “OK” button. This may cause the software to run slightly slower, but will
reduce the amount of memory required.
Installing onto a Network
This section applies only to those users who have a computer network and will be installing
and using the software on more than one computer. You will need to install the application on
each computer’s local drive. It will not work if you install the program on a remote (or
network) computer.
In this section, "data path" and "data directory" refer to the directory where your data is
stored. "Program path" and "program directory" refer to the directory where the actual
program resides. A "data server" is the computer which contains the data for all the other
computers on the network to use (you can think of it as serving data to all the other
computers).
TAA Forms for Windows® has built-in network support. It is designed to be installed with
multiple copies of the program accessing a single copy of the data. First, decide which
computer will be the data server. This is the computer which will contain all the databases. It
will have the data directory which all the other computers will use. It will also have its own
copy of the program.
After you have successfully installed the software on the data server, you may install it on the
remainder of the computers. When the installation program prompts you for the program
path, it will be on the local hard drive (usually drive C). After installing, go to Preferences |
System Configuration and change the data path to directory where the data files are stored on
the server.
For example:
•
•
•
•
•
You have two computers on a network: computers 1 and 2.
Computer 2 can see computer 1's hard drive as drive D.
Computer 1 is the computer you use the most often, so you decide this should be the
data server as well.
Install the software on computer 1. The program path on computer 1 is C:\Wintaa.
The data path on computer 1 is C:\WinTAA\data.
Once the software is installed on computer 1, install it on computer 2. The program
path for computer 2 is on computer 2's hard drive, so it is C:\WinTAA. The data is on
computer 1's hard drive, so the data path is D:\WinTAA\data.
The clicks counter is specific to each machine, so once you get everything installed correctly,
you will need to install clicks on every machine.
Import File Structure
The import file is a plain text file with the file extension of .TAA, or .TXT. Its structure is: Unit,
Resident 1, Resident 2, Resident 3, Resident 4, Occupant 1, Occupant 2, Occupant 3,
TAA FORMS FOR WINDOWS - USER’S GUIDE
BLUE MOON SOFTWARE
MISCELLANEOUS TOPICS
40
Occupant 4, Beginning Lease Date, Ending Lease Date, Monthly Rent, Prorated Rent, Security
Deposit, Address . Each value must be in quotes, and separated by commas.
An example import file would look like this:
“106B”, “Bill Clinton”, “George Bush”, “Ronald Reagan”, “Jimmy Carter”, “Al Gore”, “Dan
Quayle”, “George Bush”, “Walter Mondale”, “01/01/99”, “12/31/00”, “100.00”, “50.00”,
“25.00”, “1600 Pennsylvania”
License Agreements and Upgrades
When you purchase the TAA Forms for Windows® Software you will automatically be entitled
to one year of FREE upgrades, TAA form revisions, and technical support.
After the first year you will need to pay an annual license fee to Blue Moon Software to
continue using the software. Renewal notices will be sent out a month prior to your license
agreement expiration date as a reminder.
Customers who do not purchase license
agreements within 30 days after the end of their original one year of coverage are no longer
covered and will have to re-purchase the software at the current retail price in order to obtain
the latest version.
The software will start warning you that your license will expire thirty days before it actually
expires.
To avoid interruption of service, contact Blue Moon Software. Your software will
cease to work thirty days after the expiration date. If you have internet access, you can
receive your license update by selecting File | Automatic Software Update, anytime after we
receive your license fee. Once the software shuts down, you can only renew it by installing a
new license from a CD and diskette provided to you by Blue Moon staff.
Packing the Database
The database engine that ships with TAA Forms for Windows® version is very efficient and
should rarely require packing or repairing. However, we do ship a packing utility with the
software in the event your data files get corrupted by a power failure or other abnormal
computer shutdown. Choose File | Pack Database in the menu bar to pack the database. It is
recommended that you pack the database periodically, especially if you are adding and
deleting many leases.
Keyboard Shortcuts
The Menu Bar
To access the options under the menu bar using only the keyboard, press the <Alt> key,
release it, then press the key corresponding to the underlined letter in the option you desire.
The <Alt> key is used to select the menu bar. After you have pressed <Alt> once, it is not
necessary to press it again within the menus. For example, the key combination for the
Modify Property Information option is <Alt>, <P>, <M>.
The Button Row
The <Alt> key is also used to access the button row, except you must hold down the <Alt>
key while pressing the key corresponding to the underlined letter in the desired button. For
example, the key combination for the New Lease window is <Alt>-<L>.
Edit Mode
The keyboard shortcuts for Edit mode are:
TAA FORMS FOR WINDOWS - USER’S GUIDE
BLUE MOON SOFTWARE
MISCELLANEOUS TOPICS
•
•
•
•
•
•
•
41
<Tab> to move to the next field. <Tab> also moves to the first field of the next page
of the lease when the cursor is on the Cancel button.
<Shift>-<Tab> to move to the previous field. When you are on the first field of the
current page, <Shift>-<Tab> will switch you to the previous page and put the cursor
on the Cancel button.
<Page Down> to switch to the next page.
<Page Up> to switch to the previous page.
<Space> to toggle the value of check boxes.
<Alt>-<O> to save the data in the current lease and exit Edit mode.
<Escape> to exit Edit mode without saving.
The Form Window
The keyboard shortcuts for the Form window are the same as for Edit mode in the Property
Database window except that <Page Up> and <Page Down> move you up and down in the
form's pages instead of moving from page to page in the form. To move from page to page,
press <Ctrl>-<Page Up> and <Ctrl>-<Page Down>.
When You Have Problems
When You Have Problems
Blue Moon Software provides this guide and the online help in the software to answer most
questions, and to help users solve most problems related to using the TAA Forms for
Windows® program. We have included on the following page the most common printing
problems and their solutions. If your question is not answered here, there are four ways in
which we can help you answer your question:
1)
2)
3)
4)
online help in the program itself;
technical support on our website;
e-mail technical support; and
telephone technical support.
Online Help
The Help menu has a list of topics that users can read about for step by step instructions for
executing particular actions. As the software is updated, you will see additional topics added
to the Help menu, based on customer feedback. You may want to check here first for any
questions you have that are not covered in the guide.
Technical Support on the World Wide Web
Users can access our website at the following address: www.bluemoon.com. When you arrive
at the site, click on the Support section to access our regularly updated list of topics.
Technical Support by E-mail
If have questions or experience problems, you can e-mail the Blue Moon technical support
help desk at: [email protected]
You can also e-mail the Blue Moon help desk directly by selecting the new “Send E-mail”
option under the Help menu. A Blue Moon representative will respond to your question or
problem in a timely manner.
Telephone Technical Support
You can call our technical support staff at (512) 322-0999, Monday-Friday, 8:30 am - 5:00 pm
(Central Time Zone).
TAA FORMS FOR WINDOWS - USER’S GUIDE
BLUE MOON SOFTWARE
MISCELLANEOUS TOPICS
42
Some Printing Solutions
If you have a laser printer with less than one megabyte of RAM (check printer manual or print
out a test page to find out), and you experience memory problems, you can adjust the
memory usage in the Windows Printer Setup. Please note: The Lead Hazard Addendum,
because of its high graphical content, requires at least 1MB to print properly.
1.
2.
3.
4.
From the Start menu, select Settings--Printers.
Double-click the appropriate printer.
Select Printer | Properties from the Printer window.
In the Properties window, click on the Device Options tab, then click the down arrow
on the right of the Printer Memory box and scroll until you find 512K.
5. Click OK to save.
If there are large portions of the form that are blank, or if you are getting a message such as
“out of memory,” “memory overflow” or “data too complex” when you try to print, you may be
able to correct the problem by lowering the print resolution setting (this option is not available
for inkjet printers).
Follow steps 1-3 above. In the Properties window, click the Print Quality tab (on some
computers, the Graphics tab). Depending on your printer, either click the down arrow on the
right of the Resolution box and pick the next lower resolution available, or pick 300 dpi from
the Printer Optimization settings list.
If you continue to have printing problems after reducing the resolution, follow steps 1-3
above, click the Details tab, click on New Printer Driver:
HP Laser Printers: select HP Laserjet III driver
HP Inkjet Printers: select HP Deskjet 550 driver
Other Printers: Ask the manufacturer to suggest a basic “foolproof” driver.
General Protection Fault, Page Fault
General Protection Fault or Page Fault errors are Windows errors which result when the
operating system “loses track” of information. Shut down the computer, turn the power off for
about 30 seconds, and restart. This will nearly always solve the problem.
Online Help
To access the online help for TAA Forms for Windows®, choose Help | Contents from the menu
bar. The Help windows will open to the Table of Contents.
There are also several quick reference choices under the Help choice in the menu bar. These
will give you step-by-step instructions on how to create a new lease, how to order additional
clicks, and several other topics.
Words in green with a solid underline are links to other pages. When you click on these
words, the Help window associated with that link will open. Words in green with a dotted
underline are called pop-ups. When you click on these words, a small window will open in the
Help window and provide a definition of the word you clicked on.
You can search for specific help on a desired topic by clicking the Index button. The Index
window will open. Type your desired help topic in the box at the top of the Index window. As
you type, the list of words below that edit box will move to match as closely as possible what
you have typed. When you have found your topic, double-click on it.
TAA FORMS FOR WINDOWS - USER’S GUIDE
BLUE MOON SOFTWARE
MISCELLANEOUS TOPICS
43
To search the entire help file, click on the Find tab on the index window. The first time you do
this, you will be guided through the steps to create a complete index of the help file.
You can also access Help files specific to the window you are currently using in the software by
pressing the <F1> key while in many windows. You must be in Edit mode for this feature to
work in the Property Database windows.
TAA FORMS FOR WINDOWS - USER’S GUIDE
BLUE MOON SOFTWARE